Kubernetes Services and Service Discovery
 Rajat Chauhan
Kubernetes (K8s) is a powerful platform for managing containerized applications. While deploying applications is essential, making them accessible to the outside world and enabling seamless communication within the Kubernetes cluster is equally crucial. Kubernetes Services and service discovery mechanisms provide the tools to expose workloads and ensure smooth communication between different components.
In this blog, we'll delve into Kubernetes Services, how to expose workloads to the outside world, and the various mechanisms available for service discovery within a Kubernetes cluster.
1. Understanding Kubernetes Services
A Kubernetes Service is an abstraction that defines a logical set of Pods and a policy for accessing them. Services provide stable network endpoints, allowing clients to communicate with your applications reliably, even as Pods are dynamically created and destroyed.
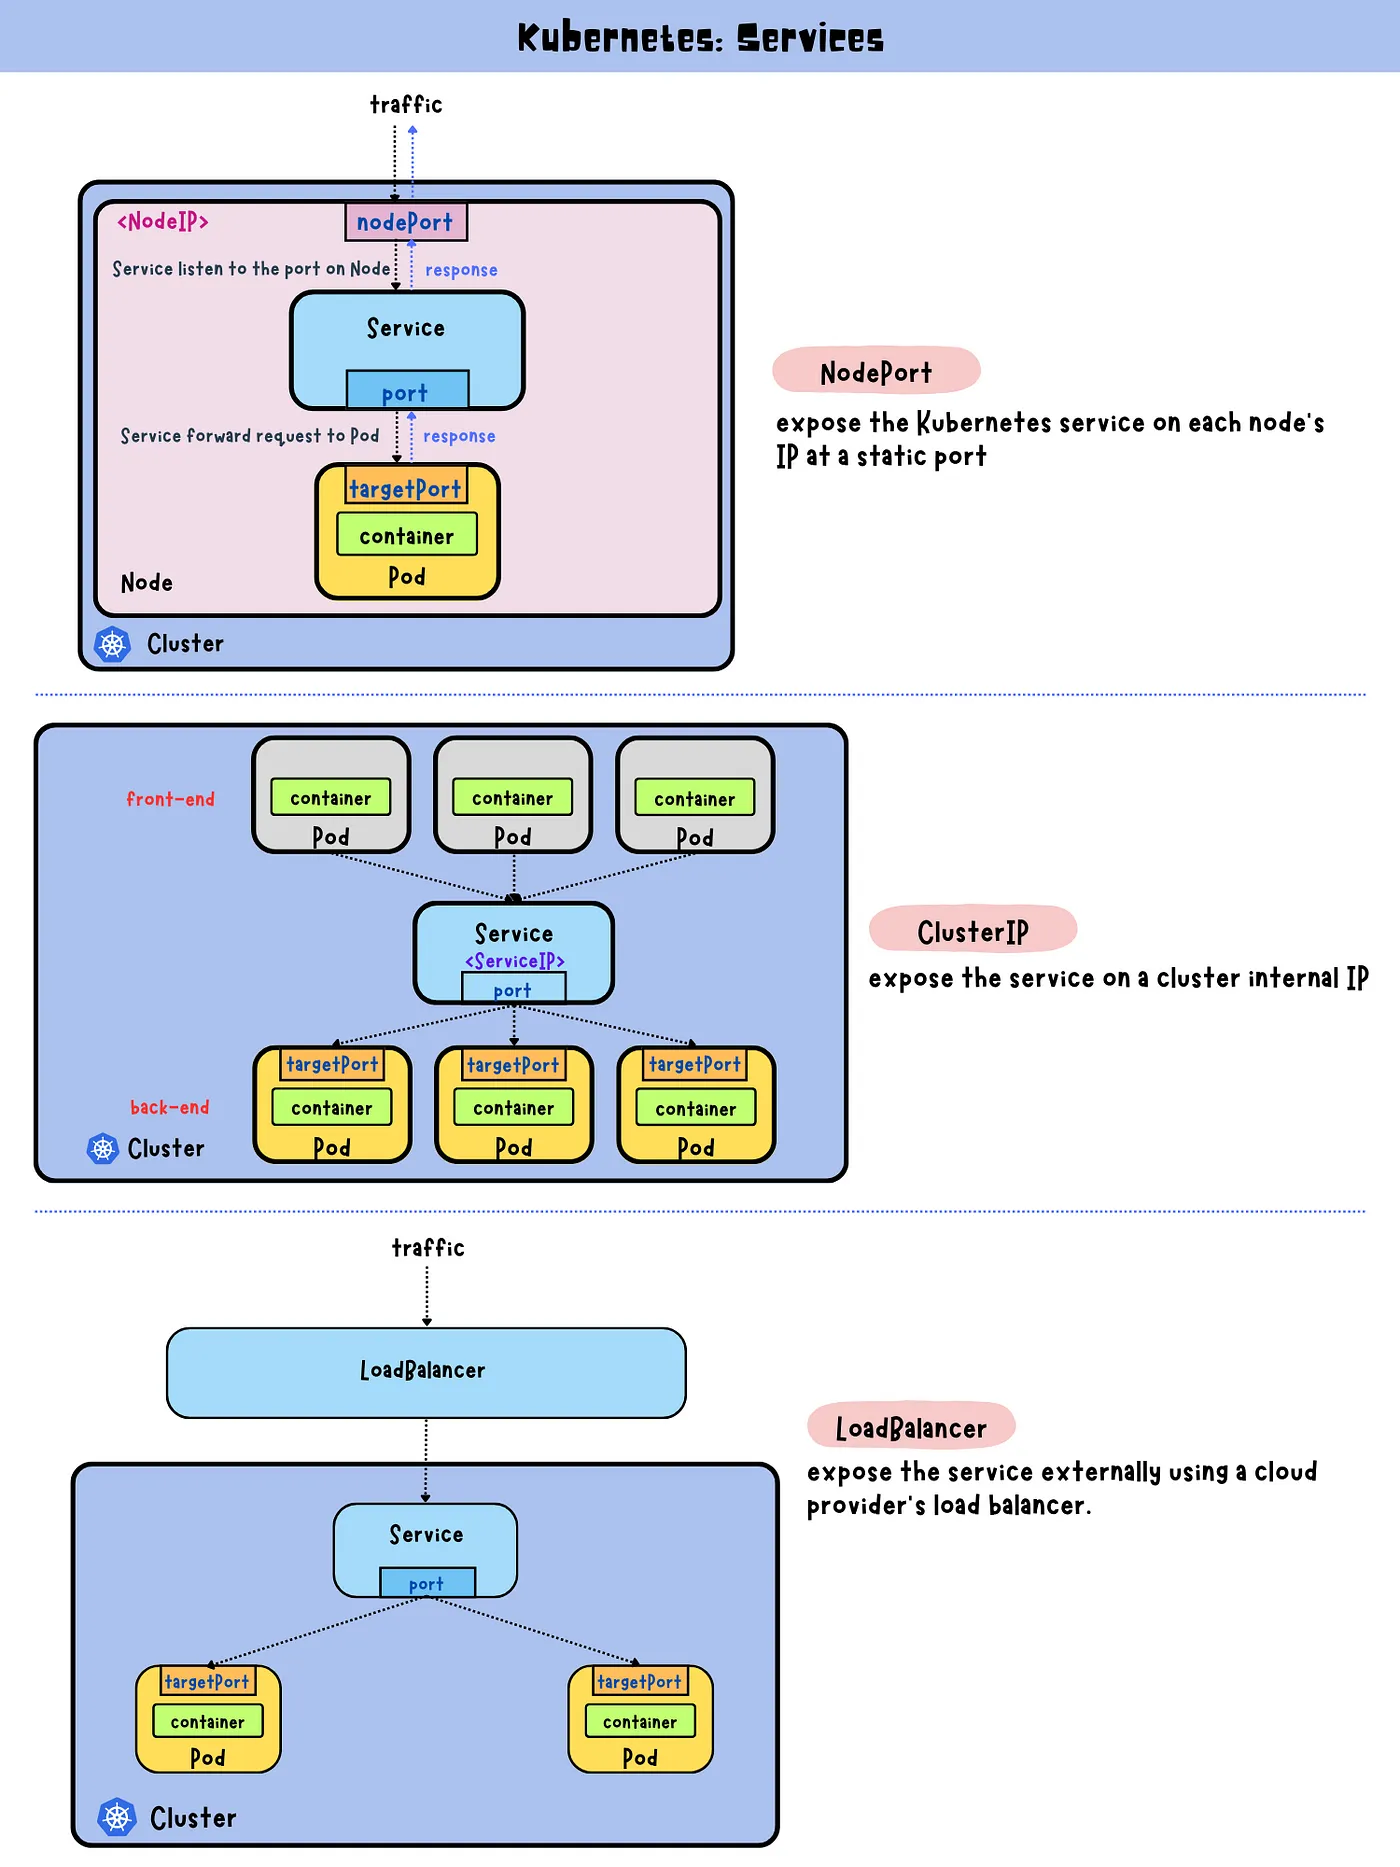
Types of Kubernetes Services
ClusterIP (Default): Exposes the Service on an internal IP within the cluster, making it accessible only from within the cluster.
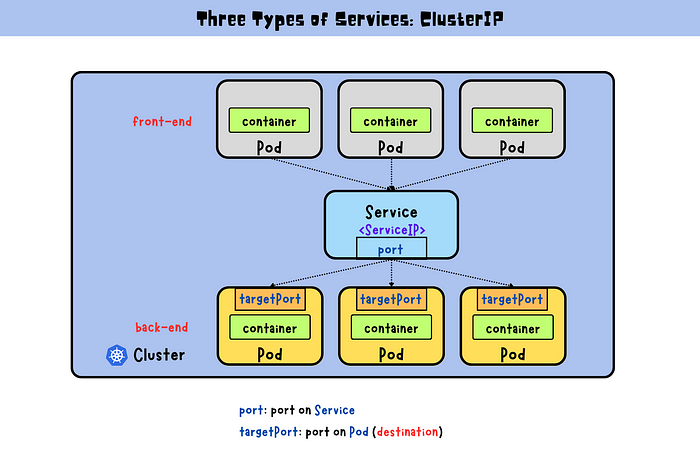
Use Case: Internal communication between microservices within the same Kubernetes cluster.
Example Scenario: A microservices-based application where different components (e.g., frontend, backend, database) must communicate internally.
NodePort: Exposes the Service on each Node’s IP at a static port, allowing external access using
<NodeIP>:<NodePort>.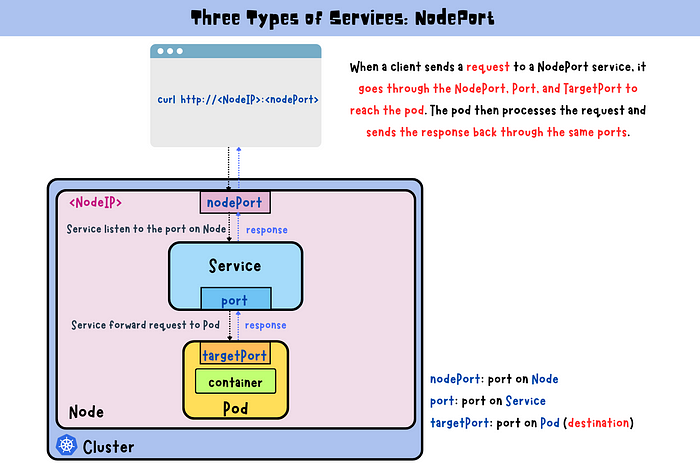
Use Case: Direct access to a Service from outside the cluster, suitable for development environments or simple services.
Example Scenario: Exposing a service without needing a cloud provider’s load balancer.
LoadBalancer: Provisions an external load balancer (provided by the cloud provider) to expose the Service externally.
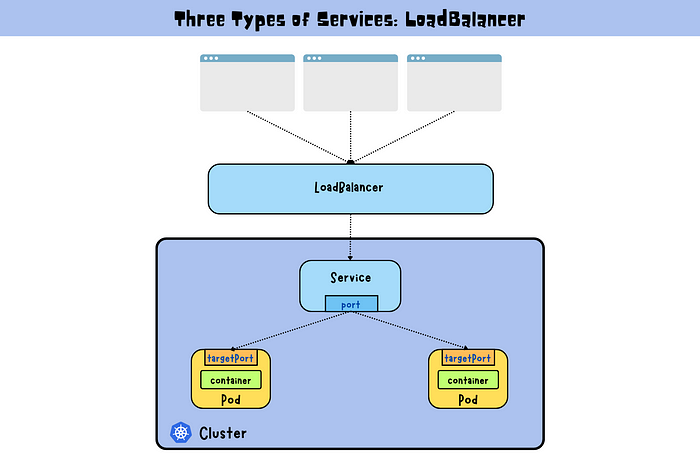
Use Case: Distributing traffic across Pods running on multiple nodes for production-grade applications.
Example Scenario: Exposing a high-availability web application to the internet using a cloud provider's load balancer.
ExternalName: Maps the Service to an external DNS name by returning a CNAME record.
Use Case: Accessing external services as if they were part of the Kubernetes cluster.
Example Scenario: Integrating a third-party API or service into a Kubernetes application without managing the DNS records manually.
How Kubernetes Services Work
When you create a Service, Kubernetes assigns it a stable IP address (ClusterIP) and creates a set of rules for routing traffic to the correct Pods. The Service uses a selector to match Pods based on labels, ensuring that traffic is always directed to the correct set of Pods.
Example: ClusterIP Service YAML
apiVersion: v1
kind: Service
metadata:
  name: my-app-service
spec:
  selector:
    app: my-app
  ports:
    - protocol: TCP
      port: 80
      targetPort: 8080
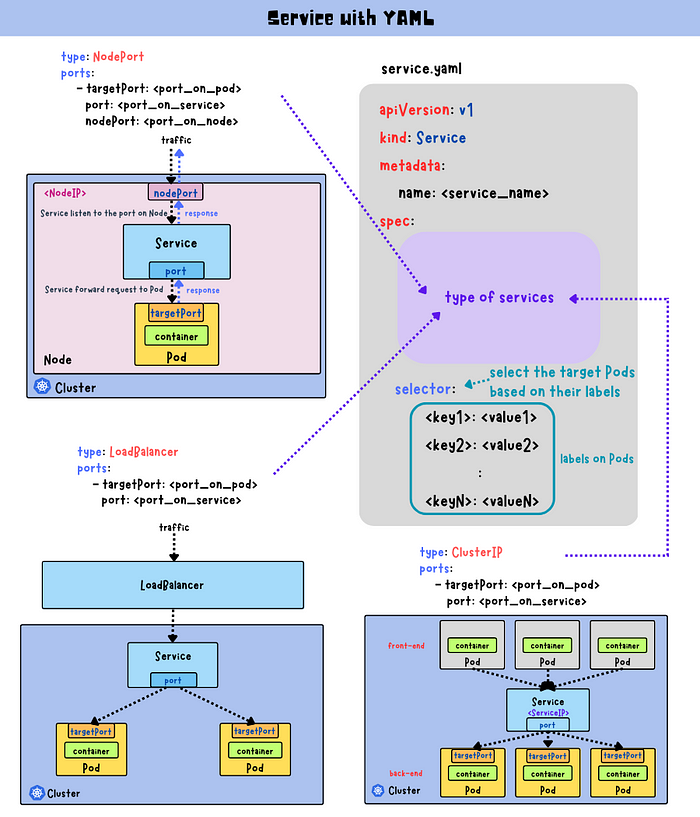
Selector: Matches the Pods labeled with
app: my-app.Port: The port on which the Service is exposed.
TargetPort: The port on the Pods to which traffic is directed.
2. Exposing Kubernetes Workloads to the Outside World
For applications that need to be accessible from outside the Kubernetes cluster, Kubernetes provides multiple mechanisms, primarily through NodePort, LoadBalancer, and Ingress.
Using NodePort to Expose Services
NodePort opens a specific port on each Node’s IP address, allowing external access to the Service. The port range is typically between 30000 and 32767.
Example: Exposing a Service Using NodePort
apiVersion: v1
kind: Service
metadata:
  name: my-nodeport-service
spec:
  type: NodePort
  selector:
    app: my-app
  ports:
    - port: 80
      targetPort: 8080
      nodePort: 32000
- nodePort: Specifies the port to open on each Node.
Drawbacks of NodePort:
You can only have one service per port.
You can only use ports 30000–32767.
If your Node/VM IP address changes, you need to manage it.
Using LoadBalancer for External Access
LoadBalancer is the most common method for exposing Services in a production environment. It automatically provisions a cloud provider’s load balancer, which distributes traffic to the Service’s Pods.
Example: Exposing a Web Application Using LoadBalancer
apiVersion: v1
kind: Service
metadata:
  name: my-loadbalancer-service
spec:
  type: LoadBalancer
  selector:
    app: my-app
  ports:
    - port: 80
      targetPort: 8080
- Cloud Integration: The cloud provider manages the load balancer, including health checks, routing, and scaling.
Benefits:
Automatic load balancing across multiple Pods.
Managed by cloud providers, reducing operational overhead.
Supports SSL termination, providing secure connections.
Considerations:
Load balancers incur additional costs.
The provisioning process might take time depending on the cloud provider.
Using Ingress for Advanced Load Balancing and Routing
Ingress provides a more flexible way to manage external access. It allows routing based on hostnames or paths, SSL termination, and load balancing across multiple Services.
Example: Ingress for a Web Application
apiVersion: networking.k8s.io/v1
kind: Ingress
metadata:
  name: my-ingress
spec:
  rules:
    - host: myapp.example.com
      http:
        paths:
          - path: /
            pathType: Prefix
            backend:
              service:
                name: my-app-service
                port:
                  number: 80
Host: Routes requests based on the hostname (e.g.,
myapp.example.com).Path: Routes requests based on the URL path (e.g.,
/).
Advantages of Ingress:
Consolidates multiple Services under a single IP address.
Supports name-based virtual hosting.
Can handle SSL/TLS termination.
Ingress Controllers: To use Ingress, an Ingress Controller must be installed in the cluster. Popular controllers include NGINX, Traefik, and HAProxy.
3. Running an Nginx Application Using Deployment
Let's walk through deploying a simple Nginx application.
Create a Pod using deployment.yml:
apiVersion: apps/v1
kind: Deployment
metadata:
  name: nginx
spec:
  selector:
    matchLabels:
      app: nginx
  template:
    metadata:
      labels:
        app: nginx
    spec:
      containers:
      - name: nginx
        image: nginx:1.14.2
        ports:
        - containerPort: 80
- Apply the deployment:
kubectl apply -f deployment.yml
Create a Service for the application using service.yml:
apiVersion: v1
kind: Service
metadata:
  name: nginx-service
spec:
  type: NodePort
  selector:
    app: nginx
  ports:
    - protocol: TCP
      port: 80
      targetPort: 80
      nodePort: 30001
- Apply the service:
kubectl apply -f service.yml
- Verify the service status:
kubectl get svc -o wide
- Expose the port to access the application on the browser:
kubectl port-forward svc/nginx-service 8081:80 --address=0.0.0.0 &
- Now try to access the application in your browser at
http://<NodeIP>:8081.
4. Discovering Services and Pods within a Kubernetes Cluster Using DNS
Service Discovery Using DNS
Let’s start by deploying a simple Service.
Create deployment and service and apply both of them:
deployment.yml:
apiVersion: apps/v1
kind: Deployment
metadata:
  name: hello-world
  namespace: default
spec:
  replicas: 3
  selector:
    matchLabels:
      app: hello-world
  template:
    metadata:
      labels:
        app: hello-world
    spec:
      containers:
      - name: hello-world
        image: hashicorp/http-echo:0.2.3
        args:
        - "-text=Hello, Kubernetes!"
        ports:
        - containerPort: 5678
service.yml:
apiVersion: v1
kind: Service
metadata:
  name: hello-world-service
  namespace: default
spec:
  selector:
    app: hello-world
  ports:
    - protocol: TCP
      port: 80
      targetPort: 5678
- Apply both files:
kubectl apply -f deployment.yml
kubectl apply -f service.yml
- Test deployment and service at once:
kubectl get all
Discover the Service Using DNS: You can resolve the Service DNS name from within any Pod in the same namespace.
- Deploy a test Pod:
kubectl run -it --rm --image=busybox dns-test -- /bin/sh
- Within this Pod, use the
nslookupordigcommand to resolve the Service name:
nslookup hello-world-service.default.svc.cluster.local
Pod Discovery Using DNS
Step 1: Enable Headless Service
To discover individual Pods, create a Headless Service by setting clusterIP: None.
Example: Headless Service YAML:
apiVersion: v1
kind: Service
metadata:
  name: my-app-headless
spec:
  selector:
    app: my-app
  ports:
    - port: 80
      targetPort: 8080
  clusterIP: None
- Outcome: Each Pod will get its DNS record, allowing direct access via
PodName.ServiceName.Namespace.svc.cluster.local.
Step 2: Use DNS to Discover Pods
- You can discover a specific Pod by its DNS name:
nslookup <pod-name>.<service-name>.<namespace>.svc.cluster.local
Thank you for taking the time to read! 💚
Subscribe to my newsletter
Read articles from Rajat Chauhan directly inside your inbox. Subscribe to the newsletter, and don't miss out.
Written by

Rajat Chauhan
Rajat Chauhan
Rajat Chauhan is a skilled Devops Engineer, having experience in automating, configuring, deploying releasing and monitoring the applications on cloud environment. • Good experience in areas of DevOps, CI/CD Pipeline, Build and Release management, Hashicorp Terraform, Containerization, AWS, and Linux/Unix Administration. • As a DevOps Engineer, my objective is to strengthen the company’s applications and system features, configure servers and maintain networks to reinforce the company’s technical performance. • Ensure that environment is performing at its optimum level, manage system backups and provide infrastructure support. • Experience working on various DevOps technologies/ tools like GIT, GitHub Actions, Gitlab, Terraform, Ansible, Docker, Kubernetes, Helm, Jenkins, Prometheus and Grafana, and AWS EKS, DevOps, Jenkins. • Positive attitude, strong work ethic, and ability to work in a highly collaborative team environment. • Self-starter, Fast learner, and a Team player with strong interpersonal skills • Developed shell scripts (Bash) for automating day-to-day maintenance tasks on top of that have good python scripting skills. • Proficient in communication and project management with good experience in resolving issues.