User Input with Flutter Auto-Fill Integration: A Comprehensive Guide
 Kuldeep Jindani
Optimize Efficiency and Elevate User Experience with Auto-Fill in Your Flutter Application — Discover How to Implement Auto-Fill with Comprehensive Code Examples
What is Auto-Fill?
In contemporary applications, a primary focus is placed on enhancing usability and user experience, as superior UX not only retains existing users but also attracts new ones. This emphasis on UX begins with the very first interactions, such as registration and authentication processes, which serve as gateways to accessing and authorizing app features and functionalities. This article will primarily address these initial steps.
Many popular applications have moved away from traditional email-based logins, where users were required to input extensive identity information during the sign-up process before gaining access. Instead, some applications now offer a hybrid approach, combining traditional email-based sign-ups with social media account logins (such as Google, Facebook, Apple, and GitHub). Additionally, numerous apps have adopted magic link-based logins, where users simply enter their email address and receive a link to log in directly. There are also applications utilizing phone number-based logins with OTPs (one-time passwords).
The evolution from traditional logins to social media logins, magic links, and OTP-based logins has notably reduced the time and effort required for users to access applications. This streamlining of authentication processes not only enhances usability but also significantly improves the overall user experience by minimizing hassle and expediting access.
Pain Point
A significant challenge for users has been the need to remember numerous passwords for various applications across the internet, a task that can be exceedingly burdensome. In our digital age, where we rely on a multitude of applications to streamline our lives, this issue is particularly pressing.
One proposed solution was to store authentication credentials in a document file, which could then be referenced whenever login information was needed. However, this approach has its drawbacks. If a user updates their password in an application but forgets to update the document, the stored credentials become obsolete. Consequently, the user would need to reset their password to regain access, adding an extra layer of frustration.

The Auto-Fill service addresses the challenge of remembering and updating passwords by securely storing them in browsers and mobile password managers. This functionality eliminates the need for users to manually recall and update credentials, streamlining the authentication process and enhancing convenience.
What does this Password Auto-fill do?
A password auto-fill service in mobile applications is a feature designed to automatically populate login credentials, such as usernames and passwords, when users access an app or website. This service streamlines the login process by eliminating the need for manual entry, saving users time and effort. Beyond passwords, it can also store additional information such as addresses and credit card details, using previously entered data to automatically complete forms.
The auto-fill service operates by securely storing user credentials on the device, either locally or in the cloud. When a user needs to log in, the service retrieves and inputs the relevant information automatically. Mobile operating systems like iOS and Android provide built-in auto-fill services that work across various applications, while some apps may offer their own integrated auto-fill functionality.
To utilize a password auto-fill service, users typically need to enable the feature and grant the necessary permissions for the app or operating system to access their credentials. This process is crucial for maintaining the security of sensitive information and preventing unauthorized access to user accounts.
Activating auto-fill within an app prompts the application to present a dialog box, inviting the user to save their login details, such as usernames and passwords, akin to the functionality seen in web browsers. Following this, the app securely stores these credentials in a password manager.
Password Storage: Decision Process
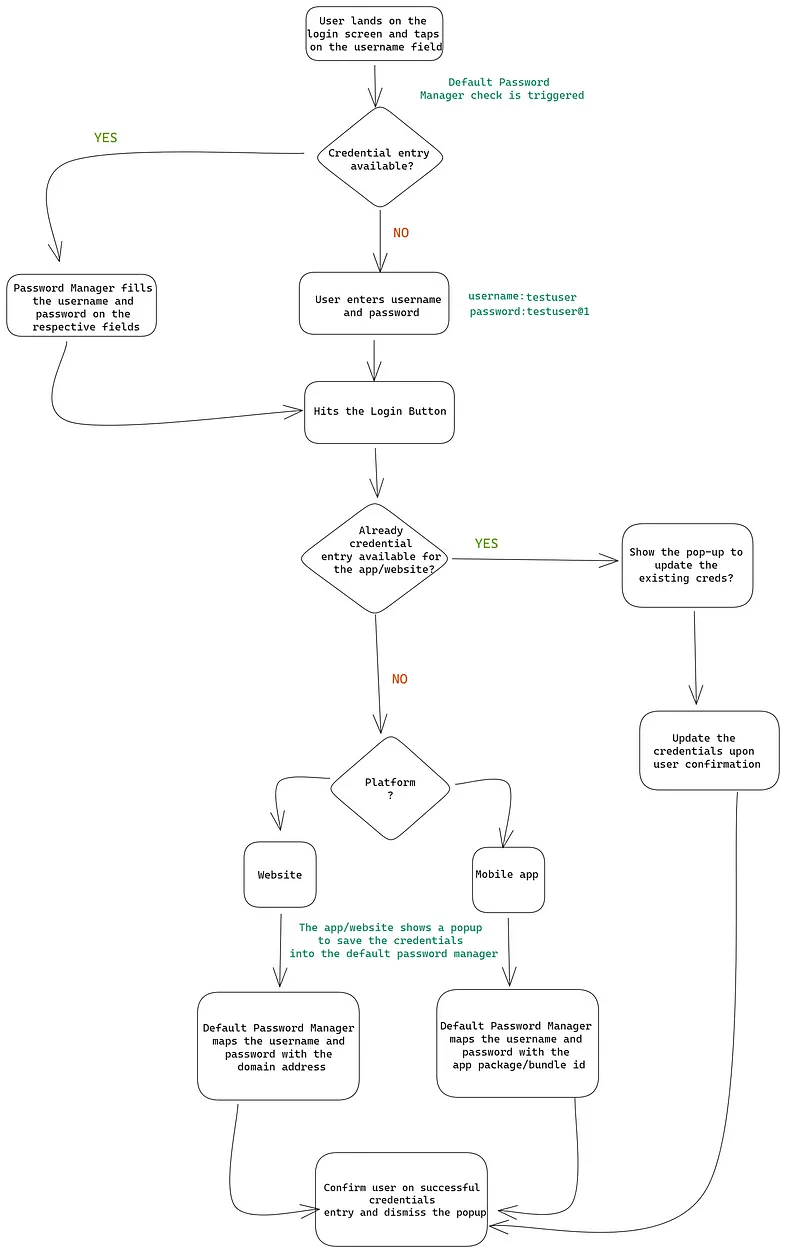
In this section, we will explore how a password manager determines where to store passwords for a particular app, website, or domain. This process will be illustrated through a detailed flowchart.

The flowchart above provides a clear illustration of the internal decision-making process employed by a password manager. The stages and procedures are straightforward: if a credential entry for a specific app or domain already exists, the password manager will automatically fill in the username and password from its stored data. If no such entry is found, the manager will prompt the user to confirm and save the new credentials for future use. Additionally, if an entry for a particular app and username is already present, the app will request the user to update the credentials. Upon confirmation, the new information will be saved in the manager's storage.
Please be aware that multiple credentials may be stored for a given domain or app. When the user selects the username field, the password manager will display a list of all saved credentials for selection. Once the user chooses a credential, the corresponding fields will be automatically populated.
We now possess a comprehensive understanding of the primary challenges associated with password management and storage. Additionally, we have examined how auto-fill services address these issues effectively. Auto-fill services greatly enhance user convenience, and Flutter facilitates their seamless integration into applications. In this article, we will delve into the fundamentals of auto-fill services and guide you through their implementation in a Flutter app. Moreover, we will provide source code examples to assist you in getting started.
Implementation
Flutter offers a widget called TextField for capturing user input. To activate the auto-fill functionality within a TextField, you need to employ the AutofillGroup widget. The AutofillGroup groups together TextFields that should be auto-filled simultaneously, allowing users to switch between different auto-fill groups as needed.
Here is an example illustrating the use of the AutofillGroup widget:
class MyWidget extends StatefulWidget {
  @override
  _MyWidgetState createState() => _MyWidgetState();
}

class _MyWidgetState extends State<MyWidget> {
  final _formKey = GlobalKey<FormState>();
  final _usernameController = TextEditingController();
  final _passwordController = TextEditingController();

  @override
  Widget build(BuildContext context) {
    return Scaffold(
      body: Center(
        child: Column(
          crossAxisAlignment: CrossAxisAlignment.center,
          children:[
            Padding(
              padding: const EdgeInsets.all(40.0),
              child: Form(
                key: _formKey,
                child: AutofillGroup(
                  child: Column(
                    children: [
                      Text(
                        'Login',
                        style: TextStyle(
                          fontSize: 32.0,
                          fontWeight: FontWeight.bold,
                          color: Colors.blue,
                        ),
                      ),
                      SizedBox(height: 40),
                      TextFormField(
                        controller: _usernameController,
                        autofillHints: [AutofillHints.username],
                        decoration: InputDecoration(
                          border: OutlineInputBorder(),
                          labelText: 'Username',
                          prefixIcon: Icon(Icons.person),
                        ),
                      ),
                      SizedBox(height: 40),
                      TextFormField(
                        controller: _passwordController,
                        autofillHints: [AutofillHints.password],
                        obscureText: true,
                        decoration: InputDecoration(
                          border: OutlineInputBorder(),
                          labelText: 'Password',
                          prefixIcon: Icon(Icons.lock),
                        ),
                      ),
                      SizedBox(height: 40),
                      ElevatedButton(
                        onPressed: () {
                          // Handle login action
                        },
                        style: ElevatedButton.styleFrom(
                          backgroundColor: Colors.blue,
                          padding: EdgeInsets.symmetric(horizontal: 50, vertical: 15),
                          shape: RoundedRectangleBorder(
                            borderRadius: BorderRadius.circular(30),
                          ),
                        ),
                        child: Text(
                          'Login',
                          style: TextStyle(
                            fontSize: 18.0,
                            color: Colors.white,
                          ),
                        ),
                      ),
                    ],
                  ),
                ),
              ),
            ),
          ]
        ),
      ),
    );
  }
}
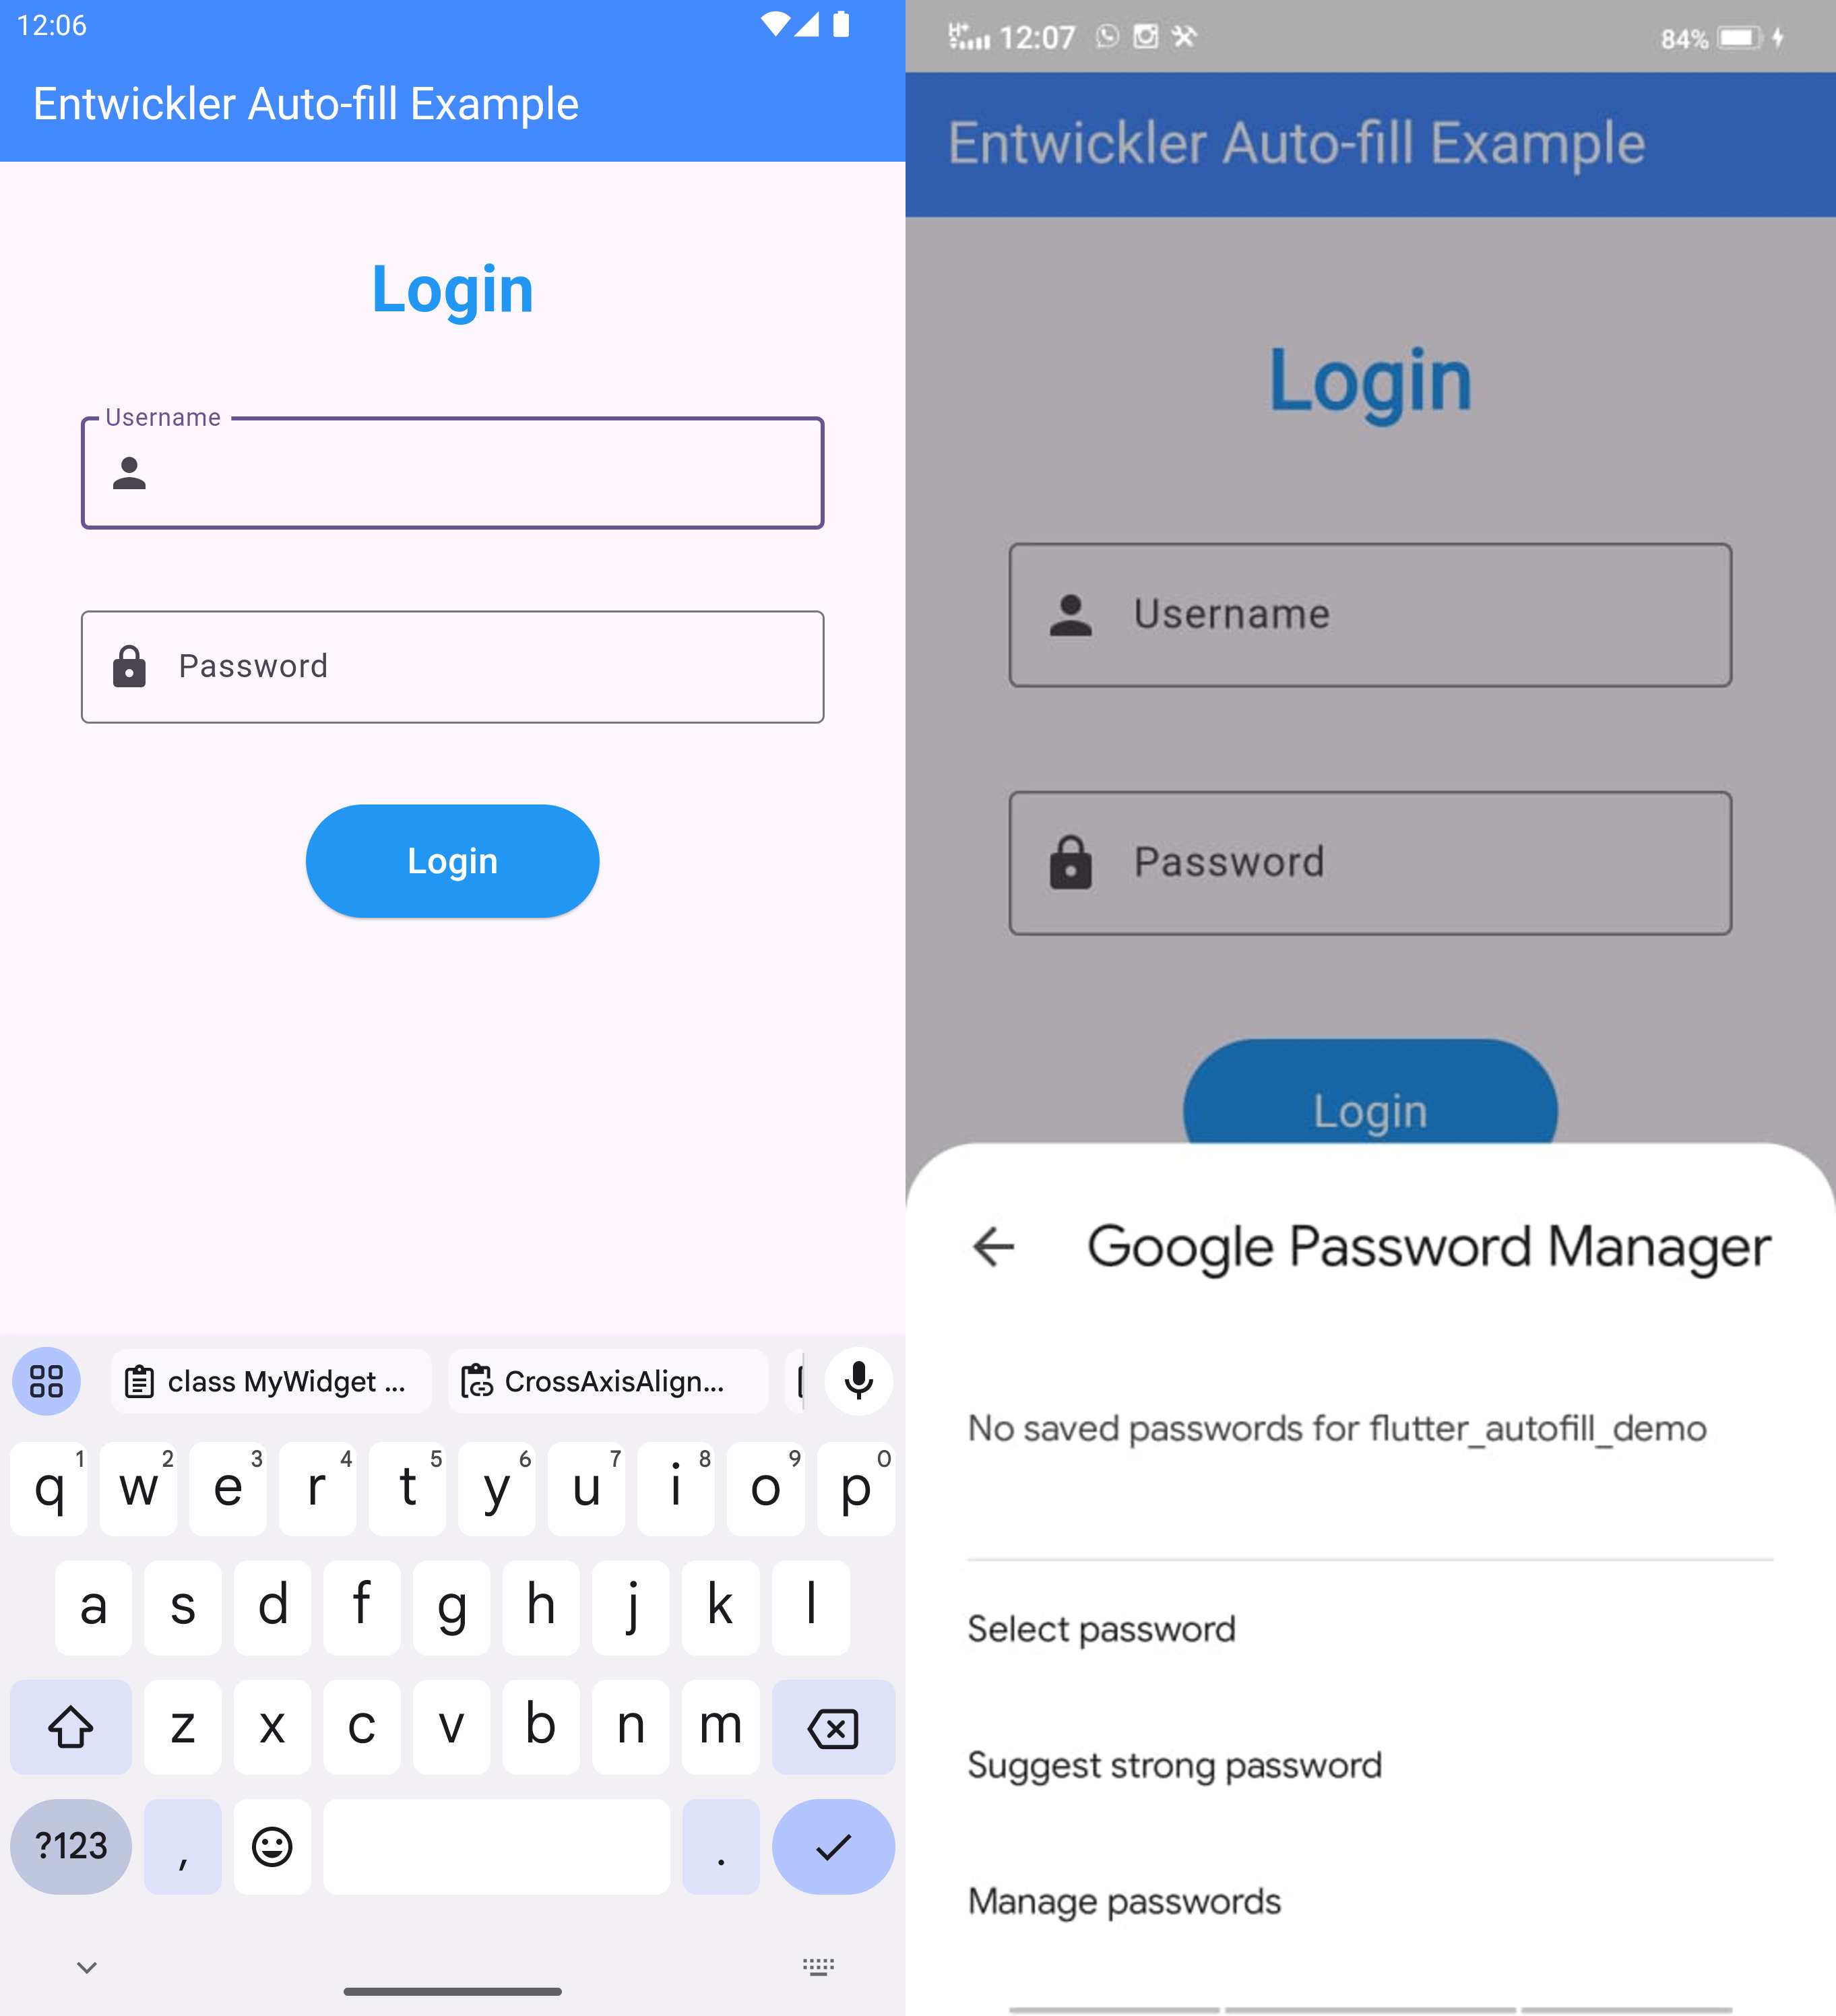
Which is look like this...

In the example provided, we utilized an AutofillGroup encompassing two TextFormFields for capturing the username and password. We specified the autofillHints property to associate each field with the appropriate auto-fill hint. The autofillHints property accepts an array of AutofillHints that denote the type of information intended for auto-fill.
For instance, AutofillHints.username indicates that the TextFormField should be populated with a stored username, while AutofillHints.password signifies that the field should be filled with a stored password.
When a user interacts with the username or password fields, the auto-fill service presents suggestions based on the saved credentials. Users can select a suggestion to automatically populate the respective field.
To enable auto-fill functionality, it is essential to declare the autofillHints property in each TextField where auto-fill is desired.
Additionally, the TextInput.finishAutofillContext() method is used to notify the auto-fill system that the auto-fill operation is complete and to dismiss the auto-fill suggestion popup.
TextInput.finishAutofillContext();
Note: To clarify, when a
TextFieldor any otherTextInputwidget is configured with theautofillHintsproperty, the auto-fill system will present suggestions to the user upon interaction with the widget. The user can then choose a suggestion to automatically fill in the field. After a selection is made, theTextInput.finishAutofillContext()method is invoked to inform the auto-fill system that the operation is complete and to close the suggestion popup.
Conclusion
Auto-fill services are a valuable feature that enhances user convenience and efficiency by saving time and improving the overall experience. In Flutter, integrating auto-fill services is a seamless process, facilitated by the AutofillGroup widget, which enables the grouping of TextFields for simultaneous auto-filling. By following the provided example, you can swiftly incorporate auto-fill functionality into your Flutter application.
I trust you found this guide informative.
Subscribe to my newsletter
Read articles from Kuldeep Jindani directly inside your inbox. Subscribe to the newsletter, and don't miss out.
Written by

Kuldeep Jindani
Kuldeep Jindani
I have hands-on 6 years of experience in Android development with Java + Kotlin, Experience in most trending Android functionalities, UI Designs, Reusable Components, MVVM & MVI architectures, Testing, Bug Fixes, and self & quick learning skills. My expertise includes: Proficiency in Kotlin & Java Both Strong understanding of app architecture Like MVVM, Clean Architecture Experience with Jetpack Compose and coroutines and RxJava Collaboration with designers and product managers Commitment to delivering high-quality, testable code TECHNICAL SKILL SET Kotlin | Java | Jetpack Compose | Kotlin Multiplatform Platform (KMP) | Kotlin Flow | Firebase | Sqlite | Room/Realm database | Kotlin Coroutine | REST API | Web Service | MVVM/MVI/ Clean Architecture | Multiple screen support | JUnit/Mockito Unit Testing | Espresso UI Testing | Instrumental Testing | Version Controlling | Git | Jenkins CI/CD | Retrofit | Dagger/Hilt | BLE | CameraX | IOT