Easy Setup and Execution of Cypress Tests in GitLab CI
 Subham Saurabh
In today’s fast-paced development environment, continuous integration and testing have become crucial for delivering high-quality software. Cypress, a powerful end-to-end testing framework, paired with GitLab CI, a robust continuous integration tool, can streamline your testing process and help catch bugs early. In this guide, we’ll walk you through the steps to set up Cypress tests in GitLab CI.
Why Cypress?
Cypress is gaining popularity due to its developer-friendly nature, real-time reloads, and powerful testing capabilities. It’s an all-in-one testing framework that supports end-to-end testing, unit testing, and integration testing. Cypress provides detailed and interactive error reports, making it easier to debug tests.
Prerequisites
Before diving in, ensure you have the following:
• A GitLab repository with your project code.
• A basic understanding of GitLab CI/CD pipelines.
Step 1: Set Up Cypress in Your Project
If you haven’t already installed Cypress in your project, you can do so with npm or yarn:
npm install cypress --save-dev
or
yarn cypress --dev
Once installed, you can initialize Cypress by running
npx cypress open
This command sets up the necessary folder structure and configuration files. You’ll find a cypress.config.js file in the root directory, where you can configure Cypress settings.
Step 2: Add Code coverage
You need to install @cypress/code-coverage and nyc (Istanbul's command-line interface) in your project:
npm install --save-dev @cypress/code-coverage nyc
In your cypress.config.js file, add the following configuration to include the code coverage plugin:
const { defineConfig } = require('cypress');

module.exports = defineConfig({
  e2e: {
    setupNodeEvents(on, config) {
      require('@cypress/code-coverage/task')(on, config);
      return config;
    },
  },
});
If you want to add it for component testing you can add the
const { defineConfig } = require('cypress');

module.exports = defineConfig({
  e2e: {
    setupNodeEvents(on, config) {
      require('@cypress/code-coverage/task')(on, config);
      return config;
    },
  },
  component: {
     setupNodeEvents(on, config) {
       require('@cypress/code-coverage/task')(on, config);
       return config;
    },
  },
});
Create or update the cypress/support/command.js file to include the code coverage support:
import '@cypress/code-coverage/support';
also, import the cypress/support/command.js file into cypress/support/e2e.js and cypress/support/component.js to get the coverage for the e2e and component test files.
To generate the code coverage report, you can use the following command:
nyc report --reporter=<reporter>
You can replace <reporter> with any of the available reporter options provided by nyc. Some common reporter options include:
html: Generates an HTML report.text: Outputs the report in plain text.text-summary: Provides a summary in plain text.lcov: Generates an lcov report, which can be used with various CI tools.json: Outputs the report in JSON format.
For example, to generate an HTML report, you would use:
npx nyc report --reporter=html
You can specify multiple reporters by separating them with a space:
npx nyc report --reporter=html --reporter=text-summary\
This command will generate both an HTML report and a text summary of the code coverage.
Step 3: Create Your Cypress Tests
Cypress organizes tests into specs, which are just JavaScript files. You can create a new spec file in the cypress/e2e/mytest.cy.js folder:
describe('My First Test', () => {
  it('Visits the Kitchen Sink', () => {
    cy.visit('https://example.cypress.io')
    cy.contains('type').click()
    cy.url().should('include', '/commands/actions')
    cy.get('.action-email')
      .type('fake@email.com')
      .should('have.value', 'fake@email.com')
  })
})
This is a simple test that visits the Cypress example page, clicks a link, and asserts that the URL contains /commands/actions. Cypress provides a clean syntax to interact with web elements and make assertions.
Step 4: Configure GitLab CI
Next, we need to set up GitLab CI to run our Cypress tests automatically. Start by creating a .gitlab-ci.yml file in the root directory of your project if you don’t already have one.
Here’s a basic configuration to run Cypress in GitLab CI:
stages:
  - test

test:
  image: cypress/base:10 # you can use different docker image on cypress official website
  stage: test
  variables:
    NODE_ENV: test # if you want to set up the node_env to test
    STATEMENT: 50  # Set your desired threshold for statements to be covered
    FUNCTION: 50   # Set your desired threshold for functions to be covered
    BRANCHES: 50   # Set your desired threshold for branches to be covered
    LINES: 50      # Set your desired threshold for lines to be covered
  cache:
    key: ${CI_COMMIT_REF_SLUG}-setup
    paths:
      - node_modules/
  before_script:
    - npm ci
  script:
    - npx cypress install  # Explicitly install Cypress as a fallback
    - npx cypress run --headless
    - npx nyc check-coverage --lines $LINES --statements $STATEMENT --functions $FUNCTION --branches $BRANCHES
  after_script:
    - npx nyc report --reporter=cobertura --reporter=text-summary
  coverage: '/^Statements\s*:\s*([^%]+%)/'
  allow_failure: true # this will fail the pipeline
  artifacts:
    paths:
     - coverage/lcov-report/index.html
     - coverage/cobertura-coverage.xml
    reports:
      coverage_report:
        coverage_format: cobertura
        path: coverage/cobertura-coverage.xml
  rules:
    - if: $CI_PIPELINE_SOURCE == 'merge_request_event'
    - if: $CI_COMMIT_BRANCH == 'master'
This configuration is designed to run Cypress tests in a GitLab CI pipeline with NYC for coverage checking. It ensures that your code meets the defined coverage thresholds before being merged or deployed.
• Stages: Defines the stages in the CI/CD pipeline. In this case, there is a single test stage where the Cypress tests will be executed.
• Test Job: This is the job that runs in the test stage.
• Image: Uses cypress/base:10 Docker image, which has Node.js and Cypress pre-installed. You can use different versions or images based on your requirements.
• Variables:
• NODE_ENV: test: Sets the environment to test mode.
• STATEMENT, FUNCTION, BRANCHES, LINES: These variables define the minimum coverage thresholds (in percentage) for statements, functions, branches, and lines. If your tests do not meet these thresholds, the job will fail.
• Cache: Caches the node_modules/ directory to speed up subsequent pipeline runs. The cache key is based on the current branch, ensuring different branches do not conflict.
• Before Script: This command installs the project dependencies using npm ci, which is faster and more reliable in CI environments compared to npm install.
• Script:
• npx cypress install: Explicitly installs Cypress, ensuring it’s available even if something goes wrong with the initial setup.
• npx cypress run --headless: Runs Cypress tests in headless mode, meaning no browser UI is shown, which is typical in CI environments.
• npx nyc check-coverage: Checks the test coverage against the defined thresholds (LINES, STATEMENT, FUNCTION, BRANCHES). If the coverage falls below these thresholds, the job will fail.
• After Script: Generates coverage reports in cobertura format (which is compatible with many CI tools) and a text summary, allowing you to easily review coverage results.
• Coverage Regex: A regular expression that GitLab uses to parse the coverage percentage from the job output, enabling the coverage percentage to be displayed in the merge request widget.
• Allow Failure: This option allows the job to fail without failing the entire pipeline. This is useful for non-blocking jobs where you might want to allow code to be merged even if coverage is below the threshold.
• Artifacts: Specifies the files to be retained after the job completes. Here, the coverage report in cobertura format is stored as an artifact, which can be accessed later for review.
• Rules: Defines conditions under which the job will run. In this case, the job will run for merge requests and when committing directly to the master branch.
Step 5: Push to GitLab and Trigger the Pipeline
Once your .gitlab-ci.yml file is ready, commit and push the changes to your GitLab repository:
git add .gitlab-ci.yml
git commit -m "Add GitLab CI configuration for Cypress tests"
git push origin main
This will trigger a new pipeline in GitLab. You can monitor the progress of your pipeline by navigating to the CI/CD > Pipelines section in your GitLab project or you can create a merge request to master.
Step 6: Reviewing Test Results
When the pipeline completes, you can review the test results directly in the GitLab interface. If any tests fail, you’ll be able to download the screenshots and videos captured during the test run, which can be invaluable for debugging.
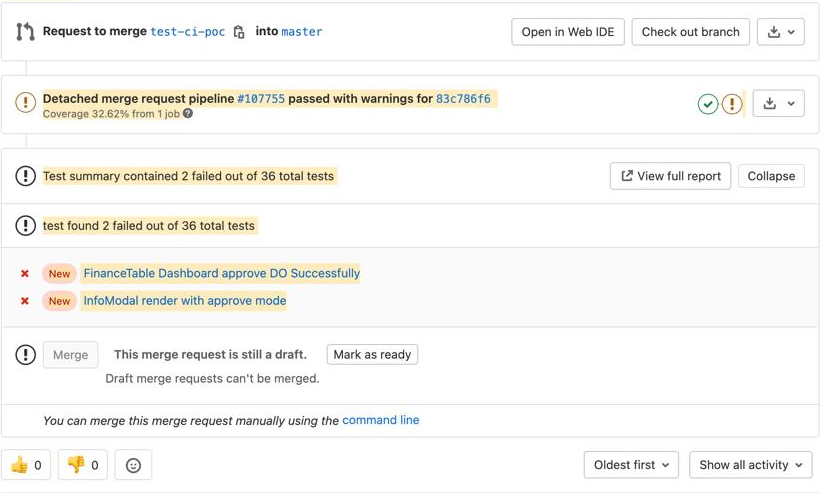
Additionally, the test results can be viewed on the Merge Request (MR) dashboard, providing a convenient overview of the test outcomes and making it easier to identify and address issues.

Step 6: Advanced Configuration (Optional)
For larger projects, you might want to parallelize tests to reduce the overall runtime. Cypress supports test parallelization natively, but you’ll need to configure your GitLab runner accordingly and use Cypress Dashboard to manage parallel runs.
Another advanced configuration involves setting environment variables for different stages, such as running tests in different environments (staging, production) or using custom configurations for different types of tests.
Conclusion
By integrating Cypress with GitLab CI, you’re taking a big step towards ensuring your codebase remains bug-free and stable. Automated tests run on every push, catching issues before they reach production. This setup not only saves time but also boosts confidence in your code.
With the basics covered, you can now expand on this foundation by exploring advanced Cypress features, optimizing your pipeline, or integrating other tools like Slack for notifications. Happy testing!
This guide should help developers set up Cypress testing in GitLab CI. If you need any more details or specific sections expanded, just let me know!
Subscribe to my newsletter
Read articles from Subham Saurabh directly inside your inbox. Subscribe to the newsletter, and don't miss out.
Written by
