How to Fetch Data from a Database Using ADO.NET in ASP.NET Core 8 MVC
 Rohit Surwade
Table of contents
- Step 1: Create a New Project in Visual Studio
- Step 2: Create the Database and Table
- Step 3: Create Stored Procedures for Data Retrieval
- Step 4: Install the Microsoft.Data.Sqlclient Package from NuGet
- Step 5: Create a New Folder Named Utility
- Step 6: Create a New Class Named ConnectionString in the Utility Folder
- Step 7: Create the New Model Class
- Step 8: Create the Database Access Class Named StudentDataAccessLayer
- Step 9: Constructor Injection & Declaration of Private Readonly Field
- Step 10: Create an Action In Controller
- Step 10: Register StudentAccessDataLayer Class in Program.cs
- Step 11: Create the View to Display All Student Data
In this blog, we will explore how to retrieve data from a database using ADO.NET in ASP.NET Core 8 MVC. Our approach will be beginner-friendly, ensuring that even if you're new to ADO.NET, you'll be able to follow along easily. We'll break down each step with clear explanations, guiding you through writing and understanding the code. By the end of this blog, you'll have a solid foundation in using ADO.NET for data retrieval in your ASP.NET Core projects. Let's dive in!
Step 1: Create a New Project in Visual Studio
Open Visual Studio on your computer. If you don’t have it installed, you can download the latest version from the official Microsoft website (Download Visual Studio)
After opening the Visual Studio, click on "Create a new project."
Use the search bar or scroll to find "ASP.NET Core Web App (Model-View-Controller)" With C# and select it. This template is specifically designed for MVC applications in ASP.NET Core

Project Name: Enter a name for your project, such as ADONetDemo or something similar. And We're Giving The Name SanskariVidhyalayADO to our Project
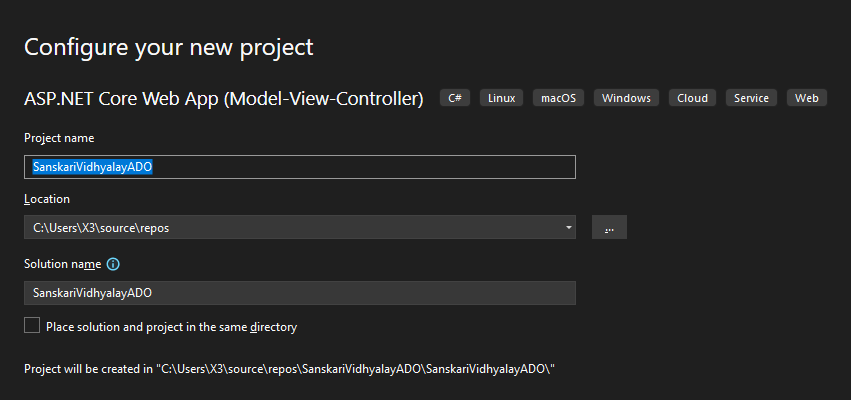
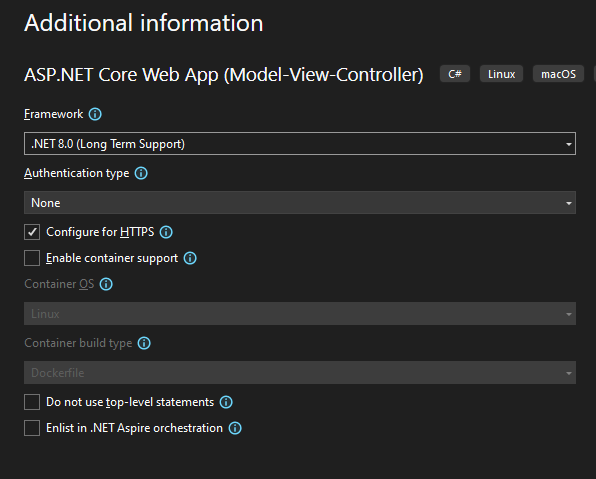
Click "Next" And Ensure that “.NET 8.0 (Long-term support)” is selected as the framework Then Click “Create” to generate the project. Visual Studio will set up the project structure, including folders for your controllers, views, models, and more.
Our Project is Generated Now, We Will Work on it But First We Need To Create Database in SQL Server Managent Studio (SSMS). Let Move To The Step 2
Step 2: Create the Database and Table
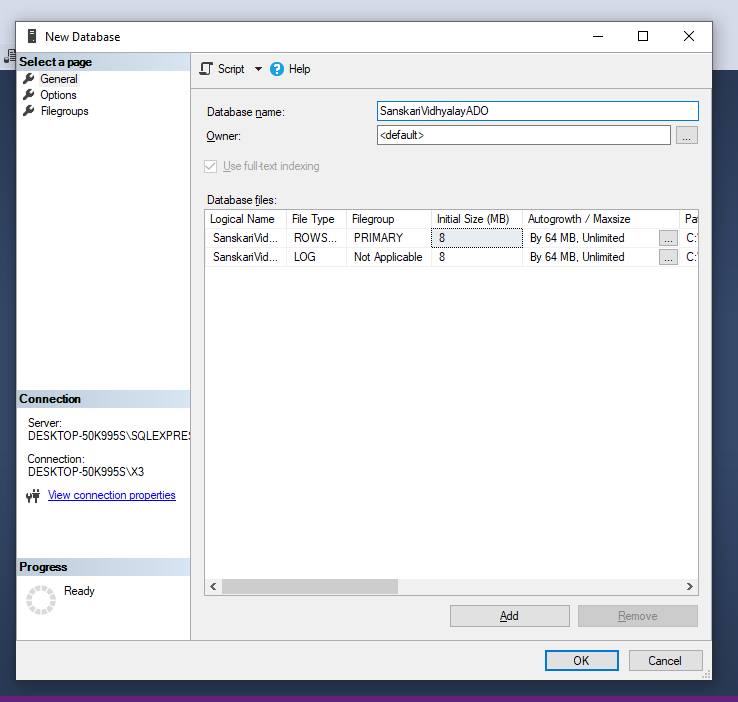
Create a New Database, In the Object Explorer, right-click on the Databases folder and select New Database
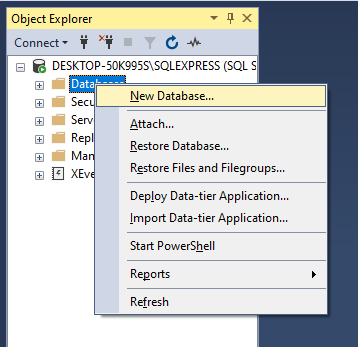
Click on New Database And Enter a name for your database, such as SchoolDB Then Click OK to create the database. We're giving SanskariVidhyalayADO Name To Our Database
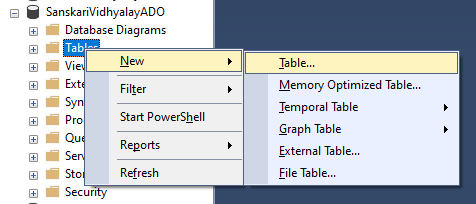
After the database is created, expand the Databases folder in the Object Explorer, find your new database (SanskariVidhyalayADO).

Expand It, Right-click on the Tables folder and select New Table….
Now Table Design Screen Will Be Appear, You Can Create Your Table But We Are Creating The Table By Entering The Queries. It All Your Choice, How Do You Want To Generate The Table
CREATE TABLE StudentInfo(
    StudentID INT PRIMARY KEY IDENTITY(1,1),
    FirstName VARCHAR(15) NOT NULL,
    LastName VARCHAR(15) NOT NULL,
    Standard INT NOT NULL,
    Medium VARCHAR(50) NOT NULL,
    DateOfBirth VARCHAR(15) NOT NULL,
    MobileNumber VARCHAR(12) NOT NULL,
    AlternativeMobileNumber VARCHAR(15) NOT NULL,
    Address VARCHAR(50) NOT NULL,
    City VARCHAR(20) NOT NULL,
    Region VARCHAR(15) NOT NULL,
    PinCode INT NOT NULL
);
We Generated the table name "StudentInfo", Which will store Basic information of Students
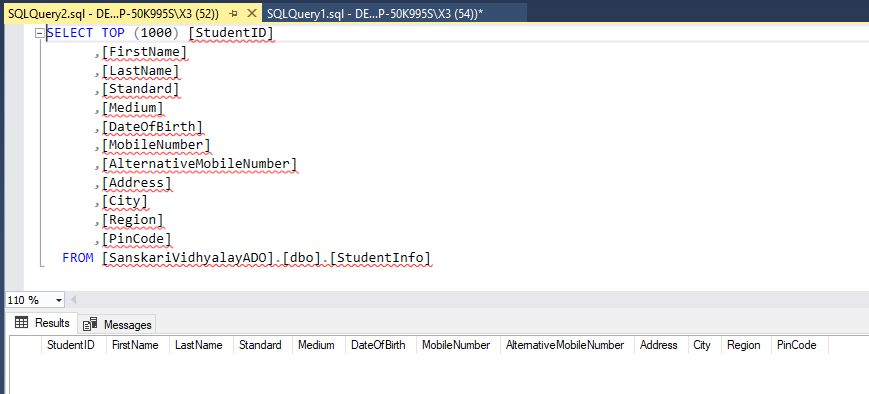
We added the some Student Data in Table Using Insert Into Queries
INSERT INTO StudentInfo (FirstName, LastName, Standard, Medium, DateOfBirth, MobileNumber, AlternativeMobileNumber, Address, City, Region, PinCode)
VALUES
('Aarav', 'Sharma', 10, 'English', '2008-05-12', '9876543210', '9988776655', '1234 MG Road', 'Delhi', 'North', 110001),
('Vivaan', 'Patel', 9, 'Gujarati', '2009-07-22', '8765432109', '9876543210', '5678 Patel Street', 'Ahmedabad', 'Gujarat', 380001),
('Aditya', 'Singh', 11, 'Hindi', '2007-03-15', '9988776655', '9776655443', '9101 Singh Nagar', 'Mumbai', 'Maharashtra', 400001),
('Ishaan', 'Verma', 8, 'English', '2010-01-25', '9898989898', '9456781234', '3456 Verma Lane', 'Noida', 'Uttar Pradesh', 201301),
('Arjun', 'Kumar', 10, 'Hindi', '2008-11-02', '9944556677', '9112233445', '6789 Arjun Street', 'Bangalore', 'Karnataka', 560001),
('Riya', 'Reddy', 9, 'Marathi', '2009-08-19', '9123456789', '9234567890', '2345 Reddy Avenue', 'Hyderabad', 'Telangana', 500001),
('Saanvi', 'Gupta', 11, 'English', '2007-06-30', '9345678901', '9456781234', '4567 Gupta Road', 'Kolkata', 'West Bengal', 700001),
('Kartik', 'Joshi', 8, 'Hindi', '2010-10-10', '9654321098', '9543216789', '7890 Joshi Complex', 'Pune', 'Maharashtra', 411001),
('Maya', 'Bansal', 10, 'English', '2008-12-24', '9456123456', '9678901234', '8901 Bansal Circle', 'Chennai', 'Tamil Nadu', 600001),
('Rahul', 'Mehta', 9, 'Gujarati', '2009-04-16', '9876123456', '9712345678', '1234 Mehta Place', 'Surat', 'Gujarat', 395001),
('Ananya', 'Singh', 11, 'Hindi', '2007-09-05', '9765432109', '9345678901', '5678 Singh Street', 'Jaipur', 'Rajasthan', 302001),
('Aryan', 'Jain', 8, 'English', '2010-02-22', '9898989898', '9123456789', '6789 Jain Lane', 'Indore', 'Madhya Pradesh', 452001),
('Pooja', 'Nair', 10, 'Marathi', '2008-07-11', '9678901234', '9123456789', '3456 Nair Avenue', 'Kochi', 'Kerala', 682001),
('Rohan', 'Chopra', 9, 'English', '2009-05-30', '9876543210', '9234567890', '7890 Chopra Plaza', 'Dehradun', 'Uttarakhand', 248001),
('Tanya', 'Sharma', 11, 'Hindi', '2007-10-12', '9345678901', '9456123456', '9012 Sharma Street', 'Lucknow', 'Uttar Pradesh', 226001),
('Gaurav', 'Yadav', 8, 'Hindi', '2010-12-15', '9988776655', '9776655443', '2345 Yadav Road', 'Agra', 'Uttar Pradesh', 282001);
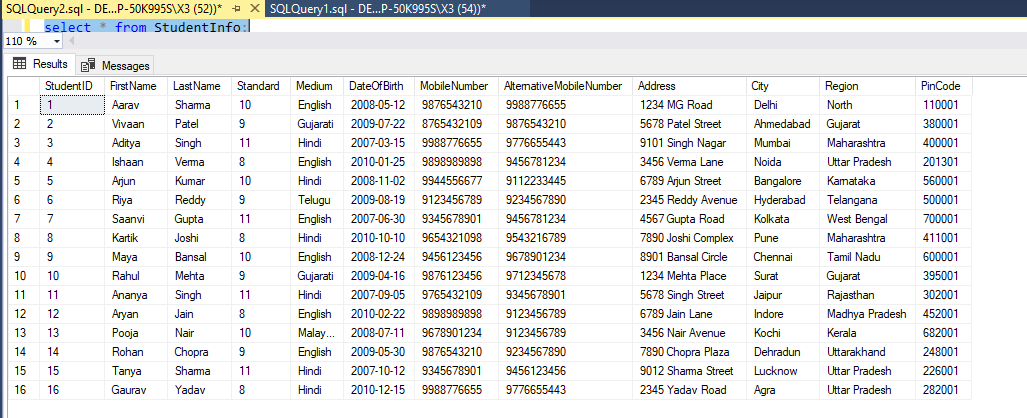
Explanation:
StudentID: The primary key with
IDENTITY(1,1)to auto-increment.First Name, Last Name, Date of Birth, Mobile Number, Alternative Mobile Number, Address, City, Region, Pin Code: All these columns are defined as
NOT NULLbased on the required field.VARCHAR: Used for string fields with specified lengths.
INT: Used for numeric fields like Standard and PinCode.
We have successfully generated the database and table. Now, we need to create the stored procedures to manage and interact with the data efficiently. Stored procedures will help us streamline operations like inserting, updating, and retrieving data from our table, ensuring that these tasks are performed consistently and securely.
Step 3: Create Stored Procedures for Data Retrieval
In this step, We'll create a stored procedure that retrieves all student records from the StudentInfo table. This procedure will allow us to quickly access the data without having to write out the query each time.
CREATE PROCEDURE GetStudentInfo
AS
BEGIN
    SELECT * FROM StudentInfo;
END;
Explanation:
CREATE PROCEDURE GetStudentInfo: This command creates a new stored procedure namedGetStudentInfo.AS BEGIN ... END: Defines the body of the stored procedure, where we specify the SQL commands to execute.SELECT * FROM StudentInfo: The SQL query that retrieves all records from theStudentInfotable.
By setting up this stored procedure, we make it easier to access and manage student data efficiently.
How Can We See Stored Procedures?
Expand the Your Database Then Find The Folder Name Programmability, Expand It Then Expand The Folder Name Stored Procedure then you will see your generated procedure

If You Cant See Any Procedure Then You Need To Refresh Object Explorer or Re-open SQL Server Management Studio (SSMS)
Step 4: Install the Microsoft.Data.Sqlclient Package from NuGet
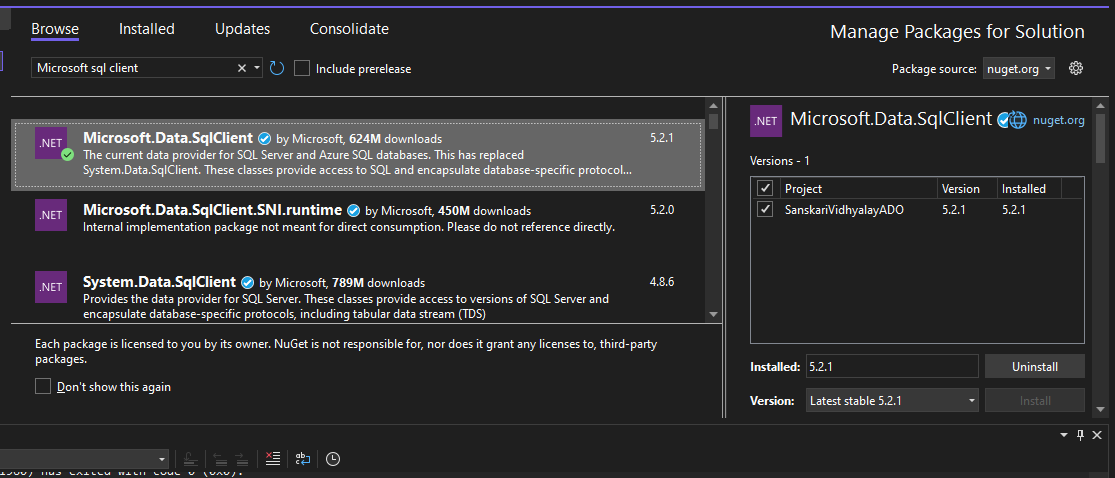
you'll need to install the Microsoft.Data.Sqlclient package. This package provides the necessary classes and methods to interact with SQL Server databases.
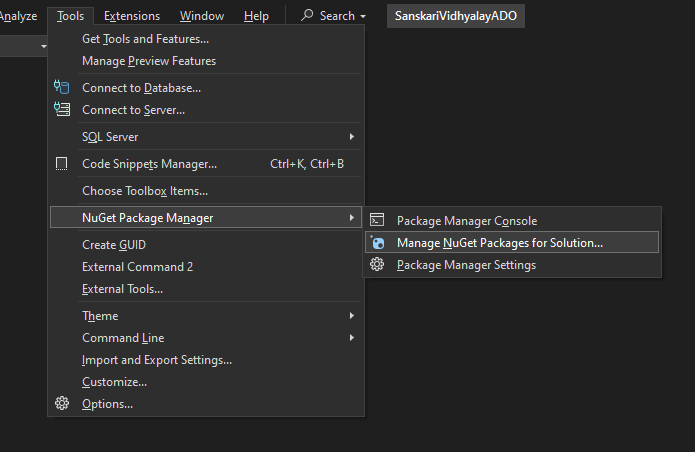
Click on The Tools And Open the NuGet Package Manager
And Search for the Microsoft.Data.Sqlclient Package, Install It
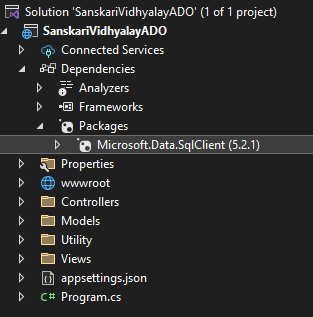
To see the installed packages, expand the Dependencies node in the Solution Explorer. Then, expand the Packages node. Here, you will see the list of your installed packages.
Step 5: Create a New Folder Named Utility
In this step, we will create a new folder in name Utility
Right-click on your project in Solution Explorer, then go to Add and select New Folder
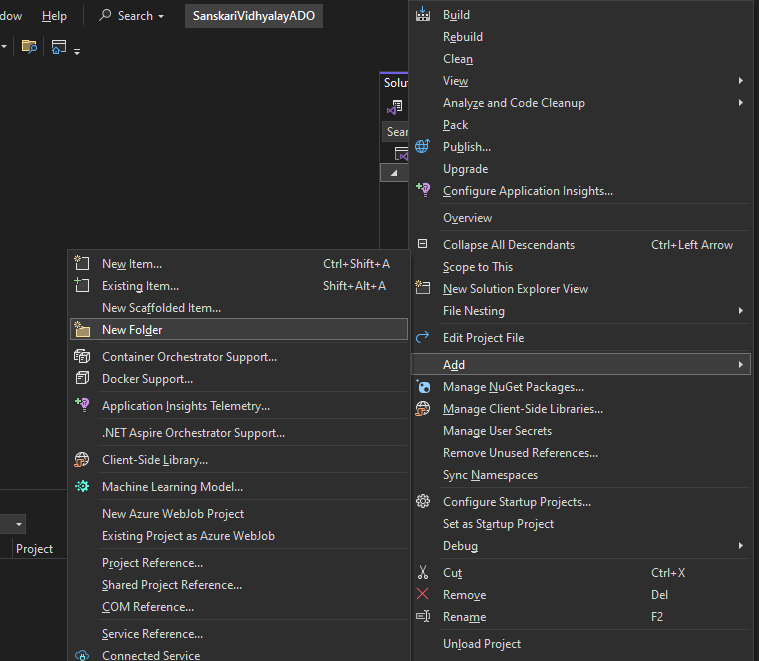
and now named it "Utility"
Step 6: Create a New Class Named ConnectionString in the Utility Folder
In this step, we'll create a class that will hold the connection string for your SQL Server database.
Right-click on the Utility folder, go to Add, and select Class. Name the new class ConnectionString
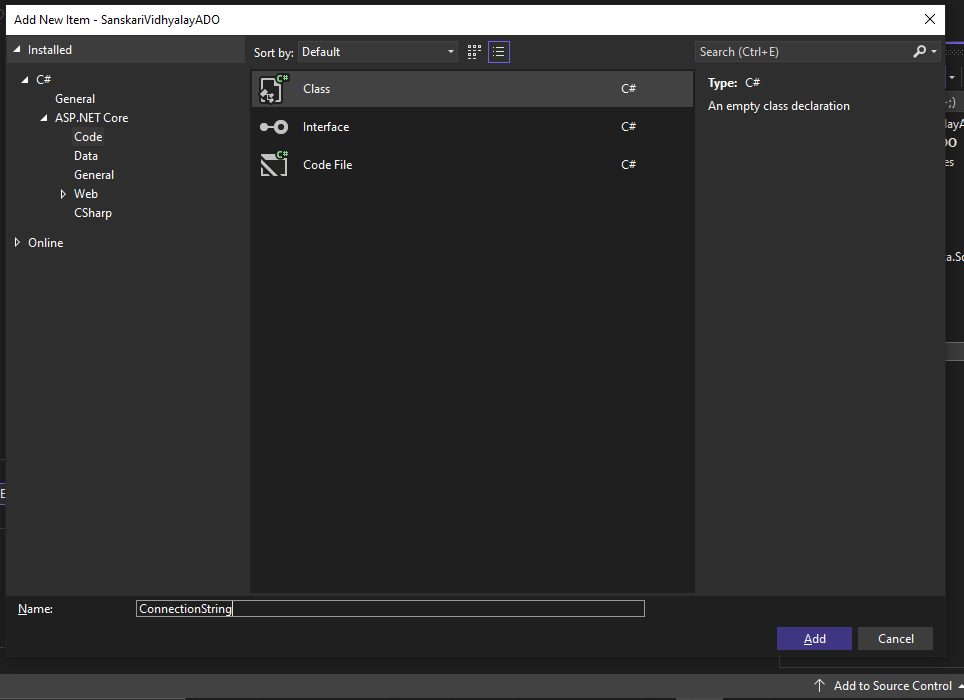
After creating the new ConnectionString class, you'll need to paste the following code into the class
    public class ConnectionString
    {
        private static string cName = "EMPTY-SPACE";
        public static string CName
        {
            get => cName;
        }
    }
}
We've added the code for the ConnectionString, but we're not done yet. Next, we need to add the connection.
"Press Ctrl + Alt + S to open the Server Explorer tab and you will see screen just like below screenshot
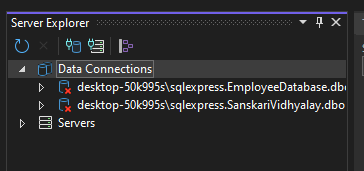
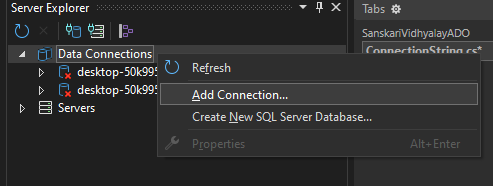
Right click over Data Connection And Click on Add Connection
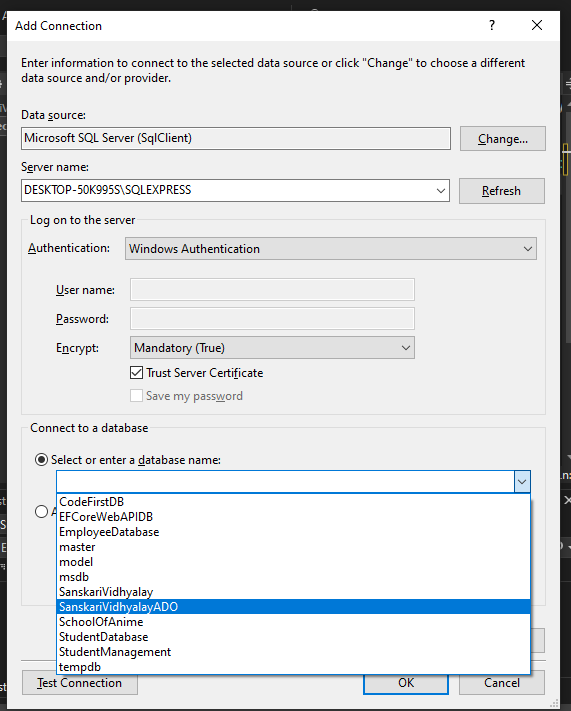
After clicking on Add Connection Now you will see Add Connection Tab, Enter Your Server Name (You Can Copy Your Server Name From SSMS) Accept Trust Connection and Then Select Your Database Then Click on OK
After Clicking on OK, You Will See Your Database in Data Connections Tab
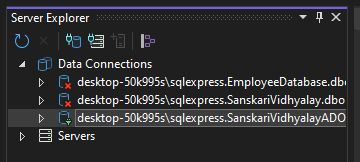
Now, Right Click Your New Added Data Connection And Select Properties
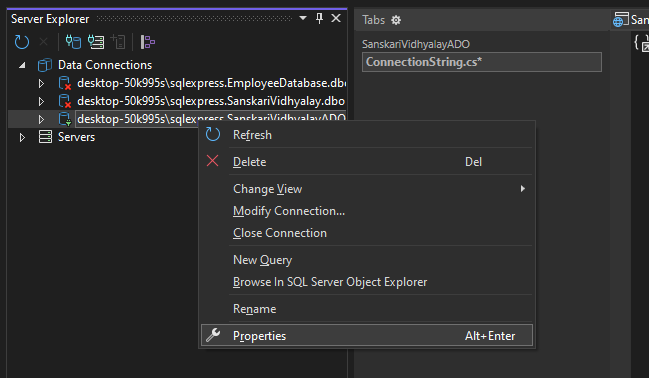
After Clicking on The Properties, You Will See Properties of Data Connection Below The Solution Explore The You Have To Find Connection String Copy All String From Connection String
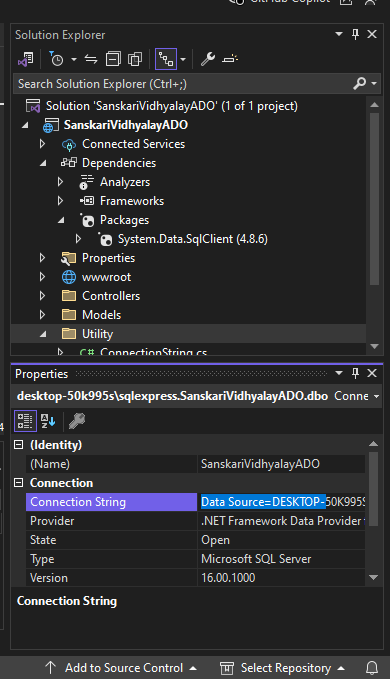
And Then Paste it In Empty Space of Connection String Class
 public class ConnectionString
 {
     // PASTE THE CODE HERE
     private static string cName = "Data Source=DESKTOP-50K995S\\SQLEXPRESS;Initial Catalog=SanskariVidhyalayADO;Integrated Security=True;Trust Server Certificate=True";
     public static string CName
     {
         get => cName;
     }
Now, We Successfully Created New Connection String Class Now We've To Create New Model Class And We Will Add Property According Database Table
Step 7: Create the New Model Class
In this step, we will create a new class model name "Student" and add properties corresponding to the columns of the table
To Create The New Model Class, Right Click on Model Folder, Click on Add And Then Select Class, Give The Name for New Model Class Then Click Add
After Creating New Model Class, Add the Properties According To The Table
using System.ComponentModel.DataAnnotations;
using System.ComponentModel.DataAnnotations.Schema;

namespace SanskariVidhyalayADO.Models
{
    public class Student
    {
        [Key]
        public int StudentID { get; set; }

        [Column("FirstName", TypeName = "VARCHAR(15)")]
        [Required]
        public string FirstName { get; set; }

        [Column("LastName", TypeName = "VARCHAR(15)")]
        [Required]
        public string LastName { get; set; }

        [Required]
        public int Standard { get; set; }

        [Column("Medium", TypeName = "VARCHAR(50)")]
        [Required]
        public string Medium { get; set; }

        [Column("DateOfBirth", TypeName = "VARCHAR(15)")]
        [Required]
        public string DateOfBirth { get; set; }

        [Column("MobileNumber", TypeName = "VARCHAR(12)")]
        [Required]
        public string MobileNumber { get; set; }

        [Column("AlternativeMobileNumber", TypeName = "VARCHAR(15)")]
        [Required]
        public string AlternativeMobileNumber { get; set; }

        [Column("Address", TypeName = "VARCHAR(50)")]
        [Required]
        public string Address { get; set; }

        [Column("City", TypeName = "VARCHAR(20)")]
        [Required]
        public string City { get; set; }

        [Column("Region", TypeName = "VARCHAR(15)")]
        [Required]
        public string Region { get; set; }

        [Column("PinCode", TypeName = "INT")]
        [Required]
        public int PinCode { get; set; }
    }
}
Step 8: Create the Database Access Class Named StudentDataAccessLayer
In this step, we will create a new class responsible for interacting with the database. This class will handle data operations such as retrieving, inserting, updating, and deleting records in the StudentInfo table.
We've Created The New Model Class For Data Access Name "StudentDataAccessLayer" Now We Are Going To Add Code In Class.
namespace SanskariVidhyalayADO.Models
{
    public class StudentAccessDataLayer
    {
        string connectionString = ConnectionString.CName;
        public IEnumerable<Student> GetAllStudent()
        {
            List<Student> lstStudent = new List<Student>();
            using (SqlConnection con = new SqlConnection(connectionString))
            {
                SqlCommand cmd = new SqlCommand("GetStudentInfo", con);
                cmd.CommandType = CommandType.StoredProcedure;
                con.Open();
                SqlDataReader rdr = cmd.ExecuteReader();

                while (rdr.Read())
                {
                    Student student = new Student();
                    student.StudentID = Convert.ToInt32(rdr["StudentID"]);
                    student.FirstName = rdr["FirstName"].ToString();
                    student.LastName = rdr["LastName"].ToString();
                    student.Standard = Convert.ToInt32(rdr["Standard"]);
                    student.Medium = rdr["Medium"].ToString();
                    student.DateOfBirth = rdr["DateOfBirth"].ToString();
                    student.MobileNumber = rdr["Mobile Number"].ToString();
                    student.AlternativeMobileNumber = rdr["Alternative Mobile Number"].ToString();
                    student.Address = rdr["Address"].ToString();
                    student.City = rdr["City"].ToString();
                    student.Region = rdr["Region"].ToString();
                    student.PinCode = Convert.ToInt32(rdr["PinCode"]);

                    lststudent.Add(student);
                }
                con.Close();
            }
            return lstStudent;
        }
    }
}
Explanation of the StudentAccessDataLayer Class Code
connectionString: A field holding the connection string retrieved from theConnectionString.CNameproperty.GetAllStudent: A method that retrieves all student records from the databaselstStudent: A list to store student records fetched from the database.SqlConnection con: Creates a new connection to the database using the connection string andconis a reference object of SqlConnection.SqlCommand cmd: Creates a command object to execute the stored procedure named"GetStudentInfo".con.Open(): Opens the database connection.SqlDataReader rdr: Executes the command and retrieves data from the database.rdris a reference object ofSqlDataReaderwhile (rdr.Read()): Loops through each record returned by the data readerStudent student: Creates a newStudentobject for each record andstudentis a object of Student Classstudent.Property = rdr["ColumnName"].ToString(): Maps each column from the database to the properties of theStudentobject.lstStudent.Add(student): Adds theStudentobject to the list.con.Close(): Closes the database connection.return lstStudent: Returns the list ofStudentobjects to the caller
For easier understanding, we have created the code syntax you can copy the provided syntax and paste it into your project. You may need to adjust it according to your specific table and class requirements
********** SYNTAX OF CODE **********
namespace WRITE_YOUR_NAMESPACE_NAME.Models
{
    public class WRITE_YOUR_DATA_ACCESS_CLASS_NAME
    {
        string connectionString = ConnectionString.CName;
        public IEnumerable<MODEL-CLASS-NAME> GetAllStudent()
        {
            List<MODEL-CLASS-NAME> lstStudent = new List<MODEL-CLASS-NAME>();
            using (SqlConnection con = new SqlConnection(connectionString))
            {
                SqlCommand cmd = new SqlCommand("WRITE-STORED-PROCCEDURE-NAME", con);
                cmd.CommandType = CommandType.StoredProcedure;
                con.Open();
                SqlDataReader rdr = cmd.ExecuteReader();

                while (rdr.Read())
                {
                    WRITE-MODEL-CLASS CREATE-OBJECT = new WRITE-MODEL-CLASS();
                    OBJECT.FIRST-PROPERTY(NOTE: THIS IS THE INT DATA TYPE PROPERTY) = Convert.ToInt32(rdr["FIRST-COLUMN-NAME"]);
                    OBJECT.SECOND-PROPERTY(NOTE: THIS IS THE STRING DATA TYPE PROPERTY) = rdr["SECOND-COLUMN-NAME"].ToString();
                    OBJECT.THIRD-PROPERTY = rdr["THIRD-COLUMN-NAME"].ToString();
                    OBJECT.FORTH-PROPERTY = Convert.ToInt32(rdr["FORTH-COLUMN-NAME"]);
                    OBJECT.FIFTH-PROPERTY = rdr["FIFTH-COLUMN-NAME"].ToString();
                    OBJECT.SIXTH-PROPERTY = rdr["SIXTH-COLUMN-NAME"].ToString();
                    OBJECT.SEVENTH-PROPERTY = rdr["SEVENTH-COLUMN-NAME"].ToString();
                    OBJECT.EIGHTH-PROPERTY = rdr["EIGHTH-COLUMN-NAME"].ToString();
                    OBJECT.NINTH-PROPERTY = rdr["NINTH-COLUMN-NAME"].ToString();
                    OBJECT.TENTH-PROPERTY = rdr["TENTH-COLUMN-NAME"].ToString();
                    OBJECT.ELEVENTH-PROPERTY = rdr["ELEVENTH-COLUMN-NAME"].ToString();
                    OBJECT.TWELVE-PROPERTY = Convert.ToInt32(rdr["TWELVE-COLUMN-NAME"]);
                }
                con.Close();
            }
            return lstStudent;
        }
    }
}
Step 9: Constructor Injection & Declaration of Private Readonly Field
In this step, you will modify the HomeController to include dependency injection for the StudentAccessDataLayer class. This allows the controller to use the data access layer to interact with the database.
public class HomeController : Controller
{
    public class HomeController : Controller
{
    private readonly ILogger<HomeController> _logger;
    private readonly StudentAccessDataLayer _studentAccessDataLayer;

    public HomeController(ILogger<HomeController> logger, StudentAccessDataLayer studentAccessDataLayer)
    {
        _logger = logger;
        _studentAccessDataLayer = studentAccessDataLayer;
    }
}
Explanation:
private readonly StudentAccessDataLayer _studentDataAccessLayer;: This field is used to store the injected instance ofStudentAccessDataLayer. It’s markedreadonlyto ensure it can only be set in the constructor and not modified later._studentDataAccessLayer = studentDataAccessLayer;: The constructor accepts aStudentAccessDataLayerparameter, which is automatically injected by the dependency injection system and this instance is assigned to the private field_studentDataAccessLayer
Step 10: Create an Action In Controller
In this step, we will add an action method in the HomeController to fetch and display data from the StudentInfo table from database. This action will use the StudentAccessDataLayer to retrieve data and pass it to the view. So, In this code we have created the action named Student and added the code
public IActionResult Student()
{
    var students = _studentAccessDataLayer.GetAllStudent();
    return View(students);
}
Explanation:
public IActionResult Student():Studentis the name of the action method. You can choose any name that is meaningful for your purposevar students = _studentDataAccessLayer.GetAllStudent();: Calls theGetAllStudentmethod ofStudentAccessDataLayerto get the list of students from the databasereturn View(students);Returns the list ofStudentobjects to the caller.
Step 10: Register StudentAccessDataLayer Class in Program.cs
To ensure that the StudentAccessDataLayer class is available for dependency injection throughout your application, you need to register it in the Program.cs file. This step is essential for enabling the ASP.NET Core DI (Dependency Injection) system to inject instances of this class where needed, such as in your controllers.
builder.Services.AddScoped<StudentAccessDataLayer>();

var app = builder.Build();
Explanation:
AddScoped<StudentAccessDataLayer>();registers theStudentAccessDataLayerclass with a scoped lifetime. This means that a new instance ofStudentAccessDataLayerwill be created for each request.
Step 11: Create the View to Display All Student Data
In this step, we'll create a view that will display the student data retrieved from the database using the StudentAccessDataLayer. This view will be associated with the Student action you created in the HomeController.
In Solution Explorer, right-click on the Home folder in View Folder, select Add > View, and choose Razor View Empty. And Name it Same as Your Action Which We Generated In The Home Controller
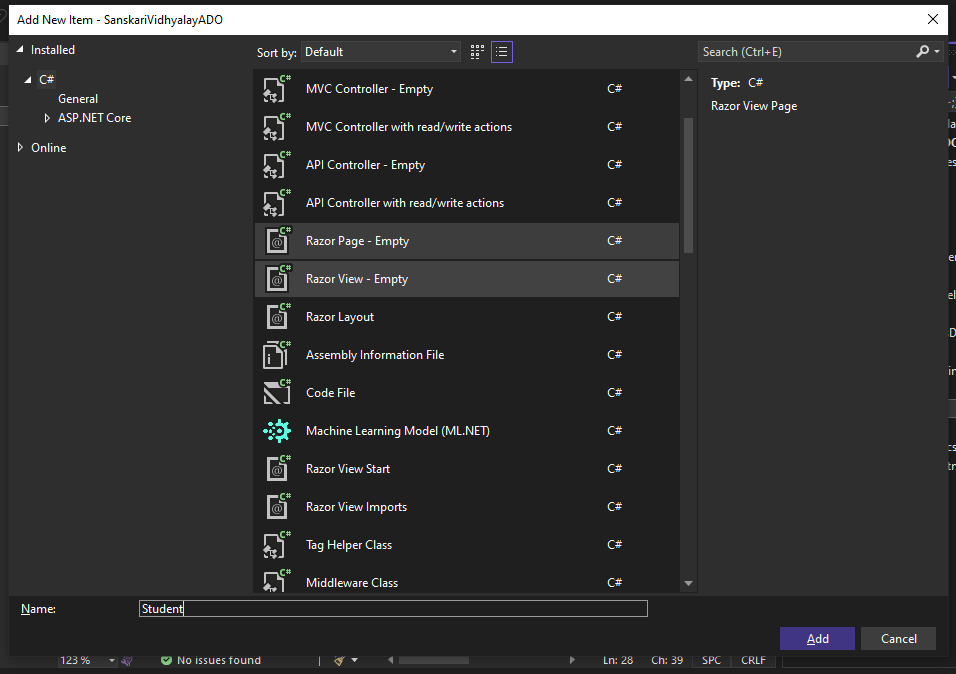
We Created New View Page, Now We Will Write CSHTML Code In Our View Page
@model List<Student>
<div class="container bg-light p-4 rounded mt-4">
    <div class="jumbotron text-center bg-primary text-white p-5 rounded">
        <h1 class="display-4">Admin Panel</h1>
        <p class="lead">View and Manage Student Data</p>
    </div>
    <br />
    <table id="studentTable" class="table table-bordered display">
        <thead>
            <tr class="bg-light text-black">
                <th>ID</th>
                <th>First Name</th>
                <th>Last Name</th>
                <th>Standard</th>
                <th>Medium</th>
                <th>Date of Birth</th>
                <th>Mobile Number</th>
                <th>Alternative Mobile Number</th>
                <th>Address</th>
                <th>City</th>
                <th>Region</th>
                <th>Postal Code</th>
            </tr>
        </thead>
        <tbody>
            @foreach (var data in Model)
            {
                <tr class="bg-light">
                    <td>@data.StudentID</td>
                    <td>@data.FirstName</td>
                    <td>@data.LastName</td>
                    <td>@data.Standard</td>
                    <td>@data.Medium</td>
                    <td>@data.DateOfBirth</td>
                    <td>@data.MobileNumber</td>
                    <td>@data.AlternativeMobileNumber</td>
                    <td>@data.Address</td>
                    <td>@data.City</td>
                    <td>@data.Region</td>
                    <td>@data.PinCode</td>
                </tr>
            }
        </tbody>
    </table>
    <br />
</div>
Explanation:
@model List<Student>: The view is strongly typed to aList<Student>model, which means it expects to receive a list ofStudentobjects. TheseStudentobjects are typically passed from theHomeControllerto the view
2. @foreach (var data in Model): loop in your Razor view iterates over each item in the Model, which is a List<Student>. For each Student object in the list, the loop creates a table row (<tr>) and fills the table cells (<td>) with the student's properties (like StudentID, FirstName, etc.). This allows the view to dynamically display the student data in an HTML table.
Now our code is complete, we can run the project
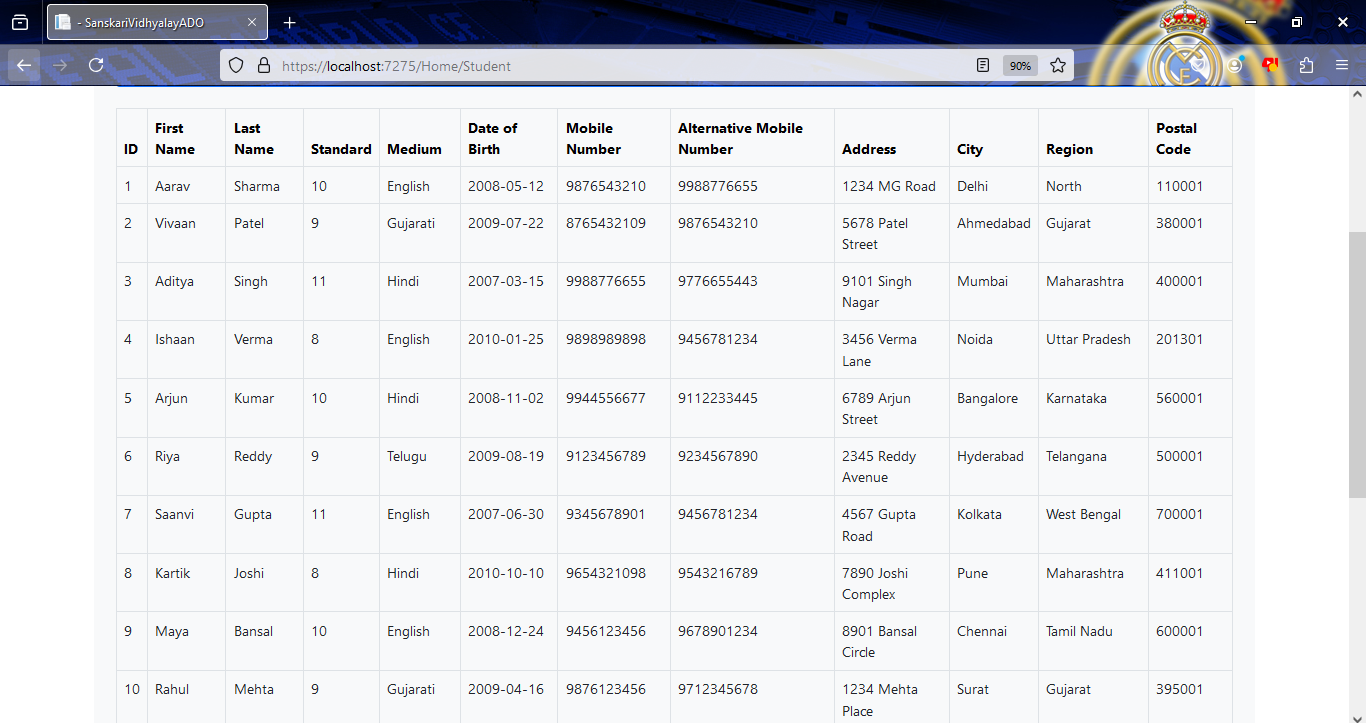
After running the project, Do search of your Action name in Header and then press Enter

After Pressing Enter, You Will See Your All Data on Display
Thank you for following along with our step-by-step guide on integrating ADO.NET with ASP.NET Core MVC! We hope you found this tutorial helpful in learning how to retrieve and display data from a database. If you have any questions or feedback, feel free to reach out. Happy coding!
Subscribe to my newsletter
Read articles from Rohit Surwade directly inside your inbox. Subscribe to the newsletter, and don't miss out.
Written by

Rohit Surwade
Rohit Surwade
’m a Full Stack Developer with expertise in C# and the ASP.NET framework.