A Step by Step Guide to Kmeans Clustering in Machine Learning
 Arbash Hussain
Introduction
Welcome to the seventh blog post in our machine learning series! Today, we will explore Kmeans Clustering and break down the concept into simple, easy-to-understand terms. As always, we will also implement this algorithm from scratch in Python. By the end of this blog, you will have a comprehensive understanding of Kmeans Clustering, its mathematical intuition, and when to use it.
What is Kmeans Clustering?
Clustering is a technique in machine learning where the goal is to group a set of objects in such a way that objects in the same group (called a cluster) are more similar to each other than to those in other groups. This is particularly useful when you have a large dataset and want to identify natural groupings within the data without any prior labels.
There are several types of clustering methods, including hierarchical clustering, density-based clustering, and partitioning clustering. Each method has its own way of defining and finding clusters.
Kmeans Clustering is a type of partitioning clustering. In partitioning clustering, the data is divided into a predefined number of clusters. The Kmeans algorithm specifically works by partitioning the data into K clusters, where K is a user-defined parameter.
Imagine a classroom where students naturally form groups. Some students sit together because they are friends, some because they are from the same class, and others because they share common interests like playing the same sport. Now, let’s say we want to identify these groups without knowing anything about the students beforehand. This is where Kmeans clustering comes in.
Decide on the Number of Groups (K): First, we decide how many groups (or clusters) we think exist in the classroom. Let’s say we believe there are 3 main groups: friends, classmates, and sports buddies. So, K = 3.
Place the "Group Centers" (Centroids): Imagine placing 3 random chairs (representing the centroids) in the classroom. These chairs don’t belong to any particular student yet. The idea is to eventually have each chair represent the center of a group of students.
Assign Students to the Nearest Chair: Each student now goes and sits in the chair that is closest to them. This means students who are close to each other, say friends or classmates, will likely go to the same chair.
Adjust the Chairs (Recalculate Centroids): After all the students have chosen a chair, we notice that some chairs might be in the wrong place. So, we move each chair to the center of the group of students sitting around it. This is like finding the "average" location of all the students in that group.
Reassign Students: Now that the chairs (centroids) have moved, some students might find a different chair closer to them. They will switch to that chair.
Repeat Until No One Moves: We keep moving the chairs and reassigning students until no one switches chairs anymore. When that happens, the groups are final, and we’ve successfully identified clusters of students who are most similar (e.g., friends, classmates).
At the end of this process, students sitting in the same cluster (group) are likely to be similar in some way—just like how Kmeans clusters data points that are similar into groups.
This is essentially how K-Means clustering works! It groups similar items together based on their characteristics, even when we don’t have any prior labels or categories for those items.
Kmeans Clustering for Regression and Classification
Although Kmeans is typically used for clustering, it can also help in regression and classification tasks by preprocessing the data.
For Regression: You can cluster data points and then fit a regression model to each cluster. This way, each cluster can have its own regression line, improving the model's accuracy.
For Classification: Kmeans can be used to create labels for unlabeled data. Once the data is clustered, you can assign a label to each cluster and use these labels for classification.
Mathematical Intuition
For Regression: Suppose you have a dataset with points spread out. Kmeans will try to minimize the sum of squared distances between each point and its nearest centroid. This process helps in grouping similar data points, which can then be used for regression.
For Classification: Kmeans minimizes the within-cluster variance, which means it reduces the differences between points within the same cluster. This is useful in classification as it helps to group similar instances, which can later be labeled for training a classifier.
Hyperparameters in Kmeans Clustering
Some of the few key hyperparameters of Kmeans are:
K (Number of Clusters): This is the number of groups you want to divide your data into. Choosing the right value of K is crucial as it directly affects the clustering result. Elbow and Silhouette are some methods that help in finding the K value.
Max Iterations: This is the maximum number of times the algorithm will run through the process of assigning points to clusters and updating centroids.
Plot Steps (Optional): If set to True, the algorithm will visualize the steps it takes during the clustering process.
Implementation Steps
Euclidean Distance Function:
 def euclidean_distance(x1, x2):
     return np.sqrt(np.sum((x1-x2)**2))
This function calculates the straight-line distance between two points. It's used to find the closest centroid to each data point.
Initialization:
 class KMeans:
     def __init__(self, K=5, max_iters=100):
         self.K = K
         self.max_iters = max_iters
         # list of sample indices for each cluster
         self.clusters = [[] for _ in range(self.K)]
         # the centers of each cluster
         self.centroids = []
Here, the
KMeansclass is initialized with the number of clusters (K), maximum iterations (max_iters).Predict Function:
 def predict(self, X):
         self.X = X
         self.n_samples, self.n_features = X.shape

         # initialize by selecting random samples as centroids
         random_sample_idxs = np.random.choice(self.n_samples, self.K, replace=False)
         self.centroids = [self.X[idx] for idx in random_sample_idxs]

         # optimize clusters
         for _ in range(self.max_iters):
             # assign samples to closest centroids (create clusters)
             self.clusters = self._create_clusters(self.centroids)

             # calculate new centroids from the clusters
             old_centroids = self.centroids
             self.centroids = self._get_new_centroids(self.clusters)

             if self._is_converged(old_centroids, self.centroids):
                 break

         # label the samples with their cluster index
         return self._get_cluster_labels(self.clusters)
This function predicts which cluster each data point belongs to. It starts by randomly choosing centroids, then iteratively assigns points to the nearest centroid and updates the centroids.
Get Cluster Labels:
 def _get_cluster_labels(self, clusters):
         # each sample will get the label of the cluster it was assigned to
         labels = np.empty(self.n_samples)
         for cluster_idx, cluster in enumerate(clusters):
             for sample_idx in cluster:
                 labels[sample_idx] = cluster_idx

         return labels
This function assigns a label to each data point based on the cluster it belongs to.
Create Clusters:
 def _create_clusters(self, centroids):
         # assign the samples to the closest centroids
         clusters = [[] for _ in range(self.K)]
         for idx, sample in enumerate(self.X):
             centroid_idx = self._closest_centroid(sample, centroids)
             clusters[centroid_idx].append(idx)
         return clusters
This function assigns each data point to the closest centroid, forming clusters.
Closest Centroid:
 def _closest_centroid(self, sample, centroids):
         # distance of the current sample to each centroid
         distances = [euclidean_distance(sample, point) for point in centroids]
         closest_idx = np.argmin(distances)
         return closest_idx
This function finds the nearest centroid to a given data point.
Update Centroids:
 def _get_new_centroids(self, clusters):
         # assign mean value of clusters to centroids
         centroids = np.zeros((self.K, self.n_features))
         for cluster_idx, cluster in enumerate(clusters):
             cluster_mean = np.mean(self.X[cluster], axis=0)
             centroids[cluster_idx] = cluster_mean
         return centroids
This function calculates the new centroids by taking the mean of all points in each cluster.
Check Convergence:
 def _is_converged(self, old_centroids, centroids):
         # distances between old and new centroids, if no change, then we have converged
         distances = [
             euclidean_distance(old_centroids[i], centroids[i]) for i in range(self.K)
         ]
         return sum(distances) == 0
This function checks if the centroids have stopped moving, meaning the algorithm has converged.
Plotting:
 def plot(self):
         _, ax = plt.subplots(figsize=(12, 8))

         for i, index in enumerate(self.clusters):
             point = self.X[index].T
             ax.scatter(*point)

         for point in self.centroids:
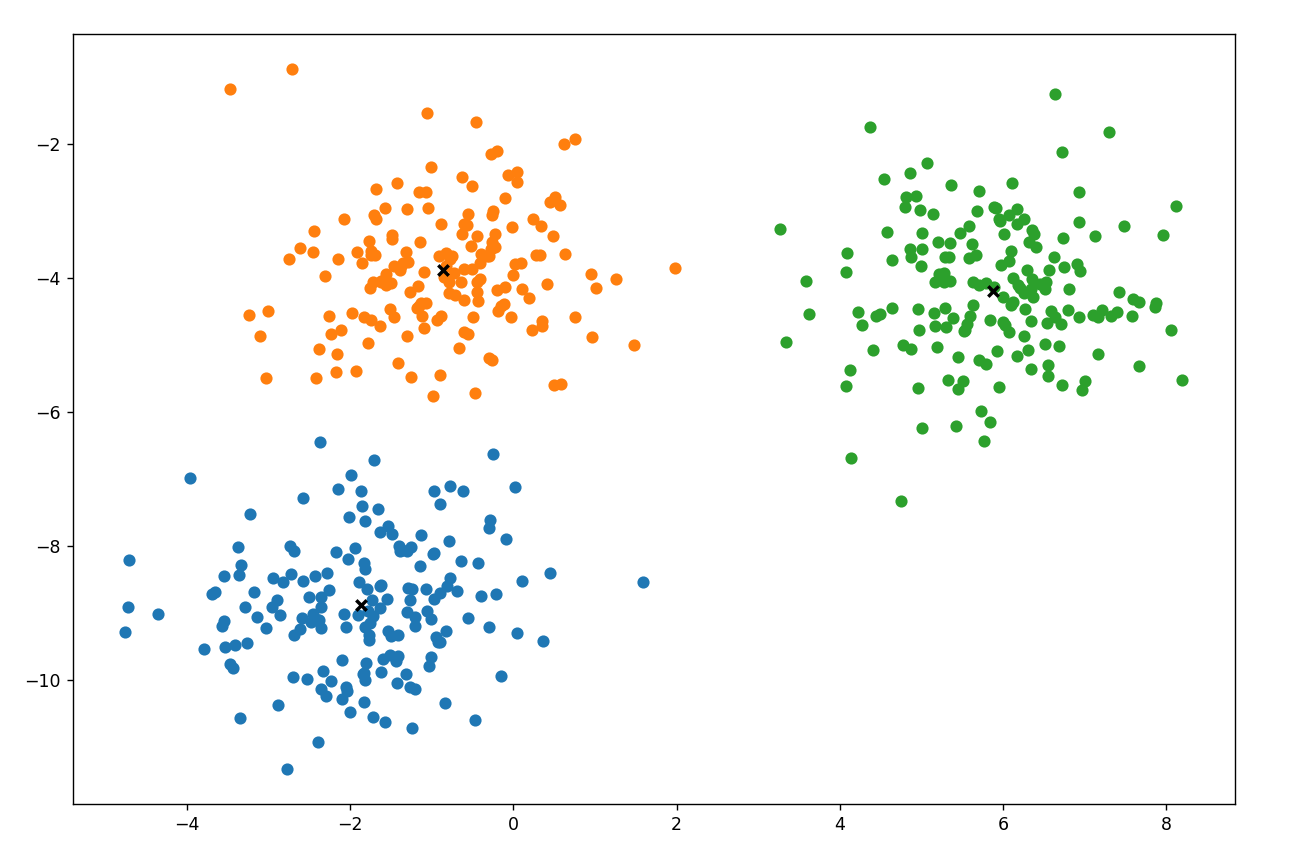
             ax.scatter(*point, marker="x", color="black", linewidth=2)

         plt.show()
Testing
if __name__ == "__main__":
    np.random.seed(42)
    from sklearn.datasets import make_blobs
    X, y = make_blobs(
        centers=3, n_samples=500, n_features=2, shuffle=True, random_state=40
    )
    print(X.shape)
    clusters = len(np.unique(y))
    print(clusters)
    k = KMeans(K=clusters, max_iters=150)
    y_pred = k.predict(X)
    k.plot()
Output

Common Misconceptions about Kmeans Clustering
Misconception: Kmeans always finds the best clustering.
Truth: Kmeans can converge to different results depending on the initial choice of centroids. It might not always find the global optimum.
Misconception: The value of K is always obvious.
Truth: Choosing the right K is often challenging and may require experimentation or techniques like the elbow method.
When to Apply Kmeans Clustering
When you have unlabeled data and want to find natural groupings.
When you need a simple and fast clustering algorithm.
When your data has a roughly spherical distribution.
Advantages of Kmeans Clustering
Simple to implement.
Scales well to large datasets.
Generally fast, especially when K is small.
Disadvantages of Kmeans Clustering
Sensitive to the initial placement of centroids.
Struggles with clusters of different sizes and densities.
Requires you to specify the number of clusters (K) upfront.
Practical Applications
Image Compression: Kmeans is used to reduce the number of colors in an image by clustering similar colors together.
Customer Segmentation: Businesses use Kmeans to group customers based on purchasing behavior.
Document Clustering: Kmeans can organize a large collection of documents into topics.
Conclusion
I hope this guide is useful to you. If so, please like and follow to stay updated with my latest posts. You can also check out my other blogs in my series on machine learning algorithms, where I explore various other algorithms and their applications. Additionally, I encourage you to explore more clustering algorithms based on hierarchy and density, as they offer unique advantages and can be particularly effective for different types of data. Your feedback and engagement are highly appreciated, so feel free to share your thoughts or ask questions in the comments section.
Subscribe to my newsletter
Read articles from Arbash Hussain directly inside your inbox. Subscribe to the newsletter, and don't miss out.
Written by

Arbash Hussain
Arbash Hussain
I'm a Computer Science Engineer with a passion for data science and AI. My interest for computer science has motivated me to work with various tech stacks like Flutter, Next.js, React.js, Pygame and Unity. For data science projects, I've used tools like MLflow, AWS, Tableau, SQL, and MongoDB, and I've worked with Flask and Django to build data-driven applications. I'm always eager to learn and stay updated with the latest in the field. I'm looking forward to connecting with like-minded professionals and finding opportunities to make an impact through data and AI.