Angular’s Backyard: The Resolving of Components Dependencies
 freeCodeCamp
By Dor Moshe
This article originally appeared on dormoshe.io
Many of us use the Hierarchical Dependency Injection mechanism of Angular. We use it through a service or a component to resolve another service or provider. But, do we know what Angular does in order to resolve the dependencies? Probably not, because Angular takes care of what we need to use it as a black box.
In this article, we’ll open the black box and explore the code of the component dependencies resolution mechanism.
Back to the basics
Dependency Injection (DI) is a powerful pattern for managing code dependencies. Angular’s DI system creates and delivers dependent services “just-in-time”. Angular has its own DI framework, and we can’t build an Angular application without it.
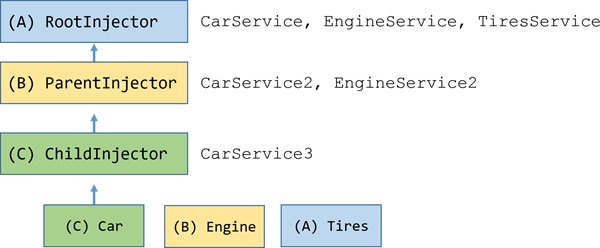
The Angular DI system is actually a Hierarchical system. This system supports nested injectors in parallel with the component tree. An injector creates dependencies using providers. We can reconfigure the injectors at any level of that component tree. Behind the scenes, each component sets up its own injector with zero, one, or more providers defined for that component itself.
 A mini Angular injectors tree
Resolution Order
The hierarchical DI has an order to the resolution of the dependencies. When a component requests a dependency, if it exists in the @Component.providers array (the component injector), then this dependency will be supplied.
Elsewhere, Angular continues to the parent component injector and checks again and again. If Angular doesn’t find an ancestor, it will supply this dependency via the application main injector. This is the core concept of the hierarchical DI mechanism.
Let’s see the code
When Angular instantiates a component, it calls the resolveDep function. This function's signature contains the component view container, the element, the dependency definition and some more arguments. We will focus on the component view and the dependency object. The dependency object contains only one dependency of the component.
Here is the resolveDep function skeleton from the Angular GitHub repository:
The function skeleton contains the main concepts of the resolution, without the edge cases. The full code can be found here. In the next parts, we will explore the function skeleton.
Pausa
The Exclamation mark is a new feature of Typescript 2.0. The ! post-fix expression operator may be used to assert that its operand is non-null and non-undefined in contexts where the type checker is unable to conclude that fact. Angular uses this feature frequently, so we should not be afraid.
Part 1 — Preparation
The const startView = view; code saves the original view (the view container of the component) in a variable because the view variable will change soon.
The const tokenKey = depDef.tokenKey; code fetches the tokenKey or the dependency key, for example, HeroService_4. This key builds by the dependency name and a generated number to handle the dependency uniquely.
Part 2 —Source component and Ancestors search
The while loop implements the stages of checking the source @Component.providers and the ancestor components.
According to the dependency token key, the source component providers will be checked in lines 1–3:
If the provider exists on line 4, then the source component satisfies the dependency. So, if the dependency was instantiated in the past on line 6, the instance will return by the resolveDep function at line 10. If this is the first time that the component or its children ask for the dependency it will be created at line 7 and will return by the resolveDep function at line 10.
If the dependency is not found in the view component injector, theelDef = viewParentEl(view) !; and view = view.parent !; will be called to advance the variable to the parent element. The while loop will continue running until the dependency is found in the ancestor injector. If the dependency is still not found after checking all ancestors, the while loop will end and the third part will come into action.

Part 3 — Root injector
If come to this part, the dependency can’t be satisfied by any of the component ancestors injectors. Then the startView or the source component will be checked at line 1:
If the source component or one of its ancestor components was loaded by the Router Outlet (the router component), the root injector is the Outlet Injector. This injector supplies some dependencies like the Router service. Otherwise, the root injector is the bootstrap component’s injector.
If the dependency is found at line 3, then the value will be returned by the resolveDep function. In the other case, part 4 will come into action.
Part 4 — Application module injector
When we come to this part, it means that the dependency can’t be satisfied by part 2 and part 3. This is the last chance to satisfy the dependency. This part’s code tries to get the dependency from the application module injector or the root module. This module contains the application-wide dependencies:return startView.root.ngModule.injector.get(depDef.token,notFoundValue);
This part finishes the resolveDep flow. If the dependency is not found, then Angular can’t satisfy this dependency and it should throw an exception.
Conclusion
The Hierarchical DI is a core feature that Angular leans on a lot. Sometimes, the resolution process looks complicated and long. It’s very convenient to leave Angular to manage this flow and enjoy the ease of use. Now, after we hiked in the backyard of the component dependency resolution, we know what to expect when we use it.

You can follow me on dormoshe.io or Twitter to read more about Angular, JavaScript and web development.
Subscribe to my newsletter
Read articles from freeCodeCamp directly inside your inbox. Subscribe to the newsletter, and don't miss out.
Written by

freeCodeCamp
freeCodeCamp
Learn to code. Build projects. Earn certifications—All for free.