How I used Deep Learning to classify medical images with Fast.ai
 freeCodeCamp
By James Dietle
Convolutional Neural Networks (CNNs) have rapidly advanced the last two years helping with medical image classification. How can we, even as hobbyists, take these recent advances and apply them to new datasets? We are going to walk through the process, and it’s surprisingly more accessible than you think.
As our family moved to Omaha, my wife (who is in a fellowship for pediatric gastroenterology) came home and said she wanted to use image classification for her research.
Oh, I was soooo ready.
For over two years, I have been playing around with deep learning as a hobby. I even wrote several articles (here and here). Now I had some direction on a problem. Unfortunately, I had no idea about anything in the gastrointestinal tract, and my wife hadn’t programmed since high school.
Start from the beginning
My entire journey into deep learning has been through the Fast.ai process. It started 2 years ago when I was trying to validate that all the “AI” and “Machine Learning” we were using in the security space wasn’t over-hyped or biased. It was, and we steered clear from those technologies. The most sobering fact was learning that being an expert in the field takes a little experimentation.
Setup
I have used Fast.ai for all the steps, and the newest version is making this more straightforward than ever. The ways to create your learning environment are proliferating rapidly. There are now docker images, Amazon amis, and services (like Crestle) that make it easier than ever to set up.
Whether you are the greenest of coding beginners or experienced ninja, start here on the Fast.ai website.
I opted to build my machine learning rig during a previous iteration of the course. However, it is not necessary, and I would recommend using another service instead. Choose the easiest route for you and start experimenting.
Changes to Fast.ai with version 3
I have taken the other iterations of Fast.ai, and after reviewing the newest course, I noticed how much more straightforward everything was in the notebook. Documentation and examples are everywhere.
Let’s dive into “lesson1-pets”, and if you have setup Fast.ai feel free to follow along in your personal jupyter instance.

I prepared for the first lesson (typically defining between 2 classes — cats and dogs — as I had many times before. However, I saw this time that we were doing something much more complex regarding 33 breeds of cats and dogs using fewer lines of code.
The CNN was up and learning in 7 lines of code!!
That wasn’t the only significant change. Another huge stride was in showing errors. For example, we could quickly see a set of the top losses (items we confidently predicted wrong) and corresponding pet pictures from our dataset below.
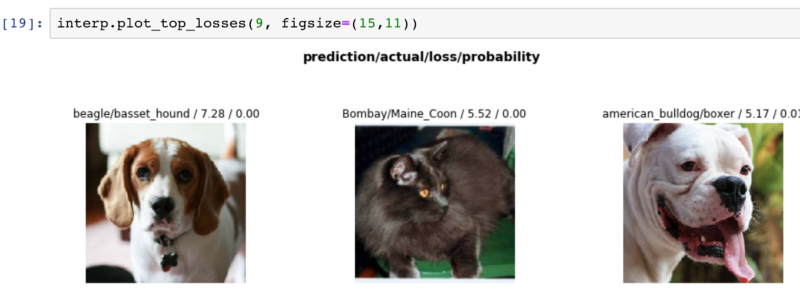
This function was pretty much a spot check for bad data. Ensuring a lion, tiger, or bear didn’t sneak into the set. We could also see if there were glaring errors that were obvious to us.
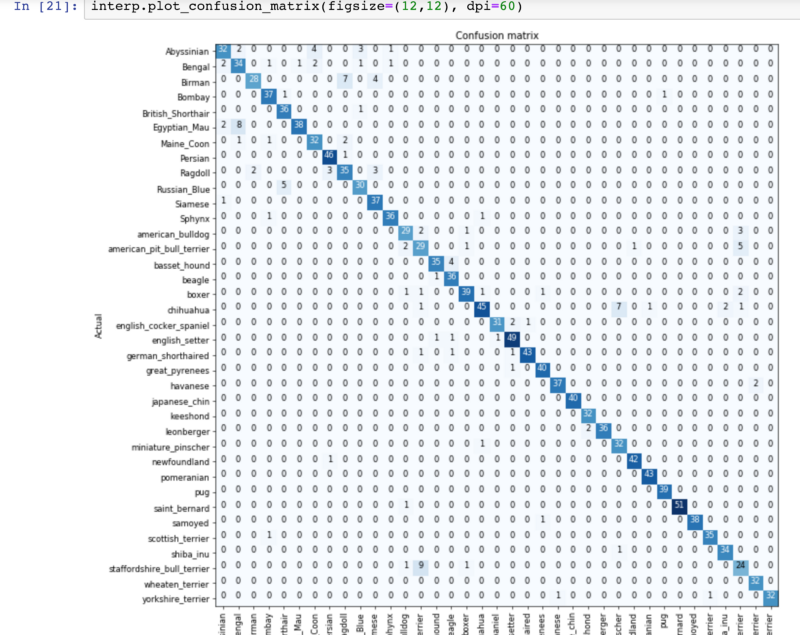
The confusion matrix was even more beneficial to me. It allowed me to look across the whole set for patterns in misclassification between the 33 breeds.
Of the 33 breeds presented, we could see where our data diverged and ask ourselves if it made sense. A few breeds popped out in particular, and here are examples of the commonly confused images:
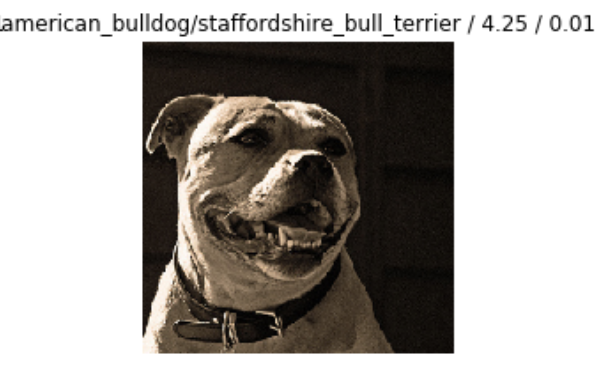

Not being a pet owner or enthusiast, I wouldn’t have be able to figure out these subtle details out about a breed’s subtle features. The model is doing a much better job than I would’ve been able to do! While I am certainly getting answers, I am also curious to find that missing feature or piece of data to improve the model.
There is an important caveat. We are now at the point where the model is teaching us about the data. Sometimes we can get stuck in a mindset where the output is the end of the process. If we fall into that trap, we might miss a fantastic opportunity to create a positive feedback loop.
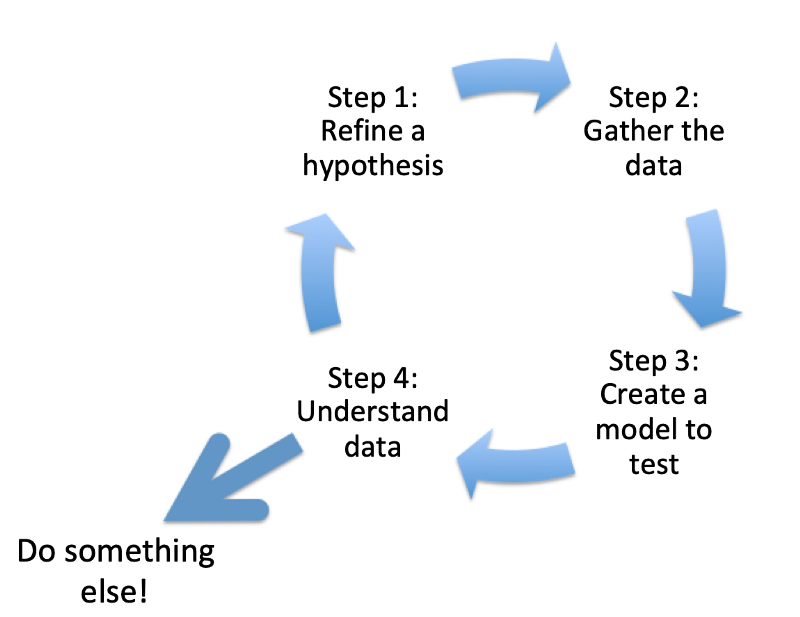
Therefore, we are sitting a little wiser and little more confident in the 4th phase. Given this data, what decisions should I improve accuracy with?
- More training
- More images
- More powerful architecture
Trick question! I am going to look at a different dataset. Let’s get up and personal with endoscope images of people’s insides.
Get the dataset, see a whole lot of sh… stuff
For anyone else interested in gastroenterology I recommend looking into The Kvasir Dataset. A good description from their site is:
the dataset containing images from inside the gastrointestinal (GI) tract. The collection of images are classified into three important anatomical landmarks and three clinically significant findings. In addition, it contains two categories of images related to endoscopic polyp removal. Sorting and annotation of the dataset is performed by medical doctors (experienced endoscopists)
There is also a research paper by experts (Pogorelov et al.) describing how they tackled the problem, which includes their findings.
Perfect, this is an excellent dataset to move from pets to people. Although a less cuddly dataset (that also includes stool samples) it is something exciting and complete.
As we download the data, the first thing we notice is that there are 8 classes in this dataset for us to classify instead of the 33 from before. However, it shouldn’t change any of our other operations.
Side Note: Originally, I spent a few hours scripting out how to move folders into validation folders, and spent some good time setting everything up. The scripting effort turned out to be a waste of time because there is already a simple function to create a validation set.
The lesson is “if something is a pain, chances are someone from the Fast.ai community has already coded it for you.”
Diving into the notebook
You can pick up my Jupyter notebook from GitHub here.
Building for speed and experimentation
As we start experimenting, it is crucial to get the framework correct. Try setting up the minimum needed to get it working that can scale up later. Make sure data is being taken in, processed, and provides outputs that make sense.
This means:
- Use smaller batches
- Use lower numbers of epochs
- Limit transforms
If a run is taking longer than 2 minutes, figure out a way to go faster. Once everything is in place, we can get crazy.
Data Handling
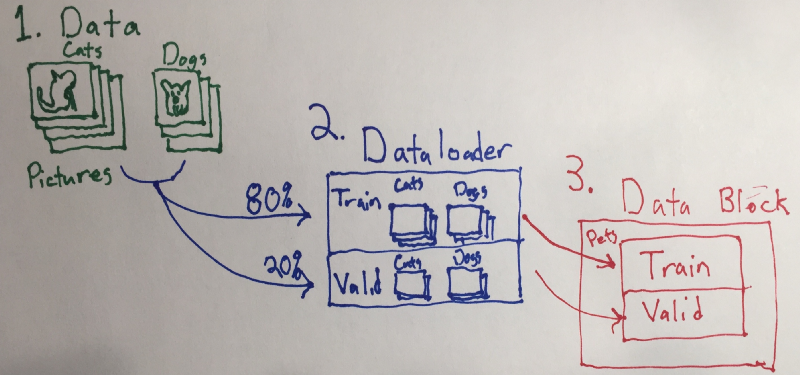
Data prioritization, organization, grooming, and handling is the most important aspect of deep learning. Here is a crude picture showing how data handling occurs, or you can read the documentation.
Therefore we need to do the same thing for the endoscope data, and it is one line of code.
Explaining the variables:
- Path points to our data (#1)
- The validation set at 20% to properly create dataloaders
- default transforms
- the image size set at 224
That’s it! The data block is all set up and ready for the next phase.
Resnet
We have data and we need to decide on an architecture. Nowadays Resnet is popularly used for image classification. It has a number after it which equates to the number of layers. Many better articles exist about Resnet, therefore, to simplify for this article:
More layers = more accurate (Hooray!)
More layers = more compute and time needed (Boo..)
Therefore Resnet34 has 34 layers of image finding goodness.
Ready? I’m ready!
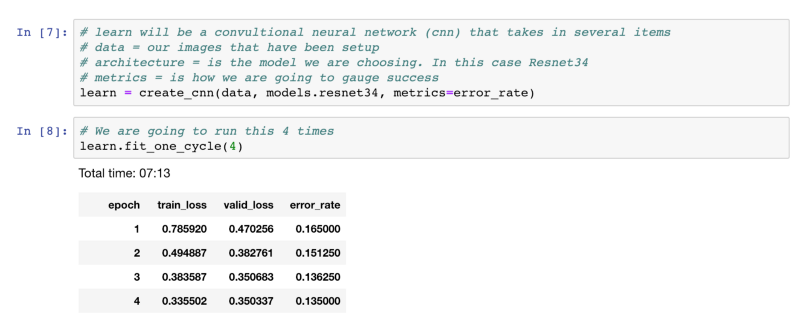
With the structured data, architecture, and a default error metric we have everything we need for the learner to start fitting.
Let’s look at some code:
We see that after the cycles and 7 minutes we get to 87% accuracy. Not bad. Not bad at all.
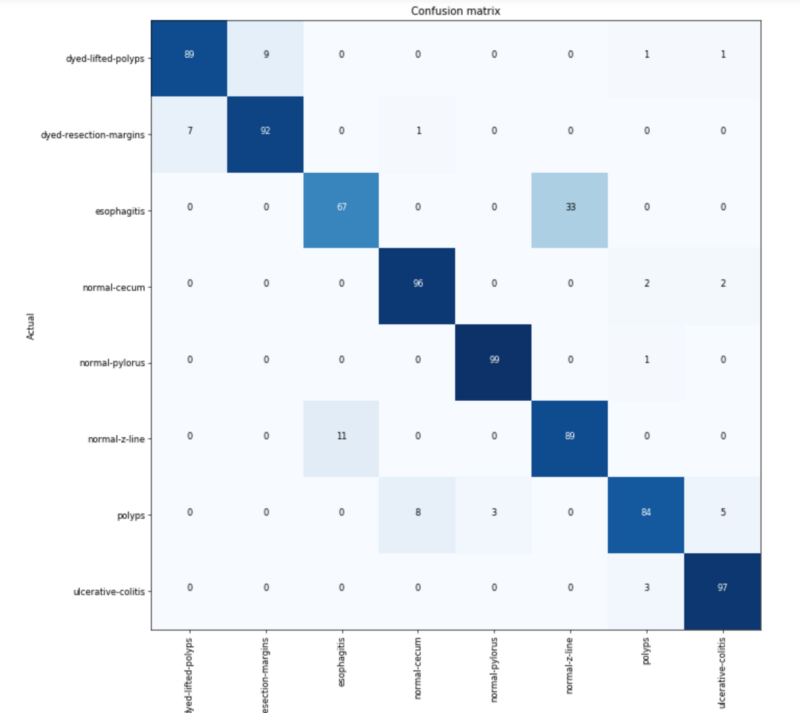
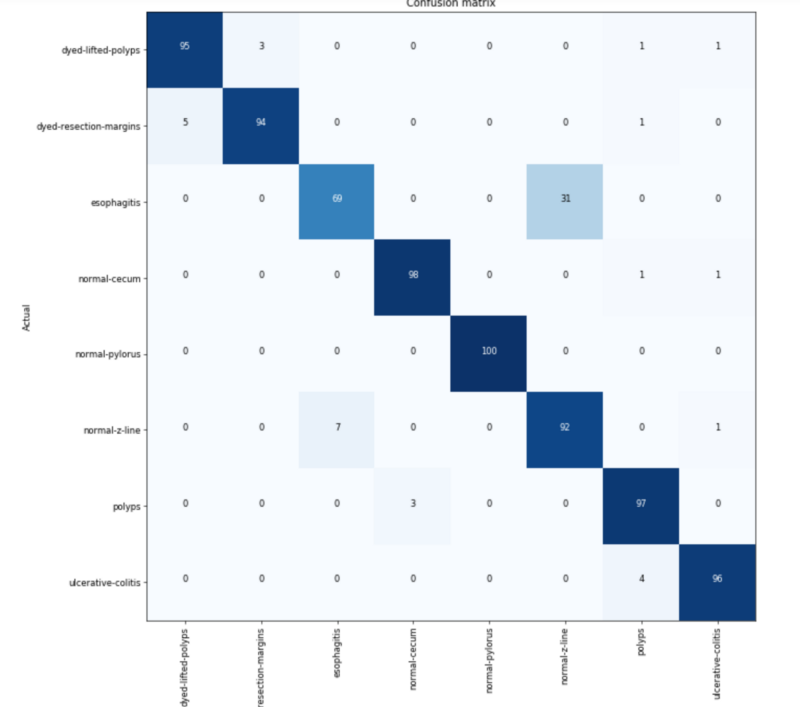
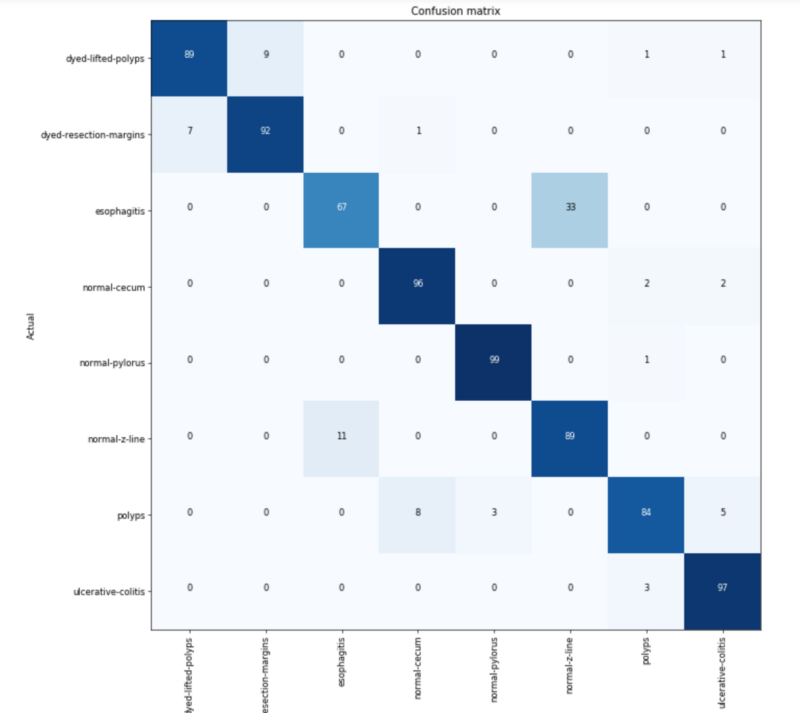
Not being a doctor, I have a very untrained eye looking at these. I have no clue what to be looking for, categorization errors, or if the data is any good. So I went straight to the confusion matrix to see where mistakes were being made.
Of the 8 classes, 2 sets of 2 are often confused with each other. As a baseline, I could only see if they are dyed, polyps, or something else. So compared to my personal baseline of 30% accuracy, the machine is getting an amazing 87%.
After looking at the images from these 2 sets side by side, you can see why. (Since they are medical images, they might be NSFW and are present in the Jupyter notebook.)
- The dyed sections are being confused with each other. This type of error can be expected. They are both blue and look very similar to each other.
- Esophagitis is hard to tell from a normal Z-line. Perhaps esophagitis presents redder than Z-line? I’m not certain.
Regardless, everything seems great, and we need to step up our game.
More layers, more images, more power!
Now that we see our super fast model working, let’s switch over to the powerhouse.
- I increased the size of the dataset from v1 to v2. The larger set doubles the number of images available from 4000 to 8000. (Note: All examples in this article show v2.)
- Transform everything that makes sense. There are lots of things you can tweak. We are going to go into more of this shortly.
- Since the images from the dataset are relatively large, I decided to try making the size bigger. Although this would be slower, I was curious if it would be better able to pick out little details. This hypothesis still requires some experimentation.
- More and more epochs.
- If you remember from before, Resnet50 would have more layers (be more accurate) but would require more compute time and therefore be slower. So we will change the model from Resnet34 to Resnet50.
Transforms: Getting the most of an image
Image transforms are a great way to improve accuracy. If we make random changes to an image (rotate, change color, flip, etc.) we can make it seem like we have more images to train from and we are less likely to overfit. Is it as good as getting more images? No, but it’s fast and cheap.
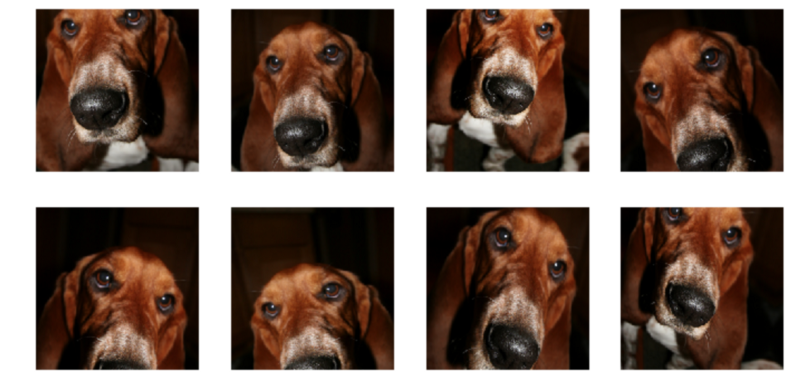
When choosing which transforms to use, we want something that makes sense. Here are some examples of normal transforms of the same image if we were looking at dog breeds. If any of these individually came into the dataset, we would think it makes sense. Putting in transforms we now we have 8 images instead for every 1.
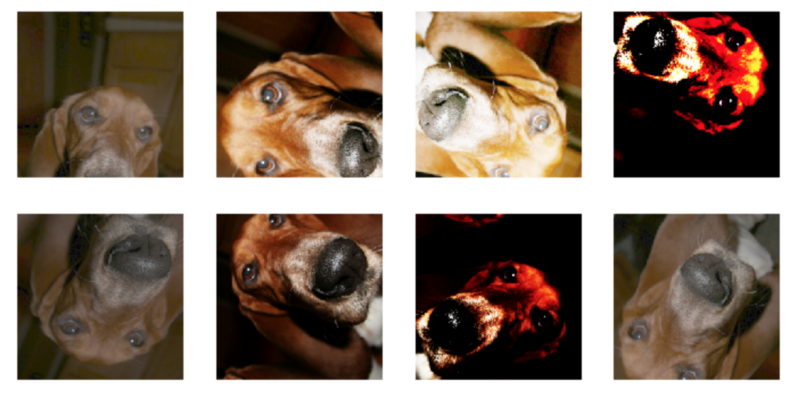
What if in the transformation madness we go too far? We could get the images below that are a little too extreme. We wouldn’t want to use many of these because they are not clear and do not correctly orient in a direction we would expect data to come in. While a dog could be tilted, it would never be upside down.
For the endoscope images, we are not as concerned about it being upside down or over tilted. An endoscope goes all over the place and can have a 360-degree rotation here, so I went wild with rotational transforms. Even a bit with the color as the lighting inside the body would be different. All of these seem to be in the realm of possibility.
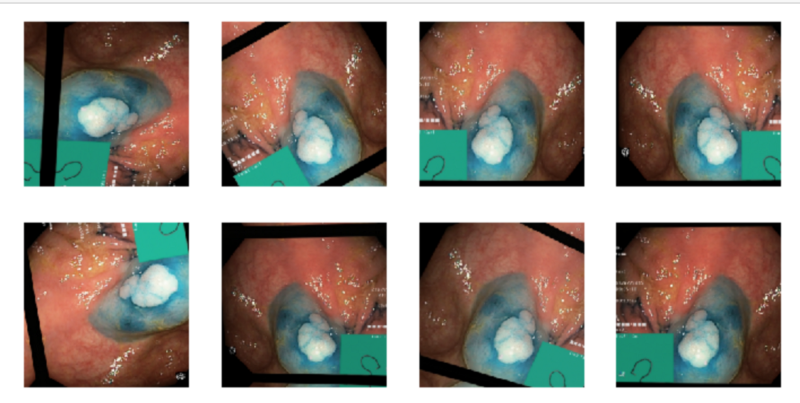
(Note: the green box denotes how far the scope traveled. Therefore, this technique might be cutting off the value that could have provided.)
Reconstructing data and launching
Now we can see how to add transforms and how we would shift other variables for data:
Then we change the learner:

Then we are ready to fire!
Many epochs later…

93% accurate! Not that bad, let’s look a the confusion matrix again.
It looks like the problem with dyed classification has gone away, but the esophagitis errors remain. In fact, the numbers of errors get worse in some of my iterations.
Can this run in production?
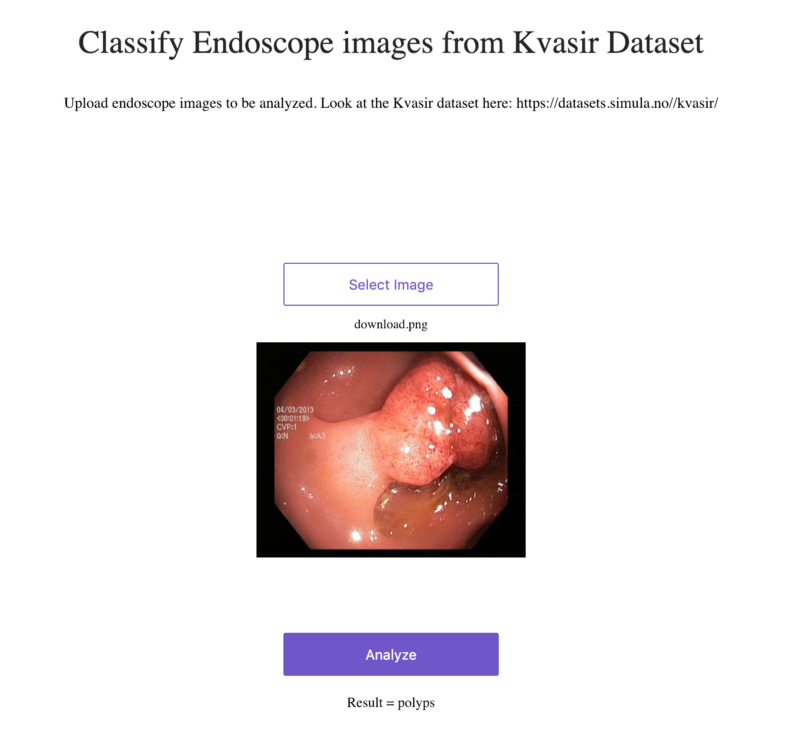
Yes, there are instructions to quickly host this information as a web service. As long as the license isn’t up and you don’t mind waiting… you can try it on Render right here!
Conclusion and Follow-up:
As you can see, it is straightforward to transfer the new course from Fast.ai to a different dataset. Much more accessible than ever before.
When going through testing, make sure you start with a fast concept to make sure everything is on the right path, then turn up the power later. Create a positive feedback loop to make sure you are both oriented correctly and as a mechanism to force you to learn more about the dataset. You will have a much richer experience in doing so.
Some observations on this dataset.
- I am trying to solve this problem wrong. I am using a single classifier when these slides have multiple classifications. I discovered this later while reading the research paper. Don’t wait until the end to read papers!
- As a multi-classification problem, I should be including bounding boxes for essential features.
- Classifications can benefit from a feature describing how far the endoscope is in the body. Significant landmarks in the body would help to classify the images. The small green box on the bottom left of the images is a map describing where the endoscope is and might be a useful feature to explore.
- If you haven’t seen the new fast.ai course take a look, it took me more time to write this post than it did to code the program, it was that simple.
Resources
- Github Notebook
- Kvasir Dataset
- KVASIR: A Multi-Class Image Dataset for Computer Aided Gastrointestinal Disease Detection (Pogorelov, Konstantin & Randel, Kristin & Griwodz, Carsten & de Lange, Thomas & Eskeland, Sigrun & Johansen, Dag & Spampinato, Conceo & Dang Nguyen, Duc Tien & Lux, Mathias & Schmidt, Peter & Riegler, Michael & Halvorsen)
- FastAI
- PyTorch
- Youtube video on this topic
Subscribe to my newsletter
Read articles from freeCodeCamp directly inside your inbox. Subscribe to the newsletter, and don't miss out.
Written by

freeCodeCamp
freeCodeCamp
Learn to code. Build projects. Earn certifications—All for free.
