Securing Your S3 Bucket with AWS Lambda and EventBridge
 Anant Vaid
Introduction
Quick Recap
Welcome to part three of our series on Building a Secure Static Website on Amazon S3. Previously, we covered hosting a static website on S3, creating a custom domain, and managing its DNS. For better context, we recommend reading the earlier parts.
In this article, we will guide you on how to secure your S3 bucket by restricting access to only Cloudflare IPs.
Security Concerns in Our S3 Bucket
Until now, we allowed public access to our S3 bucket. The bucket policy was too permissive, posing a potential security risk. The current policy looks like this:
{
    "Id": "Policy1723743432498",
    "Version": "2012-10-17",
    "Statement": [
      {
        "Sid": "Stmt1723743388166",
        "Action": [
            "S3:GetObject"
        ],
        "Effect": "Allow",
        "Resource": "arn:aws:s3:::techtalkswithanant.online/*",
        "Principal": "*"
      }
   ]
}
You might be thinking that the S3 bucket policy only grants GetObject permission and not PutObject, so the public can only view and not upload any content to our bucket. However, this is still a security issue. Imagine having many extra files in the bucket that are not used in your static website and can be easily downloaded by an attacker. This is not something you would want, right? Therefore, it is always better to restrict access to the S3 bucket to only those services that need it.
Understanding the Architecture
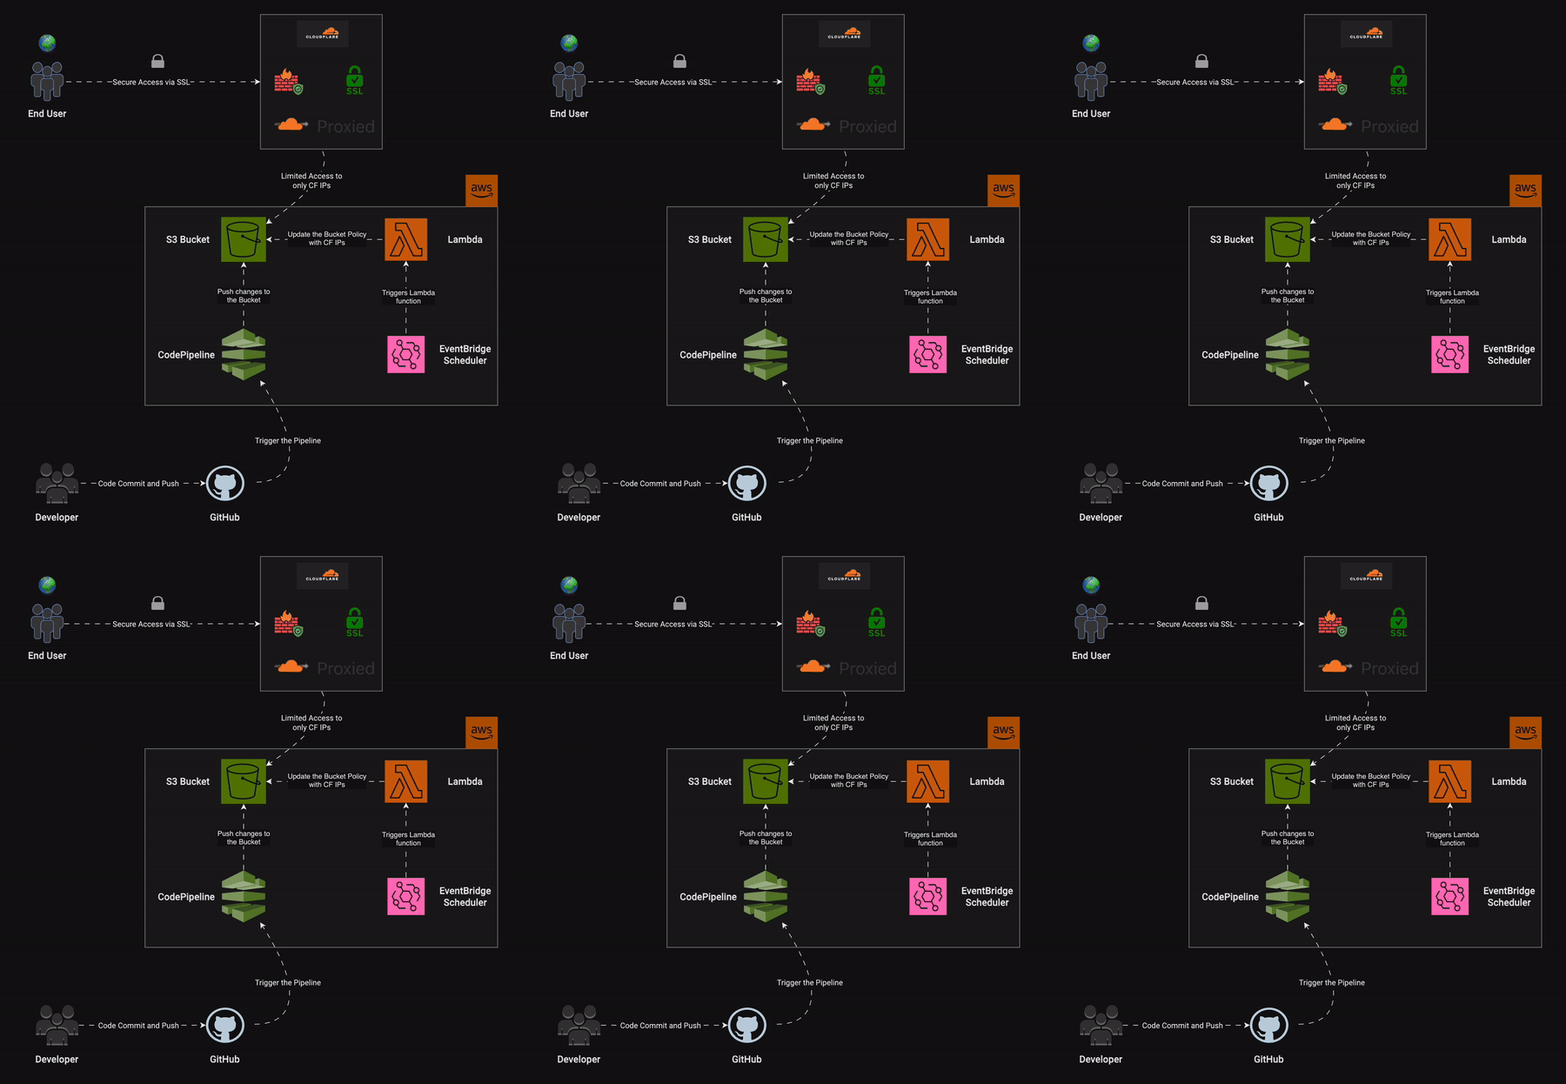
As DevOps Engineers, we enjoy automating tasks, don't we? We'll do the same here. We have already set up our static website on S3, created a custom domain, and are managing the DNS through Cloudflare. What we can do next is restrict access to our S3 bucket to only Cloudflare IPs. This way, if a user tries to access the S3 bucket directly, they are denied access. However, when the user visits the custom domain, the request goes to Cloudflare (the nameserver for the domain). Cloudflare then returns the site if it is cached in its CDN network. If not, it tries to access the S3 bucket (CNAME to the custom domain). Since we have created a policy to allow only Cloudflare IPs, the S3 bucket will respond to requests made by Cloudflare.
Purpose of using AWS Lambda and EventBridge for S3 security
Cloudflare IP subnet ranges are listed here. These IPs can change at Cloudflare's discretion. To keep our site reliable and always available, we need to ensure these changes don't affect our site. We can use a Lambda function to fetch the IP ranges from the Cloudflare API and update our S3 bucket policy with the new list of IPs.
EventBridge Schedule works like a cron job, automatically triggering events at specified intervals. Since the Lambda function is event-driven and we want this event to occur regularly, we can use AWS EventBridge Schedule to trigger it daily. This way, the Lambda function fetches the IP list and updates the bucket policy every day. The frequency can be adjusted based on our needs. For instance, if Cloudflare IPs don't change often, a daily schedule is sufficient. If the IPs change frequently, we can switch to an hourly or even minute-by-minute schedule.
Now, refer back to the architectural diagram from the previous section. In the AWS zone, we can see that EventBridge Schedule triggers the Lambda function every day. This function fetches the IP list from the Cloudflare API and updates the S3 bucket policy.
Got the flow? Great, now let's see how this is implemented.
Introduction to AWS Lambda
What is AWS Lambda?
AWS Lambda is a serverless computing service provided by Amazon Web Services (AWS) that allows you to run code without provisioning or managing servers. With AWS Lambda, you can execute code in response to various events, such as changes to data in an Amazon S3 bucket, updating an S3 bucket policy, updates to a DynamoDB table, or HTTP requests via Amazon API Gateway. This makes it ideal for building event-driven architectures.
Benefits of using Lambda for automation
Some benefits of using AWS Lambda includes:
Automatic Scaling: Scales your application automatically.
Pay-As-You-Go Pricing: Charges based on usage.
Integrated with AWS Services: Seamlessly integrates with other AWS services.
Supports Multiple Languages: Supports several programming languages, including Node.js, Python, Java, Ruby, C#, and Go.
Monitoring and Logging: Provides built-in monitoring and logging.
Introduction to Amazon EventBridge
What is EventBridge?
Amazon EventBridge is a serverless event bus service provided by AWS that makes it easy to connect applications using data from your own applications, integrated Software-as-a-Service (SaaS) applications, and AWS services. EventBridge allows you to build event-driven architectures by routing events from various sources to targets like AWS Lambda, Amazon SNS, Amazon SQS, and more.
In the world of AWS, "events" can be anything—like a file being uploaded to S3, a new record being added to a database, or even a specific time of day. EventBridge watches for these events and, when they happen, it triggers the right actions, like starting a function, sending a notification, or moving data to another service.
So, instead of you having to manually monitor and react to things happening in your system, EventBridge does it for you, ensuring everything happens smoothly and on time. It helps you automate and connect different parts of your application in a way that’s efficient and scalable.
Benefits of using EventBridge for monitoring and automation
Some benefits of using EventBridge:
Event-Driven Architecture: Enables you to build applications that react to events in real-time.
Integration with AWS Services: Integrates seamlessly with a wide range of AWS services like AWS Lambda, Amazon SNS, Amazon SQS, and others.
Support for Custom and SaaS Events: Routes events from your own applications as well as from integrated SaaS applications.
Event Filtering and Routing: Defines rules to filter and route events to specific targets based on the content of the events.
Serverless and Scalable: Automatically scales to handle the volume of events, without the need for you to manage any infrastructure.
Creating a Lambda function
Understanding the API structure
Great, let's dive into some practical knowledge! What is our use case here? We need to create a function to fetch the Cloudflare IPs from the API, create an S3 bucket policy, and then update the S3 bucket with this policy.
Let's look at the API and examine the response structure.
curl --request GET --url https://api.cloudflare.com/client/v4/ips | jq
You might wonder: The curl command is fine, but why did you pipe it with jq? Well, jq makes it easier to read by indenting the output and helping you see the structure clearly. If you see an error while running the command, make sure you have both curl and jq installed. To find the installation commands for your specific operating system, visit Command-Not-Found.
However, if you are a Windows user and find it difficult to use jq, a simple curl command should work. After that, you can use an online JSON formatter to view the output.
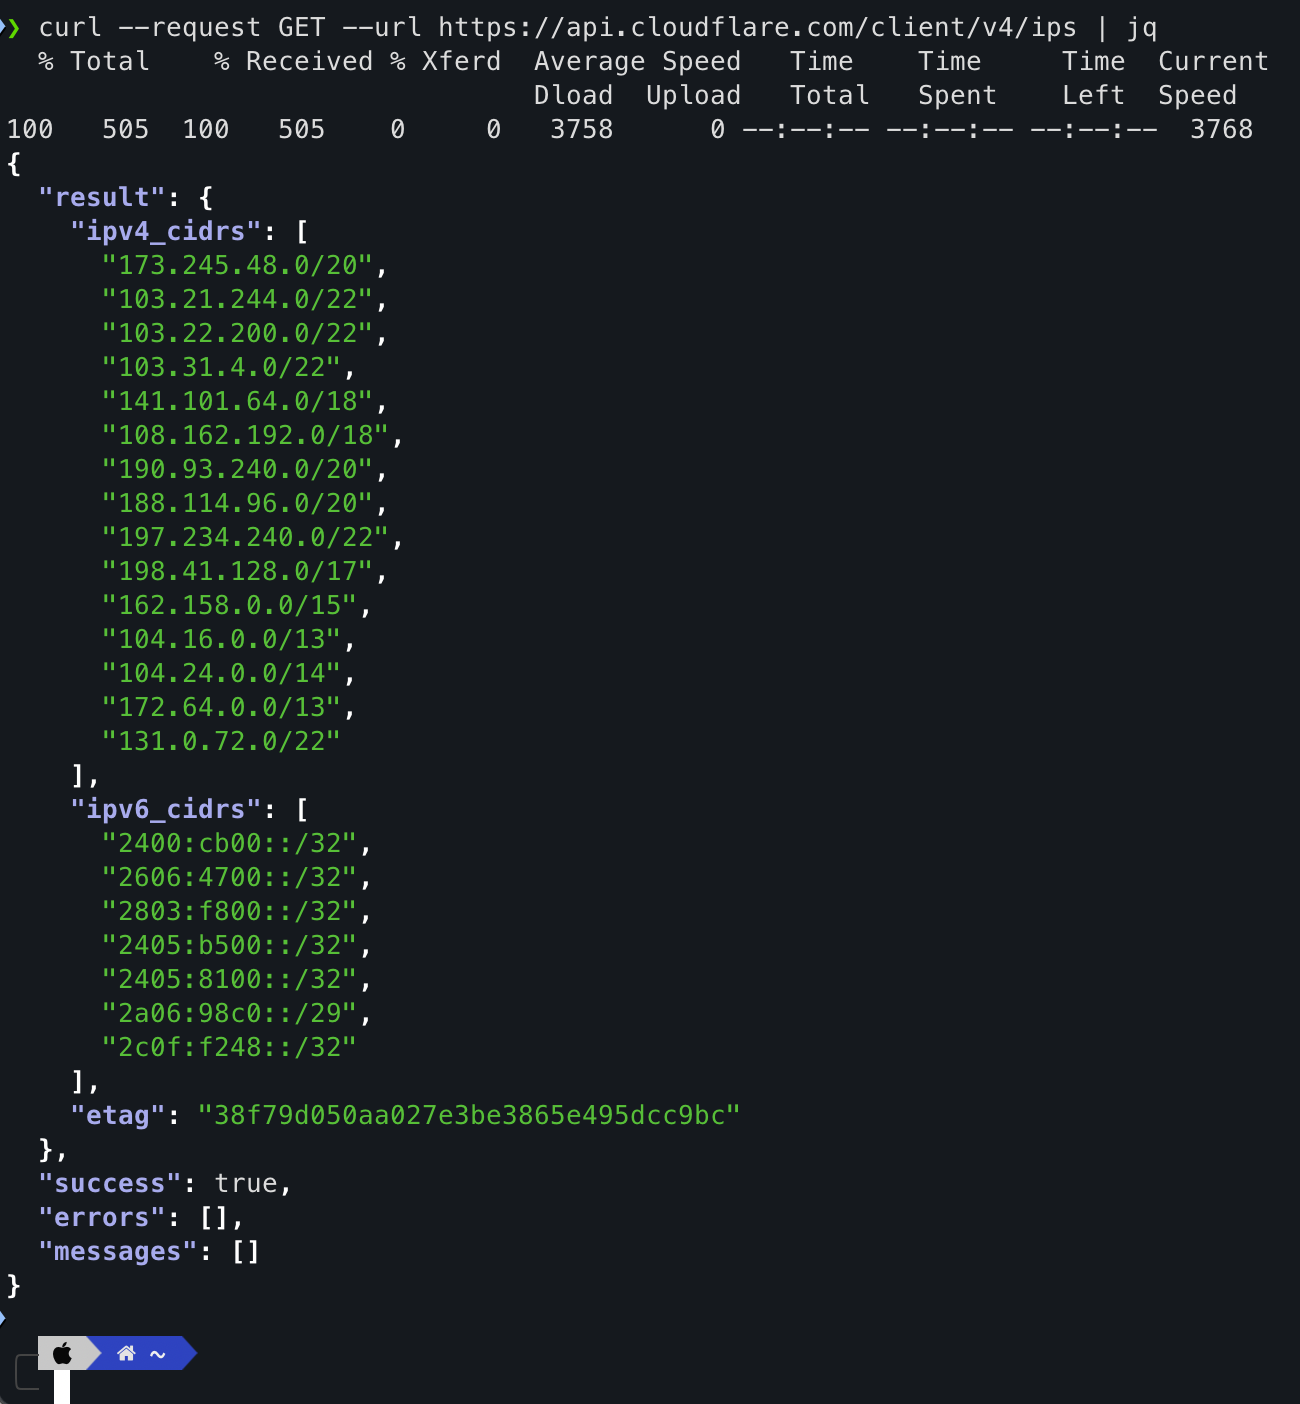
Alright! The structure is pretty simple and straightforward. We have a result with ipv4_cidrs and ipv6_cidrs.
Great, now we have to choose a language to code the Lambda function. Lambda offers support to a lot of programming languages like Node.js, Python, Ruby, Java, C# and Go. In our case, let's proceed with Python, as it is convenient to code with and works well with AWS using the boto3 library.
Coding the Lambda function
Since this isn't a Python-specific blog, I'll skip the detailed explanation and provide the code here.
import boto3
import requests
import json
import os

def lambda_handler(event, context):
    # Lambda Handler for updating S3 bucket policy.
    try:
        response = requests.get("https://api.cloudflare.com/client/v4/ips")
        json_val = response.json()

        BUCKET = os.environ["BUCKET_NAME"]
        result = json_val["result"]
        ipv4_list = result["ipv4_cidrs"]
        ipv6_list = result["ipv6_cidrs"]
        ip_list = [*ipv4_list, *ipv6_list]

        s3_bucket_policy = {
            "Version": "2012-10-17",
            "Statement": [
                {
                    "Sid": "PublicReadGetObject",
                    "Effect": "Allow",
                    "Principal": "*",
                    "Action": "s3:GetObject",
                    "Resource": f"arn:aws:s3:::{BUCKET}/*",
                    "Condition": {
                        "IpAddress": {
                            "aws:SourceIp":
                                    ip_list
                        }
                    }
                }
            ]
        }

        s3_bucket_policy = json.dumps(s3_bucket_policy)
        client = boto3.client('s3')

        response = client.put_bucket_policy(
            Bucket = BUCKET,
            Policy = s3_bucket_policy,
        )

        return {
            'statusCode': 200,
            'body': json.dumps('S3 bucket policy updated successfully')
        }
    except Exception as e:
        print(e)
        return {
            'statusCode': 500,
            'body': json.dumps('Error updating S3 bucket policy')
        }
Don't feel overwhelmed! Let me quickly explain what the code does:
The lambda_handler(event, context) function is the entry point for Lambda functions. We use the requests module in Python to fetch Cloudflare IPs through its API. Once we get the response, we retrieve the IPv4 and IPv6 CIDR lists, merge them into a single list, and use this list in the S3 bucket policy template.
If you look closely, the bucket policy is similar to the one we used for providing public access. The only difference is the Condition block, which checks the source IP address and grants GetObject access only to those IPs.
We have stored the S3 bucket name in an environment variable provided by Lambda, making the code reusable for different environments. We will cover how to set environment variables in AWS Lambda in the later sections.
Setting up AWS Credentials
boto3 library requires your AWS credentials (Access Key ID and Secret Access Key) to interact with AWS services which can be set up in several ways that includes:
AWS CLI
aws configureThis command will prompt you to enter your AWS Access Key ID, Secret Access Key, region, and output format. The credentials will be stored in
~/.aws/credentials, and the configuration will be in~/.aws/config.Creating a credentials file
Create the credentials file at~/.aws/credentials:[default] aws_access_key_id = YOUR_ACCESS_KEY_ID aws_secret_access_key = YOUR_SECRET_ACCESS_KEYSetting up Environment variables
  export AWS_ACCESS_KEY_ID=YOUR_ACCESS_KEY_ID
  export AWS_SECRET_ACCESS_KEY=YOUR_SECRET_ACCESS_KEY
  export AWS_DEFAULT_REGION=YOUR_REGION
Note: These configurations are necessary when coding and testing on our local machines. However, these steps can be skipped if we are running the code on AWS Lambda, as AWS manages the configurations.
Setting up Lambda function in AWS
Search for Lambda in AWS Management Console search bar.
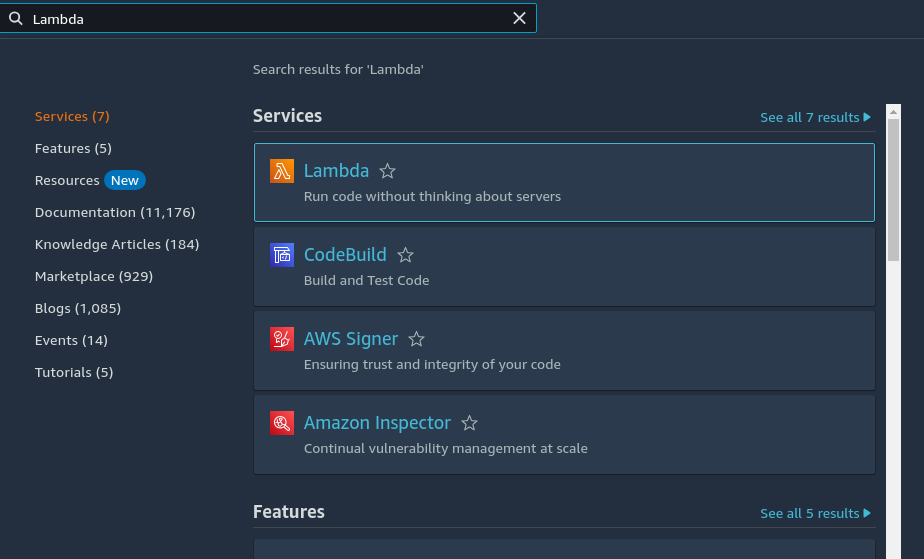
Click on Lambda and then click "Create a function".
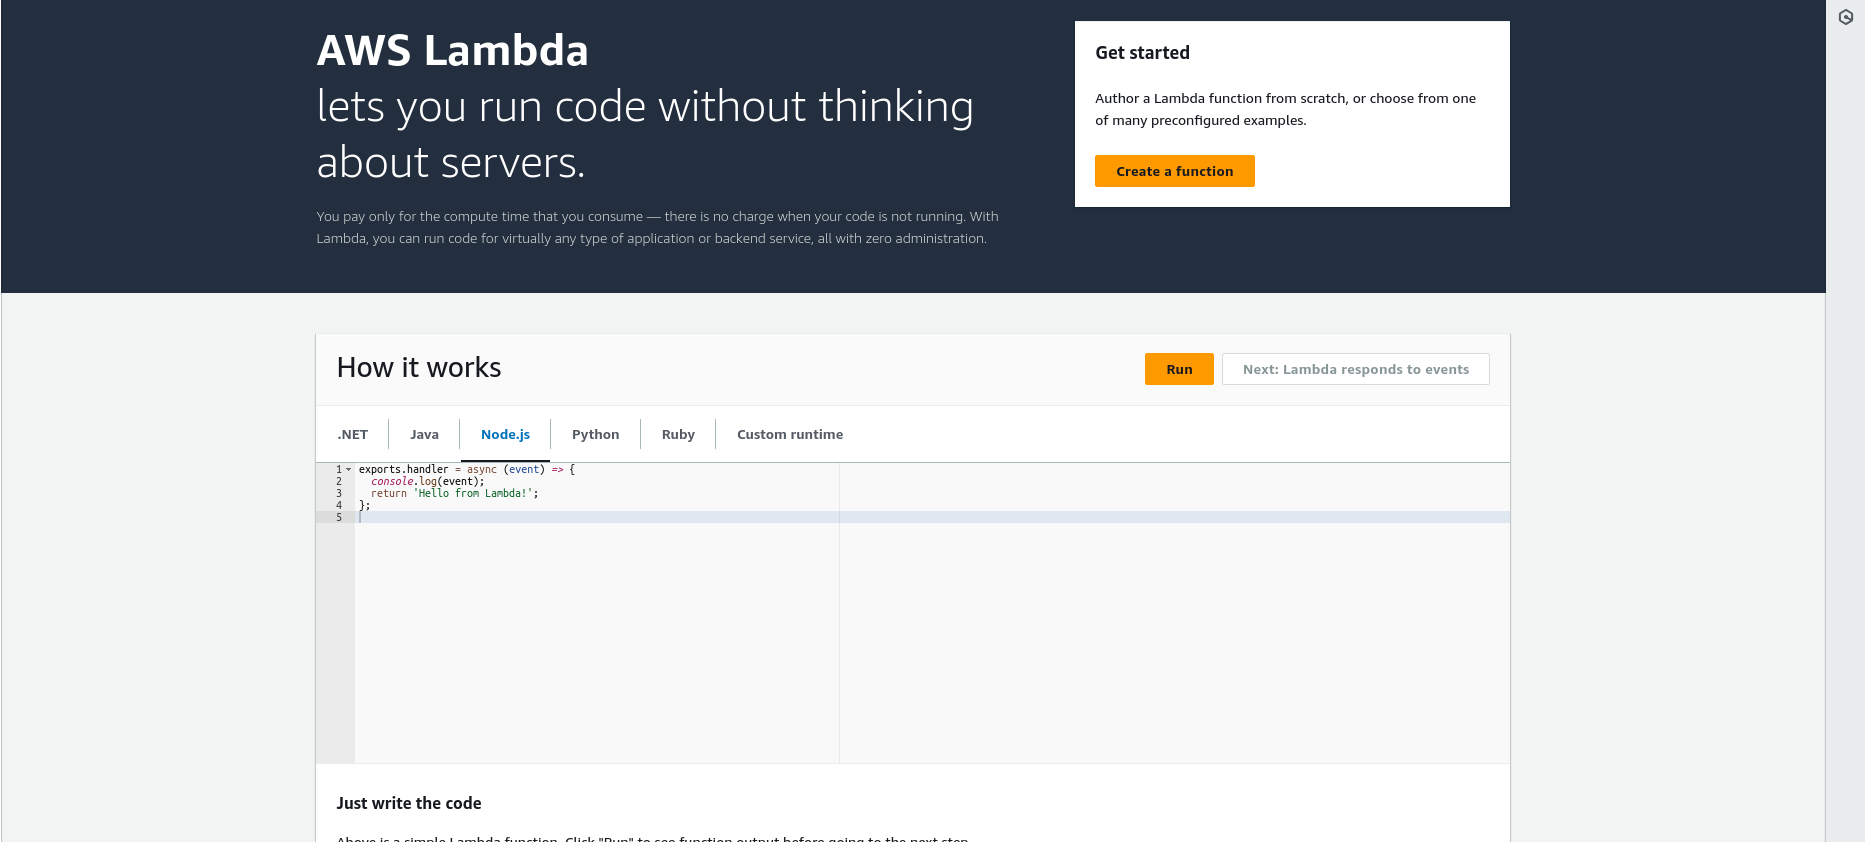
Choose the "Author from Scratch" option and enter the function name. For the Runtime, select the latest Python version, in this case, Python 3.12. You can skip the other settings by keeping the defaults, and then click the "Create function" button.
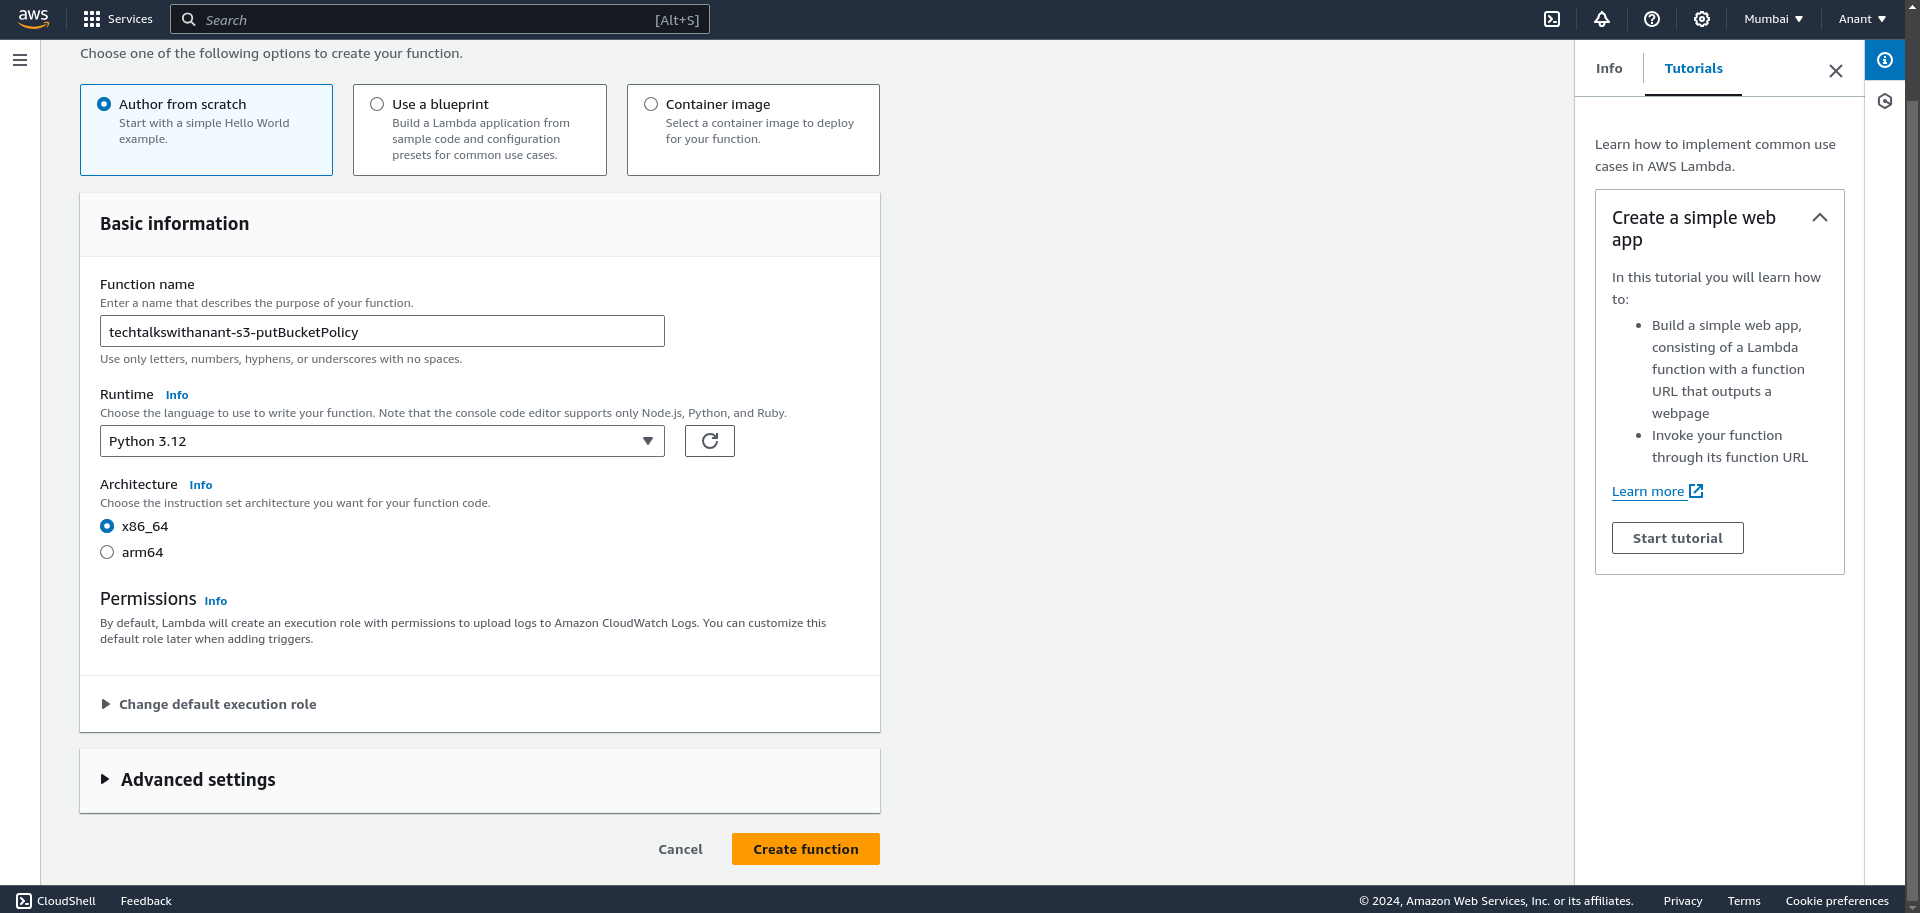
You will be able to see a text editor with a sample code written in Python.
Next, go to the Configuration tab and select Environment variables from the left-hand panel. Click Edit to add environment variables for Lambda.
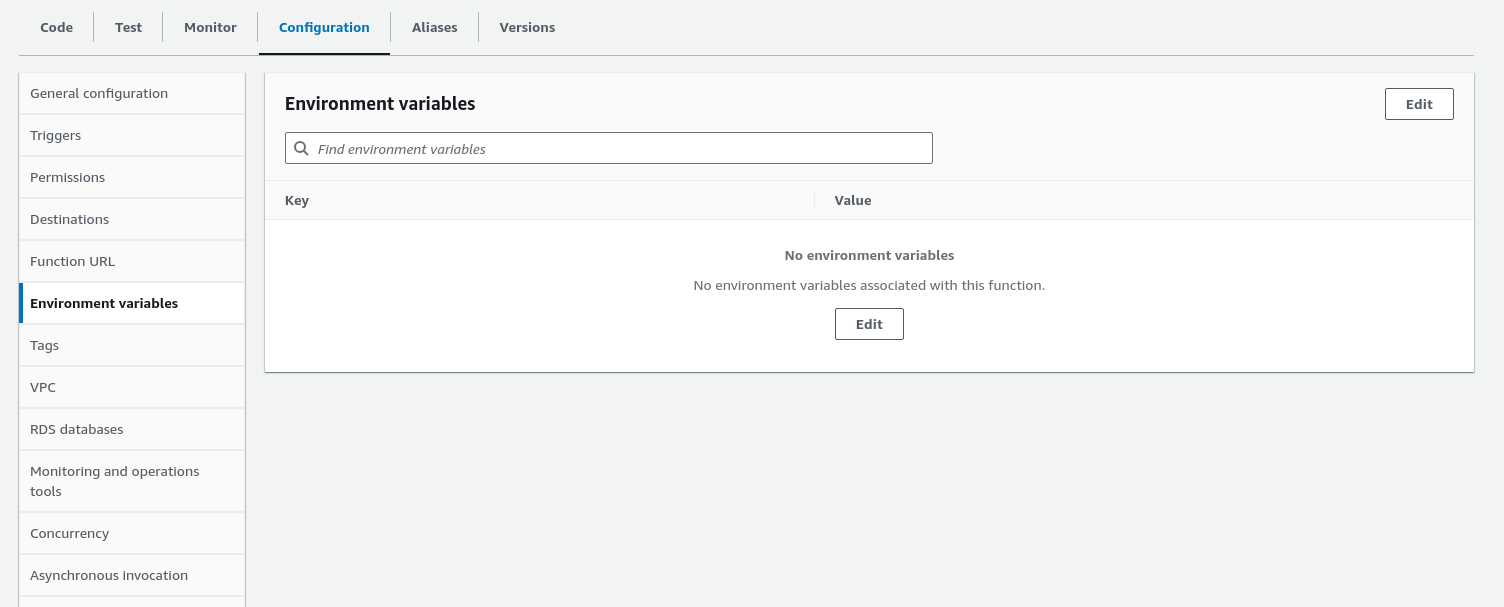
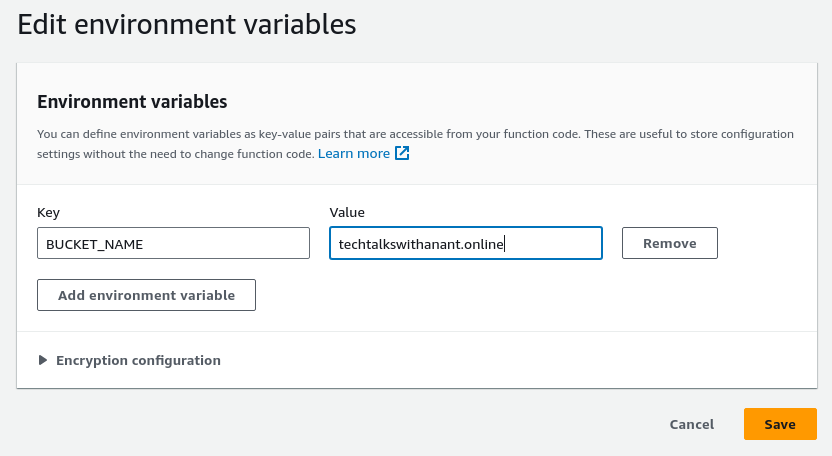
Create a new environment variable BUCKET_NAME with the value techtalkswithanant.online. Click the "Save" button.
Paste the written code into the code editor.
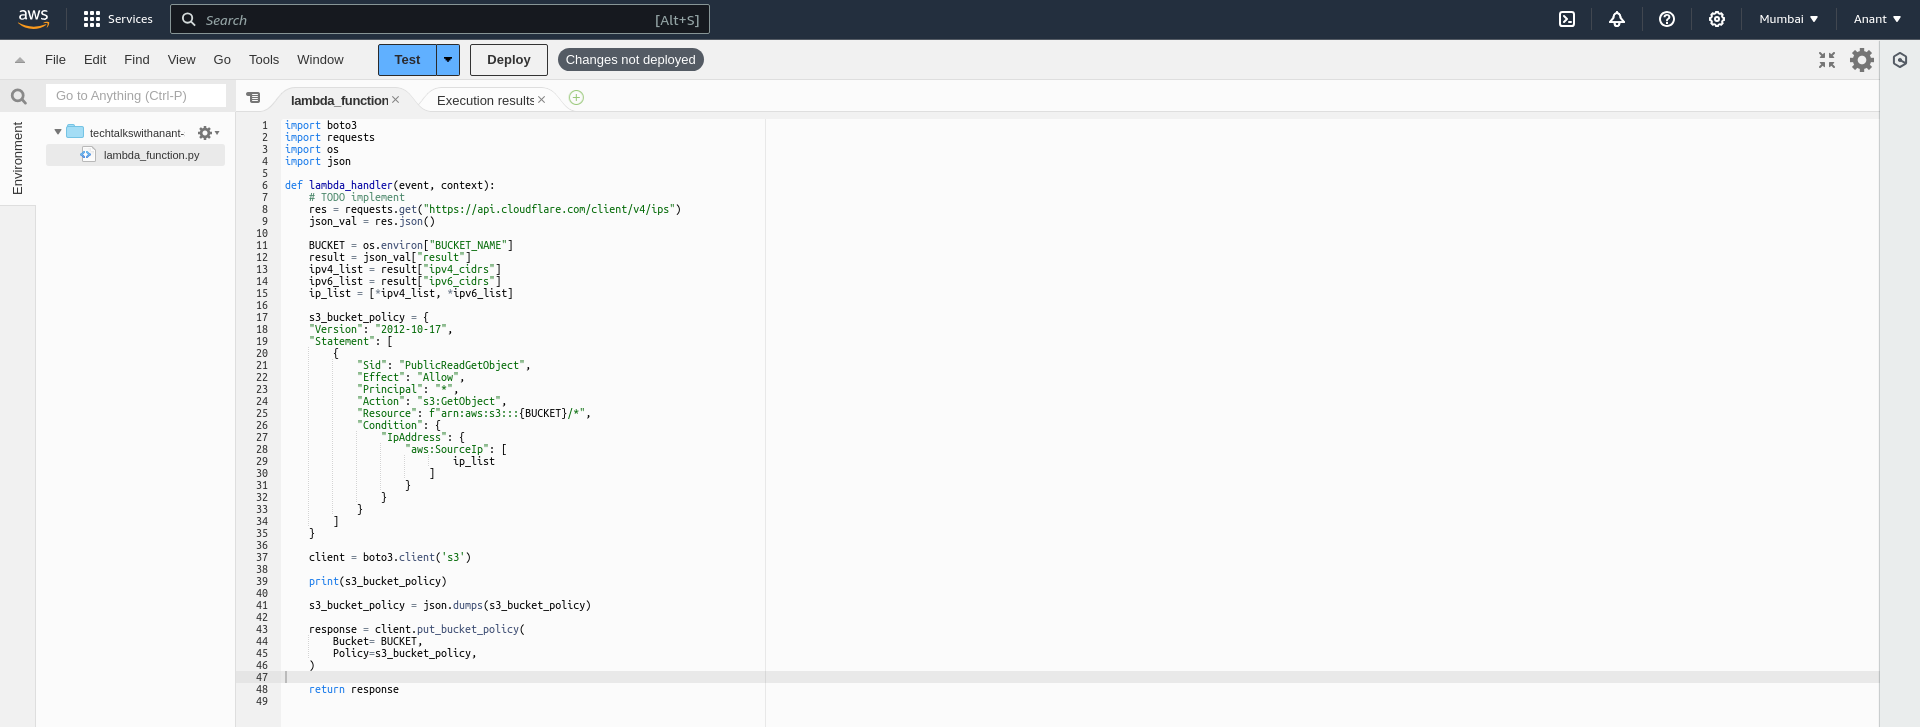
Note: The code in the screenshot might look a bit different because the code provided in the above section was improved later.
Once the code is pasted in and the environment variables are set, we can deploy the code using the "Deploy" button at the top of the code editor.
Time to test the code! Click the "Test" button to see the response.
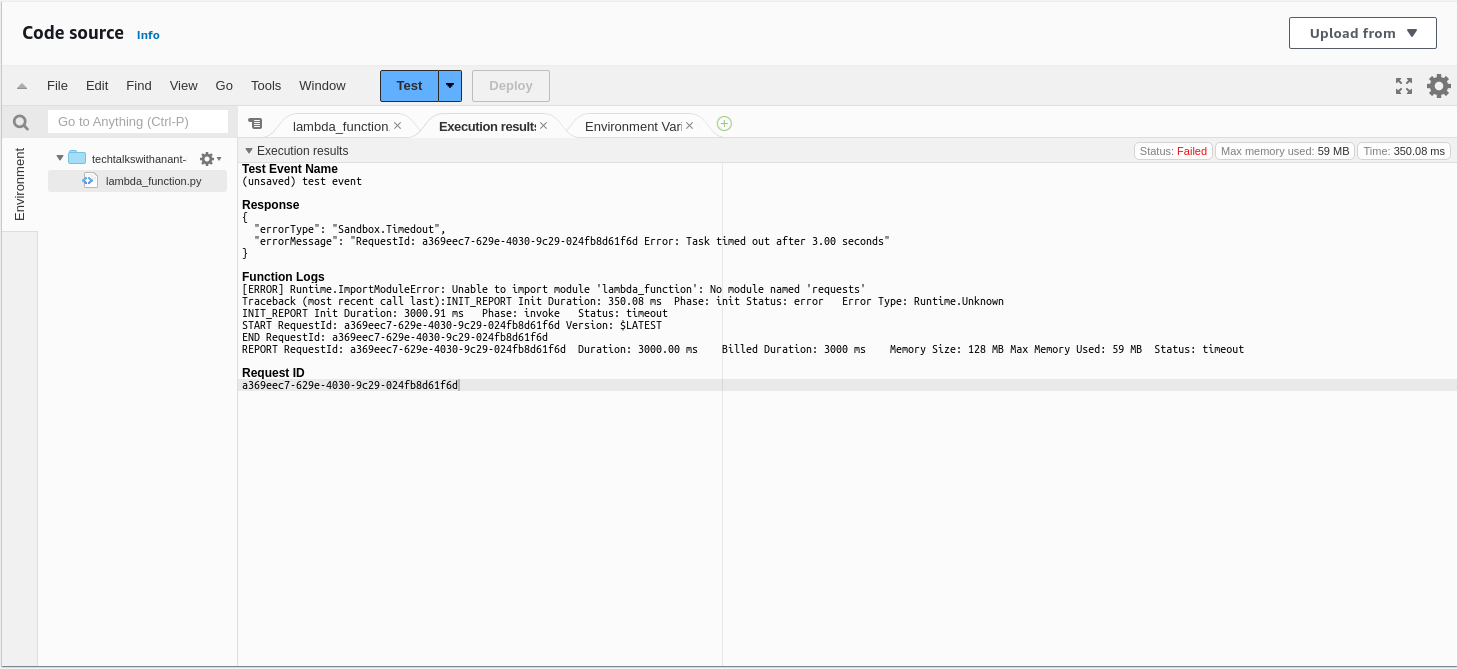
Uh oh! We are facing an issue now. The error message says there is an ImportModuleError and it cannot import the module named requests.
This is because Lambda does not have third-party dependencies installed directly. To install third-party dependencies and modules like requests, we need to use Lambda layers. Let's see what layers are.
Lambda Layers
Lambda layers are a feature in AWS Lambda that allows you to manage and share common code and dependencies across multiple Lambda functions.
Some of the key points are:
Purpose: Lambda layers help you avoid code duplication by allowing you to package libraries, custom runtimes, and other dependencies separately from your function code. This makes it easier to manage and update shared code.
Creation: You can create a Lambda layer by packaging your dependencies into a ZIP file and uploading it to AWS Lambda. Each layer can be versioned, allowing you to manage updates and rollbacks easily.
Usage: Once a layer is created, you can add it to your Lambda function by specifying the layer's ARN (Amazon Resource Name). A single Lambda function can include up to five layers.
Benefits:
Code Reusability: Share common code across multiple functions without duplicating it.
Simplified Updates: Update the layer independently of the function code, making it easier to manage dependencies.
Reduced Deployment Package Size: By separating dependencies into layers, the size of your deployment package can be reduced, leading to faster deployments.
Okay, let's create a Lambda layer with the requests module installed.
mkdir lambda_layer
cd lambda_layer
python3 -m venv myenv
source myenv/bin/activate
pip install requests
mkdir python
mv myenv/lib python/
zip -r python.zip python/
What we did above was create a virtual environment in Python and install the requests module in it. The virtual environment contained all the necessary dependencies and libraries. We only needed the lib/ folder because it includes all the libraries and dependencies required by the requests module. So, we moved the lib/ folder from the virtual environment to a python/ directory. After that, we zipped the python directory into a python.zip file.
We now have a python.zip file in the current working directory. Note that the Lambda layers requires the zip file to be named python.zip. That's why we used this specific name.
Go to Lambda > Layers in the left-hand panel. Then click on the "Create layer" button.

Now, type in the Name of the layer with a small description. We will choose "Upload a .zip file" option and upload the file. Select the compatible runtimes and click on "Create" button.
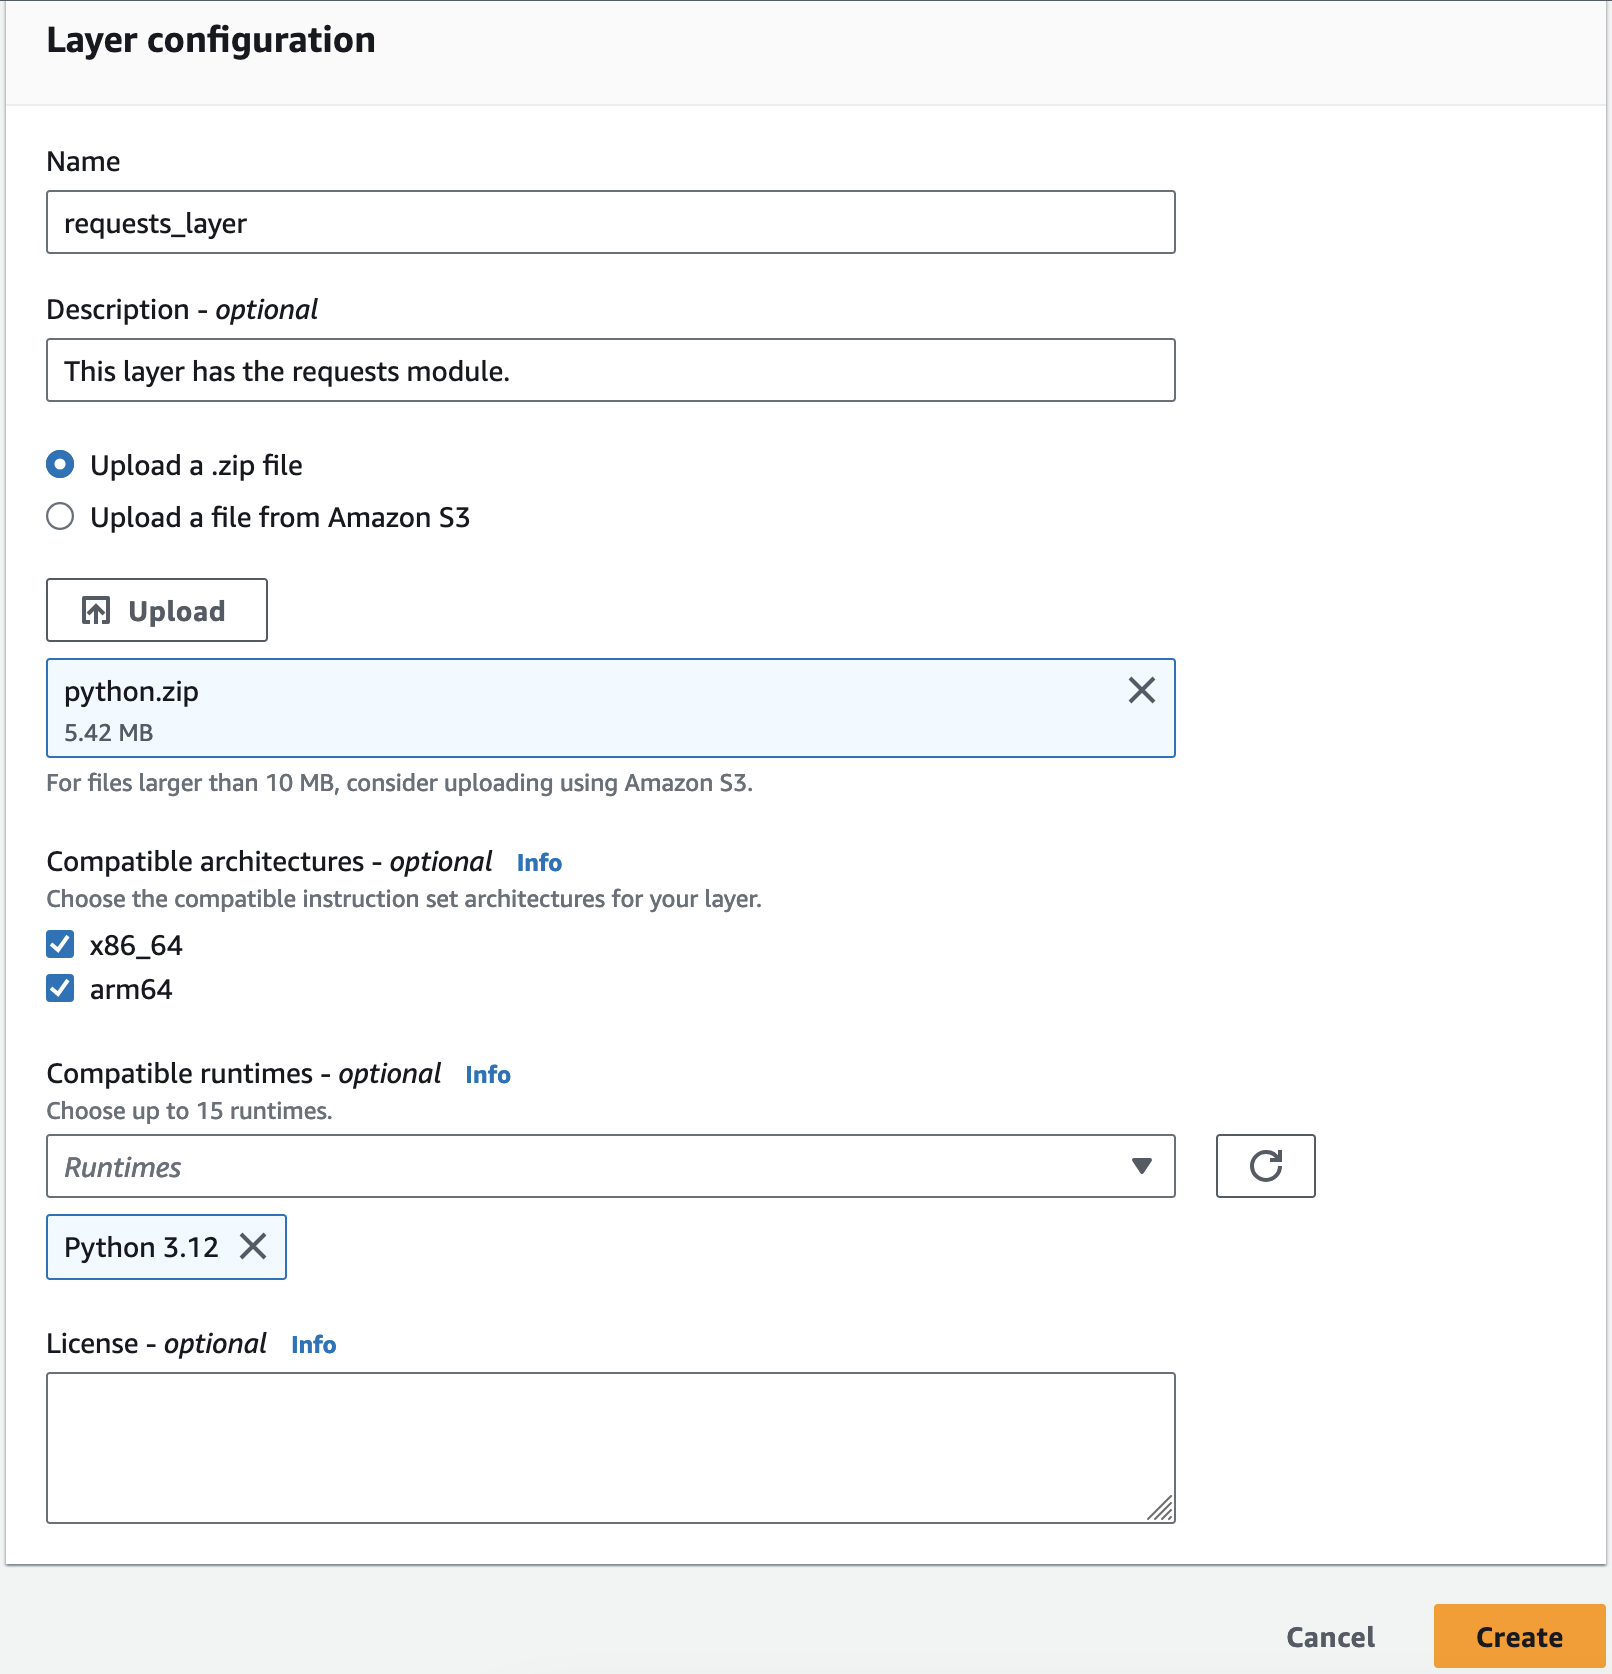
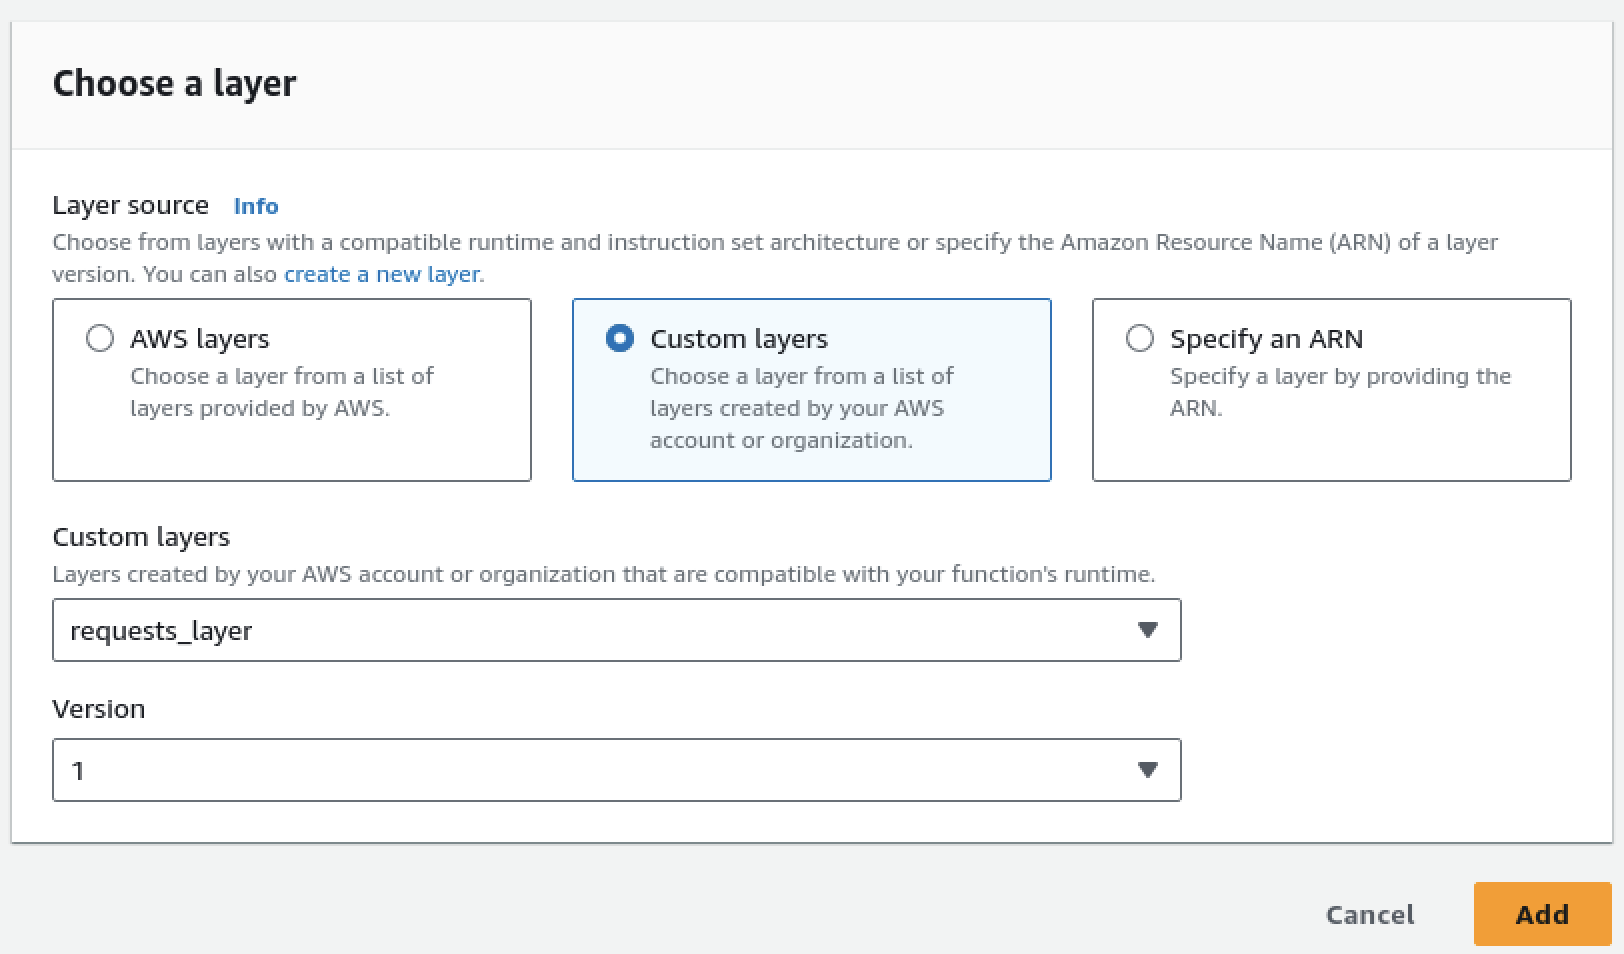
Once complete, proceed with adding this layer to our Lambda function. In the Configuration tab > General configuration, go to the bottom of the page and in the Layers section, click on "Add a layer".

Click on Custom layers and choose the Custom layers as requests_layer from the dropdown menu and click "Add".
Okay, so the requests module will work now, but Lambda function does not have the required permissions to edit the S3 bucket policy. Let's give it the necessary permissions.
AWS Lambda Roles and Policies
Navigate to the Configuration tab and go to the Permissions panel. Click on the Role name to be automatically redirected to the Identity and Access Management (IAM) page.
An IAM role is an AWS identity with specific permissions that can be assumed by entities such as users, applications, or services.
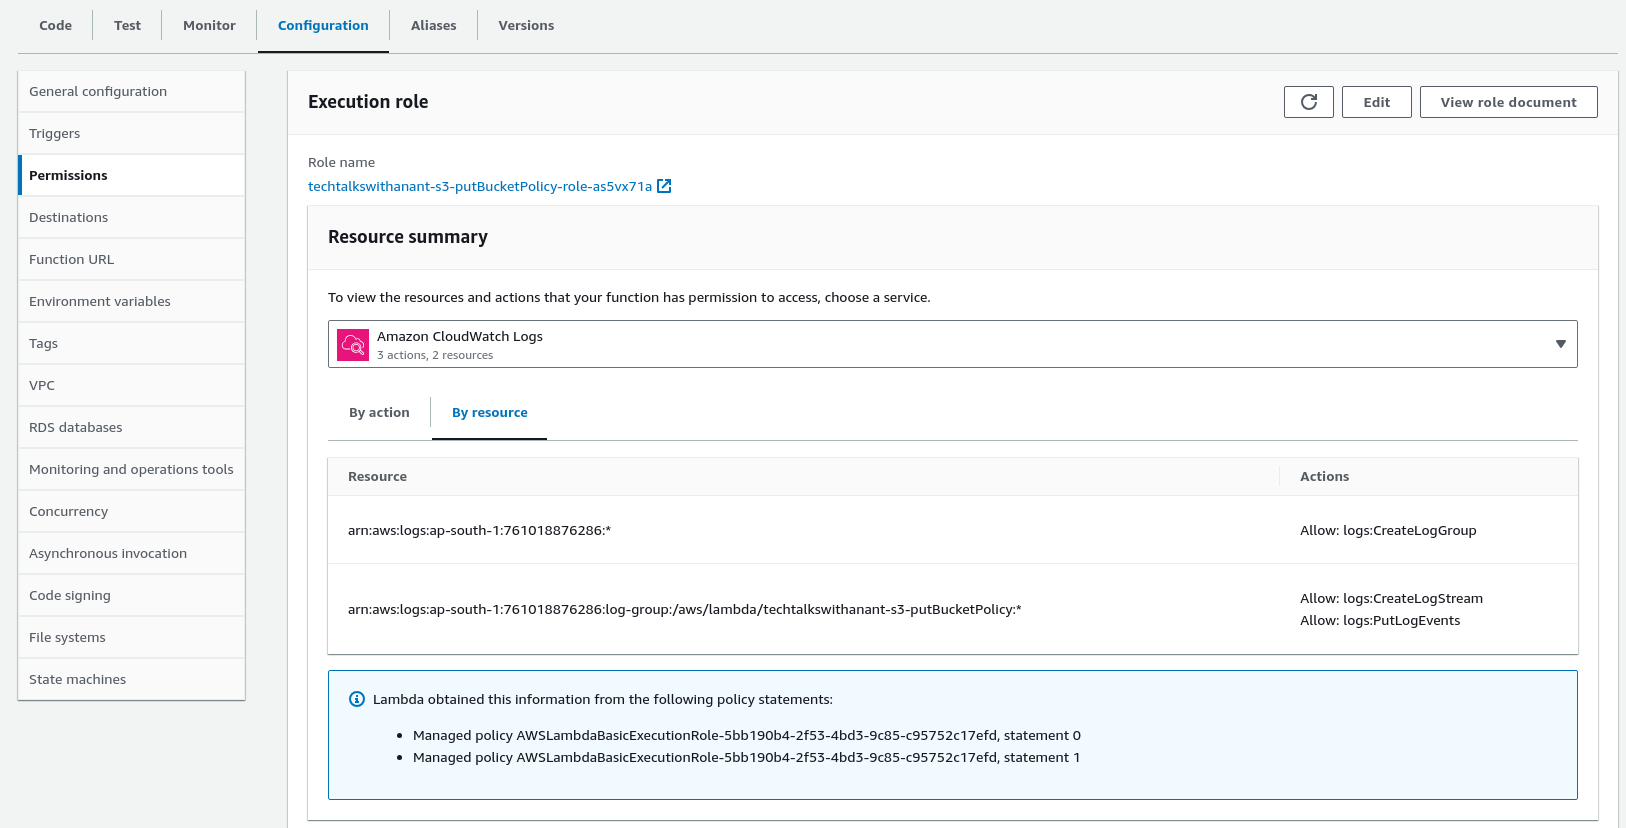
Click on the Policies button on the left-hand panel to add permissions to the Lambda role.
IAM Policies are JSON documents that define permissions to perform actions on AWS resources.
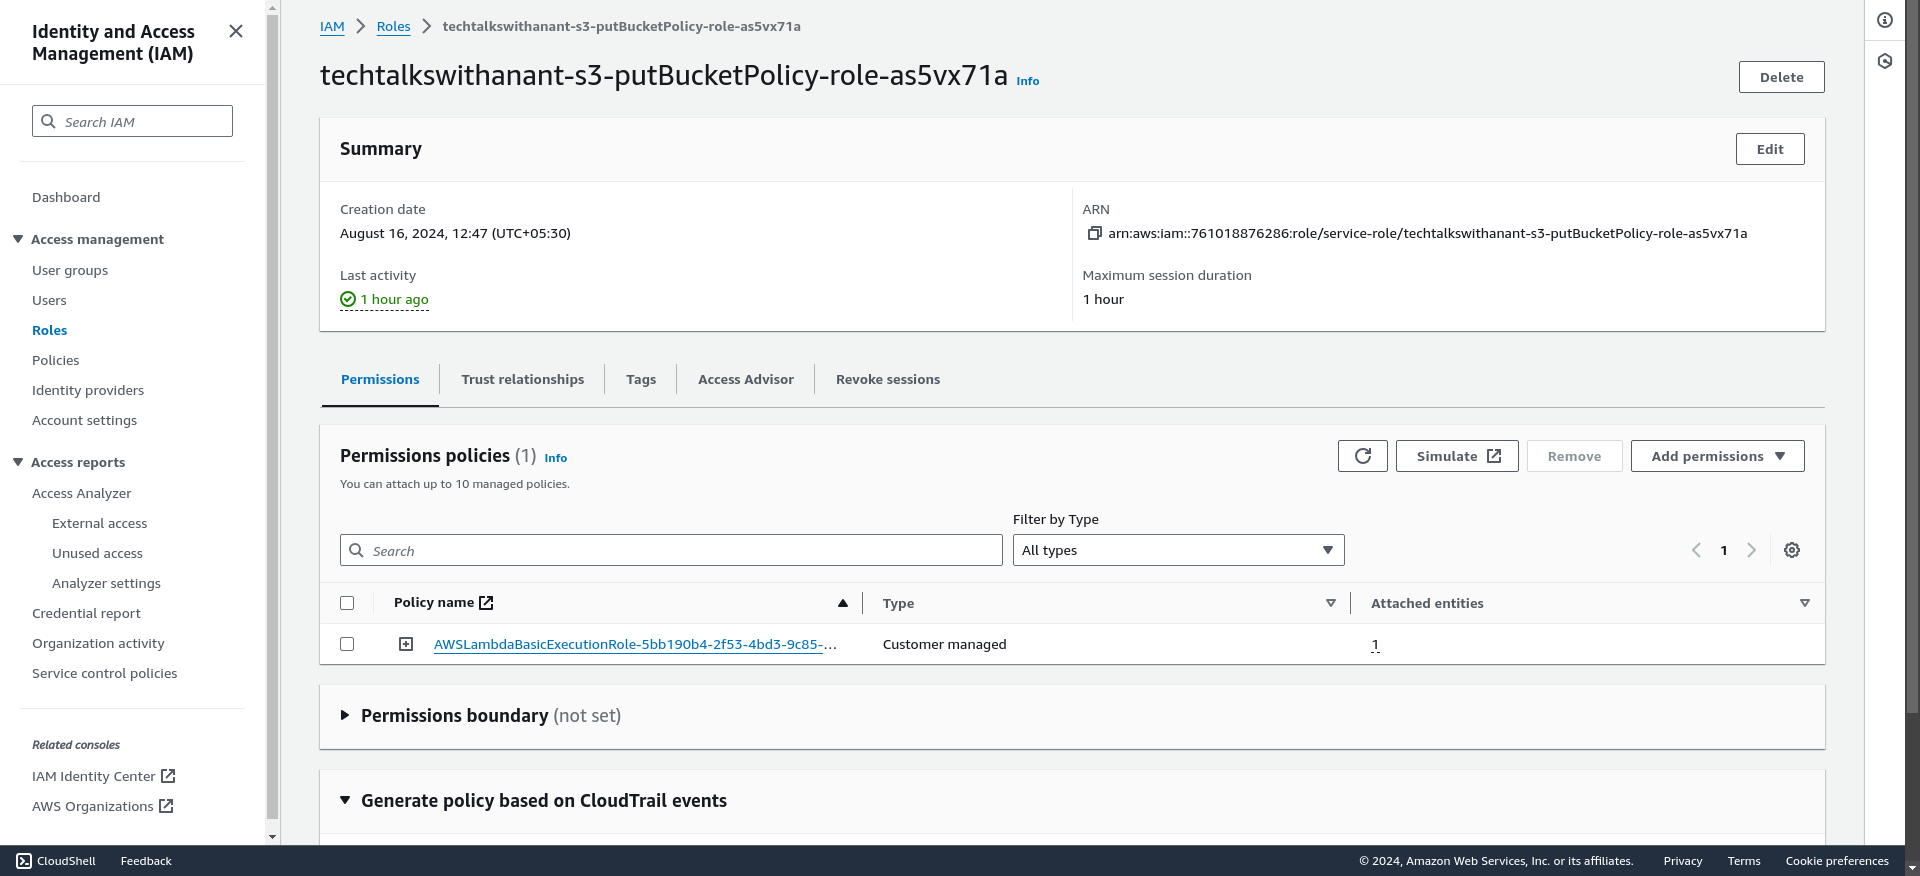
Now click on "Create policy" button, as we will create a custom policy to allow Lambda to perform PutBucketPolicy operations on an S3 bucket.

Choose S3 as the Object and in the Permissions management section, select PutBucketPolicy for a specific bucket with the name techtalkswithanant.online.
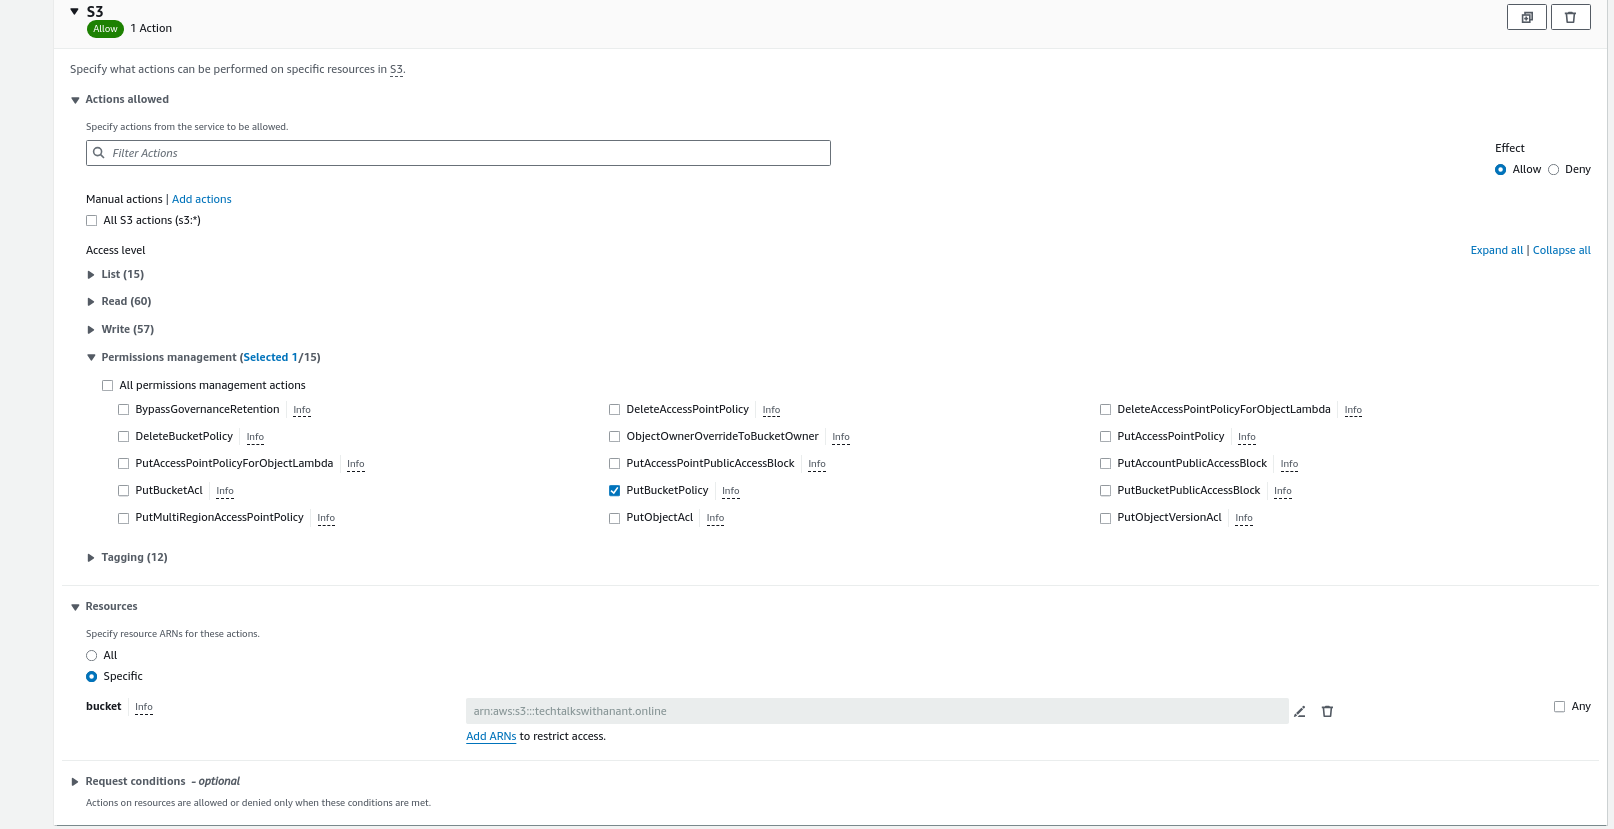
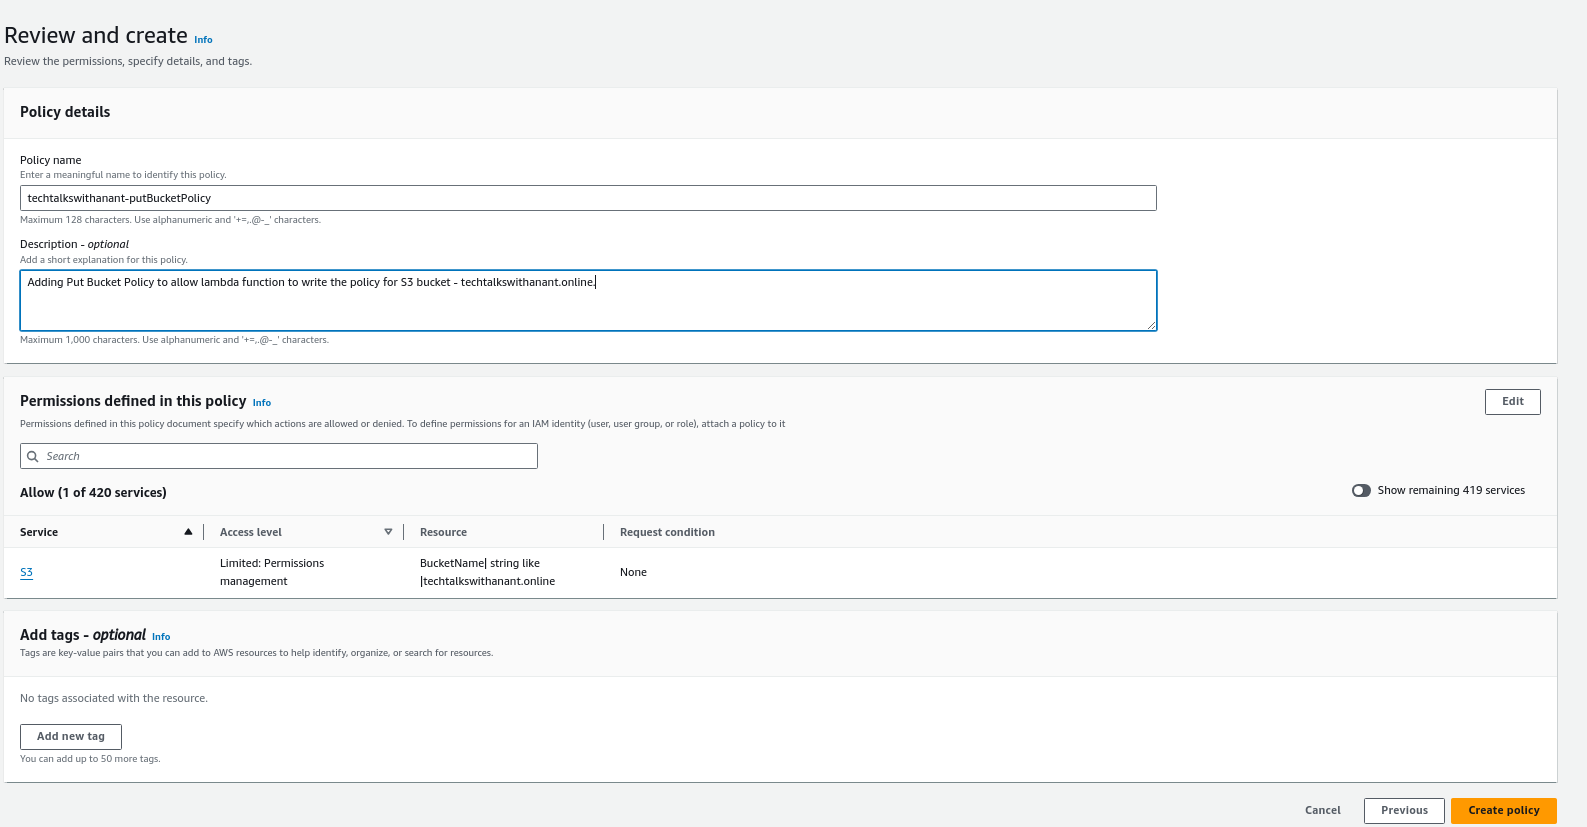
Once reviewed, click on "Create policy" to create this policy. Then, in the Roles page, click on Attach policies to attach this custom policy to the AWS Lambda role.

Search for the name of the custom policy and then click on "Add permissions" to add this policy to the role.

Click on the test button in the AWS Lambda code section again, to test the functionality of the code.
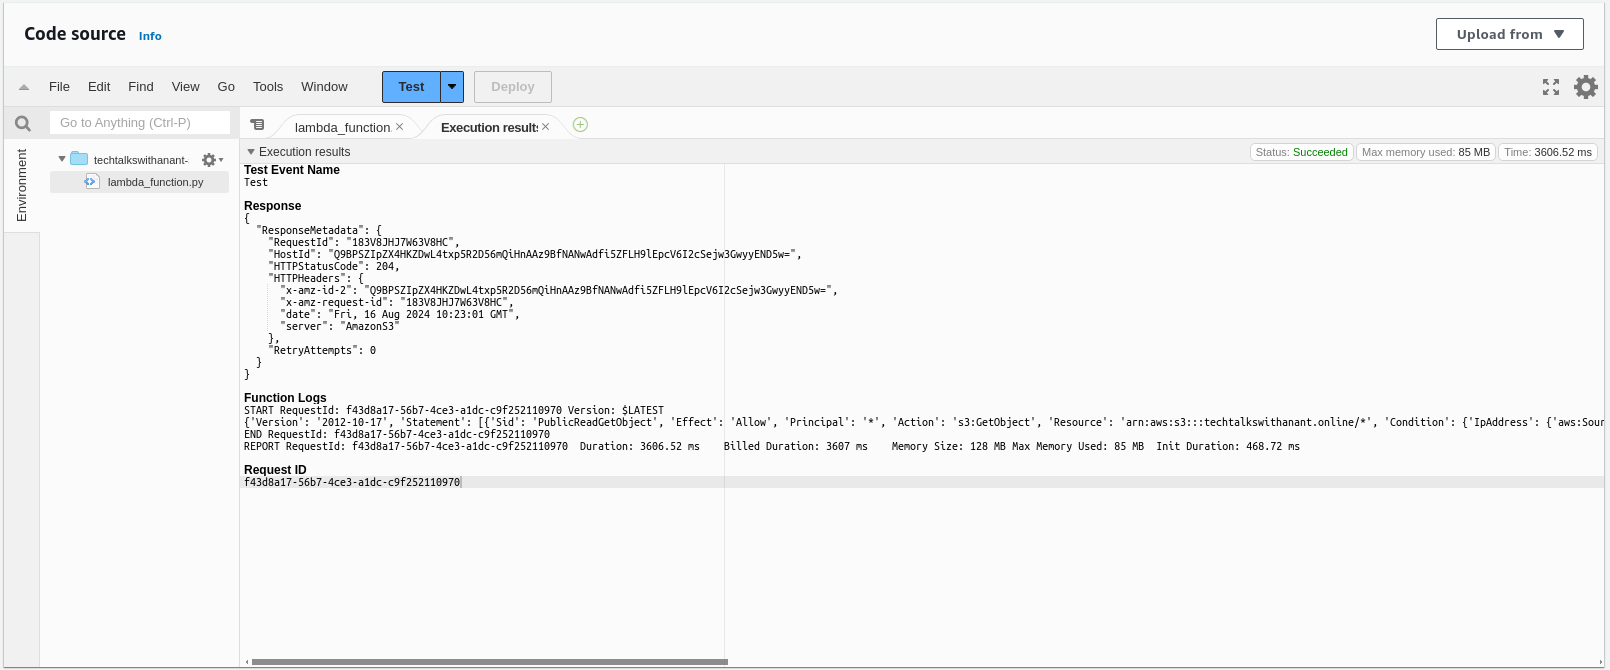
Hurray! We have successfully deployed and tested our Lambda function. This also updated our Bucket policy with the required IP Addresses.
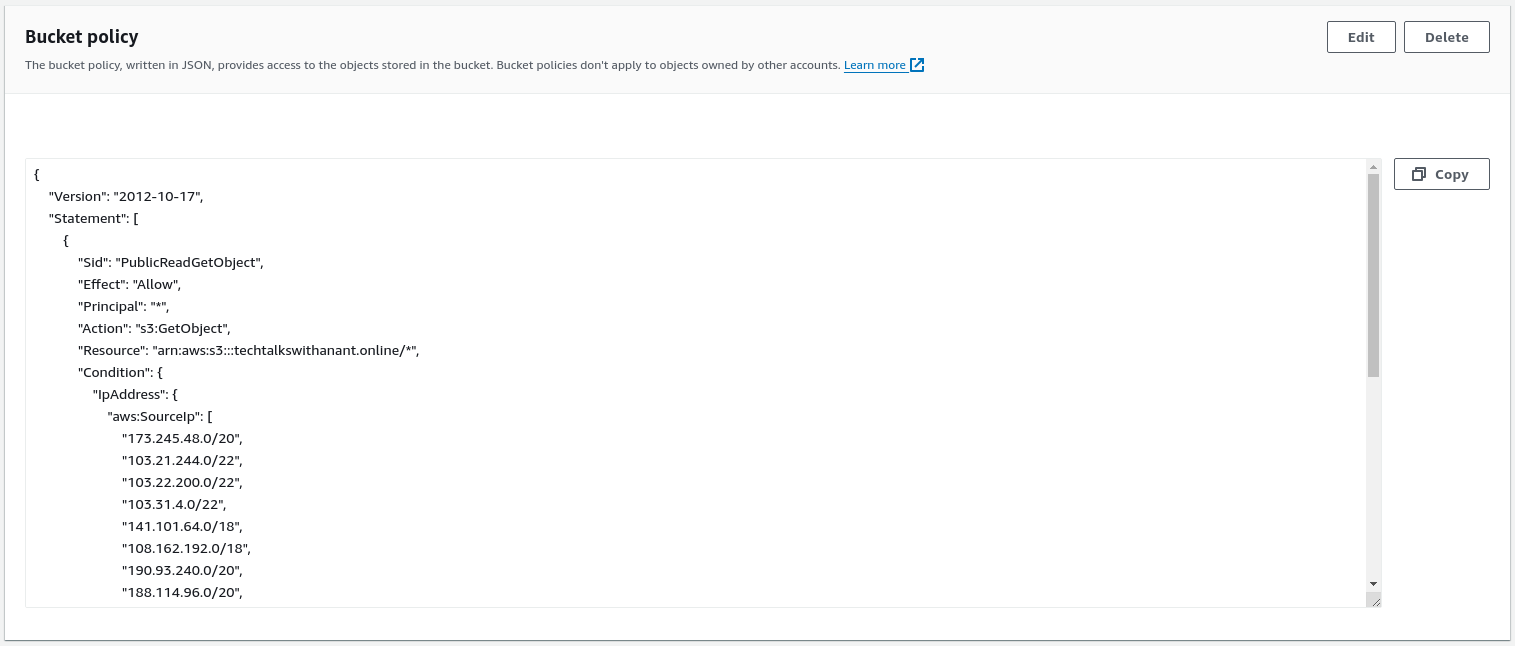
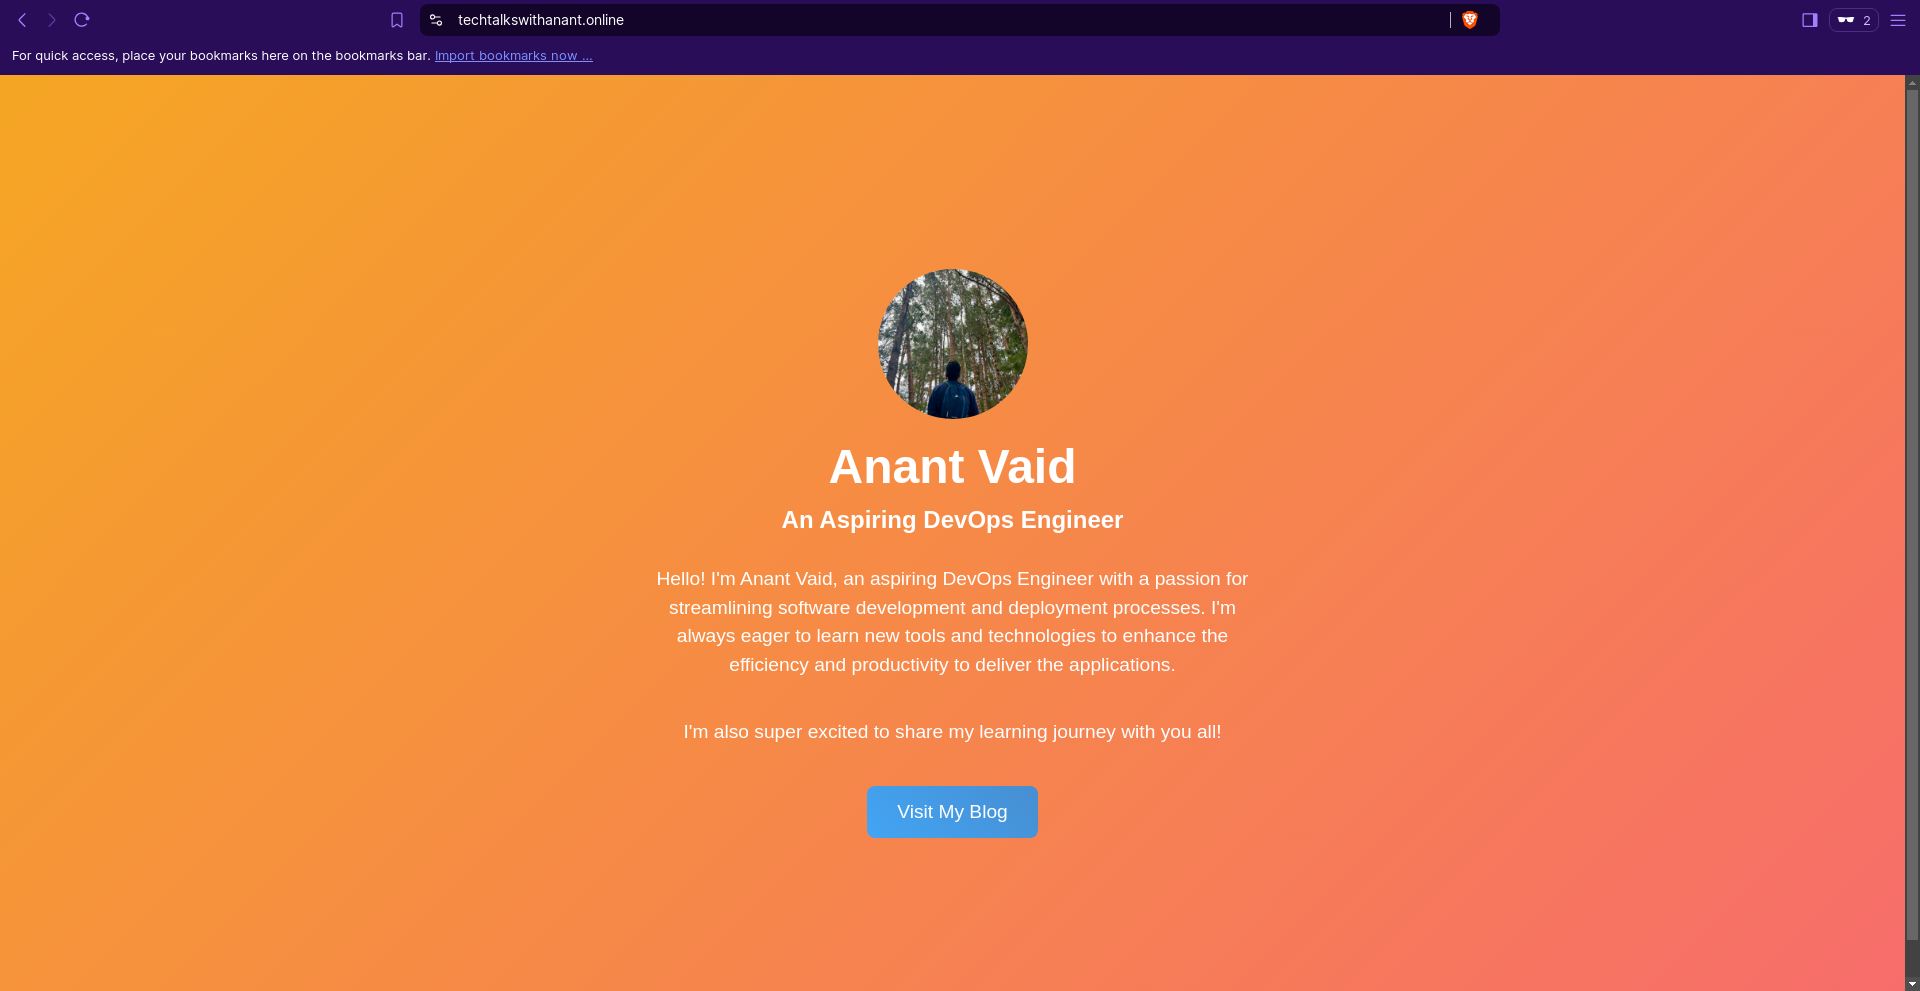
We were able to secure our S3 bucket URL through the Lambda function automation.

Integrating Lambda and EventBridge Schedule
We already discussed how EventBridge Schedule helps create a schedule for the Lambda function to run at specific intervals. Let's build on that and create an EventBridge Schedule.
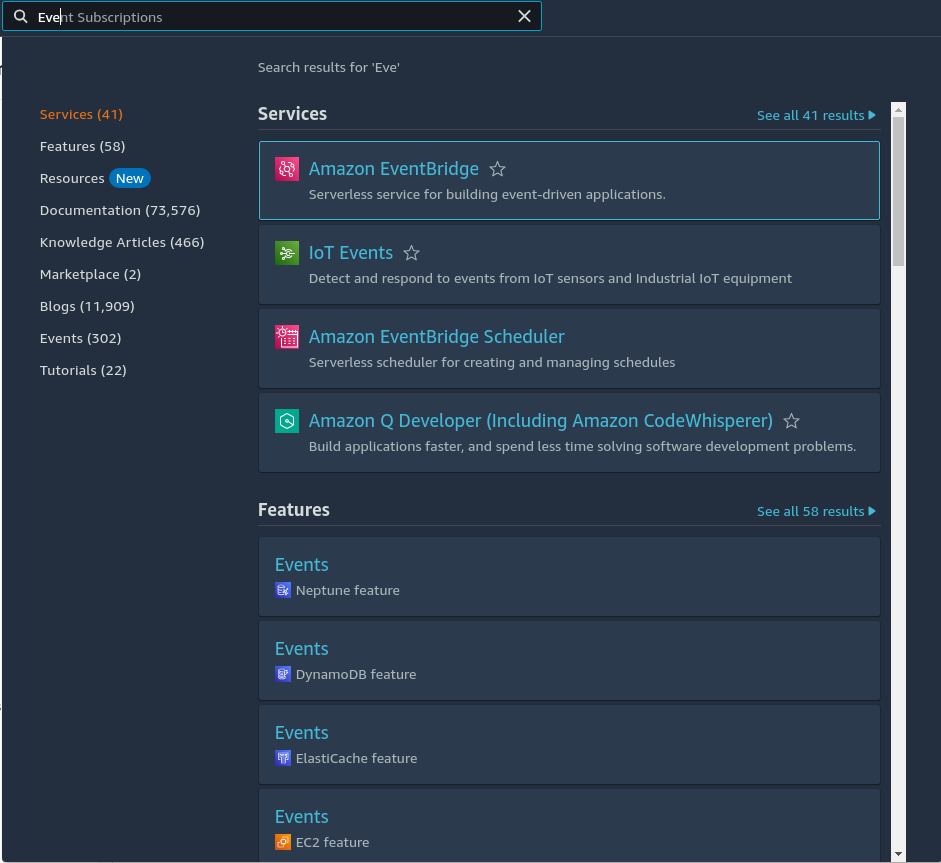
Search for EventBridge on AWS Management Console search area.
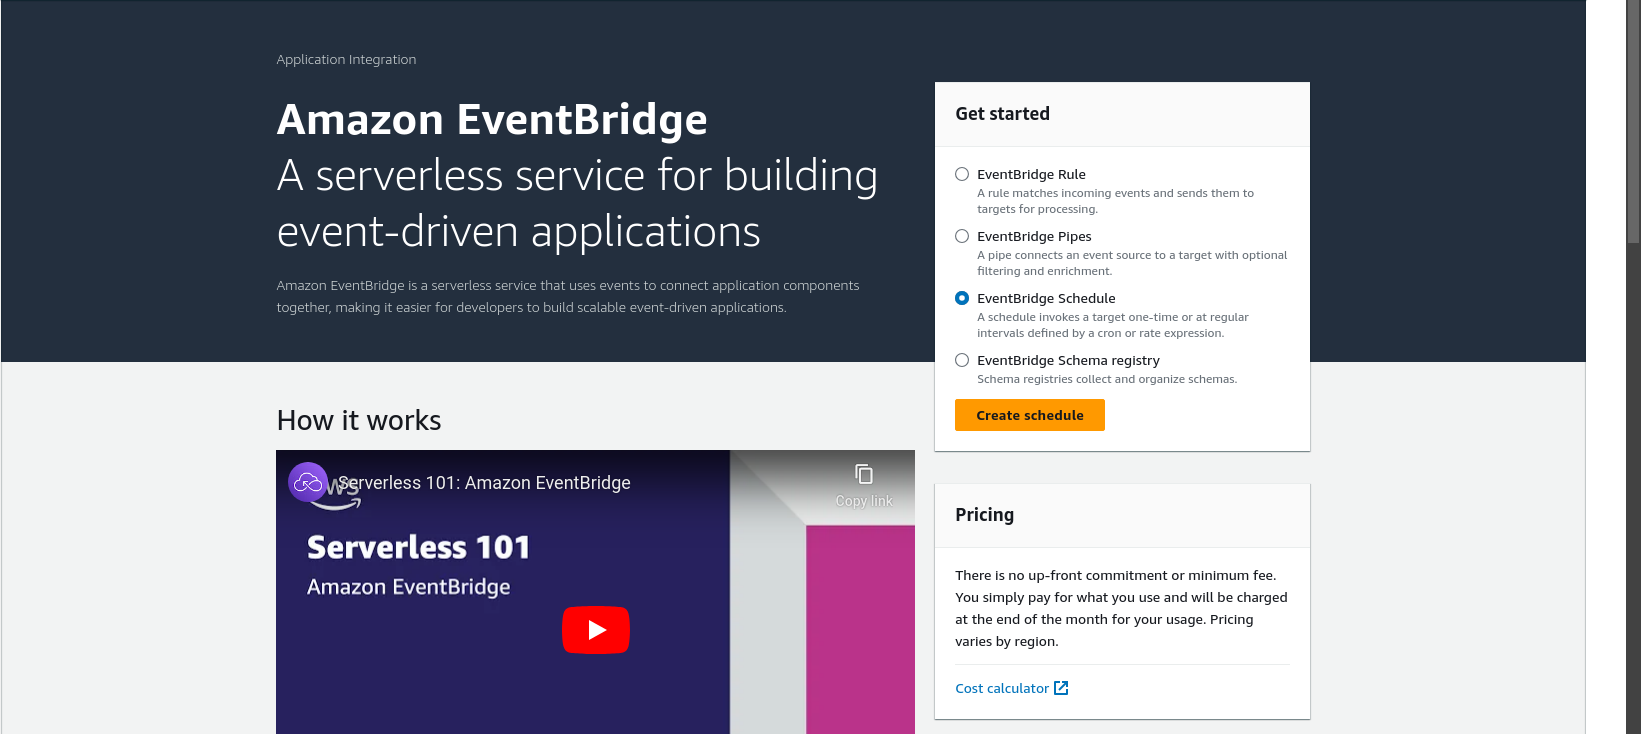
Click on Amazon EventBridge and then select EventBridge Schedule. Click the "Create schedule" button.
Let's create a recurring schedule using a Cron-based schedule to run every day at 00:00 hours.
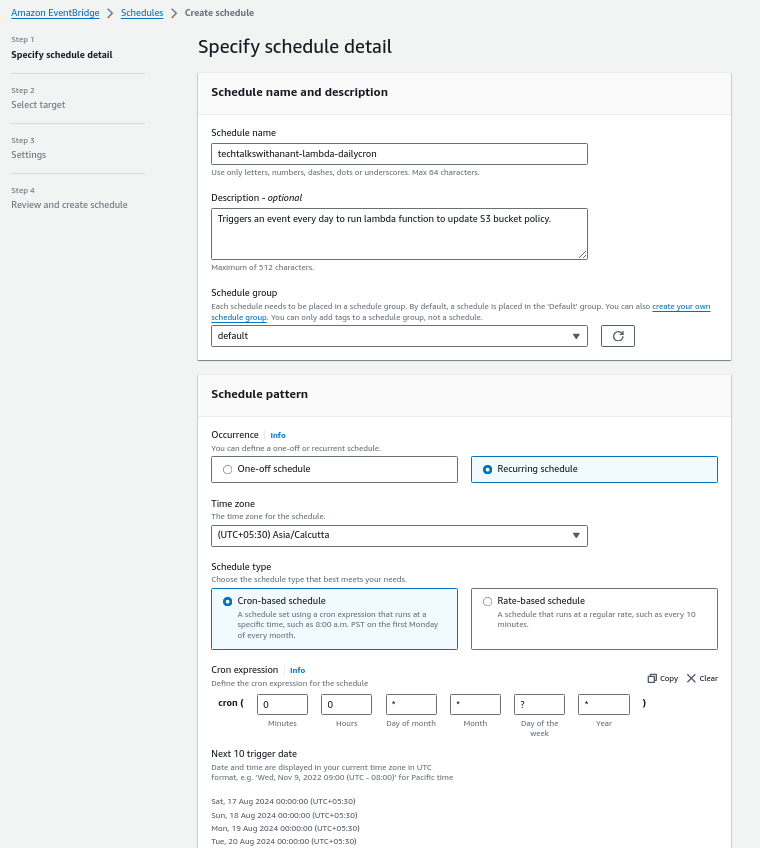
Click on Next.
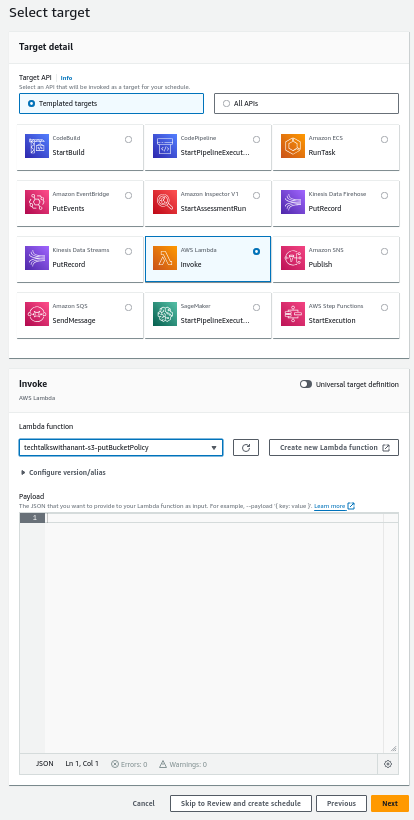
While selecting the Target, choose Templated targets and click on AWS Lambda Invoke. Select the Lambda function from the drop-down menu. Click on "Skip to Review and create schedule" and then Create Schedule.
We have successfully created a daily schedule to invoke a Lambda function that automatically updates the S3 bucket policy based on the Cloudflare IPs fetched from the API.
Error Handling
Here are some common errors and troubleshooting tips:
ImportModuleError:
Issue: This error occurs when a required module is not found.
Solution: Ensure all third-party dependencies are included in Lambda layers. For example, if you are using the
requestsmodule, create a Lambda layer with the necessary dependencies and attach it to your Lambda function.
Permission Denied:
Issue: This error occurs when the Lambda function does not have the required permissions to perform an action, such as updating an S3 bucket policy.
Solution: Verify that the IAM role associated with the Lambda function has the necessary permissions. Create a custom IAM policy that allows
PutBucketPolicyactions on the specific S3 bucket and attach it to the Lambda role.
Rate Limiting:
Issue: AWS services have rate limits that can be exceeded if your Lambda function is invoked too frequently.
Solution: Implement exponential backoff and retry logic in your Lambda function to handle rate-limiting errors gracefully.
Invalid JSON Response:
Issue: The API response might not be in the expected JSON format.
Solution: Add error handling to check the validity of the JSON response before processing it. Use try-except blocks to catch and handle JSON parsing errors.
Lambda Timeout:
Issue: The Lambda function might exceed the maximum execution time.
Solution: Optimize the code to reduce execution time. If necessary, increase the timeout setting for the Lambda function in the AWS Management Console.
EventBridge Schedule Issues:
Issue: The EventBridge schedule might not trigger the Lambda function as expected.
Solution: Verify the EventBridge rule configuration and ensure it is correctly set to trigger the Lambda function at the specified intervals. Check the CloudWatch logs for any errors related to the EventBridge rule.
Conclusion
Summary of key points
This article outlines step-by-step instructions for securing an Amazon S3 bucket by restricting access to only Cloudflare IPs. It covers creating a Lambda function to fetch Cloudflare IP ranges via API and update the bucket policy, incorporating AWS EventBridge Schedule to automate the task on a daily basis.
Key insights include the benefits of AWS Lambda and EventBridge in event-driven architecture, managing AWS credentials, setting up Lambda functions and layers, and configuring IAM roles and policies for necessary permissions. This ensures a more secure and reliable static website hosted on S3.
Coming up next
We will complete our project by incorporating CI/CD into our process by using AWS CodePipeline. This will ensure that all our code changes are automatically deployed without any manual effort.
Subscribe to my newsletter
Read articles from Anant Vaid directly inside your inbox. Subscribe to the newsletter, and don't miss out.
Written by

Anant Vaid
Anant Vaid
An Aspiring DevOps Engineer passionate about automation, CI/CD, and cloud technologies. On a journey to simplify and optimize development workflows.