How to Create a Multiplayer Web App in OutSystems using Liveblocks
 Houman Mohebbi
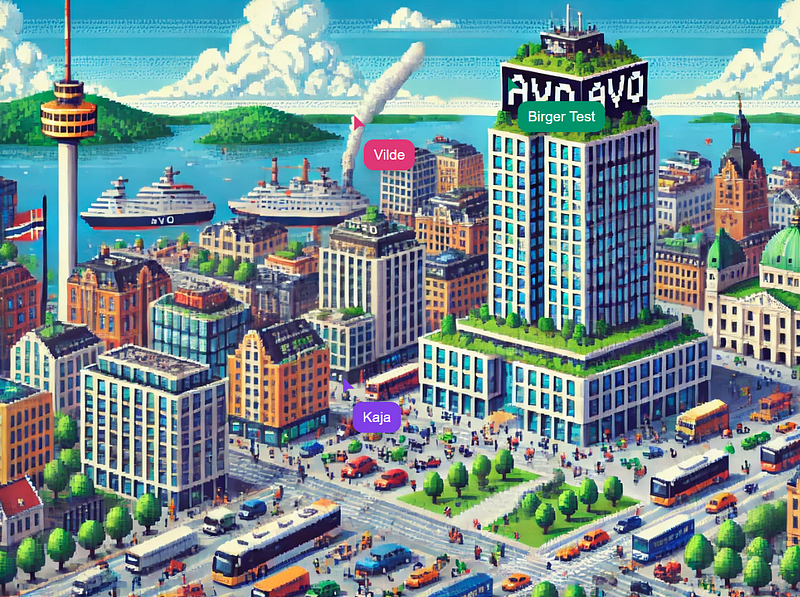
The “What is this about?” part
Collaborative web applications are increasingly important because they enable real-time teamwork and communication, which is crucial in today’s remote and hybrid work environments. As businesses seek more efficient ways to work together from different locations or engage with customers, we need an easy way to integrate real-time collaborative experiences into our business apps.
This article gives a tutorial on how to get started building your own collaborative multiplayer experience in OutSystems using Liveblocks.
The goal of this simply to demonstrate how to integrate Liveblocks into OutSystems with Miro or Figma like live cursors to see the presence of the other users in the same Room as seen on the picture above.
OutSystems is a low-code platform that helps you build apps quickly with a visual interface and ready-made components. You can also add your own custom code using .NET and JavaScript for more complex features. It’s a great tool for developers who want the ease of low-code with the flexibility of high-code.
Liveblocks is a platform that makes it super easy to add real-time collaboration features to your apps. It lets you build things like multiplayer editing or live presence, with just a few lines of code. Plus, if you want to get fancy, you can extend it with your own custom JavaScript to create unique, interactive experiences. It’s perfect for businesses looking to add live, interactive elements to their projects quickly.
The tutorial part..
The stuff you need to do before diving into the tutorial..
Before we get started we need to have a few things in place:
IDE of choice — I use VS Code
Be able to run NPM (run npm -v in terminal to check version installed)
OutSystems Environment and Service Studio (Sign up for free personal environment)
Liveblocks account (Register for a free)
Basic knowledge of OutSystems and JavaScript/TypeScript
The NPM part…
Start by creating a folder for your code and open the folder in VS Code (as admin).
Then, we need to initialize the package.json file with default values
npm init -y
Now we are ready to install the latest version of Liveblocks Client and its dependencies using NPM install
npm install @liveblocks/client
There was a catch in using Node modules in OutSystems, as it does not support integrating Node modules directly, so we need to use some workarounds in order to make it work. Namely, we need to bundle the code into a single JavaScript file with the necessary dependencies included i the file. To do this we need to install a bundler. In this case, I am going to use ESBuild.
npm install esbuild
The code part…
Now we will implement the code. First off create a file called app.ts in the root of your folder.
We first need to import our Liveblocks/client module which will be used to create a client with aRoom and Authentication to communicate with the Liveblocks server. We also need to declare a structure that will hold the properties of each user's presence in the Room.
import { createClient } from "@liveblocks/client";

declare global {
  interface Liveblocks {
    // Each user's Presence
    Presence: {
      cursor: {
        x: number; // The x-coordinate of the cursor's position.
        y: number; // The y-coordinate of the cursor's position.
        name: string; // The user's name.
        city: string; // The user's city.
        countryCode: string; // The user's country code.
      } | null;
    };
  }
}
Let's define some other variables and constants that we need. The PUBLIC_KEY can be found in the Liveblocks Dashboard →Projects → {Environement} → API keys.
Be aware that for this demo we will be using a public key, but for production scenerios more robust authentication should be used. Learn more about them here: https://liveblocks.io/docs/authentication.
let PUBLIC_KEY = "{public_key}";
let roomId = "LiveblocksOutSystemsDemo";
// User's location name for cursor
let locationData: { city: string; countryCode: string } ;
// User's cursor name
let cursorName: string;
// Container for cursors that will be implemented in OutSystems
const cursorsContainer = document.getElementById("cursorscontainer")!;
//Colors assigned to each user
const COLORS = ["#DC2626", "#D97706", "#059669", "#7C3AED", "#DB2777", "#3B82F6", "#16A34A", "#F59E0B", "#EC4899", "#4B5563"];
Now let's initiate the client and assign the collaborative Room
const client = createClient({
  throttle: 16, // websocket throttle in milliseconds to smooth the realtime animations
  publicApiKey: PUBLIC_KEY,
});

// Enter room with initial presence
const { room, leave } = client.enterRoom(roomId, {
  initialPresence: { cursor: null },
});
To receive other users' presence we need to subscribe to events where cursors change. We will also add the functions for cursor CRUD operations later on.
room.subscribe("others", (others, event) => {
  switch (event.type) {
    case "reset": {
      // Clear all cursors
      cursorsContainer.innerHTML = "";
      for (const user of others) {
        updateCursor(user);
      }
      break;
    }
    case "leave": {
      deleteCursor(event.user);
      break;
    }
    case "enter":
    case "update": {
      updateCursor(event.user);
      break;
    }
  }
});
Now let’s add some Listeners to update the presence on each Pointer move and leave. Notice that we also update the user's name from an input field which we will later on define in OutSystems.
// Listen for pointer movements
document.addEventListener("pointermove", (event) => {
  // Get cursor container boundaries
  const rect = cursorsContainer.getBoundingClientRect();
  // Calculate cursor x and y within the container bounds
  const x = Math.min(Math.max(event.clientX - rect.left, 0), rect.width);
  const y = Math.min(Math.max(event.clientY - rect.top, 0), rect.height);

  // Get the user's name from input field
  const inputName = document.getElementById("nameInput")! as HTMLInputElement;
  cursorName = inputName.value ? inputName.value : "";

  // Update user's presence with cursor position and info
  room.updatePresence({
    cursor: { x: Math.round(x), y: Math.round(y), name: cursorName, city: locationData.city, countryCode: locationData.countryCode },
  });
});

// Set cursor to null when pointer leaves the document
document.addEventListener("pointerleave", (e) => {
  room.updatePresence({ cursor: null });
});
At the end of the code, we need to add some code to visualize the cursors with labels.
// Updates the cursor's position and visibility based on user presence
function updateCursor(user) {
  const cursor = getCursorOrCreate(user.connectionId);

  if (user.presence?.cursor) {
    // Set cursor position and make it visible
    cursor.style.transform = `translate(${user.presence.cursor.x}px, ${user.presence.cursor.y}px)`;
    cursor.style.opacity = "1";

    // Update cursor label text and position
    const cursorText = document.getElementById(`cursortext${user.connectionId}`);
    if (cursorText) {
      cursorText.style.transform = `translate(${user.presence.cursor.x}px, ${user.presence.cursor.y + 20}px)`;
      cursorText.textContent = user.presence.cursor.name ? `${user.presence.cursor.name}` : `${user.presence.cursor.city}, ${user.presence.cursor.countryCode}`;
      cursorText.style.opacity = "1";
    }
  } else {
    // Hide cursor and label when user presence is not available
    cursor.style.opacity = "0";
    const cursorText = document.getElementById(`cursortext${user.connectionId}`);
    if (cursorText) {
      cursorText.style.opacity = "0";
    }
  }
}

// Retrieves or creates a cursor element for the specified connectionId
function getCursorOrCreate(connectionId): HTMLElement {
  let cursor: HTMLElement | null = document.getElementById(`cursor${connectionId}`);
  let cursorText: HTMLElement | null = document.getElementById(`cursortext${connectionId}`);

  if (cursor == null) {
    // Clone the cursor template and assign a unique ID
    cursor = document.getElementById("cursortemplate")!.cloneNode(true) as HTMLElement;
    cursor.id = `cursor${connectionId}`;
    cursor.style.fill = COLORS[connectionId % COLORS.length];

    // Create and style the cursor text element
    cursorText = document.createElement("div");
    cursorText.id = `cursortext${connectionId}`;
    cursorText.style.backgroundColor = cursor.style.fill;
    cursorText.className = 'cursortext';
    cursorText.style.position = 'absolute';
    cursorText.style.opacity = '0'; // Initially hidden

    // Append the cursor and text elements to the container
    cursorsContainer.appendChild(cursor);
    cursorsContainer.appendChild(cursorText);
  }

  return cursor;
}

// Removes the cursor and associated label for the given user
function deleteCursor(user) {
  const cursor = document.getElementById(`cursor${user.connectionId}`);
  const cursorText = document.getElementById(`cursortext${user.connectionId}`);
  if (cursor) {
    cursor.parentNode!.removeChild(cursor);
  }
  if (cursorText) {
    cursorText.parentNode!.removeChild(cursorText);
  }
}
As seen previously in the code we also have the user's location in the Presence structure. This is so that we can see a label before the user has input any username. So let's add this function at the end.
// Function to fetch geolocation data based on IP address
async function fetchLocation() {
  try {
    const response = await fetch('https://ipapi.co/json/');
    const data = await response.json();
    return {
      city: data.city,
      countryCode: data.country_code
    };
  } catch (error) {
    console.error('Failed to fetch location data:', error);
    return {
      city: 'Unknown',
      countryCode: 'Unknown'
    };
  }
}
and we need to fetch location data once at the start of the code, for example, before creating the client.
..
//const COLORS = ["#DC2626", "#D97706" ...

// Fetch location data at the start
fetchLocation().then(location => {
  locationData = location;
});

//const client = createClient({
..
The build and bundle part…
Now we are going to build and bundle the code and its dependencies into a single JavaScript -file that can be used in OutSystems.
Let's add a folder called “static”. This is where our bundled file will go.
mkdir static
In the package.json remove the “main” property and change the “scripts” property so that we use esbuild bundle the file. It should look something like this
 "name": "liveblocksdemo",
  "version": "1.0.0",
  "scripts": {
    "build": "esbuild app.ts --bundle --outfile=static/liveblocks.js"
  },
  "keywords": [],
  "author": "",
  "license": "ISC",
  "description": "",
  "dependencies": {
    "@liveblocks/client": "^2.4.0",
    "esbuild": "^0.23.0"
  }
}
now build and you will get a file static/liveblocks.js
npm run build
The Low-Code part…
Let’s move on to OutSystems Service Studio to integrate the code we have generated.
Start by setting up the app
Create an App from scratch, and give it a name and logo
Create a Module as “Reactive Web App” and give it a name
Create a “Blank” Screen in the MainFlow of the Interface
Then we need to go to Interface → Scripts → import Script and choose the JavaScript bundle from the previous part, liveblocks.js
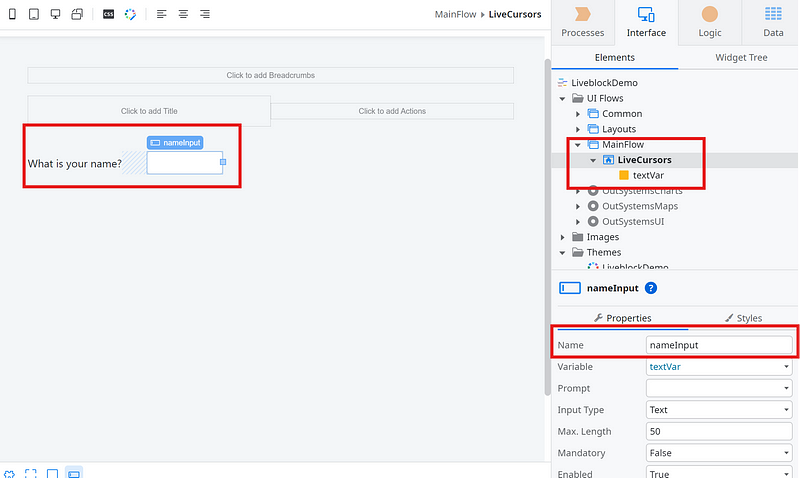
We then need to set up our UI. Let's put a simple Input Widget where users can provide their names. Assign a local Variable to the Input Field.
Name: nameInput (ref. eventListener in the code)
To display the cursors for each user, we will incorporate an Inline SVG Widget into our UI. SVGs are particularly useful when we want editable graphics, such as when we need to change the color of the cursors.
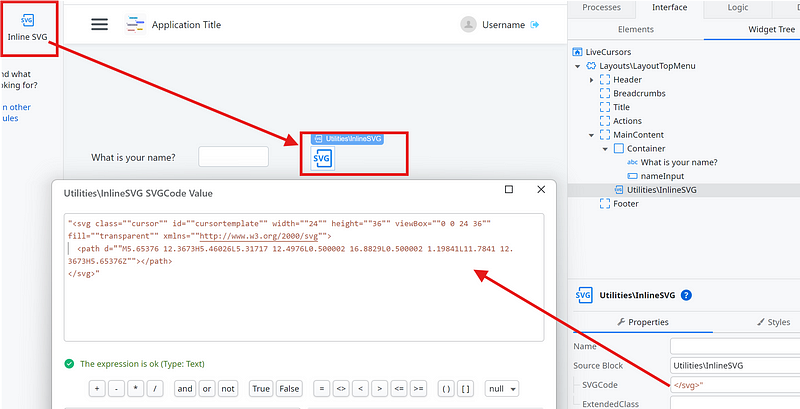
Here’s the SVGCode for copy-paste
"<svg class=""cursor"" id=""cursortemplate"" width=""24"" height=""36"" viewBox=""0 0 24 36"" fill=""transparent"" xmlns=""http://www.w3.org/2000/svg"">
<path d=""M5.65376 12.3673H5.46026L5.31717 12.4976L0.500002 16.8829L0.500002 1.19841L11.7841 12.3673H5.65376Z""></path>
</svg>"
Last we need to define a Container for the boundaries where cursors will collaborate. Give it the following properties
Name: cursorscontainer
Height: 600px
Width: 800px
Background Color: {of your choice}
To give it the Miro-like look and feel add these CSS elements to your app:
.cursor {
  position: absolute;
  top: 0;
  left: 0;
  opacity: 100%;
}

#cursorscontainer {
  position: relative;
  top: 0;
  left: 0;
  width: 100vw;
  height: 100vh;
}

/* Cursor Text */
.cursortext {
  position: absolute;
  width: auto; /* Auto width for dynamic text */
  height: auto; /* Auto height for dynamic text */
  color: #ffffff; /* White text color */
  padding: 5px 10px; /* Padding around the text */
  border-radius: 10px; /* Rounded corners */
  font-size: 14px; /* Font size */
  font-family: Arial, sans-serif; /* Font family */
  box-shadow: 0px 4px 10px rgba(0, 0, 0, 0.2); /* Soft shadow for depth */
  transition: opacity 0.2s ease-in-out; /* Smooth transition for opacity */
  pointer-events: none; /* Prevent the cursor from interacting with the label */
  opacity: 0; /* Initially hidden */
  left: 10px; /* Position from the left */
  top: 5px;
  z-index: 1000; /* Ensure it appears above other elements */
}
As a Final step before we publish, we need to add the JavaScript to run at the end of the Body when the page is loaded.
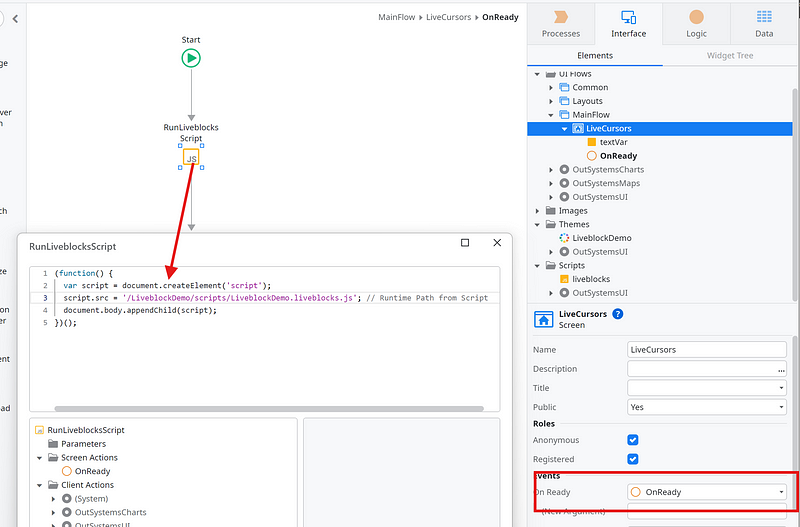
Go to Screen and add OnReady event
In the Client Action “OnReady” a JavaScript widget with the following code ( remember to change src to your JavaScripts Runtime Path)
(function() {
  var script = document.createElement('script');
  script.src = '/LiveblockDemo/scripts/LiveblockDemo.liveblocks.js'; // Runtime Path from Script
  document.body.appendChild(script);
})();
NOW PUBLISH!
Open two browser windows side-by-side and see it in action. You should get something like this. Voilà, multiplayer real-time cursors in OutSystems!
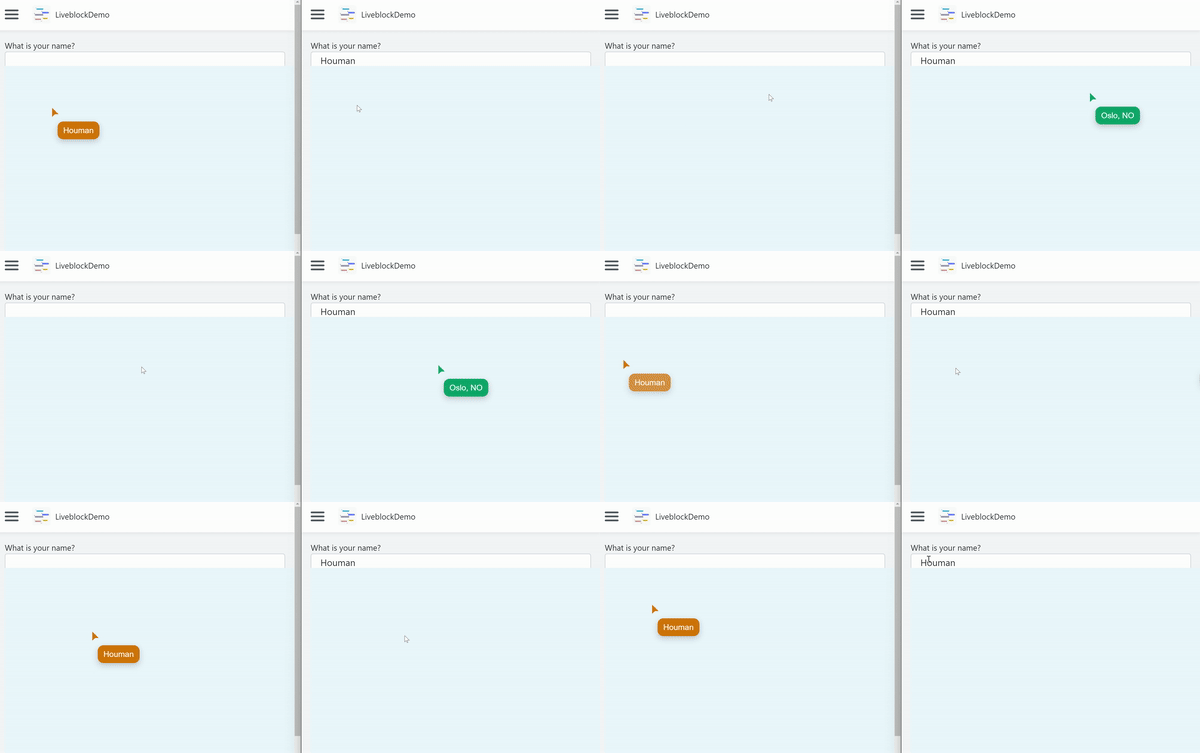
Example with two Clients, where one fetches location and one has name filled
Feel free to test out demo app here
The “Final thoughts” part...
In this tutorial, we only scratched the surface of what’s possible with Liveblocks and its multiplayer features. For more in-depth information, please visit their website and documentation. I know I will explore further as well.
I believe this tutorial provides a basic starting point for building a collaborative multiplayer web app on OutSystems. To make this app production-ready, we need to implement more secure authentication methods, modify the JavaScript code and OutSystems configurations to better integrate Rooms and Users through actions and data in OutSystems, and also ensure the cursor presence is responsive across different screen resolutions. I look forward to exploring this some more and how it can be used in different use cases.

Feel free to connect with me on LinkedIn to share thoughts
Subscribe to my newsletter
Read articles from Houman Mohebbi directly inside your inbox. Subscribe to the newsletter, and don't miss out.
Written by

Houman Mohebbi
Houman Mohebbi
Solution Architect working at Avo Consulting, Norway. Exploring and writing about app development using low-code and no-code tools.