Enhancing Cybersecurity with SOAR-EDR: A Comprehensive Project Using LimaCharlie, Slack, and Tines
 TATHAGATA ROY
Table of contents
- Introduction to SOAR-EDR Integration
- Project Objectives
- Setting Up LimaCharlie for SOAR-EDR
- Generating and Detecting Telemetry with LaZagne
- Setting Up Detection and Response Rules
- Integrating LimaCharlie with Slack and Tines
- Implementing User Prompts and Machine Isolation
- Testing and Finalizing the SOAR-EDR Workflow
- Conclusion
- FAQs Section

Here in this project the enhancement of cybersecurity with a SOAR-EDR project using LimaCharlie, Slack, and Tines will be demonstrated.
Introduction to SOAR-EDR Integration
Overview of SOAR-EDR and Its Importance
Definition of SOAR and EDR: Security Orchestration, Automation, and Response (SOAR) and Endpoint Detection and Response (EDR) are two critical components in modern cybersecurity. SOAR platforms help automate and orchestrate security operations, while EDR tools focus on detecting and responding to threats on endpoint devices. The integration of these two technologies creates a robust security environment capable of quickly identifying and neutralizing threats.
Importance of SOAR-EDR Integration: The integration of SOAR and EDR enhances the efficiency and effectiveness of security operations. By automating routine tasks, SOAR allows security teams to focus on more complex threats, while EDR provides the detailed endpoint data necessary for comprehensive threat analysis and response.
Project Objectives
Here is the workflow diagram that we will follow through the project build up and execution.
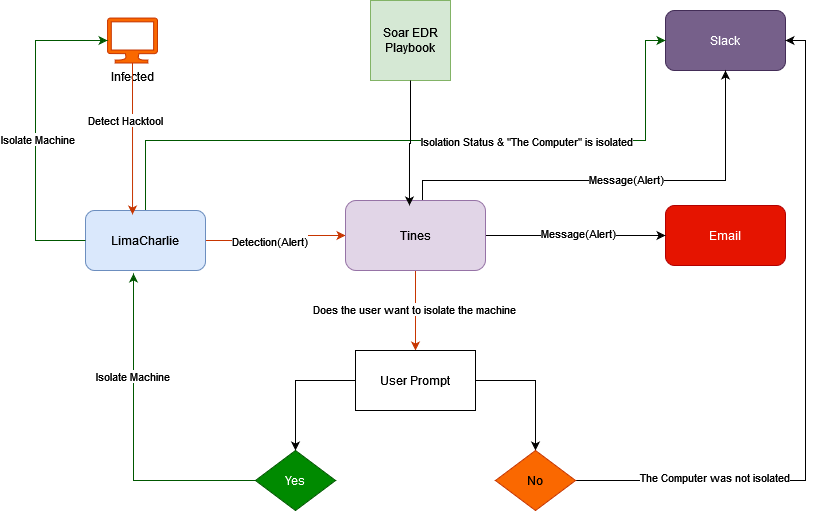
Aims of the SOAR-EDR Project: The primary goal of this project is to set up a fully integrated SOAR-EDR system using LimaCharlie, Slack, and Tines. The project aims to automate the detection and response processes, reducing the time and effort required to manage and mitigate security incidents.
Benefits of Automation: Automating threat detection and response reduces human error, speeds up incident response times, and ensures consistent handling of security events. This project will demonstrate how these benefits can be realized through the use of LimaCharlie for endpoint management, Slack for communication, and Tines for workflow automation.
Setting Up LimaCharlie for SOAR-EDR
Creating an Organization in LimaCharlie
Setting Up an Account: Start by setting up an account on LimaCharlie. This platform allows us to manage sensors (endpoints) and installation keys, which are essential for controlling and monitoring the systems.
Creating an Organization: Once the account is set up, the next step is to create an organization within LimaCharlie. This organization will house all the sensors and installation keys. Within this organization, we’ll find pre-created sensors and installation keys that are used to manage and monitor endpoints.
Installing and Configuring the Sensor
Creating a New Installation Key: To begin, create a new installation key named “SOAR-EDR-Project.” Installation keys in LimaCharlie are used to authenticate sensors, which are responsible for collecting and sending telemetry data from the endpoint to LimaCharlie.
Downloading the Sensor: Navigate to the “Installation Keys” section, where we’ll find sensor download links. For this project, select the EDR sensor for Windows 64-bit. Copy the download link, paste it into the server, and download the
.exefile.Installing the Sensor: Now we copy the sensor key from the installation keys project. Open PowerShell in Administrator mode, navigate to the directory where the sensor
.exewas downloaded, and run the installation commandlc_sensor.exe -i YOUR_INSTALLATION_KEY. This command installs the sensor on the server, linking it to our LimaCharlie organization. Sensor key is the Installation key here. After installing the sensor, this image will appear.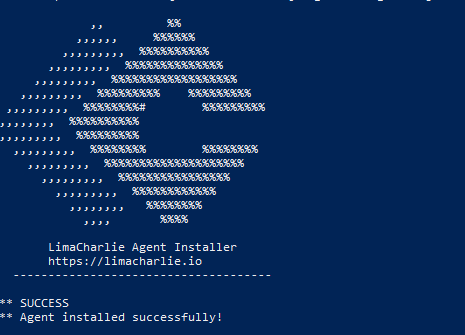
Verifying the Installation: After installation, check the services on our server to ensure that the LimaCharlie service is running. Additionally, navigate to the “Sensors” list in LimaCharlie, where we should see our server listed as an active sensor. This indicates that the sensor is properly installed and communicating with LimaCharlie. Click on the server, there will be a bunch of information about the server there.
Generating and Detecting Telemetry with LaZagne
Running LaZagne to Generate Telemetry
Introduction to LaZagne: LaZagne is an open-source tool designed for credential dumping, which extracts sensitive information like usernames and passwords from various applications on a system. In this project, LaZagne will be used to generate telemetry that LimaCharlie can detect and analyze.
Disabling Windows Security: Before running LaZagne, disable Windows Security on the server to prevent interference with the telemetry generation. This step is necessary as security software might block LaZagne from executing, thereby hindering the demonstration of the SOAR-EDR workflow.
Downloading and Running LaZagne: Download the latest release of LaZagne (e.g., version 2.4.6) from GitHub. Run the executable on the server using the command
.\LaZagne.exe. This execution will generate telemetry data that the LimaCharlie sensor will pick up, simulating a real-world credential dumping attack.
Analyzing Telemetry in LimaCharlie
Searching for LaZagne-Related Events: After running LaZagne, navigate to the “Sensors” list in LimaCharlie and select your server. Go to the “Timeline” section and search for events related to LaZagne. You should see various events associated with the execution of LaZagne, such as process creation.
Examining New_Process Events: Focus on the
new_processevents, which indicate the creation of a new process (in this case, LaZagne). This telemetry is crucial for detecting potential malicious activities, as it shows that an unauthorized or suspicious process has been executed on the endpoint.
Setting Up Detection and Response Rules
Creating Custom Detection Rules in LimaCharlie
Accessing D&R Rules: LimaCharlie’s D&R (Detection and Response) Rules allow you to create and manage detection and response strategies. In this project, you will create a custom detection rule to identify and respond to the execution of LaZagne. It can be found under the automation section.
Copying and Modifying Rules from GitHub: Search for existing rules related to credential dumping or suspicious process creation, such as
windows_process_creation/proc_creation_win_lolbin_device_credential_deployment. This rule is available on a GitHub repository. Copy the raw rule code and create a new rule in LimaCharlie.Customizing the Rule: In the new rule, paste the copied code into the “Detect” window and move the “Respond” block to the appropriate section. Modify the detection criteria to trigger only on
NEW_PROCESSorEXISTING_PROCESSevents. This customization ensures that the rule is specifically tailored to detect the execution of LaZagne. Delete the detect: and respond: row in the code, also in the events section we can see that there is aNEW_PROCESSandEXISTING_PROCESS, so the process will only trigger if it is underNEW_PROCESSorEXISTING_PROCESSevent type. The edited detect block should be like this: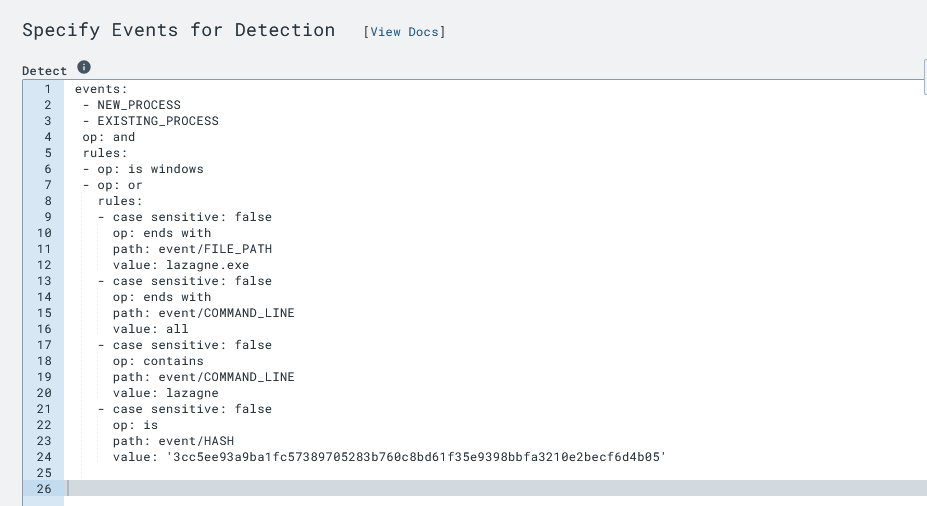
now head over to the respond block, make the necessary changes and save the rules. Any existing rule can be modified according to the project and a new rule can be created.
Responding to Detected Threats
Setting Up Response Actions: In the “Respond” section of the rule, define the actions that should be taken when LaZagne is detected. For example, you can configure LimaCharlie to isolate the affected machine from the network or send an alert to the security team.
Testing the Detection and Response: Run LaZagne again on the server and monitor the detection rule’s performance in LimaCharlie. Verify that the rule triggers as expected and that the defined response actions are executed. This step confirms that the SOAR-EDR integration is functioning correctly. Now head over to server and run
.\LaZagne.exe, now head over to detection and refresh it, all the detections will be there, there will be the respond name there, click on it and there will be a link which will be later used in the playbook.
Integrating LimaCharlie with Slack and Tines
Setting Up Slack for Alerts
Creating a Slack Account and Workspace: Slack is used in this project for real-time communication and alerting. Start by creating a Slack account and setting up a new workspace. This workspace will serve as the communication hub for security alerts generated by LimaCharlie.
Creating a Channel for Alerts: Within your Slack workspace, create a new channel dedicated to security alerts. Name it something relevant like
#security-alertsto ensure it is easily identifiable. This channel will receive notifications from LimaCharlie when a threat is detected.
Building the Playbook in Tines
Introduction to Tines: Tines is an automation platform that allows you to build security workflows (playbooks). In this project, Tines will be used to automate the handling of security alerts generated by LimaCharlie and ensure that they are properly communicated via Slack.
Creating a Webhook in Tines: Start by signing up for Tines and creating a new playbook. Add a webhook action to your playbook, which will receive detection data from LimaCharlie. Copy the webhook URL provided by Tines.
Connecting Tines to LimaCharlie: In LimaCharlie, navigate to the “Outputs” section and add a new output for detections. Select Tines as the destination and paste the webhook URL from Tines into the destination host field. This connection enables LimaCharlie to send detection data directly to your Tines playbook.
Testing Detection Retrieval: To ensure the integration is working, trigger a detection event in LimaCharlie (e.g., by running LaZagne again) and check Tines to verify that the webhook successfully retrieves the detection data. Now we will build the playbook according to the workflow.
Automating Notifications with Slack and Email
Configuring Slack Notifications in Tines: In your Tines playbook, add a Slack action that sends a message to the
#security-alertschannel when a detection event is received from the applications tab. Now we navigate to tines credentials then to tines app for slack. Now we head over to story and grab on slack, add it to playbook. Select send a message, we copy the channel id of alerts from slack and paste it to id field in, send a message, type in the message, we want to be shown and connect it. Now we draw a line from the webhook to the slack block. Then we test the connection and view the logs, we can now head over to check the alerts in the slack for messages. We can customize the message to include details such as the time of detection, the affected machine, and the nature of the threat.Setting Up Email Alerts: In addition to Slack, configure an email action in Tines to send email notifications for detections. This redundancy ensures that critical alerts are not missed. Now we draw a line from webhook to the email block, choose build, fill out the description, we add the email id options, we test it with the webhook, select the first id that is the latest one, there should be an alert in the email. Use the
<br>HTML tag to format the message for readability.Testing and Verifying the Integration: Test the entire notification workflow by generating a detection event and confirming that both Slack and email alerts are received with the correct information.
Implementing User Prompts and Machine Isolation
Designing User Prompts for Threat Response
Creating User Prompts in Tines: User prompts allow for interactive decision-making during incident response. In Tines, create a user prompt page that asks the security team whether they want to isolate the affected machine. This prompt provides a way to verify and control automated actions. we go to tools, select page, we name it user prompt, then edit the description and succcess message, then we link the webhook with the user prompt. We set up the webhook so that it sends details of the detection to the email and the slack.To get the appropriate information in the email and slack we have to paste this block into the messages section.
  Title: <<retrieve_detections.body.cat>>
  Time: <<retrieve_detections.body.detect.routing.event_time>>
  Computer: <<retrieve_detections.body.detect.routing.hostname>>
  Source IP: <<retrieve_detections.body.detect.routing.int_ip>>
  Username: <<retrieve_detections.body.detect.event.USER_NAME>>
  File Path: <<retrieve_detections.body.detect.event.FILE_PATH>>
  Command Line: <<retrieve_detections.body.detect.event.COMMAND_LINE>>
  Sensor ID: <<retrieve_detections.body.detect.routing.sid>>
  Detection: <<retrieve_detections.body.link>>
Now we test it in the slack by choosing the first action, now we head over to slack and watch the alert messages, we also have to do this for emails, for email we have to use
<br>tag after everyline for a line break. Now we edit the page, we go on to message, and addDo you want to isolate the machine?in the messages.Configuring the Boolean Block: Add a boolean block to the user prompt that provides the options “Yes” or “No” for machine isolation. This block will determine the next steps in the playbook based on the user’s choice. Change description of boolean to isolate,now we run the no block in a new page,next add a trigger block, connect the page block to the trigger block.
Now we will trigger a event where the user chooses
no. First we selectrules, thenvalue,thenuser_prompt,after thatbody, thenisolate,the result should beresult : false. Taking from the data of the user, prompt block is equal tofalse, after theisolate = falsethe slack will receive a meaasge, to do this we have to add a slack block after the trigger block the message should be ---The computer: {}retrieve_detections.body.detect.routing.hostname was not isolated, please investigate.Now connect the trigger block with the slack block and test the slack block from the
user_promptblock.Now we have to design the trigger event where the user chooses
yes, that will send messages to the limachrlie to isolate the infected machine. Now we will add another trgger for theyesprompt, we will reemmit another event fom the webhook,then click on the user prompt, we will selectyes, connect user prompt to theyestrigger, now the isolate option will betrue.The rules option will also beequal totrue.Connecting the Workflow: Link the user prompt to subsequent actions in the playbook, ensuring that the workflow dynamically adjusts based on the response. For instance, if the user selects “Yes,” the playbook should proceed to isolate the machine; if “No,” it might trigger a different response or log the decision for review.
Automating Machine Isolation with LimaCharlie
Setting Up the Isolation Command: For the yes prompt, after the boolean block, we have to add a new action that sends a request to LimaCharlie to isolate the affected machine.We choose
isolate sensor,thenchange the URLwithhttps://api.limacharlie.io/v1/<<retrieve_detections.body.detect.routing.sid>>/isolation>. Now we connect the trigger to theisolate sensor, if we see the result asno, then we have to rerun the plabook. To connect the credential with lima charlie, we have to getapi keysfrom lima charlie. We go toaccess management, then selectrest api,copy api key fromOrg JWT,then go to credential of tines, select new credential, selectname : limacharlie, paste thekey valuein theValue section. Fill outDomains: *.limacharlie.io. Save this then click on connect. We now select the credential, and test the user prompt.Now in limaCharlie in the overview section the network access should be isolated. If we now go on to the server and try to ping, it will fail. To remove the isolation, we have to rejoin the network from the limacharlie overview section. We have to click on the isolated, then rejoin. If we now ping from the server, it will get reply. Now we have to add a slack block after the limacharlie block that will receive the success messge, that the computer is isolated.
To add the slack block, we have to just copy the url from the
noblock. Themessageshould be ---The computer: {}retrieve_detections.body.detect.routing.hostname has been isolated.Testing the Isolation Workflow: Test the workflow by generating a detection event and following the user prompt to isolate the machine. After the isolation command is executed, verify in LimaCharlie that the machine is marked as isolated and that it is no longer accessible over the network.
Rejoining the Network: Demonstrate how to remove the isolation and rejoin the network from LimaCharlie’s overview section. This step is crucial for returning the machine to normal operations after the threat has been mitigated.
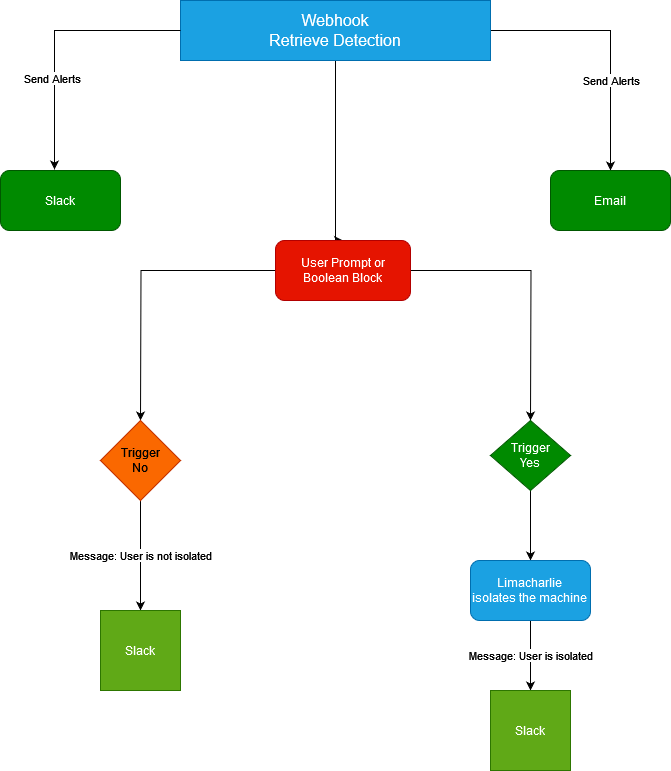
The playbook diagram should look like this
Testing and Finalizing the SOAR-EDR Workflow
Comprehensive Testing of the Playbook
Step-by-Step Testing: Conduct a thorough test of the entire SOAR-EDR workflow, from detection to response and notification. This testing should include all possible scenarios, such as successful and unsuccessful isolation attempts, and ensuring that alerts are correctly sent to Slack and email.
Troubleshooting Common Issues: Address any issues encountered during testing, such as misconfigured rules, failed notifications, or incorrect isolation commands. Document these issues and their solutions to assist with future troubleshooting.
Optimizing the Setup: Based on the test results, make any necessary adjustments to optimize the workflow. This could include fine-tuning detection rules, improving notification formatting, or adding additional response actions.
Regular Updates and Maintenance: Regularly update the components of the SOAR-EDR system, including LimaCharlie, Slack, and Tines. Keeping these tools up-to-date ensures that the system remains secure and efficient.
Monitoring and Adjusting Detection Rules: Continuously monitor the performance of your detection rules and adjust them as needed. As new threats emerge, you may need to create new rules or modify existing ones to maintain effective detection and response.
Conclusion
Summary of the SOAR-EDR Project
Recap of Key Steps: Summarized the key steps involved in setting up and configuring the SOAR-EDR project, from sensor installation to workflow automation. Emphasized the importance of each component in achieving a comprehensive security solution
Potential Integrations and Advancements: Discussed potential future advancements in SOAR and EDR technology, and how these could be integrated into the existing system. This might include the use of machine learning for advanced threat detection or the integration of additional communication platforms for broader alert distribution.
FAQs Section
What is the primary benefit of integrating SOAR with EDR?
- The primary benefit is the ability to automate and orchestrate the detection and response to security threats, reducing response times and improving the overall efficiency of security operations.
How does LimaCharlie improve threat detection and response?
- LimaCharlie provides real-time monitoring and management of endpoints, allowing for detailed telemetry collection and the execution of automated response actions based on predefined rules.
What role does LaZagne play in this project?
- LaZagne is used to simulate a credential dumping attack, generating telemetry data that is detected and analyzed by the SOAR-EDR system. This demonstrates the system’s ability to identify and respond to real-world threats.
How can I customize detection rules in LimaCharlie?
- Detection rules in LimaCharlie can be customized by accessing the D&R Rules section, where you can create new rules or modify existing ones to tailor the detection criteria and response actions to your specific needs.
What are the best practices for maintaining a SOAR-EDR setup?
Best practices include regularly updating all components of the system, monitoring and adjusting detection rules, and continuously testing the workflow to ensure optimal performance and security.
Resources
LimaCharlie Documentation[https://docs.limacharlie.io/docs]
Tines Documentation [https://www.tines.com/docs/quickstart/]
Subscribe to my newsletter
Read articles from TATHAGATA ROY directly inside your inbox. Subscribe to the newsletter, and don't miss out.
Written by

TATHAGATA ROY
TATHAGATA ROY
Hello! I'm a passionate and dedicated cybersecurity enthusiast with a love for learning and sharing insights, my blog dives deep into cybersecurity threats, technical analysis, and best practices to safeguard digital assets.