Setting Up an SMB Server on Ubuntu 24.04 Using GCP
 LakshmanaRao
Why this Article?
In today's world of cloud computing and distributed teams, file sharing is an essential aspect of collaboration. While cloud-based file-sharing services are popular, sometimes it's necessary to set up a local file-sharing system for security, compliance, or performance reasons. This article aims to provide a step-by-step guide on setting up SMB (Server Message Block) file sharing on Ubuntu 24.04, which can be helpful for system administrators, DevOps engineers, and anyone who needs to share files between Linux systems.
Prerequisites
Before we begin, ensure you have the following:
A Google Cloud Platform (GCP) account.
Basic knowledge of the Linux command line.
Terraform installed on your local machine.
💡 Tip: Make sure Terraform is installed on your local machine before proceeding.
Step 1: Create Linux VM Instances with Terraform
We begin by creating two Linux VM instances in GCP using Terraform. Here's a sample Terraform configuration to get started.
Run the following commands to deploy the instances:
terraform init
terraform apply
This will create two instances: a file server (smb-server) and a test server (test-server), both running Ubuntu 24.04.
Step 2: Install Samba on the File Server (smb-server)
Next, we'll install Samba, the SMB file-sharing server, on the smb-server.
# Update the package list to ensure we have the latest package information
sudo apt update

# Install Samba, the SMB file-sharing server
sudo apt install samba -y
Step 3: Configure Samba on the File Server (smb-server)
After installing Samba, we need to configure it to define how the file server will share directories.
Editing the Samba Configuration:
By default, Samba is configured with a set of default settings but we'll make some changes to the default configuration to demonstrate how to customize the setup and to provide a clear example of how to configure Samba. Before editing stop the smbd service.
# back up the original config file
sudo mv /etc/samba/smb.conf ~/smb.conf.bkp
#create a new config file
sudo vi /etc/samba/smb.conf
Add the following lines to the above file:
[global]
# Set the server string to identify the file server
server string = File sharing server

# Set the workgroup name to TEST
workgroup = TEST

# Set the security mode to user-level security
security = user

# Map unknown users to the guest account
map to guest = Bad User

# Set the name resolution order to broadcast and then host
name resolve order = bcast host

# Include the shares configuration file
include = /etc/samba/shares.conf
Explanation:
server string: A description of the server; it can be anything you like.workgroup: The name of the workgroup to which this server will belong.security: Sets the type of security (user-level in this case).map to guest: Maps users that don’t have a Samba account to the guest account.name resolve order: Defines the order of methods used to resolve hostnames.include: Includes another configuration file (shares.conf) for share definitions.
Creating the Shares Configuration File:
Now, create a new file to define the shared directories:
sudo vi /etc/samba/shares.conf
Add the following lines to define the public and private shares
[Public]
  path = /share/public
  force user = smbuser
  force group = smbgroup
  create mask = 0664
  force create mode = 0664
  directory mask = 0775
  force directory mode = 0775
  public = yes
  writable = yes
  browseable = yes

[Private]
  path = /share/private
  force user = smbuser
  force group = smbgroup
  create mask = 0640
  force create mode = 0640
  directory mask = 0750
  force directory mode = 0750
  public = no
  writable = yes
  valid users = @smbgroup
  browseable = no
Explanation:
Public Share: Accessible by everyone. Writable and browseable.
Private Share: Restricted to members of smbgroup. Non-browseable, meaning it won’t show up in a list of shares.
path= /share/public: Specifies the directory on the server that is being shared. Here, /share/public is the directory path.force user= smbuser: Ensures that all files created in this share are owned by the smbuser, regardless of who created them.force group= smbgroup: Similar to force user, this forces all files and directories in this share to belong to the smbgroup.create mask= 0664: This sets the default permissions for new files created in the share. 0664 means that files are readable and writable by the owner and group, but only readable by others.force create mode= 0664: Ensures that files will always be created with 0664 permissions, overriding the default if necessary.directory mask= 0775: Sets the default permissions for new directories. 0775 allows the owner and group to read, write, and execute, while others can read and execute.force directory mode= 0775: Similar to force create mode, this forces directories to have 0775 permissions.
Step 4: Create the Shared Directories on the File Server (smb-server)
Before creating the directories, let's ensure the smbuser and smbgroup exist on the file server.
Creating the smbuser and smbgroup:
If smbuser and smbgroup do not already exist, create them using the following commands
# Create a new group named smbgroup
sudo groupadd smbgroup

# Create a new user named smbuser and add them to smbgroup
sudo useradd -M -s /sbin/nologin -G smbgroup smbuser

# Add the smbuser to the smbgroup
sudo usermod -aG smbgroup smbuser
"Create a new user named smbuser, assign them to the smbgroup, and ensure the user doesn't have a home directory or shell, as this user is primarily for Samba access."
Create the Shared Directories:
After creating the user and group, proceed with creating the shared directories and setting the necessary permissions:
# Create the shared directories
sudo mkdir -p /share/public /share/private

# Set the ownership of the shared directories to smbuser and smbgroup
sudo chown smbuser:smbgroup /share/public /share/private

# Set the permissions of the shared directories
sudo chmod 0755 /share/public /share/private
Step 5: Restart the Samba Service on the File Server (smb-server)
To apply the changes made to the Samba configuration, restart the Samba service.
sudo systemctl restart smbd
⚠️ Important: After editing smb.conf and shares.conf, don’t forget to save the files and restart the Samba service to apply the changes.
Step 6: Test the File Sharing on the Test Server (test-server)
Finally, we will test the file sharing setup using the test server.
Install smbclient on both servers:
sudo apt install smbclient -y
List the Shared Directories:
Use smbclient to list the shared directories on the file server:
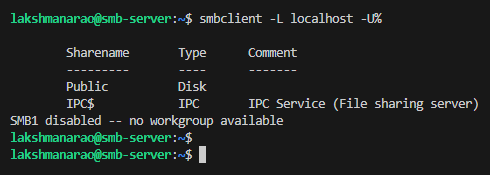
smbclient -L localhost -U%

as you can see above only public share is listed because only public is mentioned as browsable and private share didn't.
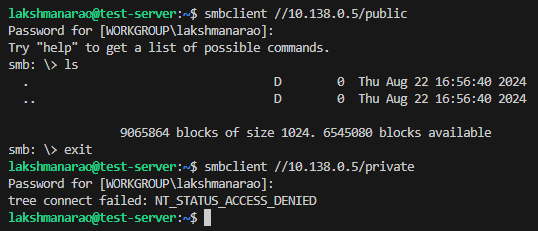
Connect to the Public Share from test-server:
smbclient //smb-server/public
Try to Connect to the Private Share from test-server:
smbclient //smb-server/private
the connection to public share will get succeed and private connection will fail.

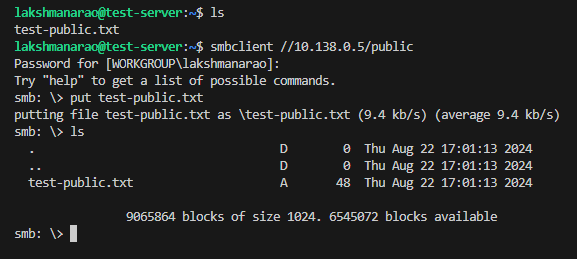
Now if we want we can write into public share as it is writable. create a text file in local machine and push it into public share.

Conclusion
By following this guide, you should have a fully functional SMB file-sharing setup on Ubuntu 24.04, allowing you to share files securely and efficiently across your network. This setup is particularly useful in scenarios where cloud-based file sharing isn't an option, and you need control over the file-sharing environment.
References
Subscribe to my newsletter
Read articles from LakshmanaRao directly inside your inbox. Subscribe to the newsletter, and don't miss out.
Written by
LakshmanaRao
LakshmanaRao
DevOps Engineer with specializing in designing, implementing, and maintaining cloud infrastructures on Azure and AWS. Proficient in Kubernetes (EKS, GKE, OpenShift v4), CI/CD pipelines, and infrastructure automation using Terraform and Ansible.