Intrusion Detection System (IDS) with Suricata
 chris tchassem
What and Why an IDS
An intrusion detection system is a technology used to monitor and analyze network and data traffic over a network and upon detection of unwanted traffic, an alert is activated which alarms security professionals on a potential breach so they can remedy to it.
The first officially recognized IDS having features based on the patterns of an intruder. As time passed by, this technology had been refined and upgraded to meet growing security issues.
Suricata
Suricata is one of the most popular and recent open-source intrusion detection systems which is mainly but not only signature-based. Signature-based means that it analyzes the traffic pattern based on already known malicious traits and if they match, an alert is sounded.
One big drawback of signature-based IDS is that if there is just a slight change in the behaviour of a malicious activity, detection will be impossible, and this clearly shows that knowledge is static when working with these kinds of IDS
To remedy to this, anomaly-based IDS have come to fruition in order to overcome the limitations of signature-based. As said in the first paragraph, suricata is not limited to signature-based detection although it is well its baseline is found. With the increasing creativity and innovation of engineers and scientists, suricata is able to act as an anomaly-based detector by integration of artificial intelligence. This feature is a game changer and a leverage that makes suricata one of the best IDS in existence.
Setting up suricata in Linux
Assuming you already have knowledge on how linux basic commands functions, to install suricata, these are the steps to be followed:
Setup the latest release and install
  sudo apt-get install software-properties-common
  sudo add-apt-repository ppa:oisf/suricata-stable
  sudo apt-get update
  sudo apt-get install suricata
Configure the suricata.yaml to suit your network
To configure suricata, you have to go to its yaml file directory and open the file:

Make appropriate changes like setting your IP address, network mask:

Add the right network interface

Activate rules or create custom rules

Adding rules to suricata
There generally exist two ways to add rules in suricata; which are the:
Using the suricata.rules file or creating a custom rule file like seen on the image above
Suricata.rule file
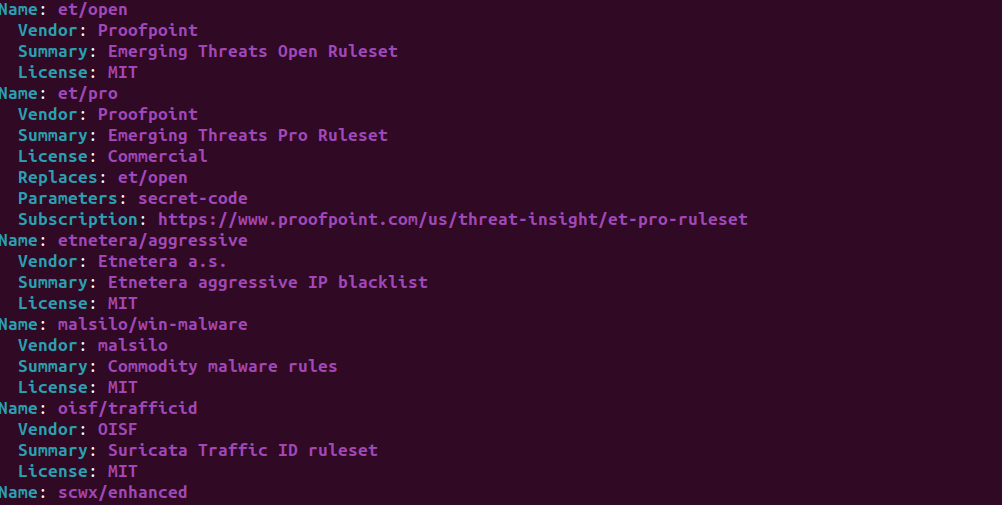
Using the suricata.rules file, you need to enter the following command to see the sources of available rules
sudo suricata-update list-sources

After selecting the rule to add, for instance the malsilo/win-malware, it can be added to the rule file and verified as follows:
sudo suricata-update enable-source malsilo-malware
sudo suricata-update list-enabled-sources
Custom.rule file
In order to to create and add your own custom file for rules in suricata, you need to have some knowledge on the format of a rule in suricata:
# action protocol source_ip source_port -> dest_ip dest_port (rule_options)
alert tcp any any -> any 80 (msg:"HTTP traffic detected"; sid:1000001;)
Like seen above, the basic format of a rule is made of:
action: Specifies the action to take when the rule is triggered.
protocol: Defines the protocol to monitor (e.g.,
tcp,udp,icmp,http).Source IP and Port: The source IP address and the port associated in the data traffic
->: Indicates the direction of the traffic flow; From source to destination.Destination IP and Port : Destination IP address and its associated port
Rule Options (inside parentheses):
A list of conditions or options that specify how the rule works. Common options include:msg:"HTTP traffic detected": Describes the rule, included in alerts.sid:1000001: Unique identifier for the rule (used to manage rules).content:"POST": Searches for specific content in the payload (e.g., HTTPPOSTrequest).rev:1: Revision number of the rule.
In order to execute a suricata command to inita=iate traffic analysis for potential alert, you can use the following command
sudo suricata -c /etc/suricata/suricata.yaml -i enps33 --set rule-files=/etc/suricata/rules/custom.rules
OR
sudo suricata -c /etc/suricata/suricata.yaml -i enps33 --set rule-files=/etc/suricata/rules/suricata.rules
Note that, when entering the command above, you need to specify which rule fule to use for detection.
After launching the command , you need to be able to see whether suricata had detected any unwanted traffic. Open another tab of the terminal and enter:
sudo tail -f /var/log/suricata/fast.log
OR
sudo tail -f /var/log/suricata/alerts.json
Conclusion
From the above article depicting how to setup and use IDS suricata, you can realize that learning how to use this tool is a leverage in strengthening your understandings of networks, servers, protocols and many other concepts in networking and security; as well as sharpening your skills in linux configuration and management.
Subscribe to my newsletter
Read articles from chris tchassem directly inside your inbox. Subscribe to the newsletter, and don't miss out.
Written by

chris tchassem
chris tchassem
I am a cybersecurity analyst, with growing skills in system monitoring, threat hunting, incident reponse as well as pentesting (Web, system and network).