Linux Backup : A project based Approach
 MD. TANVIR RAHMAN
Scenario:
As a Junior System Administrator at Office Security Solution, you’ve been tasked with setting up accounts for new employees and interns joining your company.
Task 1:
Your company is onboarding two full-time employees and two interns. You are required to:
Create separate home directories for each employee and intern.
Set the employee account format as
Employee_Name_EMP.Set the intern account format as
Intern_Name_INTwith a validity period of 6 months.
Solution for Task 1:
Create Directories and Users:
First, create two directories and two user accounts for the employees.
Assign each directory as the respective user’s home directory.
Assume the employee names are "John" and "Emily"
Repeat for Interns:
Next, create two directories and two user accounts for the interns.
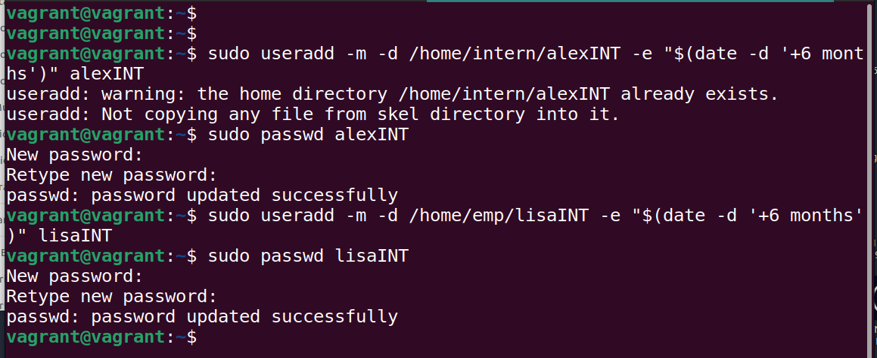
When creating the intern accounts, ensure to set their expiry date to 6 months from the date of creation.
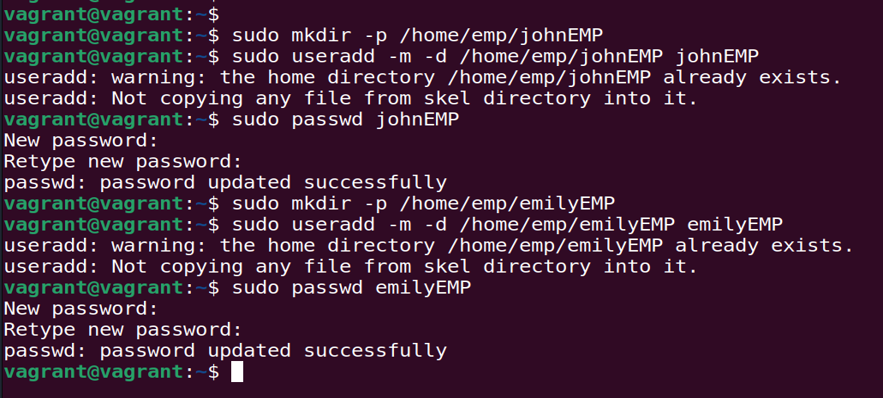
Below is the Linux command to create users "John" and "Emily," along with their respective home directories:
Creating Employee Users and Their Home Directories
For the employee accounts, you will create user profiles and assign them unique home directories. This step involves setting up the employee usernames in the required format, Employee_Name_EMP, and ensuring each directory is properly linked as the user’s home directory.
Creating Intern Users and Their Home Directories
When creating user accounts for the interns, you need to incorporate additional commands to set a 6-month expiration date for each account. This ensures that the intern accounts are automatically disabled after the specified period.
User Groups and Permissions
Task 2:
You are required to create two groups: Employees and Interns. Different permissions will be applied to each group.
Why Create Groups?
Creating groups allows you to efficiently manage permissions for multiple users at once. By adding users to a group, any permissions applied to that group will automatically apply to all its members. This approach is not only practical but essential in a real-world scenario, especially in a large organization.
For example, managing permissions individually for 500 employees would be impractical and unmanageable. Additionally, some users might require extended permissions. Grouping users simplifies the process, ensuring that permissions are consistently and efficiently applied.
Remember, a single user can be a part of multiple groups, which allows for flexibility in managing access rights.
Task 2 Solution
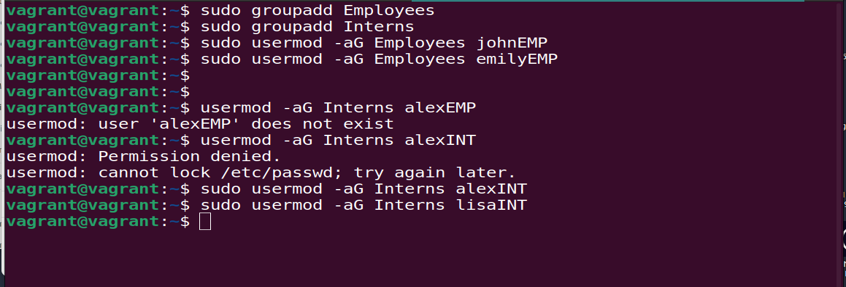
Creating Groups and Adding Users to the Groups
To efficiently manage permissions, you will need to create the Employees and Interns groups. Once the groups are created, you can add users to the appropriate group. This will automatically apply the necessary permissions to all users within each group, streamlining the management process.
Task 3
You are required to create three directories on the server:
company_documents
customer_information
project_files
Each directory should contain at least two files. The permissions for these directories will be assigned as follows:
Employees Group Permissions:
Full Read, Write, & Execute:
customer_information
project_files
Read-Only:
- company_documents
Interns Group Permissions:
Full Read, Write, & Execute:
- project_files
Read & Execute:
- customer_information
Read-Only:
- company_documents
Special Note:
- Files within the company_documents directory should be protected, meaning they cannot be edited or deleted by users in the Interns group. The Employees group should also have read-only access to this directory to prevent any modifications.
Task 3 Solution
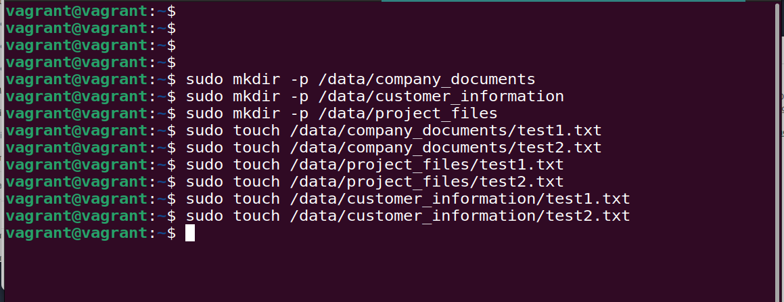
Step 1: Create the Directories and Dummy Documents
Start by creating the required directories on the server. Once the directories are created, populate each one with at least two dummy files. This will serve as placeholders and allow you to properly set up and test the permissions for each group.
Step 2: Change Ownership
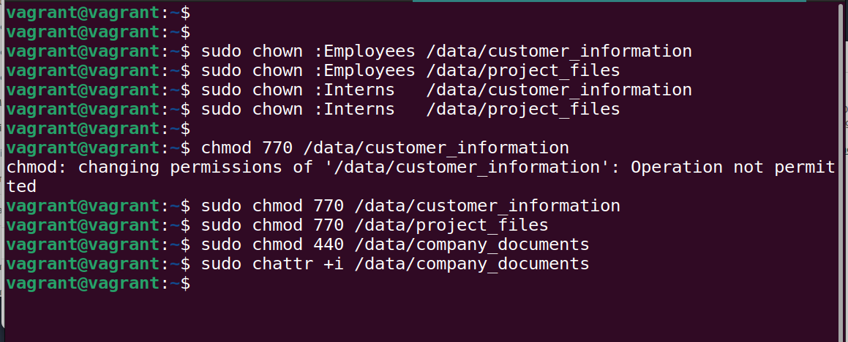
Change the ownership of the directories to the appropriate groups:
customer_informationandproject_filesshould be owned by both the Employees and Interns groups.
Step 3: Set Directory Permissions
Apply the following permissions to the directories:
customer_informationandproject_files: Set permissions to770.What Does 770 Mean?
Linux permissions can be represented numerically. Here’s a breakdown of
770:7 (for the user): This means Read (4) + Write (2) + Execute (1) = 7.
7 (for the group): This means Read (4) + Write (2) + Execute (1) = 7.
0 (for others): No permissions are granted.
Therefore, 770 grants full permissions (Read, Write, Execute) to both the user and the group, while others have no access.
company_documents: Set permissions to440.Why
440?4 (for the user): Read permission only.
4 (for the group): Read permission only.
4 (for others): No permission.
This configuration allows users to view files but prevents any modifications or deletions.
Note: Since the company_documents directory should not be edited or deleted, it is configured with read-only permissions to ensure that files within this directory are protected from changes.
To further secure the
company_documentsdirectory so that its contents cannot be modified or deleted, set the immutable attribute:sudo chattr +i /data/company_documentsThe
+iflag makes the directory immutable, preventing any changes to its files or structure.Note: The immutable attribute adds an extra layer of protection, ensuring that even users with appropriate permissions cannot alter or delete files within the directory
Task 4
- We need to add a backup file system with the server. It can be a network file system.
Task 4 Solution : Backup Configuration
Objective:
Attach a Network File System (NFS) to the system for storing backups, with the NFS server configured to use the local IP 10.0.2.15/24.
Steps to Configure NFS for Backup:
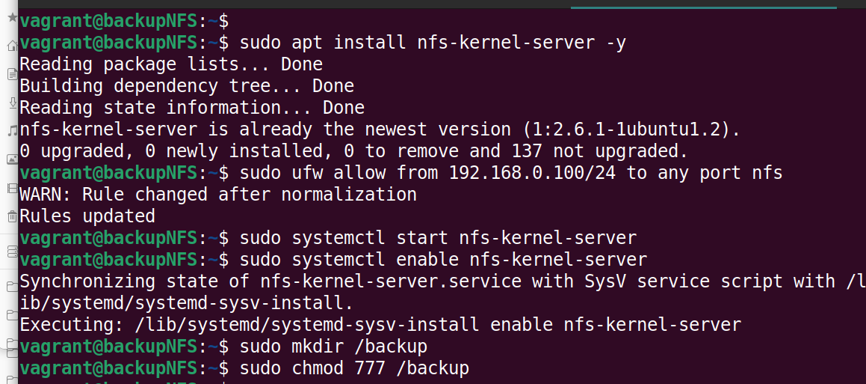
Install NFS
Install the NFS package on both the NFS client and server.
Configure the NFS Server
Create a Backup Directory: On the NFS server, create a directory for backup storage.
Set Permissions: Grant read, write, and execute permissions to this backup directory.
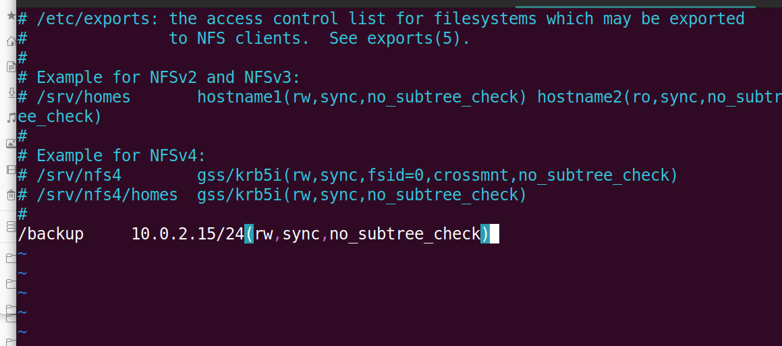
Configure NFS Exports: Update the NFS configuration to share the backup directory with the appropriate network.
Start the NFS Service: Start and enable the NFS service on the server.
Configure the Firewall
On the NFS Server: Allow NFS traffic through the firewall for the specified network.
On the NFS Client: Allow communication with the NFS server through the firewall.
Edit NFS Configuration
Open the NFS configuration file with a Vim editor:
Mount the NFS Share on the Client
On the client machine, create a directory to mount the NFS share and mount it. Additionally, configure the system to automatically mount the NFS share at boot.
New we go to the configuration file and edit with vim editor. Command is
sudo vim /etc/nfs.confWe Give and entry of the IP of the network storage
Mount the NFS Share on the Main Server
Create a Local Directory: On the main server, create a directory named
localbackup.Mount the NFS Share: Mount the NFS server's backup folder to the
localbackupdirectory on the main server.When files are placed in the
localbackupdirectory on the main server, they will be stored in thebackupfolder on the remote NFS server.

Creating a Backup Script
To automate the backup process, create a bash script named backup.sh. This script will:
Archive the three directories.
Compress the archive into a zip file.
Copy the zip file to the
localbackupdirectory.
This will ensure that the backup is automatically transferred to the backup folder on the NFS server.
Scheduling Backup with CRON
To schedule the backup process, use CRON to execute the backup.sh script every day at 11 PM.
Edit the CRON configuration by running:
sudo crontab -eThen we write this

Results
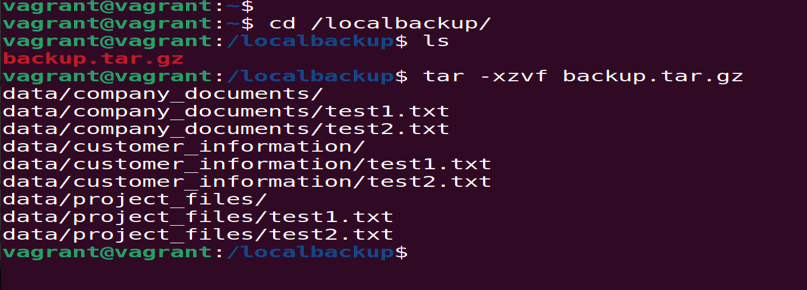
After 11 PM, check the localbackup directory on the main server. You should see:
A new archive file that contains the zipped backup of the three directories (
customer_information,project_files, andcompany_documents).The script should have successfully created this backup file and copied it to the
localbackupdirectory, which in turn, is mounted to the NFS server'sbackupfolder.
Verify that the backup file is present in both the localbackup directory on the main server and the backup folder on the NFS server to ensure the backup process is functioning correctly.
Verification
To check the backup on the NFS server:
Access the NFS Server:
Log in to the NFS server where the backup folder is located.
Navigate to the Backup Directory:
Go to the directory where the backups are stored.
Check for the Backup File:
Look for the presence of the backup file created by the
backup.shscript. Verify that it matches the expected name and timestamp, indicating that the backup process was successful and the file was transferred from the main server.
Final Remarks
In this setup, you've successfully configured a robust backup solution using NFS. Here’s a summary of what was accomplished:
User and Directory Management:
Created user directories and set up permissions for employees and interns.
Configured directory permissions to ensure proper access and security.
NFS Configuration:
Installed and configured NFS for network storage.
Set up the backup directory on the NFS server and configured necessary permissions.
Ensured the NFS client could communicate with the NFS server and mounted the backup directory.
Backup Script:
Developed a
backup.shscript to automate the backup process by archiving and compressing directories.Scheduled the script to run daily at 11 PM using CRON.
Verification:
- Confirmed that the backup file appears in the
localbackupdirectory on the main server and is properly transferred to the NFS server's backup folder.
- Confirmed that the backup file appears in the
By following these steps, you’ve established a reliable and automated backup system that integrates with network storage, ensuring that critical data is securely archived and easily accessible.
If you need any further assistance or have additional questions in the future, feel free to reach out!
Subscribe to my newsletter
Read articles from MD. TANVIR RAHMAN directly inside your inbox. Subscribe to the newsletter, and don't miss out.
Written by

