Getting Started With Paymaster
 Buidl On Base
Coinbase Paymaster is a service that helps you pay for transaction fees (aka "gas fees") when using decentralized apps (dApps) on different blockchain networks. It's super helpful for new users who want to try out dApps without having to buy additional eth just for fees.
What You Get:
Easy Peasy Payments: Pay for fees in a way that's easy to understand, using stablecoins or even your regular money (fiat currency) instead of needing to buy specific cryptos.
Seamless Integration: Developers can add Coinbase Paymaster to their apps, making it easier for new users to join the blockchain party without getting bogged down by gas fees.
Newbie Friendly: This service is perfect for those new to blockchain. It makes it way easier to get started without getting confused by gas fees.
In this introduction, we are going to set up our Paymaster endpoint in the Coinbase Developer Portal, and also send our first gasless transaction.
Getting an Endpoint on CDP
The first thing we need to do is sign in to our Coinbase Developer Portal account or create a new account if you currently do not have an account.
Once you are signed, your dashboard will look like this
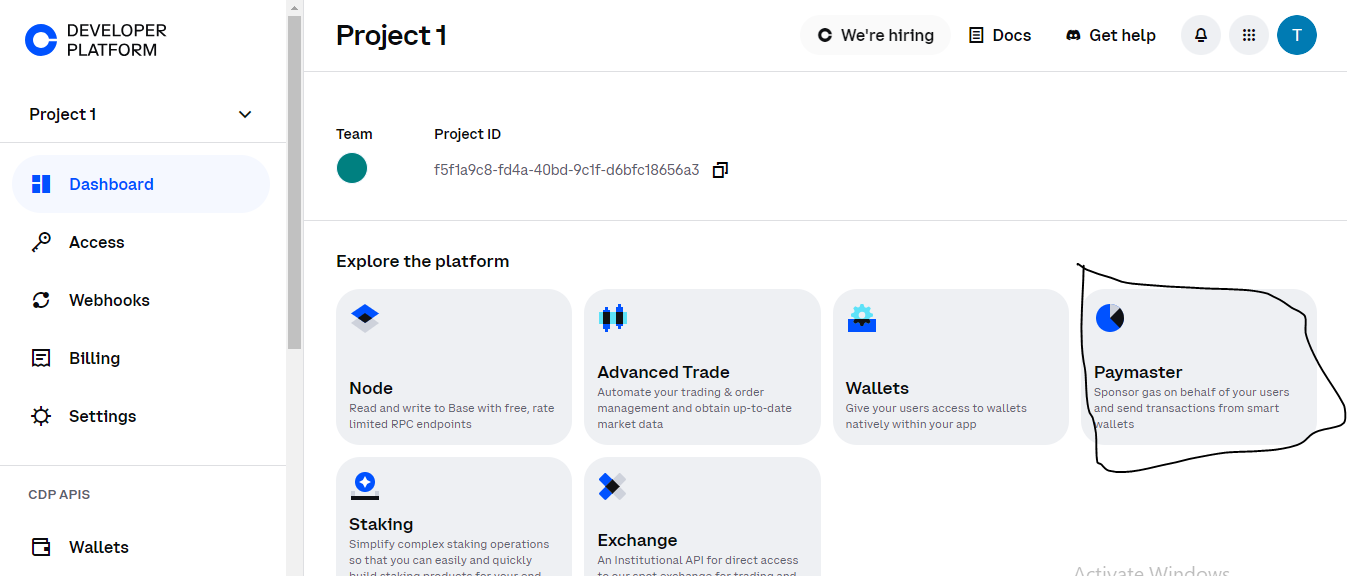
Click on Paymaster. When it loads you will see the following.
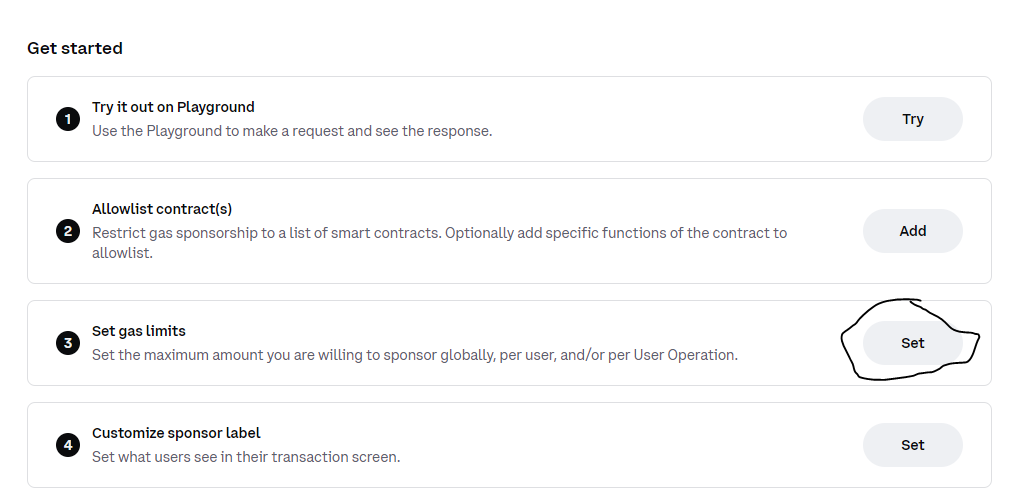
Click the "Set gas limits" option. It opens to a new tab. The first thing you will see is a dropdown which allows you to select either Base Mainnet or Testnet, your Paymaster endpoint, and a switch to either enable or disable Paymaster
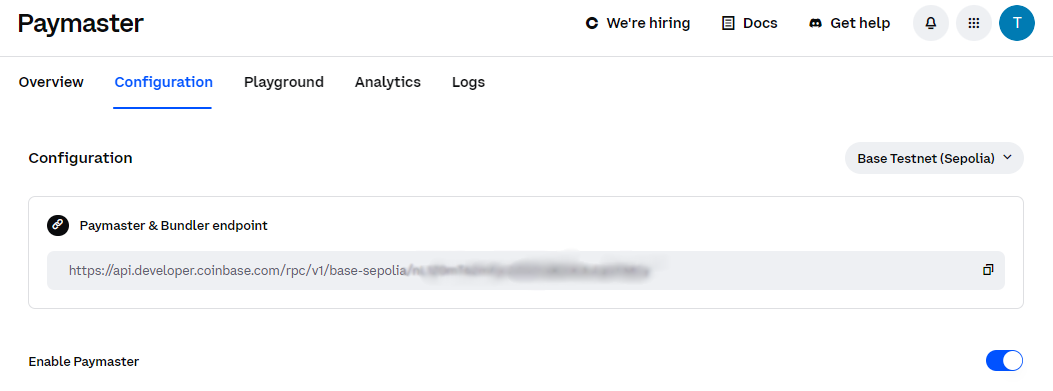
Select Base Testnet, copy the url to the Paymaster endpoint and toggle the switch to on, to enable Paymaster.
Scroll down the page and click on add in the "Contract allowlist" panel.
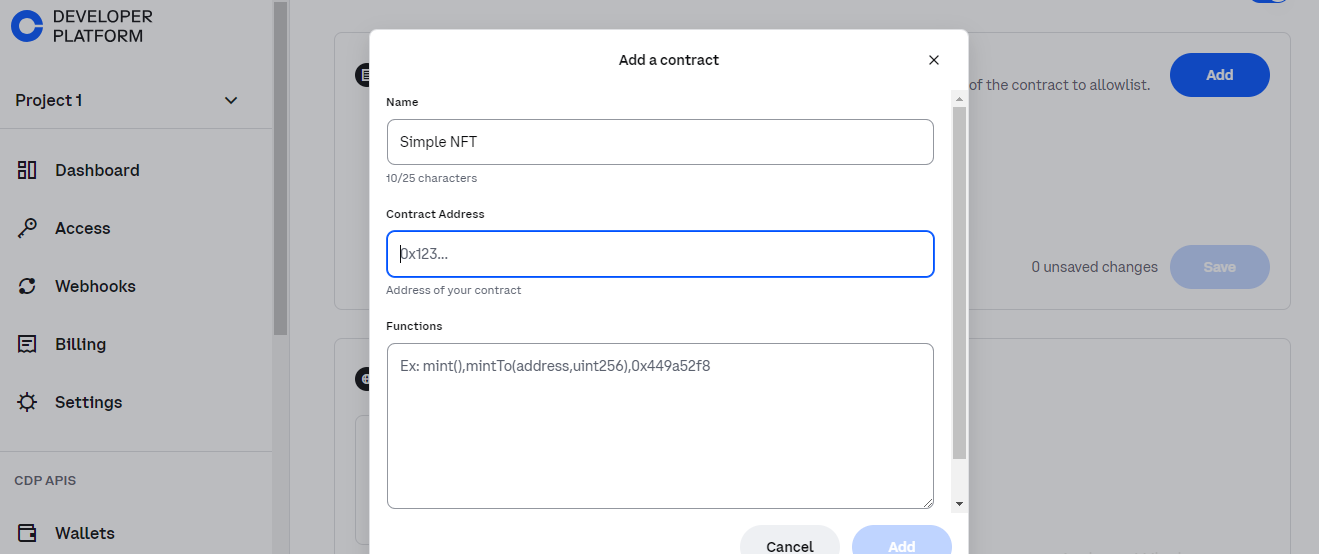
This loads a modal requiring you to give a name to the smart contract, and enter the smart contract address. I am using Simple NFT Smart Contract. Here is the contract address "0x83bd615eb93ee1336aca53e185b03b54ff4a17e8". Once you have added the smart contract click save.
Next we need to set the gas limit. Scroll down the page, you will see a Global limit panel. It is set at 0/$1 by default. Before we edit this scroll down to the next panel which sets a per user limit
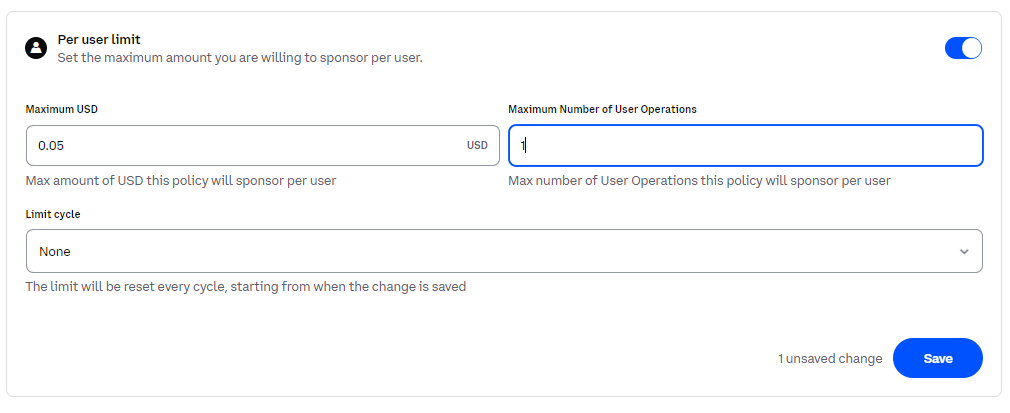
For this tutorial, I've chosen $0.05 and set the maximum per user to 1. Set the per user limit as you desire and save it.
On returning to the global you will find that the global policy has changed from 0/$1 to 0/the user limit you set, which in my case is $0.05
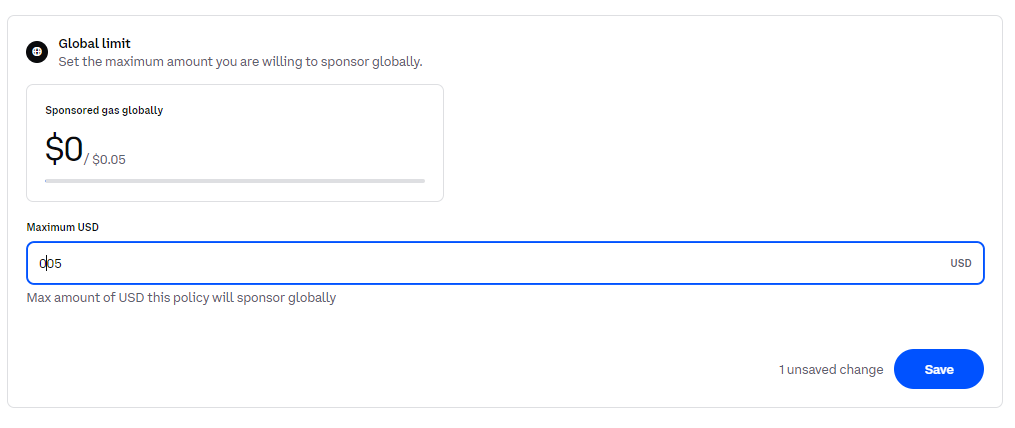
Edit the maximum to correspond with your limit and save the entry.
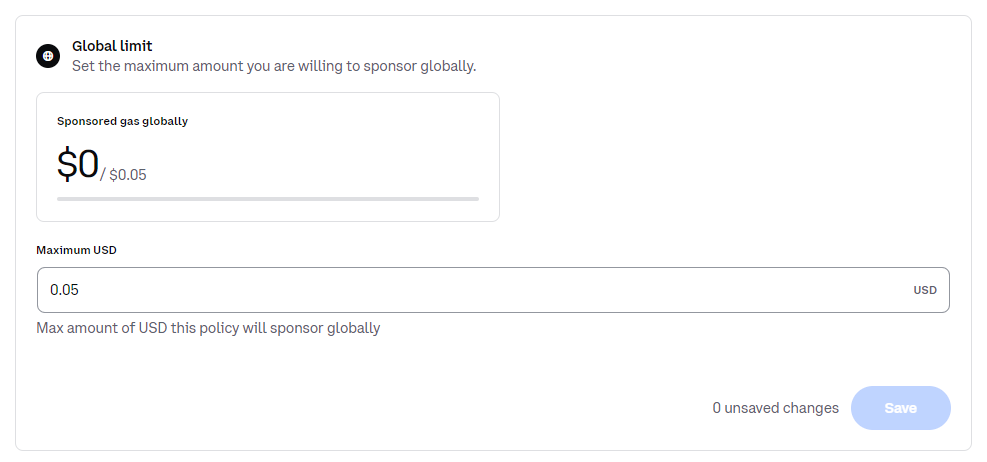
We are now through with the Coinbase Developer Portal. Next we start working on sending our first gasless transaction
Sending Our First Transaction
First things first, let’s get your project up and running. Open up your terminal and create a new directory for this project called paymaster-tutorial, then initialize it using npm. Here's how:
mkdir paymaster-tutorial
cd paymaster-tutorial
npm init es6
Now, we need to download a couple of things: permissionless.js and viem. Run these commands:
npm install permissionless
npm install viem
We’re going to need some code to interact with your contract. Start by creating a new file called utils.js. This will store your contract's ABI (basically a blueprint for the contract). Just copy and paste this into your utils.js file:
export const abi = [
  {
    inputs: [
      { internalType: "address", name: "recipient", type: "address" },
      { internalType: "uint16", name: "item", type: "uint16" },
    ],
    name: "mintTo",
    outputs: [{ internalType: "uint256", name: "", type: "uint256" }],
    stateMutability: "payable",
    type: "function",
  },
];
Next, create a file called index.js and add these imports at the top:
import { http, createPublicClient, encodeFunctionData } from "viem";
import { base } from "viem/chains";
import { createSmartAccountClient } from "permissionless";
import { privateKeyToSimpleSmartAccount } from "permissionless/accounts";
import { createPimlicoPaymasterClient } from "permissionless/clients/pimlico";
import { abi } from "./utils.js";
Time to create a smart account for your user. For this example, we'll use a SimpleAccount with a private key as the signer.
First, you’ll need a new private key. We’re going to use Foundry for that.
Install Foundry:
curl -L https://foundry.paradigm.xyz | bash
When this downloads finish install Foundry using this command
foundryup
After the installation of Foundry is complete, we need to generate a new key pair. This is done by running this command:
cast wallet new
Now, let’s set up some variables in your index.js:
const rpcUrl = "YOUR RPC URL";
const BASE_FACTORY_ADDRESS = "0x15Ba39375ee2Ab563E8873C8390be6f2E2F50232";
const BASE_ENTRYPOINT_V06 = "0x5FF137D4b0FDCD49DcA30c7CF57E578a026d2789";
const targetContract = "0x83bd615eb93eE1336acA53e185b03B54fF4A17e8";

const publicClient = createPublicClient({
  chain: base,
  transport: http(rpcUrl),
});

const simpleAccount = await privateKeyToSimpleSmartAccount(publicClient, {
  privateKey: "YOUR PRIVATE KEY HERE",
  factoryAddress: BASE_FACTORY_ADDRESS,
  entryPoint: BASE_ENTRYPOINT_V06,
});
Replace "YOUR RPC URL" in this line const rpcUrl = "YOUR RPC URL"; with the Paymaster endpoint that you were assigned in the Coinbase Developer Portal.
The values for the "BASE_FACTORY_ADDRESS" and the "BASE_ENTRYPOINT_V06" can be found in the Paymaster API documentation here.
Insert the newly generated private key in here "YOUR PRIVATE KEY HERE" in this line privateKey: "YOUR PRIVATE KEY HERE".
We will now create a Paymaster using the Coinbase Developer Platform and hook it up to your smart account client:
const cloudPaymaster = createPimlicoPaymasterClient({
  chain: base,
  transport: http(rpcUrl),
  entryPoint: BASE_ENTRYPOINT_V06,
});

const smartAccountClient = createSmartAccountClient({
  account: simpleAccount,
  chain: base,
  bundlerTransport: http(rpcUrl),
  middleware: {
    sponsorUserOperation: cloudPaymaster.sponsorUserOperation,
  },
});
It is time to send the transaction. We’re going to call the mintTo function on the Base Sepolia NFT contract. If you want to use your own contract, just edit the encodeFunctionData arguments.
const callData = encodeFunctionData({
  abi: abi,
  functionName: "mintTo",
  args: [smartAccountClient.account.address],
});

async function sendTransactionFromSmartAccount() {
  try {
    const txHash = await smartAccountClient.sendTransaction({
      account: smartAccountClient.account,
      to: targetContract,
      data: callData,
      value: 0n,
    });

    console.log("✅ Transaction successfully sponsored!");
    console.log(`🔍 View on Etherscan: https://basescan.org/tx/${txHash}`);
  } catch (error) {
    console.log("Error sending transaction: ", error);
  }
}

sendTransactionFromSmartAccount();
Your index.js file should look like this
import { http, createPublicClient, encodeFunctionData } from "viem";
import { base } from "viem/chains";
import { createSmartAccountClient } from "permissionless";
import { privateKeyToSimpleSmartAccount } from "permissionless/accounts";
import { createPimlicoPaymasterClient } from "permissionless/clients/pimlico";
import { abi } from "./utils.js";

const rpcUrl = "https://api.developer.coinbase.com/rpc/v1/base-sepolia/nL1Z0mT62mFjc2ZG7nsRmKdulqIzFMCy";
const BASE_FACTORY_ADDRESS = "0x15Ba39375ee2Ab563E8873C8390be6f2E2F50232";
const BASE_ENTRYPOINT_V06 = "0x5FF137D4b0FDCD49DcA30c7CF57E578a026d2789";
const targetContract = "0x83bd615eb93eE1336acA53e185b03B54fF4A17e8";

const publicClient = createPublicClient({
  chain: base,
  transport: http(rpcUrl),
});

const simpleAccount = await privateKeyToSimpleSmartAccount(publicClient, {
  privateKey: "0x829dff52bc2797019ed829469d3d86fdf813227d9ee72f40bca2fe4ff61d328b",
  factoryAddress: BASE_FACTORY_ADDRESS,
  entryPoint: BASE_ENTRYPOINT_V06,
});

const cloudPaymaster = createPimlicoPaymasterClient({
    chain: base,
    transport: http(rpcUrl),
    entryPoint: BASE_ENTRYPOINT_V06,
  });

  const smartAccountClient = createSmartAccountClient({
    account: simpleAccount,
    chain: base,
    bundlerTransport: http(rpcUrl),
    middleware: {
      sponsorUserOperation: cloudPaymaster.sponsorUserOperation,
    },
  });

  const callData = encodeFunctionData({
    abi: abi,
    functionName: "mintTo",
    args: [smartAccountClient.account.address],
  });

  async function sendTransactionFromSmartAccount() {
    try {
      const txHash = await smartAccountClient.sendTransaction({
        account: smartAccountClient.account,
        to: targetContract,
        data: callData,
        value: 0n,
      });

      console.log("✅ Transaction successfully sponsored!");
      console.log(`🔍 View on Etherscan: https://basescan.org/tx/${txHash}`);
    } catch (error) {
      console.log("Error sending transaction: ", error);
    }
  }

  sendTransactionFromSmartAccount();
Finally,in the terminal run your script by entering the following command:
node index.js
And there you have it! You should see an entry in the terminal with a url linking the transaction to basescan.
Subscribe to my newsletter
Read articles from Buidl On Base directly inside your inbox. Subscribe to the newsletter, and don't miss out.
Written by
