Install Kubernetes Using Containerd And Kubeadm On Ec2 Instances
 Chisom Jude
In this exercise, you will need to spin up 3 EC2 instances, one will serve as your control plane or master node, and the other two will Servers, as your worker nodes.
Ensure that your master nodes are of high capacity, this lab uses an EC2 instance of the following capacities - Ubuntu, 20.04 LTS, t2.large.
Once your instances are ready, connect to your EC2 instances and set the hostname using the command. Setting hostname is for easy identification of the servers.
sudo hostnamectl set-hostname <choosen-hostname>
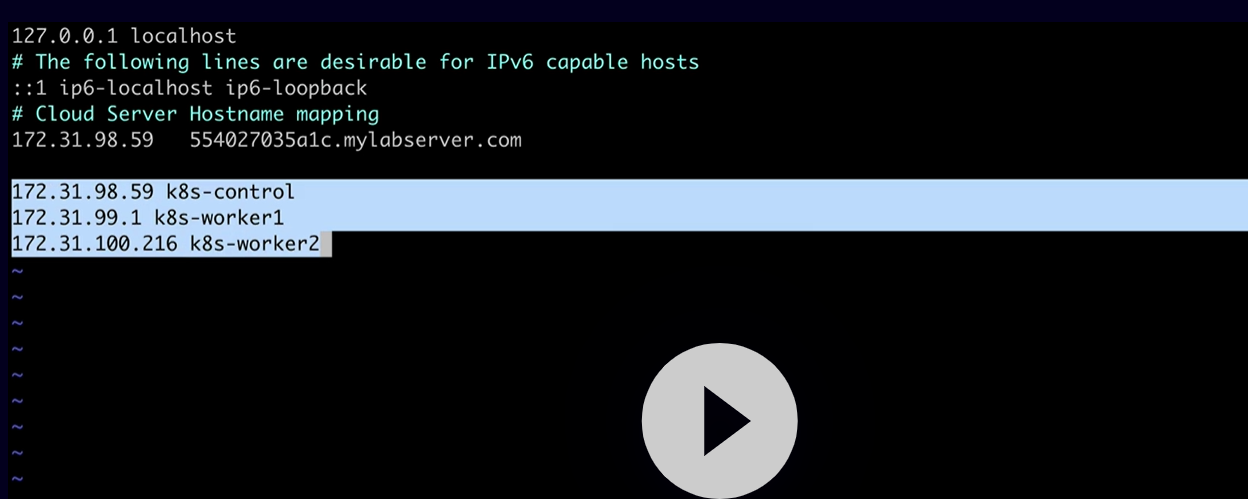
sudo vi /etc/hosts
Edit the hostfile and map the hostname to the private IP of your servers across both the control plane server and worker nodes


Install Packages
Log in to the control plane node.
Note: The following steps must be performed on all three nodes.
Create the configuration file for containerd:
 cat <<EOF | sudo tee /etc/modules-load.d/containerd.conf
 overlay
 br_netfilter
 EOF
Load the modules:
 sudo modprobe overlay
 sudo modprobe br_netfilter
Set the system configurations for Kubernetes networking:
 cat <<EOF | sudo tee /etc/sysctl.d/99-kubernetes-cri.conf
 net.bridge.bridge-nf-call-iptables = 1
 net.ipv4.ip_forward = 1
 net.bridge.bridge-nf-call-ip6tables = 1
 EOF
Apply the new settings and reload the configuration:
sudo sysctl --systemInstall containerd:
sudo apt-get update && sudo apt-get install -y containerdCreate the default configuration file for containerd:
sudo mkdir -p /etc/containerdGenerate the default containerd configuration, and save it to the newly created default file:
sudo containerd config default | sudo tee /etc/containerd/config.tomlRestart containerd to ensure the new configuration file is used:
sudo systemctl restart containerdVerify that containerd is running:
sudo systemctl status containerdDisable swap:
sudo swapoff -aInstall the dependency packages:
sudo apt-get update && sudo apt-get install -y apt-transport-https curlDownload and add the GPG key:
curl -s https://packages.cloud.google.com/apt/doc/apt-key.gpg | sudo apt-key add -Add Kubernetes to the repository list:
cat <<EOF | sudo tee /etc/apt/sources.list.d/kubernetes.list
deb https://apt.kubernetes.io/ kubernetes-xenial main
EOF
Update the package listings:
sudo apt-get updateInstall Kubernetes packages:
Note: If you get a
dpkg lockmessage, just wait a minute or two before trying the command again. Kindly install the lastest version instead of V1.27.0-00sudo apt-get install -y kubelet=1.27.0-00 kubeadm=1.27.0-00 kubectl=1.27.0-00Turn off automatic updates:
sudo apt-mark hold kubelet kubeadm kubectlLog in to both worker nodes and repeat the same process as above, to set up your worker nodes
Initialize your Cluster
Initialize the Kubernetes cluster on the master node using
kubeadm:sudo kubeadm init --pod-network-cidr 192.168.50.0/16 --kubernetes-version 1.27.0Set
kubectlaccess:mkdir -p $HOME/.kube sudo cp -i /etc/kubernetes/admin.conf $HOME/.kube/config sudo chown $(id -u):$(id -g) $HOME/.kube/configTest access to the cluster:
kubectl get nodes
Install the Calico Network Add-On
On the master node, install Calico Networking:
Always confirm from Calico official documentation the install command
kubectl create -f https://raw.githubusercontent.com/projectcalico/calico/v3.26.3/manifests/tigera-operator.yamlCheck the status of the control plane node: you will need to allow it some time to ensure your nodes are ready before proceeding to add other nodes
kubectl get nodes
Join the Worker Nodes in the Cluster
In the control plane node, create the token and copy the
kubeadm joincommand:kubeadm token create --print-join-commandNote: This output will be used as the next command for the worker nodes
like this
kubeadm join <masterip>:6443 --token 3d9o26.j5566e5u7 --discovery-token-ca-cert-hash sha256:38b879a36f37ed9Copy the full output from the command from the master node, navigate to the worker node, and run it as a root example
sudo kubeadm join <masterip>:6443 --token 3d9o26.j5566e5u7 --discovery-token-ca-cert-hash sha256:38b879a36f37ed9sudo kubeadm join...
In the control plane/master node, view the cluster status:
kubectl get nodes
Note: You may have to wait a few minutes to allow your nodes to become ready.
Possible Errors
This error shows off when trying to install Calico ()
The connection to the server 172.31.30.242:6443 was refused - did you specify the right host or port?

HOW I RESOLVED IT
Reboot the instance
Run this command
On a successful run, do kubectl get nodes to see if this resolved the error, then proceed to install Calico
sudo -i
swapoff -a
exit
strace -eopenat kubectl version
if this doesn't resolve the issue confirm firewall on your host may be active.
sudo systemctl status ufw
and disable it using
Was this helpful, Like 👍 this post and share your thoughts in the comment session. Have issues setting up you can reach me at hello@chisomjude.net
sudo systemctl stop ufw
Subscribe to my newsletter
Read articles from Chisom Jude directly inside your inbox. Subscribe to the newsletter, and don't miss out.
Written by

Chisom Jude
Chisom Jude
I am experienced Cloud Devops Engineer I blog about Solutions, Cloud and DevOps Projects that boost your portfolio and provide troubleshooting guides on Cloud and DevOps