A Comprehensive Guide to Running dbt Models
 Vipin
Vipin
Introduction:
Data transformation is a critical step in the analytics process, and dbt (data build tool) has become a cornerstone of modern data engineering. In this blog post, we’ll dive into the practical aspects of running dbt models, an essential part of any dbt project. Whether you’re new to dbt or looking to optimize your workflow, this guide will walk you through the key steps and best practices.
What Are dbt Models?
At the heart of dbt are models—SQL files that define the transformations you want to apply to your raw data. These models are housed in the models directory of your dbt project and are typically organized by theme or data domain.
A dbt model is more than just a SQL query. It’s a reusable transformation that dbt compiles, optimizes, and materializes in your data warehouse. dbt models can be used to create tables, views, or incremental loads, depending on how you configure them.
One of the powerful features of dbt is its use of the Jinja templating language, allowing you to create dynamic, parameterized SQL that adapts to different environments and scenarios.
Prerequisites
Before we dive in, make sure you have the following tools installed:
Python: Required to run dbt.
Visual Studio code. Install Python and dbt extension in VS code.
A Snowflake Account: Ensure you have a Snowflake account with sufficient permissions to create roles, warehouses, databases, etc. Refer https://vipinmp.hashnode.dev/snowflake-a-beginners-guide
Snowflake data load
The data used here is stored as CSV files in a public S3 bucket and the following steps will guide you through how to prepare your Snowflake account for that data and upload it.
Log in to your trial Snowflake account.
In the Snowflake UI, click + Worksheet in the upper right corner to create a new worksheet.
Create a new virtual warehouse, two new databases (one for raw data, the other for future dbt development), and two new schemas (one for
jaffle_shopdata, the other forstripedata).To do this, run these SQL commands by typing them into the Editor of your new Snowflake worksheet and clicking Run in the upper right corner of the UI:
 create database raw;
 create database analytics;
 create schema raw.jaffle_shop;
 create schema raw.stripe;
In the
rawdatabase andjaffle_shopandstripeschemas, create three tables and load relevant data into them:First, delete all contents (empty) in the Editor of the Snowflake worksheet. Then, run this SQL command to create the
customertable:create table raw.jaffle_shop.customers ( id integer, first_name varchar, last_name varchar );Delete all contents in the Editor, then run this command to load data into the
customertable:copy into raw.jaffle_shop.customers (id, first_name, last_name) from 's3://dbt-tutorial-public/jaffle_shop_customers.csv' file_format = ( type = 'CSV' field_delimiter = ',' skip_header = 1 );Delete all contents in the Editor (empty), then run this command to create the
orderstable:create table raw.jaffle_shop.orders ( id integer, user_id integer, order_date date, status varchar, _etl_loaded_at timestamp default current_timestamp );Delete all contents in the Editor, then run this command to load data into the
orderstable:copy into raw.jaffle_shop.orders (id, user_id, order_date, status) from 's3://dbt-tutorial-public/jaffle_shop_orders.csv' file_format = ( type = 'CSV' field_delimiter = ',' skip_header = 1 );Delete all contents in the Editor (empty), then run this command to create the
paymenttable:create table raw.stripe.payment ( id integer, orderid integer, paymentmethod varchar, status varchar, amount integer, created date, _batched_at timestamp default current_timestamp );Delete all contents in the Editor, then run this command to load data into the
paymenttable:copy into raw.stripe.payment (id, orderid, paymentmethod, status, amount, created) from 's3://dbt-tutorial-public/stripe_payments.csv' file_format = ( type = 'CSV' field_delimiter = ',' skip_header = 1 );
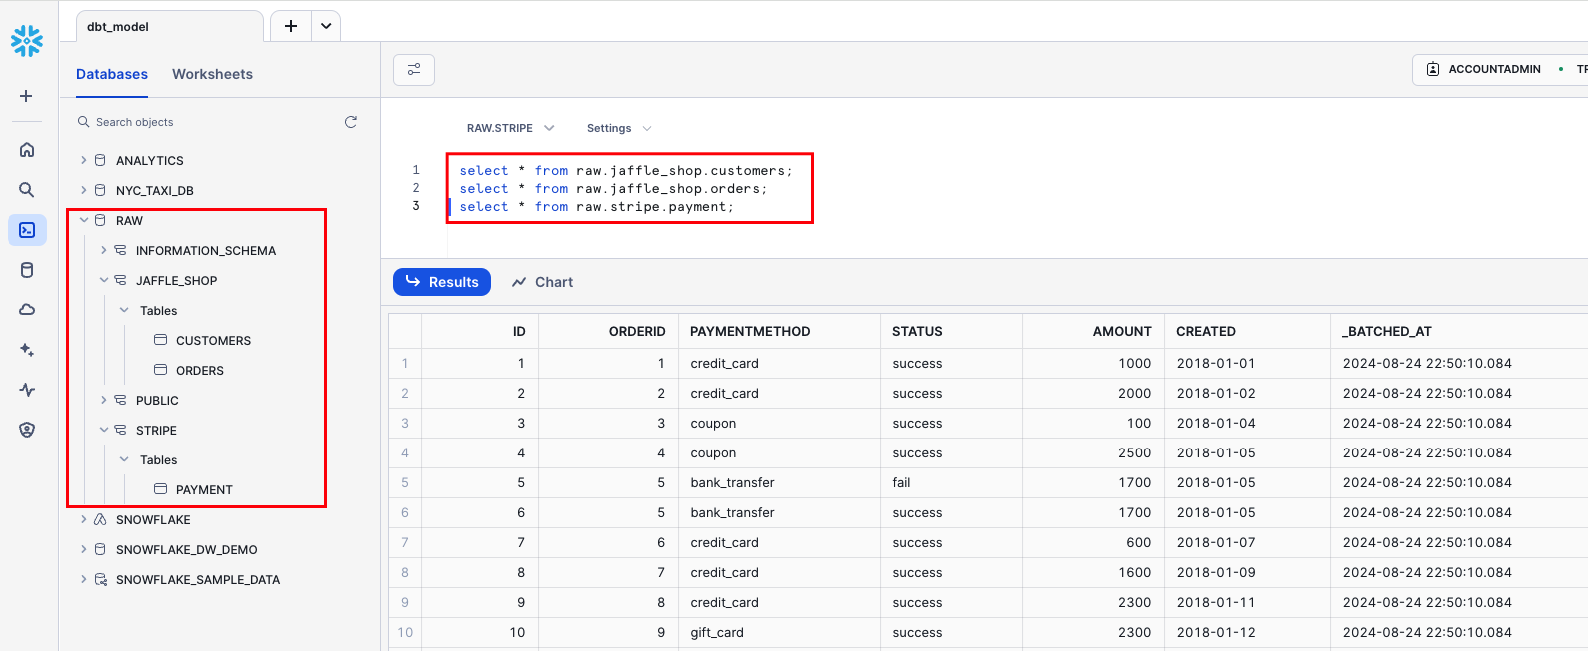
Verify that the data is loaded by running these SQL queries. Confirm that you can see output for each one.
Initialize dbt and check the connection
Create virtual environment and activate itvirtualenv my_dbt_venvsource my_dbt_venv/bin/activate
Install dbt along with the Snowflake adapter:pip install dbt-core dbt-snowflake
Create .dbt folder in the home directory.
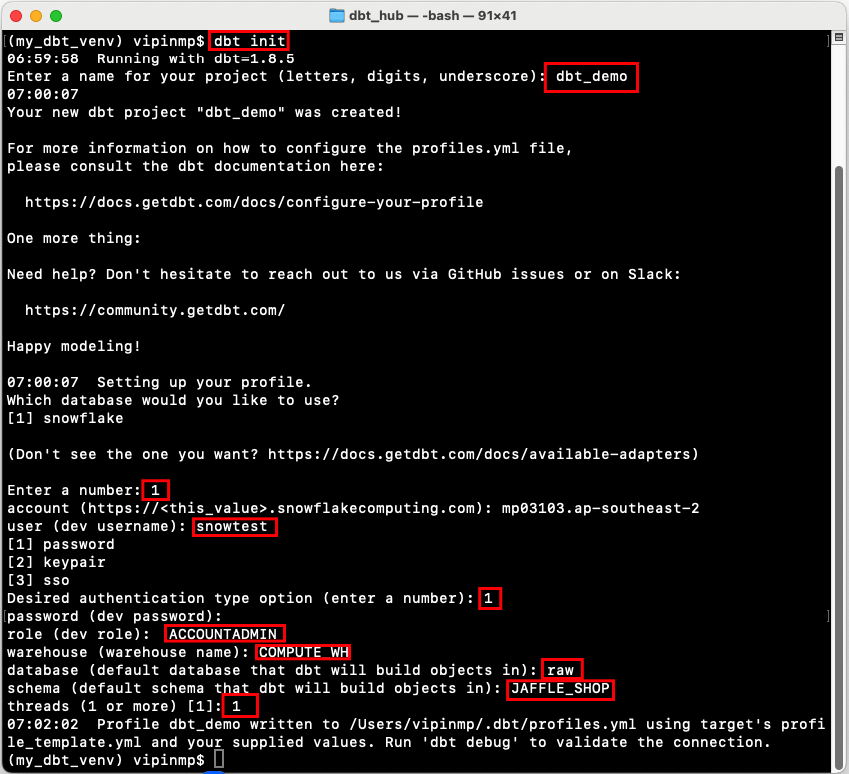
Create a New dbt Project: Run the following command to initialize a new dbt project:
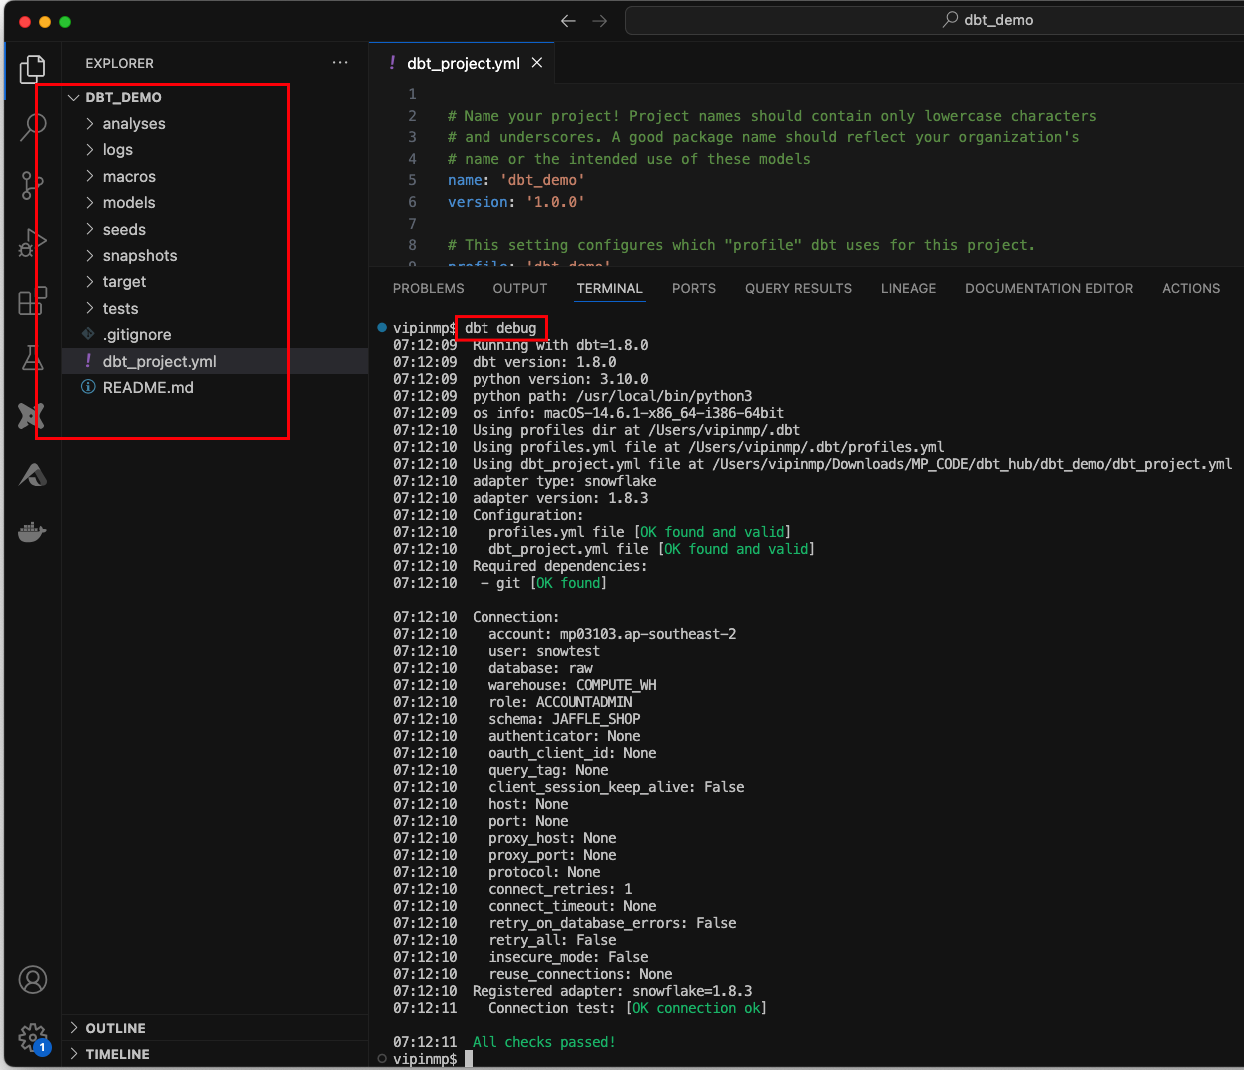
Open the newly created project in VSCODE and Activate the virtual environment and test the connection using
dbt debugcommand.
Build the Model
Go to the
modelsdirectory, then select Create file.Name the file
customers_order.sql, then click Create.Copy the following query into the file and click Save.
    with customers as (

        select
            id as customer_id,
            first_name,
            last_name

        from raw.jaffle_shop.customers

    ),

    orders as (

        select
            id as order_id,
            user_id as customer_id,
            order_date,
            status

        from raw.jaffle_shop.orders

    ),

    customer_orders as (

        select
            customer_id,

            min(order_date) as first_order_date,
            max(order_date) as most_recent_order_date,
            count(order_id) as number_of_orders

        from orders

        group by 1

    ),

    final as (

        select
            customers.customer_id,
            customers.first_name,
            customers.last_name,
            customer_orders.first_order_date,
            customer_orders.most_recent_order_date,
            coalesce(customer_orders.number_of_orders, 0) as number_of_orders

        from customers

        left join customer_orders using (customer_id)

    )

    select * from final
Model explanation:
customersCTE:Selects customer data from the
raw.jaffle_shop.customerstable.Renames the
idcolumn tocustomer_idfor better clarity.
ordersCTE:Selects order data from the
raw.jaffle_shop.orderstable.Renames the
idcolumn toorder_idanduser_idtocustomer_idto maintain consistency with thecustomersCTE.
customer_ordersCTE:Aggregates order data by
customer_id.Calculates the
first_order_date,most_recent_order_date, andnumber_of_ordersfor each customer.
finalCTE:Combines the
customersandcustomer_ordersdata.Uses a
LEFT JOINto ensure all customers are included, even those without any orders.The
coalescefunction ensures that customers with no orders will show0fornumber_of_orders.
Final
SELECT:- Selects and displays all the relevant fields from the
finalCTE.
- Selects and displays all the relevant fields from the
Enter
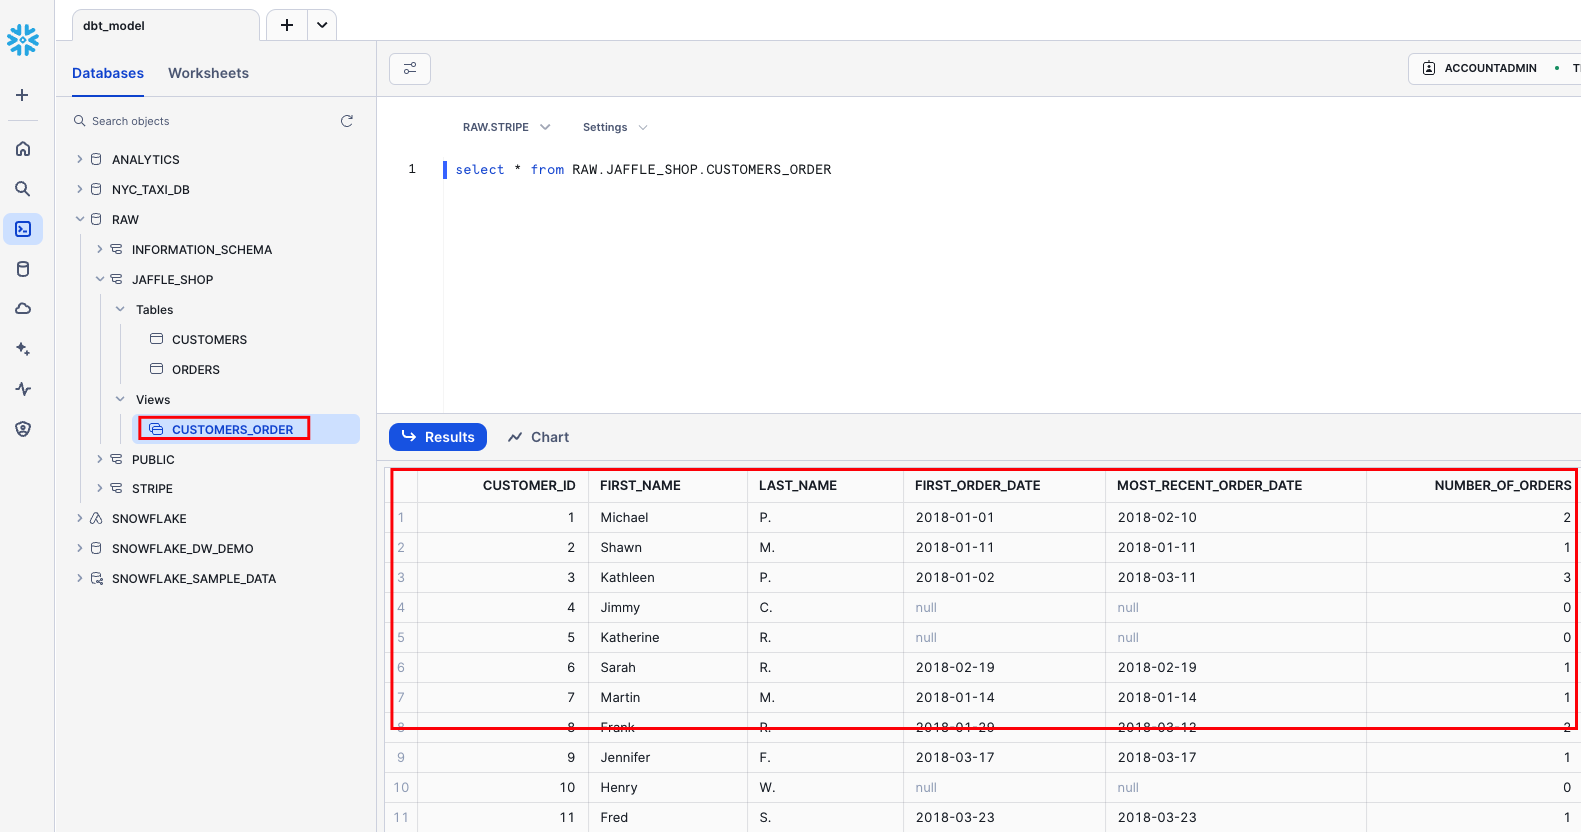
dbt runin the command prompt at the bottom of the screen. You should get a successful run and see the three models.
Change the way your model is materialized
One of the most powerful features of dbt is that you can change the way a model is materialized in your warehouse, simply by changing a configuration value. You can change things between tables and views by changing a keyword rather than writing the data definition language (DDL) to do this behind the scenes.
By default, everything gets created as a view. You can override that at the directory level so everything in that directory will materialize to a different materialization.
Edit your
dbt_project.ymlfile.Update your project
nameto:dbt_project.yml
name: 'dbt_demo'Configure
jaffle_shopso everything in it will be materialized as a table; and configureexampleso everything in it will be materialized as a view. Update yourmodelsconfig block to:dbt_project.yml
  models:
    dbt-demo:
      +materialized: table
Click Save.
Enter the
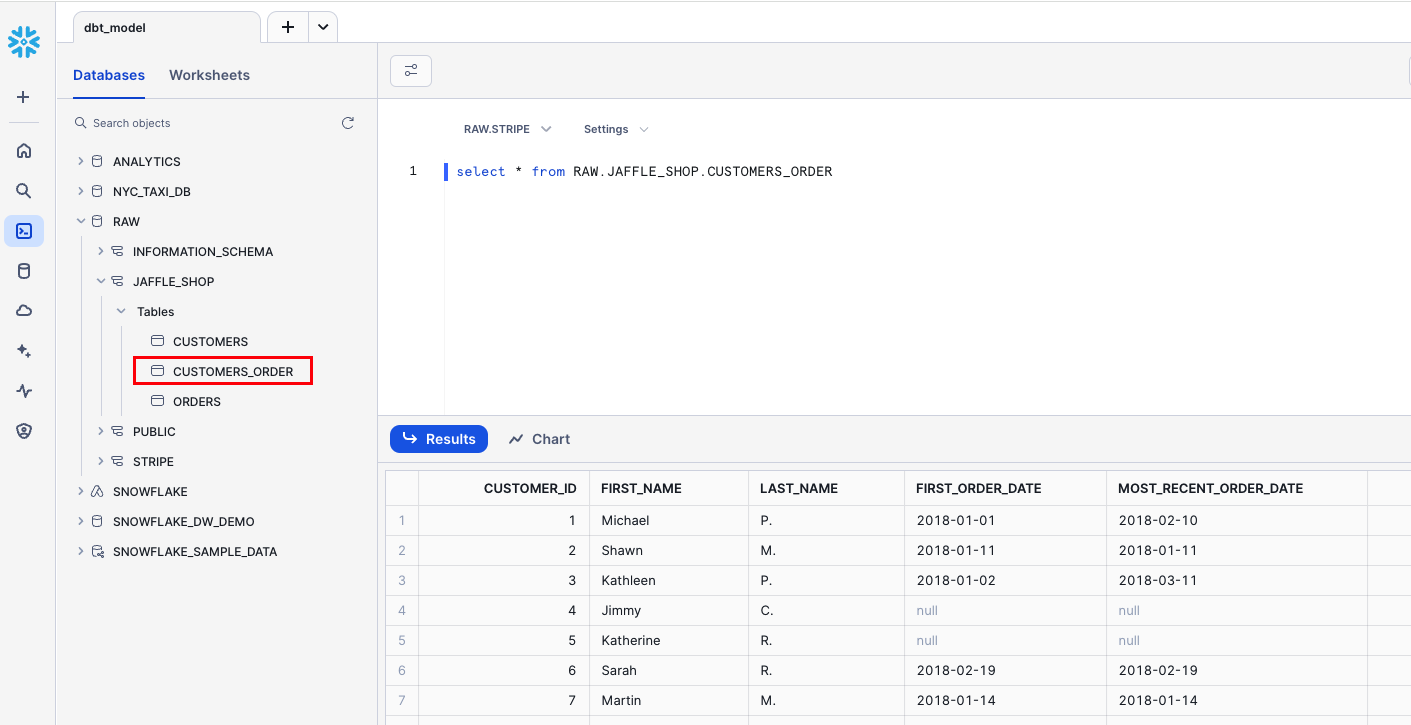
dbt runcommand. Yourcustomersmodel should now be built as a table!
Build models on top of other models
As a best practice in SQL, you should separate logic that cleans up your data from logic that transforms your data. You have already started doing this in the existing query by using common table expressions (CTEs).
Now you can experiment by separating the logic out into separate models and using the ref function to build models on top of other models:

The DAG we want for our dbt project
Create a new SQL file,
models/stg_customers.sql, with the SQL from thecustomersCTE in our original query.Create a second new SQL file,
models/stg_orders.sql, with the SQL from theordersCTE in our original query.models/stg_customers.sql
 select
     id as customer_id,
     first_name,
     last_name

 from raw.jaffle_shop.customers
models/stg_orders.sql
 select
     id as order_id,
     user_id as customer_id,
     order_date,
     status

 from raw.jaffle_shop.orders
Edit the SQL in your
models/customers_order.sqlfile as follows:models/customers_order.sql
 with customers as (

     select * from {{ ref('stg_customers') }}

 ),

 orders as (

     select * from {{ ref('stg_orders') }}

 ),

 customer_orders as (

     select
         customer_id,

         min(order_date) as first_order_date,
         max(order_date) as most_recent_order_date,
         count(order_id) as number_of_orders

     from orders

     group by 1

 ),

 final as (

     select
         customers.customer_id,
         customers.first_name,
         customers.last_name,
         customer_orders.first_order_date,
         customer_orders.most_recent_order_date,
         coalesce(customer_orders.number_of_orders, 0) as number_of_orders

     from customers

     left join customer_orders using (customer_id)

 )

 select * from final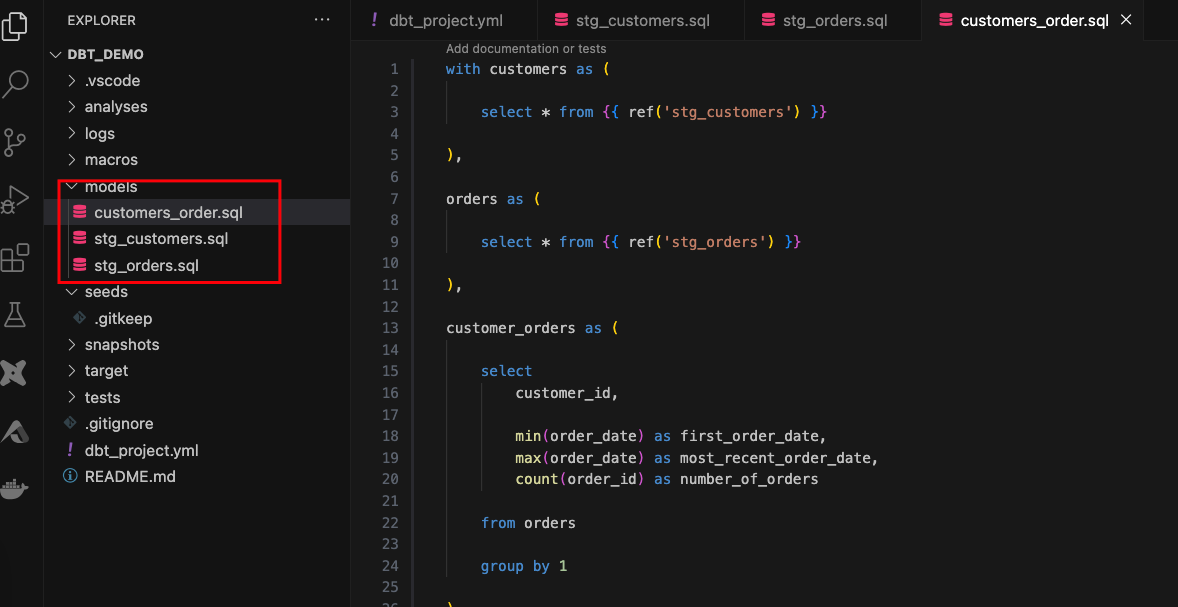
Execute
dbt run.This time, when you performed a
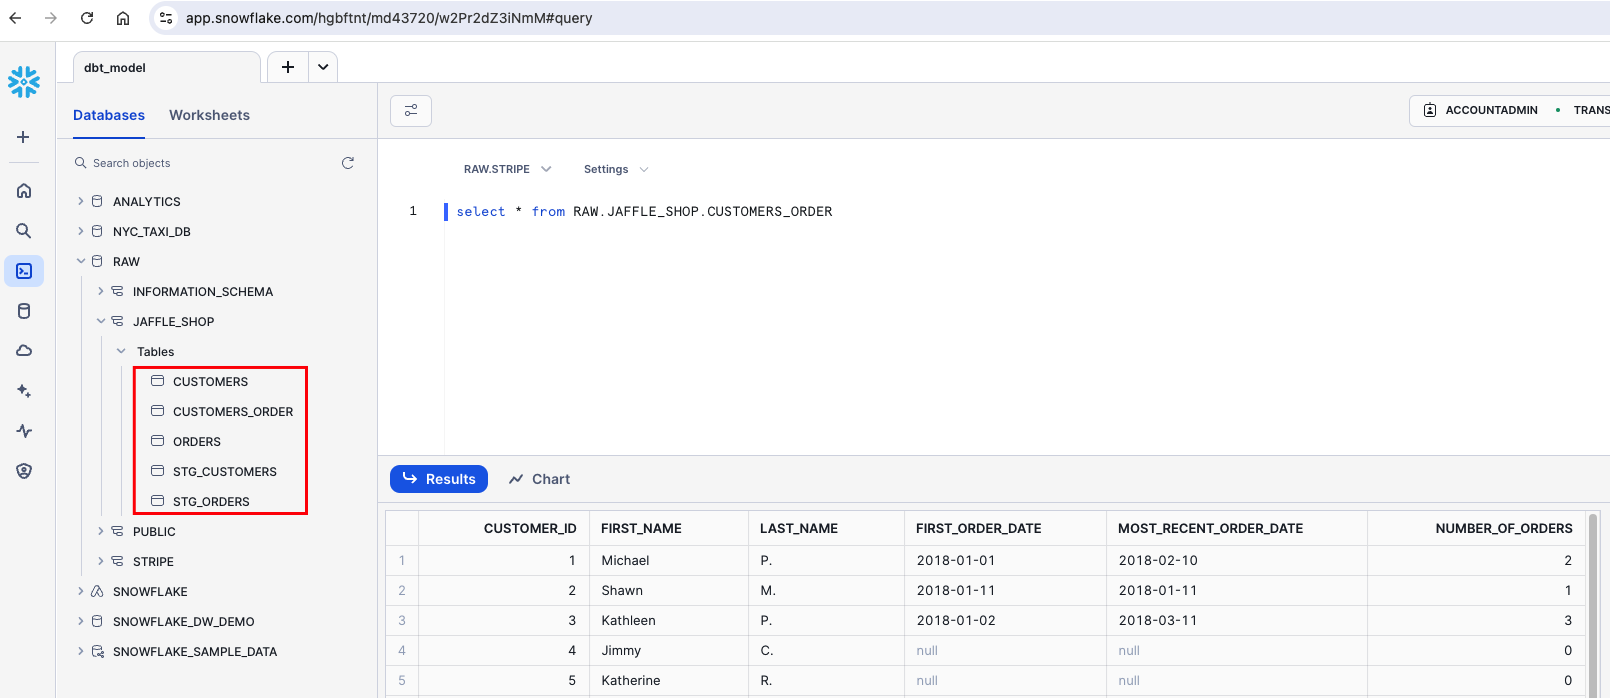
dbt run, separate views/tables were created forstg_customers,stg_ordersandcustomers. dbt inferred the order to run these models. Becausecustomersdepends onstg_customersandstg_orders, dbt buildscustomerslast. You do not need to explicitly define these dependencies.
Resources and Further Reading
Conclusion
Running dbt models efficiently is key to maintaining a robust and reliable data pipeline. Whether you're running individual models, incremental models, or your entire project, understanding how to leverage dbt’s powerful run commands will help streamline your workflow and ensure your data transformations are accurate and up-to-date.
Subscribe to my newsletter
Read articles from Vipin directly inside your inbox. Subscribe to the newsletter, and don't miss out.
Written by

Vipin
Vipin
Highly skilled Data Test Automation professional with over 10 years of experience in data quality assurance and software testing. Proven ability to design, execute, and automate testing across the entire SDLC (Software Development Life Cycle) utilizing Agile and Waterfall methodologies. Expertise in End-to-End DWBI project testing and experience working in GCP, AWS, and Azure cloud environments. Proficient in SQL and Python scripting for data test automation.