Easy SSO Setup for Salesforce Using SAML and Microsoft Entra ID
 Pratul
These few days I have been working on setting up SSO with Salesforce where I wanted the identities present in Microsoft Entra ID (applicable for cloud users & users from on Prem AD synced via Entra Connect) to access salesforce app with same credentials which is used for daily logins.
I learnt quite new concepts & technologies related to this.
We have the privilege of creating application from Microsoft Entra ID at tenant level. All this can be configured with a free Entra ID license without the need of any subscription.
We take,
Azure AD -> Identity Provider
Salesforce -> Resource Provider
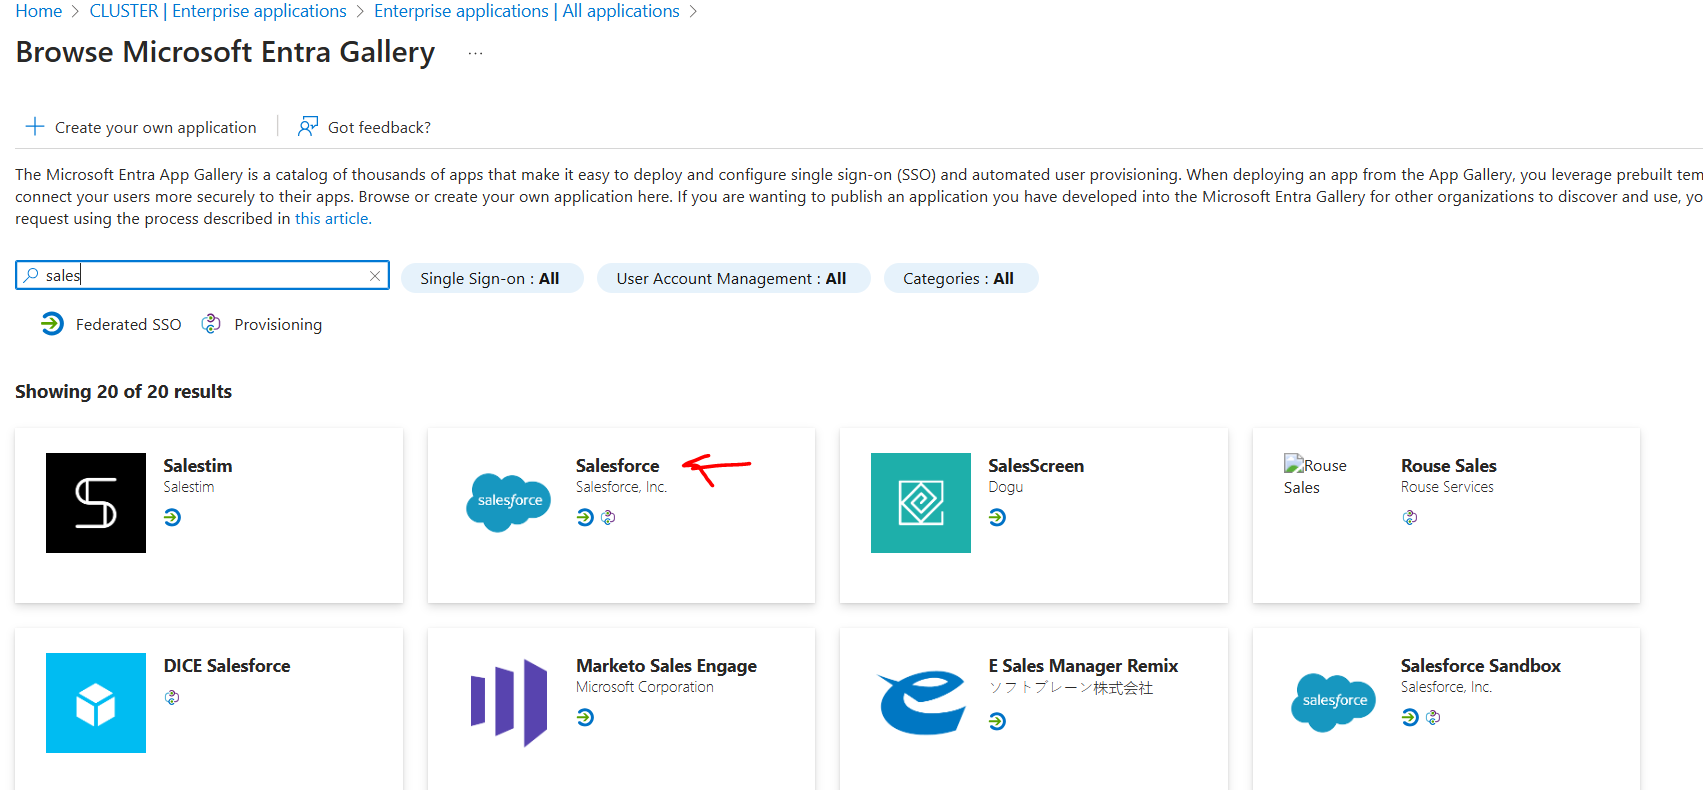
First, we go to Enterprise Application -> New Application -> Search & Click for Salesforce.
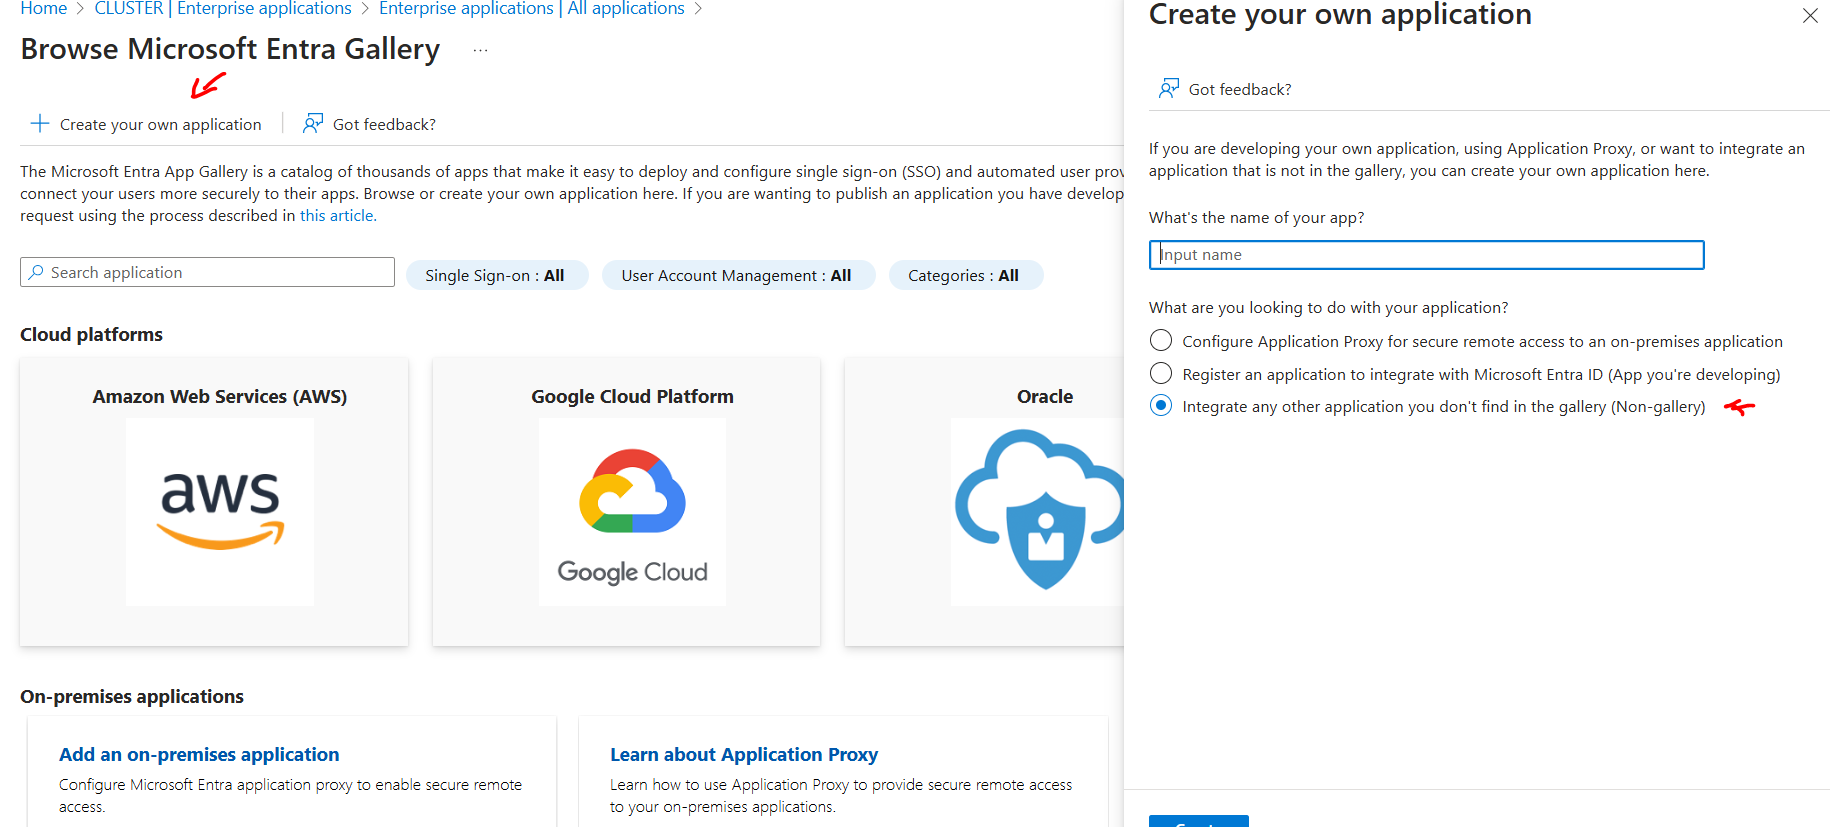
NOTE: I also learnt that we can also configure SSO for a third-party custom apps as well by got for "Create your own application" & selecting the option of "non-Gallery".
Once Salesforce is created with preferred name, we follow the below order as mentioned.
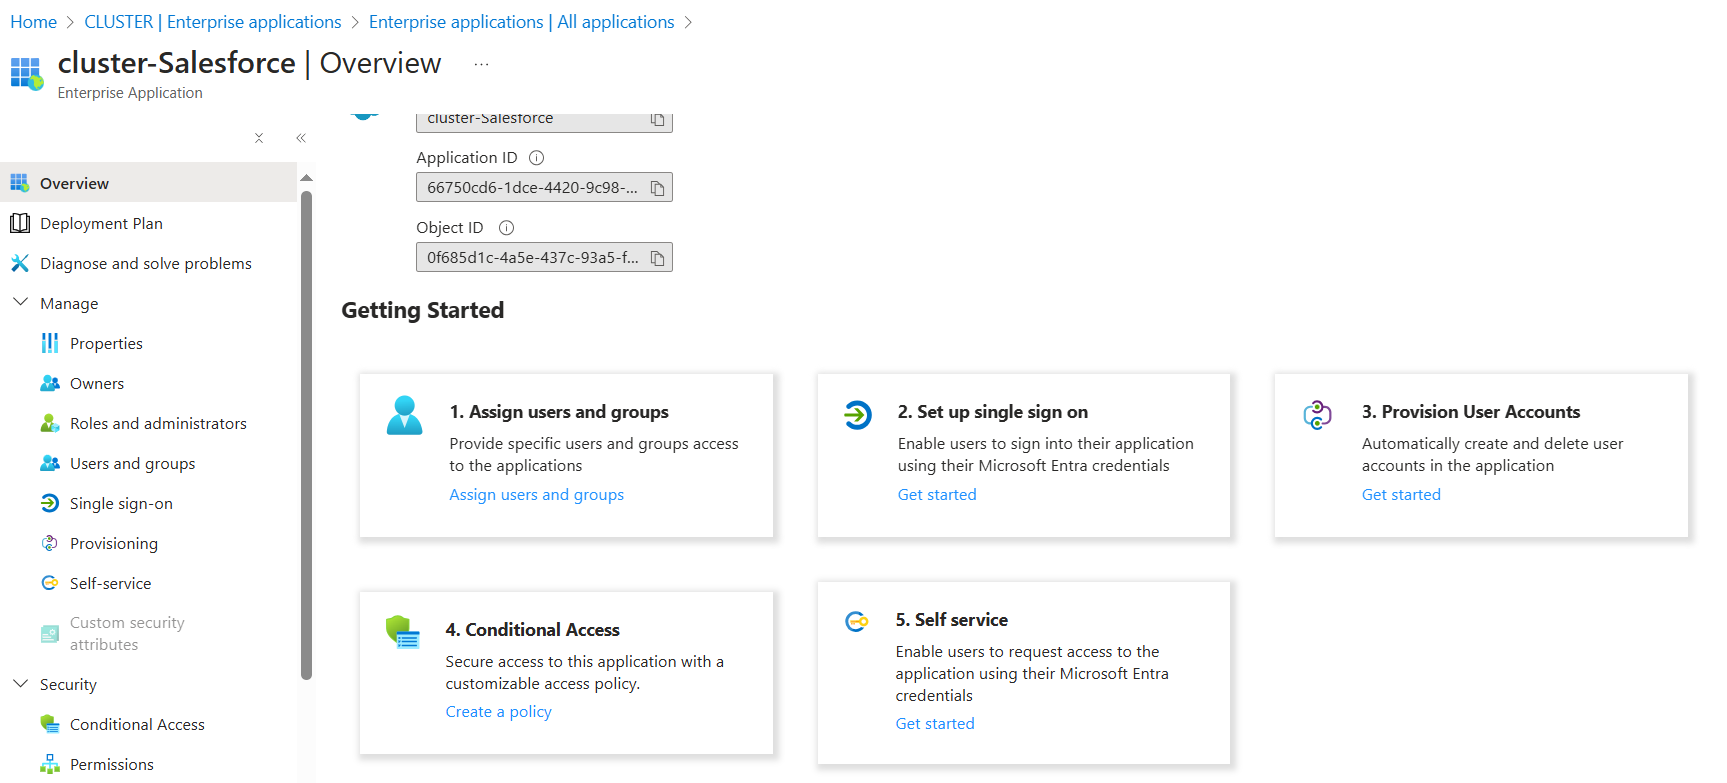
NOTE: Step1 & Step2 are mandatory for overall SSO Configuration. Rest of the steps can be evaded.
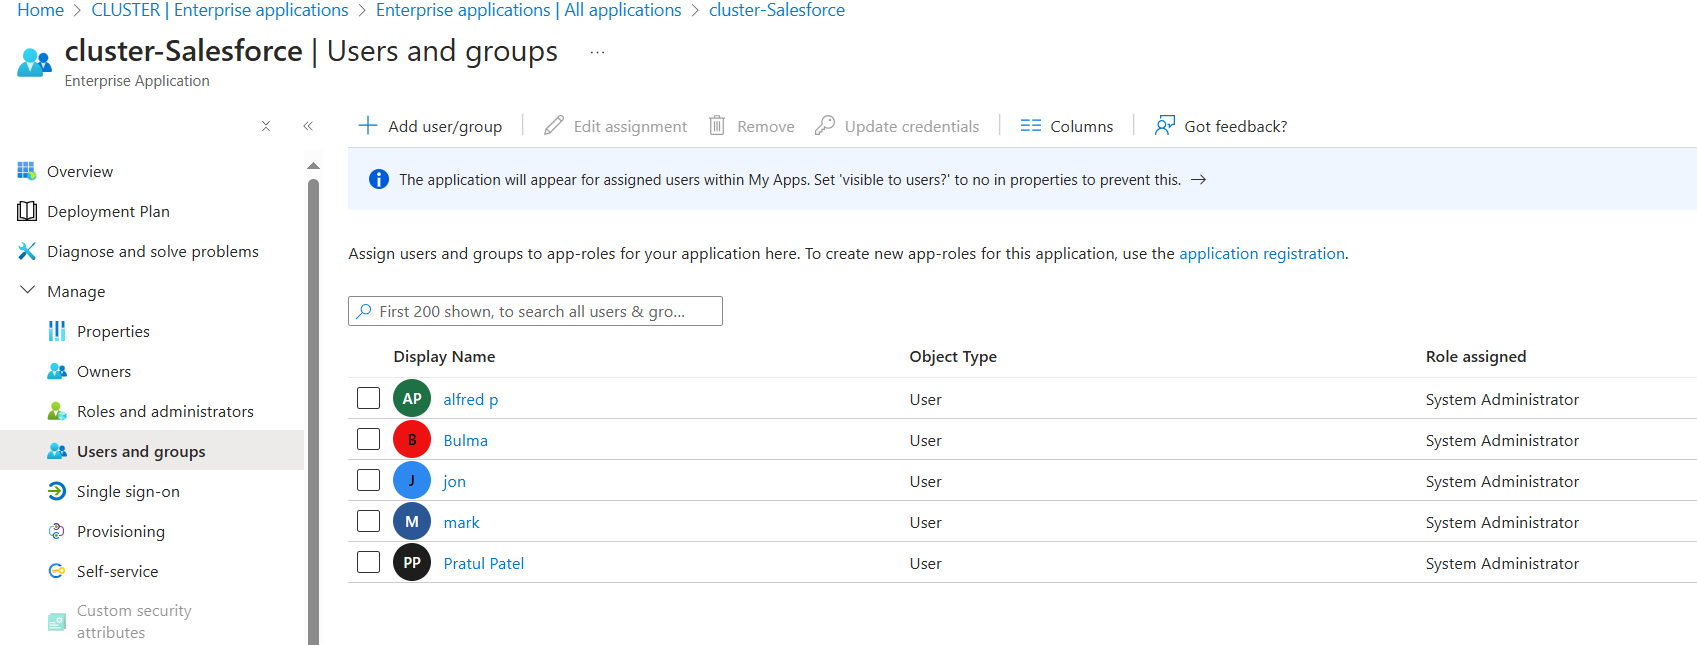
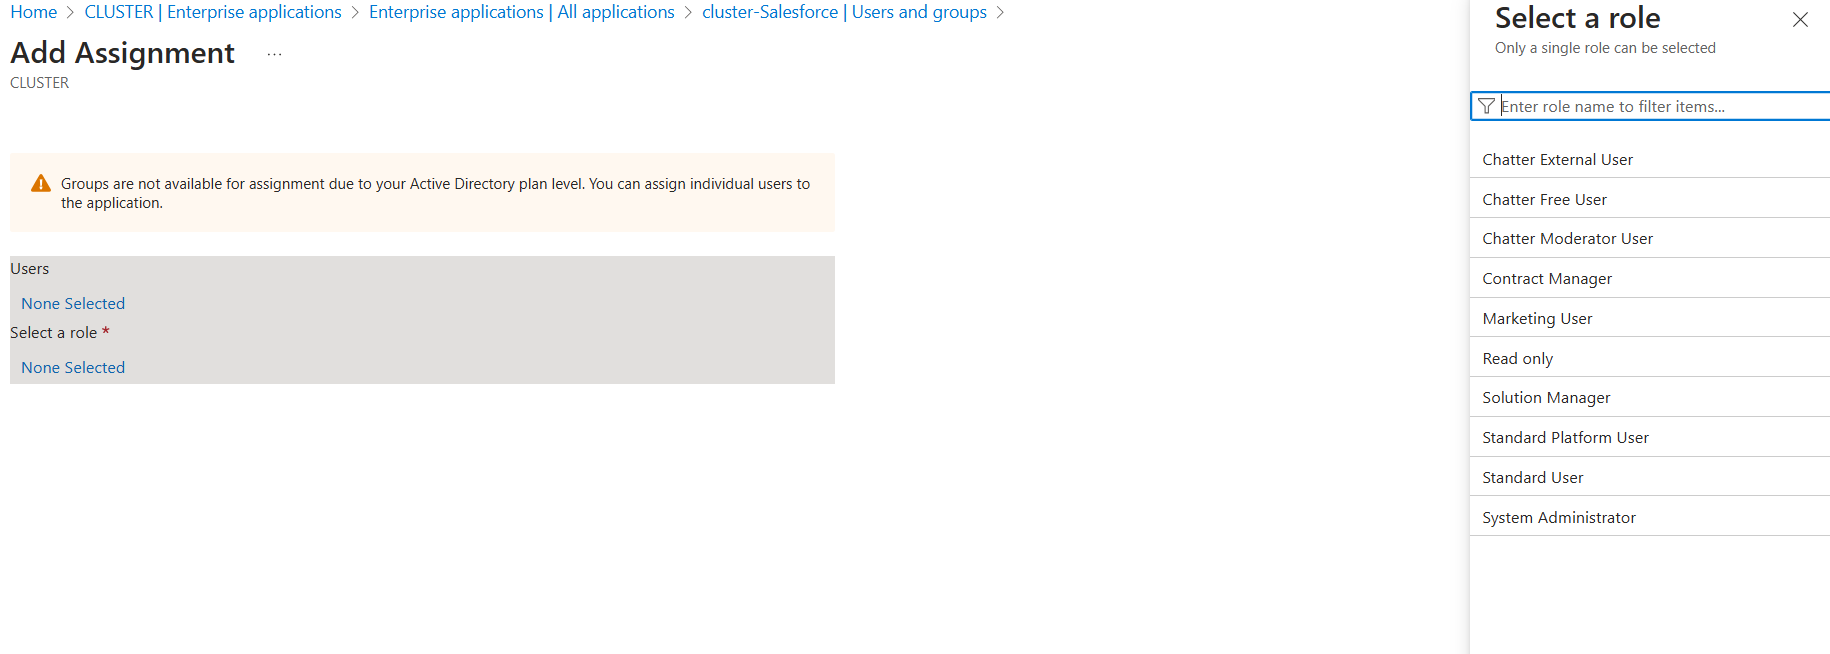
I added users (mix of cloud users, on Prem users & admins) and provided them the desired roles.
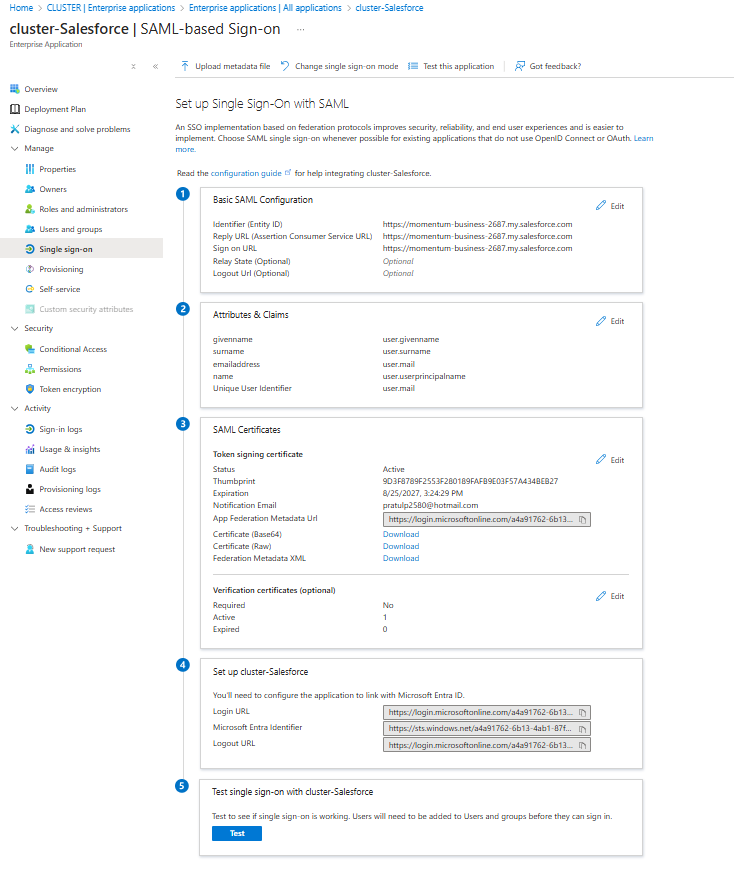
Finally, in the SSO section which is the main scope of learning, It is preferred that setting up SSO for Salesforce Account first.
Configuration of SSO in Salesforce:
First, I created a free trial (30 days) Salesforce account.
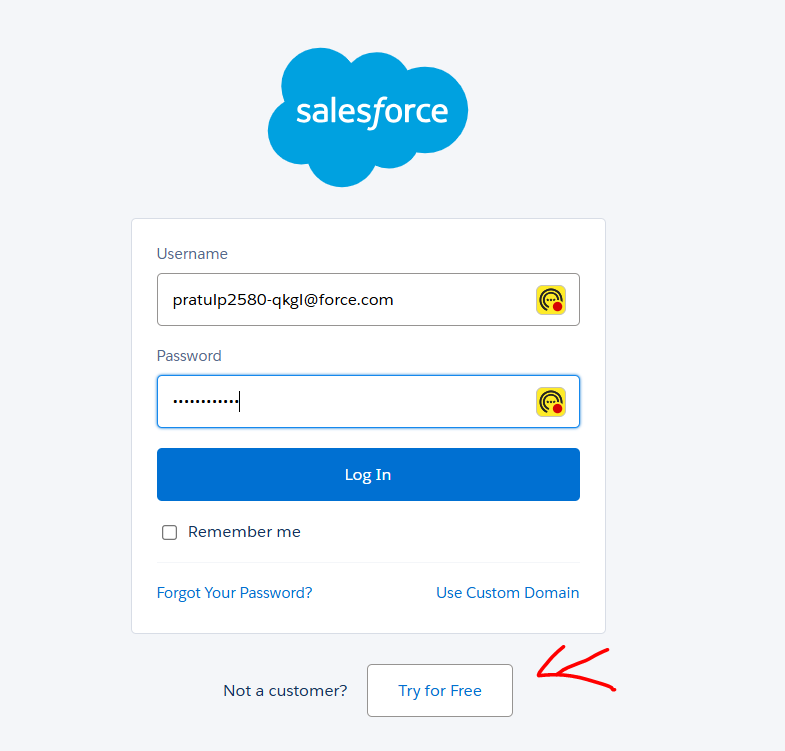
Once I completed the free account setup with necessary details, moved back to sign-in page & enter the credential as mentioned above.
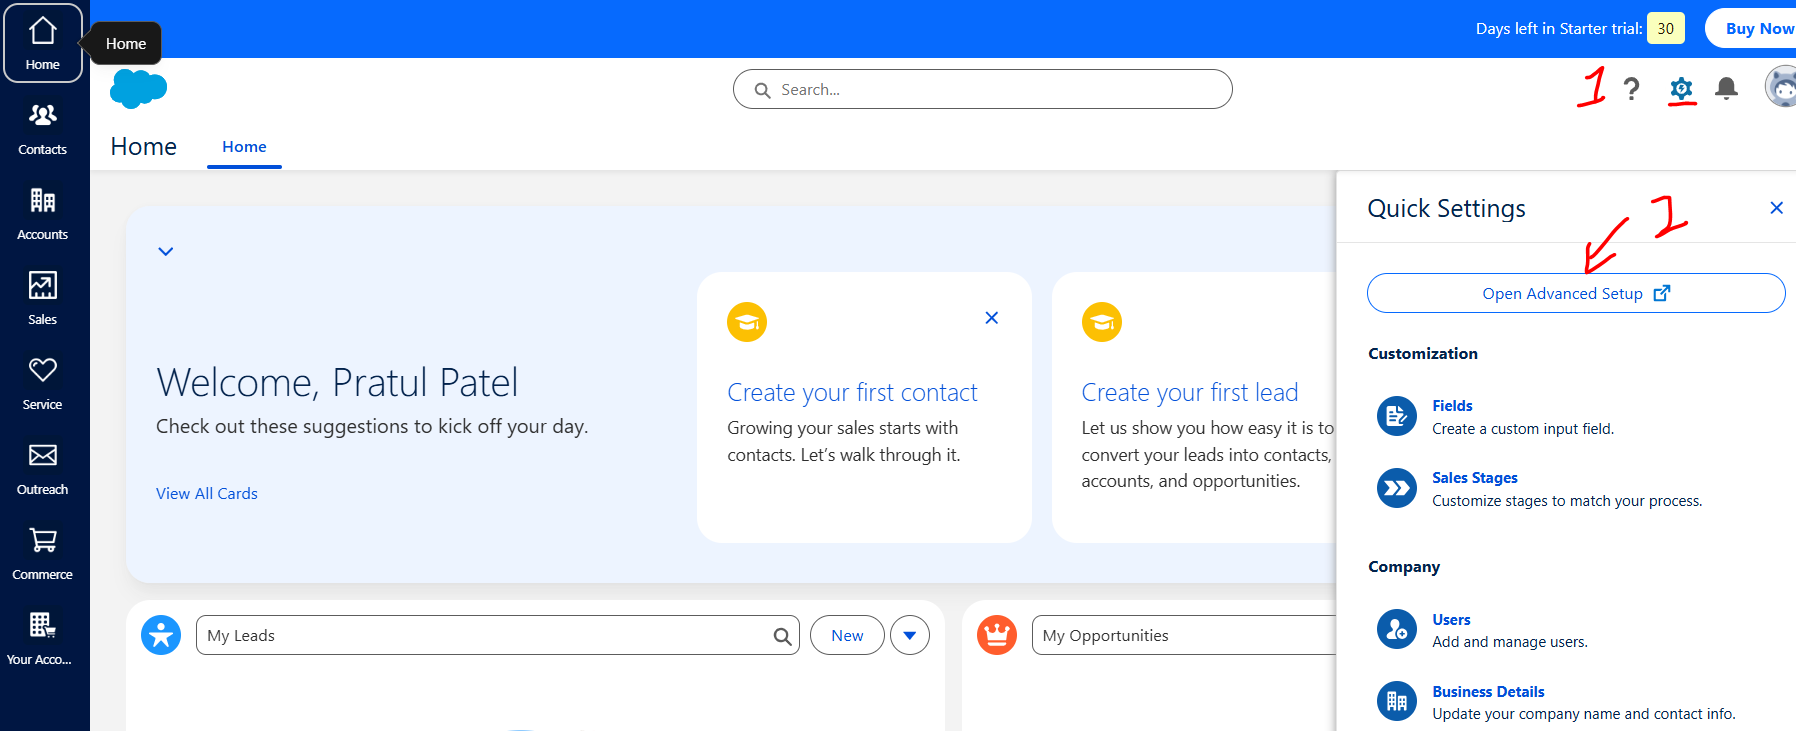
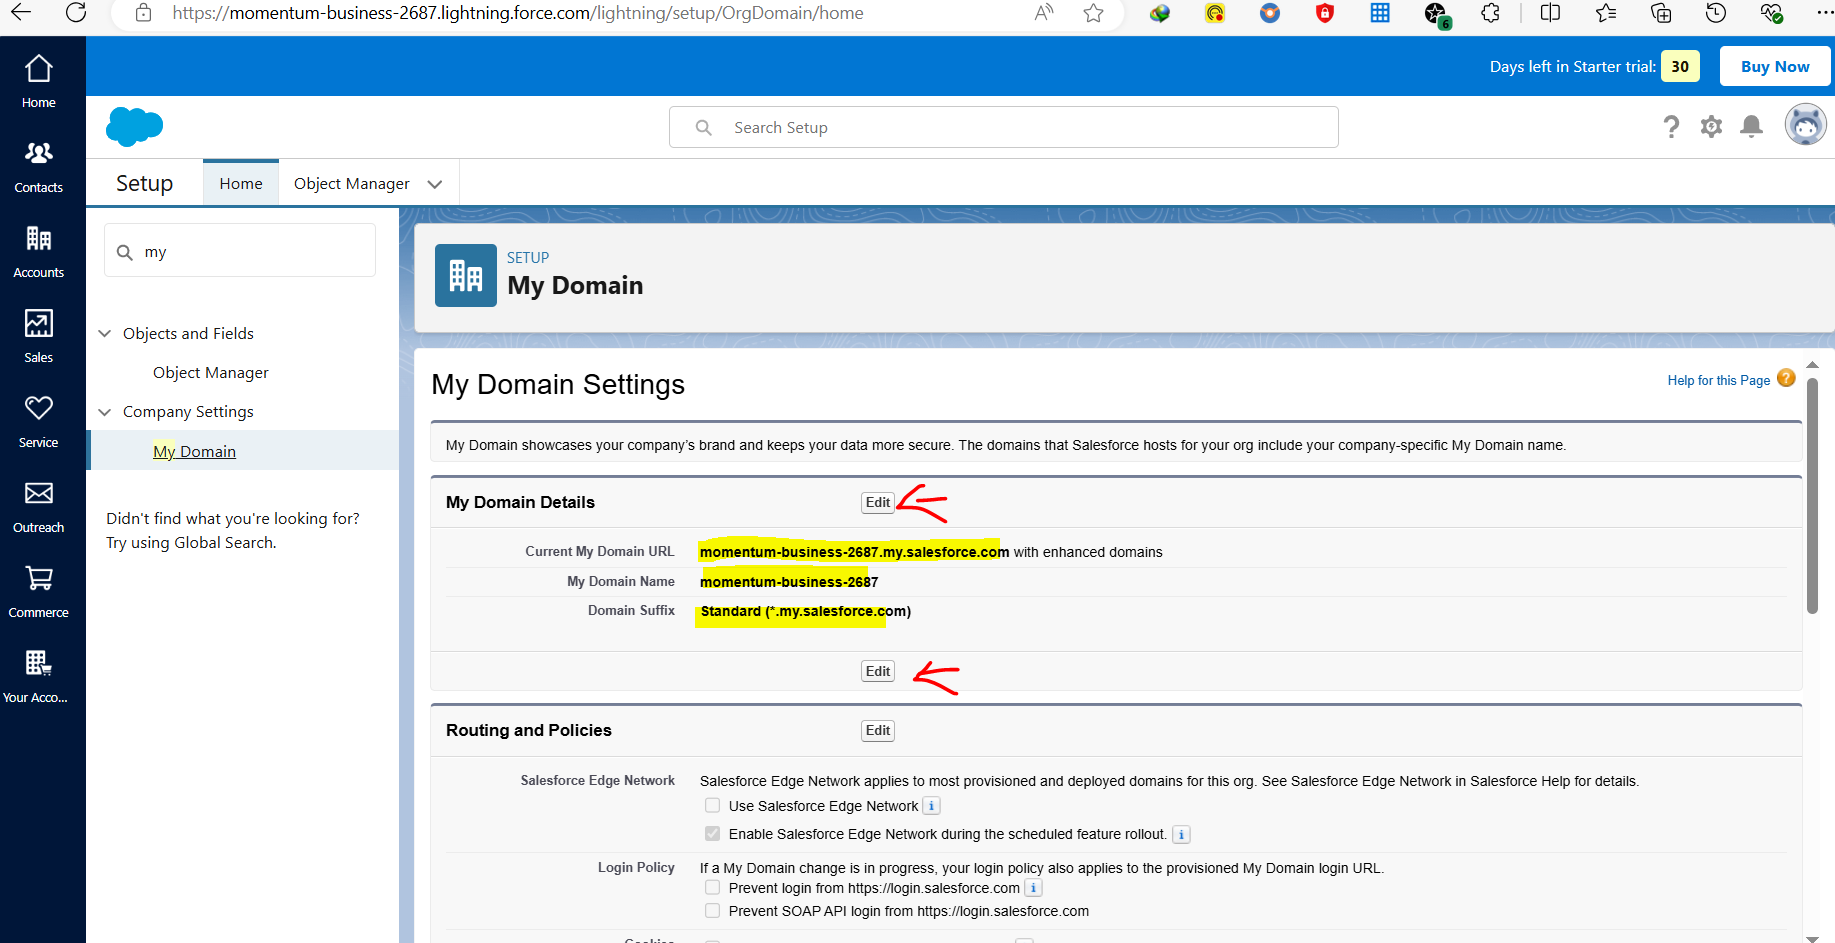
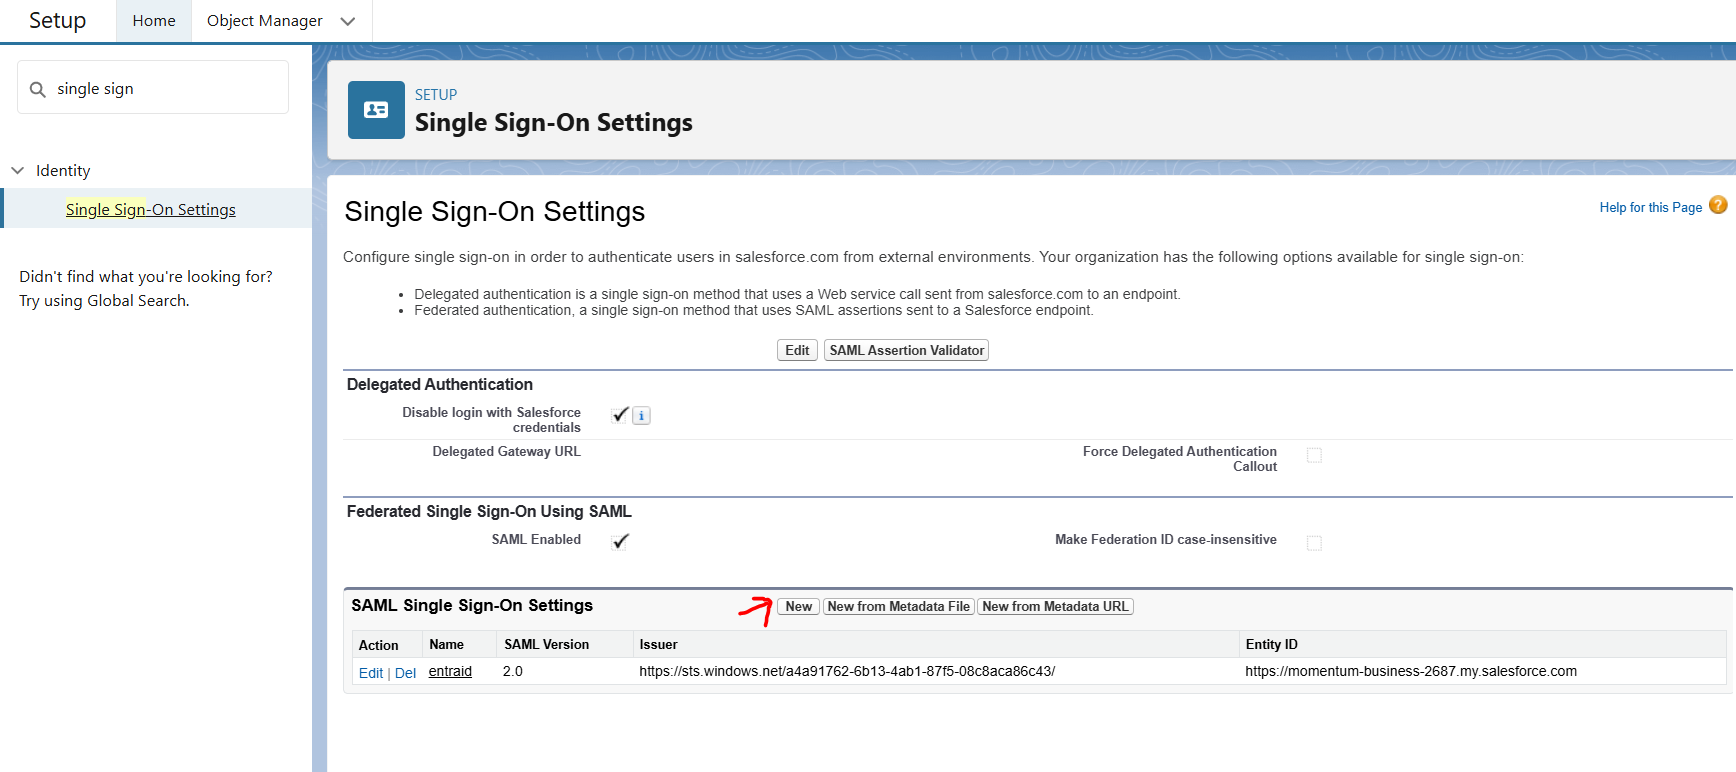
After this I navigated to advanced Setup -> Using Quick Search Tool
My Domains
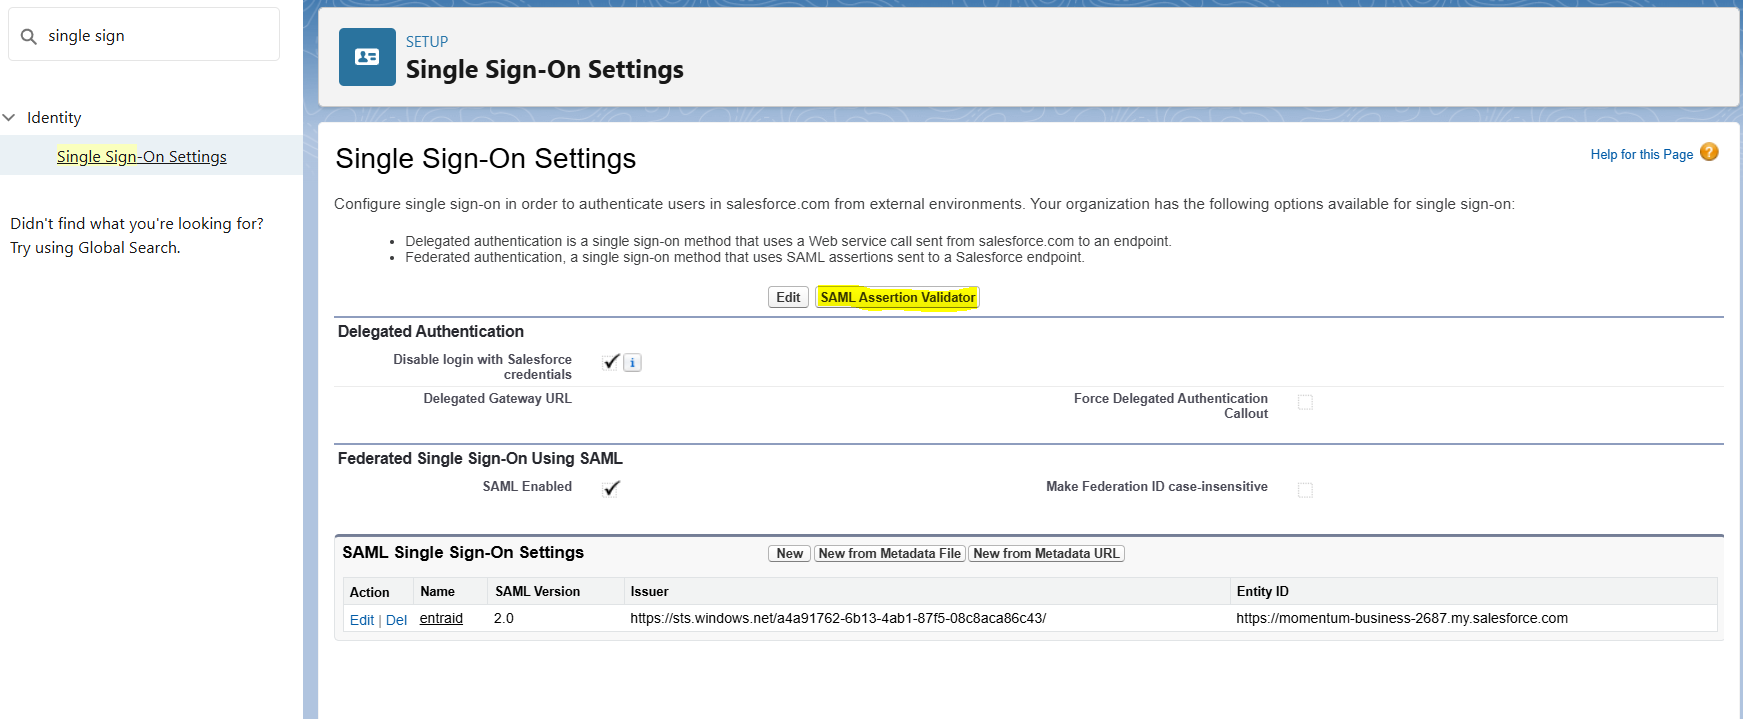
Single Sign-On

Now, before setting up SSO in Salesforce we, again traverse back to Microsoft Entra ID & continue setting up "Basic SAML Configuration"
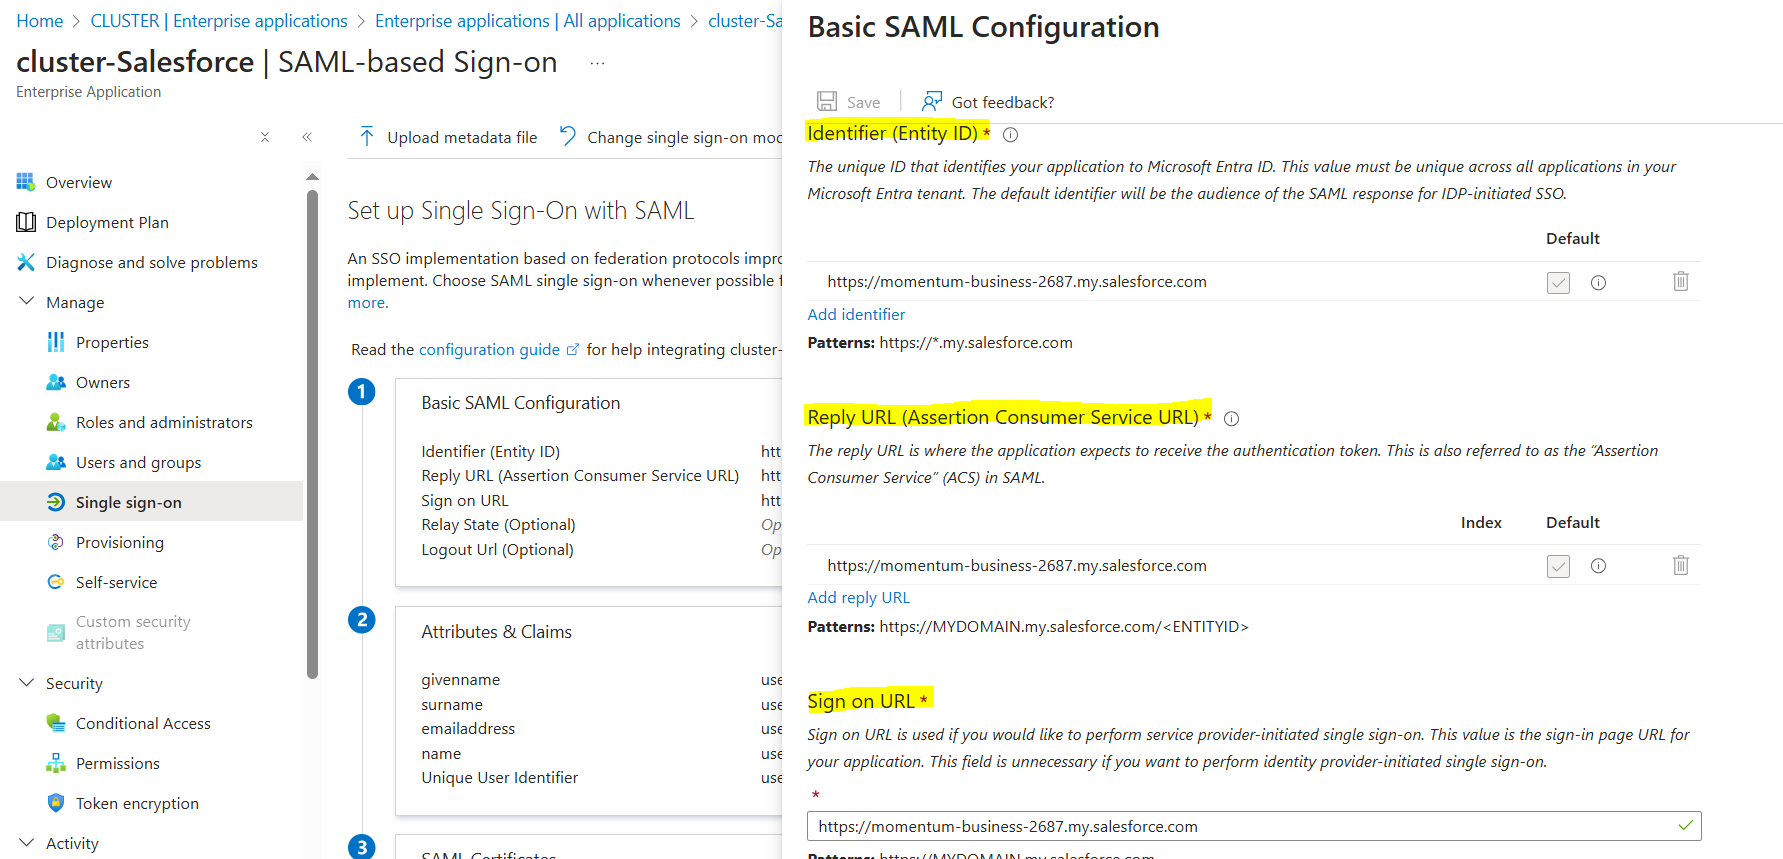
It is mandatory to setup these three fields as shown above;
Identifier (Entity ID)
Reply URL (Assertion Consumer Service URL)
Sign on URL
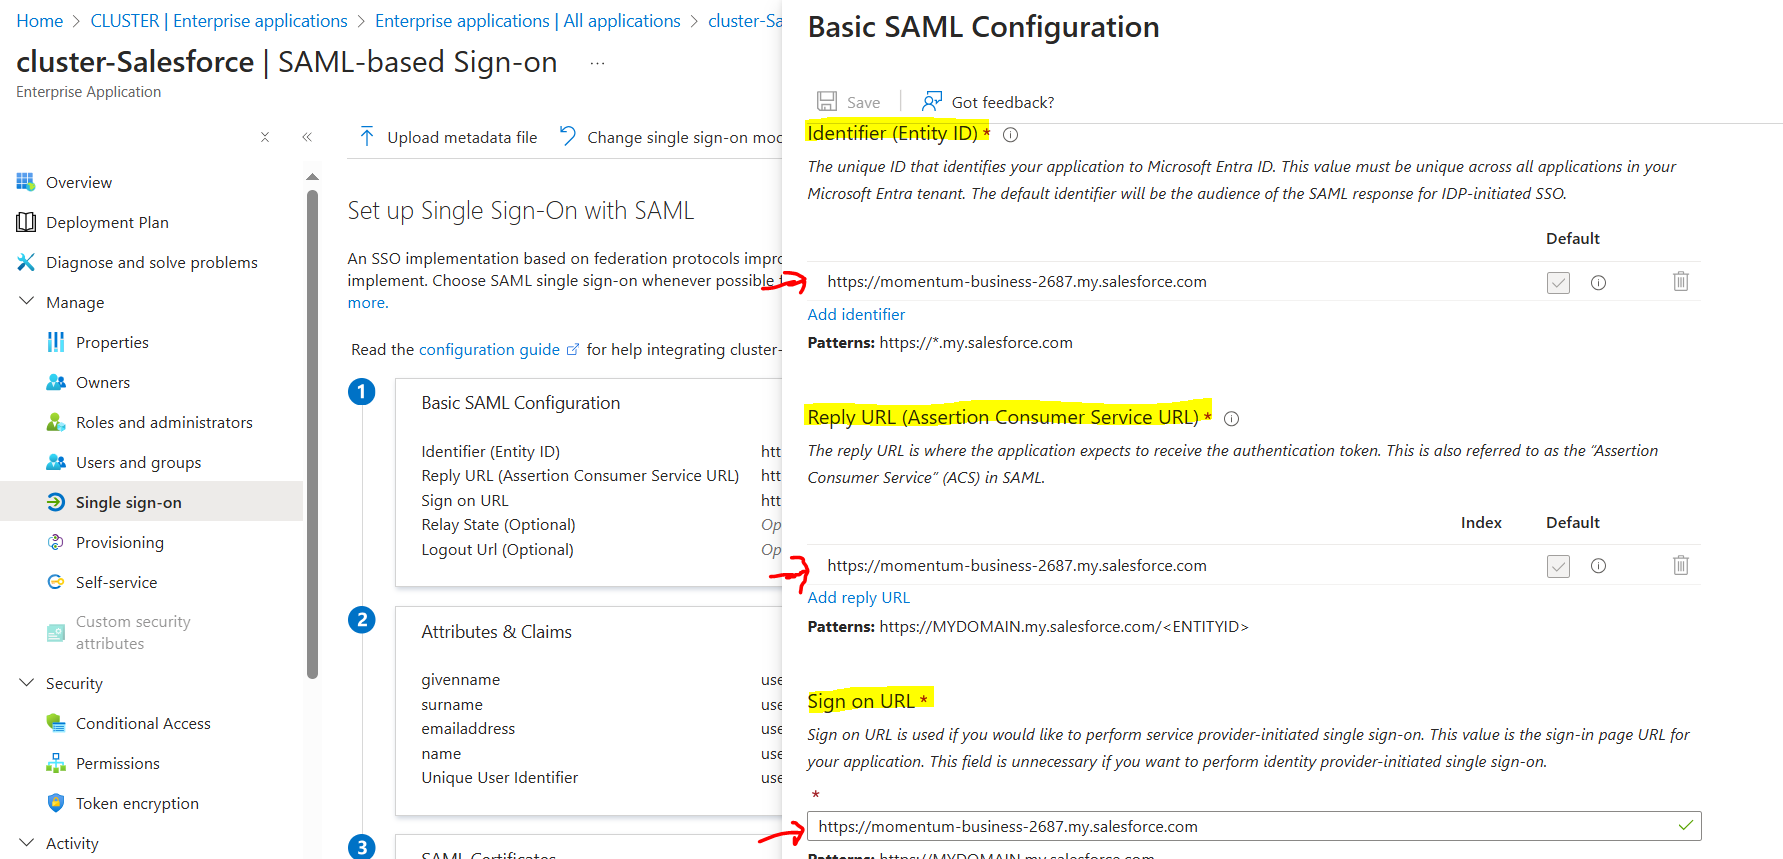
Use the "Current My Domain URL" by taking reference from "My Domain section" of Advanced Setup in Salesforce.
Use it in all the three fields & save it.
Reference:
Once Basic SAML is configured, we move to "Attributes & Claims" & set "Unique User Identifier (Name ID)" as
user.mail
user.employeeid
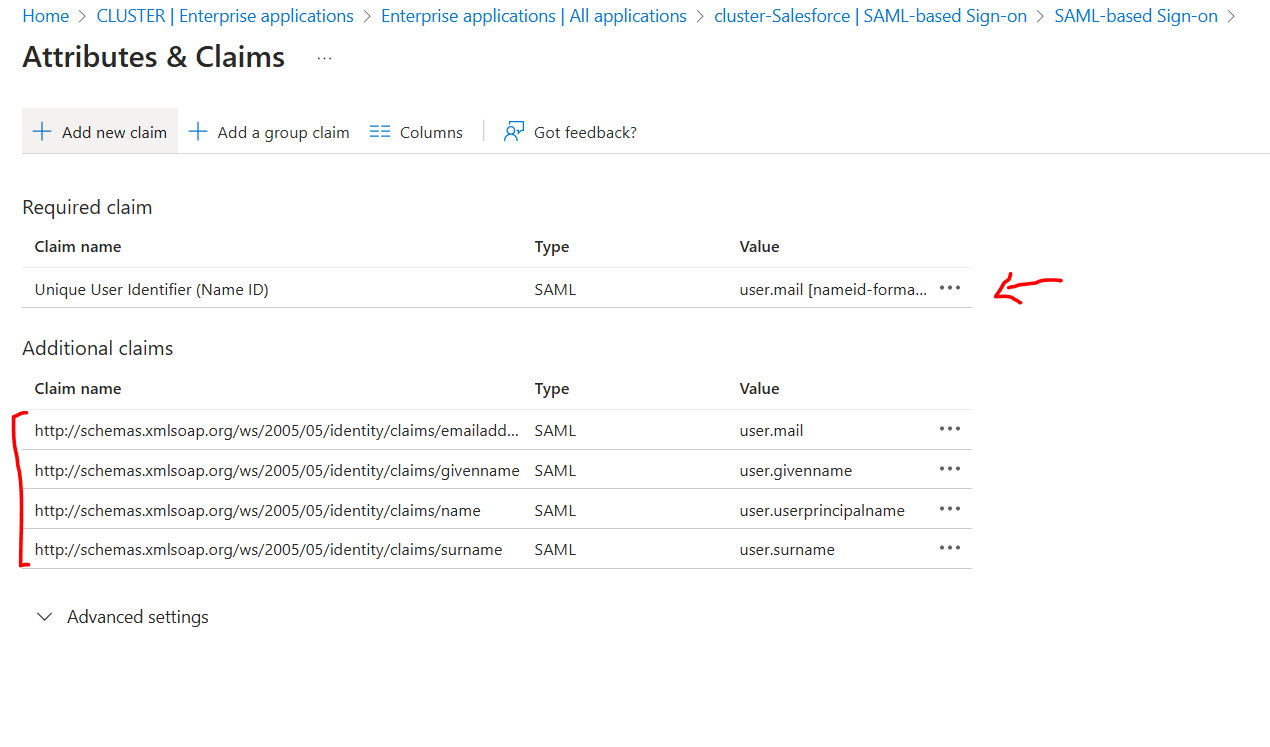
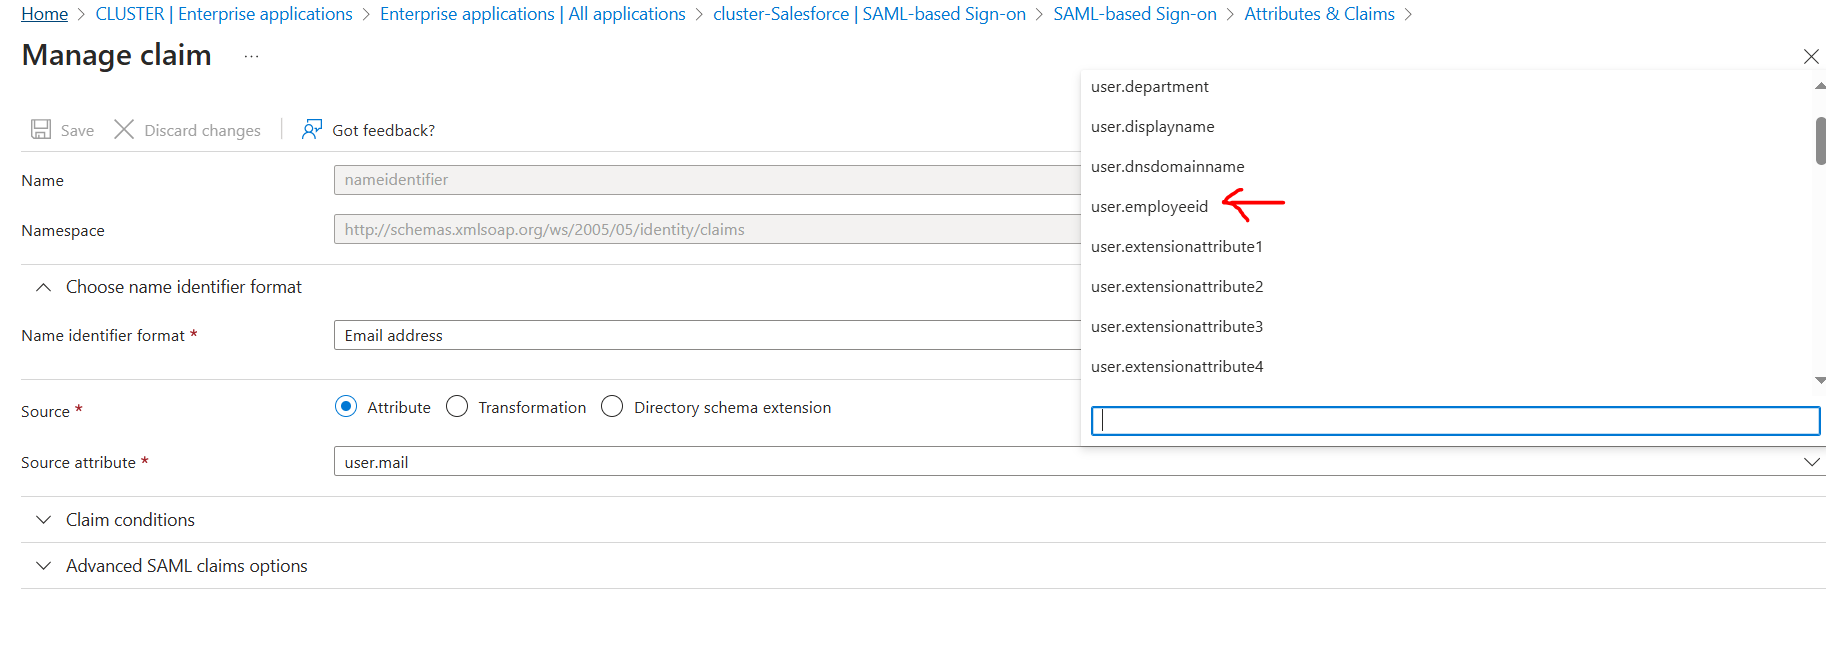
NOTE: The Additional claims can be useful to provide more information while signing into app through SSO.
NOTE: We can set the Unique User Identifier (Name ID) as either one of them depending on the business requirement.
The configuration of SAML based using SSO is configured with final step in downloading these files which are "Federation Metadata XML" & "Certificate (Base64)".
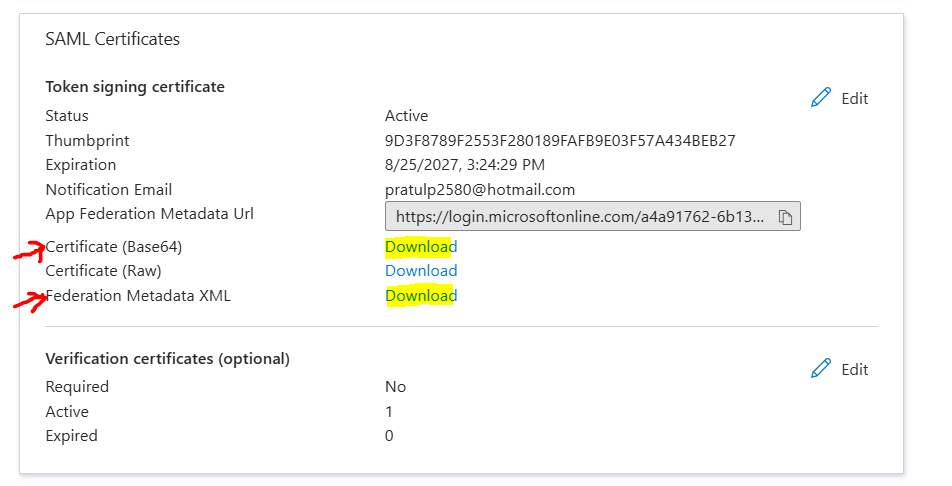
This is necessary for setting up SSO in Salesforce. In Salesforce, we can create new by taking reference from this document stepwise
https://www.miniorange.com/iam/integrations/salesforce-single-sign-on-sso
OR
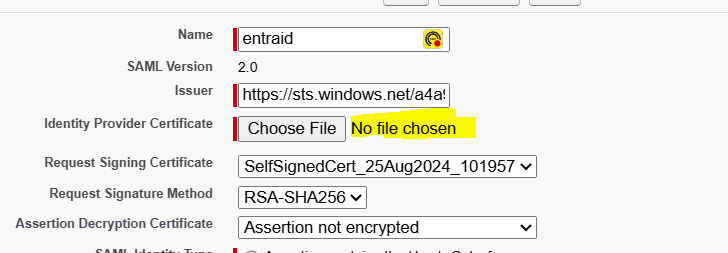
We can attach the '.XML' file in by which it automatically creates a template with data filled, taking reference from the XML datafile;
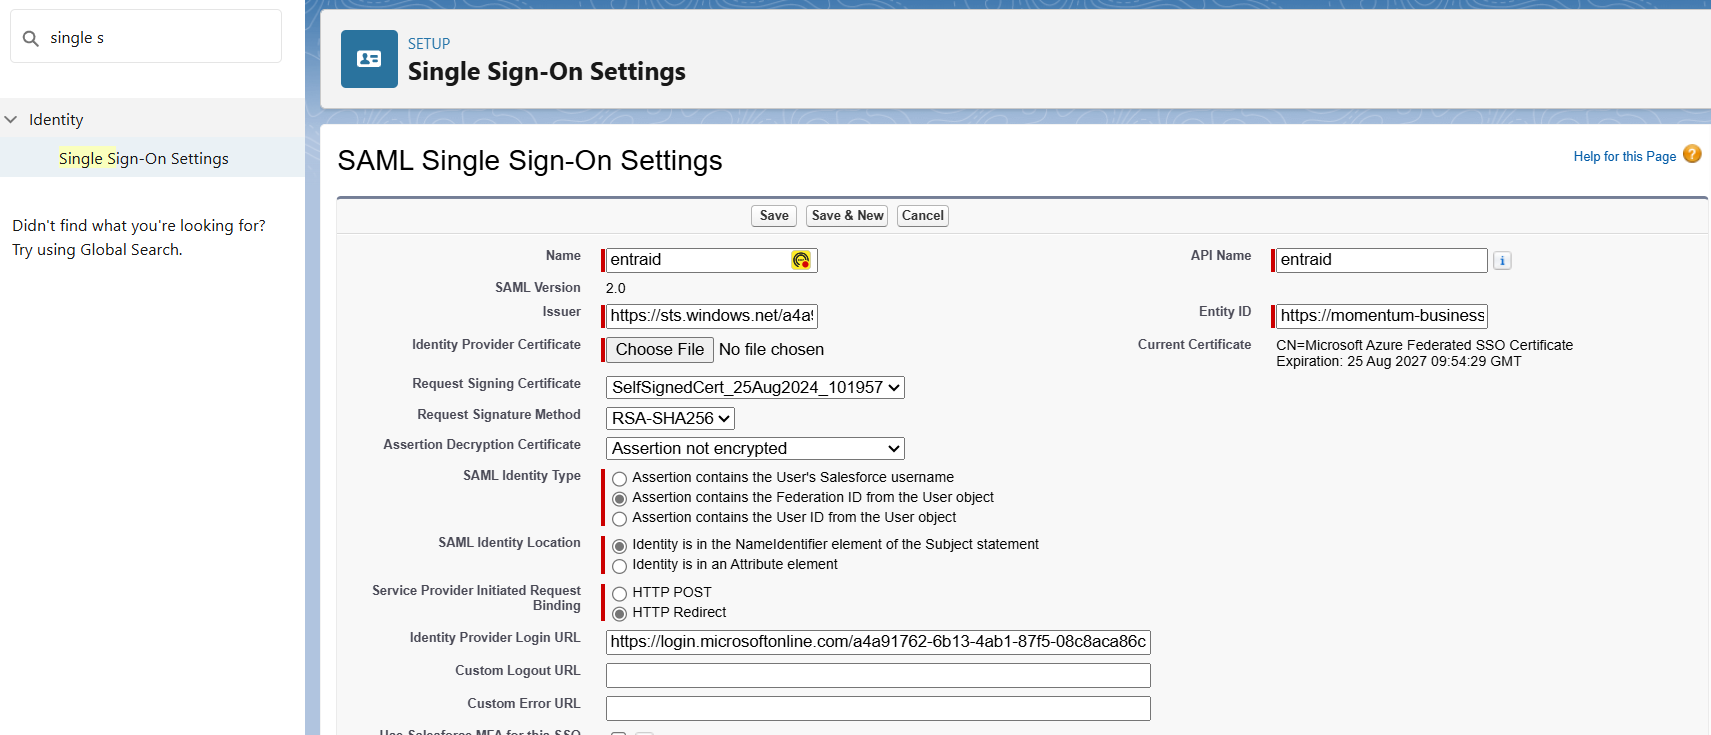
NOTE: Make sure to fill "Issuer", "Entity ID" & "Identity Provider Login URL" by taking reference from Entra ID:

Finally, attach the "Identity Provider Certificate" with the "Certificate (Base64)" downloaded above. Save it & enable SAML option by traversing back to SSO settings.
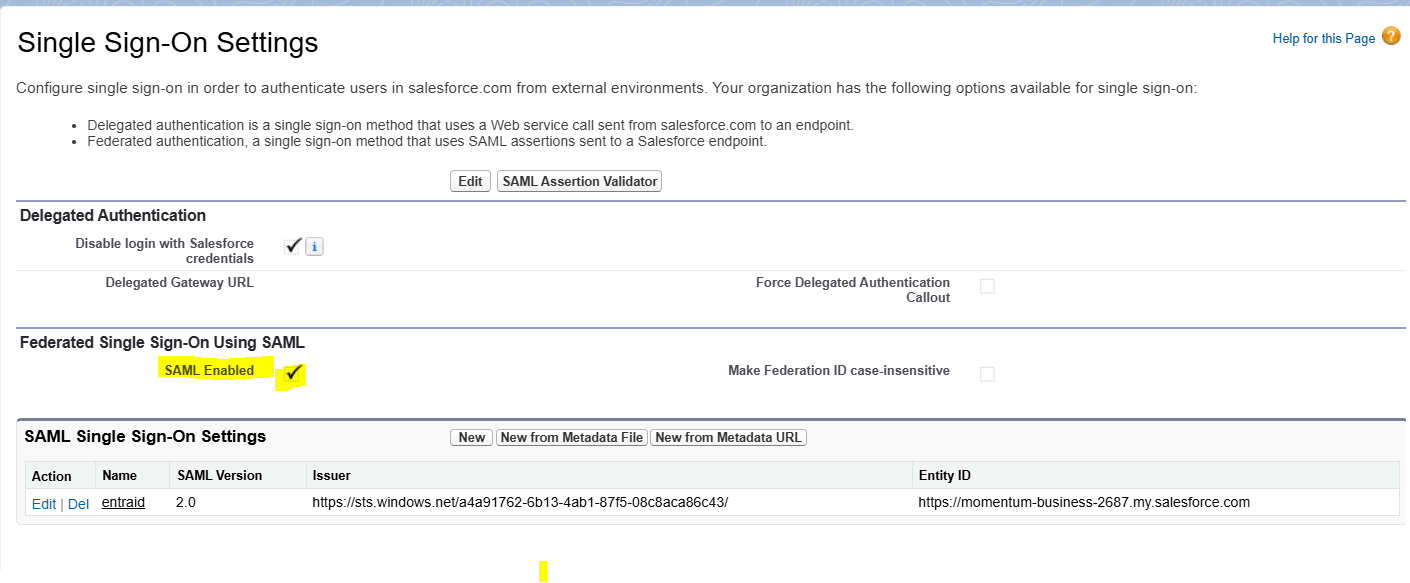
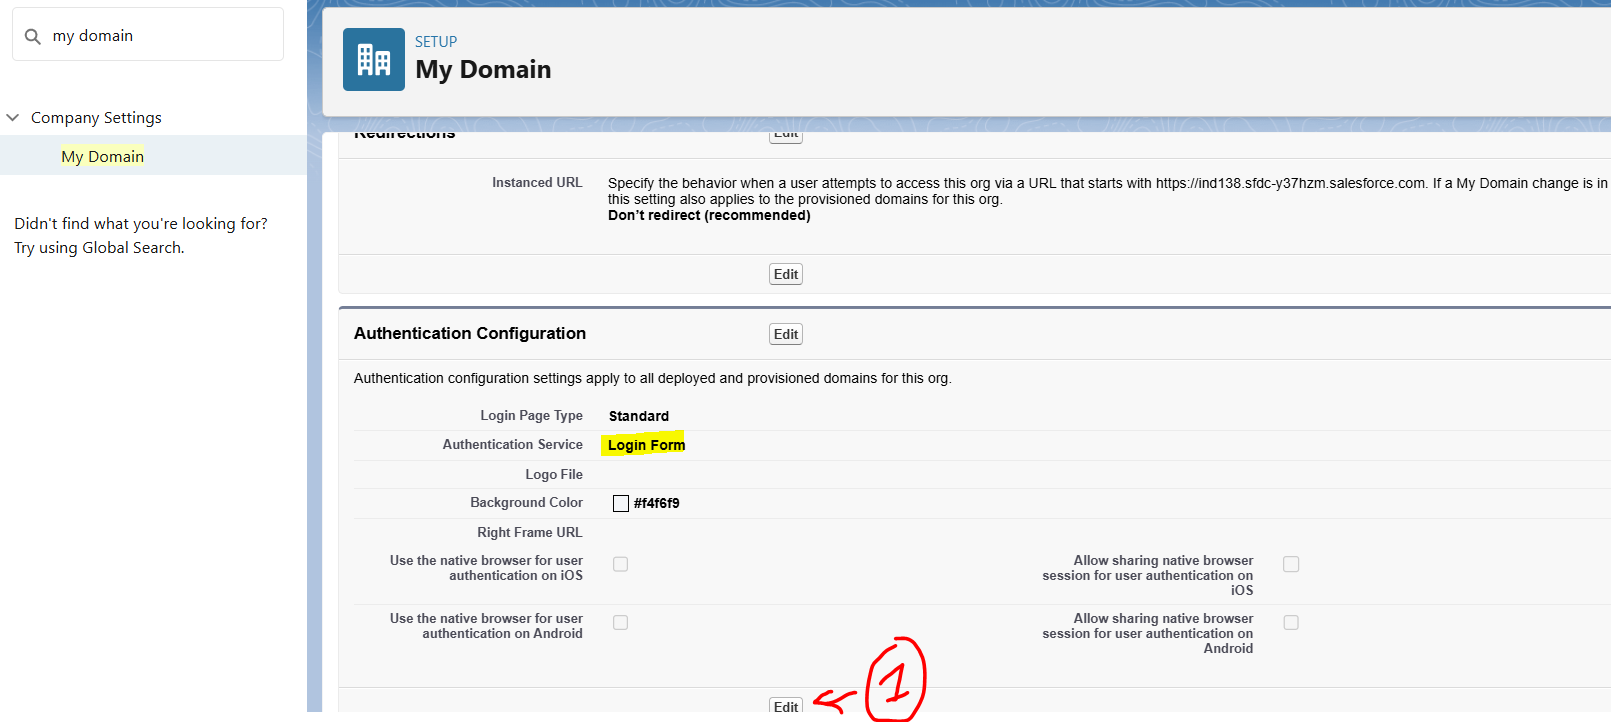
Last step, Go to My Domains -> Authentication Configuration
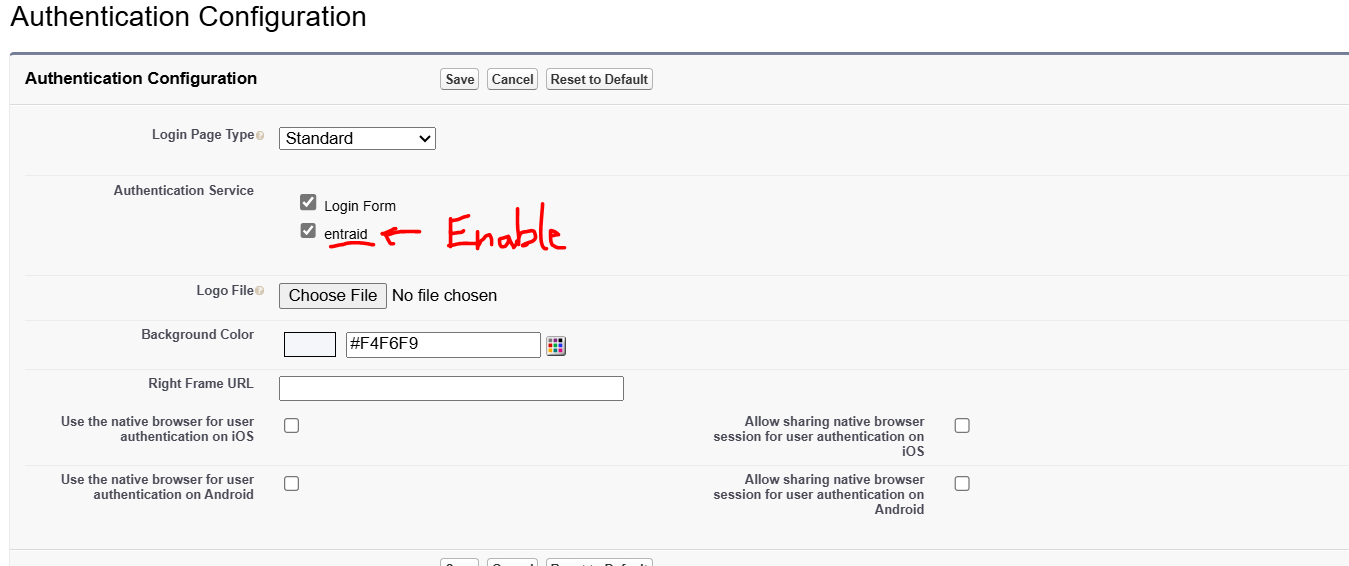
Enable the newly configured SSO and save it.
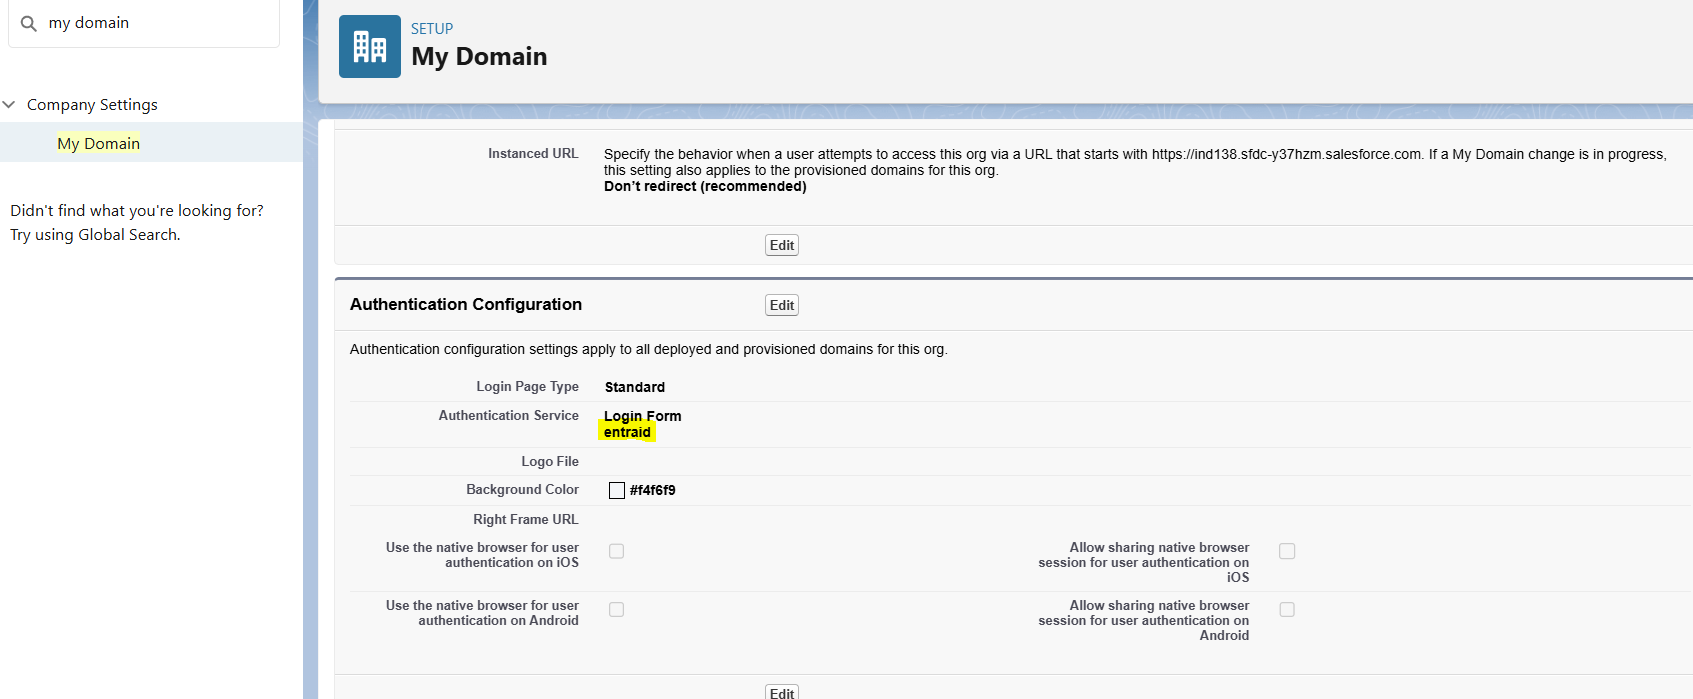
Once setup, we are good to go with SSO with SAML test!!!
NOTE: This step is essential because it plays a vital role in redirecting to the custom site which we configured in SSO settings of Enterprise Apps of Entra ID ('user.name' or 'user.employeeID' as unique user identifier).
CHALLENGES:
While running the test for SSO login, I faced the issue for Reply-URL & Sign-on URL
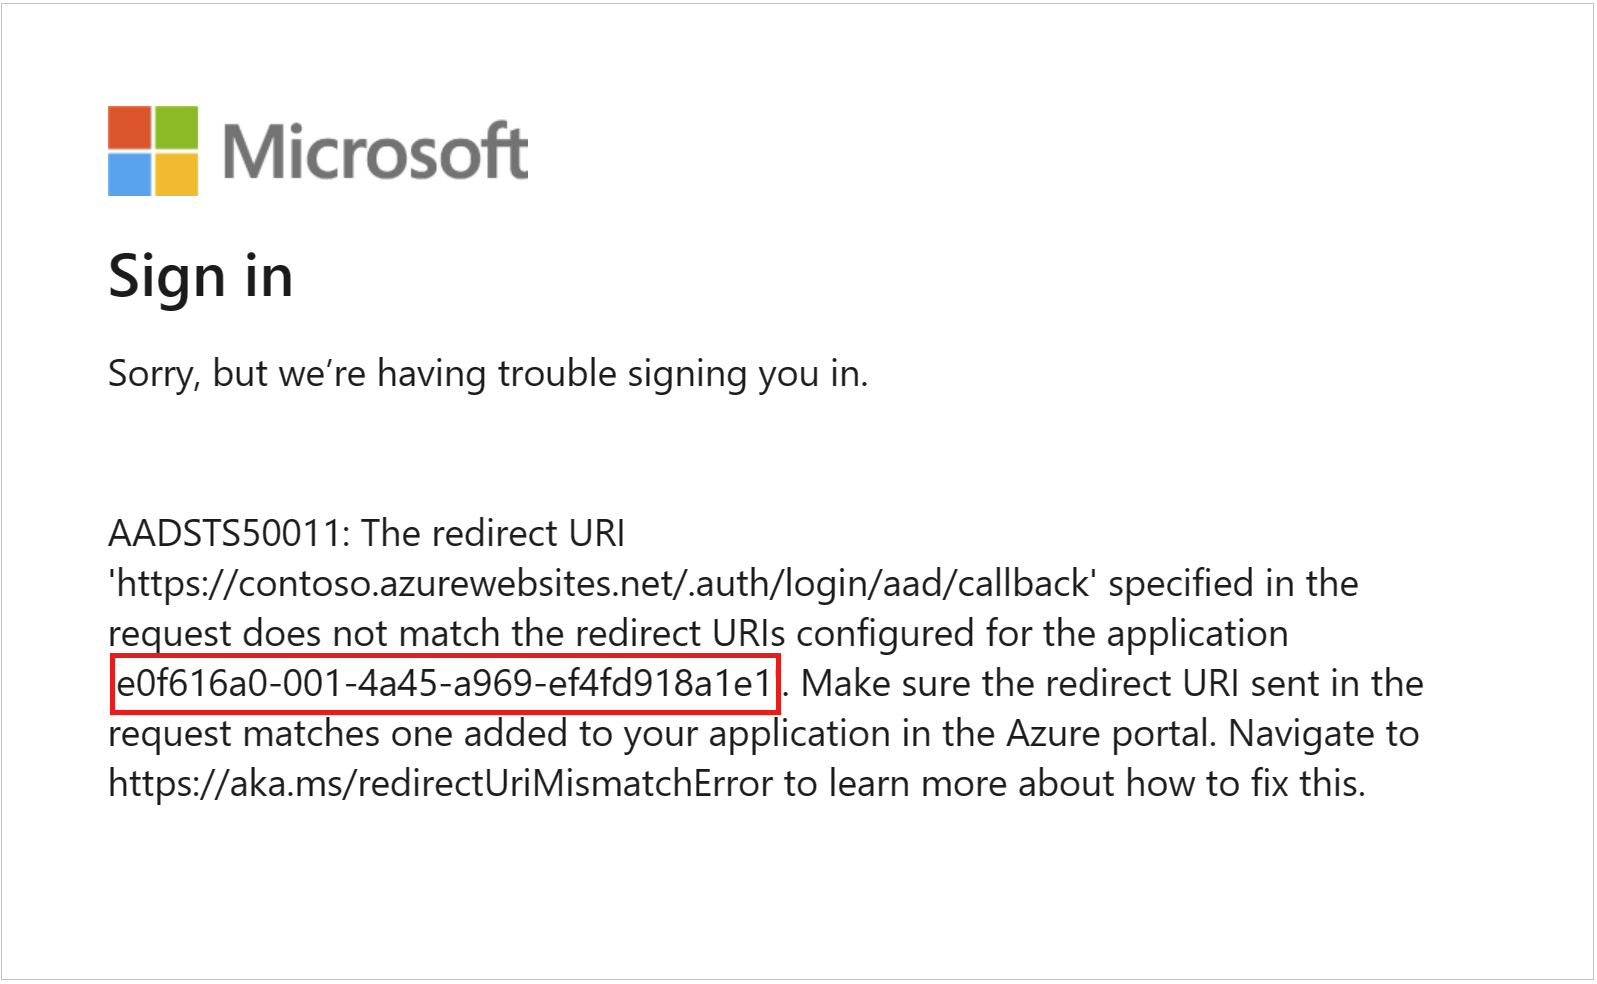
On diagnosing & referring to error, I noticed that the Reply-URL & Sign-on URL were not configured with domain as "**/salesforce.com".
I referred back to my Salesforce account in My domains sections & reconfigured all with "**/salesforce.com" & it worked next time**.**
I also used "SAML Validator" in SSO settings of Salesforce to diagnose the issue as well.
SIDE ACTIVITIES:
I also configured a Certificate to Salesforce app in Entra ID by creating it in Azure Key Vaults.
CHALLENGES:
I was unable to create the certificate in Azure Vault even though I was a service Admin & owner as well.
On referring to below documentation, I came to know that it irrespective of above roles, we must have these any one of these two RBAC roles:
Key Vault Administrator: Full access to manage all aspects of the Key Vault, including access policies.
Key Vault Contributor: Access to manage the Key Vault but without data plane access.
Subscribe to my newsletter
Read articles from Pratul directly inside your inbox. Subscribe to the newsletter, and don't miss out.
Written by

Pratul
Pratul
A passionate L1 Server Engineer with a growing focus on DevOps practices. With experience in server administration, troubleshooting and infrastructure management, I am skilled at optimizing workflows through automation and CI/CD pipelines. Currently working with cloud platforms like AWS & Azure, virtualization technologies, and configuration management tools. Committed to enhancing efficiency and productivity. Through this blog, I will be sharing hands-on insights, tutorials, and practical tips aimed at helping fellow professionals in server engineering and DevOps.