Automating React Storybook: Generate, version upgrade & publish to npm.
 Sidhant Kumar Sahoo
Have you ever wondered how libraries like Material UI and Tailwind CSS are built and published?
In this guide, we'll walk you through creating Storybook components using React and Vite, publishing them to npm, and automating version updates with semantic-release.
What We'll Cover
Introduction to Storybook
Generating a boilerplate Storybook for React, TypeScript, and Vite
Setting up the project and adding a simple custom button component to Storybook
Compiling TypeScript files
Bundling using Rollup
Publishing to npm
Automating the entire package release workflow to npm via GitHub Actions and
semantic-release
What is Storybook?
Storybook is a frontend workshop for building UI components and pages in isolation. It helps you develop and share hard-to-reach states and edge cases without needing to run your whole app. It's open source and free.
Setting up the Project
mkdir storybook-react-components
cd storybook-react-components
npx storybook@latest init
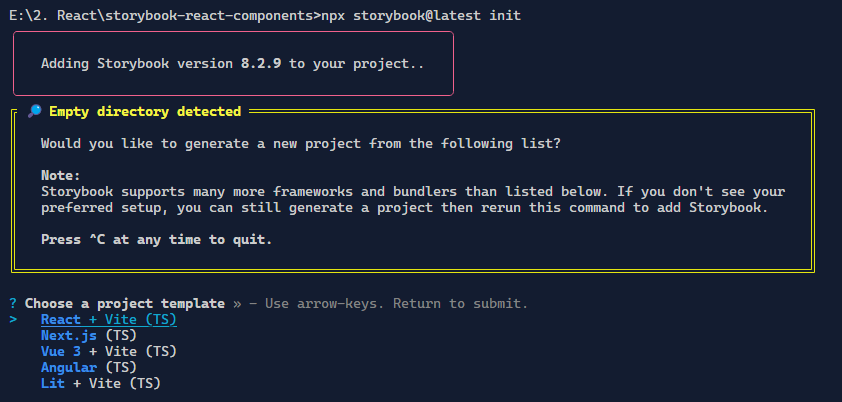
Choose the project template as React + Vite (TS). Wait for a while, and Storybook will open at http://localhost:6006 by default. Below is the folder structure.
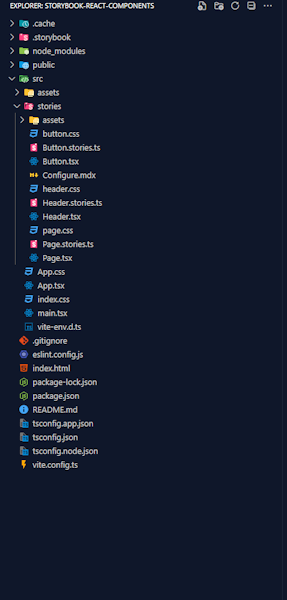
Clean up the boilerplate code and organize the folders as we typically do in React projects. After cleaning up, the folder structure will look like this:
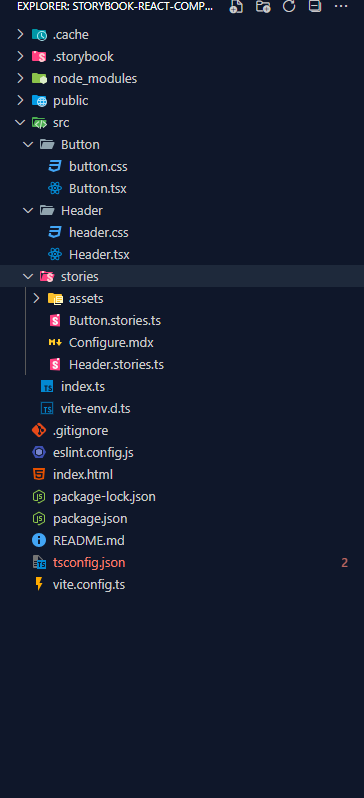
Update the
tsconfig.jsonwith below settings{ "compilerOptions": { "useDefineForClassFields": true, "lib": [ "ES2020", "DOM", "DOM.Iterable", "esnext" ], // Includes necessary libraries. "allowJs": true, // Allows processing of JavaScript files. "esModuleInterop": true, // Enables ES module interoperability. "allowSyntheticDefaultImports": true, // Allows default imports. "forceConsistentCasingInFileNames": true, // Enforces consistent file name casing. "skipLibCheck": true, // Skips type checks for libraries. "resolveJsonModule": true, // Resolves JSON modules. "moduleResolution": "node", // Uses Node.js module resolution. "strict": true, // Enables strict type-checking. "noUnusedLocals": true, "noUnusedParameters": true, "noFallthroughCasesInSwitch": true, // Prevents fall-through cases in switch statements. "target": "ES6", "module": "ES6", "jsx": "react", // Uses React JSX factory. "outDir": "./dist", "rootDir": "./src", "noEmit": true, // Prevents emitting JavaScript files. "isolatedModules": true: // Isolates each module. }, "include": [ "src/**/*" ], "exclude": [ "node_modules", "dist" ] }Update the
index.tsfile with the following code, which will include reusable components. Here, I will add the Button and Header components generated by the Storybook boilerplate code.import Button from "./Button/Button"; import Header from "./Header/Header"; import type { ButtonProps } from "./Button/Button"; import type { HeaderProps, User } from "./Header/Header"; export { Button, ButtonProps, Header, HeaderProps, User };After updating the code, run the below command to check and ensure if storybook is running without errors.
npm run storybookNow create new repository in your GitHub and push the code to
main branch.
Bundling Using Rollup
Now that we have compiled our code, we need to bundle it for different environments.
Install Rollup:
npm install rollupInstall additional plugins: save as dev dependencies
npm install @rollup/plugin-node-resolve @rollup/plugin-commonjs @rollup/plugin-typescript rollup-plugin-peer-deps-external @rollup/plugin-terser rollup-plugin-dts rollup-plugin-postcss -D
@rollup/plugin-node-resolve: Resolves dependencies in your code.@rollup/plugin-commonjs: Allows use of CommonJS modules.@rollup/plugin-typescript: Enables TypeScript support.rollup-plugin-peer-deps-external: Manages peer dependencies.@rollup/plugin-terser: Minifies JavaScript code.rollup-plugin-dts: Generates type declarations.rollup-plugin-postcss: Install the postcss plugin
Create rollup.config.js in your root directory:
Add following keys to
package.jsonRemove
"private": trueand"type": "module"frompackage.json{ ... "name": "storybook-react-components", "description": "A collection of reusable components for React Storybook", "main": "dist/index.js", "module": "dist/index.mjs", "types": "dist/index.d.ts", "files": ["dist/**/*", "README.md", "*.js", "*.d.ts"], "scripts": { "dev": "storybook dev -p 3001", "build": "storybook build", "lint": "eslint .", }, "exports": { ".": { "types": "./dist/index.d.ts", "node": "./dist/index.js", "require": "./dist/index.js", "import": "./dist/index.mjs" }, "./manager": "./dist/manager.mjs", "./preview": "./dist/preview.mjs", "./package.json": "./package.json" }, "bundler": { "exportEntries": [ "src/index.ts" ], "managerEntries": [ "src/manager.ts" ], "previewEntries": [ "src/preview.ts" ] }, ... }Writing the config (
rollup.config.js)import resolve from "@rollup/plugin-node-resolve"; import commonjs from "@rollup/plugin-commonjs"; import typescript from "@rollup/plugin-typescript"; import dts from "rollup-plugin-dts"; import terser from "@rollup/plugin-terser"; import peerDepsExternal from "rollup-plugin-peer-deps-external"; import postcss from "rollup-plugin-postcss"; const packageJson = require("./package.json"); export default [ { input: "src/index.ts", output: [ { file: packageJson.main, format: "cjs", // Output as CommonJS module. sourcemap: true, }, { file: packageJson.module, format: "esm", // Output as ES module. sourcemap: true, }, ], plugins: [ peerDepsExternal(), resolve(), commonjs(), typescript({ tsconfig: "./tsconfig.json", jsx: "react" }), terser(), postcss(), ], external: ["react", "react-dom"], // Excludes specified dependencies from the bundle. }, { input: "src/index.ts", output: [{ file: packageJson.types, format: "esm" }], plugins: [dts.default()], external: [/\.css$/], }, ]Build Script: update the
package.jsonfile{ ... "scripts": { "rollup": "rollup -c --bundleConfigAsCjs", ... } }Explanation of the Build Script
"rollup": This is the name of the script. You can run it usingnpm run rollup."rollup -c --bundleConfigAsCjs": This command runs Rollup with the specified options:-c: Tells Rollup to use a configuration file (rollup.config.jsby default).--bundleConfigAsCjs: Ensures the output is bundled as a CommonJS module.
Publish to NPM
npm run buildThis will create a dist folder in your root directory.
Finally, you can publish your package to NPM by following these steps:
Create a account in npm if you don't have a account.
Create a
.npmignorefile in root directory.node_modules src rollup.config.js tsconfig.json .gitignorenpm login
Publish the package:
npm publishAnd that's it! You've successfully created and published your React TypeScript storybook component to NPM.
Automate version increments of your npm package
The above steps for publishing to npm are manual. Each time you change the version in package.json, you have to run the commands again. This makes it difficult to maintain our package when new components are added.
  {
     ...
     "version": "1.2.0", // This you will be changing manually before
                         // publishing
     ...
   }
Now most exciting part of this blog, we will automate the entire package release workflow, including determining the next version number, generating the release notes, and publishing the package. Follow the steps below to achieve this:
Install
semantic-releasenpm install --save-dev semantic-releaseInstall some plugins for
semantic-release:npm install @semantic-release/changelog @semantic-release/git -DCreate a
.releaserc.jsonfile in the root directory and add the following configuration code:{ "branches": ["main"], "plugins": [ "@semantic-release/commit-analyzer", "@semantic-release/release-notes-generator", [ "@semantic-release/changelog", { "changelogFile": "CHANGELOG.md" } ], "@semantic-release/npm", "@semantic-release/github", [ "@semantic-release/git", { "assets": ["package.json", "CHANGELOG.md"], "message": "chore(release): ${nextRelease.version} [skip ci]\n\n${nextRelease.notes}" } ] ] }This configuration tells
semantic-releaseto run only on themainbranch and sets up several plugins for us. You see more plugins defined here than we installed earlier because the coresemantic-releasepackage already includes some plugins likecommit-analyzer,release-notes-generator,npm, andGitHub. We only needed to install the ones that aren't pre-installed.When we push to
mainor merge a new PR, a GitHub action will run (we’ll configure this soon). Our commit messages will be analyzed, the correct new version will be determined using semantic versioning, and then a new git tag, GitHub release, and NPM package will be created for that version.GitHub Action Configuration
To set up the GitHub Action, create a
.githubfolder at the root of your repository. Inside this folder, create another folder namedworkflows. Then, in theworkflowsfolder, create a new file calledrelease.ymland paste the following code into it.
 name: Release
 on:
   push:
     branches:
       - main

 jobs:
   release:
     name: Release
     runs-on: ubuntu-latest

     steps:
       - name: Checkout
         uses: actions/checkout@v2
         with:
           fetch-depth: 0

       - name: Setup Node.js
         uses: actions/setup-node@v2
         with:
           node-version: "lts/*"

       - name: Install dependencies
         run: npm install

       - name: Run Rollup
         run: npm run rollup

       - name: Release
         env:
           GITHUB_TOKEN: ${{ secrets.GITHUB_TOKEN }}
           NPM_TOKEN: ${{ secrets.NPM_TOKEN }}
         run: npx semantic-release
This action is triggered by pushes to the main branch (including PR merges). The workflow then checks out the latest code, sets up Node.js, and installs our dependencies using
npm install. After that, it runs Rollup withnpm run rollup. Finally, it runs thesemantic-releasepackage usingnpx semantic-release. We provide ourGITHUB_TOKENandNPM_TOKENas environment variables so it can carry out the necessary actions we described above.The
GITHUB_TOKENis automatically created for us in GitHub Actions, so we don’t need to configure it. However, we do need to add theNPM_TOKENto our repository secrets so it can be used in the action when it runs. Let’s configure that now.NPM Setup and Token
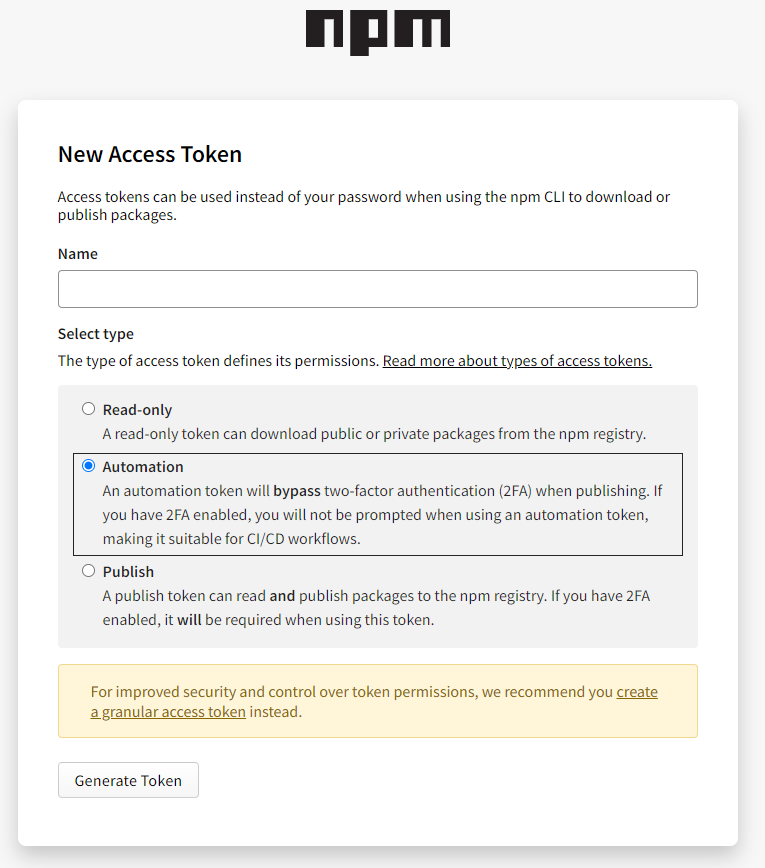
To set this up, you need an NPM account. Go to their website and sign in if you already have an account, or create a new one if you don’t. Once logged in, click on your avatar/icon in the top right corner and select "Access Tokens" from the dropdown menu.Click the “Generate New Token” button, then select "Classic Token" and choose the “Automation” option. Name your token and press “Generate Token”. Copy the token you just created and go back to your GitHub repository.
On your repository page, go to the
settingspage. UnderActions ==> General, findWorkflow Permissions, select theRead and Write permissionsradio button, and then click save.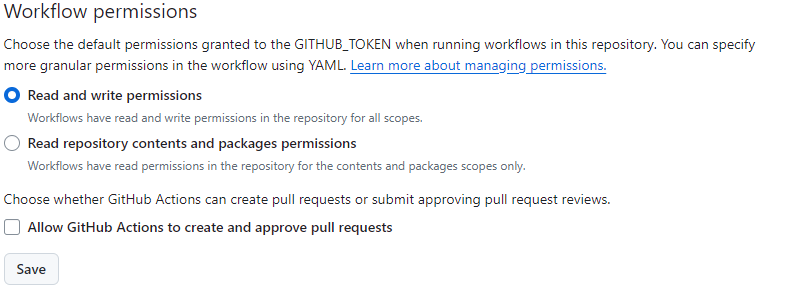
On the same page, under Security, click on
"Secrets and variables ==> Actions". Then, click"New repository secret", name itNPM_TOKEN, and paste the token you just created into the “Secret” field. YourNPM_TOKENis now configured and ready to be used.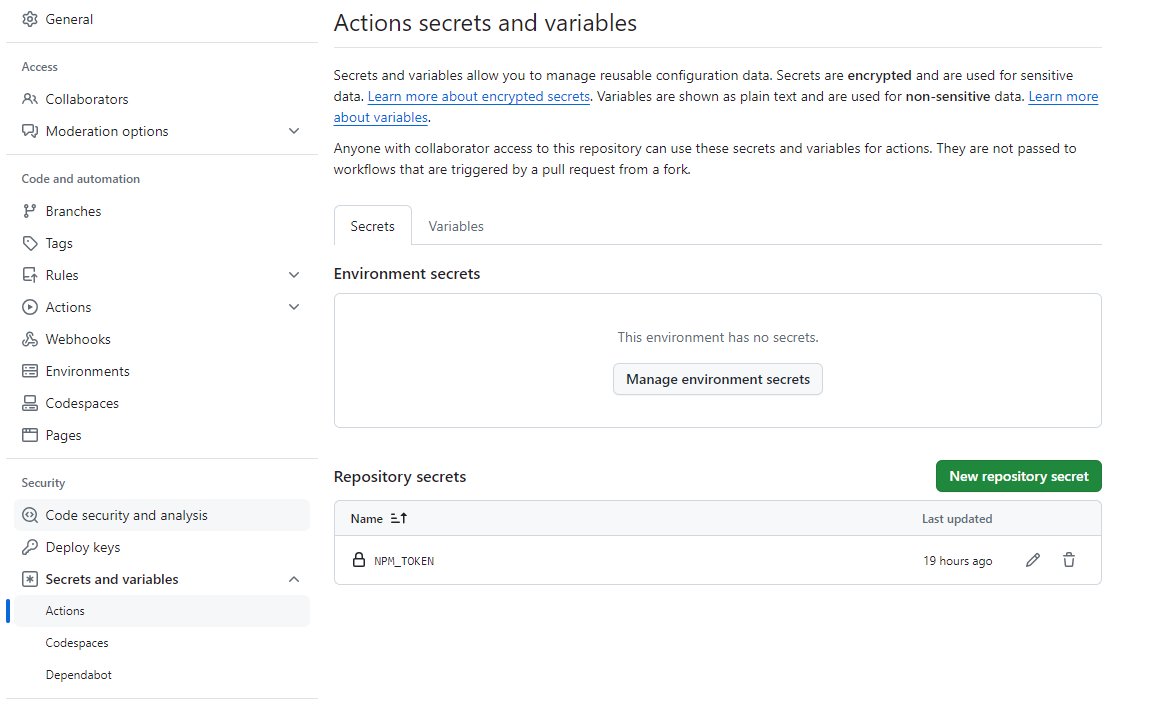
With our NPM token,
semantic-releasepackage, and GitHub Action all set up, we are ready for the big moment: releasingv1.0.0of our new package to GitHub and NPM. If you’ve been working locally on themainbranch, commit your changes using the conventional commits specification and then push them to GitHub. If you’ve been working on a separate branch, commit your changes the same way, push them to GitHub, and then create a PR intomain.Once your code is on
main, the GitHub action should automatically trigger. When it completes successfully,v1.0.0should be released. You can confirm this on the sidebar of the “Code” tab on GitHub. Under“Releases”, you should see1as the total and your latest release asv1.0.0. You should also now have aCHANGELOG.mdin the root of your repository, which contains an automatically generated changelog from the commit messages, and yourpackage.jsonversion number should have been updated to1.0.0.Finally, the moment you’ve been waiting for: head to your package on NPM by going to
https://www.npmjs.com/package/YOUR_PACKAGE_NAME_HEREand check out your new NPM package published for the world to see. Now, whenever you commit to your repository using afix,feat, or breaking change commit, a new patch, minor, or major version (the version bump is controlled by the commit type) will be released, tagged, and published to NPM without you needing to do a thing.
Testing
Create a new React app using CRA, Vite, etc.
Go to the project folder
npm install <your-package-name-from-npm>To verify if your package is working properly, go to
node_modulesand search for the folder with the same name as your package. Inside, you will find thedistfolder, which contains all your code in a compressed format.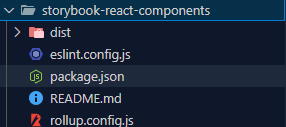
Now, go to the
App.tsxfile and import the Button component from your package.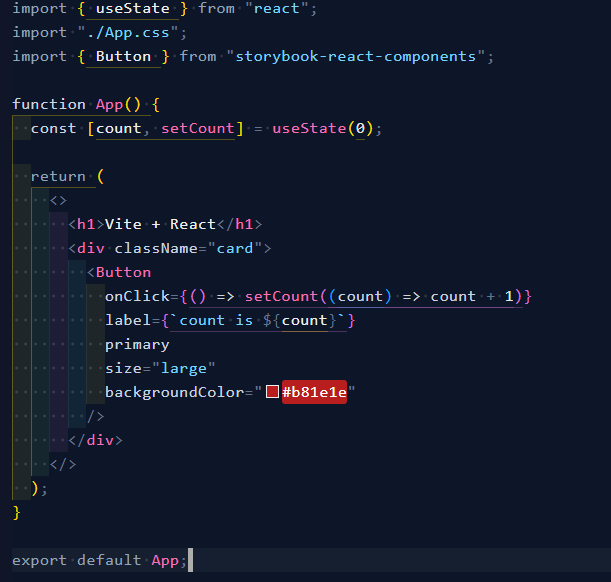
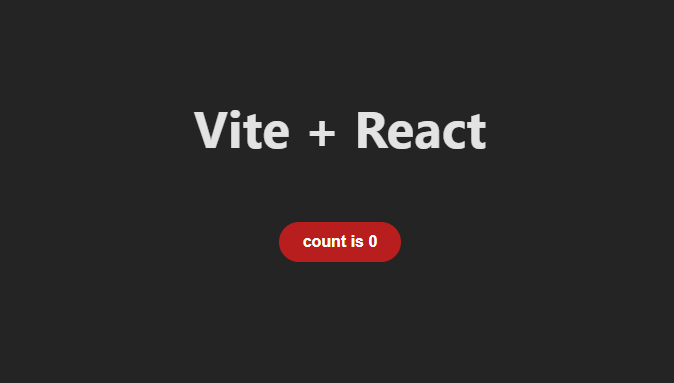
Run the application: You should see your Storybook button.
Optional:
Deploy your Storybook to Netlify as a website so you can share your components with the developer community. Go to Netlify and import your project from GitHub. If you want, you can add a custom site name.
Under Build settings, change the Publish directory to storybook-static.
Then click on deploy.
Conclusion
In this guide, we've explored the process of creating and publishing a React Storybook component library using modern tools like Vite, TypeScript, and Rollup. We went through the steps of setting up Storybook, bundling the components, and publishing them to npm. Furthermore, we automated the versioning and release process using GitHub Actions and semantic-release, making it seamless to maintain and update your package. By following these steps, you can now efficiently build, version, and share your components with the wider developer community, saving time and ensuring consistency across your projects.
Subscribe to my newsletter
Read articles from Sidhant Kumar Sahoo directly inside your inbox. Subscribe to the newsletter, and don't miss out.
Written by
