AWS Site-to-Site VPN
 Venkatesh K
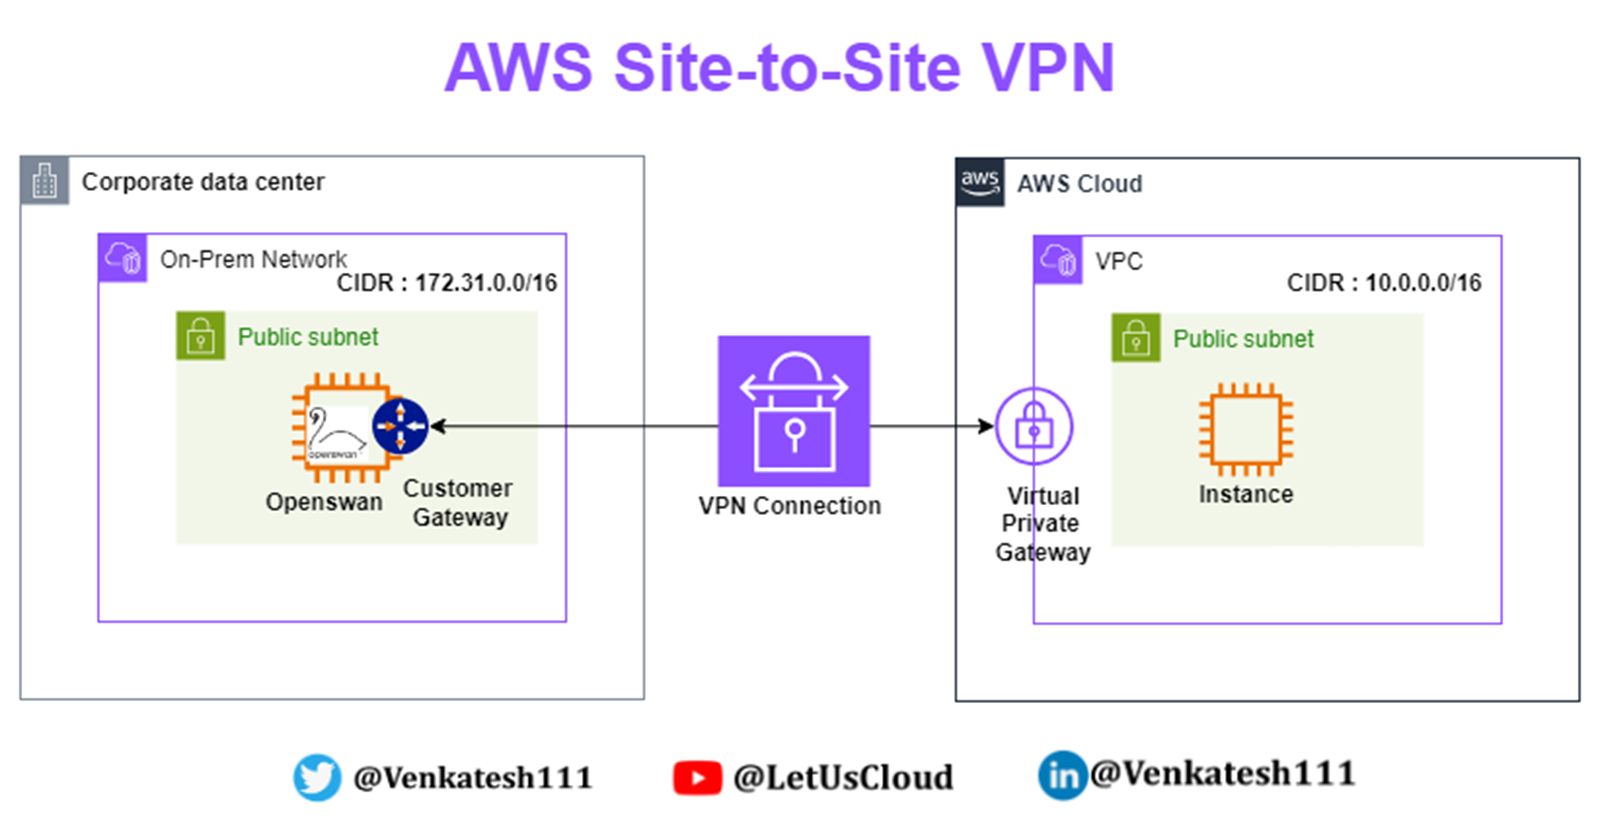
AWS Site-to-Site VPN is a fully-managed service that creates a secure connection between your data center or branch office and your AWS resources using IP Security (IPSec) tunnels.
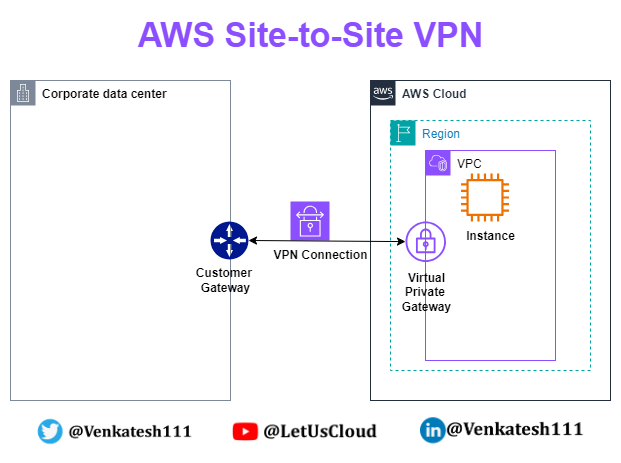
Key Terminologies
VPN connection: A secure connection between your on-premises equipment and your VPCs.
Customer gateway: The VPN endpoint on the On-premise side of a Site-to-Site VPN connection. It is an AWS resource that provides information to AWS about your customer gateway device.
Customer gateway device: A physical device or software application on the on-premises side of the Site-to-Site VPN connection.
Virtual private gateway: The VPN endpoint on the AWS side of the Site-to-Site VPN connection, attachable to a single VPC.
VPN tunnel: An encrypted link where data can pass from the customer network to or from AWS. Each VPN connection includes two VPN tunnels for high availability.
Transit gateway: A transit hub that interconnects multiple VPCs and on-premises networks and serves as a VPN endpoint for the Amazon side of the Site-to-Site VPN connection.
Setting up Site-to-Site VPN
Pre-Requisites
On-premises IP address: The public IP address of your customer gateway (your on-premises VPN device).
Routing type: Decide whether to use static routing (you specify routes) or dynamic routing using Border Gateway Protocol (BGP).
AWS VPC: A Virtual Private Cloud (VPC) set up in your AWS account where the VPN will be established.
Configuration on AWS Side
Create a virtual private gateway.
Create a customer gateway.
Configure routing.
Update your security group.
Create a VPN connection.
Download the configuration file.
Configuration on On-Premise Side
- Configure the customer gateway device.
Site-to-Site VPN Hands-On
What Are We Building?
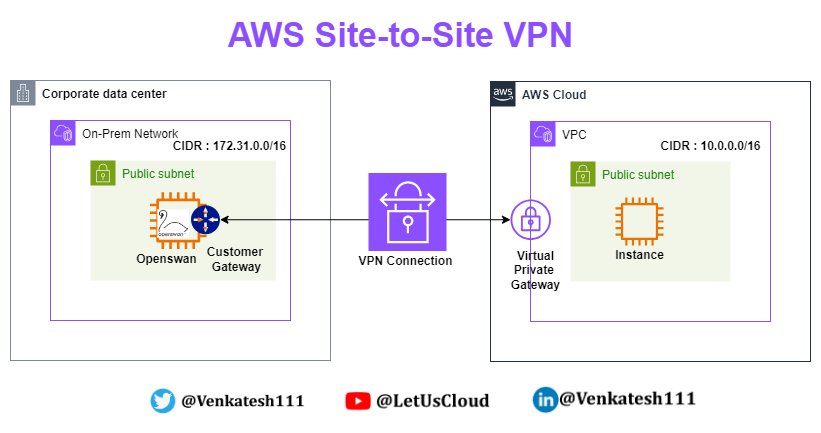
Simulating On-premises Data Center
- AWS Region: Mumbai (ap-south-1)
VPC
Create VPC with CIDR: 172.31.0.0/16.
Create a public subnet: 172.31.0.0/20.
Create a private subnet: 172.31.128.0/20.

EC2
Launch an Amazon Linux 2 instance in the public subnet of the custom VPC created.
Stop source/destination checks for this EC2 instance.

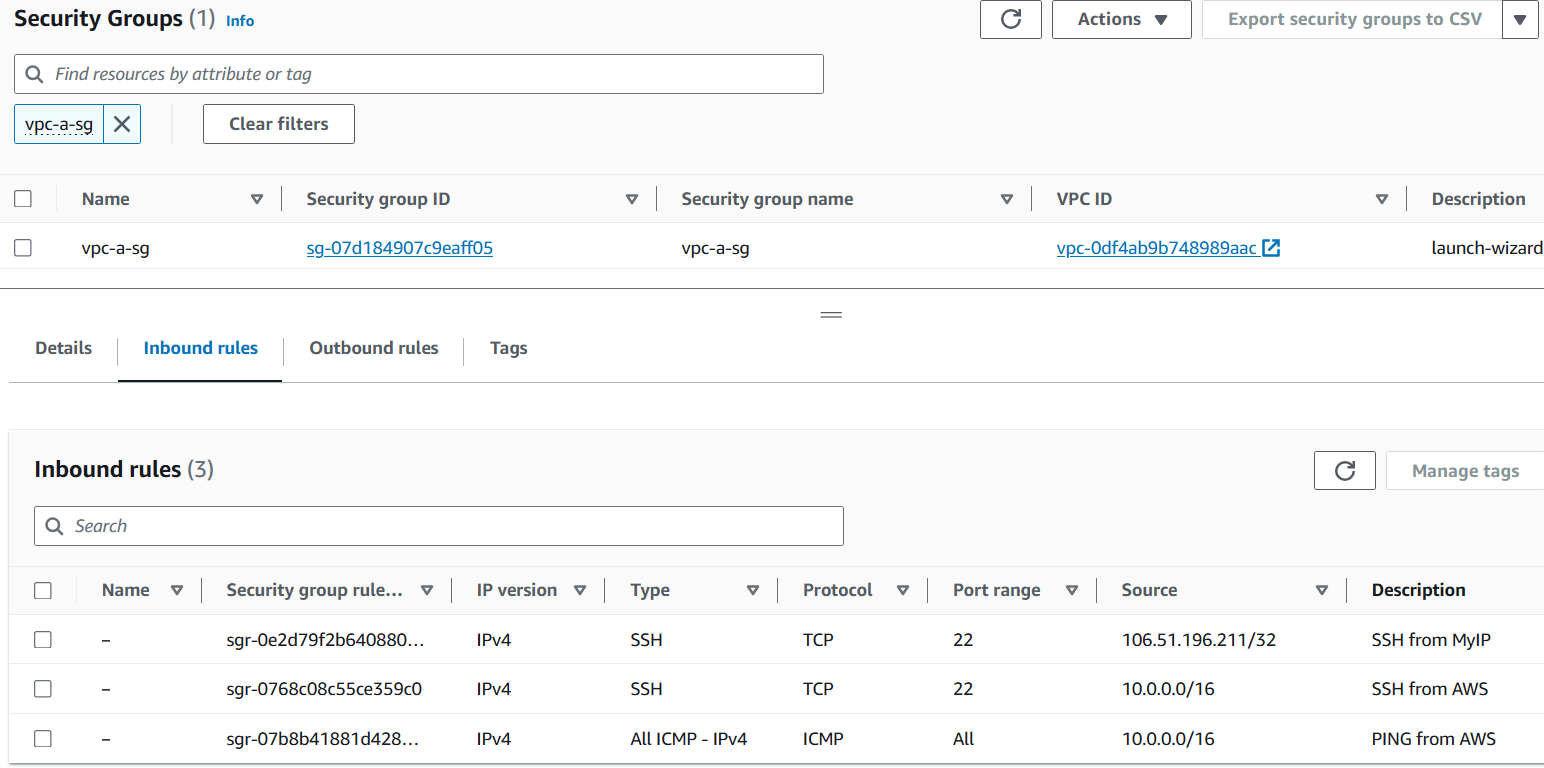
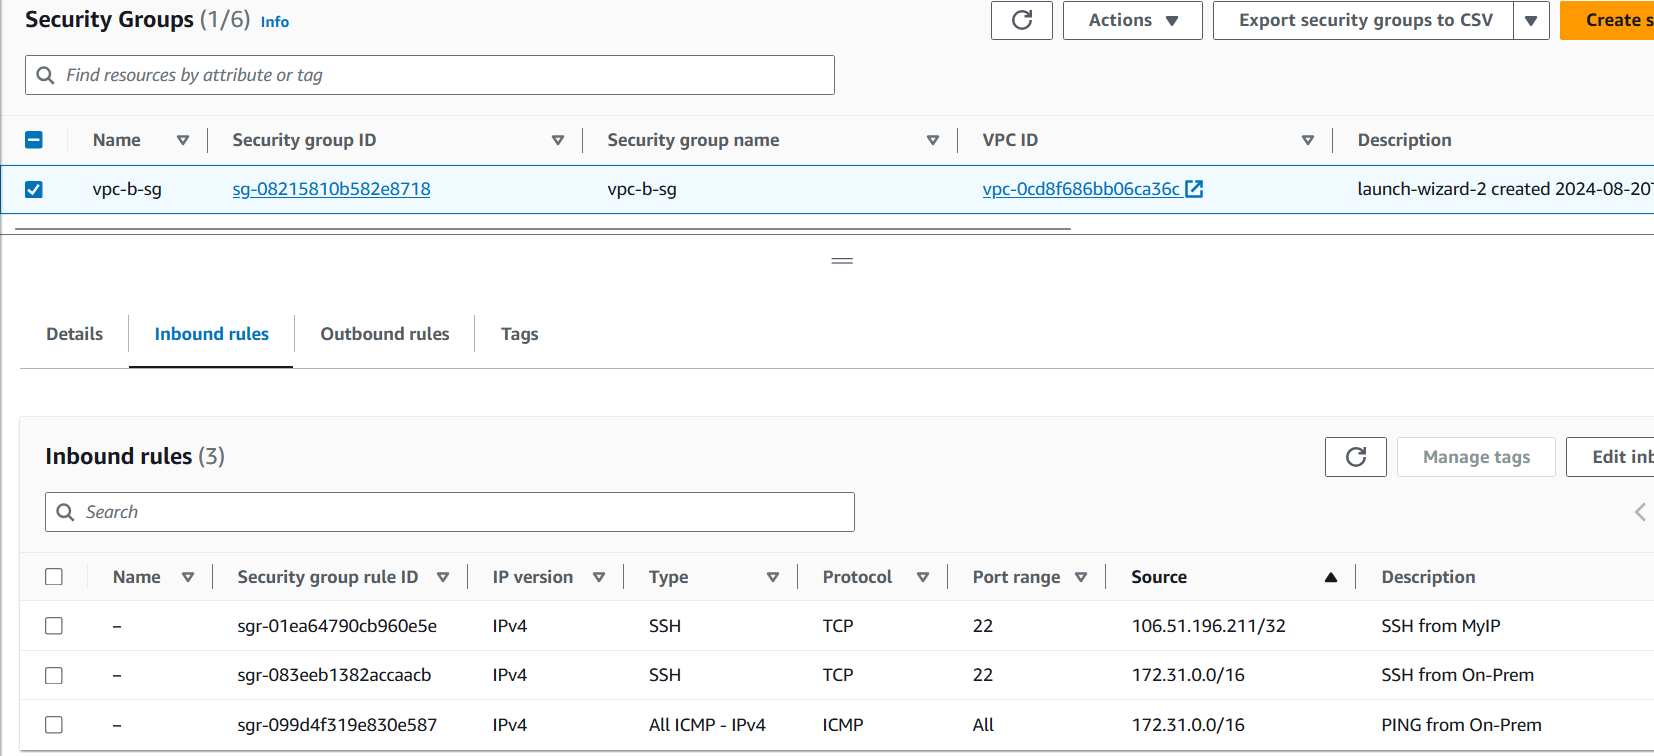
Security Group for EC2
Allow SSH on port 22 from MyIP (your own IP).
Allow ICMP from AWS VPC CIDR (10.0.0.0/16).
Allow SSH on port 22 from AWS VPC CIDR (10.0.0.0/16).
Configuring OpenSwan
Connect to the EC2 instance.
Run the following commands to install OpenSwan:
 sudo su
 yum update -y
 yum install openswan -y
Edit the config file
/etc/sysctl.confto add the following lines:net.ipv4.ip_forward = 1 net.ipv4.conf.all.accept_redirects = 0 net.ipv4.conf.all.send_redirects = 0Restart the network service:
service network restartWe will configure the
/etc/ipsec.d/aws.conffile after setting up the VPC on AWS.
Configuration on AWS Side
- AWS Region: N.Virginia (us-east-1)
VPC
Create a VPC with CIDR: 10.0.0.0/16.
Create a public subnet: 10.0.0.0/20.
Create a private subnet: 10.0.128.0/20.

EC2
Launch an Amazon Linux 2 instance in the public subnet of the custom VPC created.

Security Group for EC2
Allow SSH on port 22 from MyIP (your own IP).
Allow SSH on port 22 from On-prem CIDR (172.31.0.0/16).
Allow ICMP from On-prem CIDR (172.31.0.0/16).
Let's Do a Simple Ping Test
Both networks are not reachable.

Setting up Site-to-Site VPN Connection
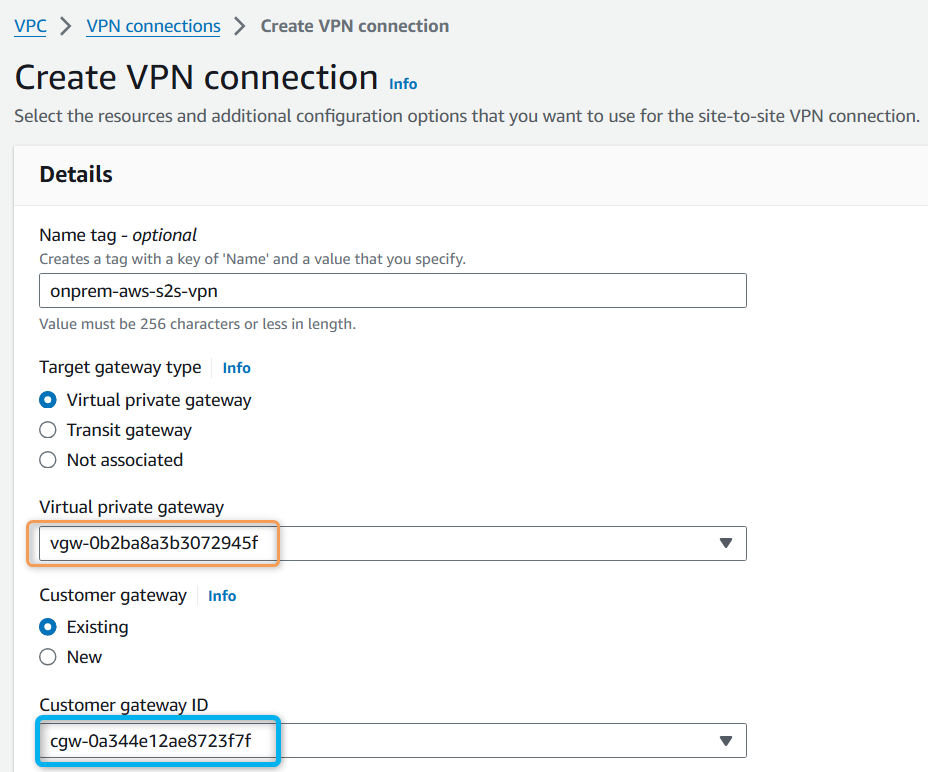
Create a Virtual Private Gateway and attach it to the AWS VPC.

Create a Customer Gateway and attach it to the AWS VPC.
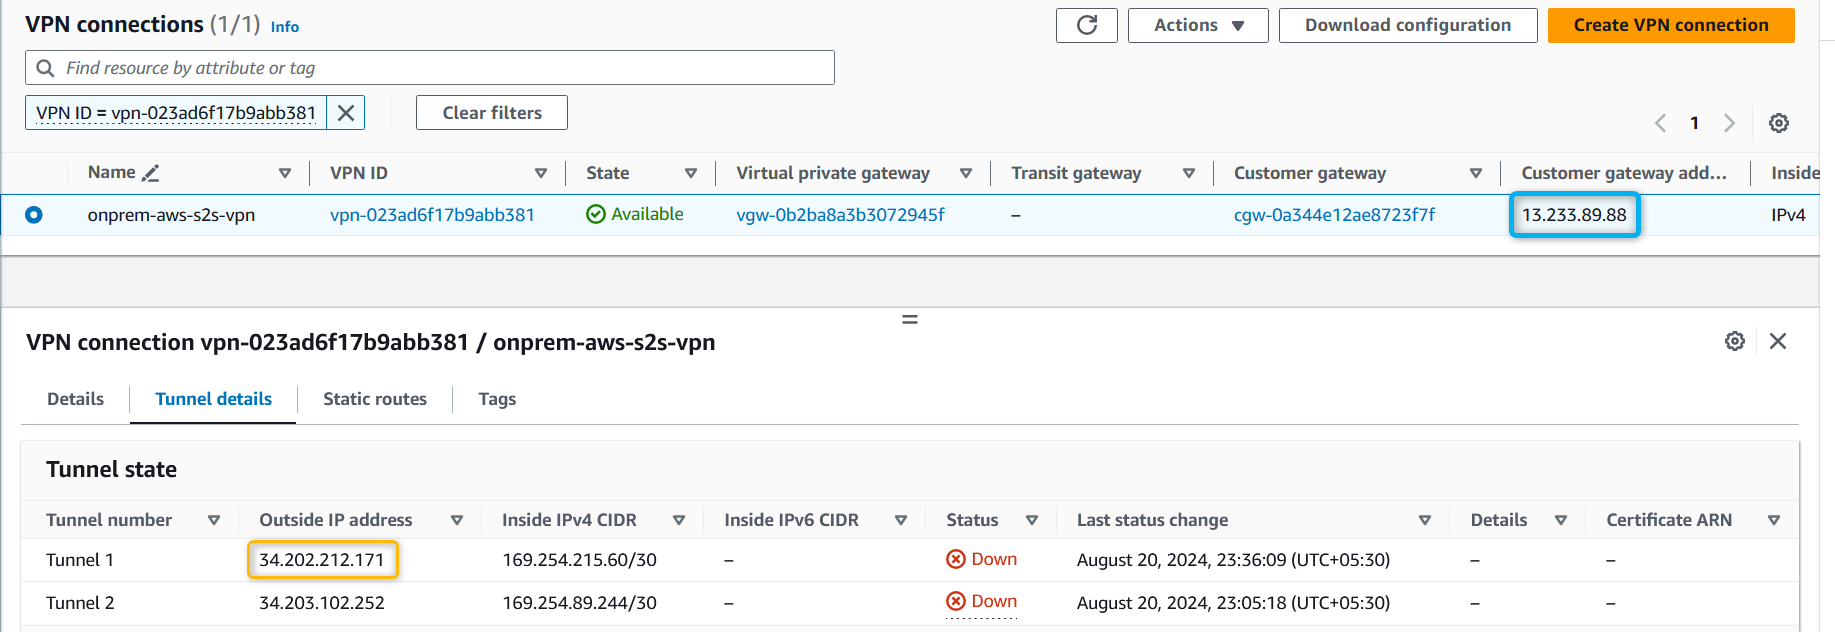
IP Address = Public IP of the VPN device, in our case, the public IP of the EC2 hosted in the Mumbai region.
IP Address = 13.233.89.88.

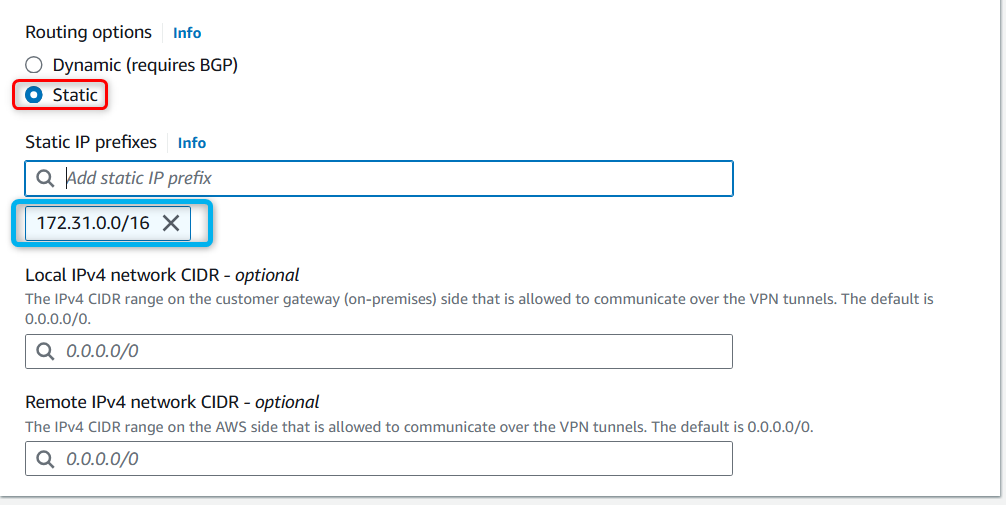
Create a site-to-site VPN connection.
Wait for the site-to-site VPN to be provisioned.
3. Configuration on On-Premise Side
Configure the Customer Gateway Device
Download the configuration file from the VPN console.
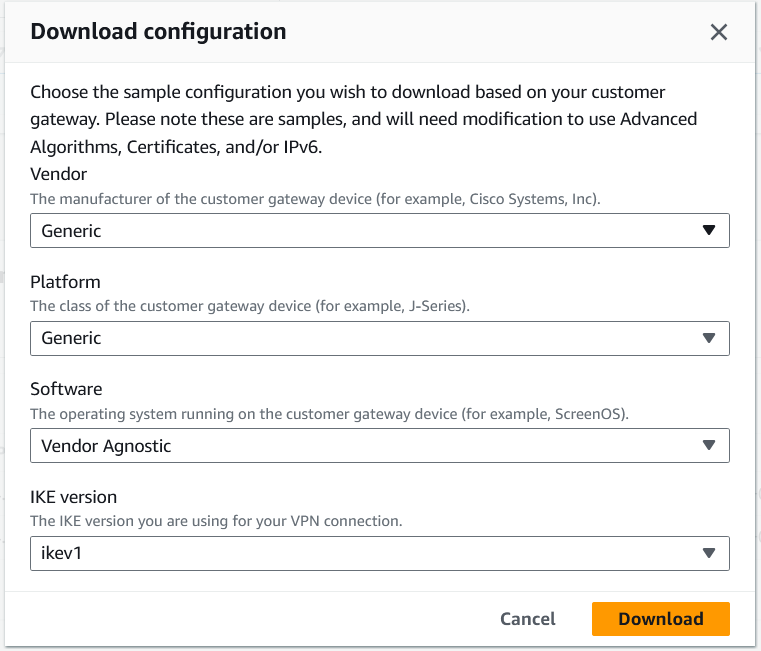
Create the config file
/etc/ipsec.d/aws.confand add the following lines:conn Tunnel1 authby=secret auto=start left=%defaultroute leftid=<Public IP of OpenSwan/CGW, pub IP of EC2 instance in Mumbai> right=<Public IP of VGW - Tunnel 1, from VPN tunnel details> type=tunnel ikelifetime=8h keylife=1h phase2alg=aes128-sha1;modp1024 ike=aes128-sha1;modp1024 keyingtries=%forever keyexchange=ike leftsubnet=<On-prem Network CIDR> rightsubnet=<AWS VPC CIDR> dpddelay=10 dpdtimeout=30 dpdaction=restart_by_peerExample for current setup:
  conn Tunnel1
      authby=secret
      auto=start
      left=%defaultroute
      leftid=13.233.89.88
      right=34.202.212.171
      type=tunnel
      ikelifetime=8h
      keylife=1h
      phase2alg=aes128-sha1;modp1024
      ike=aes128-sha1;modp1024
      keyingtries=%forever
      keyexchange=ike
      leftsubnet=172.31.0.0/16
      rightsubnet=10.0.0.0/16
      dpddelay=10
      dpdtimeout=30
      dpdaction=restart_by_peer
Add the shared secret in the file
/etc/ipsec.d/aws.secrets:Find the shared key in the downloaded VPN configuration file as "Pre-Shared Key" under Tunnel 1 - IKE configuration section.
File format:
<customer public ip> <aws vpg public ip>: PSK "<shared secret>"Example:
13.233.89.88 34.202.212.171: PSK "9d11R8zqe9xRWbALjD6I3O3qq6BYEGN7"
Configure the IPsec service to start on reboot:
chkconfig ipsec onStart the IPsec service:
  systemctl start ipsec
  systemctl status ipsec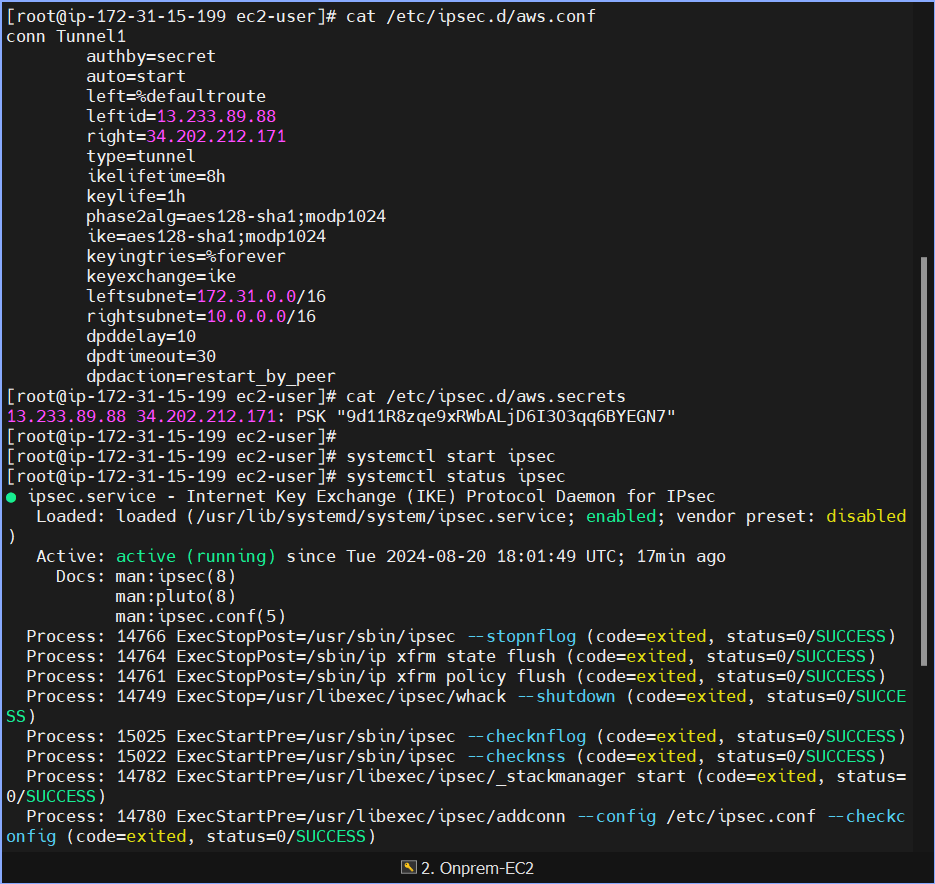
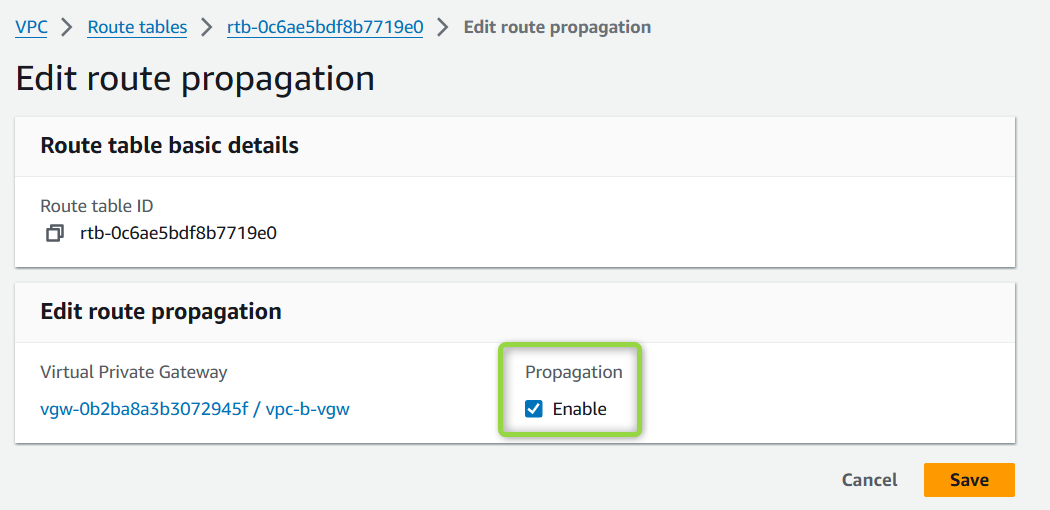
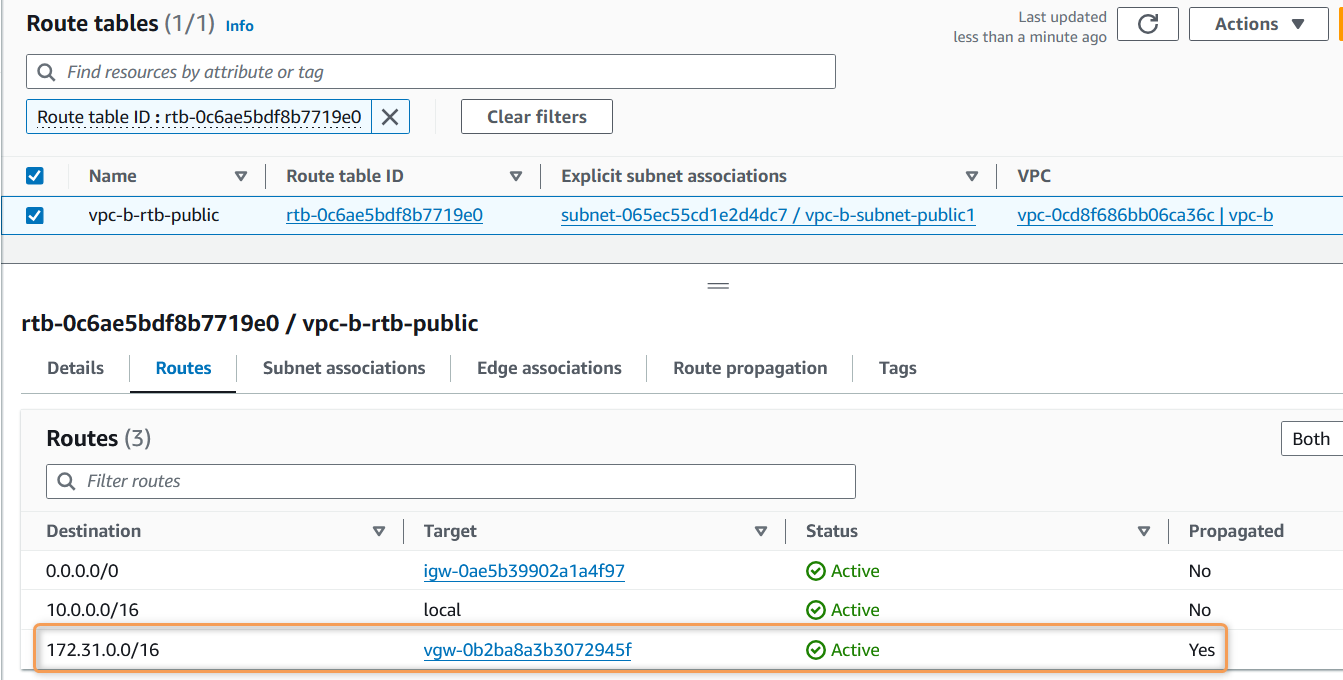
Enable Route Propagation:
On the AWS VPC Public Subnets Route table, enable route propagation.
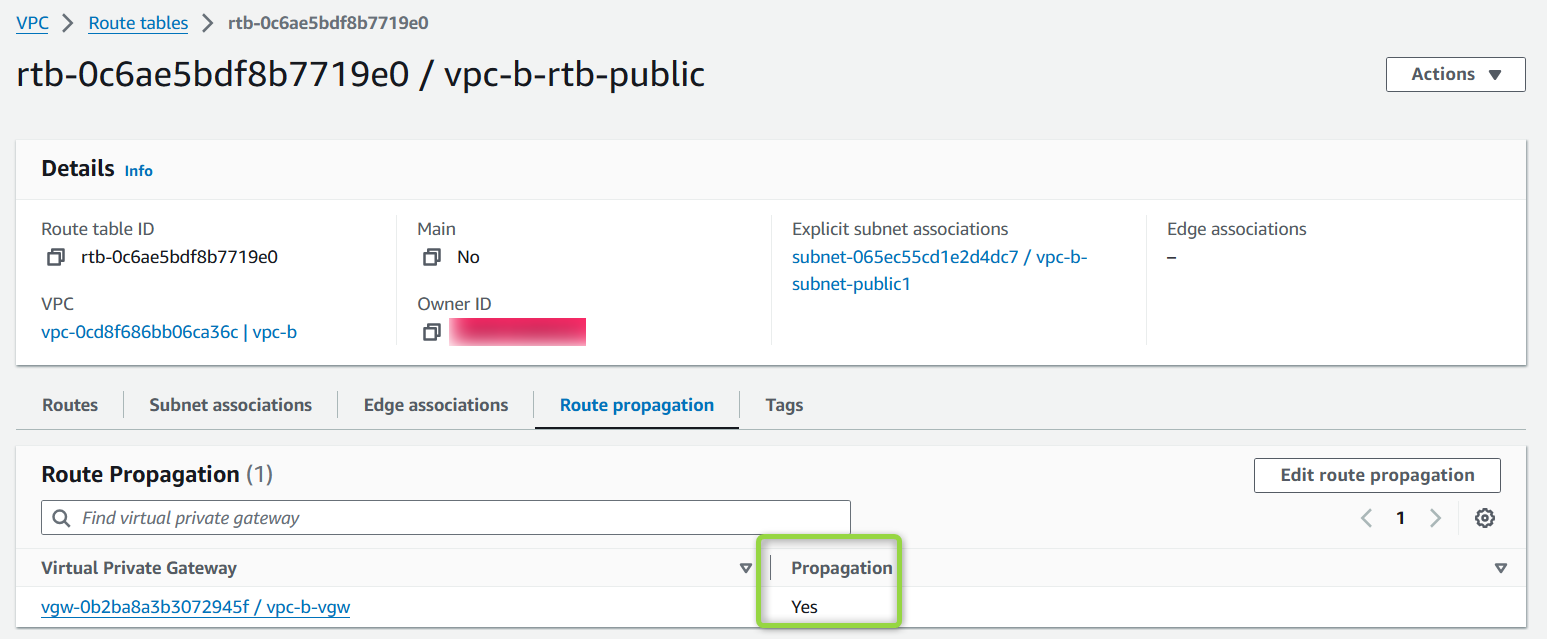
After enabling, the routes should automatically be added to the route table.
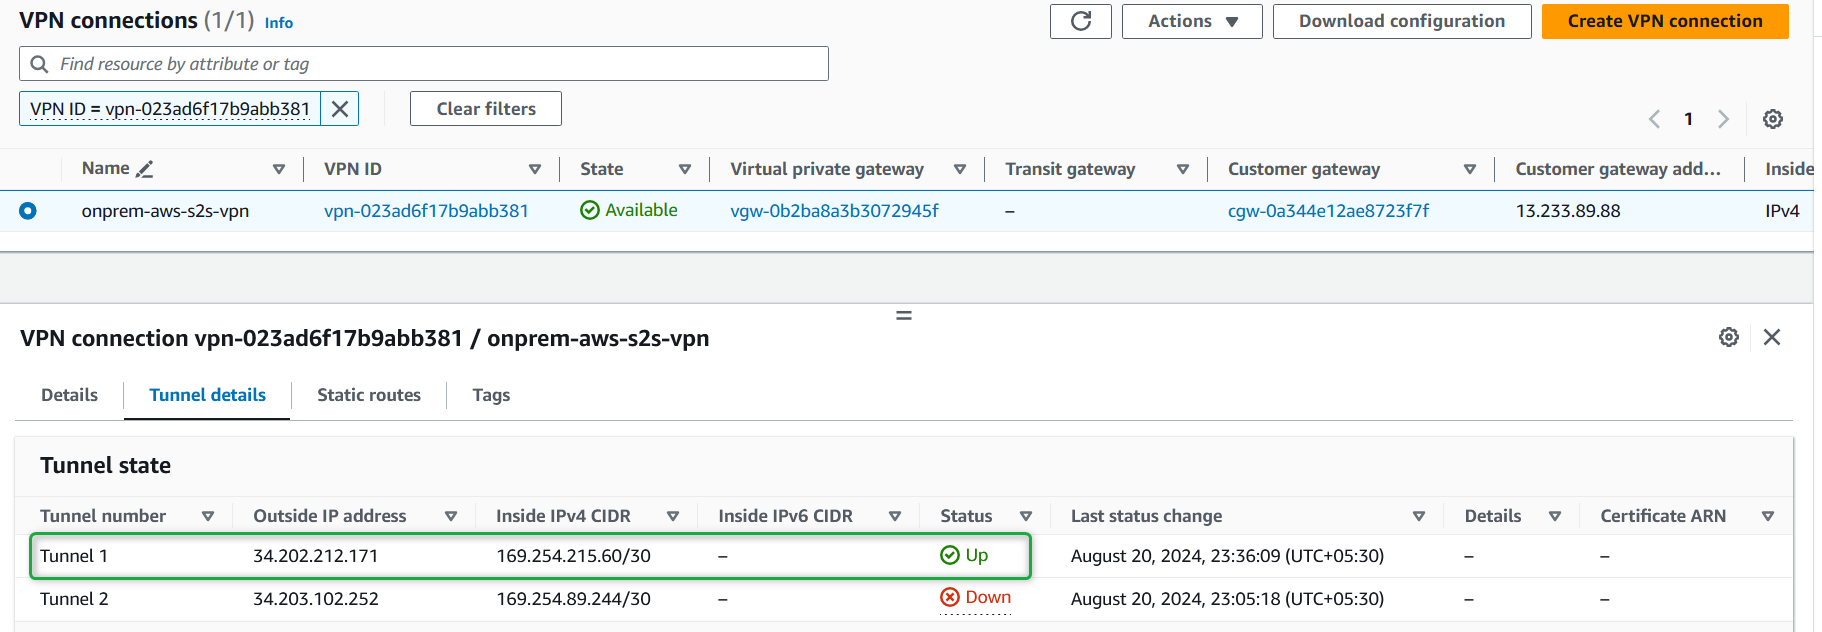
Validate VPN Connection:
You should now see Tunnel 1 as UP.
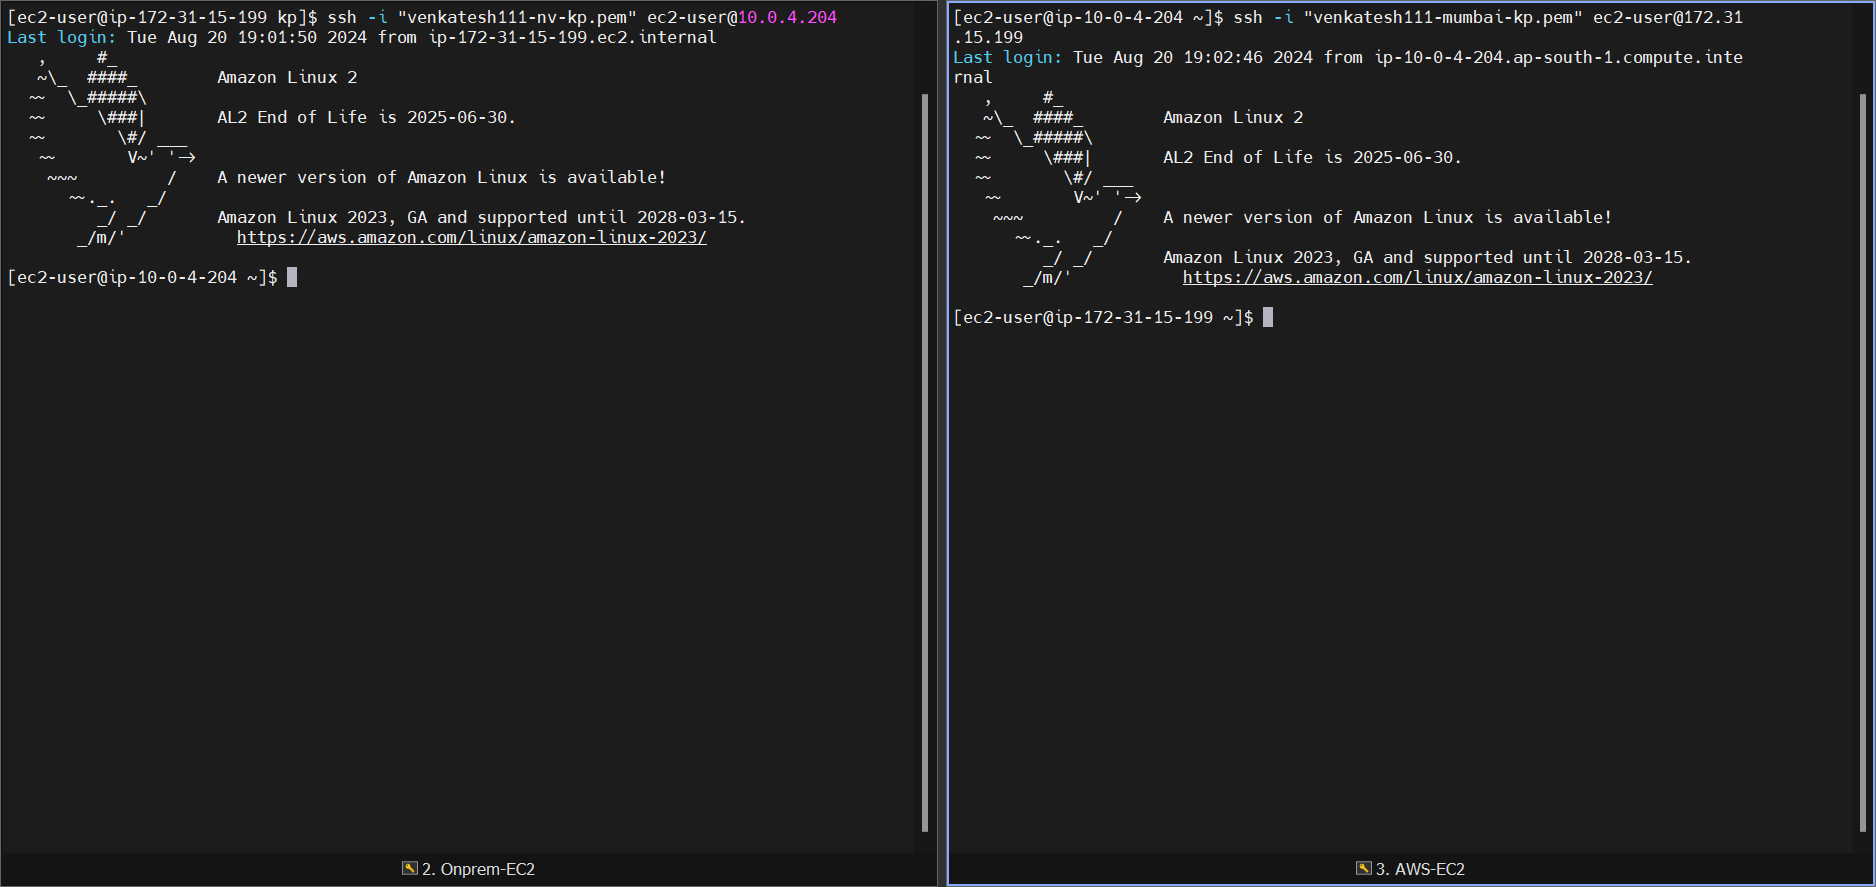
Simple Ping Test
Both networks should now be able to ping each other.

SSH Test
Copy the PEM files to the EC2 instances (on-prem and AWS) and test SSH login.
Resource Cleanup
To avoid unnecessary charges, clean up the resources:
Delete EC2 instances in both regions.
Delete EC2 Security Groups.
Delete key-pairs (if no longer required).
Delete the VPN connection.
Delete VGW and CGW.
Delete VPCs in both regions.
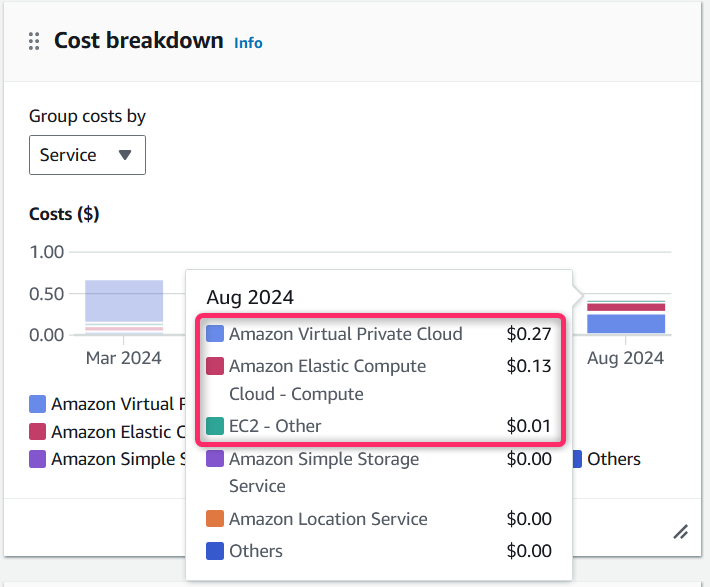
Pricing
Not Free Tier Eligible:
You are charged for each VPN connection-hour that your VPN connection is provisioned and available.
Each partial hour is billed as a full hour.
Standard AWS data transfer charges apply for all data transferred via the VPN connection.
If you no longer need the VPN connection, terminate it to stop incurring charges.
Approximate cost for this hands-on lab: $0.40 (INR 40).
References
Subscribe to my newsletter
Read articles from Venkatesh K directly inside your inbox. Subscribe to the newsletter, and don't miss out.
Written by

Venkatesh K
Venkatesh K
Engineer | Cloud | DevOps | Automation | Trainer | AWS Community Builder