AWS CI/CD Pipeline: A Comprehensive Implementation Guide
 Sagar Bawanthade
In this article we will see, how to build a complete CICD pipeline for a simple application using AWS.
Introduction
Continuous Integration and Continuous Deployment (CI/CD) are crucial components in modern DevOps practices. They enable teams to automate the build, test, and deployment processes, ensuring faster delivery of software with higher quality. AWS provides a suite of tools and services that make it easy to build a complete CI/CD pipeline. In this guide, we'll walk you through setting up a robust CI/CD pipeline using AWS services like CodeCommit, CodeBuild, CodeDeploy, and CodePipeline.
Section 1: Understanding the CI/CD Pipeline
What is CI/CD?
Continuous Integration (CI): CI is the practice of merging all developer working copies to a shared mainline several times a day. Each integration is automatically verified by an automated build and automated tests to detect integration errors as quickly as possible.
Continuous Deployment (CD): CD is the practice of automating the entire release process up to production, ensuring that the software can be reliably released at any time.
Why AWS for CI/CD?
Scalability: AWS services can easily scale with your application needs.
Reliability: With AWS's global infrastructure, you can deploy your applications across multiple regions, ensuring high availability.
Automation: AWS provides native integration with a range of tools to automate the entire CI/CD process, from code commit to deployment.
prerequisites
To perform this project you should have a application which is uploaded on Github Repository also with a Dockerfile. In this Project I m using a simple HTML,CSS,JS application. You can also use mine just fork my repo form here .
Section 2: Setting Up the CI/CD Pipeline on AWS
Project Diagram:-
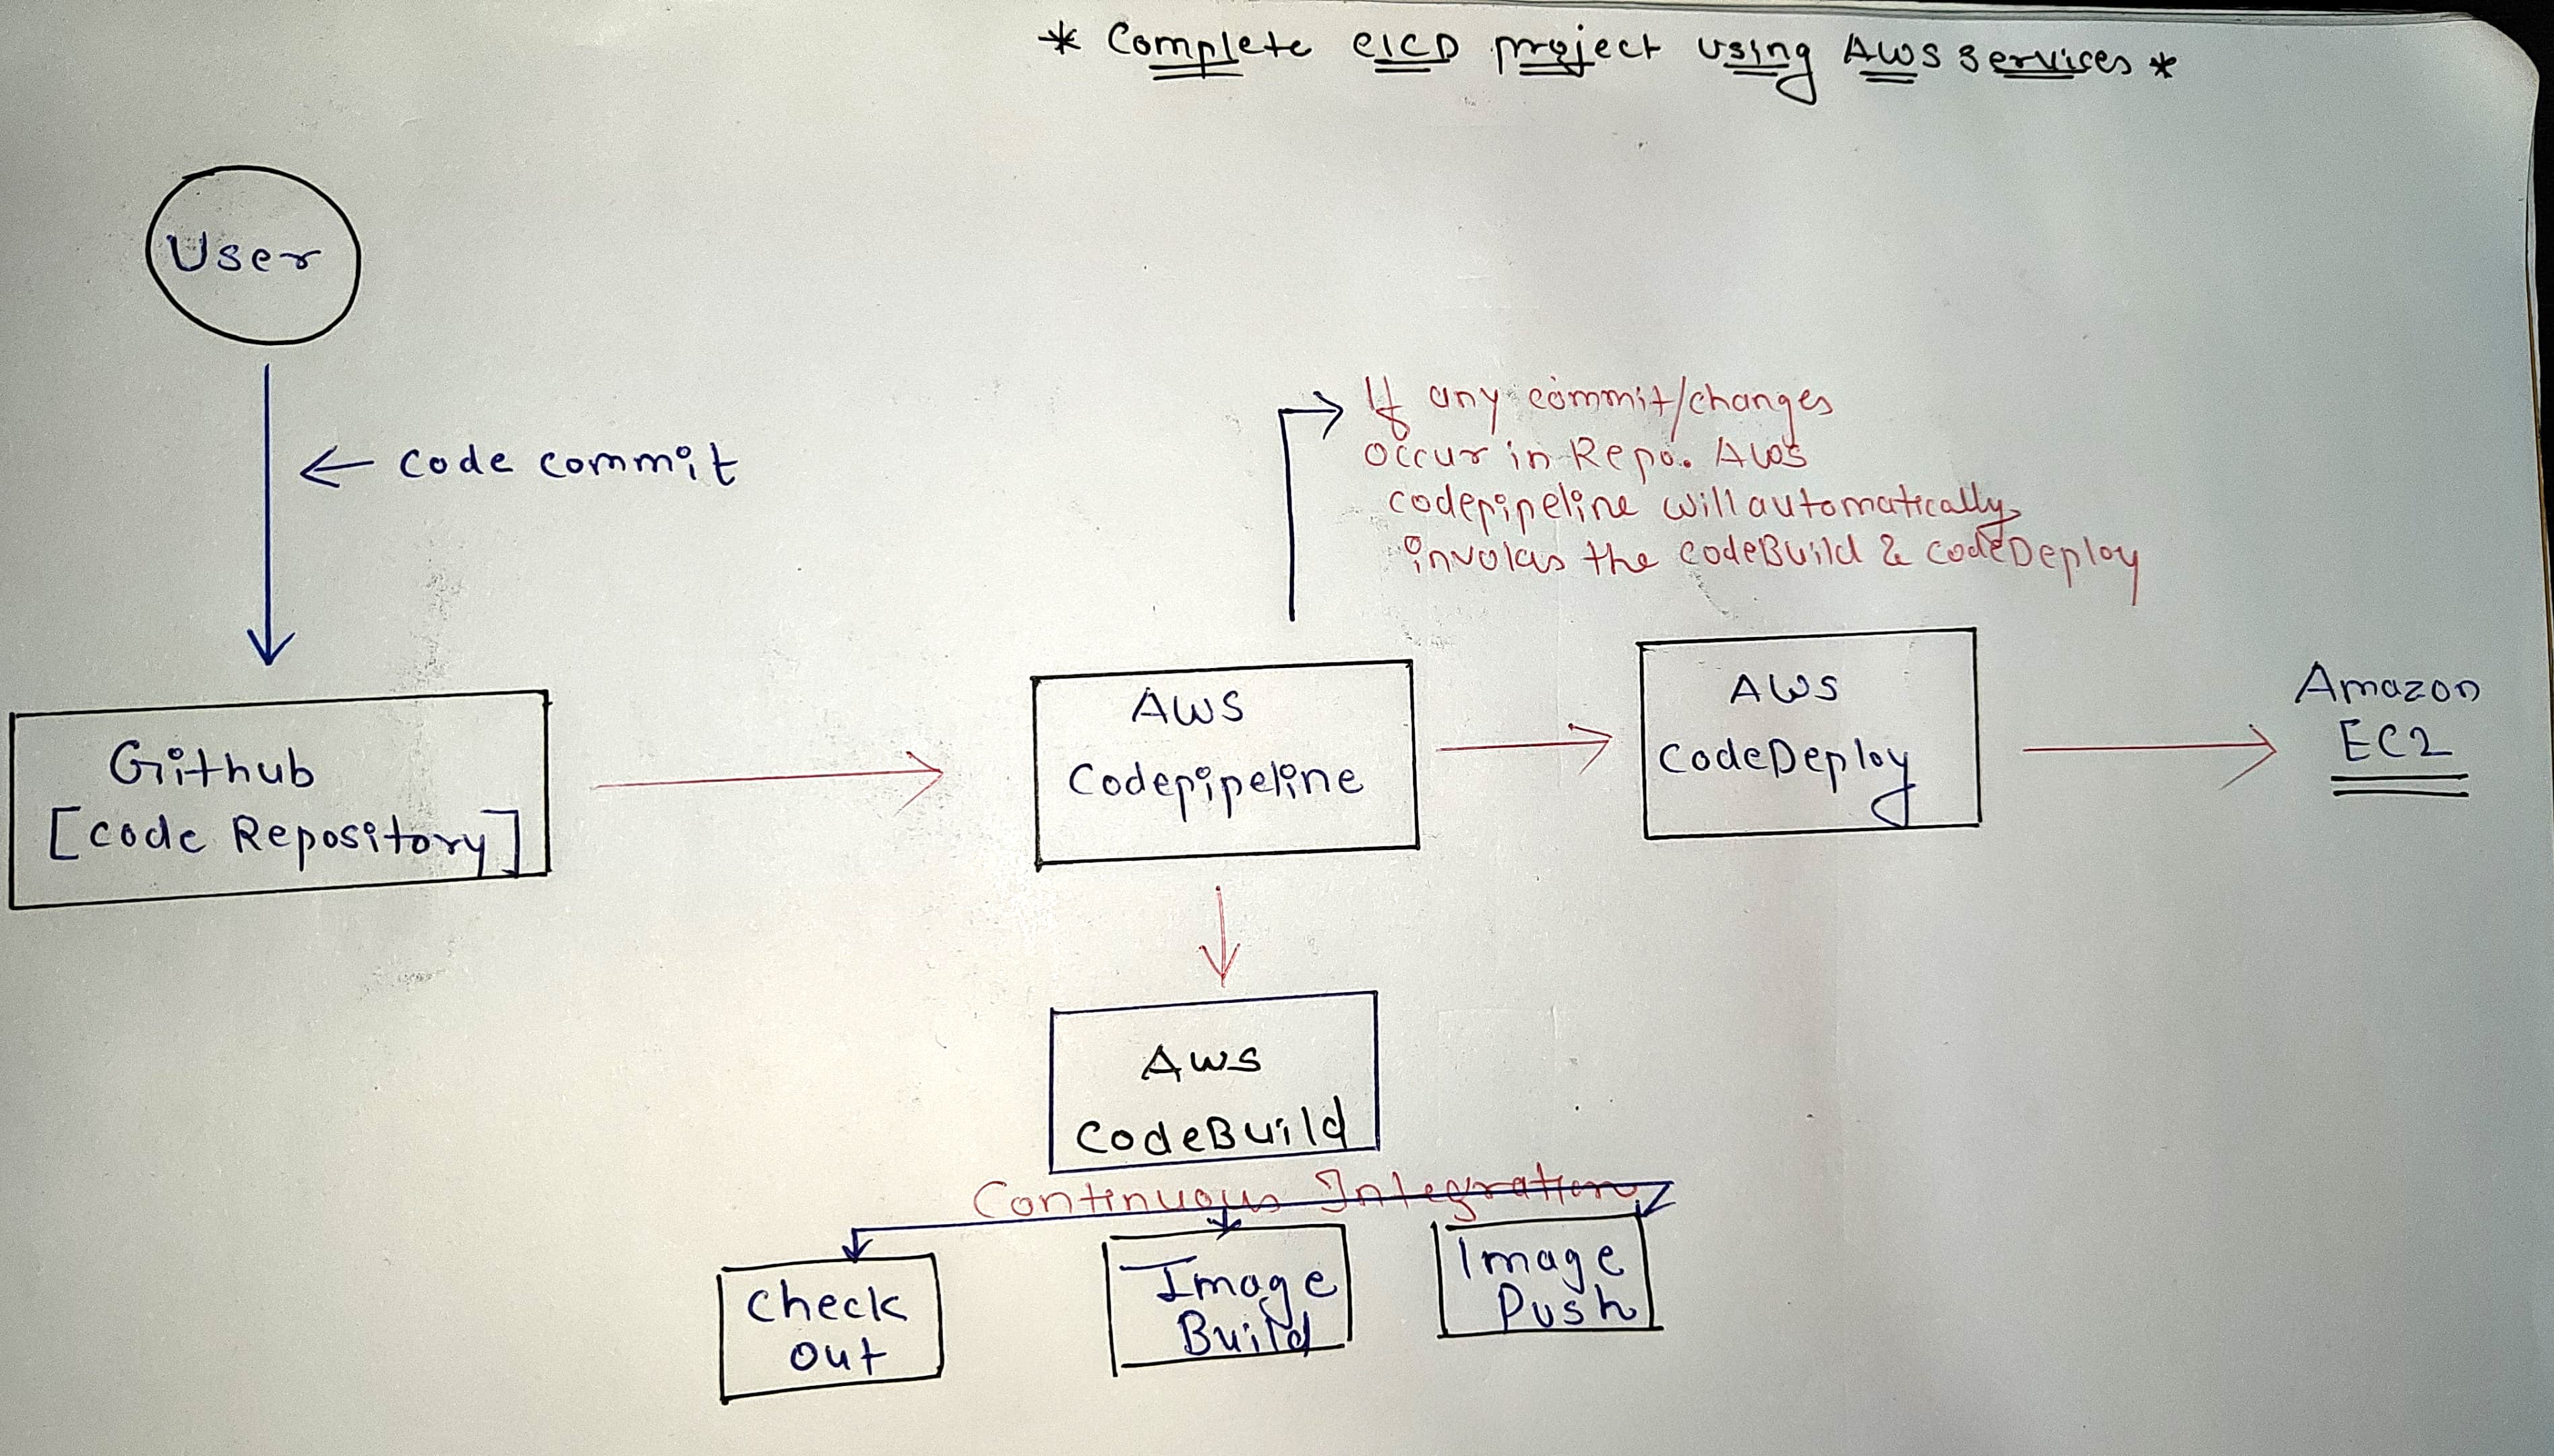
Step 1: Source Control with AWS CodeCommit
What is CodeCommit? AWS CodeCommit is a fully managed source control service that makes it easy for teams to host secure and scalable Git repositories.
But in this Project I will use Github as Source Control because most of the people are familiar with it.
- Setup the Github Repository with your application which you want to use for the cicd.
Step 2: Build and Test with AWS CodeBuild
What is CodeBuild? AWS CodeBuild is a fully managed build service that compiles source code, runs tests, and produces software packages that are ready to deploy.
On AWS Console , search for AWS CodeBuild.
Go to Build Project & click on Create Project.
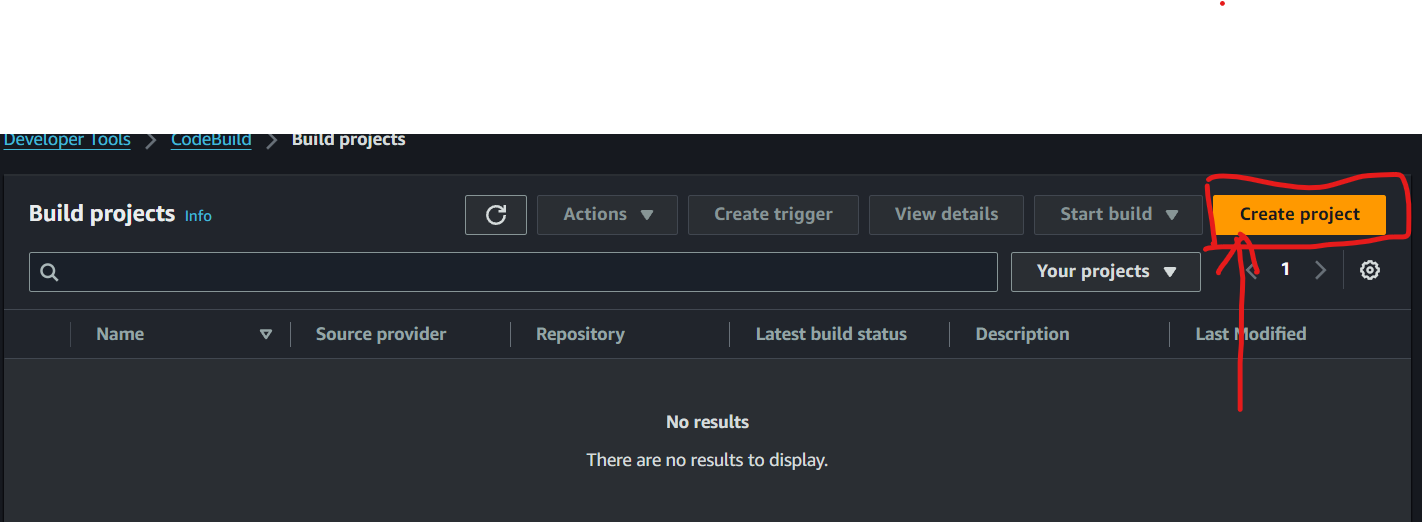
Give a name to project according to you.

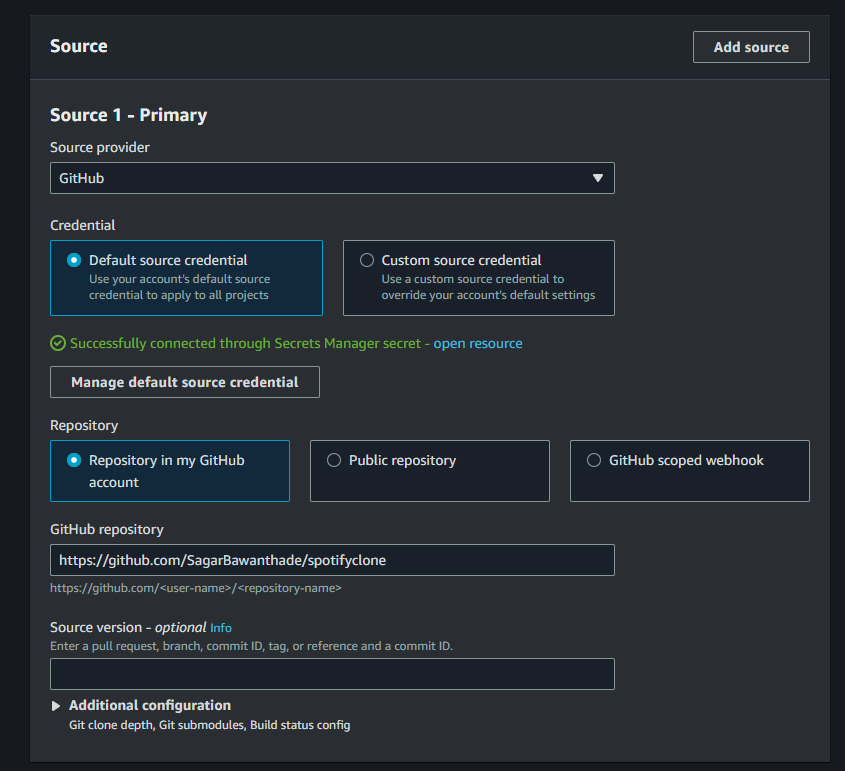
In Source, choose Github and connect the Github to your Github Account and give the URL of your project repository.
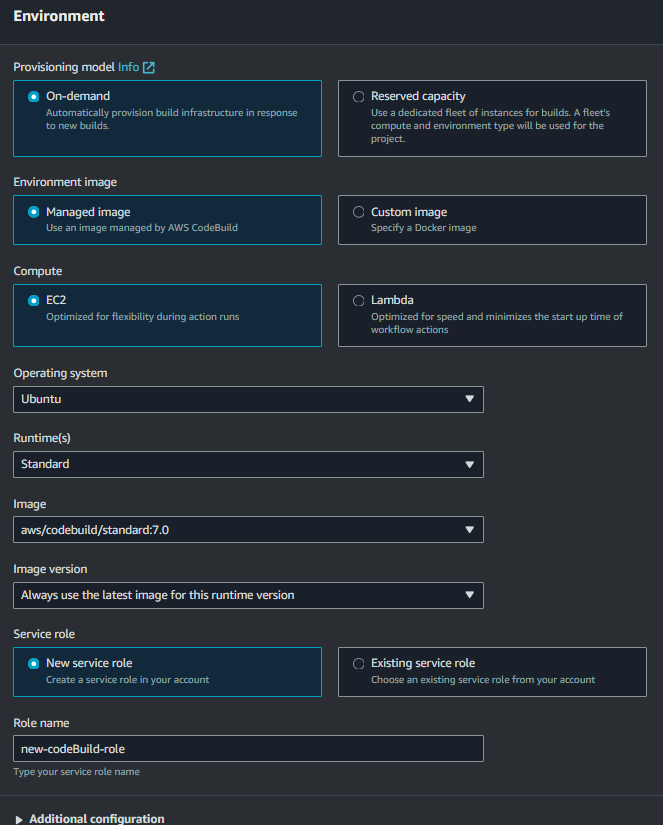
After configuring Source, In Environment choose ubuntu as Operating System and configure all the settings as shown in image. Also choose new service role option & give a name to that role.
Now in BuildSpec, choose insert build commands option and then insert the yaml for your application , in my case :-
 version: 0.2

 env:
   parameter-store:
     DOCKER_REGISTRY_USERNAME: /myapp/docker-credentials/username-user
     DOCKER_REGISTRY_PASSWORD: /myapp/docker-credentials/password-userpass
     DOCKER_REGISTRY_URL: /myapp/docker-credentials/url

 phases:
   install:
     commands:
       - echo "Nothing to install, skipping this phase."

   build:
     commands:
       - echo "Building the application... and also Building Docker Image for it"
       - echo "$DOCKER_REGISTRY_PASSWORD" | docker login "$DOCKER_REGISTRY_URL" -u "$DOCKER_REGISTRY_USERNAME" --password-stdin
       - docker build -t "$DOCKER_REGISTRY_URL/$DOCKER_REGISTRY_USERNAME/spotify:v3" .
       - docker push "$DOCKER_REGISTRY_URL/$DOCKER_REGISTRY_USERNAME/spotify:v3"
       - echo "Your application is ready for deployment."

   post_build:
     commands:
       - echo "Build completed successfully!"

 artifacts:
   files:
     - '**/*'
uncheck the CloudWatch Logs option and leave all the configuration as it is and click on the Create Project.
Now your Project has been created Successfully now just attach the necessary policies to your IAM Role which is being Created. Now Go to IAM and search for the role in my case:-

Attach the policies to this role to run the build Successfully without any permissions errors.
Search for AmazonSSMFullAccess policy and attach it to role.
At Last to Go to "System Manager" (you can search the service on search bar at console) and click on the Parameter Store & create parameters.
I will create 3 parameters:-
Just click on the create parameters, give them name and value for it and create it.
/myapp/docker-credentials/username-user --parameters name
/myapp/docker-credentials/password-userpass --parameters name
/myapp/docker-credentials/url --parameters name
Always named this parameters according to the buildspec file because these parameters will be used in build process to get secret information like in this case docker username, password & URL will be the parameters.
Step 3: Orchestrating the Pipeline with AWS CodePipeline
What is CodePipeline? AWS CodePipeline is a continuous delivery service that automates the release process by orchestrating the various stages involved.
Now our Build Project is done and we have to configure pipeline for it.
On AWS Console , search for AWS CodePipeline.
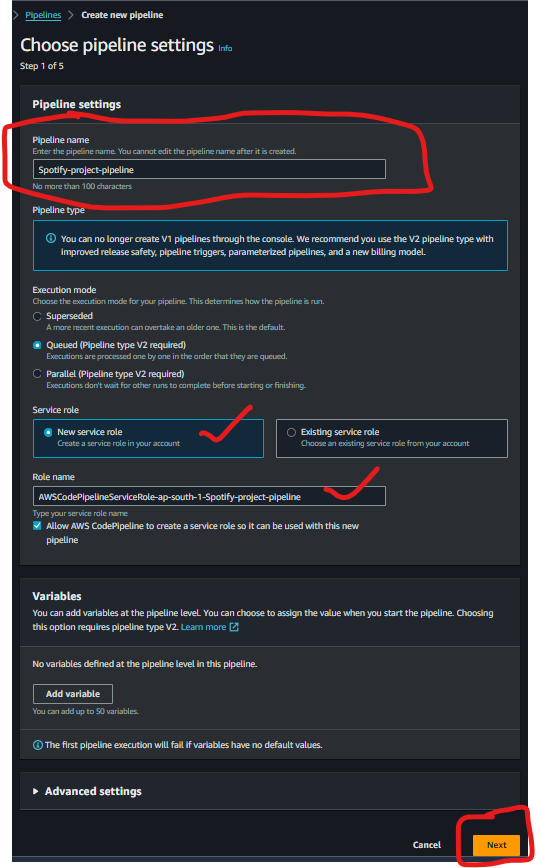
click on Create Pipeline and configure the setting for pipeline as seen in image.then click on next.
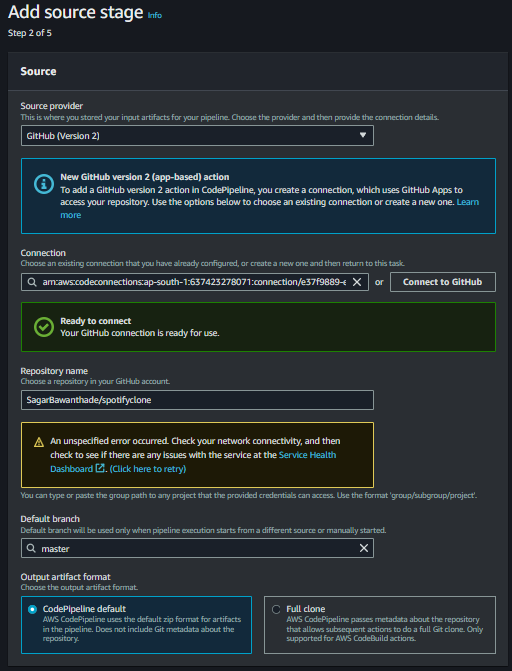
In Source Stage, add Github Version 2 and connect to your Github. then select your repository and branch and again click on next.
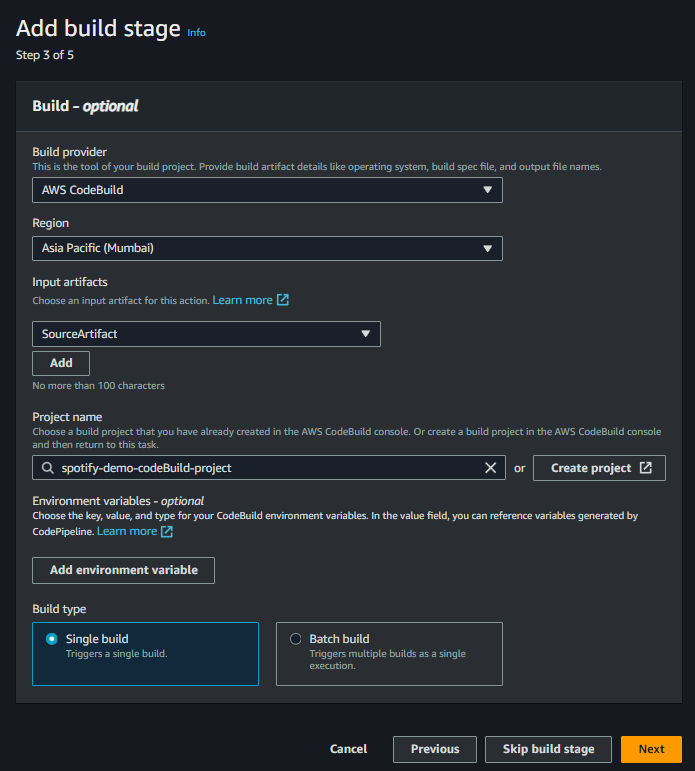
In Build Stage, choose AWS CodeBuild for Build provider, Region and choose the project which is build project(which we build in AWS CodeBuild) and choose single build. then click on next.
In the Deploy Stage, click on skip this process and create the Pipeline by clicking on create pipeline at last.
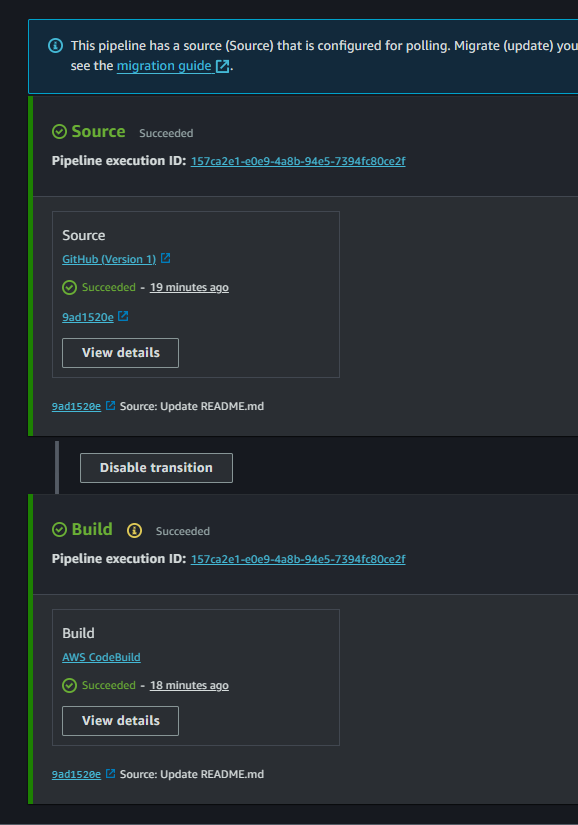
You will see the Pipeline has successfully been created , to test it's working properly you can go to your docker registry and see the image is being pushed or not is yes then Congrats you have successfully implemented the CI part now only remains the CD.
Step 3: Automating Deployments with AWS CodeDeploy
What is CodeDeploy? AWS CodeDeploy automates code deployments to any instance, including Amazon EC2 instances, etc.
On AWS Console , search for AWS CodeDeploy.
Go to Create Application & give a name and select EC2/on-premise on Compute Platform and click on create Application.
- so now to deploy this application we need a server which is ec2 instance where our application will run.
So no go to Ec2 and and create a Ec2 Instance with ubuntu OS and in Network Setting make Public IP Enable and also Add inbound rule which allows the Port 8000 and launch the Instance.
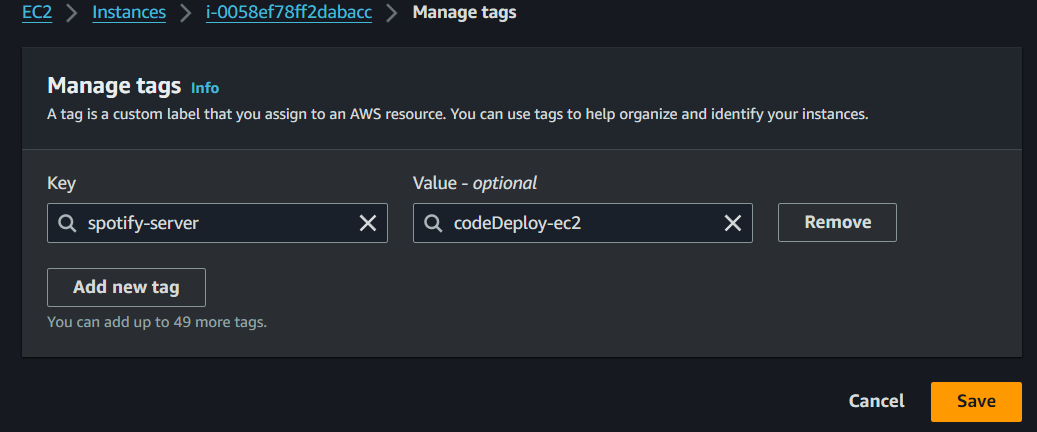
After Creating Instance got to Action and click on Manage Tag and save it as shown in image.
- So now after launching Instance and managing Tags we need to Install the Runner or Agent in the server so to do it first you need to connect the instance but click on connect in instance.
Go to this official AWS-documentation for further steps.
 sudo apt update

 sudo apt install ruby-full

 sudo apt install wget

 wget https://bucket-name.s3.region-identifier.amazonaws.com/latest/install

 chmod +x ./install

 sudo ./install auto

 systemctl status codedeploy-agent # to Check the service status

 sudo apt install docker.io -y # To Install the DOcker on the Sever
Now go to IAM Role and create a role with necessary policies and attach that role to EC2 Instance which we created.
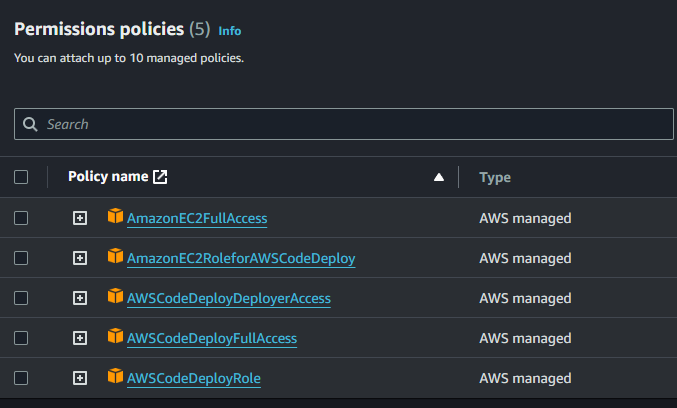
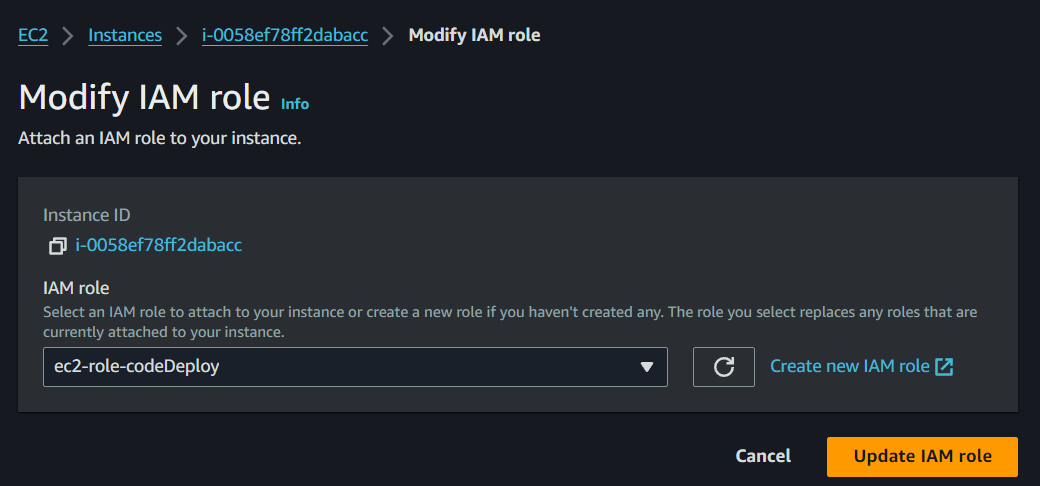
- After Modifying the Role just restart the ec2 server Agent by following command in terminal:-
sudo service codedeploy-agent restart # The Agent will take some time to Restart it

systemctl status codedeploy-agent # Again to Check the service status
Now the Agent is being Succesfully Install and configured.
Now Go to CodeDeploy Again and create a Deployment group inside your Application with the configuration shown in image and add the role which you had created while creating ec2 Instance also add the Tag which you had also created while creating ec2 instance.
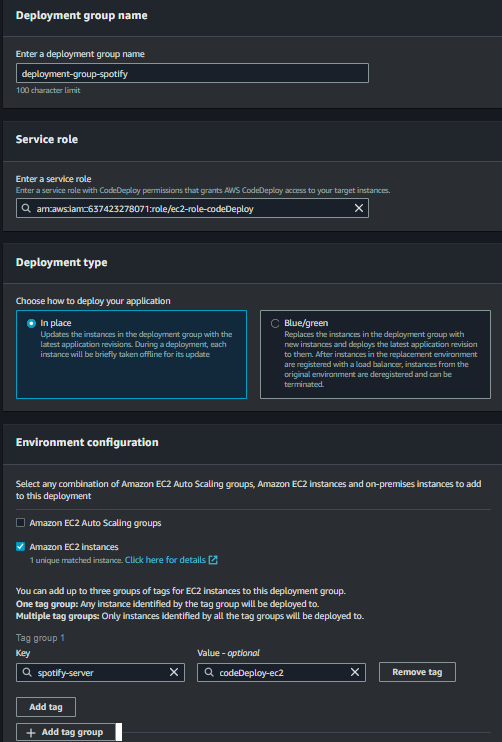
Uncheck the LoadBalancer and create the Deployment Group.
After creating Deployment , create Deployment with the configuration as seen in image:-
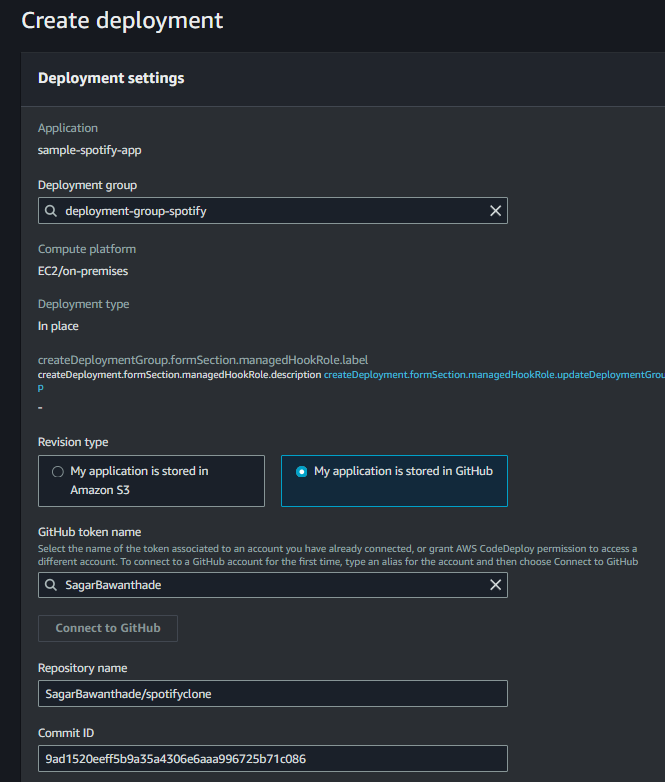
After Creating Depoyment you will see that Deployment will get Failed so for that we have to provide the root of the Github Repository by creating a appspec.yaml file in the Root folder of the Project.
version: 0.0
os: linux

hooks:
  ApplicationStop:
    - location: scripts/stop_container.sh
      timeout: 300
      runas: root
  AfterInstall:
    - location: scripts/start_container.sh
      timeout: 300
      runas: root
Also again after creating appspec.yaml you have to create a folder name scripts in root of the project folder and inside that script folder make 2 file
start_container.sh
 #!/bin/bash
 set -e

 # Pull the Docker image from Docker Hub
 docker pull sagarbawanthade/spotify:v3

 # Run the Docker image as a container
 docker run -d -p 8000:80 sagarbawanthade/spotify:v3
stop_container.sh
 #!/bin/bash
 set -e

 # Stop the running container (if any)
 echo "Hi"
Retry the Deployment and you will the Deployment Status will be Success.

Now After this go to AWS CodePipeline.
Click on Edit and again click on Add Stage .
Give a name to Stage like "Deployment".
Edit the Action and configured it properly and Click on Done.
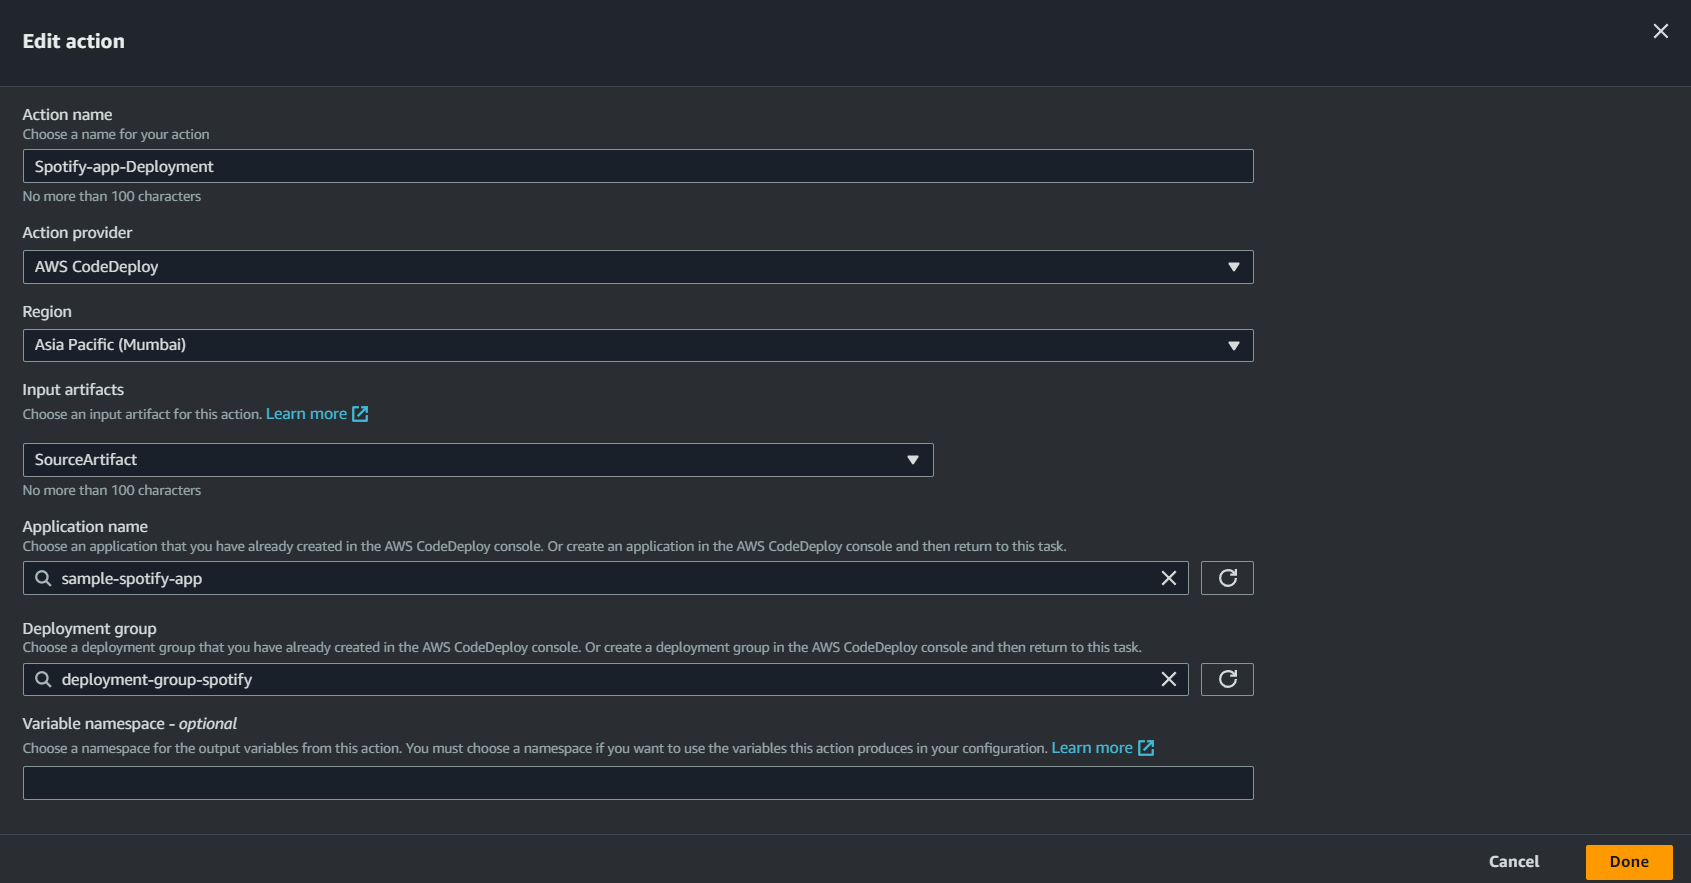
- The New Deployment Stage will be add to your AWS Pipeline and click on the Release Changes.
Also very important to remove the running container from your ec2 instance otherwise it will give error:-
sudo docker rm -f <containerId>After that Click on the Release Changes in AWS CodePipleine.
- So now you will see your all 3 stages Source, Build, Deployment will be Sucessfully Working.
Test the PipeLine and access the application
To see if it working properly or not just commit a changes to Github Repo and just Release those changes in AWS CodePipeline.
Copy the public IP of your ec2 instance and copy the IP to the browser with semicolon and ex:- http://3.110.32.94:8000/
By accessing this IP you will be access to your application.
Conclusion
Implementing a complete CI/CD pipeline on AWS can significantly streamline your development and deployment process, allowing your team to deliver high-quality software faster and more reliably.
By leveraging AWS services like CodeCommit, CodeBuild, CodeDeploy, and CodePipeline, you can automate and orchestrate every step of your software release process, from code commit to production deployment.
Thanks!
Subscribe to my newsletter
Read articles from Sagar Bawanthade directly inside your inbox. Subscribe to the newsletter, and don't miss out.
Written by

Sagar Bawanthade
Sagar Bawanthade
👋 Hey there! I'm Sagar, final year student pursuing BCA from Dy Patil International University Pune. I'm deeply into the DevOps and Cloud.