Ensuring Kubernetes Cluster Resilience with Velero: A Complete Guide
 usama ahmad
As Kubernetes becomes the backbone of modern cloud-native applications, ensuring the resilience and recoverability of these clusters is paramount. Data loss or downtime can have significant repercussions, and thus, a solid disaster recovery strategy is essential. This is where Velero shines, providing a simple yet powerful solution for backing up and restoring your Kubernetes clusters.
In this blog, we'll explore the importance of disaster recovery, the capabilities of Velero, and a step-by-step guide to implementing Velero in your Kubernetes environment.
Why Disaster Recovery is Crucial in Kubernetes
Kubernetes clusters are dynamic, with pods, services, and configurations constantly evolving. While this flexibility is one of Kubernetes' strengths, it also introduces challenges:
Data Loss: Applications relying on persistent volumes need assurance that their data is protected.
Downtime: Unexpected failures can lead to downtime, impacting business operations.
Misconfigurations: Human errors or misconfigurations can disrupt services and require quick recovery.
A robust disaster recovery plan mitigates these risks, ensuring that your Kubernetes environment can withstand and recover from adverse events.
Introducing Velero
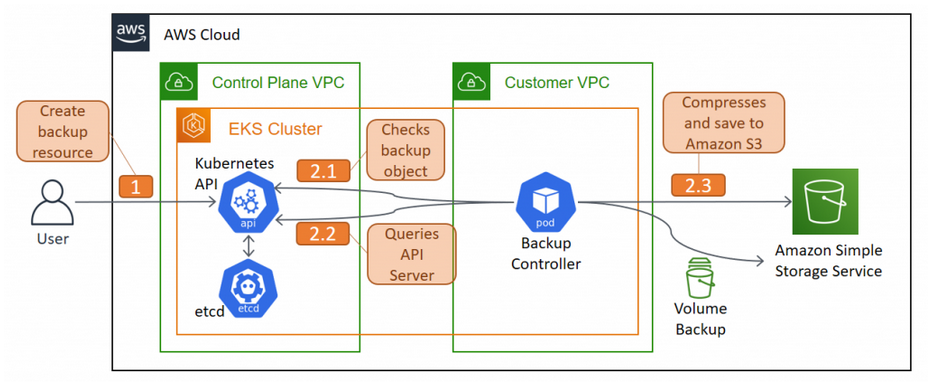
Velero is an open-source tool developed by VMware that provides backup, recovery, and migration solutions for Kubernetes clusters. With Velero, you can:
Back Up Cluster Resources: Capture the state of your cluster, including namespaces, services, deployments, and persistent volume claims.
Restore Resources: In the event of failure, quickly restore your cluster to a previous state.
Migrate Clusters: Move workloads between clusters or even across regions with minimal effort.
Schedule Regular Backups: Automate the backup process, ensuring your data is always protected.
Why Velero?
Ease of Use: Velero is straightforward to set up and configure, making it accessible even for those new to Kubernetes disaster recovery.
Flexibility: It supports various storage providers, including AWS S3, Google Cloud Storage, and Azure Blob Storage.
Community and Support: Being an open-source project, Velero is supported by a vibrant community and continuous updates.

Step-by-Step Guide to Implementing Velero
1. Prerequisites
Before you start, ensure that you have the following:
A running Kubernetes cluster.
Cluster must be configured with an EKS IAM OIDC Provider.
Access to a cloud storage provider (e.g., AWS S3) for storing backups.
kubectlinstalled and configured to access your cluster.
2. Install the Velero CLI
First, you'll need to install the Velero command-line interface (CLI) on your local machine.
curl -LO https://github.com/vmware-tanzu/velero/releases/download/{VERSION}/velero-VERSION-linux-amd64.tar.gz
tar zxvf velero-{VERSION}-linuxamd64.tar.gz
sudo mv velero-{VERSION}-linux-amd64/velero /usr/local/bin/velero
3. Configure Your Cloud Provider
Set up your cloud provider's credentials to allow Velero to access the storage bucket where backups will be stored.
For AWS, for example:
- Create IAM policy for the service account to give access of S3 to the velero
cat > velero_policy.json <<EOF
{
    "Version": "2012-10-17",
    "Statement": [
        {
            "Effect": "Allow",
            "Action": [
                "ec2:DescribeVolumes",
                "ec2:DescribeSnapshots",
                "ec2:CreateTags",
                "ec2:CreateVolume",
                "ec2:CreateSnapshot",
                "ec2:DeleteSnapshot"
            ],
            "Resource": "*"
        },
        {
            "Effect": "Allow",
            "Action": [
                "s3:GetObject",
                "s3:DeleteObject",
                "s3:PutObject",
                "s3:AbortMultipartUpload",
                "s3:ListMultipartUploadParts"
            ],
            "Resource": [
                "arn:aws:s3:::${BUCKET}/*"
            ]
        },
        {
            "Effect": "Allow",
            "Action": [
                "s3:ListBucket"
            ],
            "Resource": [
                "arn:aws:s3:::${BUCKET}"
            ]
        }
    ]
}
EOF

aws iam create-policy \
    --policy-name VeleroAccessPolicy \
    --policy-document file://velero_policy.json
Service account for velero
  PRIMARY_CLUSTER=<CLUSTERNAME>
  ACCOUNT=$(aws sts get-caller-identity --query Account --output text)
  eksctl create iamserviceaccount \
      --cluster=$PRIMARY_CLUSTER \
      --name=velero-server \
      --namespace=velero \
      --role-name=eks-velero-backup \
      --role-only \
      --attach-policy-arn=arn:aws:iam::$ACCOUNT:policy/VeleroAccessPolicy \
      --approve
4. Install Velero on Your Kubernetes Cluster
- Create values.yaml file for your velero helm chart
helm repo add vmware-tanzu https://vmware-tanzu.github.io/helm-charts

cat > values.yaml <<EOF
configuration:
  backupStorageLocation:
  - bucket: $BUCKET
    provider: aws
  volumeSnapshotLocation:
  - config:
      region: $REGION
    provider: aws
initContainers:
- name: velero-plugin-for-aws
  image: velero/velero-plugin-for-aws:v1.7.1
  volumeMounts:
  - mountPath: /target
    name: plugins
credentials:
  useSecret: false
serviceAccount:
  server:
    annotations:
      eks.amazonaws.com/role-arn: "arn:aws:iam::${ACCOUNT}:role/eks-velero-backup"
EOF
Use the helm install command to install the velero helm chart
  helm install velero vmware-tanzu/velero \
      --create-namespace \
      --namespace velero \
      -f values.yaml
5. Creating Your First Backup
Once Velero is installed, creating a backup is as simple as running:
velero backup create my-first-backup
This command backs up all resources in the cluster. You can specify namespaces or label selectors to fine-tune what gets backed up.
6. Scheduling Regular Backups
Automate the backup process by scheduling regular backups:
velero schedule create daily-backup --schedule "0 2 * * *"
This creates a daily backup at 2 AM.
7. Restoring from a Backup
In case of a disaster or data loss, you can easily restore your cluster using Velero:
velero restore create --from-backup my-first-backup
This command restores your cluster to the state it was in at the time of the backup.
8. Advanced Velero Features
Migration: Use Velero to migrate your cluster resources to a new cluster or even to a different cloud provider.
Custom Plugins: Velero supports custom plugins, allowing you to extend its functionality.
Restic Integration: For volume snapshots, Velero integrates with Restic, providing an additional layer of data protection.
Conclusion
Velero is a powerful and flexible tool that simplifies the backup and disaster recovery process for Kubernetes clusters. Its ease of setup and use, coupled with robust features, make it an essential part of any Kubernetes administrator's toolkit.
By implementing Velero, you ensure that your Kubernetes clusters are resilient, your data is protected, and your business can recover swiftly from any disaster. Don't wait for a disaster to strike—integrate Velero into your Kubernetes environment today and take control of your cluster's future.
Subscribe to my newsletter
Read articles from usama ahmad directly inside your inbox. Subscribe to the newsletter, and don't miss out.
Written by
