Building a CRUD API with Next.js and Prisma
 Maheshwara sampath
Hi Everyone! In this blog post, we'll dive into building a backend API using Next.js and Prisma. We'll explore the basics of setting up a CRUD API and how these tools can work together. Let's get started! 🚀
What is Next.js and Prisma?
Before we dive into the post, let's first understand what Next.js and Prisma are all about. Here’s a quick overview of each to set the stage for our project
Quick intro to Next.js:
Next.js is a framework for building React applications that makes it easy to create fast, optimized websites. It offers server-side rendering, which means the HTML for your pages is generated on the server before it reaches the browser. This helps your site load quickly and improves search engine optimization. Next.js also supports static site generation and automatic code splitting, so your users only load the JavaScript needed for the current page, further speeding up your site.
Basic introduction to Prisma:
Prisma is an ORM (Object-Relational Mapping) tool that serves as a bridge between your database and your application. It simplifies database management by allowing you to interact with your database using a type-safe API. Prisma translates your application's data needs into efficient queries, handling complex database operations and making it easier to work with data
Project Setup: Getting Started with Next.js and Prisma
In this section we will install the basic setup to start with the project:
npx create-next-app@latest
This command will create new Next.js application in your project directory and setup the default configuration
npm install @prisma/client
npx prisma init
After running these commands, you'll have Prisma Client installed and Prisma set up in your project. The prisma init command will create the necessary configuration files, including schema.prisma for defining your data models and a .env file for your database connection details.
update the .env file your database connection details. This ensures Prisma can connect to your database. Replace the DATABASE_URL placeholder in the .env file with your actual database URL. In this project we will be using PostgreSQL.
DATABASE_URL="postgresql://username:password@localhost:5432/mydatabase"
With the basic setup of the project complete, we're now ready to define our Prisma schema.
Prisma Schema:
Next, we'll define our Prisma schema, which specifies the data models and relationships in our database. This schema file helps Prisma understand how to interact with your database
Navigate to the
prisma/schema.prismafile, where we'll define our data models for the application. This file is where you specify the structure of your database and the relationships between tables.
Prisma Model:
In the Prisma model, we define the schema to outline the structure of our data. This includes specifying how different data types are related and how they should be organized in the database.
In this project, we will use two main models: Author and Book. The Author model represents authors, while the Book model represents the books written by these authors, linking them together through a relationship.
model Author {
  id Int @id @default(autoincrement())
  name String
  books Book[]
}

model Book{
  id Int @id @default(autoincrement())
  title String @unique
  description String
  published String
  authorId Author @relation(fields: [bookId], references: [id])
  bookId Int
}
In this schema, we define the Author model and the Book model, illustrating their relationship. Each Author can have multiple Books, linked via the authorId field in the Book model, establishing a one-to-many relationship between authors and their books
Prisma Migration:
Now that we have defined our data models and their relationships, it's time to apply these changes to our database. In this section, we'll use Prisma Migrations to create and apply the necessary schema changes.
To start, run the following command to generate a migration file based on your schema:
npx prisma migrate dev --name init
This command creates a new migration file and applies it to your database. It will also update your Prisma client with the new schema. After running this command, your database will be in sync with your Prisma schema.
After completing the migration, navigate to the
prisma/migrationsfolder in your project directory. Inside, you'll find a series of migration files. Open themigration.sqlfile to see the PostgreSQL commands that have been executed to update your database schema
-- CreateTable
CREATE TABLE "Author" (
    "id" SERIAL NOT NULL,
    "name" TEXT NOT NULL,

    CONSTRAINT "Author_pkey" PRIMARY KEY ("id")
);

-- CreateTable
CREATE TABLE "Book" (
    "id" SERIAL NOT NULL,
    "title" TEXT NOT NULL,
    "description" TEXT NOT NULL,
    "published" TEXT NOT NULL,
    "bookId" INTEGER NOT NULL,

    CONSTRAINT "Book_pkey" PRIMARY KEY ("id")
);

-- AddForeignKey
ALTER TABLE "Book" ADD CONSTRAINT "Book_bookId_fkey" FOREIGN KEY ("bookId") REFERENCES "Author"("id") ON DELETE RESTRICT ON UPDATE CASCADE;
After running the migration and seeing the generated queries in the migration folder, the next step is to generate the Prisma client.
npx prisma generate
command will generate the Prisma Client based on your schema. This client allows you to interact with your database using TypeScript or JavaScript, providing a powerful and type-safe API for database operations.
Once the Prisma Client is generated, you can integrate it into your Next.js application. You'll import the Prisma Client into your code to start interacting with your database.
Now, you're ready to dive into integrating Prisma with your Next.js application!
Implementing CRUD Operations with Next.js and Prisma
Before diving into the CRUD operations, make sure to import the necessary modules. Import the PrismaClient to interact with your database and NextResponse for handling HTTP responses:
import { PrismaClient } from "@prisma/client";
import { NextResponse } from "next/server";

const prisma = new PrismaClient()
CRUD operation for Author's 📝:
In this section we are going to perform CRUD operation for the author field.
Before implementing the CRUD operations, ensure that your Next.js project has the correct folder structure. In the
appdirectory, create anapifolder. Inside theapifolder, add another folder namedauthor. Inside theauthorfolder, create aroute.tsfile. This file will handle all the CRUD operations related to theauthorschema, includingGET,POST,PUT, andDELETErequests.
The GET Request:
In the GET request, we retrieve all authors from the database, including their associated books.
export const GET = async (req: Request) => {
    try {
        const authors = await prisma.author.findMany({
            include: {
                books: true
            }
        });

        return NextResponse.json({
            authors
        });
    } catch (error: any) {
        return NextResponse.json({
            msg: 'Failed to retrieve authors',
            error: error.message
        }, { status: 500 });
    }
};
In this GET request, Prisma fetches all the authors stored in the database along with their related books. It utilizes the findMany function to include the associated books for each author. If there are authors in the database, the request will return all the authors along with their related books. If no authors exist, the response will be an empty array. In case of any error, the system returns a failure message, "Failed to retrieve authors", with a status code of 500.
To ensure that this code is running correctly, we'll use Postman to test the GET request and verify the output. This will allow us to see what data is being returned from the database and confirm that everything is functioning as expected.

This pic shows the output from Postman when performing a GET request. Since there are currently no authors in the database, it returns an empty array, indicating that the GET request is functioning properly and the table is empty
The POST Request:
The POST request allows us to create a new author, checking first if the author already exists to avoid duplicates.
export const POST = async (req: Request) => {
    try {
        const { name } = await req.json();

        if (!name || typeof name !== 'string') {
            return NextResponse.json({
                msg: 'Invalid or missing author name'
            }, { status: 400 });
        }

        const existingAuthor = await prisma.author.findFirst({
            where: { name }
        });

        if (existingAuthor) {
            return NextResponse.json({
                msg: 'Author with this name already exists'
            }, { status: 409 });
        }

        const newAuthor = await prisma.author.create({
            data: { name }
        });

        return NextResponse.json({
            msg: 'Author created successfully',
            author: newAuthor
        });
    } catch (error: any) {
        return NextResponse.json({
            msg: 'Failed to create the author',
            error: error.message
        }, { status: 500 });
    }
};
In the POST request, you'll first validate that the name field is provided and is a string. If it's not, you'll return an error message indicating "Invalid or missing author name." Next, you'll check if an author with the given name already exists using prisma.author.findFirst. If the author is found, you'll respond with a message saying "Author with this name already exists." If the author does not exist, you'll create a new author with the specified name. Finally, if the creation is successful, you'll return a success message confirming that the author has been created, along with the details of the new author.

In the POST request, if the input is valid and the author does not already exist, the author will be created successfully. The response will include the author’s ID and name, as shown in the screenshot where the author was created with the specified ID and name.

If you try to create an author with a name that already exists, you'll get a message saying that an author with this name already exists. You can see this in the screenshot where an attempt to create an existing author resulted in an error message.
The PUT Request:
In the PUT we are updating the existing author using their Id if the id is correct we will update the existing author name
export const PUT = async (req: Request) => {
    try {
        const { id, name } = await req.json();

        if (isNaN(Number(id)) || !name) {
            return NextResponse.json({
                msg: 'Invalid input data'
            }, { status: 400 });
        }

        const author = await prisma.author.update({
            where: { id: Number(id) },
            data: { name }
        });

        return NextResponse.json({
            msg: `The updated author name is ${author.name}`
        });
    } catch (error: any) {
        return NextResponse.json({
            msg: 'Failed to update the author',
            error: error.message
        }, { status: 500 });
    }
};
In this PUT request, we update an existing author's information using their ID and a new name. First, the request verifies that the provided ID is a number. If valid, it updates the author's name in the database. Upon success, it returns the updated author name. If there's an issue, it returns an error message.
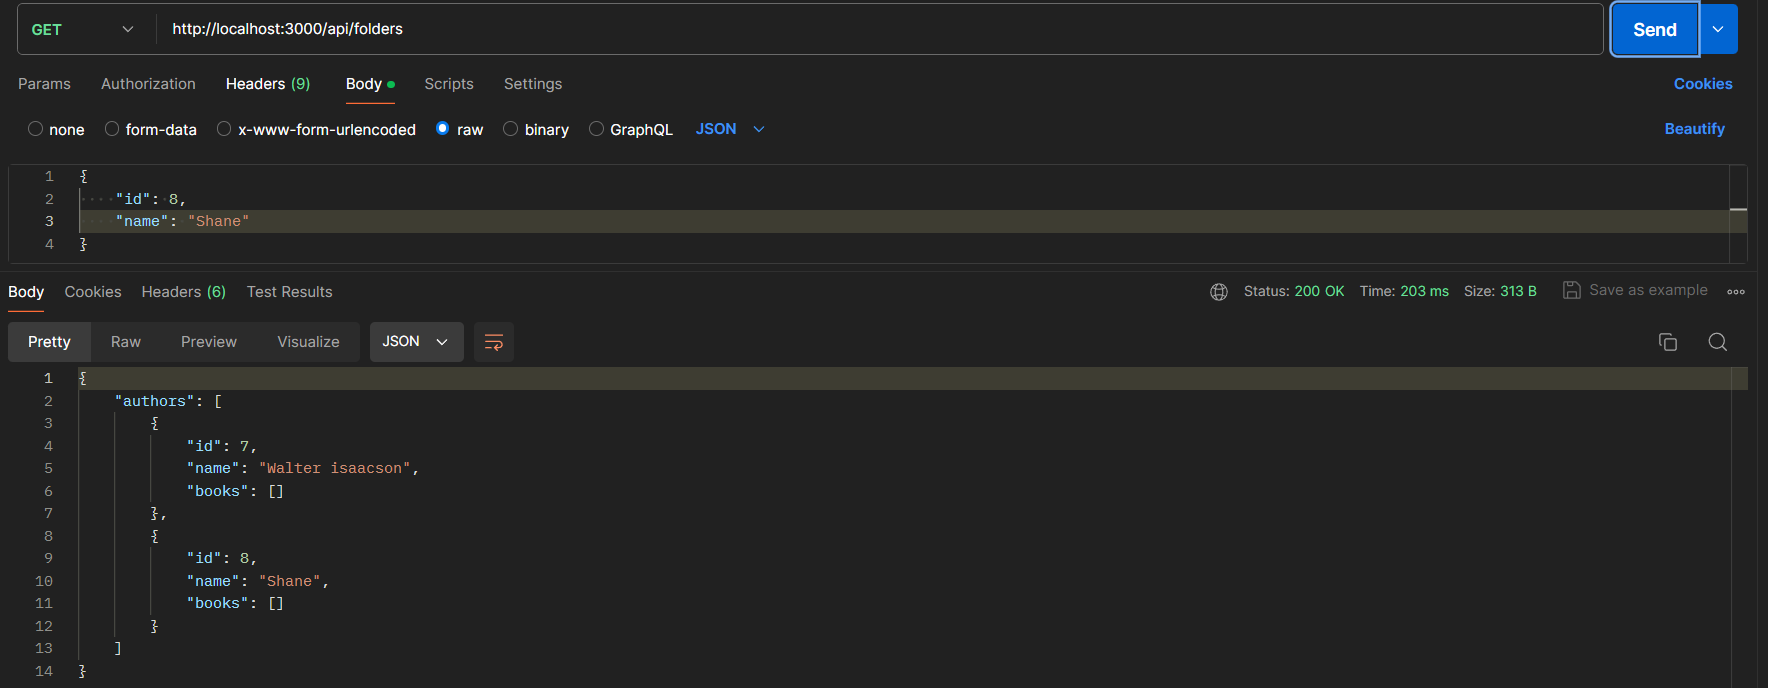


In this section, we handle the PUT request to update an existing author's name. After retrieving all the current author details with the GET request, you can use the PUT request to change the name of a specific author by providing their ID and the new name. Upon successful update, the response will include the updated author's name. If there are any issues, an error message will be returned.
The DELETE Request
Finally, the DELETE request removes an author and all their related books from the database.
export const DELETE = async (req: Request) => {
    try {
        const { id } = await req.json();

        await prisma.book.deleteMany({
            where: { authorId: Number(id) }
        });

        const author = await prisma.author.delete({
            where: { id: Number(id) }
        });

        return NextResponse.json({
            msg: `The author with id ${id} and all related books have been deleted`
        });
    } catch (error: any) {
        return NextResponse.json({
            msg: 'Failed to delete the author',
            error: error.message
        }, { status: 500 });
    }
};
In this DELETE request, it starts by using the provided ID to first remove all books associated with that author. Once the related books are deleted, it then deletes the author from the database. If the process is successful, you'll receive a confirmation message stating that both the author and their related books have been removed. If there's an error, an error message will be returned instead.
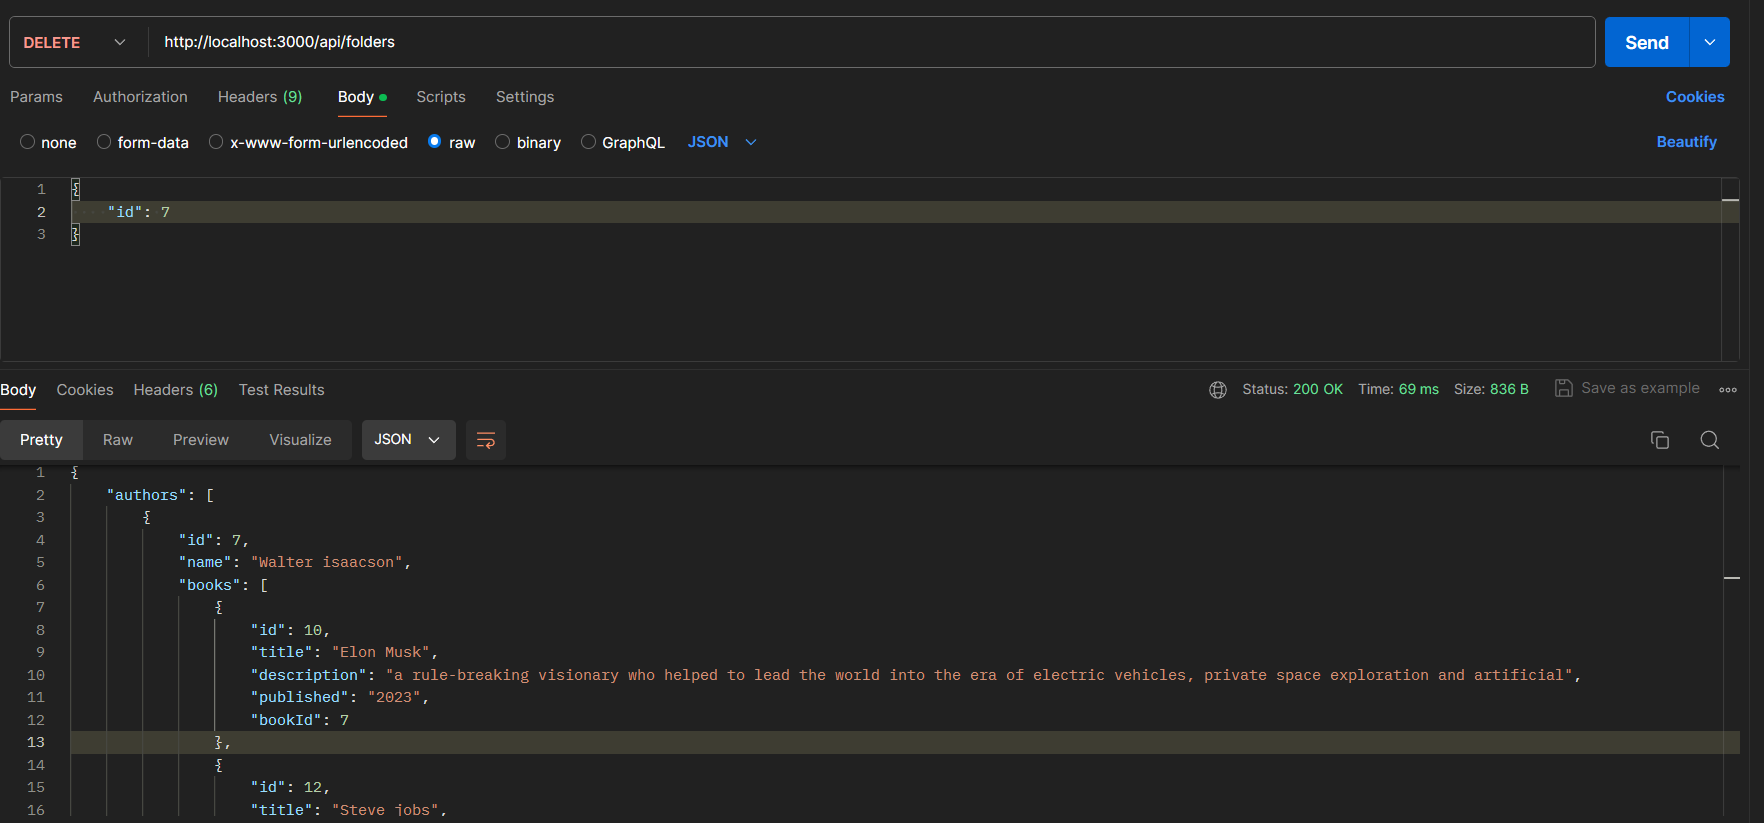
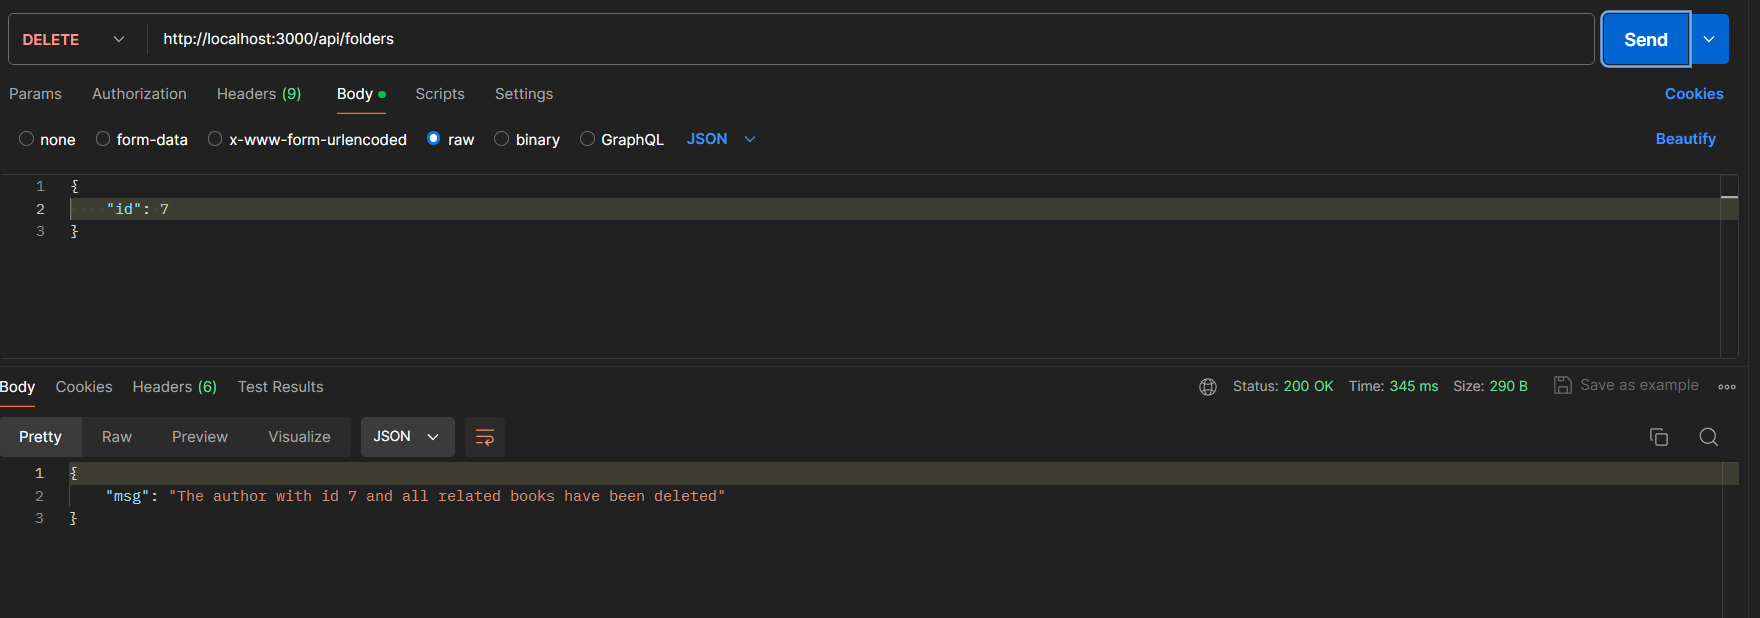
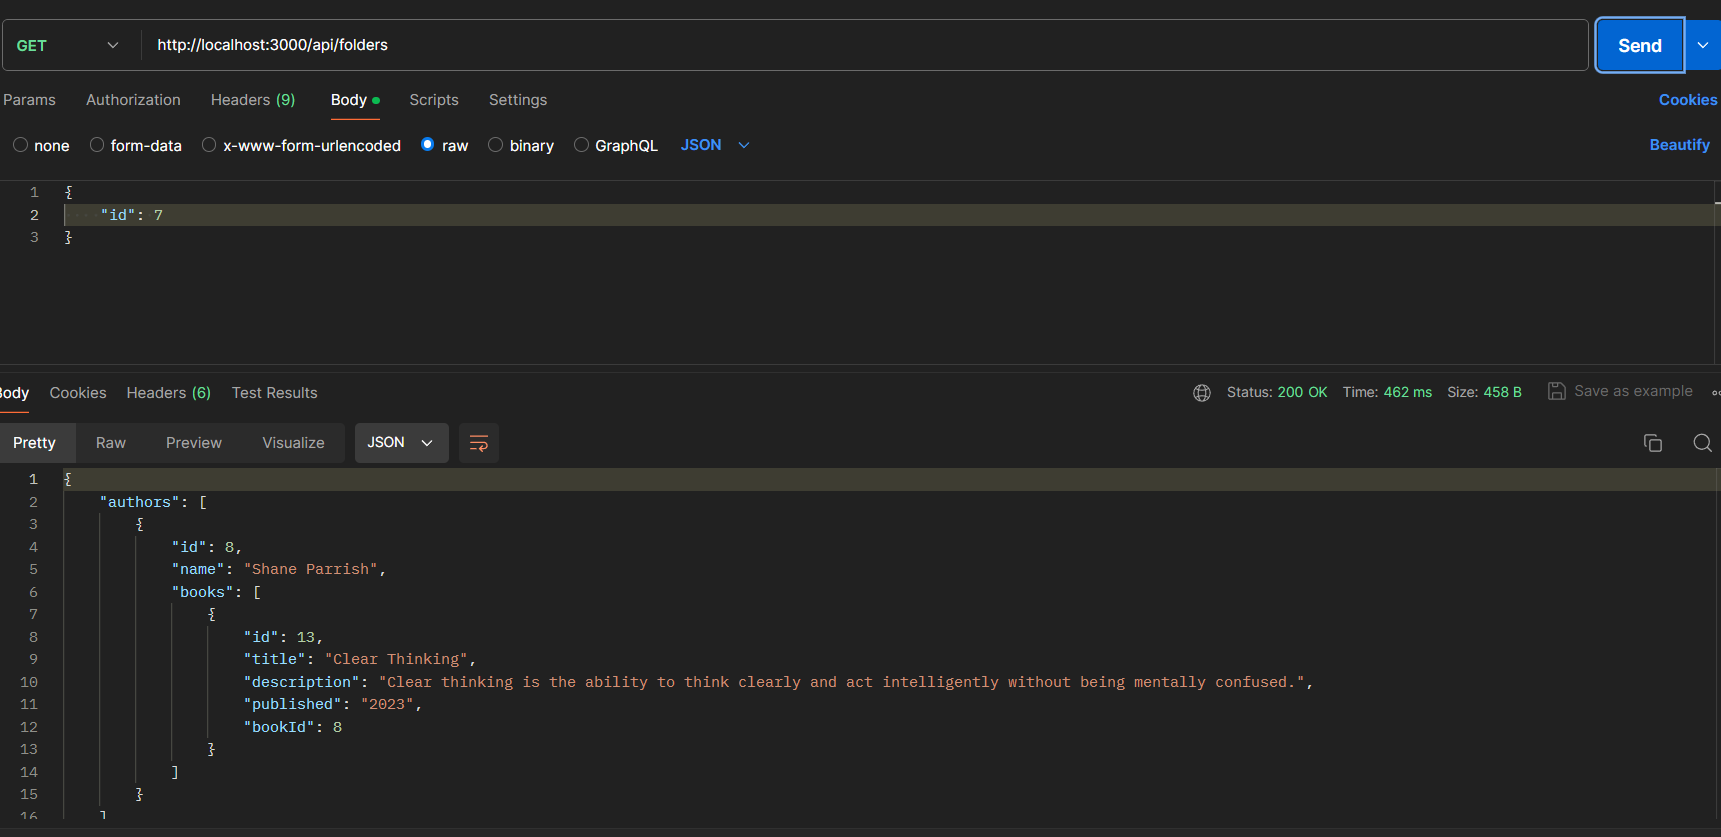
The DELETE request handler removes an author and their associated books from the database. It first deletes all books related to the author using the provided ID, then deletes the author itself. Upon successful deletion, it responds with a confirmation message. If an error occurs, it returns a failure message with the error details.
CRUD operation for Author Books 📚:
In this section we are going to perform CRUD operation for the books field related to the author.
For the query operations on the book, first, ensure that your project's folder structure is correct. In the
appdirectory, you should already have anAPIfolder. Inside this folder, create another folder namedauthors. Within theauthorsfolder, create a dynamic route file named[id]/route.ts. This setup will allow you to perform operations based on the specific book ID. By organizing the file this way, you ensure that you can efficiently handle queries and CRUD operations for each individual book.
The POST Request
In this POST request, a new book is created in the database based on the author with the mentioned ID.
export const POST = async (req: Request) => {
    try {
        const { title, description, published, authorId } = await req.json();
         const existBook = await prisma.book.findUnique({
            where: {
                title: title
            }
        });
        if (existBook) {
            return NextResponse.json({
                msg: "Please enter new data"
            }, { status: 400 });
        }
        if (isNaN(Number(authorId))) {
            return NextResponse.json({
                status: "Invalid",
                msg: "Please enter a valid author ID"
            }, { status: 400 });
        }
        const books = await prisma.book.create({
            data: {
                title,
                description,
                published,
                bookId: Number(authorId)
            }
        });
        return NextResponse.json({
            books
        });
        } catch (error: any) {
        return NextResponse.json({
            msg: 'Failed to create book',
            error: error.message
        }, { status: 500 });
    }
};
The request first checks if a book with the same title already exists. If it does, an error message is returned indicating that the book title is already taken. The request also validates the authorId to ensure it's a number. If valid, it creates a new book record with the provided title, description, published status, and author ID. If successful, it returns the created book details.
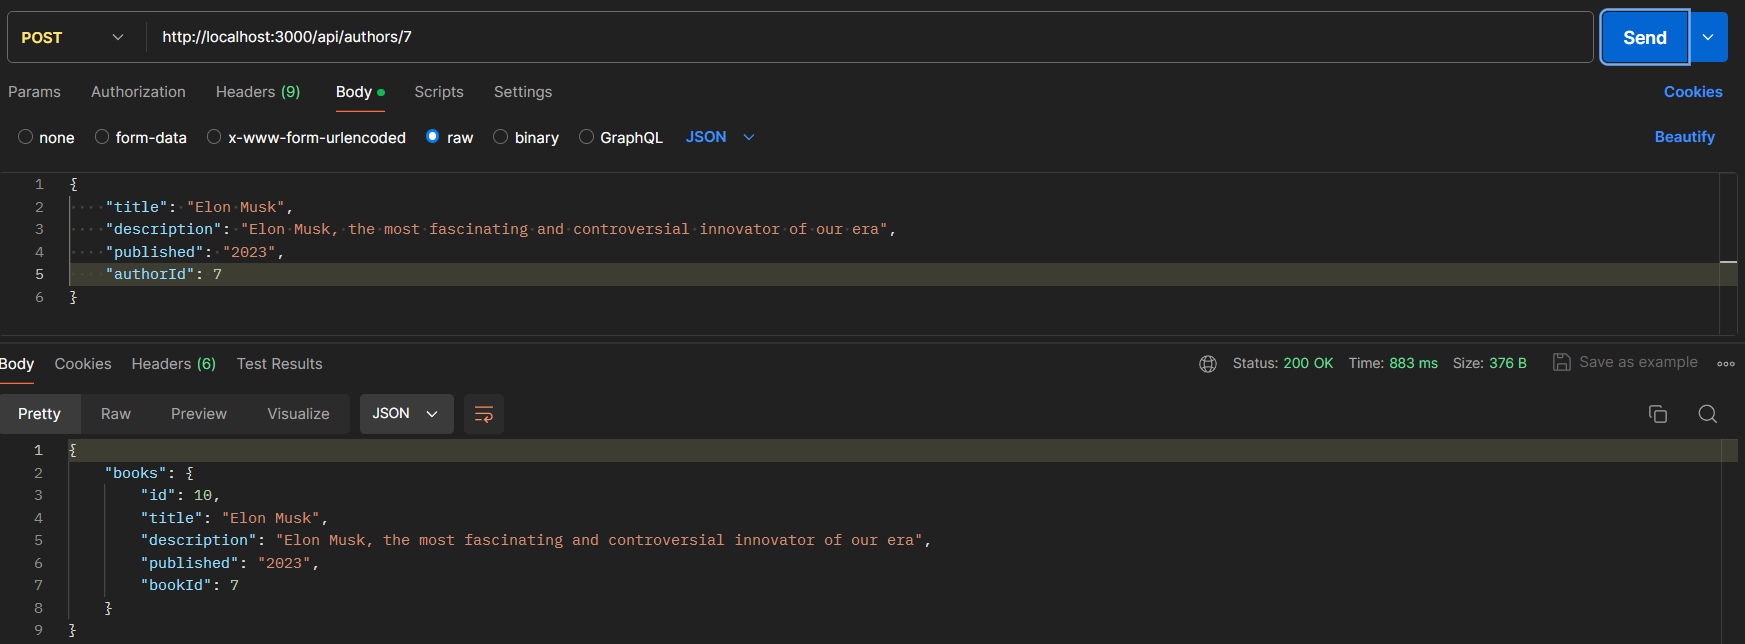

In the POST request section, when you successfully send the data, it adds the author to the database with a unique author ID. If the POST request is sent again with the same author name, it will return a message indicating that the author already exists and prompts you to enter new data.
The GET Request:
The GET request handler retrieves an author's details by ID, including their books, or returns an appropriate error message if the author is not found or an invalid ID is provided.
export const GET = async (req: Request) => {
    try {

        const urlParts = req.url.split('/');
        const id = Number(urlParts[5]);

        if (isNaN(id)) {
            return NextResponse.json({
                msg: 'Invalid author ID'
            }, { status: 400 });
        }
        const author = await prisma.author.findUnique({
            where: {
                id: id
            },
            include: {
                books: true
            }
        });

        if (!author) {
            return NextResponse.json({
                msg: 'Author not found'
            }, { status: 404 });
        }

        return NextResponse.json({
            msg: author
        });

    } catch (error) {

        if (error instanceof Error) {
            return NextResponse.json({
                msg: 'Failed to fetch the author',
                error: error.message
            }, { status: 500 });
        } else {
            return NextResponse.json({
                msg: 'An unknown error occurred'
            }, { status: 500 });
    }
}
};
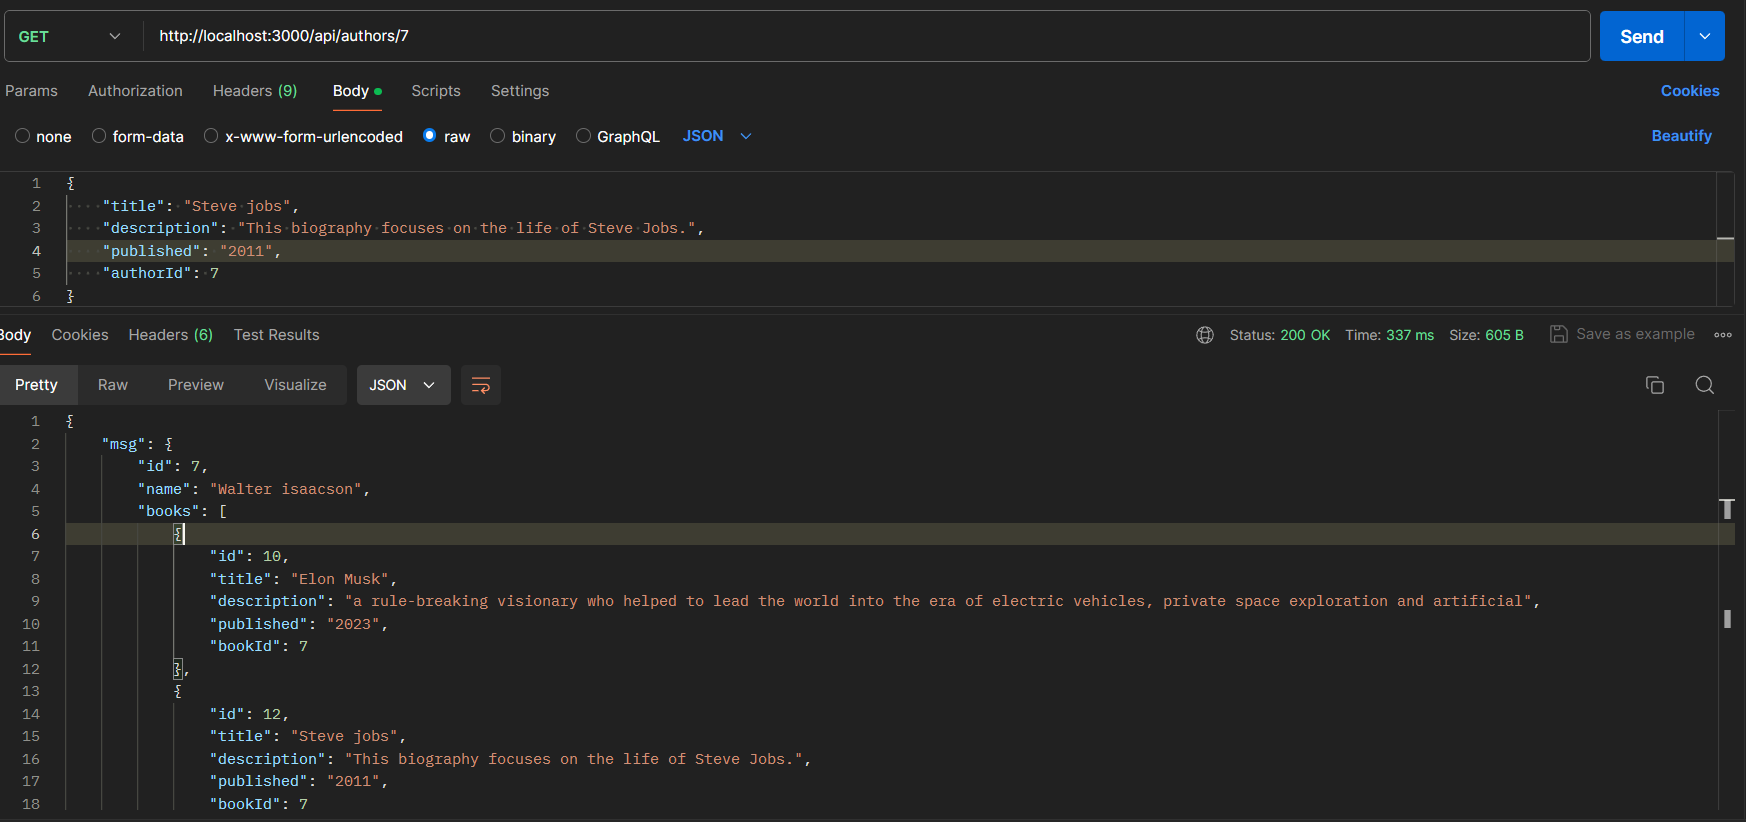
The GET request handler fetches an author's details by their ID, including their books. It gets the ID from the request URL and checks if it's a number. If the ID is invalid, it sends an error message saying the author ID is invalid. If the ID is valid but the author isn't found, it sends a 'not found' message. If the author is found, it sends back the author's details and their books. If any errors happen, it sends error messages to handle the issues.
The PUT Request:
In the provided PUT request code, the goal is to update a book's details that are associated with a particular author.
export const PUT = async (req: Request) => {
    try {
        const urlParts = req.url.split('/');
        const id = Number(urlParts[5]);
        const { bookId, title, description, published } = await req.json();


        if (isNaN(id) || isNaN(Number(bookId))) {
            return NextResponse.json({
                msg: 'Invalid ID provided'
            }, { status: 400 });
        }


        const updatedAuthor = await prisma.author.update({
            where: {
                id: id
            },
            data: {
                books: {
                    updateMany: {
                        where: {
                            id: bookId
                        },
                        data: {
                            title: title,
                            description: description,
                            published: published
                        }
                    }
                }
            }
        });

        return NextResponse.json({
            msg: 'Author updated successfully',
            updatedAuthor
        });

    } catch (error:any) {
        return NextResponse.json({
            msg: 'Failed to update the author',
            error: error.message
        }, { status: 500 });
    }
};
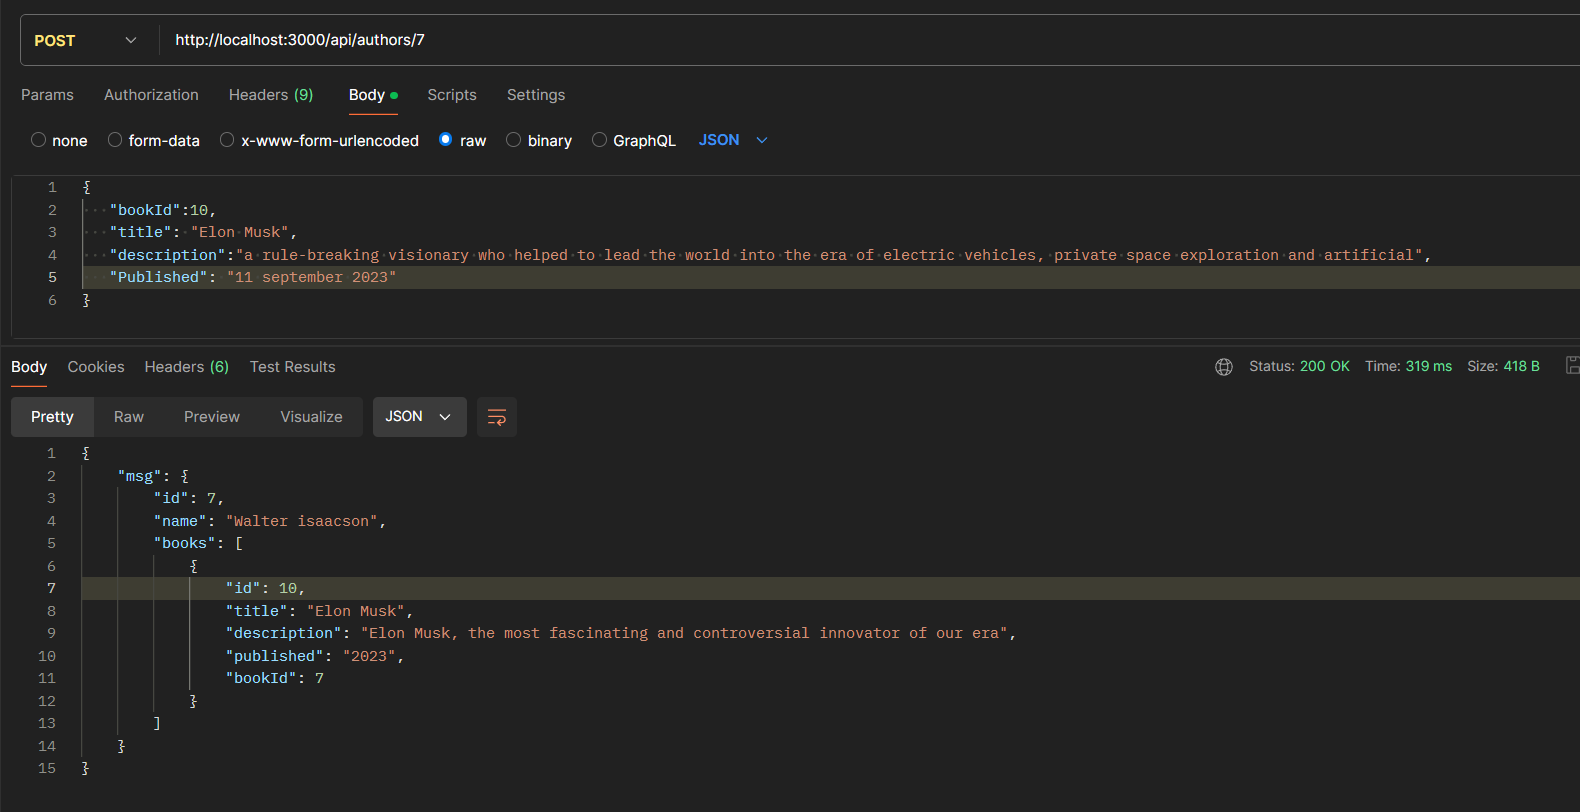
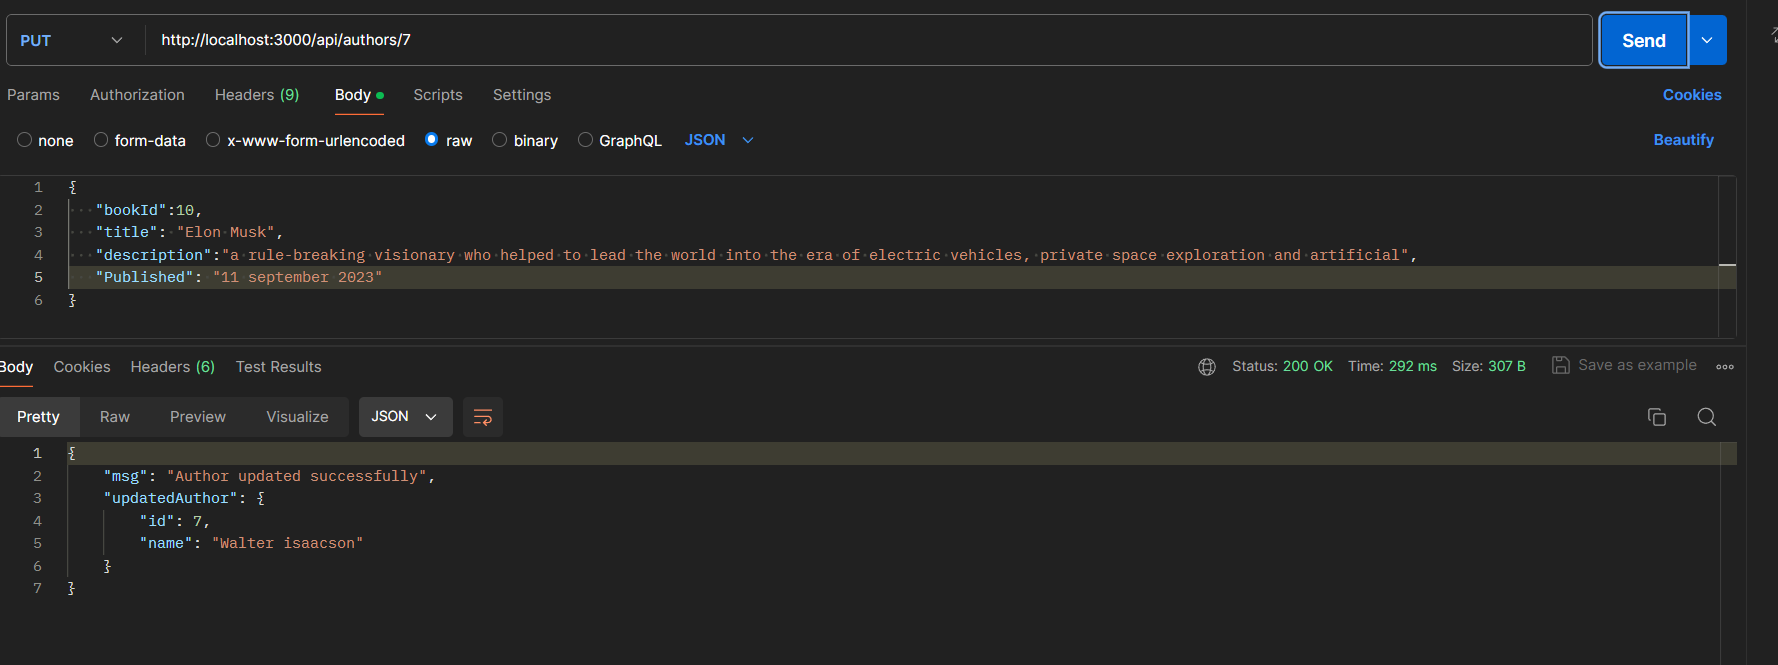
The PUT request updates the details of a specific book associated with an author. It extracts the author ID from the URL and the book details from the request body. If the IDs are valid, it uses Prisma to update the book's title, description, and publication status. The request responds with a success message and the updated information if successful, or an error message if something goes wrong.
The DELETE Request:
The DELETE request removes a specific book from the database based on its ID
export const DELETE = async (req: Request) => {
    try {
        const { id } = await req.json();


        if (isNaN(Number(id))) {
            return NextResponse.json({
                msg: 'Invalid book ID'
            }, { status: 400 });
        }


        const deleteBook = await prisma.book.delete({
            where: {
                id: Number(id)
            }
        });

        return NextResponse.json({
            msg: "Book deleted"
        });

    } catch (error:any) {
        return NextResponse.json({
            msg: 'Failed to delete the book',
            error: error.message
        }, { status: 500 });
    }
};
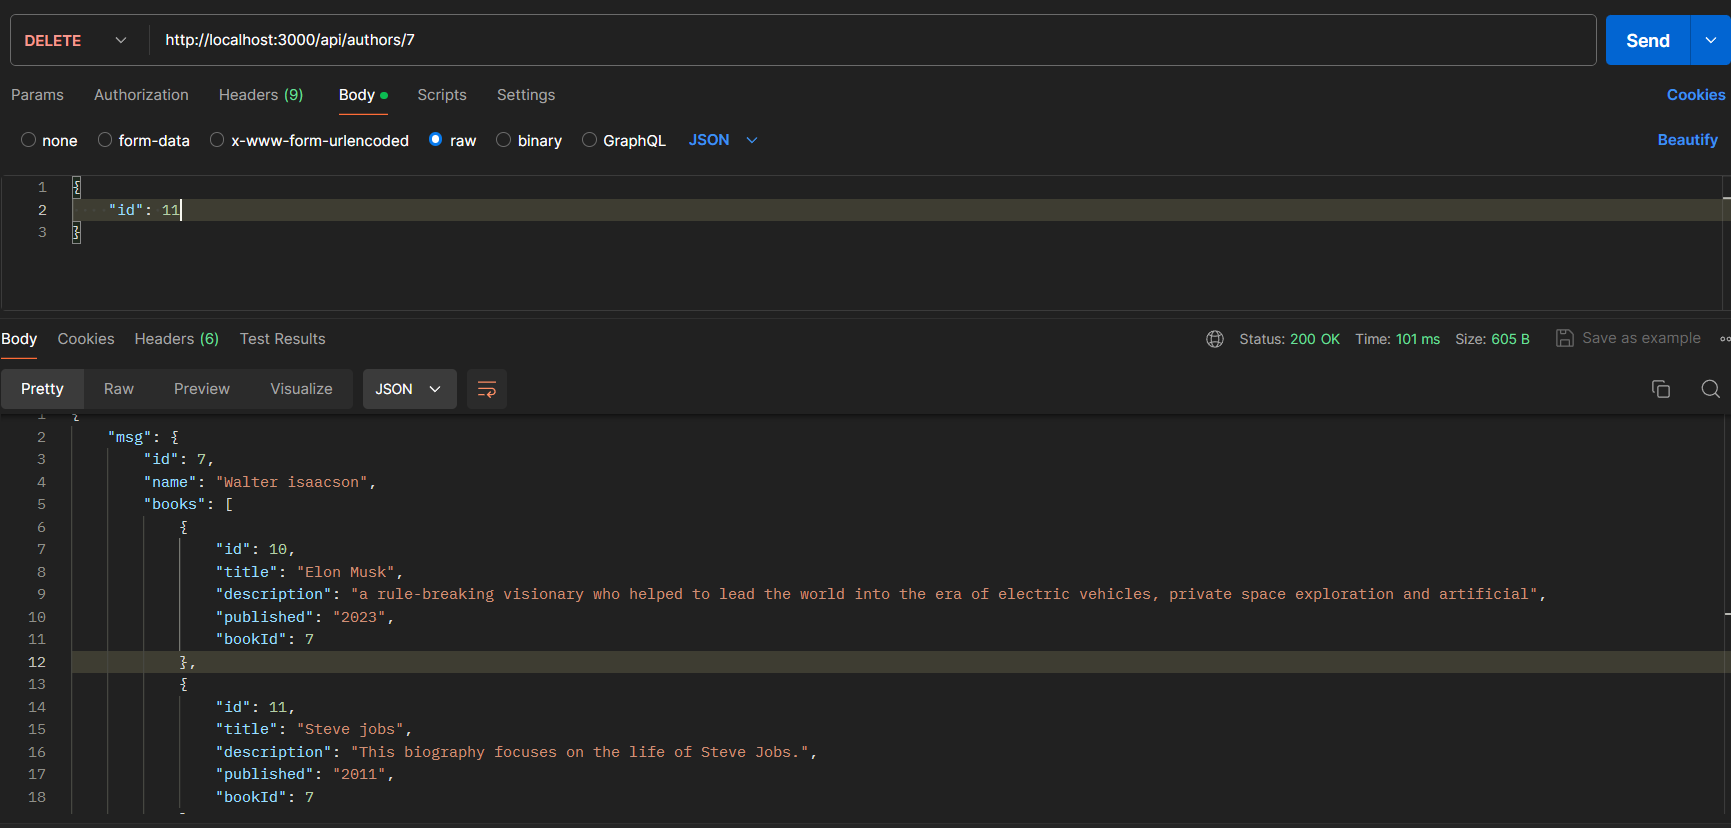

The screenshot shows the delete function in action. Before deleting, the ID number of the book is provided. After the request is processed, a message confirming that the book has been successfully deleted is displayed.
With that, we’ve covered the basics of CRUD operations using Next.js and Prisma. Hope you found it as exciting as I did!
It's a Wrap✍🏻
In this blog post, we've walked through how to build a backend API using Next.js and Prisma, covering the setup of a CRUD API, defining Prisma models, and implementing CRUD operations for authors and books. Thanks for joining on this journey. Happy coding! 🚀
Subscribe to my newsletter
Read articles from Maheshwara sampath directly inside your inbox. Subscribe to the newsletter, and don't miss out.
Written by

Maheshwara sampath
Maheshwara sampath
🚀Full-stack developer with a knack for turning complex ideas into elegant code. Passionate about bridging the frontend and backend, I write about development, share insights on the MERN stack, Prisma, and more. Always exploring new technologies and eager to share what I learn with the dev community.👨🏻💻