Day 27/40 Days of K8s: Multi-Node Kubernetes Cluster Setup Using Kubeadm !!
 Gopi Vivek Manne
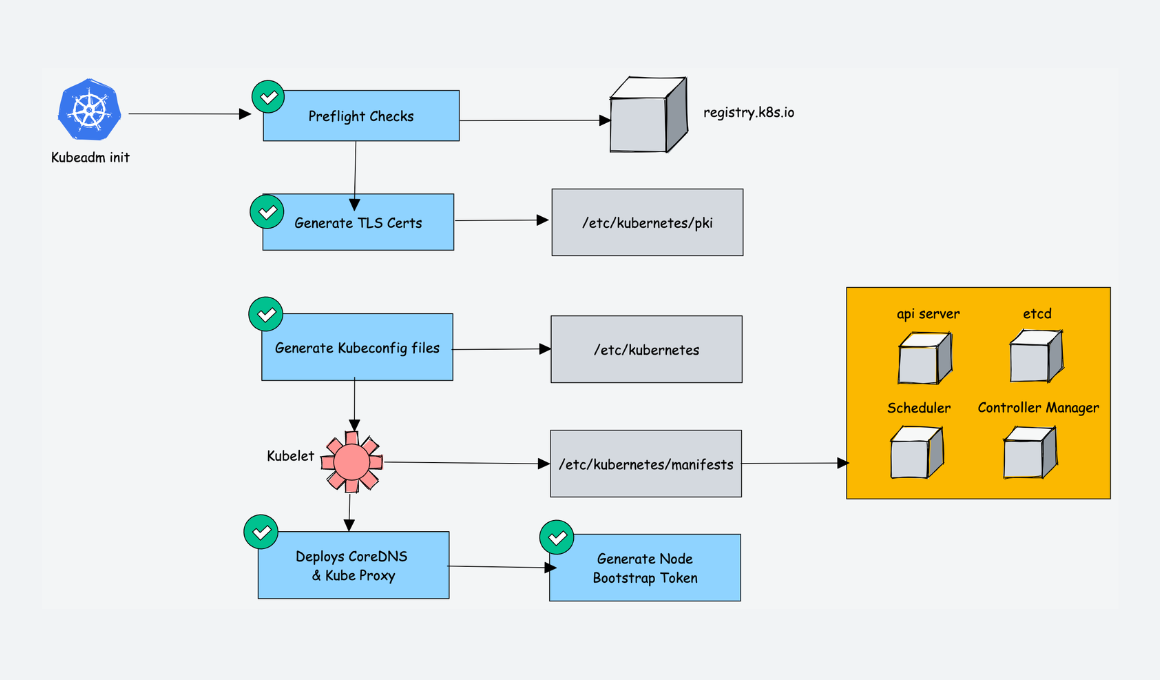
Today we will explore the process of setting up a multi-node Kubernetes cluster using Kubeadm. It's designed for a production-grade, self-managed cluster on cloud VMs (ex: AWS EC2).
Kubernetes Cluster Options
Local development clusters: kind, minikube, k3s, k3d, microk8s (quick and easy setup) for testing purposes.
Production-grade managed services: AWS EKS, GKE, AKS (control plane managed by cloud provider)
Self-managed cluster (On Cloud VMs)
Prerequisites
3 VMs: 1 Master node, 2 Worker nodes
If using AWS EC2, Create 2 security groups, attach 1 to the master and the other to two worker nodes using the below details.https://kubernetes.io/docs/reference/networking/ports-and-protocols/
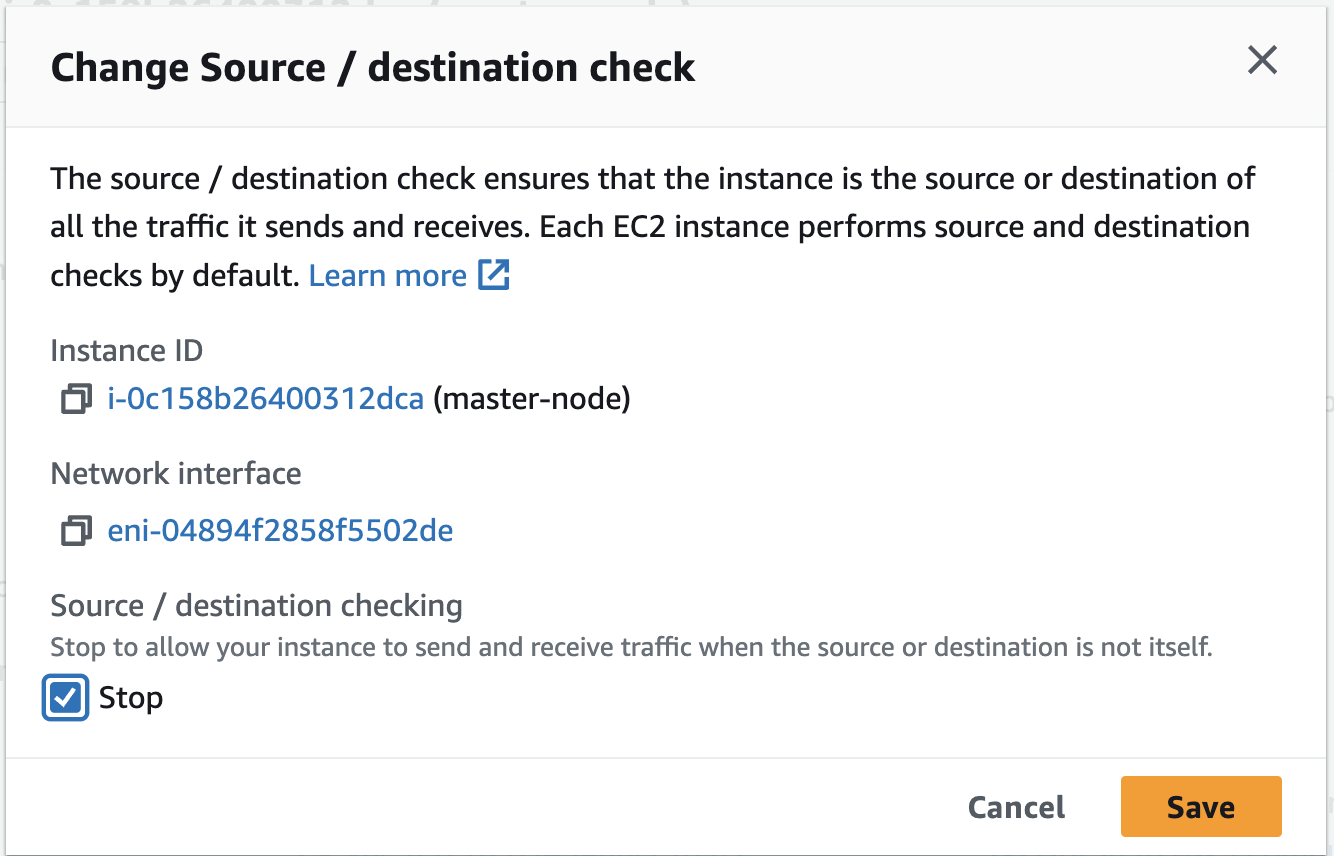
If you are using AWS EC2, you need to disable source destination check for all 3 VMs using the doc
NOTE: Kubernetes master node need to meet the minimum resource requirements of at least 2GB RAM and 2Vcpu's .Consider choosing the node of t3.small to avoid any control-plane setup problems.


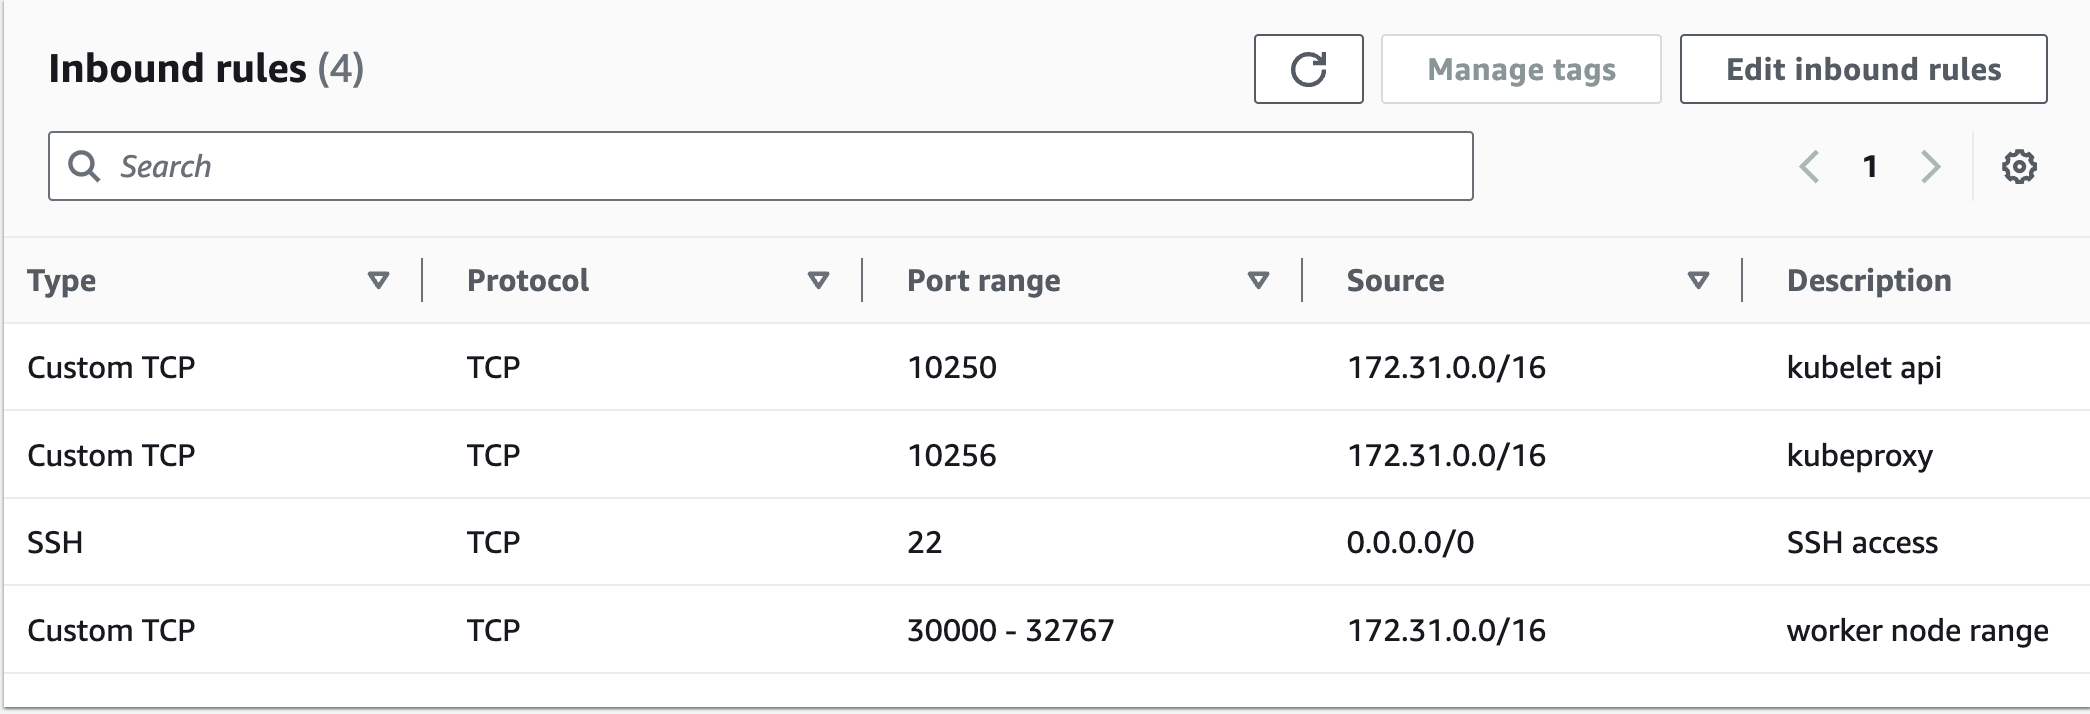
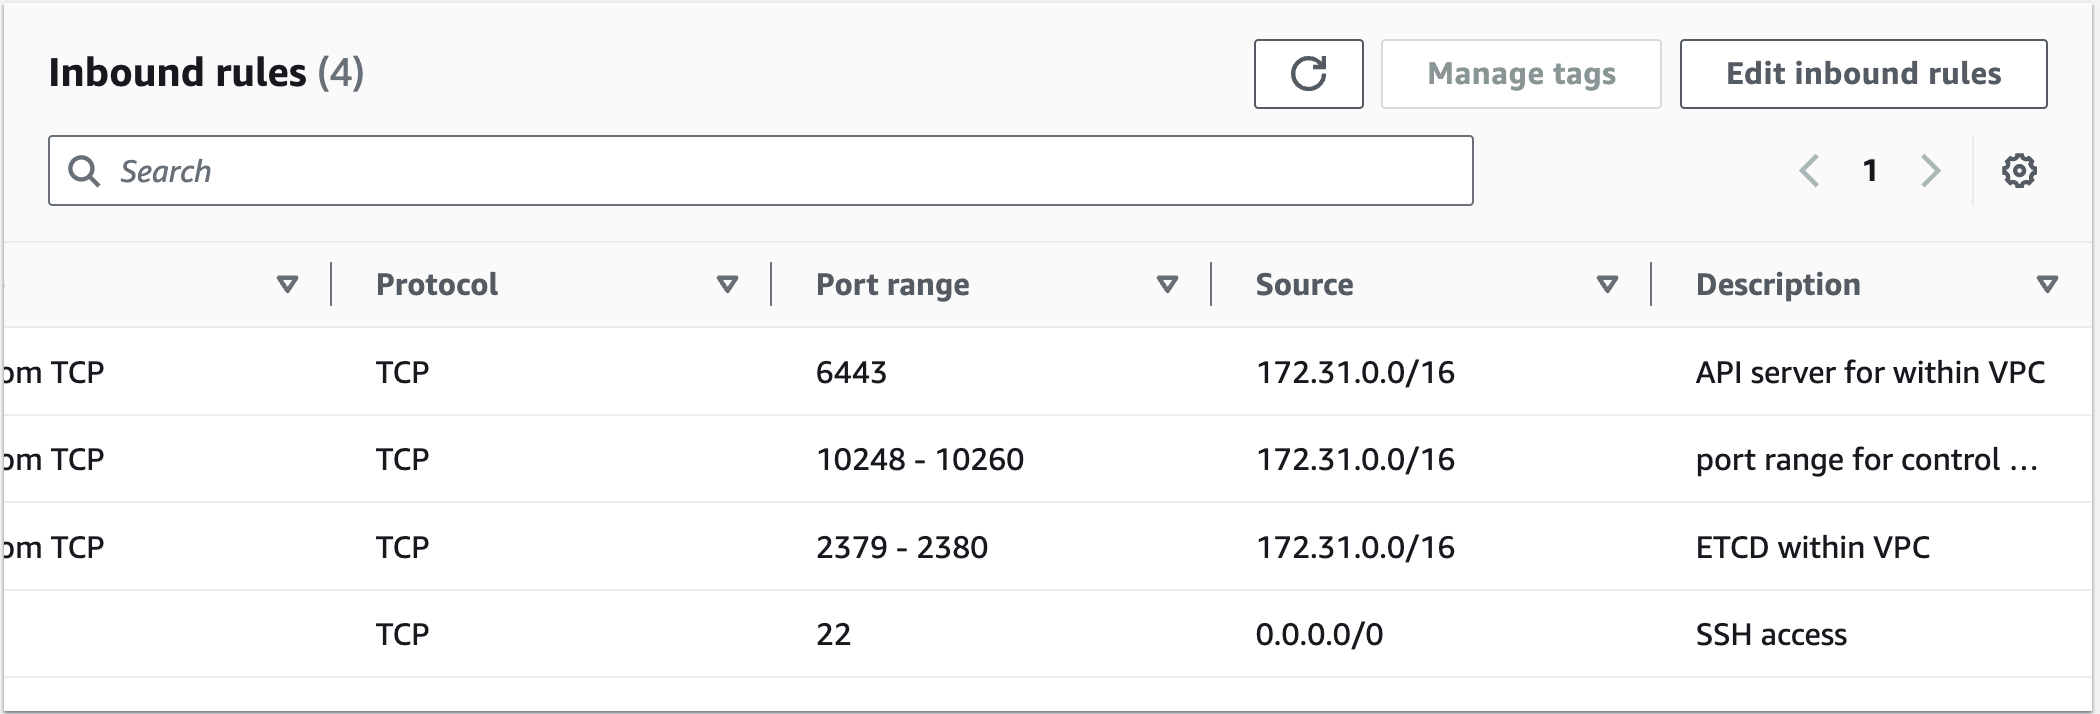
Setup Process
On All Nodes (Master and Workers)
SSH into the server
Disable Swap using the commands
 swapoff -a
 sudo sed -i '/ swap / s/^\(.*\)$/#\1/g' /etc/fstab
Forwarding IPv4 and letting iptables see bridged traffic
 cat <<EOF | sudo tee /etc/modules-load.d/k8s.conf
 overlay
 br_netfilter
 EOF

 sudo modprobe overlay
 sudo modprobe br_netfilter

 # sysctl params required by setup, params persist across reboots
 cat <<EOF | sudo tee /etc/sysctl.d/k8s.conf
 net.bridge.bridge-nf-call-iptables  = 1
 net.bridge.bridge-nf-call-ip6tables = 1
 net.ipv4.ip_forward                 = 1
 EOF

 # Apply sysctl params without reboot
 sudo sysctl --system

 # Verify that the br_netfilter, overlay modules are loaded by running the following commands:
 lsmod | grep br_netfilter
 lsmod | grep overlay

 # Verify that the net.bridge.bridge-nf-call-iptables, net.bridge.bridge-nf-call-ip6tables, and net.ipv4.ip_forward system variables are set to 1 in your sysctl config by running the following command:
 sysctl net.bridge.bridge-nf-call-iptables net.bridge.bridge-nf-call-ip6tables net.ipv4.ip_forward
Make sure to verify
net.bridge.bridge-nf-call-iptables,net.bridge.bridge-nf-call-ip6tables,net.ipv4.ip_forwardare set to 1.Install container runtime
 curl -LO https://github.com/containerd/containerd/releases/download/v1.7.14/containerd-1.7.14-linux-amd64.tar.gz
 sudo tar Cxzvf /usr/local containerd-1.7.14-linux-amd64.tar.gz
 curl -LO https://raw.githubusercontent.com/containerd/containerd/main/containerd.service
 sudo mkdir -p /usr/local/lib/systemd/system/
 sudo mv containerd.service /usr/local/lib/systemd/system/
 sudo mkdir -p /etc/containerd
 containerd config default | sudo tee /etc/containerd/config.toml
 sudo sed -i 's/SystemdCgroup \= false/SystemdCgroup \= true/g' /etc/containerd/config.toml
 sudo systemctl daemon-reload
 sudo systemctl enable --now containerd

 # Check that containerd service is up and running
 systemctl status containerd
Once the containerd service is running on the system, then go ahead and install runc.
Install runc
 curl -LO https://github.com/opencontainers/runc/releases/download/v1.1.12/runc.amd64
 sudo install -m 755 runc.amd64 /usr/local/sbin/runc
install cni plugin
 curl -LO https://github.com/containernetworking/plugins/releases/download/v1.5.0/cni-plugins-linux-amd64-v1.5.0.tgz
 sudo mkdir -p /opt/cni/bin
 sudo tar Cxzvf /opt/cni/bin cni-plugins-linux-amd64-v1.5.0.tgz
Install kubeadm, kubelet and kubectl
 sudo apt-get update
 sudo apt-get install -y apt-transport-https ca-certificates curl gpg

 curl -fsSL https://pkgs.k8s.io/core:/stable:/v1.29/deb/Release.key | sudo gpg --dearmor -o /etc/apt/keyrings/kubernetes-apt-keyring.gpg
 echo 'deb [signed-by=/etc/apt/keyrings/kubernetes-apt-keyring.gpg] https://pkgs.k8s.io/core:/stable:/v1.29/deb/ /' | sudo tee /etc/apt/sources.list.d/kubernetes.list

 sudo apt-get update
 sudo apt-get install -y kubelet=1.29.6-1.1 kubeadm=1.29.6-1.1 kubectl=1.29.6-1.1 --allow-downgrades --allow-change-held-packages
 sudo apt-mark hold kubelet kubeadm kubectl

 kubeadm version
 kubelet --version
 kubectl version --client
Configure
crictlto work withcontainerdsudo crictl config runtime-endpoint unix:///var/run/containerd/containerd.sock
To solve this error, and to access containers with
crictlclient without using sudo privileges, make ubuntu as the owner of the directory recursively and modify permissions set to 755 against the folder.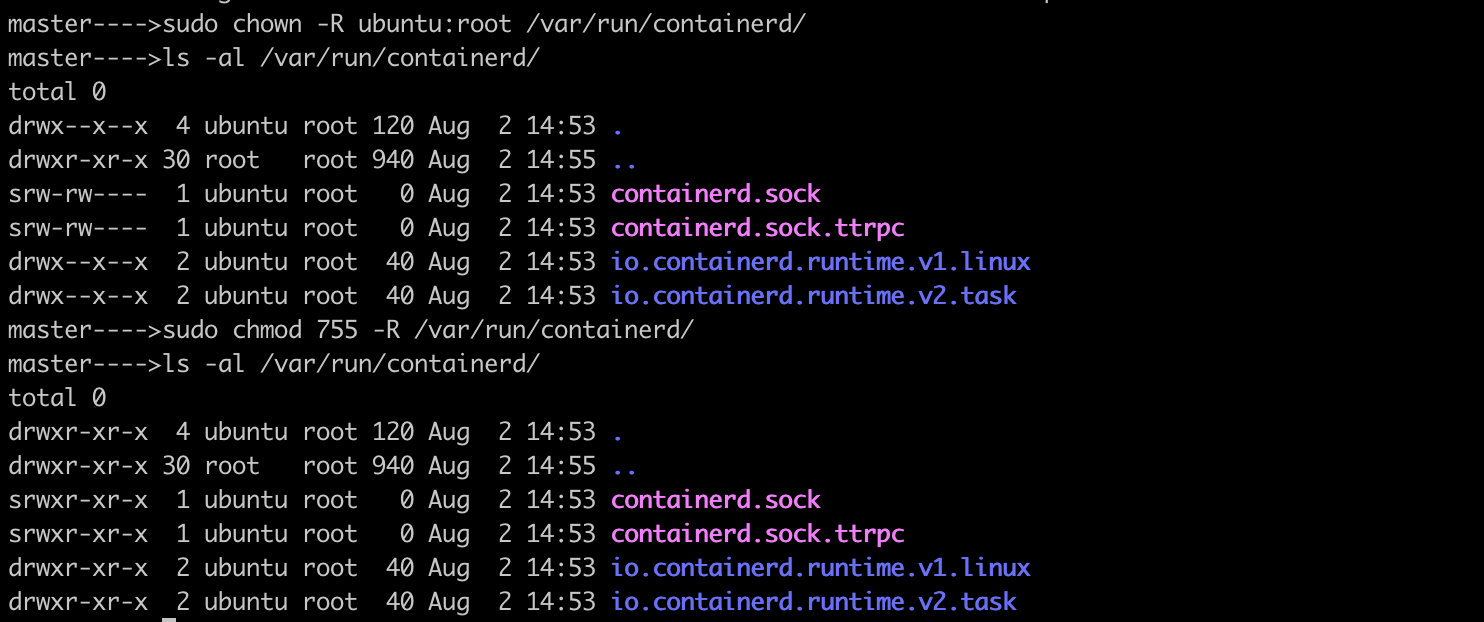
Now,
crictlclient has the ability to list containers without using sudo,
On Master Node Only
Initialize control plane
sudo kubeadm init --pod-network-cidr=192.168.0.0/16 --apiserver-advertise-address=172.31.89.68 --node-name master--pod-network-cidr(192.168.0.0/16) we define the IP address range for the pod network.
--apiserver-advertise-address(172.31.89.68) is the IP address(Private IP of master node) that other nodes in the cluster will use to communicate with the Kubernetes API server.The above command will initialize our master node as a control plane and install the necessary control plane components for a Kubernetes cluster.
Also, This command will create a kubeconfig file at
/etc/kubernetes/admin.conf, which we can use to manage the cluster usingkubectl.You can see the output as below once control-plane has initialized successfully,
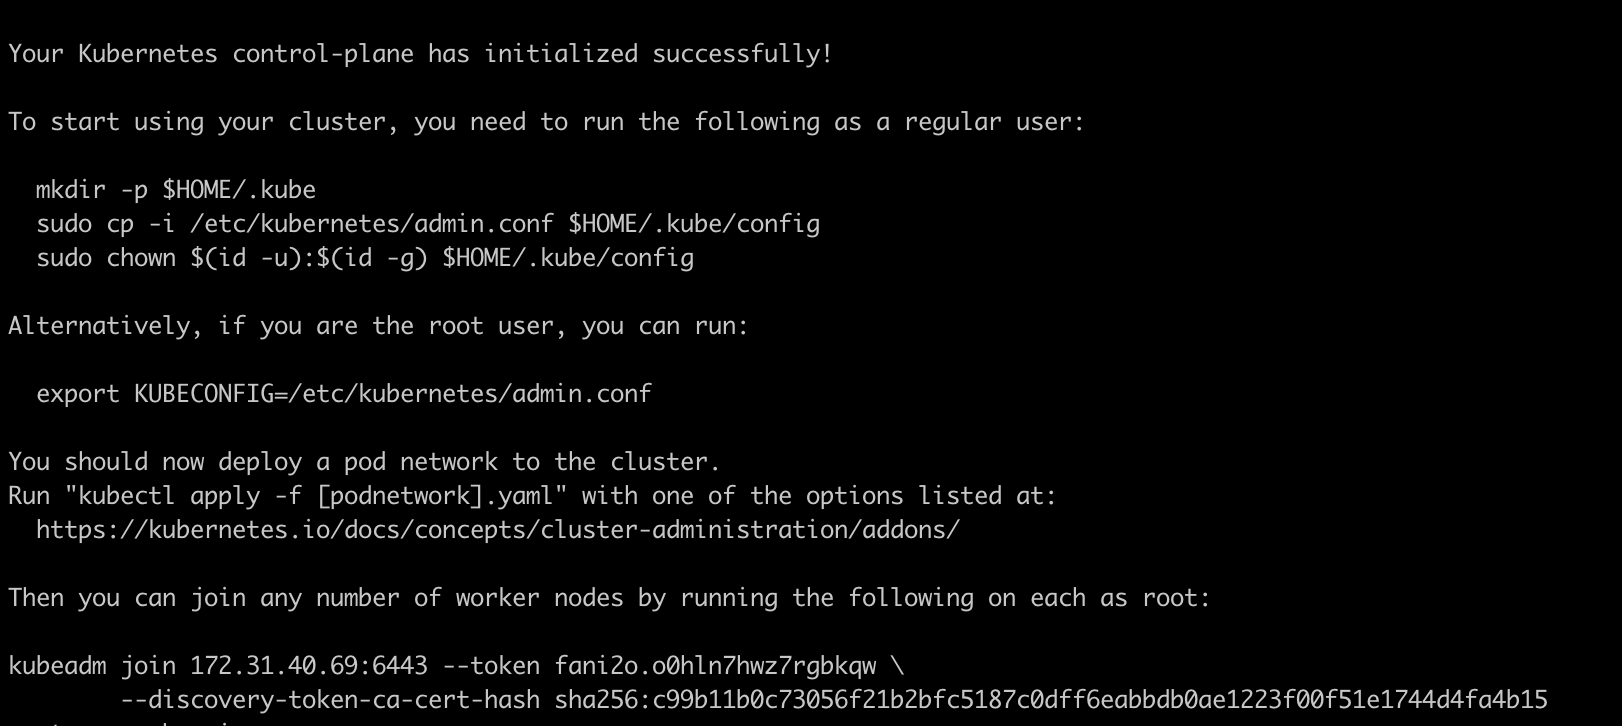
Next, copy the kubeconfig file created at
/etc/kubernetes/admin.confto the default path~/.kube/config. This is the default kubeconfig file location that Kubernetes will use for authenticating with the API server.mkdir -p $HOME/.kube sudo cp -i /etc/kubernetes/admin.conf $HOME/.kube/config sudo chown $(id -u):$(id -g) $HOME/.kube/configInstall calico
kubectl apply -f https://docs.projectcalico.org/manifests/calico.yaml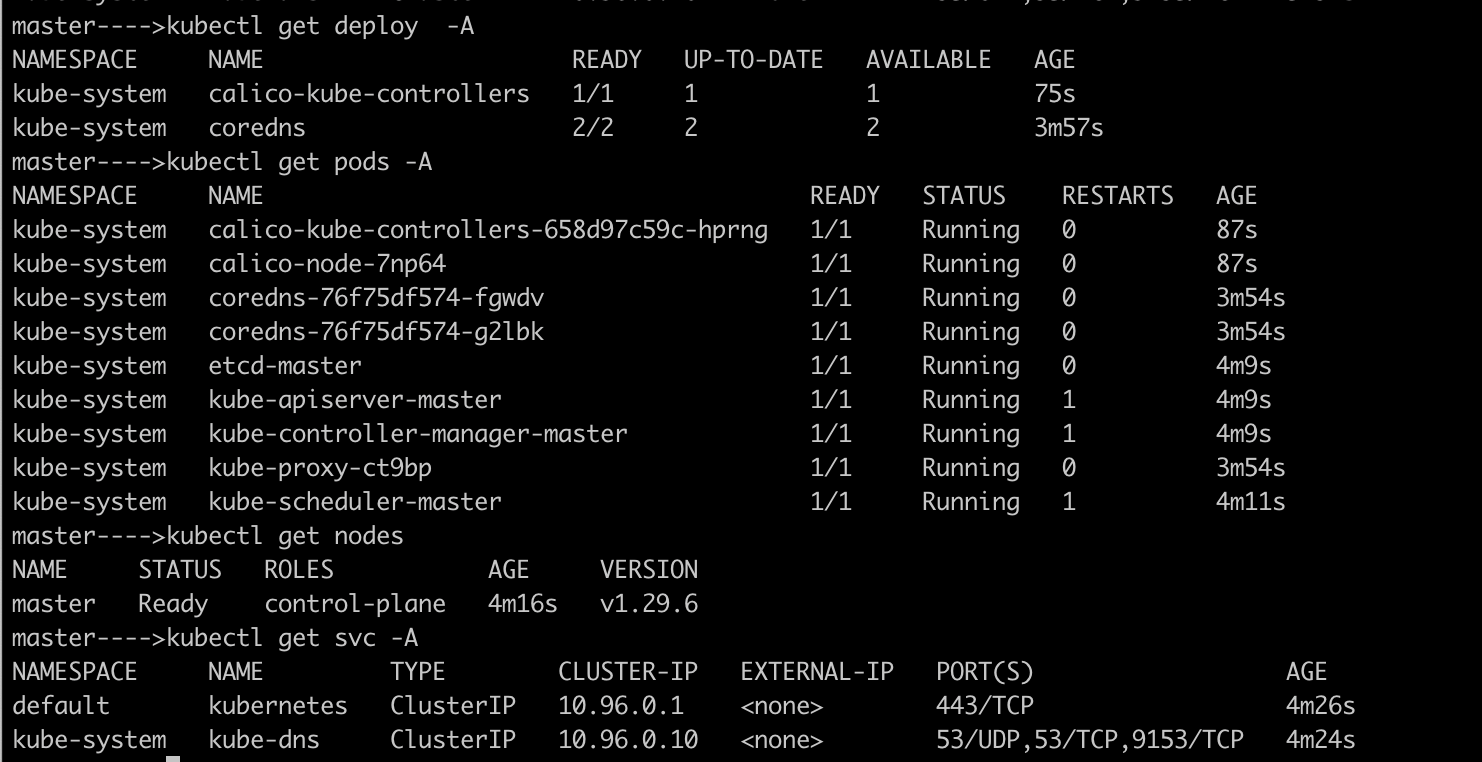
On Worker Nodes
Join the cluster Run the command generated by the master node in step 9. It should look similar to:
sudo kubeadm join 172.31.71.210:6443 --token xxxxx --discovery-token-ca-cert-hash sha256:xxxIf you forgot to copy the command, you can generate a new join command on the master node:
kubeadm token create --print-join-command
Make sure to run the join command on both worker nodes.
To manage the Kubernetes cluster from both worker nodes, you need to copy the kubeconfig file content from the master node to the
~/.kube/configdirectory on each worker nodemkdir ~/.kube #Create this directory on worker node before copy kubeconfig file content vi configOnce, copied the kubeconfig(
/etc/kubernetes/admin.conf) file from master to each worker nodes under ~/.kube/config, we can verify kubectl get nodes on the worker nodes as well.
Validation
On the master node, run:
you should be able to run kubectl get nodes on the master node, and it should return all the 3 nodes in ready status.
kubectl get nodes

On the worker nodes, run:
you should be able to run kubectl get nodes on the worker nodes, and it should return all the 3 nodes in ready status.


Also, make sure all the pods are up and running by using the command as below: kubectl get pods -A
💁 Common Issues:
If your Calico-node pods are not healthy, please perform the below steps:
Disable source/destination checks for master and worker nodes too.
Configure Security group rules, Bidirectional, all hosts,TCP 179(Attach it to master and worker nodes)
Update the
daemonsetusing the command:kubectl set env daemonset/calico-node -n calico-system IP_AUTODETECTION_METHOD=interface=ens5Where ens5 is your default interface, you can confirm by runningifconfigon all the machinesIP_AUTODETECTION_METHOD is set to first-found to let Calico automatically select the appropriate interface on each node.
Wait for some time or delete the calico-node pods and it should be up and running.
If you are still facing the issue, you can follow the below workaround
Install Calico CNI addon using manifest instead of Operator and CR, and all calico pods will be up and running
kubectl apply -f https://docs.projectcalico.org/manifests/calico.yaml
NOTE: This is not the latest version of calico though(v.3.25). This deploys CNI in kube-system NS.
#Kubernetes #Kubeadm #Multi-node-Cluster #ClusterSetup #40DaysofKubernetes #CKASeries
Subscribe to my newsletter
Read articles from Gopi Vivek Manne directly inside your inbox. Subscribe to the newsletter, and don't miss out.
Written by

Gopi Vivek Manne
Gopi Vivek Manne
I'm Gopi Vivek Manne, a passionate DevOps Cloud Engineer with a strong focus on AWS cloud migrations. I have expertise in a range of technologies, including AWS, Linux, Jenkins, Bitbucket, GitHub Actions, Terraform, Docker, Kubernetes, Ansible, SonarQube, JUnit, AppScan, Prometheus, Grafana, Zabbix, and container orchestration. I'm constantly learning and exploring new ways to optimize and automate workflows, and I enjoy sharing my experiences and knowledge with others in the tech community. Follow me for insights, tips, and best practices on all things DevOps and cloud engineering!