What you need to know about READMES
 Nkwor Jane
I recently joined a 10-day Frontend challenge organized by CodeVixens. The challenge involved tasks ranging from beginner to intermediate levels, and I had to submit my solutions daily. I completed the challenge but discovered my repository lacked documentation during the first live mentor review. After the challenge, I spent time learning how to format a README file properly and gained some valuable insights.
“No README means developers will need to delve into your code in order to understand it.”
Hackergrrl, from Art of Readme
Introduction
A README file provides essential information about a project. This type of information typically includes the project’s name, description, instructions on how to install and run the project, some key features, and any other relevant information about the project. As developers, it is essential to have a README file as it answers questions the audience might have about the usage of the project. The audience of any README file could be the author, contributor, recruiter, or an end-user.
The README file is located in the root directory of the project folder. The file’s name must be README.md. The file extension is “.md”. It is typically written in a markup language called Markdown.
Why is a README file important?
A README file is essential for several reasons, some of which are:
A README file is typically the first file most of our audience reads.
It saves time as explaining the codebase to every intending contributor or end-user won’t be necessary, especially when working with a team.
As developers, proper documentation will paint a picture for the audience without the need to install and run the code. For instance, recruiters may not have time to install and run the code during recruitment.
A well-written README file will help our future self, as this will help us continue from where we left off, even after an extended period, without questioning past decisions.
In cases where the project may be open-source, having a properly formatted README will allow intending collaborators to get to work without asking for information on everything.
How to add a README?
These are some ways to add a README file to the repository.
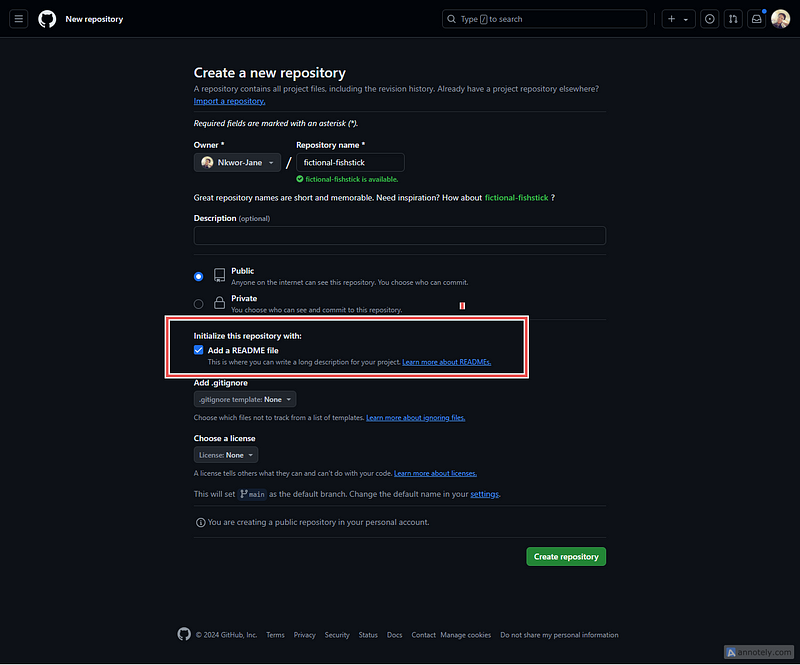
Firstly, we can add it when we create a new repository on GitHub or any other version control developer platform.
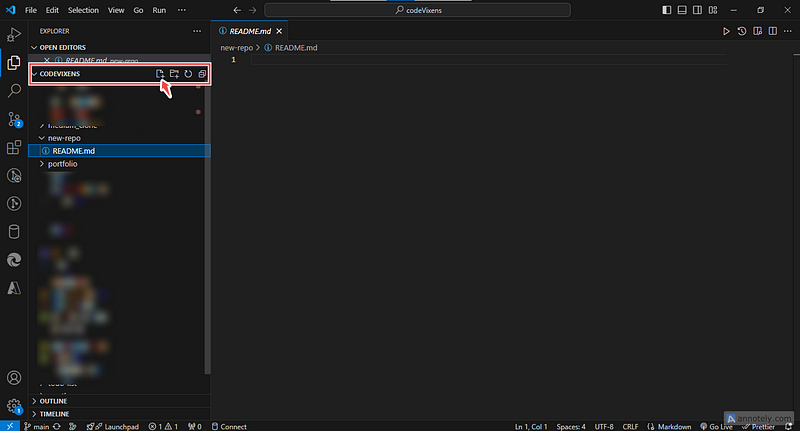
Another way to add a README file to the project is by creating a new file in the code editor.
What's in a README?
These are some of the essentials that should be in a README file
Project Title/Name
The first line of the README must be the title or name of the project. It must be self-explanatory and capture the meaning of the project.
Table of contents
A list of all sub-headings in the README file is optional but can be added for quick and easy file navigation, especially in cases where the README contains much information.
Project Overview / Description
This section should summarize what the project entails. This tells the audience what the project does, the technologies used, and even lessons learned when executing the project.
Installation
This section is a step-by-step process of properly installing the project to run on your local machine. If the project is installed using package managers like pip, npm, brew, etc., it should be appropriately stated with code blocks.
Usage
This section provides clear instructions on using and running the project, with details of expected behavior or output when the project is in use. This section allows the author(s) to go into detail about features with examples and code blocks of the project. In cases where the project has many features, a link to another documentation page can be added here.
Screenshots/Visuals
It is a good idea to add images or video recordings of the project as they show the audience the visual representation of the project.
Live Demo
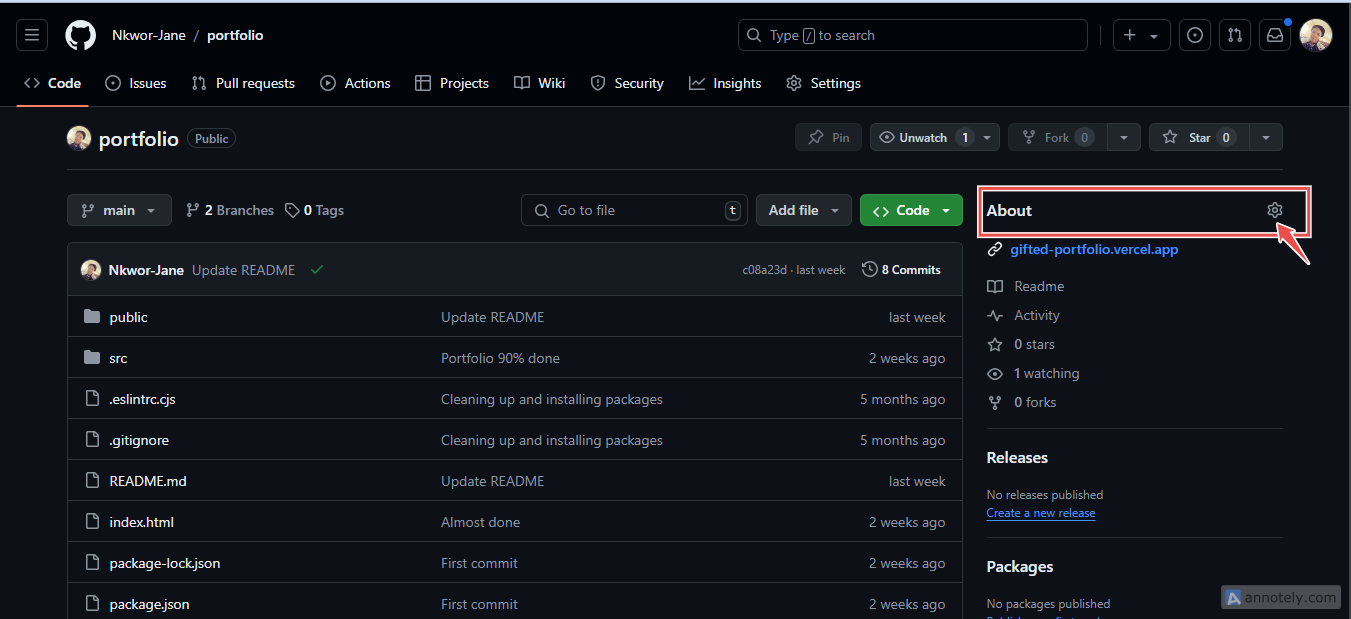
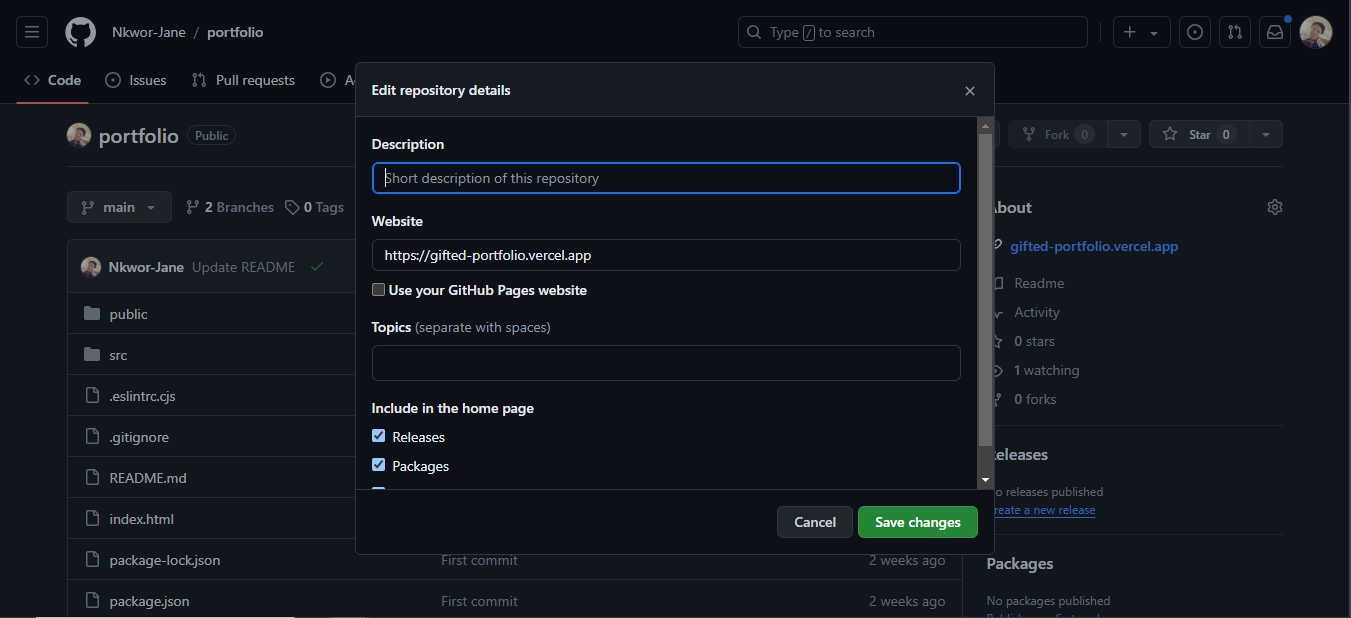
A link(URL) to the project hosted on cloud development platforms like Netlify, Vercel, GitHub pages, and other similar platforms should also be added. Another way to add a link is on the About section of the GitHub repository.
When the icon is clicked, it opens up a modal where the link and other information can be added, then save changes.
Contributing
This section is helpful in cases where the repository owner wants contributors for their project. It lets the audience know the requirements for contribution and how to get started. It should be concise, stating explicitly the dos and don’ts for contribution. These steps should be definitive as they can also help your future self. If this section is too long, a link can be provided to another “.md” file, typically named “contributing.md”, with more details about the contribution.
License
This tells the audience how the project is licensed and is optional. It helps developers know what they can and cannot do with the project. Some examples of licenses are MIT and GPL licenses, which allow users to modify and use the code commercially. There are several other licenses, choosealicense highlights other options.
Author(s) and Acknowledgements
This is the section where appreciation for those who contributed to the project regarding funding, support, or resources are acknowledged. Pictures or names of the author(s) and contributors to the project can be listed in this section.
Badges
These are optional but added to let other developers know about the repository. They are small images that convey metadata for the project and can include simple stats like the number of forks, contributors, stars, issues, versions, licenses, etc. Check out Shields.io to learn how to add and use badges in your following repository.
Tests
This section provides short code examples of tests in the project and how to run them. This boosts the confidence of the audience and intending contributors.
Readme Editors
There are various ways in which we can write and edit README files.
We can write and preview our README file on GitHub.
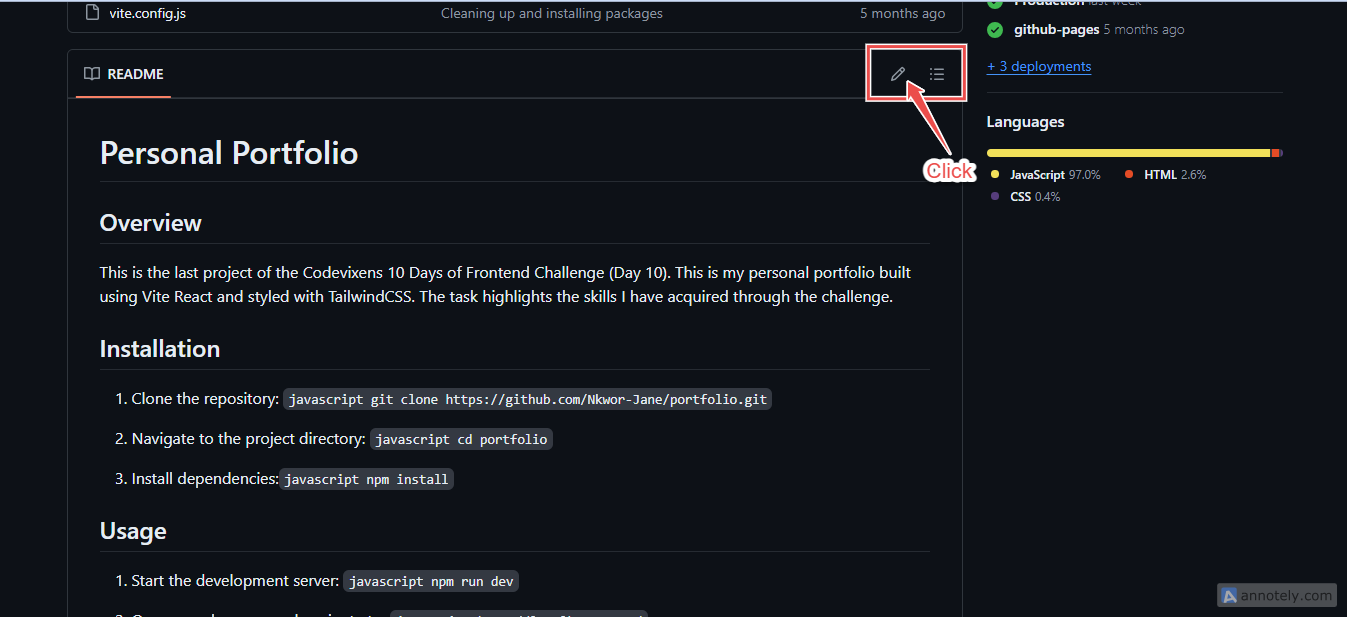
We can also write and preview the README file using our code editors. I recently discovered two extensions that can help if you use VS Code.
They are Markdown all in one and markdownlint.
We can also use online editors and templates to write and properly format our README. These tools do most of the heavy lifting as they already come with some set styleguides; we need to edit and add our project’s information. Some prominent ones are:
Conclusion
It is important to note that a README file can be short or long, depending on the project. An open-source project may have a longer README than a personal project as the former captures more information for intending contributors, changelog, licenses, and the like. The latter may not. It is, therefore, important to write with the audience in mind, putting the essential details of the project in a README.
“The lack of a README is a powerful red flag, but even a lengthy README is not indicative of there being high quality. The ideal README is as short as it can be without being any shorter.”
Hackergrrl, from Art of Readme
Subscribe to my newsletter
Read articles from Nkwor Jane directly inside your inbox. Subscribe to the newsletter, and don't miss out.
Written by

Nkwor Jane
Nkwor Jane
Software Engineer