Deploying the 2048 Game on AWS EKS Cluster Using Helm Chart
 Saurabh Adhau
Table of contents
Introduction
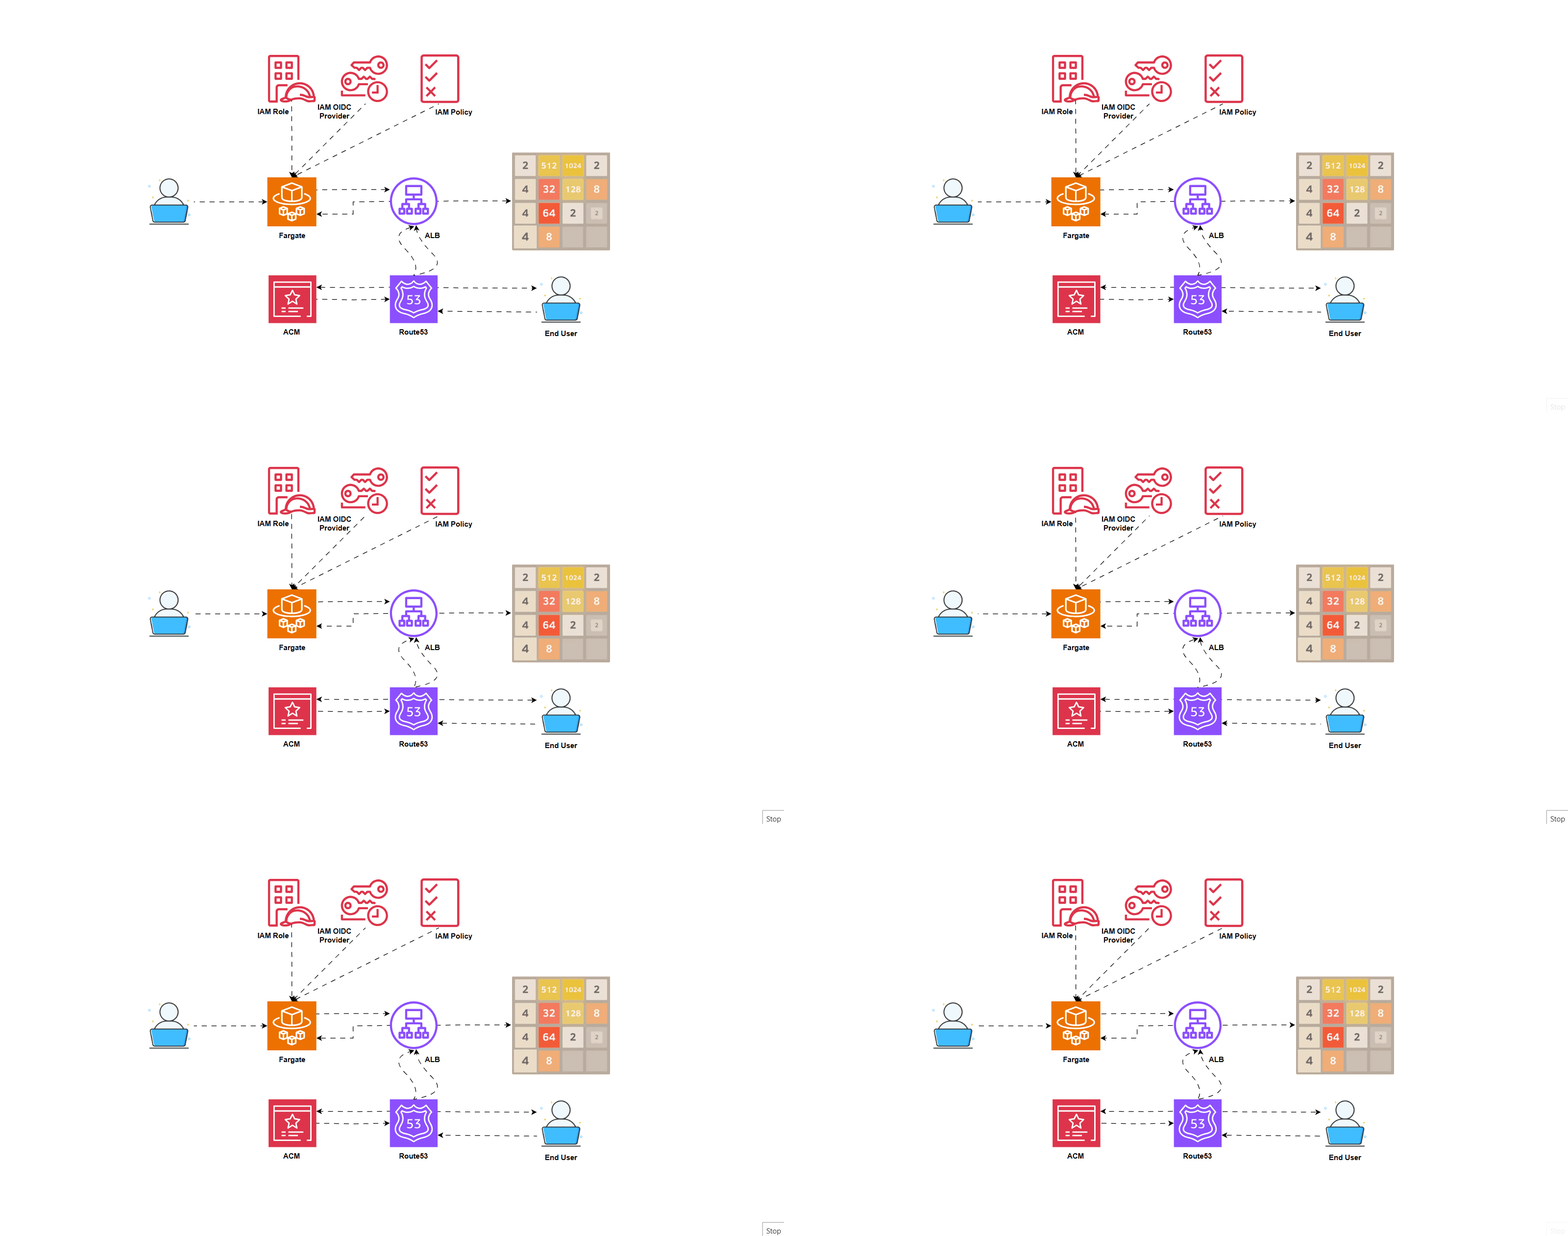
In this guide, we'll walk through the steps to deploy a sample application, the 2048 Game, on an AWS EKS (Elastic Kubernetes Service) Cluster using Helm Chart.
What is Kubernetes Ingress?
Kubernetes Ingress is an API object that manages external access to services within a Kubernetes cluster, typically via HTTPS/HTTP. It provides routing rules that control how traffic reaches various services in the cluster.
Prerequisites
Before we start, ensure you have an Ubuntu machine ready. If you already have a Ubuntu instance, you won't need to launch a new EC2 instance. Instead, you can directly proceed with creating the EKS cluster and setting up the required tools.
Step 1: Install AWS CLI
You need to install AWS CLI to interact with AWS services. Use the following commands on your Ubuntu instance:
curl "https://awscli.amazonaws.com/awscli-exe-linux-x86_64.zip" -o "awscliv2.zip"
sudo apt install unzip
unzip awscliv2.zip
sudo ./aws/install
aws --version
Step 2: Configure AWS CLI
Set up your AWS CLI with your credentials:
aws configure
Enter your AWS Access Key, Secret Access Key, Region, and Output format.
Step 3: Install and Setup kubectl
kubectl is used to interact with Kubernetes clusters. Install it using:
curl -LO "https://dl.k8s.io/release/$(curl -L -s https://dl.k8s.io/release/stable.txt)/bin/linux/amd64/kubectl"
chmod +x ./kubectl
sudo mv ./kubectl /usr/local/bin/kubectl
kubectl version --client
Step 4: Install and Setup eksctl
eksctl is a command-line tool for creating and managing EKS clusters. Install it using:
curl --silent --location "https://github.com/weaveworks/eksctl/releases/latest/download/eksctl_$(uname -s)_amd64.tar.gz" | tar xz -C /tmp && sudo mv /tmp/eksctl /usr/local/bin
eksctl version
Step 5: Install Helm
Helm is a package manager for Kubernetes. Install it using:
curl -fsSL -o get_helm.sh https://raw.githubusercontent.com/helm/helm/main/scripts/get-helm-3
chmod 700 get_helm.sh
./get_helm.sh
helm version
Step 6: Create an EKS Cluster
Now, create an EKS cluster using eksctl:
eksctl create cluster --name demo-cluster --region ap-northeast-1 --fargate
This may take about 20 minutes. Then update the kubeconfig to manage the cluster:
aws eks --region ap-northeast-1 update-kubeconfig --name demo-cluster
Step 7: Setup Fargate
- Run this accordingly:
AWS_ACCOUNT_ID=YOUR_ACCOUNT_ID_HERE
AWS_REGION=YOUR_AWS_REGION_HERE
EKS_CLUSTER_NAME=YOUR_EKS_CLUSTER_NAME_HERE
- Create Fargate profile
eksctl create fargateprofile \
    --cluster $EKS_CLUSTER_NAME \
    --region $AWS_REGION \
    --name alb-sample-app \
    --namespace game-2048
Step 8: Deploy an Application
Run this:
kubectl apply -f https://raw.githubusercontent.com/kubernetes-sigs/aws-load-balancer-controller/v2.5.4/docs/examples/2048/2048_full.yaml
Using the above command namespace, deployment and ingress resources will be created.
Step 9: Create an IAM OIDC Provider
This is necessary for associating IAM roles with Kubernetes service accounts:
eksctl utils associate-iam-oidc-provider --cluster $cluster_name --approve
Step 9: Download the IAM Policy for the Load Balancer
Download the necessary IAM policy:
curl -O https://raw.githubusercontent.com/kubernetes-sigs/aws-load-balancer-controller/v2.5.4/docs/install/iam_policy.json
Create the policy:
aws iam create-policy \
    --policy-name AWSLoadBalancerControllerIAMPolicy \
    --policy-document file://iam_policy.json
Step 10: Create an IAM Service Account
Link the IAM role to the EKS cluster:
eksctl create iamserviceaccount \
  --cluster=$cluster_name \
  --namespace=kube-system \
  --name=aws-load-balancer-controller-2 \
  --role-name AmazonEKSLoadBalancerControllerRole \
  --attach-policy-arn=arn:aws:iam::$AWS_ACCOUNT_ID:policy/AWSLoadBalancerControllerIAMPolicy \
  --approve \
  --override-existing-serviceaccounts

Step 12: Deploy the Helm Chart
Add the EKS charts repository and deploy the AWS Load Balancer Controller:
helm repo add eks https://aws.github.io/eks-charts
helm repo update eks
helm install aws-load-balancer-controller eks/aws-load-balancer-controller \
  -n kube-system \
  --set clusterName=$cluster_name \
  --set serviceAccount.create=false \
  --set serviceAccount.name=aws-load-balancer-controller-2 \
  --set region=$AWS_REGION \
  --set vpcId=$your_vpc_id
Step 13: Verify the Deployment
Verify the Deployment of aws-load-balancer-controller:
kubectl get deployment -n kube-system aws-load-balancer-controller
Step 14: Verify the Application
- Go to the Load Balancer Copy the DNS name and paste it into the browser, then you can see this:

But as you can see this site or endpoint is not secure, to do that we need to create the domain and attach SSL to it.
Step 15: Create a Domain using Route53 and attach SSL
Please follow these steps to create a domain in Route53 and attach a TLS certificate to it:
https://devopsvoyager.hashnode.dev/streamlining-ai-deployment-configuring-route-53-and-acm-for-your-chatgpt-clone-app#heading-setting-up-your-domain-in-route-53
Step 16: Modify the Load Balancer
- Go to the Load Balancer section in AWS, click on your LB (Load Balancer)
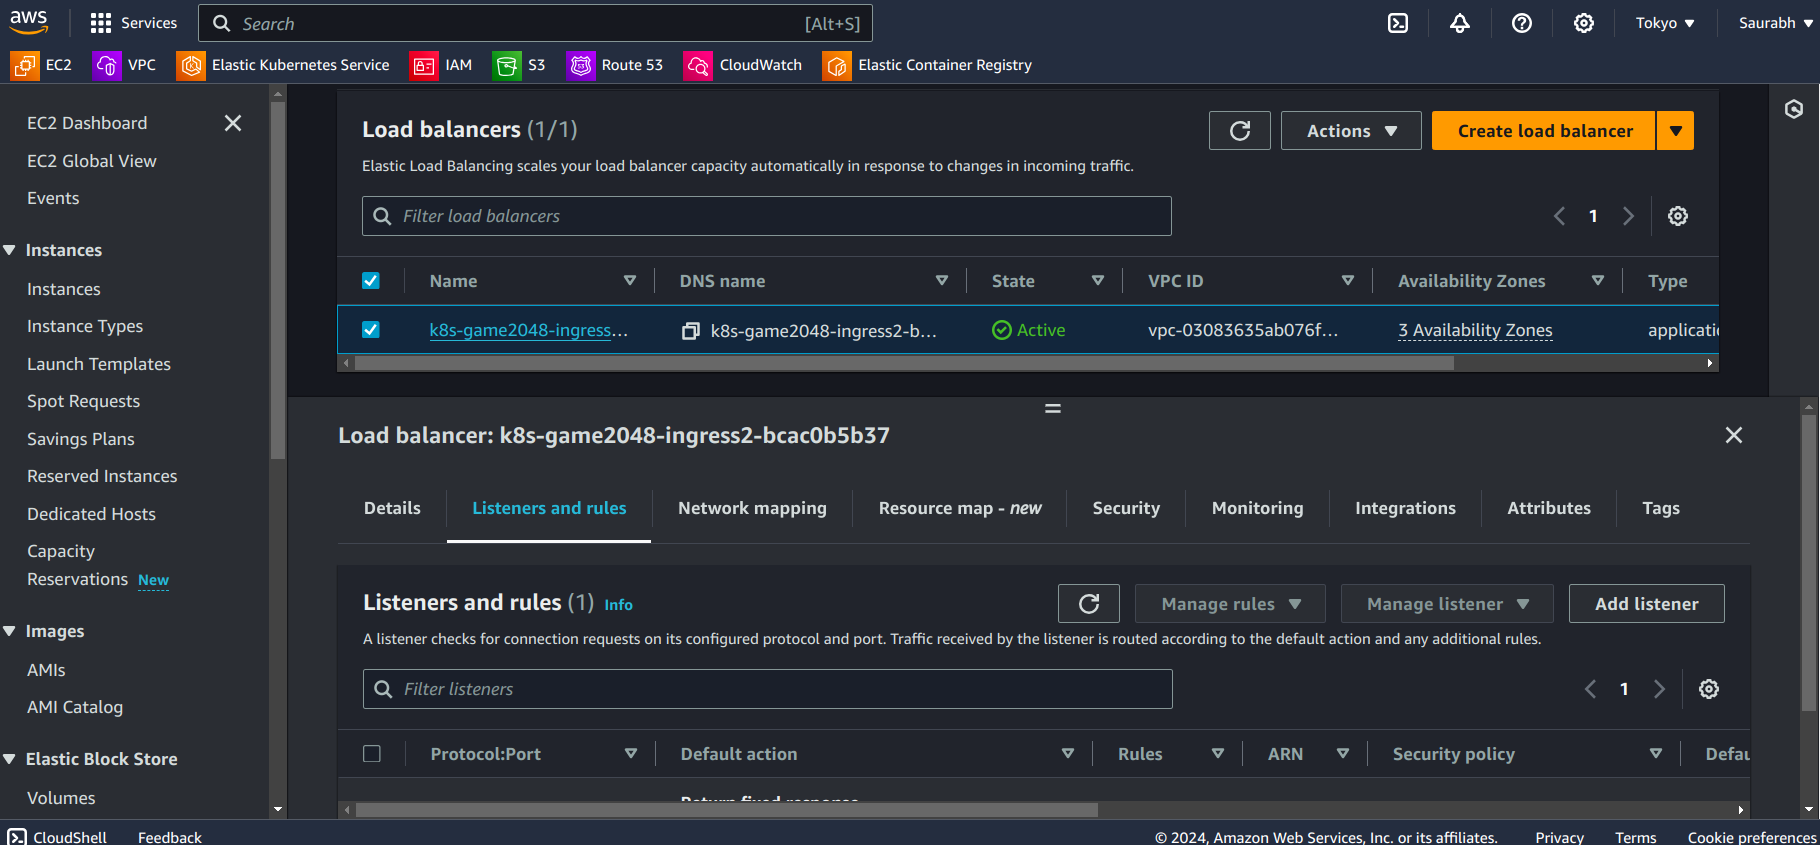
- Click on Listeners and rules
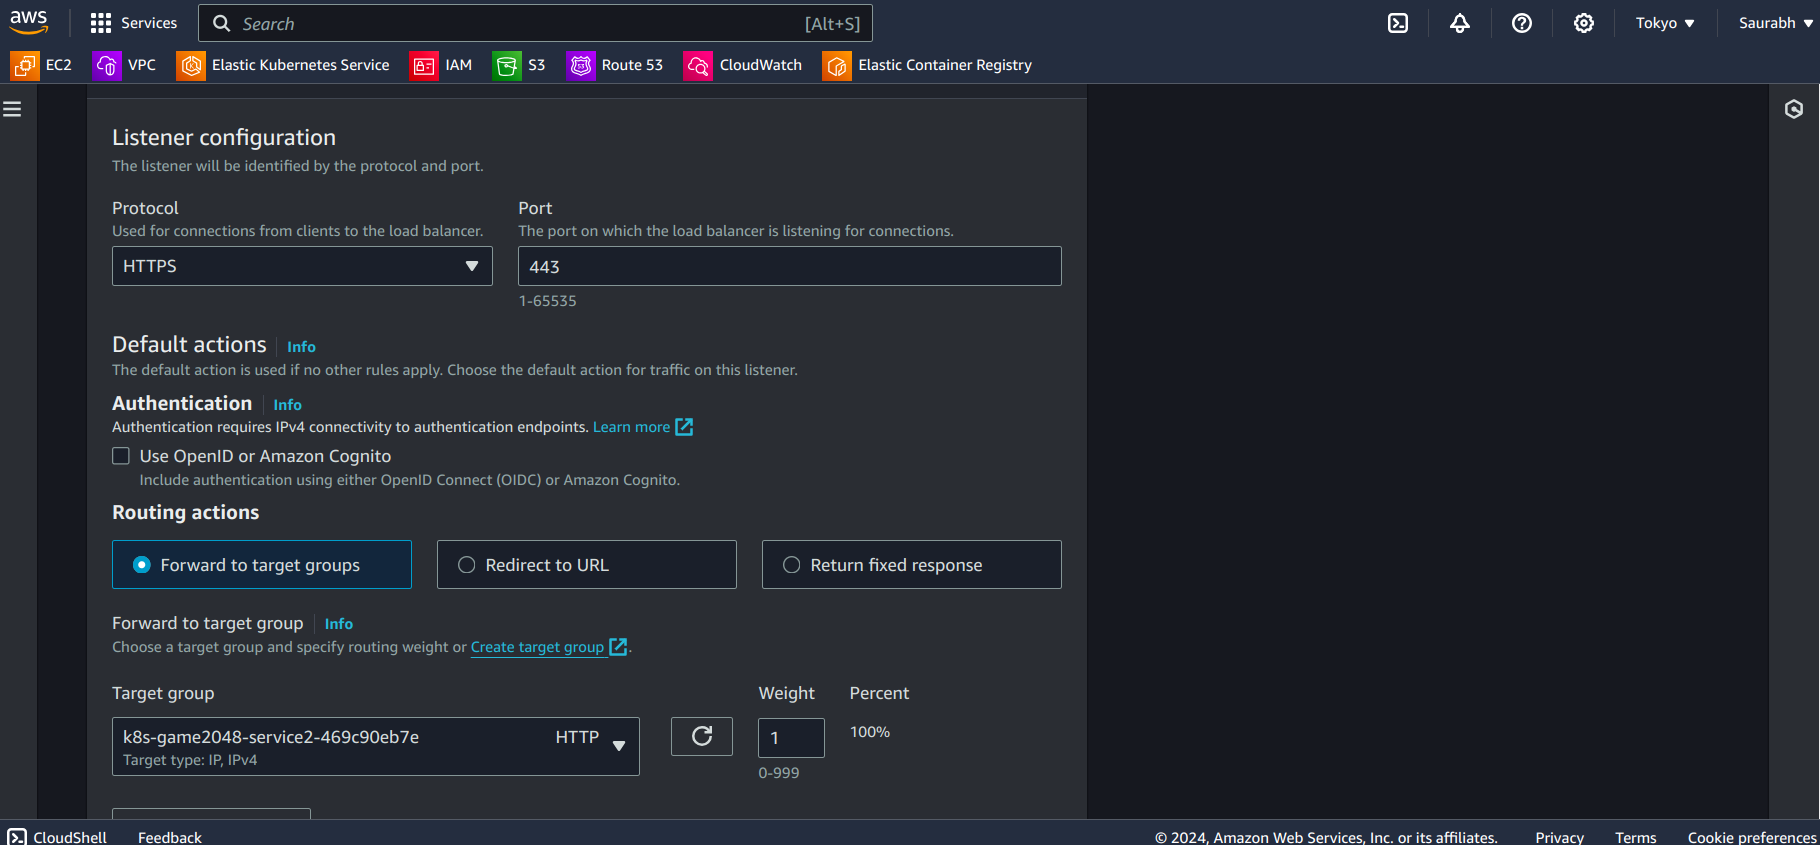
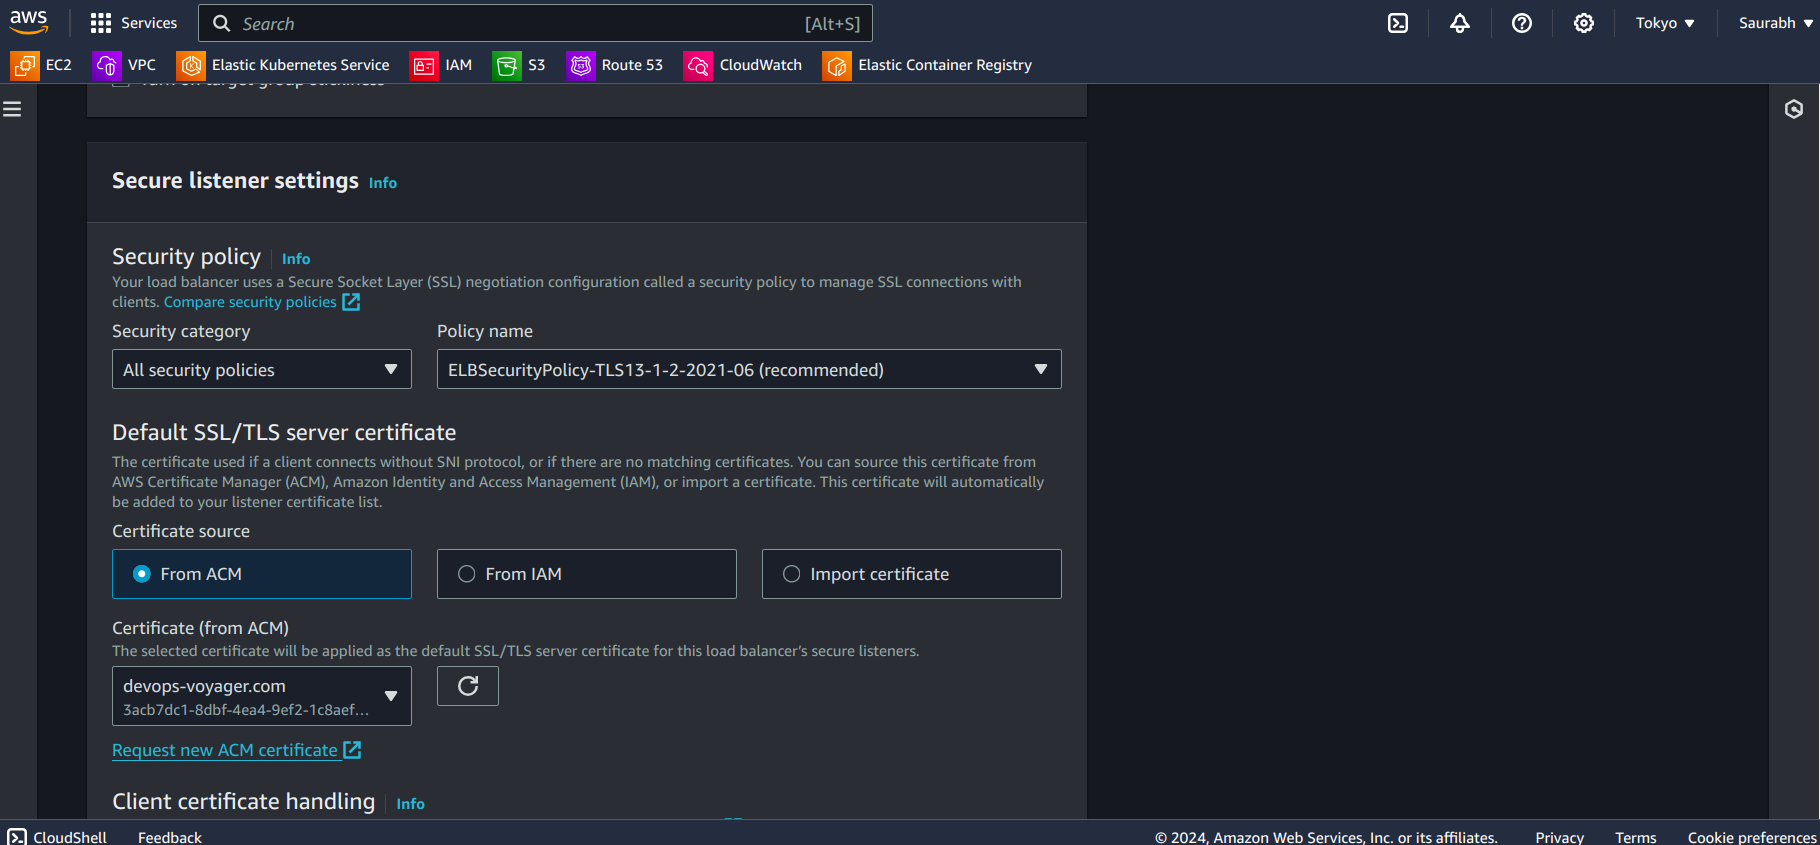
Modify it as you can see in the above image i.e. enter HTTPS select Forward to target groups, then select your target group. In Certificate source select From ACM (Hopefully you have created till now), then Select your certificate accordingly in the Certificate(from ACM) dropdown menu.
Click on Next.
Finally, you need to go to the security section
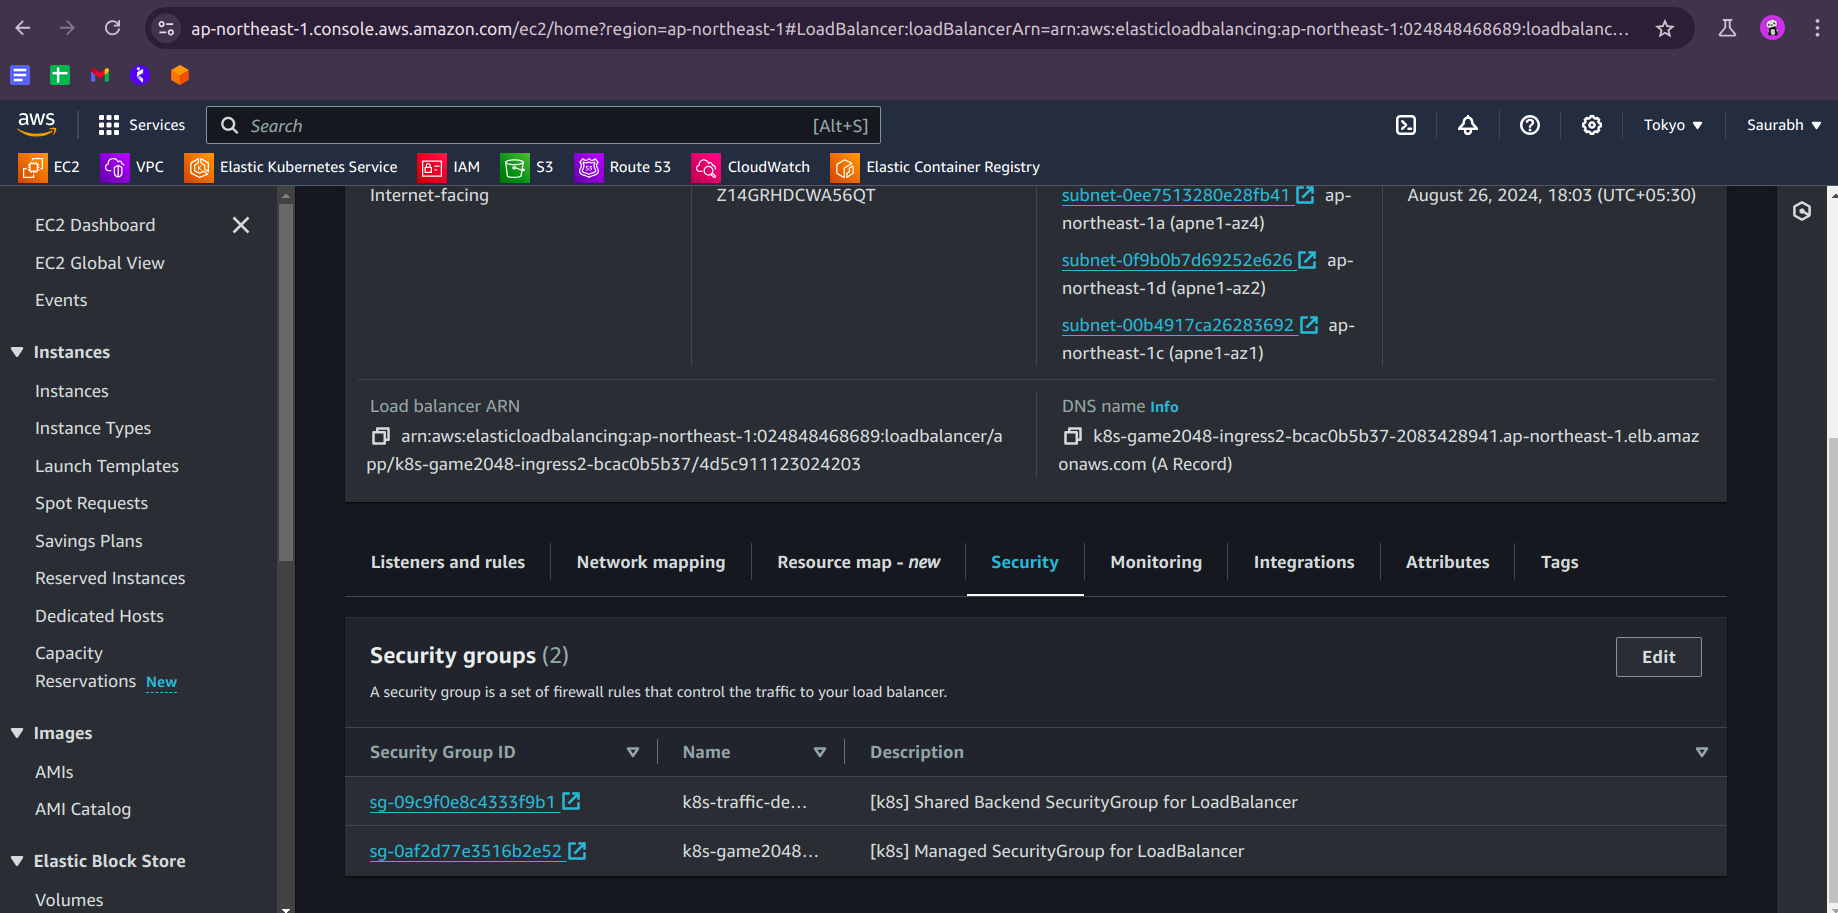
- Click on the security group that is associated with your application.
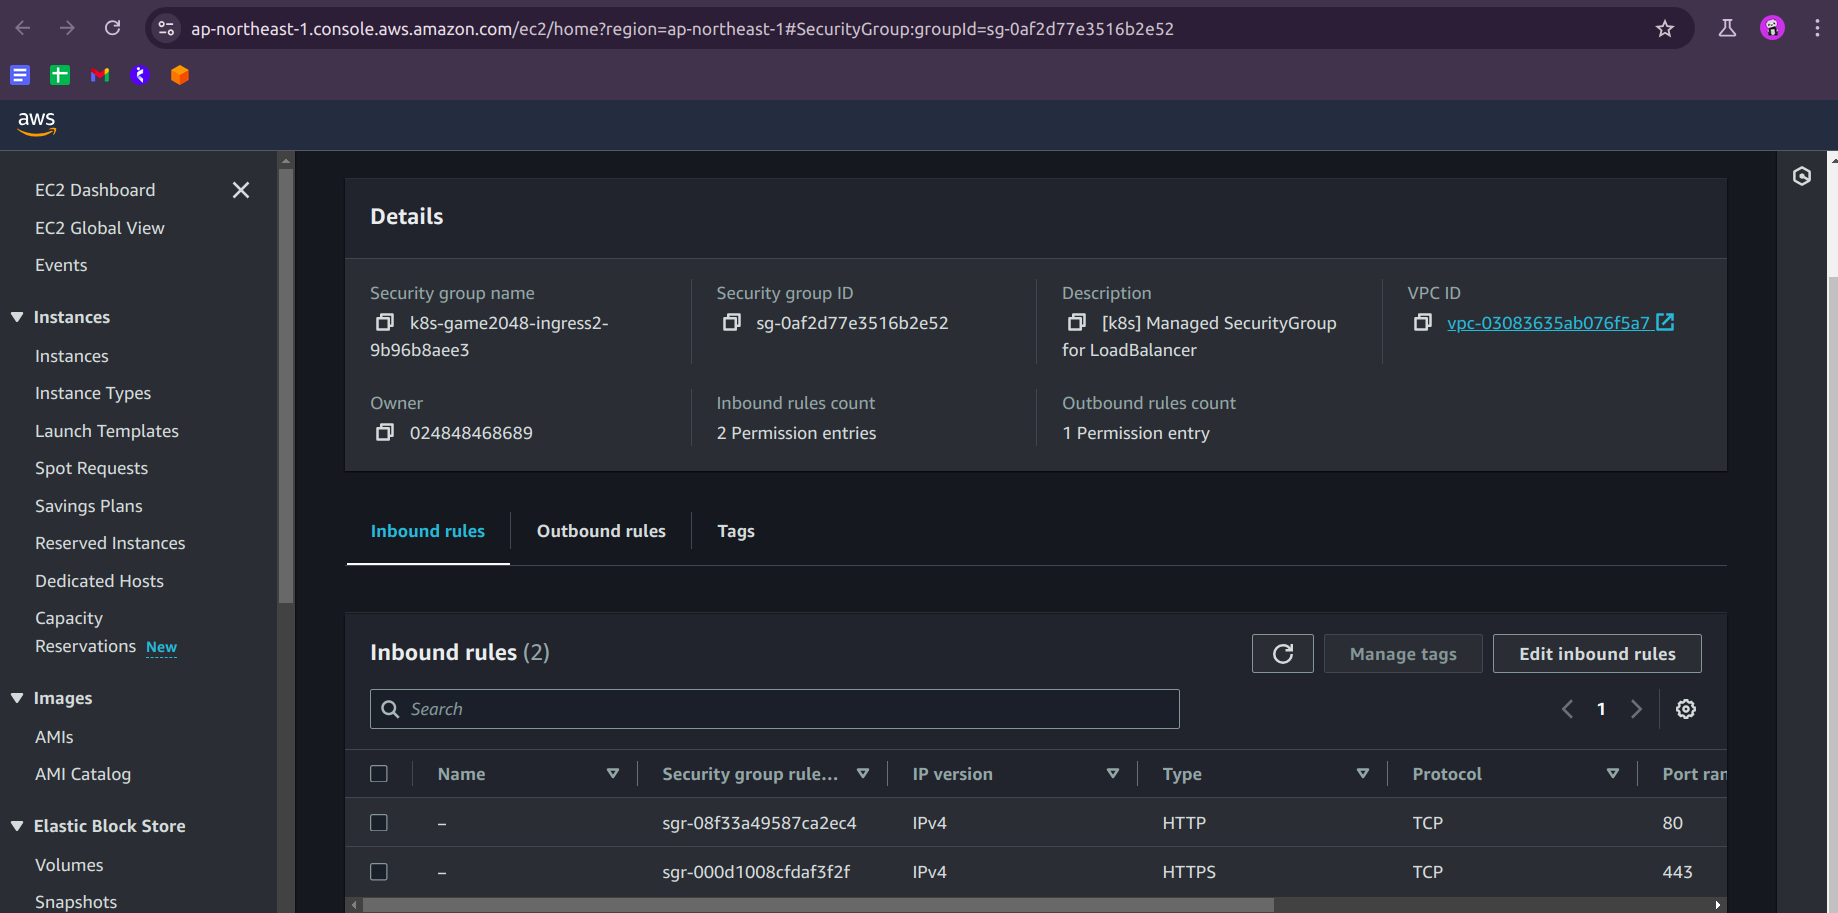
Click on Inbound Rules and then Add Rule, select HTTPS, and source will be custom then Anywhere IPV4, and Save Rules, and BOOMMM....
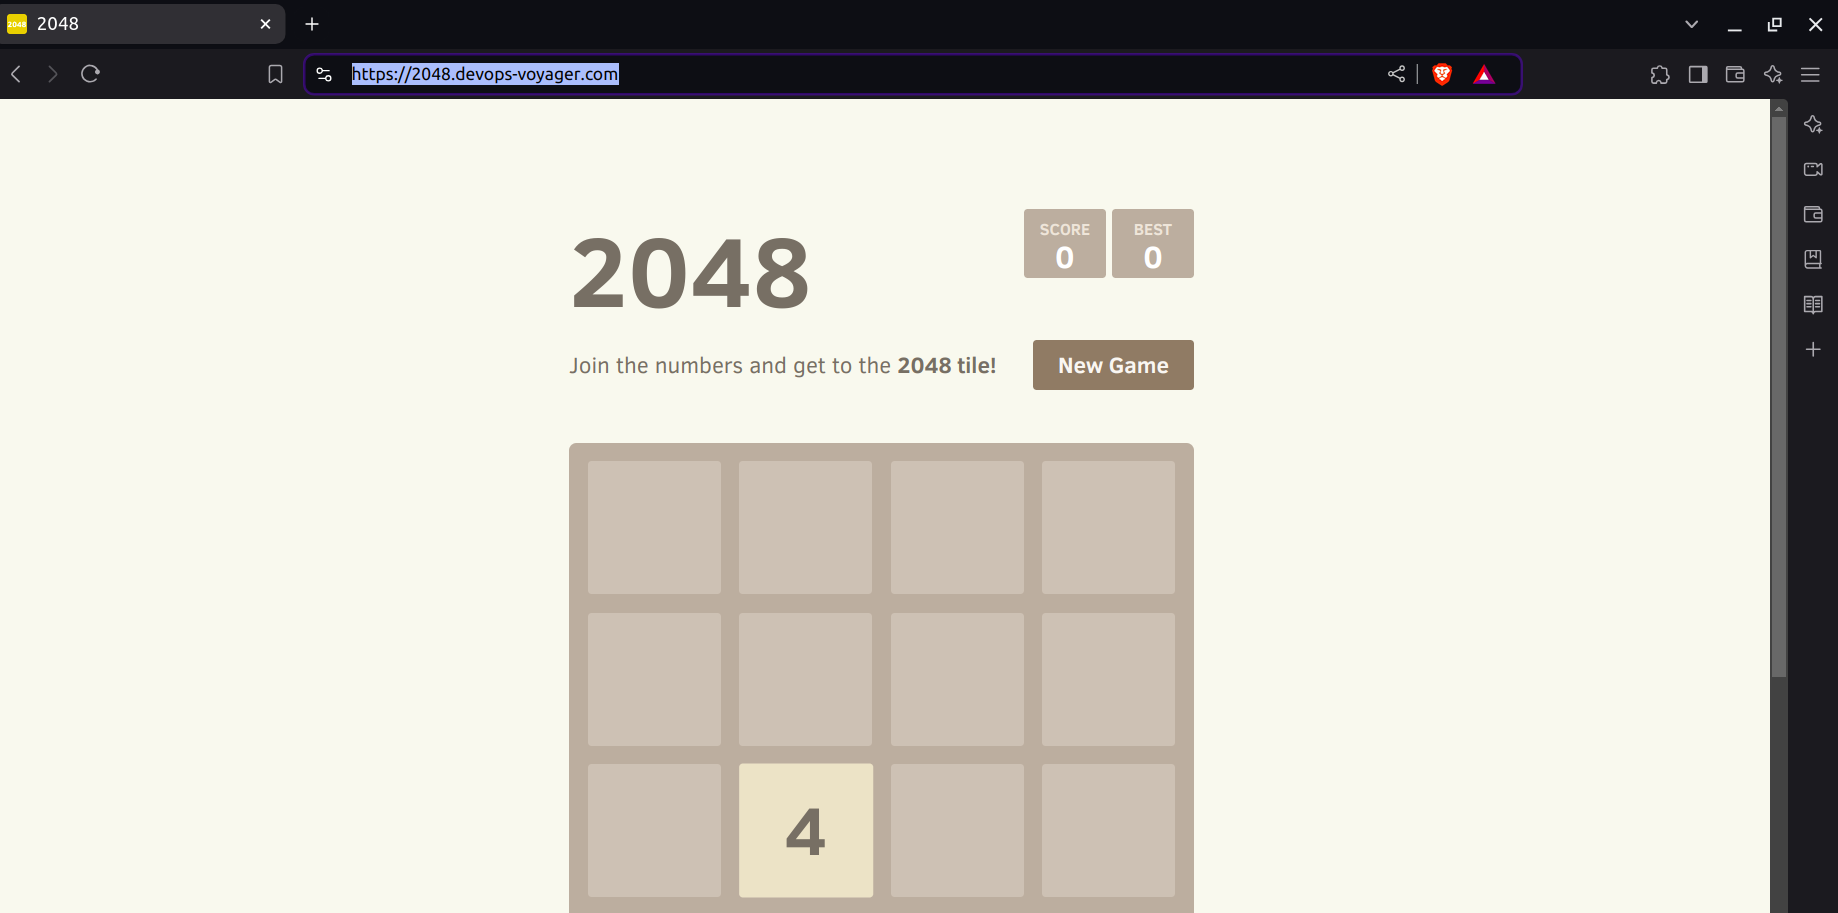
Finally, Paste your domain after 1-2 minutes, you can see your application is running on a secured endpoint.
- But there is one glitch, if you enter the HTTP in the URL then your application has no certificate that you can see. To overcome that go to your Load Balancer in Listeners and Rules, Select HTTP:80
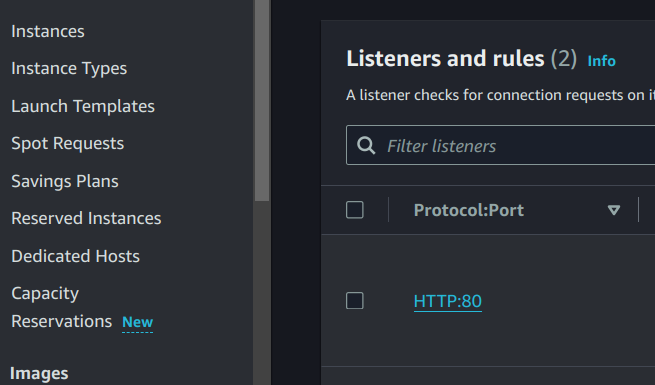
- Click on the First rule in Listener Rules, and then on Edit Rule.
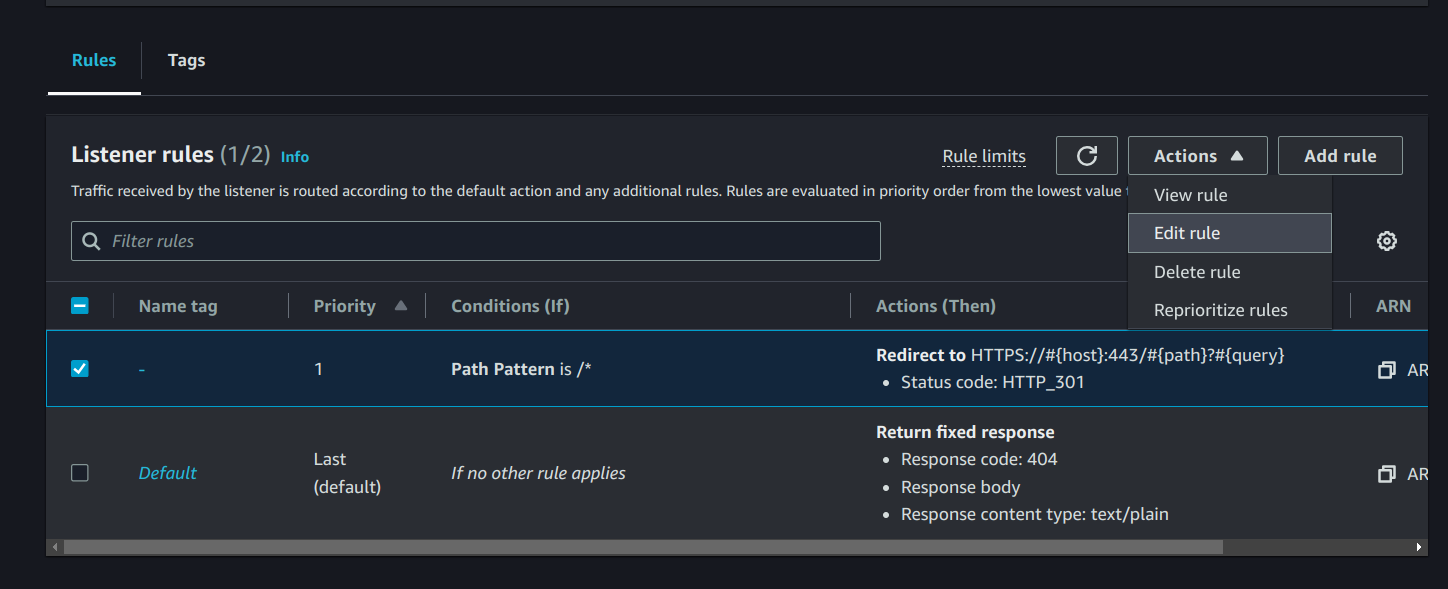
Click on Next
In Action Types, Click on Redirect to URL. Select URI parts and in Protocol write HTTPS and in Port 443. Click on Next and Save.
Now your HTTP traffic will be redirected to HTTPS only.
Step 17: Delete EKS Cluster
Once you're done, delete the EKS cluster:
eksctl delete cluster --name my-eks-cluster --region ap-northeast-1
Conclusion
Congratulations! You've successfully deployed the 2048 Game on an AWS EKS Cluster using Helm Chart and configured it with HTTPS for secure access. If you have any questions or need further assistance, feel free to reach out. For more detailed documentation and guides, the links provided should offer additional insights and support.
For more information on Kubernetes Ingress, Ingress Controllers, and AWS Route 53 domain registration and IAM roles, visit the following links: Kubernetes Ingress, Ingress Controllers, Route 53 Domain Registration, Route 53 Registrar, and EKS IAM Roles for Service Accounts.
Subscribe to my newsletter
Read articles from Saurabh Adhau directly inside your inbox. Subscribe to the newsletter, and don't miss out.
Written by

Saurabh Adhau
Saurabh Adhau
As a DevOps Engineer, I thrive in the cloud and command a vast arsenal of tools and technologies: ☁️ AWS and Azure Cloud: Where the sky is the limit, I ensure applications soar. 🔨 DevOps Toolbelt: Git, GitHub, GitLab – I master them all for smooth development workflows. 🧱 Infrastructure as Code: Terraform and Ansible sculpt infrastructure like a masterpiece. 🐳 Containerization: With Docker, I package applications for effortless deployment. 🚀 Orchestration: Kubernetes conducts my application symphonies. 🌐 Web Servers: Nginx and Apache, my trusted gatekeepers of the web.