Traversing and copying files from complex directory structures on Azure using Microsoft Fabric Data Pipeline.
 Sachin Nandanwar
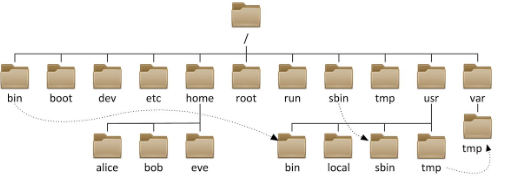
In an earlier article, I dwelled through the details of copying over the contents of one directory on Azure to the other using Fabric Data Factory pipeline. A major issue with that approach was that, it maintained the source directory structure while copying over the contents to the destination.
In some use cases that might not be desirable. You may want to put the contents of the source into a flat directory structure at the destination.
For example for a directory structure like this
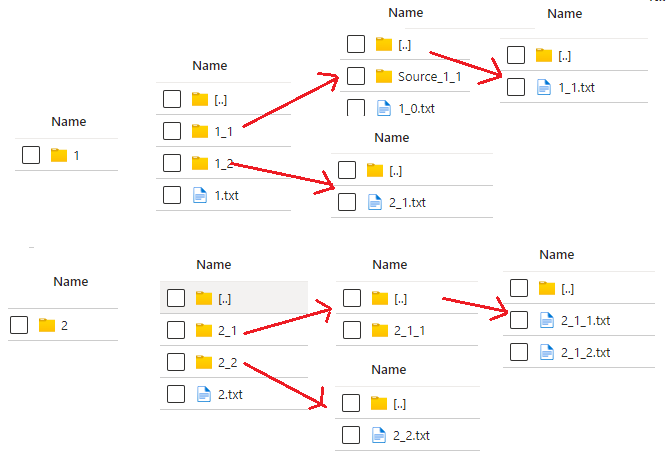
you might prefer not to maintain such a complex structure at the destination and want to place all the files in one directory at the destination.
In this article, I will demonstrate how this can be accomplished using a combination of Azure functions and Fabric Data Factory pipeline.
Just incase if you aren't aware of Azure Functions , you may want to get an idea about them before you read ahead. You can refer to Azure functions here.
The Setup
On Azure , synapasefilesystem is the source container, temporarycontainer is the destination container and the directory at the destination is called as Destination where all the files from source would be copied over.

To get started, create a new Azure Function application in Visual Studio. Ensure that the Authorization level is set to Function and the following dependencies are added to the project.
Azure Function
using Microsoft.Azure.WebJobs;
using Newtonsoft.Json;
using Microsoft.WindowsAzure.Storage.Blob;
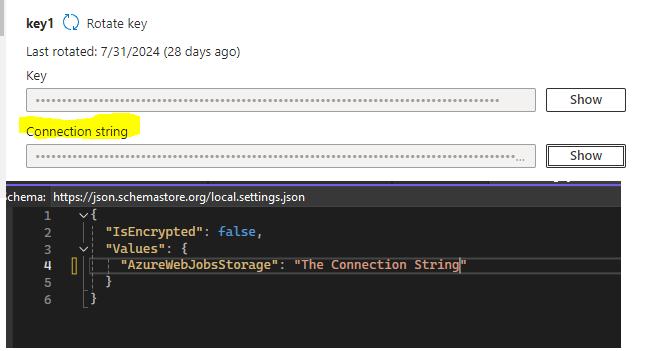
In local.settings.json file add a key calledAzureWebJobsStorage and set its value to the connectionstring of the Azure storage account
Next , create a new class called MyBlobClass with the following properties
 public class MyBlobClass
 {
     public string FileName { get; set; }
     public DateTime FileModifiedDate { get; set; }
 }
Add the following function to the Main class
  [FunctionName("GetFiles")]
  public static async Task<System.Net.Http.HttpResponseMessage> Run([HttpTrigger(Microsoft.Azure.WebJobs.Extensions.Http.AuthorizationLevel.Function, "get", "post", Route = null)] System.Net.Http.HttpRequestMessage req, Microsoft.Azure.WebJobs.Host.TraceWriter log, ExecutionContext context)
  {

      var blobconnection = Environment.GetEnvironmentVariable("AzureWebJobsStorage");
      CloudBlobClient _blobClient = Microsoft.WindowsAzure.Storage.CloudStorageAccount.Parse(blobconnection).CreateCloudBlobClient();
      var container = _blobClient.GetContainerReference("synapasefilesystem");
      BlobContinuationToken continuationToken = null;
      var response = container.ListBlobsSegmented(string.Empty, true, BlobListingDetails.None, new int?(), continuationToken, null, null);
      var blobNames = new List<string>();
      List<MyBlobClass> _items = new List<MyBlobClass>();

      foreach (var blob in response.Results)
      {
          MyBlobClass MyBlobs = new MyBlobClass();
          MyBlobs.FileName = (((CloudBlob)blob).Name);
          MyBlobs.FileModifiedDate = (((CloudBlob)blob).Properties.LastModified.Value.UtcDateTime);
          _items.Add(MyBlobs);
      }

      string json_all = JsonConvert.SerializeObject(_items);
      var responseMessage = new System.Net.Http.HttpResponseMessage(HttpStatusCode.OK)
      {
          Content = new System.Net.Http.StringContent(json_all, System.Text.Encoding.UTF8, "application/json")
      };

      return responseMessage;
  }
The Main class of the Azure function has an asynchronous function called GetFiles and Run is the name of the method that gets executed when the function is triggered which returns a Task of type HttpResponse. The function responds to both GET and POST HTTP methods. We wont require POST in this case. So its fine if it is not referenced in the function.
Breakdown of the function code
 var blobconnection = Environment.GetEnvironmentVariable("AzureWebJobsStorage");
 CloudBlobClient _blobClient = Microsoft.WindowsAzure.Storage.CloudStorageAccount.Parse(blobconnection).CreateCloudBlobClient();
 var container = _blobClient.GetContainerReference("synapasefilesystem");
The above code snippet accesses a storage service to list the files in the source container called synapasefilesystem.
Next, in the following code a list item of type class MyBlobClass is defined.
  var response = container.ListBlobsSegmented(string.Empty, true, BlobListingDetails.None, new int?(), continuationToken, null, null);
  var blobNames = new List<string>();
  List<MyBlobClass> _items = new List<MyBlobClass>();

  foreach (var blob in response.Results)
  {
      MyBlobClass MyBlobs = new MyBlobClass();
      MyBlobs.FileName = (((CloudBlob)blob).Name);
      MyBlobs.FileModifiedDate = (((CloudBlob)blob).Properties.LastModified.Value.UtcDateTime);
      _items.Add(MyBlobs);

  }
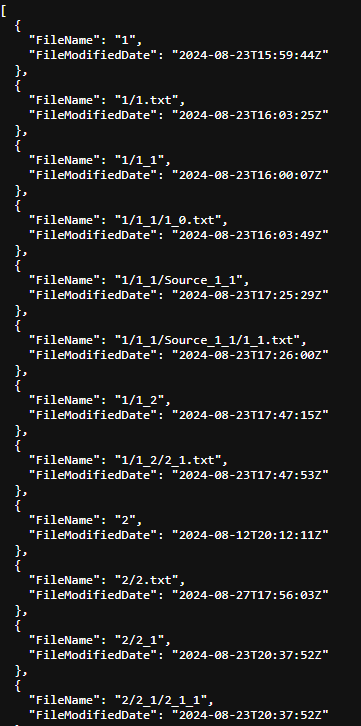
The Response object gets the metadata of the container, subject to successful authentication and the details like Name and LastModified is added as listitems to a list object named _items which is of type class MyBlobClass that was declared earlier having properties FileName and FileModifiedDate . The function then returns a list of objects from the source with details like Name and ModifiedDate through the HTTP response.
Once done, deploy the Azure function to the Azure portal. Fetch the App keys and the function URI as they would be required to be referenced in the Fabric Data Pipeline.
The Response would look like this
Fabric Data Pipeline
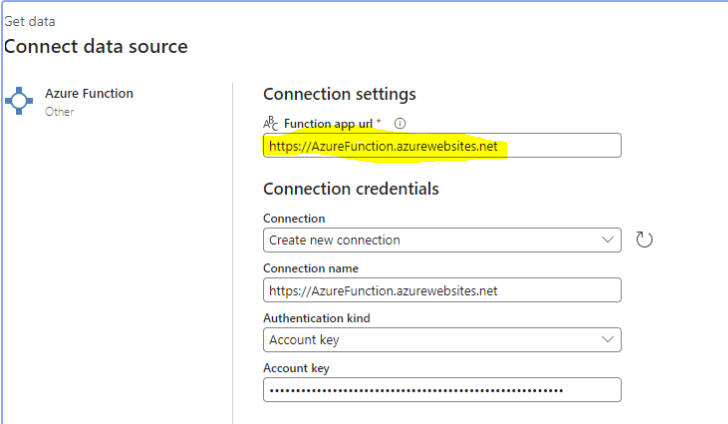
Create a new Data pipeline in Fabric and add a new Azure function activity to the pipeline. Create a connection to the deployed Azure function.
Set the relevant properties in the Settings section of the Azure Function activity.
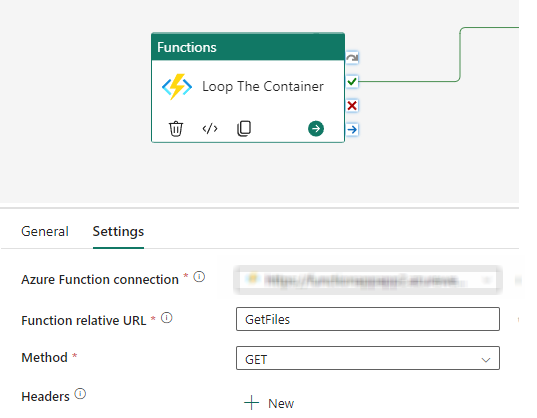
The Azure function returns the entire structure of the source Azure directory in the Response object ,so filtering out the folders/sub folders from the Response will be required.
To do that , add a new Filter activity and under the Settings section set the Items property to
@json(activity('Loop The Container').output.Response)
and the condition property to
@contains(item().FileName, '.')
The logic behind the above , is to filter out items from the Response object that have a "."(dot) indicating that they are files and only these items from the Response object should be copied over to the destination while discarding the rest.
Next, add a For Each activity and set its Items property to
@activity('Filter Only Files').output.value
Then under the For Each activity add a Copy Data activity and for the File Path section set the source container name and for the directory property set the following expression.
@if(greater(lastIndexOf(item().FileName, '/'), 0), substring(item().FileName, 0, lastIndexOf(item().FileName, '/')),'')
The above expression fetches only file path from the Response object excluding the filename
For setting the filename in the source property use the following expression
@substring(item().FileName, add(lastIndexOf(item().FileName,'/'), 1), sub(length(item().FileName), add(lastIndexOf(item().FileName, '/'), 1)))
Under the Destination property, set the destination Container and the destination directory and for the file name set the expression to
@substring(item().FileName, add(lastIndexOf(item().FileName,'/'), 1), sub(length(item().FileName), add(lastIndexOf(item().FileName, '/'), 1)))
which is same as the filename expression that was used for the source settings earlier.
Once all set, the pipeline should have four activities

When executed, the pipeline would dump all the files from the source directory into a single Destination directory on Azure, traversing the entire source directory structure recursively.

That's all....Thank you for reading !!!
Subscribe to my newsletter
Read articles from Sachin Nandanwar directly inside your inbox. Subscribe to the newsletter, and don't miss out.
Written by
