How to Implement Multilingual Support in Vue 3/React for Indian Languages via Google Translate Select
 Sahil Ahmed
Introduction
In today's globalized world, creating multilingual applications is crucial for reaching a wider audience. Previously, I wrote about using i18n for language switching in Vue applications. While this approach is effective, there are several obstacles and considerations we cannot ignore.
The Complexities of i18n
The i18n method, while accurate, comes with some challenges:
Manual creation of translation files for each supported language
Need to replace each text in the app with keys from the JSON files
Time-consuming maintenance as the application grows
These factors can significantly increase development time and complexity.
Enter Google Translate Select
Google Translate Select offers a more efficient solution. With this library, you don't need to create separate translation files or modify your existing text. The plugin automatically translates your entire page, saving time and effort.
Let's explore how to implement this in a Vue 3 application using the Composition API <script setup> method. You can also use the React version of this library with the same approach, but since the number of tutorials for Vue 3 is limited in this area, we will be focusing on Vue 3 today.
Implementation
Step 1: Installation
First, install the Google Translate Select library:
For Vue 3:
npm install @google-translate-select/vue3
For React:
npm install @google-translate-select/react
Step 2: Create a Utility File
Create a file named google-translation.ts to define the list of supported languages:
const listOfIndianLanguages = [
  {
    code: "en",
    name: "English",
    cname: "English",
    ename: "English",
  },
  {
    code: "hi",
    name: "हिन्दी",
    cname: "हिन्दी",
    ename: "Hindi",
  },
  // ... (other languages)
];

const languageCodes = [
  "en",
  "hi",
  "kn",
  "te",
  "mr",
  "pa",
  "ta",
  "ml",
  "gu",
  "bn",
  "or",
  "ur",
];

export const languagesList = languageCodes.map((code: string) => ({
  code: code,
  name:
    listOfIndianLanguages.find((language) => language.code === code)
      ?.name || "",
  cname:
    listOfIndianLanguages.find((language) => language.code === code)
      ?.cname || "",
  ename:
    listOfIndianLanguages.find((language) => language.code === code)
      ?.ename || "",
}));
This file defines the supported Indian languages and creates a mapping for the Google Translate Select component.
Step 3: Create a Google Translate Component
For Vue , Create a GoogleTranslate.vue component:
<script setup lang="ts">
import GoogleTranslateSelect from "@google-translate-select/vue3";
import type { Language as ILanguage } from "@google-translate-select/constants";
import { languagesList } from "@/utils/google-translation";
import { CSSProperties } from "vue";

type Props = {
  showDropdown?: boolean;
  dropdownStyle?: CSSProperties;
};
defineProps<Props>();
</script>

<template>
  <div>
    <GoogleTranslateSelect
      :class="showDropdown ? 'block' : 'hidden'"
      class="w-full border rounded-xl"
      :languages="(languagesList as ILanguage[])"
      default-language-code="en"
      :dropdown-style="dropdownStyle"
      default-page-language-code="en"
      :fetch-browser-language="false"
      trigger="click"
      @select="() => {}"
    />
  </div>
</template>
This component wraps the Google Translate Select library and uses our custom language list.
Step 4: Integrate into Your Login Page
Now, let's add the language switcher to the login page so users can change the language at the initial app startup. You can also add the component to any other page:
<script setup lang="ts">
// ... (other imports)
import GoogleTranslate from "../components/common/GoogleTranslate.vue";

// ... (rest of the script)
</script>

<template>
  <div class="relative w-full flex flex-col items-center justify-center min-h-screen">
    <!-- ... (other elements) -->
    <div class="w-full h-20 flex flex-col items-start space-y-1">
      <p class="text-xs text-gray-500 font-bold">
        Switch language
      </p>
      <GoogleTranslate
        class="w-full"
        :show-dropdown="true"
        :dropdown-style="{
          position: 'absolute',
          top: '100%',
          left: '0',
          zIndex: 'calc(var(--google-translate-select-z-index-dropdown) + 1)',
          maxHeight: '150px',
          width: '100%',
          overflowY: 'auto',
          backgroundColor: '#fff',
          border: '1px solid var(--google-translate-select-border-color-light)',
          borderRadius: 'var(--google-translate-select-border-radius-base)',
          boxShadow: 'var(--google-translate-select-box-shadow-light)',
        }"
      />
    </div>
    <!-- ... (other elements) -->
  </div>
</template>
Modifications and Enhancements
To better suit our needs, we made some modifications as shown above to the default Google Translate Select implementation:
Custom Language List: We created a custom list of Indian languages, as the default plugin doesn't include them in the dropdown.
Styling: We added custom styling to the dropdown to match our application's design.
Conditional Rendering: We added the ability to show/hide the dropdown based on a prop.
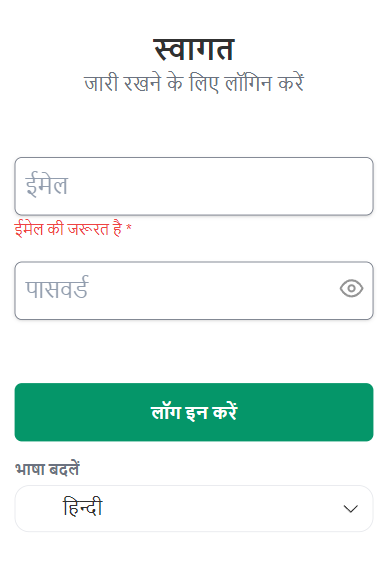
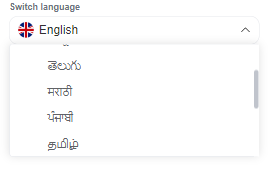
Below are some screenshots of the app showcasing the multilingual support in action:

Translated text in Hindi

Language switcher dropdown select component
Benefits of This Approach
Automatic Translation: No need to manually translate text or manage translation files.
Easy Integration: Simple to add to existing Vue 3/React projects.
Customizable: Can be tailored to support specific languages and styling needs.
Time-Saving: Significantly reduces development and maintenance time compared to manual i18n methods.
Drawbacks of Google Translate Integration
Although you can use the Google Translate API or add a Google Translate widget to your site for on-the-fly translations. However, keep in mind that automated translations may not always be accurate or context-appropriate. Additionally, relying on Google Translate can lead to inconsistent user experiences and may not handle industry-specific terminology well.
Conclusion
By leveraging the Google Translate Select library, we've created a powerful yet simple solution for adding multilingual support to Vue 3/React applications. This approach offers automatic translation without the need for manual file management, making it an excellent choice for projects that require quick and efficient language-switching capabilities.
While the i18n method offers more control over translations and is preferable for applications requiring high accuracy, the Google Translate Select method shines in scenarios where rapid development and ease of maintenance are priorities.
Resources
By implementing this solution, you can quickly add robust multilingual support to your Vue 3 applications, enhancing user experience and expanding your global reach.
Subscribe to my newsletter
Read articles from Sahil Ahmed directly inside your inbox. Subscribe to the newsletter, and don't miss out.
Written by

Sahil Ahmed
Sahil Ahmed
I'm Sahil Ahmed, an experienced software engineer who wants to be a digital polymath. My journey in software development is driven by a curiosity to create efficient, user-centric solutions for real-world problems across web and mobile platforms while writing clean code. I also love to read classic literature and play football.