State Isolation: Layout vs Workspace
 vijayaraghavan vashudevan
✈️This article, will explain in detail the configuration of isolated environments using both Workspaces and file layout methods✈️
🌍Synopsis:
🛬Understand the two primary methods of state isolation ("Isolation via Workspaces", and "Isolation via Files Layout") and how to manage state across different environments.
🌍State File Isolation:
🛬Define all of your infrastructure in a single Terraform file or a single set of Terraform files in one folder. The problem with this approach is that all of your Terraform state is now stored in a single file, too, and a mistake anywhere could break everything
🛬The whole point of having separate environments is that they are isolated from one another, so if you are managing all the environments from a single set of Terraform configurations, you are breaking that isolation. Just as a ship has bulkheads that act as barriers to prevent a leak in one part of the ship from immediately flooding all the others, you should have “bulkheads” built into your Terraform design
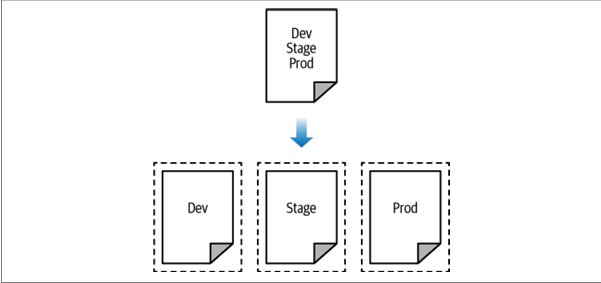
Isolation via workspaces Useful for quick, isolated tests on the same configuration
Isolation via file layout Useful for production use cases for which you need strong separation between environments
🌍Isolation via Workspaces:
🛬Terraform workspaces allow you to store your Terraform state in multiple, separate, named workspaces. Terraform starts with a single workspace called “default,” and if you never explicitly specify a workspace, the default workspace is the one you’ll use the entire time. To create a new workspace or switch between workspaces, you use the terraform workspace commands. Let's see this with an example of EC2 instances.
 resource "aws_instance" "example" {
  ami = "ami-0fb653ca2d3203ac1"
  instance_type = "t2.micro"
 }
🛬Configure a backend for this Instance using the S3 bucket and DynamoDB table you created earlier in the chapter but with the key set to workspaces-example/ terraform.tfstate:
terraform {
 backend "s3" {
    # Replace this with your bucket name!
    bucket = "terraform-up-and-running-state"
    key  = "workspaces-example/terraform.tfstate"
    region  = "us-east-2"

    # Replace this with your DynamoDB table name!
    dynamodb_table = "terraform-up-and-running-locks"
    encrypt = true
  }
 }
Run terraform init and terraform apply to deploy the code
🛬The state for this deployment is stored in the default workspace. You can confirm this by running the terraform workspace show command
$ terraform workspace show
 default
🛬The default workspace stores your state in exactly the location you specify via the key configuration. You’ll find a terraform.tfstate file in the workspaces-example folder.
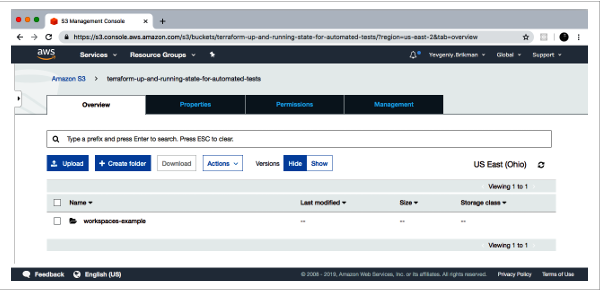
🛬Let’s create a new workspace called “example1” using the terraform workspace new command:
 $ terraform workspace new example1
 Created and switched to workspace "example1"!
🛬Terraform wants to create a totally new EC2 Instance from scratch! That’s because the state files in each workspace are isolated from one another, and because you’re now in the example1 workspace, Terraform isn’t using the state file from the default workspace and therefore doesn’t see the EC2 Instance was already created there.
Run terraform init and terraform apply to deploy the code
🛬Repeat the exercise one more time and create another workspace called “example2”
 $ terraform workspace new example2
 Created and switched to workspace "example2"!
Run terraform init and terraform apply to deploy the code
🛬You now have three workspaces available, which you can see by using the terraform workspace list command
 $ terraform workspace list
  default
  example1
 * example2
🛬And you can switch between them at any time using the terraform workspace select command
$ terraform workspace select example1
 Switched to workspace "example1".
🛬To understand how this works under the hood, take a look again in your S3 bucket; you should now see a new folder called env. Inside the env: folder, you’ll find one folder for each of your workspaces
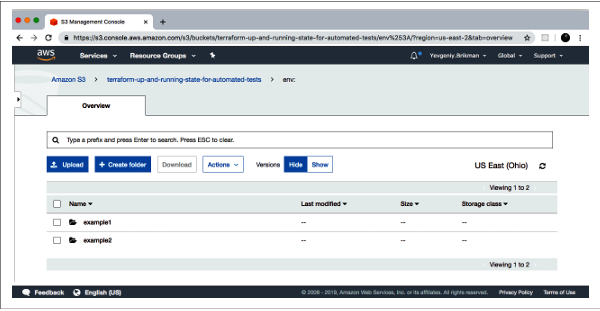
🛬Inside each of those workspaces, Terraform uses the key you specified in your backend configuration, so you should find an example1/workspaces-example/terraform.tfstate and an example2/workspaces-example/terraform.tfstate. In other words, switching to a different workspace is equivalent to changing the path where your state file is stored
🛬This is handy when you already have a Terraform module deployed and you want to do some experiments with it (e.g., try to refactor the code) but you don’t want your experiments to affect the state of the already-deployed infrastructure. Terraform workspaces allow you to run terraform workspace new and deploy a new copy of the exact same infrastructure, but storing the state in a separate file.
The state files for all of your workspaces are stored in the same backend (e.g., the same S3 bucket). That means you use the same authentication and access controls for all the workspaces, which is one major reason workspaces are an unsuitable mechanism for isolating environments (e.g., isolating staging from production)
Workspaces are not visible in the code or on the terminal unless you run terraform workspace commands. When browsing the code, a module that has been deployed in one workspace looks exactly the same as a module deployed in 10 workspaces. This makes maintenance more difficult because you don’t have a good picture of your infrastructure.
Putting the two previous items together, the result is that workspaces can be fairly error prone. The lack of visibility makes it easy to forget what workspace you’re in and accidentally deploy changes in the wrong one (e.g., accidentally running terraform destroy in a “production” workspace rather than a “staging” workspace), and because you must use the same authentication mechanism for all workspaces, you have no other layers of defense to protect against such errors.
🌍Isolation via File Layout:
🛬Put the Terraform configuration files for each environment into a separate folder. For example, all of the configurations for the staging environment can be in a folder called stage and all the configurations for the production environment can be in a folder called prod.
🛬Configure a different backend for each environment, using different authentication mechanisms and access controls: e.g., each environment could live in a separate AWS account with a separate S3 bucket as a backend.
With this approach, the use of separate folders makes it much clearer which envi ronments you’re deploying to, and the use of separate state files, with separate authentication mechanisms, makes it significantly less likely that a screw-up in one environment can have any impact on another.
🛬Virtual Private Cloud (VPC) and all the associated subnets, routing rules, VPNs, and network ACLs—you will probably change it only once every few months, at most. On the other hand, you might deploy a new version of a web server multiple times per day. If you manage the infrastructure for both the VPC component and the web server component in the same set of Terraform configurations, you are unnecessarily putting your entire network topology at risk of breakage
Therefore, I recommend using separate Terraform folders (and therefore separate state files) for each environment (staging, production, etc.) and for each component (VPC, services, databases) within that environment.
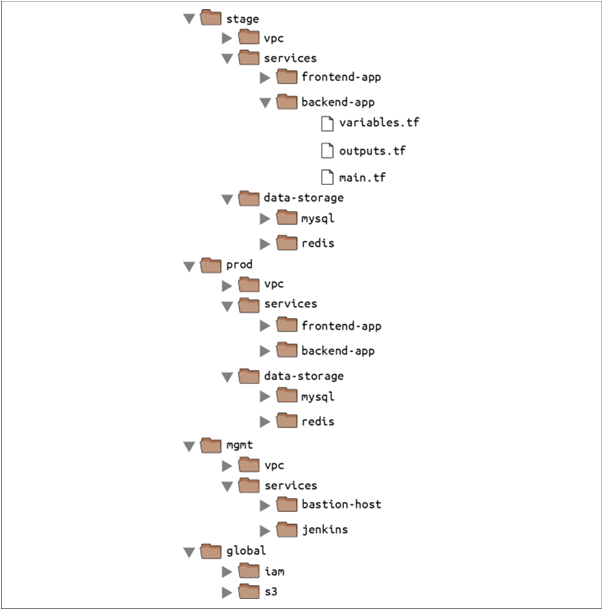
🛬At the top level, there are separate folders for each “environment.” The exact environments differ for every project
stage An environment for pre-production workloads (i.e., testing)
prod An environment for production workloads (i.e., user-facing apps)
mgmt An environment for DevOps tooling (e.g., bastion host, CI server)
global A place to put resources that are used across all environments (e.g., S3, IAM)
🛬Within each environment, there are separate folders for each “component.” The components differ for every project
vpc The network topology for this environment.
services The apps or microservices to run in this environment, such as a Ruby on Rails frontend or a Scala backend. Each app could even live in its own folder to isolate it from all the other apps.
data-storage The data stores to run in this environment, such as MySQL or Redis. Each data store could even reside in its own folder to isolate it from all other data stores.
🛬Within each component, there are the actual Terraform configuration files, which are organized according to the following naming convention
variables.tf Input variables
outputs.tf Output variables
main.tf Resources and data sources
dependencies.tf It’s common to put all your data sources in a dependencies.tf file to make it easier to see what external things the code depends on.
providers.tf You may want to put your provider blocks into a providers.tf file so you can see, at a glance, what providers the code talks to and what authentication you’ll have to provide.
main-xxx.tf If the main.tf file is getting really long because it contains a large number of resources, you could break it down into smaller files that group the resources in some logical way:
e.g., main-iam.tf could contain all the IAM resources,
main s3.tf could contain all the S3 resources, and so on.
Using the main- prefix makes it easier to scan the list of files in a folder when they are organized alphabetically, as all the resources will be grouped together.
🛬This file layout has a number of advantages:
Clear code / environment layout It’s easy to browse the code and understand exactly what components are deployed in each environment.
Isolation This layout provides a good amount of isolation between environments and between components within an environment, ensuring that if something goes wrong, the damage is contained as much as possible to just one small part of your entire infrastructure.
🛬In some ways, these advantages are drawbacks, too
Working with multiple folders Splitting components into separate folders prevents you from accidentally blowing up your entire infrastructure in one command, but it also prevents you from creating your entire infrastructure in one command. If all of the components for a single environment were defined in a single Terraform configuration, you could spin up an entire environment with a single call to Terraform apply. But if all of the components are in separate folders, then you need to run Terraform apply separately in each one.
Copy/paste The file layout described in this section has a lot of duplication. For example, the same frontend-app and backend-app live in both the stage and prod folders.
Resource dependencies Breaking the code into multiple folders makes it more difficult to use resource dependencies. If your app code was defined in the same Terraform configuration files as the database code, that app code could directly access attributes of the database using an attribute reference (e.g., access the database address via aws_db_instance.foo.address).
🕵🏻I also want to express that your feedback is always welcome. As I strive to provide accurate information and insights, I acknowledge that there’s always room for improvement. If you notice any mistakes or have suggestions for enhancement, I sincerely invite you to share them with me.
🤩 Thanks for being patient and following me. Keep supporting 🙏
Clap👏 if you liked the blog.
For more exercises — please follow me below ✅!
https://vjraghavanv.hashnode.dev/
#aws #terraform #cloudcomputing #IaC #DevOps #tools #operations #30daytfchallenge #HUG #hashicorp #HUGYDE #IaC #developers #awsugmdu #awsugncr #automatewithraghavan
Subscribe to my newsletter
Read articles from vijayaraghavan vashudevan directly inside your inbox. Subscribe to the newsletter, and don't miss out.
Written by

vijayaraghavan vashudevan
vijayaraghavan vashudevan
I'm Vijay, a seasoned professional with over 13 years of expertise. Currently, I work as a Quality Automation Specialist at NatWest Group. In addition to my employment, I am an "AWS Community Builder" in the Serverless Category and have served as a volunteer in AWS UG NCR Delhi and AWS UG MDU, a Pynt Ambassador (Pynt is an API Security Testing tool), and a Browserstack Champion. Actively share my knowledge and thoughts on a variety of topics, including AWS, DevOps, and testing, via blog posts on platforms such as dev.to and Medium. I always like participating in intriguing discussions and actively contributing to the community as a speaker at various events. This amazing experience provides me joy and fulfillment! 🙂