Building a Robust CICD Pipeline: Deploying Kubernetes Apps with Jenkins
 Balraj Singh
Table of contents
- Prerequisites
- Setting Up the Environment
- Once you clone repo then go to folder "08.Real-Time-DevOps-Project/Terraform_Code" and run the terraform command.
- Environment Setup
- Change the hostname: (optional)
- Setup for SonarQube
- Setup for Nexus
- Set up Jenkins
- Now, we will set up an EKS cluster
- Verifying the cluster
- To destroy the setup using Terraform.
- Conclusion
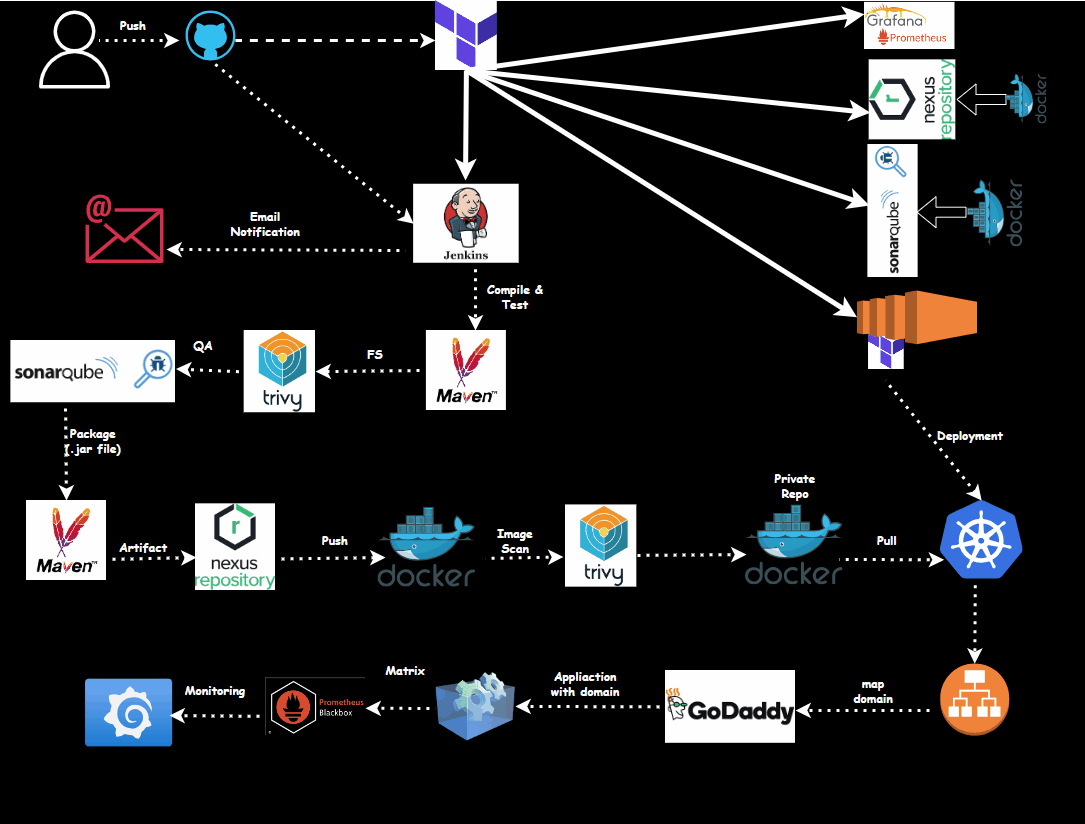
In this blog, we’ll guide you through deploying a Kubernetes application using Jenkins and integrating tools like GitHub, Trivy, SonarQube, Nexus, Grafana, Docker, and Prometheus. We will cover the setup, deployment, and monitoring stages to ensure a smooth and efficient pipeline.
Creating a complete CI/CD pipeline involves using different tools and technologies to automate the software development process from code integration to deployment. Here's a high-level overview of how each tool fits into the pipeline:
Jenkins:: An open-source automation server for building, deploying, and automating tasks.
GitHub: Serves as the version control system to manage code changes and history.
Maven: A build automation tool used for Java projects, Maven compiles the source code and packages it into a deployable format.
Trivy: An open-source vulnerability scanner for container images, ensuring the security of the application.
SonarQube: Analyzes source code quality and provides reports on code smells, bugs, and vulnerabilities.
Docker: Packages the application and its dependencies into a container, making it easy to deploy anywhere.
Terraform: Infrastructure as Code (IaC) tool that allows you to define and provision infrastructure using a high-level configuration language.
Kubernetes: An orchestration platform for managing containerized applications, handling scaling and failover.
Prometheus: A monitoring system that collects metrics from configured targets at given intervals, evaluates rule expressions, and displays results.
Grafana: A visualization tool that allows you to create dashboards for your metrics, giving insights into the application's performance and health.
By linking these tools together, developers can automate the testing, building, scanning, and deployment of applications, resulting in more efficient and reliable software delivery. The pipeline starts with a developer pushing code to GitHub, which triggers Maven to build the application. After the build, Trivy scans the Docker container for vulnerabilities and SonarQube checks for code quality issues. If all checks pass, Terraform provisions the necessary infrastructure, and Kubernetes deploys the application. Prometheus monitors the system, and Grafana provides a dashboard for real-time analytics. This pipeline demonstrates a strong DevOps practice, ensuring continuous integration and delivery with a focus on code quality and security.
Prerequisites
Domain name ( optional )
Setting Up the Environment
I have created a Terraform file to set up the entire environment, including the installation of required applications and tools.
- Setting Up the Virtual Machines (EC2)
First, we'll create the necessary virtual machines using terraform.
Below is a terraform configuration:
Once you clone repo then go to folder "08.Real-Time-DevOps-Project/Terraform_Code" and run the terraform command.
cd Terraform_Code/

$ ls -l
Mode                 LastWriteTime         Length Name
----                 -------------         ------ ----
da---l          25/08/24   8:43 PM                01.Code_IAC_Jenkins_Trivy
da---l          25/08/24   8:41 PM                02.Code_IAC_Nexus
da---l          25/08/24   8:39 PM                03.Code_IAC_SonarQube
da---l          26/08/24   9:48 AM                04.Code_IAC_Terraform_box
da---l          25/08/24   8:38 PM                05.Code_IAC_Grafana
-a---l          20/08/24   1:45 PM            493 .gitignore
-a---l          20/08/24   4:54 PM           1589 main.tf
You need to run main.tf file using the following terraform command.
Note ⇒ Make sure to run main.tf from outside the folders; do not go inside the folders.
cd 08.Real-Time-DevOps-Project/Terraform_Code

da---l          25/08/24   8:43 PM                01.Code_IAC_Jenkins_Trivy
da---l          25/08/24   8:41 PM                02.Code_IAC_Nexus
da---l          25/08/24   8:39 PM                03.Code_IAC_SonarQube
da---l          26/08/24   9:48 AM                04.Code_IAC_Terraform_box
da---l          25/08/24   8:38 PM                05.Code_IAC_Grafana
-a---l          20/08/24   1:45 PM            493 .gitignore
-a---l          20/08/24   4:54 PM           1589 main.tf

# Now, run the following command.
terraform init
terraform fmt
terraform validate
terraform plan
terraform apply --auto-approve
Environment Setup
| HostName | OS |
| Jenkins | Ubuntu 24 LTS |
| SonarQube | Ubuntu 24 LTS |
| Nexus | Ubuntu 24 LTS |
| Terraform | Ubuntu 24 LTS |
| Grafana | Ubuntu 24 LTS |
Password for the root account on all these virtual machines is xxxxxxx
Perform all the commands as root user unless otherwise specified
Change the hostname: (optional)
sudo hostnamectl set-hostname Jenkins
sudo hostnamectl set-hostname SonarQube
sudo hostnamectl set-hostname Nexus
sudo hostnamectl set-hostname Terraform
sudo hostnamectl set-hostname Grafana
Update the /etc/hosts file:
- Open the file with a text editor, for example:
sudo vi /etc/hosts
Replace the old hostname with the new one where it appears in the file.
Apply the new hostname without rebooting:
sudo systemctl restart systemd-logind.service
Verify the change:
hostnamectl
Update the package
sudo -i
apt update
Setup for SonarQube
http://publicIPofSonarQube:9000
http://54.87.30.87:9000/
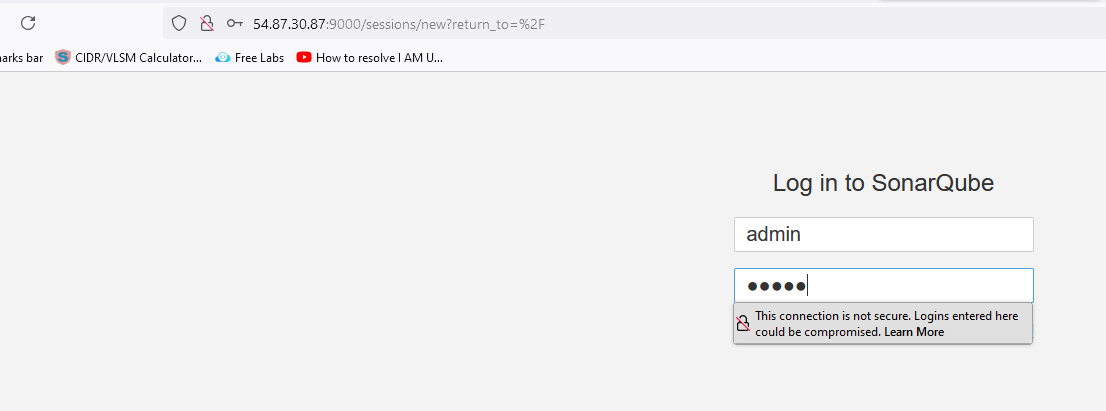
Default password is admin and you have to change it.
username: admin password: admin
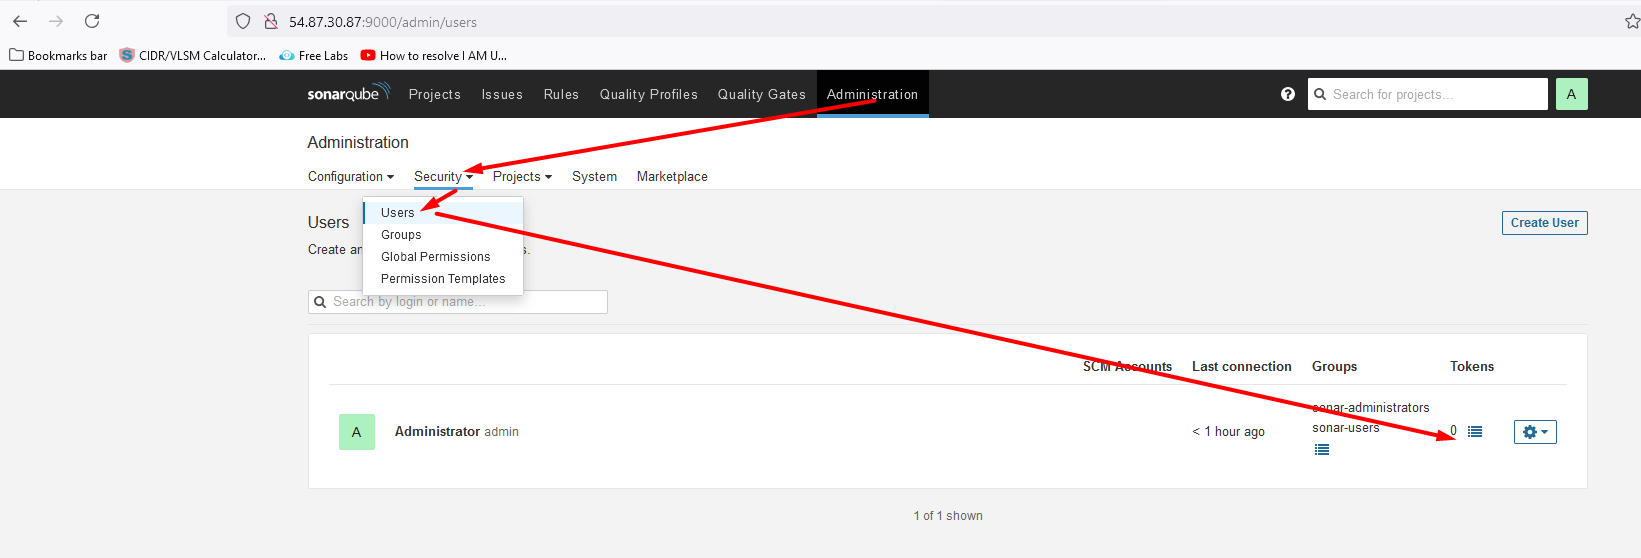
Create a token in sonarQube
Setup for Nexus
http://publicIPofNexux:8081
Now, we have to click on
sign in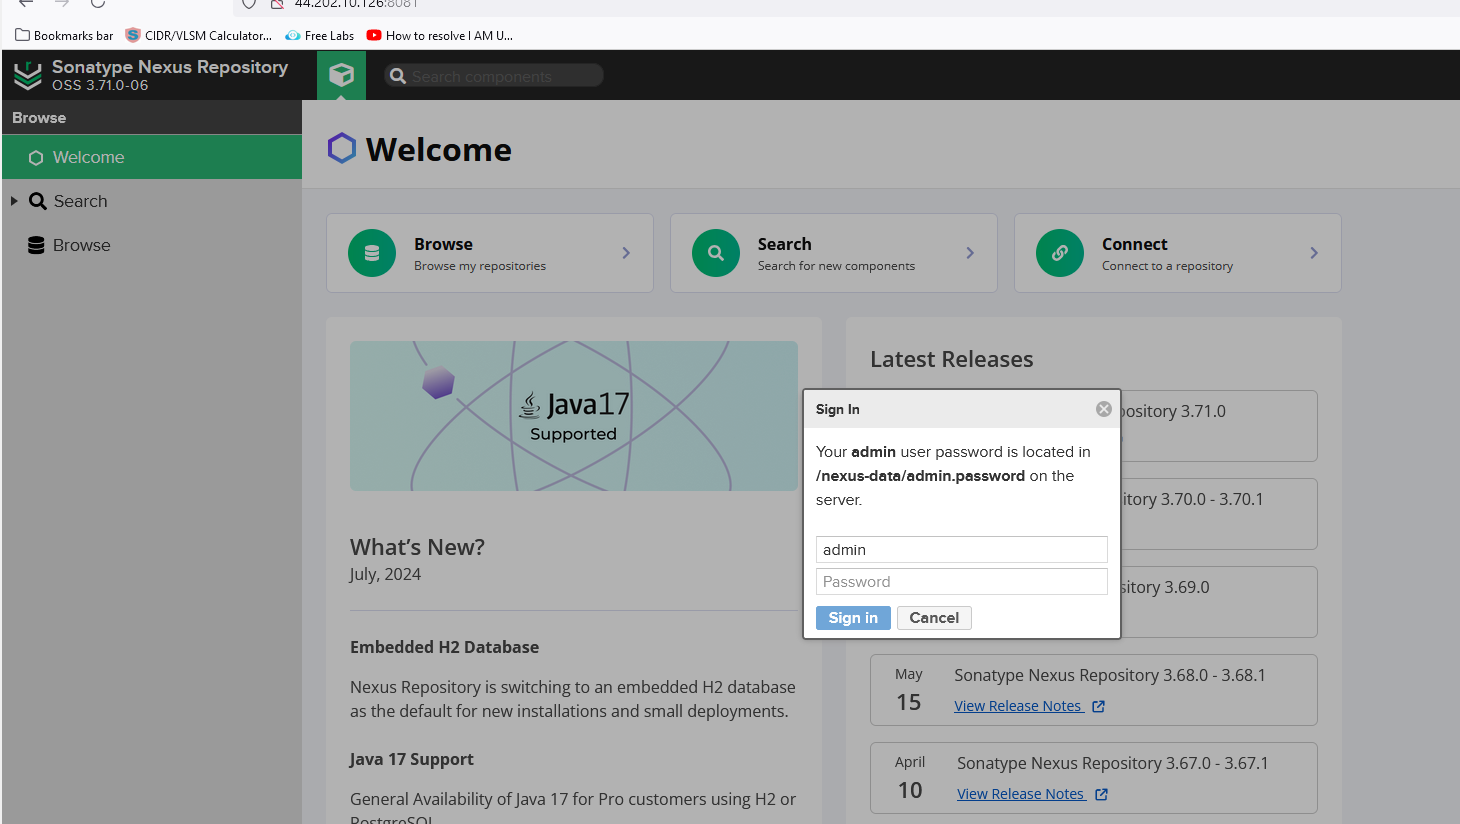
We need a password, and we are using Docker. We have to go inside the container in order to get the password, which can be gotten from the container under the directory
/nexus-data/admin.passwordsudo docker exec -it <containerID> /bin/bash cat sonatype-work/nexus3/admin.passwordubuntu@ip-172-31-80-62:~$ docker ps CONTAINER ID IMAGE COMMAND CREATED STATUS PORTS NAMES e56b0a042dda sonatype/nexus3 "/opt/sonatype/nexus…" 25 minutes ago Up 25 minutes 0.0.0.0:8081->8081/tcp, :::8081->8081/tcp nexus3 ubuntu@ip-172-31-80-62:~$ sudo docker exec -it e56b0a042dda /bin/bash bash-4.4$ ls nexus sonatype-work start-nexus-repository-manager.sh bash-4.4$ cd sonatype-work/ bash-4.4$ ls nexus3 bash-4.4$ cd nexus3/ bash-4.4$ ls admin.password blobs cache db elasticsearch etc generated-bundles instances javaprefs karaf.pid keystores lock log port restore-from-backup tmp bash-4.4$ cat admin.password 4fc19f70-71f5-4e26-901f-198a51e044ba bash-4.4$Type the new password
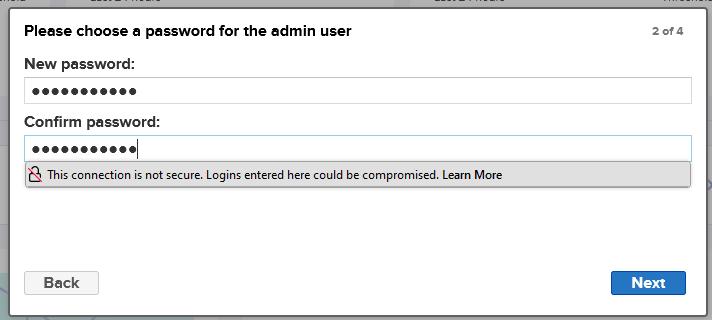
Select the
enable anonymous access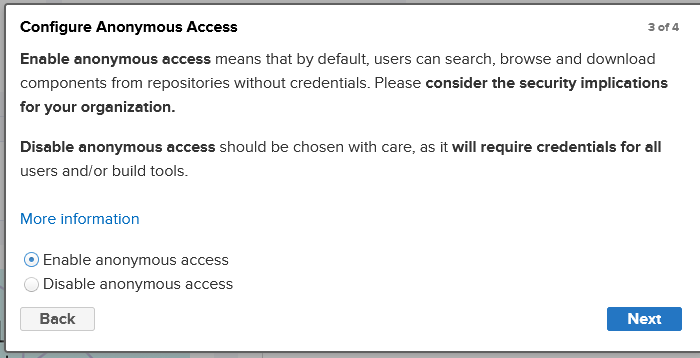
Set up Jenkins
Once Jenkins is setup then install the following plug-in-
SonarQube Scanner
Config File Provider
Maven Integration
Pipeline: Stage View
Pipeline Maven Integration
Kubernetes Client API
Kubernetes Credentials
Kubernetes
Kubernetes CLI
Docker
Docker Pipeline
Eclipse Temurin installer
Configure the above plug-in
Dashboard > Manage Jenkins> Tools
Configure
Docker
Name: docker
install automatically
docker version: latest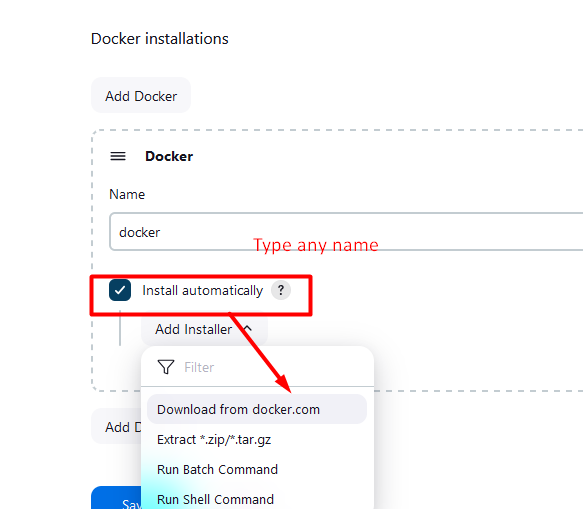
Configure
Maven
Name: maven3
install automatically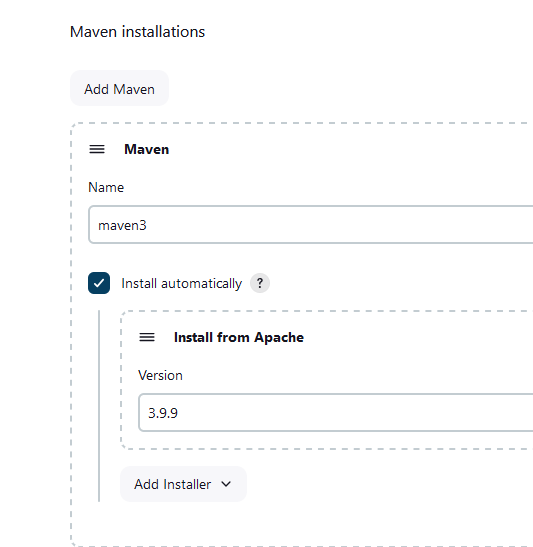
Configure
SonarQube Scanner installations
install automatically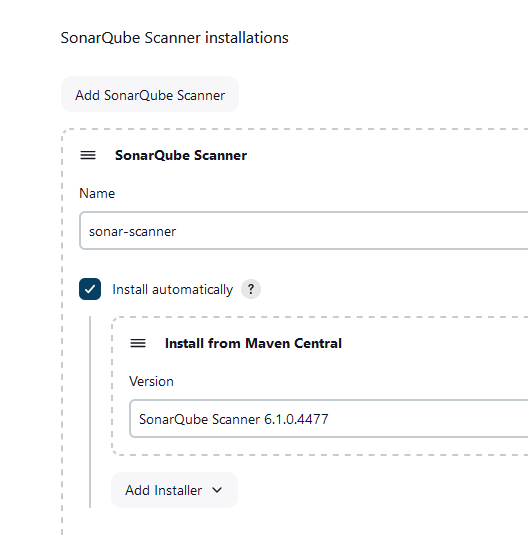
Configure JDK
install automatically
version: jdk- 17.0.12+7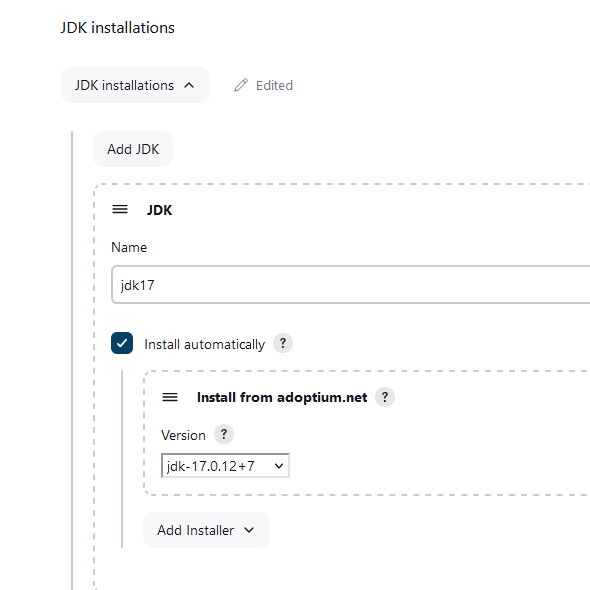
Configure the
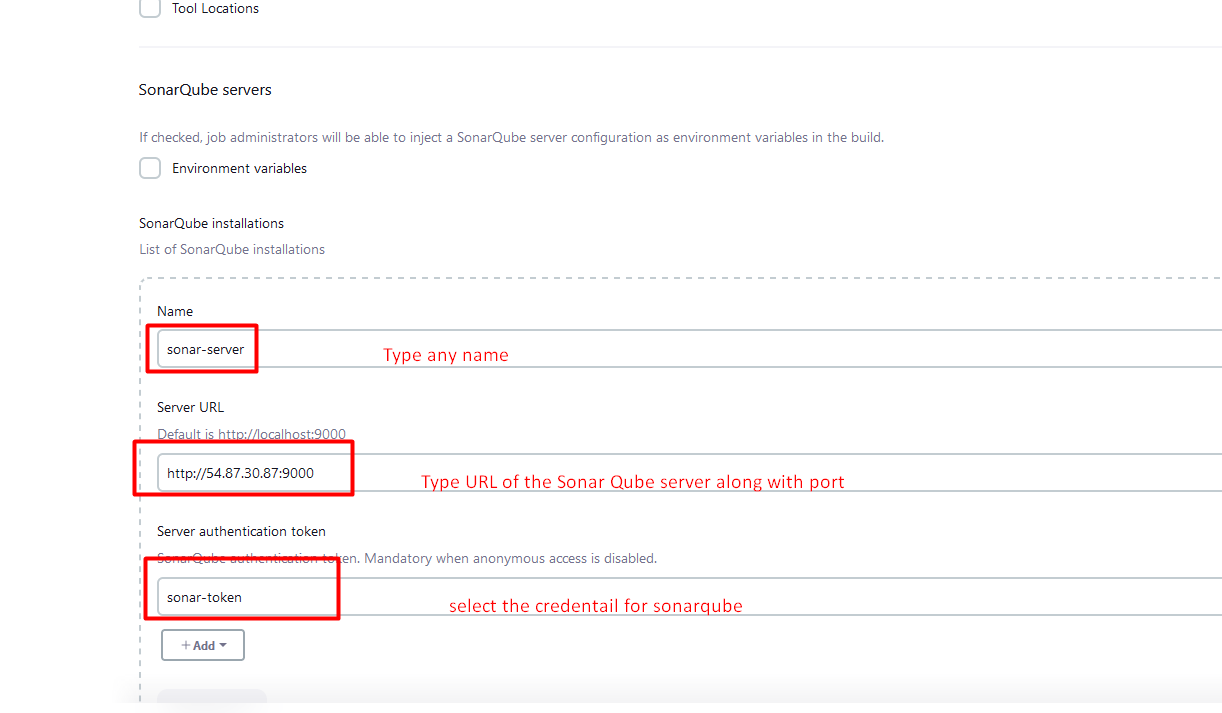
SonarQube Server
we will configure the credentials first.
Dashboard> Manage Jenkins> Credentials> System > Global credentials(unrestricted)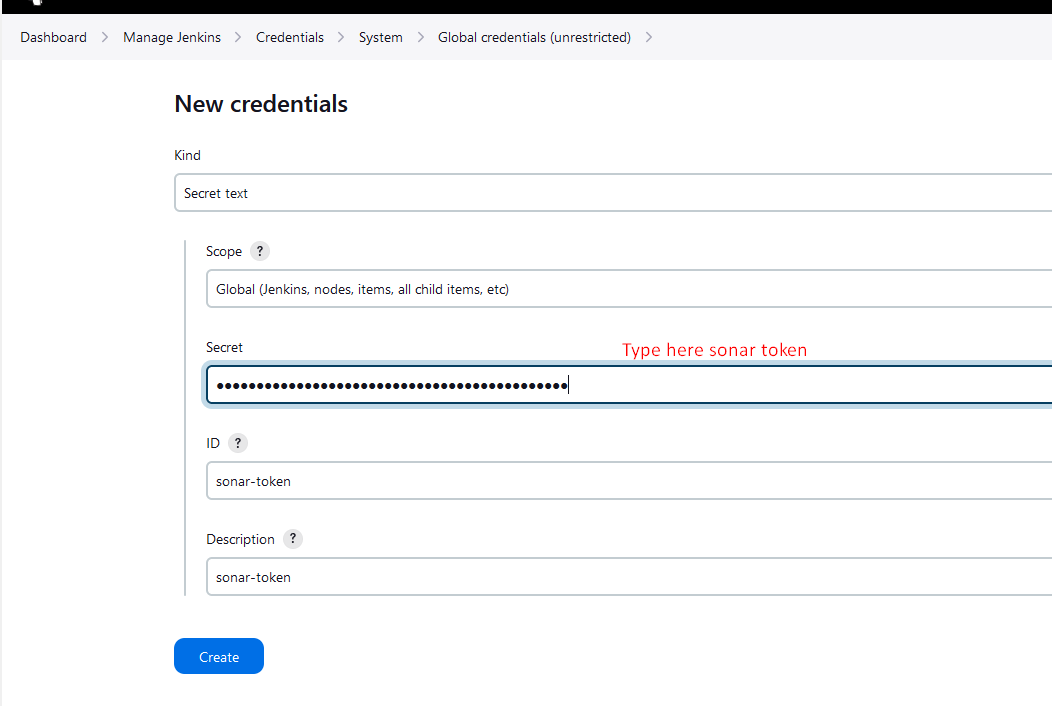
Now, we will configure the server

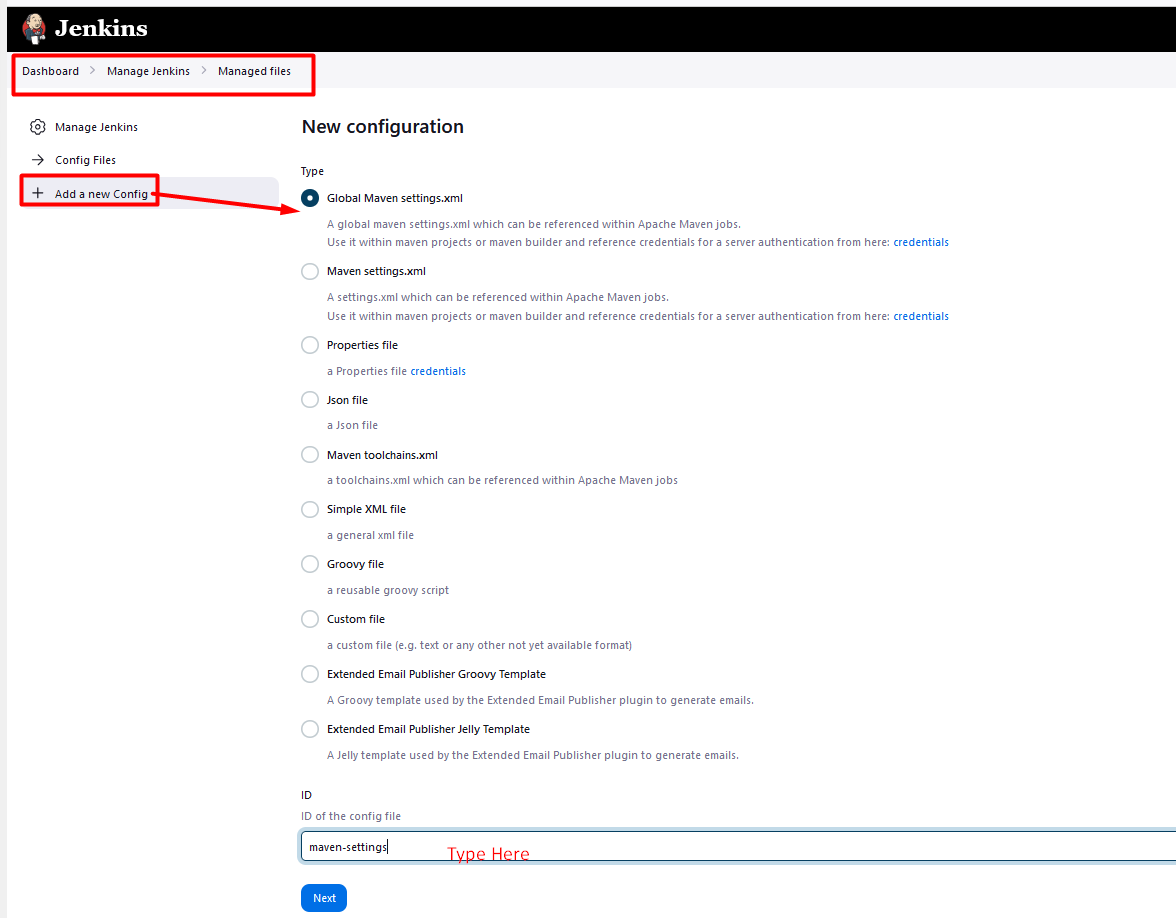
Configure the Nexus file
Create a pipeline
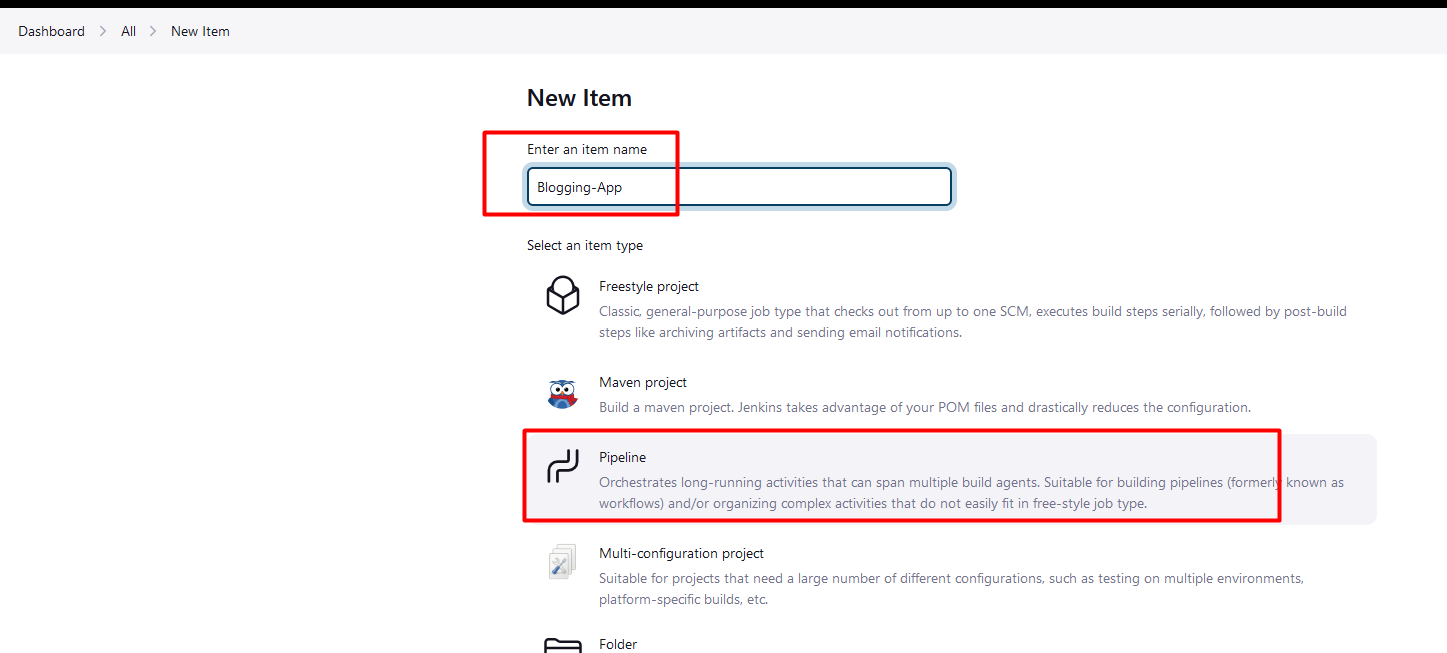
  pipeline {
      agent any
      tools {
          jdk 'jdk17'
          maven 'maven3'
      }
      environment {
          SCANNER_HOME= tool 'sonar-scanner'
      }

      stages {
          stage('Git Checkout') {
              steps {
                  git branch: 'main', url: 'https://github.com/mrbalraj007/FullStack-Blogging-App.git'
              }
          }
          stage('Compile') {
              steps {
                  sh "mvn compile"
              }
          }
          stage('Test') {
              steps {
                  sh "mvn test"
              }
          }
          stage('Trivy FS Scan') {
              steps {
                  sh "trivy fs --format table -o fs.html ."
              }
          }
          stage('SonarQube Analysis') {
              steps {
                  withSonarQubeEnv('sonar-server') {
                  sh '''$SCANNER_HOME/bin/sonar-scanner -Dsonar.projectName=Blogging-App -Dsonar.projectKey=Blogging-App \
                        -Dsonar.java.binaries=target'''
                  }
              }
          }
          stage('Build') {
              steps {
                  sh "mvn package"
              }
          }
          stage('Publish Artifacts') {
              steps {
                  withMaven(globalMavenSettingsConfig: 'maven-settings', jdk: 'jdk17', maven: 'maven3', mavenSettingsConfig: '', traceability: true) {
                      sh "mvn deploy"
                }
              }
          }
      }
  }
Test the pipeline so far and how it goes.
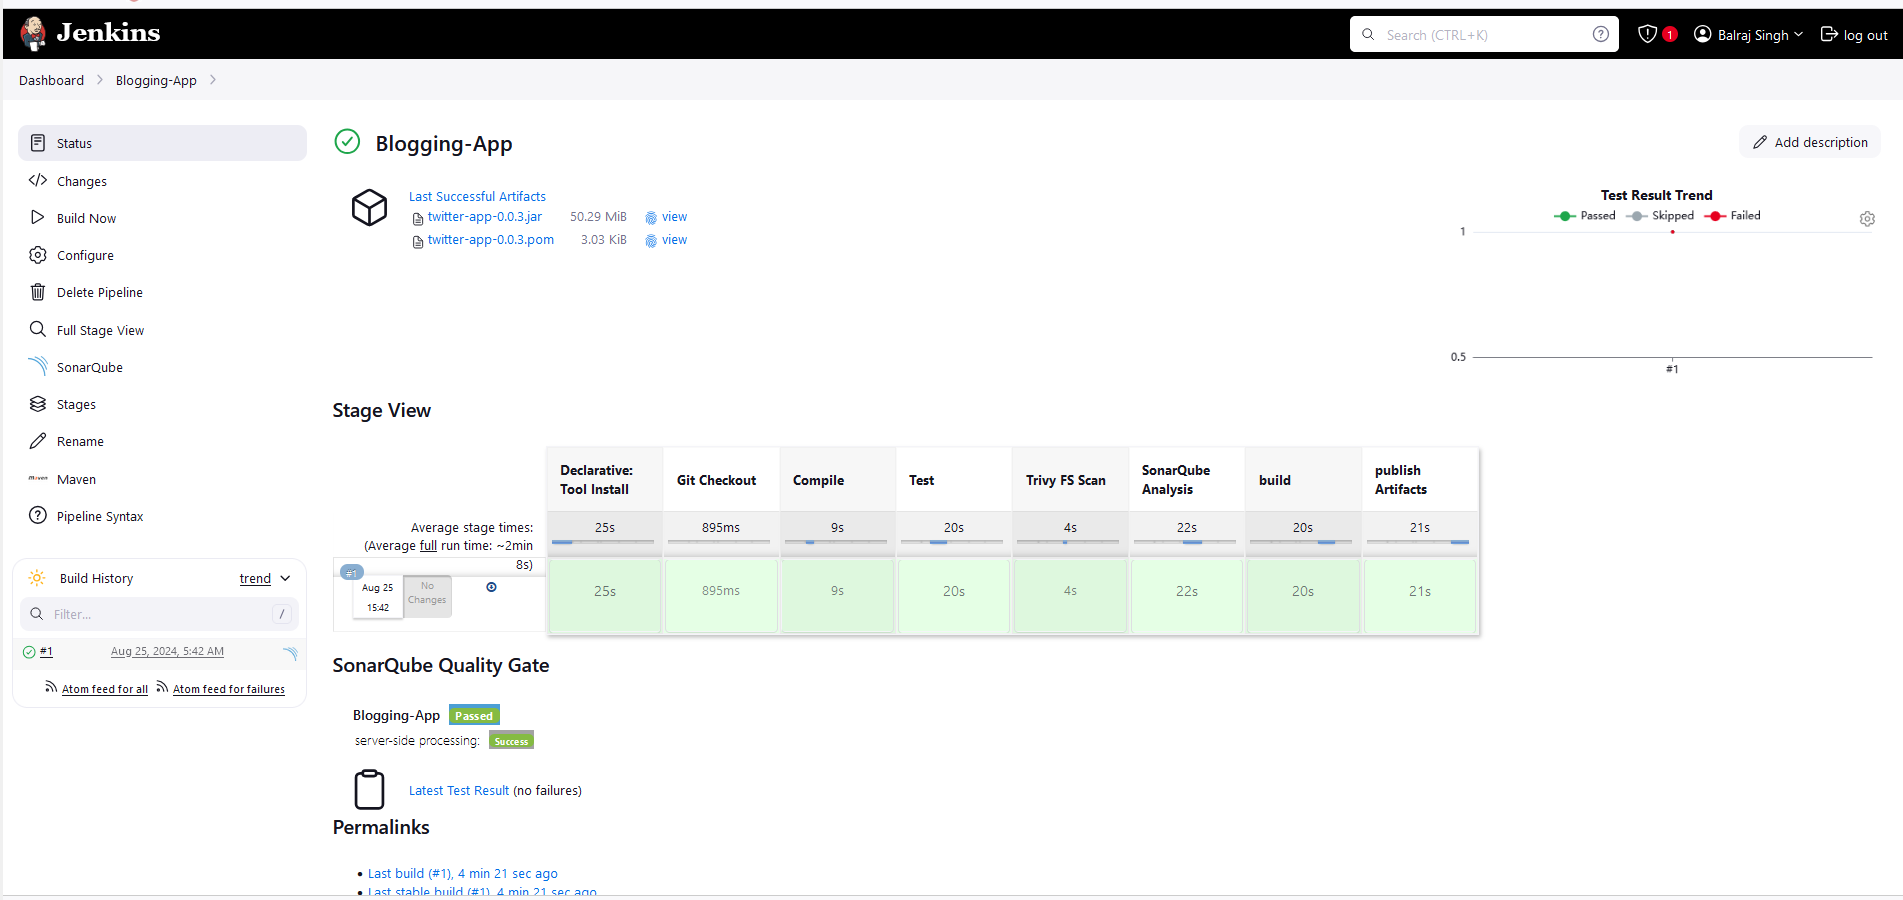
View from SonarQube:

View from Nexus:
Now, we will create a private repogitory in Docker hub. My repo name: balrajsi/bloggingapp
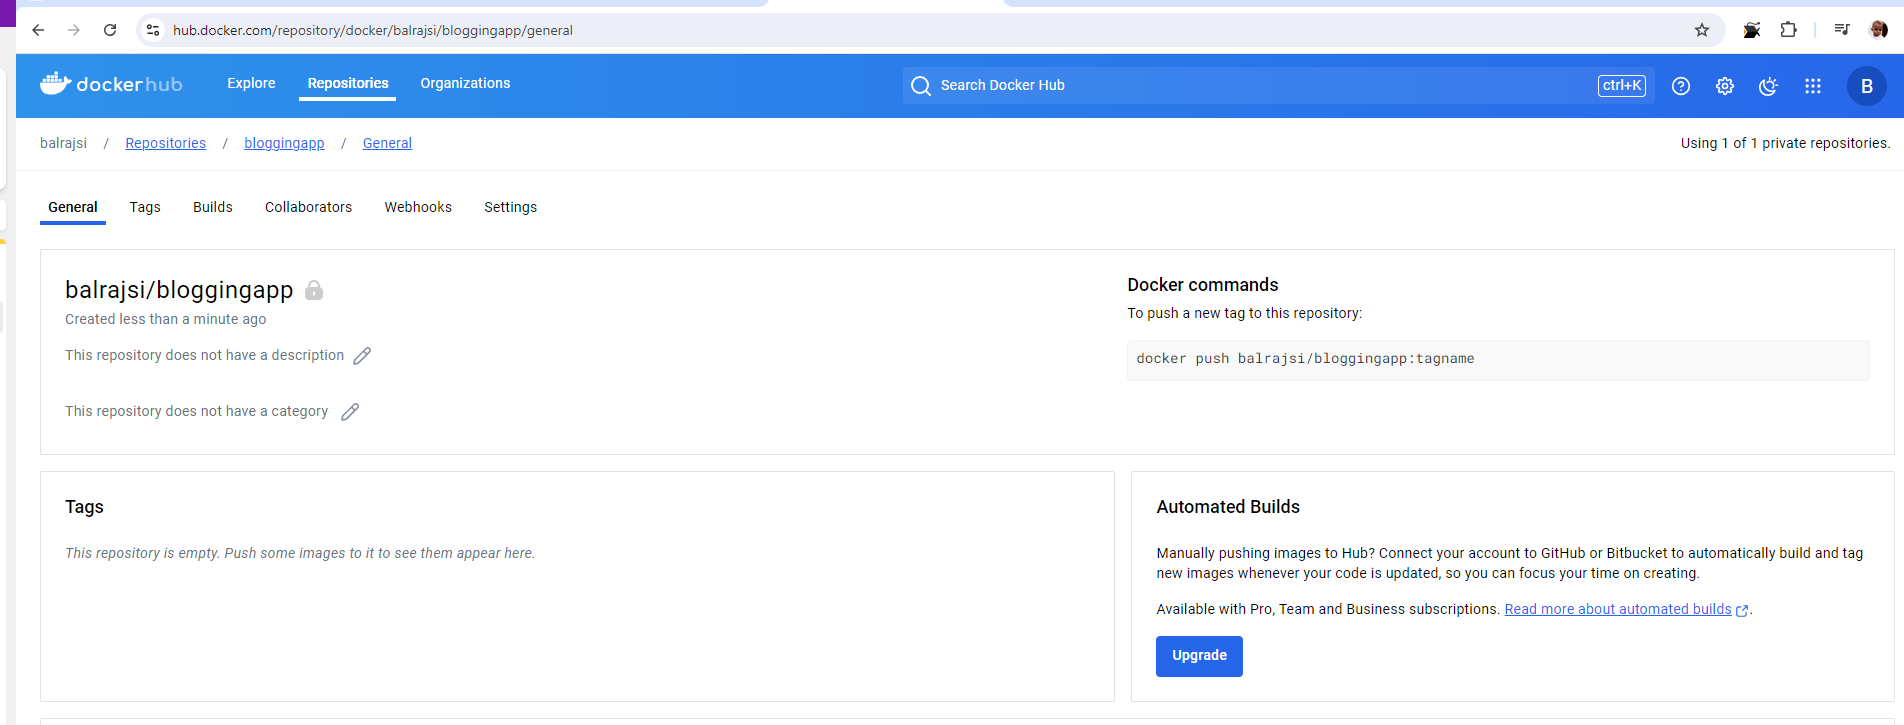
Append the existing pipeline and below is the updated pipeline
  pipeline {
      agent any
      tools {
          jdk 'jdk17'
          maven 'maven3'
      }
      environment {
          SCANNER_HOME= tool 'sonar-scanner'
      }

      stages {
          stage('Clean Workspace'){
               steps{
                   cleanWs()
               }
           }
          stage('Git Checkout') {
              steps {
                  git branch: 'main', url: 'https://github.com/mrbalraj007/FullStack-Blogging-App.git'
              }
          }
          stage('Compile') {
              steps {
                  sh "mvn compile"
              }
          }
          stage('Test') {
              steps {
                  sh "mvn test"
              }
          }
          stage('Trivy FS Scan') {
              steps {
                  sh "trivy fs --format table -o fs.html ."
              }
          }
          stage('SonarQube Analysis') {
              steps {
                  withSonarQubeEnv('sonar-server') {
                  sh '''$SCANNER_HOME/bin/sonar-scanner -Dsonar.projectName=Blogging-App -Dsonar.projectKey=Blogging-App \
                        -Dsonar.java.binaries=target'''
                  }
              }
          }
          stage('Build') {
              steps {
                  sh "mvn package"
              }
          }
          stage('Publish Artifacts') {
              steps {
                  withMaven(globalMavenSettingsConfig: 'maven-settings', jdk: 'jdk17', maven: 'maven3', mavenSettingsConfig: '', traceability: true) {
                      sh "mvn deploy"
                }
              }
          }
          stage('Docker Build and Tag') {
              steps {
                  script {
                  withDockerRegistry(credentialsId: 'docker-cred', toolName: 'docker') {
                  sh "docker build -t balrajsi/bloggingapp:latest ."
                  }
                }
              }
          }
           stage('Trivy image Scan') {
              steps {
                  sh "trivy image --format table -o image.html balrajsi/bloggingapp:latest"
              }
          }
           stage('Docker Push Image') {
              steps {
                  script {
                  withDockerRegistry(credentialsId: 'docker-cred', toolName: 'docker') {
                  sh "docker push balrajsi/bloggingapp:latest"
                  }
                }
              }
          }
      }
  }
Now, we will set up an EKS cluster
Once the cluster is set up then we will use the following command to connect it from the Terraform box.
aws eks --region <your region name> update-kubeconfig --name <your clustername>aws eks --region us-east-1 update-kubeconfig --name balraj-cluster- Check the EKS cluster
kubectl get nodes
    ubuntu@ip-172-31-28-76:~/k8s_setup_file$ kubectl get nodes
    NAME                         STATUS   ROLES    AGE   VERSION
    ip-10-0-0-174.ec2.internal   Ready    <none>   13m   v1.30.2-eks-1552ad0
    ip-10-0-0-39.ec2.internal    Ready    <none>   13m   v1.30.2-eks-1552ad0
    ip-10-0-1-198.ec2.internal   Ready    <none>   13m   v1.30.2-eks-1552ad0
Now, we have to do the RBAC configuration for the EKS cluster.
    comeout from directory "k8s_setup_file"
    cd ..
    current path
    /home/ubuntu   # Current path
To create a namespace
kubectl create ns webapps
To create a service account
    ubuntu@ip-172-31-28-76:~$ cat service.yml
    apiVersion: v1
    kind: ServiceAccount
    metadata:
     name: jenkins
     namespace: webapps
- command to apply
kubectl apply -f service.yml
To test the yml file to see whether it's a valid configuration or not, we can use either dry-run or kubeval
dry-run
Kubebal
Download the latest release:
wget https://github.com/instrumenta/kubeval/releases/latest/download/kubeval-linux-amd64.tar.gz
Extract the archive:
tar xf kubeval-linux-amd64.tar.gz
Move the binary to a directory in your PATH:
sudo mv kubeval /usr/local/bin/
Verify the installation:
kubeval --version
To create a role
    ubuntu@ip-172-31-28-76:~$ cat roles.yml
    apiVersion: rbac.authorization.k8s.io/v1
    kind: Role
    metadata:
      name: app-role
      namespace: webapps
    rules:
    - apiGroups:
      - ""
      - apps
      - extensions
      - batch
      - autoscaling
      resources:
      - pods
      - secrets
      - services
      - deployments
      - replicasets
      - replicationcontrollers
      - componentstatuses
      - configmaps
      - daemonsets
      - events
      - endpoints
      - horizontalpodautoscalers
      - ingress
      - jobs
      - limitranges
      - namespaces
      - nodes
      - persistentvolumes
      - persistentvolumeclaims
      - resourcequotas
      - serviceaccounts
      verbs: ["get", "list", "watch", "create", "update", "patch", "delete"]
To bind the role to service account
    apiVersion: rbac.authorization.k8s.io/v1
    kind: RoleBinding
    metadata:
      name: app-rolebinding
      namespace: webapps
    roleRef:
      apiGroup: rbac.authorization.k8s.io
      kind: Role
      name: app-role
    subjects:
    - kind: ServiceAccount
      name: jenkins
      namespace: webapps
To create a token for service account
file name: jen-secret.yml
    apiVersion: v1
    kind: Secret
    type: kubernetes.io/service-account-token
    metadata:
      name: mysecretname
      annotations:
       kubernetes.io/service-account.name: jenkins    # your service account name
To apply to token you need to run with namespace as below
kubectl apply -f jen-secret.yml -n webapps
Now, we need to create a docker secret as we are using private repo in docker hub.
    kubectl create secret docker-registry regcred \
    --docker-server=https://index.docker.io/v1/ \
    --docker-username=<username> \
    --docker-password=<your_password> \
    --namespace=webapps
     kubectl get secrets -n webapps
    NAME           TYPE                                  DATA   AGE
    mysecretname   kubernetes.io/service-account-token   3      8m1s
    regcred        kubernetes.io/dockerconfigjson        1      60s
Now, we will get a secret password
kubectl describe secret mysecretname -n webapps
    ubuntu@ip-172-31-28-76:~$ kubectl describe secret mysecretname -n webapps
    Name:         mysecretname
    Namespace:    webapps
    Labels:       <none>
    Annotations:  kubernetes.io/service-account.name: jenkins
                  kubernetes.io/service-account.uid: 234ebef6-6c09-414d-aa04-51ec4509a9cc

    Type:  kubernetes.io/service-account-token

    Data
    ====
    ca.crt:     1107 bytes
    namespace:  7 bytes
    token:      eyJhbGciOiJSUzI1NiIsImtpZCI6ImpRc1hZU01Meko5VXRUTE1HY2RpdFA4eTNjeUdQQkVOdXBsYmx3ZDZPLWMifQ.eyJpc3MiOiJrdWJlcm5ldGVzL3NlcnZpY2VhY2NvdW50Iiwia3ViZXJuZXRlcy5pby9zZXJ2aWNlYWNjb3VudC9uYW1lc3BhY2UiOiJ3ZWJhcHBzIiwia3ViZXJuZXRlcy5pby9zZXJ2aWNlYWNjb3VudC9zZWNyZXQubmFtZSI6Im15c2VjcmV0bmFtZSIsImt1YmVybmV0ZXMuaW8vc2VydmljZWFjY291bnQvc2VydmljZS1hY2NvdW50Lm5hbWUiOiJqZW5raW5zIiwia3ViZXJuZXRlcy5pby9zZXJ2aWNlYWNjb3VudC9zZXJ2aWNlLWFjY291bnQudWlkIjoiMjM0ZWJlZjYtNmMwOS00MTRkLWFhMDQtNTFlYzQ1MDlhOWNjIiwic3ViIjoic3lzdGVtOnNlcnZpY2VhY2NvdW50OndlYmFwcHM6amVua2lucyJ9.RFpA3VrD1hw2V8qGmMtLaRwMdlSxWxTYG2t8_NLueOKQIiIivpiRTLqEEcqgUNeCA5sKfK0qg0TeXz4h_b_8GkgtH-tGFVDzfXZ9XtkbFNgUp5HCdnMh_XKrY3HRhDwnBpzDPW0QkDofmmwXzJBUgv0FgD_MO-3kxUBp8fbEa5Tjtl6LXCzLtviLDyTSfubWgsoYff7GUOHAkb1lWw7yhAV-dvSj54iqmb2WqqGMFtkZeDi9Gz8q2IVN9I8txhYoAbB2bQBPZmETXFgGQzf9PQi-BhbPQ2VdSSJ4aPo-FpNVA9y-7JizSgakOYeJ4KnIbcIV1cblXrqX7yIXxuJs6A
Now, go to Jenkins and create a secret for k8s
Dashboard > Manage Jenkins > Credentials > System > Global credentials (unrestricted)
Create a secret textcredentials for K8s.

make sure,
Kubectlis installed onJenkins, if not then use the following command to install it.sudo snap install kubectl --classicApend in the pipeline as below
```sh pipeline { agent any tools { jdk 'jdk17' maven 'maven3' } environment { SCANNER_HOME= tool 'sonar-scanner' }
stages { stage('Clean Workspace'){ steps{ cleanWs() } } stage('Git Checkout') { steps { git branch: 'main', url: 'https://github.com/mrbalraj007/FullStack-Blogging-App.git' } } stage('Compile') { steps { sh "mvn compile" } } stage('Test') { steps { sh "mvn test" } } stage('Trivy FS Scan') { steps { sh "trivy fs --format table -o fs.html ." } } stage('SonarQube Analysis') { steps { withSonarQubeEnv('sonar-server') { sh '''$SCANNER_HOME/bin/sonar-scanner -Dsonar.projectName=Blogging-App -Dsonar.projectKey=Blogging-App \ -Dsonar.java.binaries=target''' } } } stage('Build') { steps { sh "mvn package" } } stage('Publish Artifacts') { steps { withMaven(globalMavenSettingsConfig: 'maven-settings', jdk: 'jdk17', maven: 'maven3', mavenSettingsConfig: '', traceability: true) { sh "mvn deploy"
} } } stage('Docker Build and Tag') { steps { script { withDockerRegistry(credentialsId: 'docker-cred', toolName: 'docker') { sh "docker build -t balrajsi/bloggingapp:latest ."
} } } } stage('Trivy image Scan') { steps { sh "trivy image --format table -o image.html balrajsi/bloggingapp:latest" } } stage('Docker Push Image') { steps { script { withDockerRegistry(credentialsId: 'docker-cred', toolName: 'docker') { sh "docker push balrajsi/bloggingapp:latest"
} } } } stage('K8s-Deployment') { steps { withKubeConfig(caCertificate: '', clusterName: 'balraj-cluster', contextName: '', credentialsId: 'k8-cred', namespace: 'webapps', restrictKubeConfigAccess: false, serverUrl: 'https://DDC0F8028C6233417C293B1185142548.gr7.us-east-1.eks.amazonaws.com') { sh "kubectl apply -f deployment-service.yml" sleep 30 } } } stage('Verify the Deployment') { steps { withKubeConfig(caCertificate: '', clusterName: 'balraj-cluster', contextName: '', credentialsId: 'k8-cred', namespace: 'webapps', restrictKubeConfigAccess: false, serverUrl: 'https://DDC0F8028C6233417C293B1185142548.gr7.us-east-1.eks.amazonaws.com') { sh "kubectl get pods" sh "kubectl get svc" } } }
} }
Run the pipeline
* 
## Add the email notification.
will add the following text in the pipeline.
```bash
post {
always {
script {
def jobName = env.JOB_NAME
def buildNumber = env.BUILD_NUMBER
def pipelineStatus = currentBuild.result ?: "UNKNOWN"
def bannerColor = pipelineStatus.toUpperCase() == 'SUCCESS' ? 'green' : 'red'
def body = """
<html>
<body>
<div style="border: 4px solid ${bannerColor}; padding: 10px;">
<h2>${jobName} - Build ${buildNumber}</h2>
<div style="background-color: ${bannerColor}; padding: 10px;">
<h3 style="color: white;">Pipeline Status: ${pipelineStatus.toUpperCase()}</h3>
</div>
<p>Check the <a href="${BUILD_URL}">console output</a>.</p>
</div>
</body>
</html>
"""
emailext (
subject: "${jobName} - Build ${buildNumber} - ${pipelineStatus.toUpperCase()}",
body: body,
to: "raj10ace@gmail.com", # Type your email ID
from: "jenkins@example.com",
replyTo: "jenkins@example.com",
mimeType: 'text/html'
)
}
}
}
By using this Url you need to generate a app password
https://myaccount.google.com/apppasswords
Configure email notification in Jenkins. Dashboard Manage Jenkins System
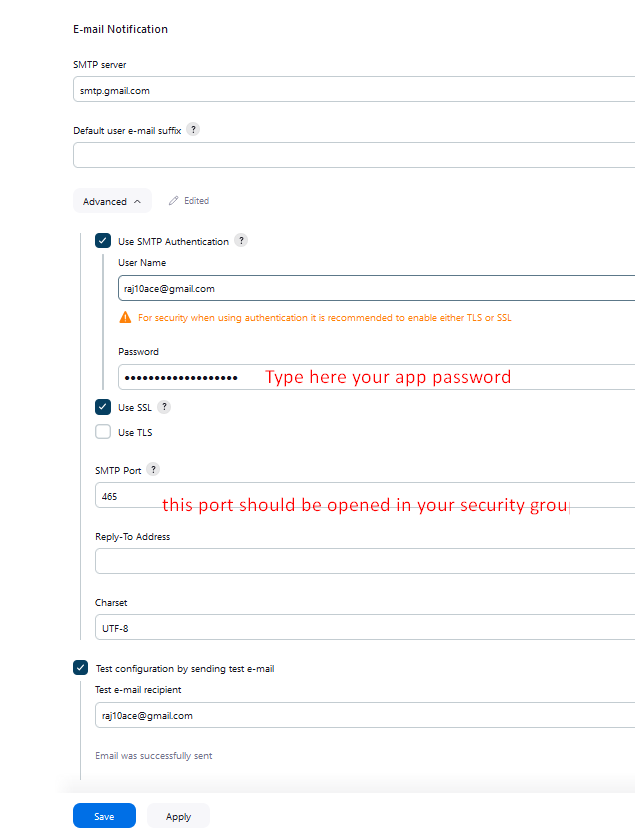
click on
test configurationnow, configureExtended E-mail Notification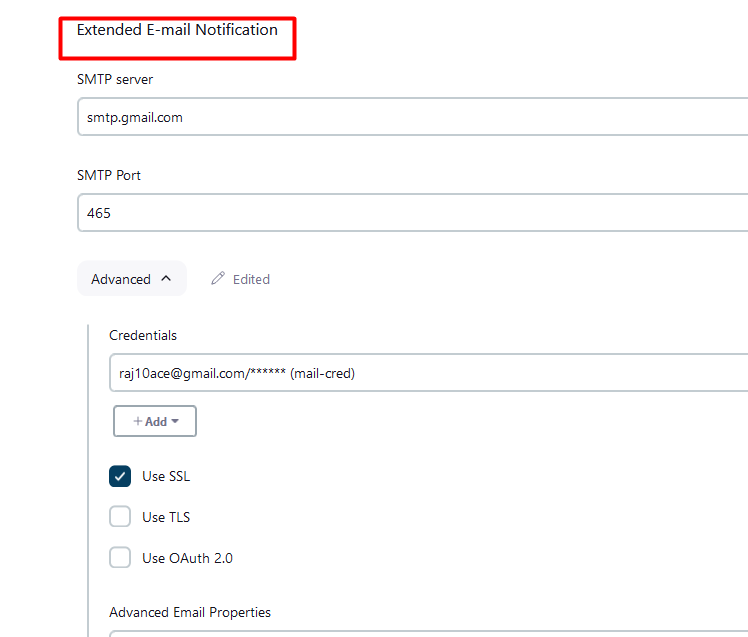
here is the complete pipeline
```sh pipeline { agent any tools { jdk 'jdk17' maven 'maven3' } environment { SCANNER_HOME= tool 'sonar-scanner' }
stages { stage('Clean Workspace'){ steps{ cleanWs() } } stage('Git Checkout') { steps { git branch: 'main', url: 'https://github.com/mrbalraj007/FullStack-Blogging-App.git' } } stage('Compile') { steps { sh "mvn compile" } } stage('Test') { steps { sh "mvn test" } } stage('Trivy FS Scan') { steps { sh "trivy fs --format table -o fs.html ." } } stage('SonarQube Analysis') { steps { withSonarQubeEnv('sonar-server') { sh '''$SCANNER_HOME/bin/sonar-scanner -Dsonar.projectName=Blogging-App -Dsonar.projectKey=Blogging-App \ -Dsonar.java.binaries=target''' } } } stage('Build') { steps { sh "mvn package" } } stage('Publish Artifacts') { steps { withMaven(globalMavenSettingsConfig: 'maven-settings', jdk: 'jdk17', maven: 'maven3', mavenSettingsConfig: '', traceability: true) { sh "mvn deploy"
} } } stage('Docker Build and Tag') { steps { script { withDockerRegistry(credentialsId: 'docker-cred', toolName: 'docker') { sh "docker build -t balrajsi/bloggingapp:latest ."
} } } } stage('Trivy image Scan') { steps { sh "trivy image --format table -o image.html balrajsi/bloggingapp:latest" } } stage('Docker Push Image') { steps { script { withDockerRegistry(credentialsId: 'docker-cred', toolName: 'docker') { sh "docker push balrajsi/bloggingapp:latest"
} } } } stage('K8s-Deployment') { steps { withKubeConfig(caCertificate: '', clusterName: 'balraj-cluster', contextName: '', credentialsId: 'k8-cred', namespace: 'webapps', restrictKubeConfigAccess: false, serverUrl: 'https://DDC0F8028C6233417C293B1185142548.gr7.us-east-1.eks.amazonaws.com') { sh "kubectl apply -f deployment-service.yml" sleep 30 } } } stage('Verify the Deployment') { steps { withKubeConfig(caCertificate: '', clusterName: 'balraj-cluster', contextName: '', credentialsId: 'k8-cred', namespace: 'webapps', restrictKubeConfigAccess: false, serverUrl: 'https://DDC0F8028C6233417C293B1185142548.gr7.us-east-1.eks.amazonaws.com') { sh "kubectl get pods" sh "kubectl get svc" } } }
} post { always { script { def jobName = env.JOB_NAME def buildNumber = env.BUILD_NUMBER def pipelineStatus = currentBuild.result ?: "UNKNOWN" def bannerColor = pipelineStatus.toUpperCase() == 'SUCCESS' ? 'green' : 'red' def body = """
${jobName} - Build ${buildNumber}
Pipeline Status: ${pipelineStatus.toUpperCase()}
Check the console output.
from: "jenkins@example.com", replyTo: "jenkins@example.com", mimeType: 'text/html' ) } } } }
E-mail notification
* 
Pipeline view:
* 
We will try to access LB and see deployment is successful or not.
* 
application is accessible now.

* will create a temp user and password and login with that user credential
* 
clink on `add post`
* 
# Custom Domain (Optional)
# Configuring monitoring(Grafana).
```bash
http://44.201.170.60:3000/login
default login password for Grafana is admin/admin.
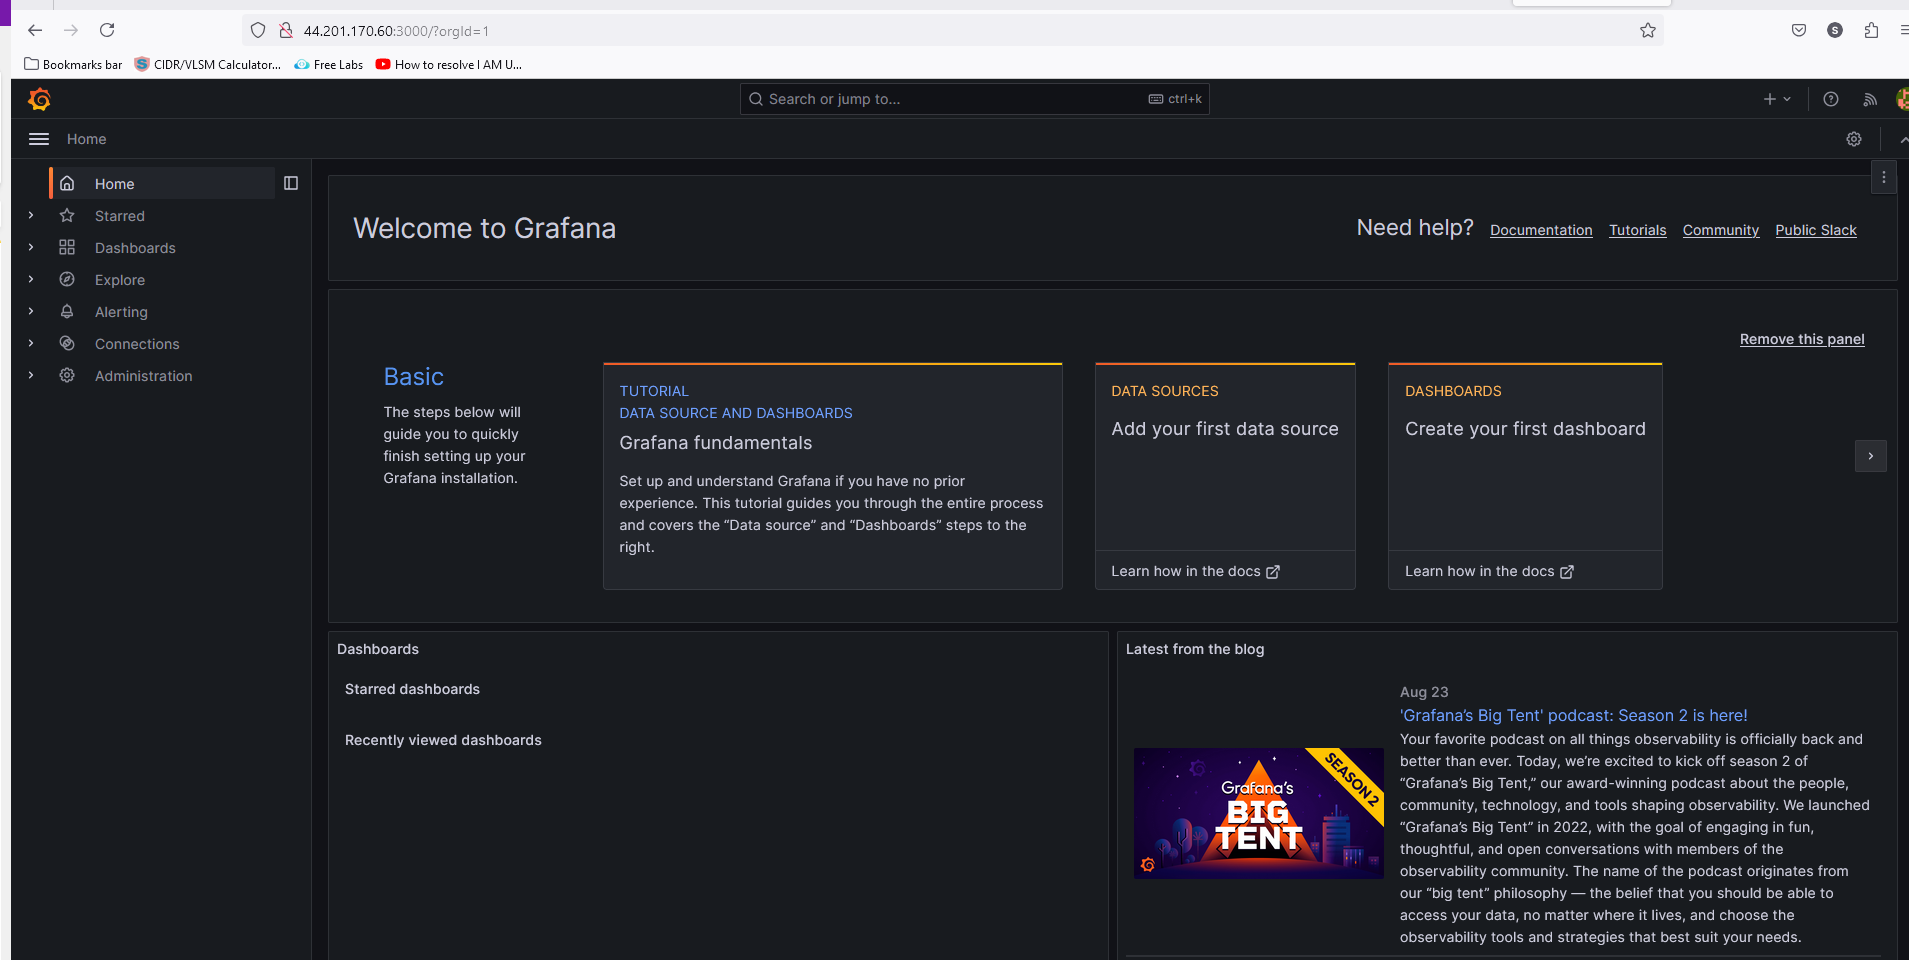
Now, run the following command for Prometheus
  ubuntu@ip-172-31-80-196:~$ cd prometheus/
  ubuntu@ip-172-31-80-196:~/prometheus$ ls
  LICENSE  NOTICE  console_libraries  consoles  prometheus  prometheus.yml  promtool
  ubuntu@ip-172-31-80-196:~/prometheus$ ./prometheus &
Tyr to open http://44.201.170.60:9090/

Now, run the following command for blackbox
  ubuntu@ip-172-31-80-196:~$ ls
  blackbox  prometheus

  ubuntu@ip-172-31-80-196:~$ pwd
  /home/ubuntu

  ubuntu@ip-172-31-80-196:~$ cd blackbox/

  ubuntu@ip-172-31-80-196:~/blackbox$ ls
  LICENSE  NOTICE  blackbox.yml  blackbox_exporter

  ubuntu@ip-172-31-80-196:~/blackbox$ ./blackbox_exporter &
Tyr to open in the browser and you will see below.
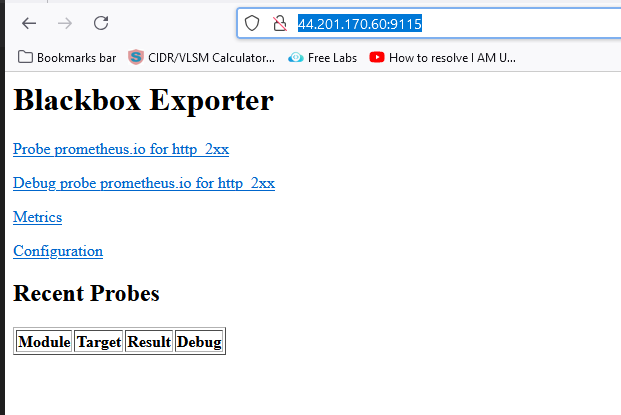
Open this repo for blackbox_exporter
Need to add the following config file in
prometheus.yml- job_name: 'blackbox' metrics_path: /probe params: module: [http_2xx] # Look for a HTTP 200 response. static_configs: - targets: - http://prometheus.io # Target to probe with http. - https://prometheus.io # Target to probe with https. - http://example.com:8080 # Target to probe with http on port 8080. relabel_configs: - source_labels: [__address__] target_label: __param_target - source_labels: [__param_target] target_label: instance - target_label: __address__ replacement: 127.0.0.1:9115
Verifying the cluster
  kubectl cluster-info
  kubectl get nodes
To destroy the setup using Terraform.
- First go to your
TerrformEC2 VM and delete the EKS cluster
- First go to your
terraform destroy --auto-approve
- then go to your directory on main folder
"Terraform_Code"directory then run the command
terraform destroy --auto-approve
Conclusion
- In this blog, we’ve covered the essential steps for deploying and monitoring a Kubernetes application using Jenkins and various supporting tools. By following this guide, you can set up a robust pipeline, ensure your application is deployed smoothly, and monitor its performance effectively.
Key Takeaways:
Set up and configure an EKS cluster and kubectl.
Define and execute Jenkins pipelines for deployment.
Configure email notifications for deployment status.
Set up and test custom domain mapping.
Install and configure monitoring tools like Prometheus, Blackbox Exporter, and Grafana*.
Subscribe to my newsletter
Read articles from Balraj Singh directly inside your inbox. Subscribe to the newsletter, and don't miss out.
Written by

Balraj Singh
Balraj Singh
Tech enthusiast with 15 years of experience in IT, specializing in server management, VMware, AWS, Azure, and automation. Passionate about DevOps, cloud, and modern infrastructure tools like Terraform, Ansible, Packer, Jenkins, Docker, Kubernetes, and Azure DevOps. Passionate about technology and continuous learning, I enjoy sharing my knowledge and insights through blogging and real-world experiences to help the tech community grow!