How to get internet connectivity to the nested VM ?
 Kaustubh Sharma
Let’s break down how to setup internet connectivity to the nested VM, focusing on the NAT (Network Address Translation) configuration.
Achieving DHCP and Internet Connectivity inside nested VM.
Let's create the Internal Virtual Switch first.
$switchName = "InternalNAT" New-VMSwitch -Name $switchName -SwitchType Internal- This creates an internal virtual switch named “InternalNAT” that allows communication between the host and nested VMs.
Setting Up NAT:
New-NetNat –Name $switchName –InternalIPInterfaceAddressPrefix “192.168.0.0/24”- This sets up a NAT network named “InternalNAT” with the IP range “192.168.0.0/24”. NAT allows the nested VMs to access external networks (like the internet) using the host’s IP address.
Assigning an IP Address to the Virtual Switch:
$ifIndex = (Get-NetAdapter | ? {$_.name -like "*$switchName"}).ifIndex New-NetIPAddress -IPAddress 192.168.0.1 -InterfaceIndex $ifIndex -PrefixLength 24- This assigns the IP address “192.168.0.1” to the virtual switch, which acts as the gateway for the nested VMs.
Configuring DHCP:
Add-DhcpServerV4Scope -Name "DHCP-$switchName" -StartRange 192.168.0.50 -EndRange 192.168.0.100 -SubnetMask 255.255.255.0 Set-DhcpServerV4OptionValue -Router 192.168.0.1 -DnsServer 168.63.129.16 Restart-service dhcpserverAdd-DhcpServerV4Scope: Creates a DHCP scope that assigns IP addresses from 192.168.0.50 to 192.168.0.100 to the nested VMs.
Set-DhcpServerV4OptionValue: Configures the default gateway (192.168.0.1) and DNS server (168.63.129.16) for the DHCP scope.
Restart-service dhcpserver: Restarts the DHCP server to apply the new configuration.
Breakdown of NAT Configuration
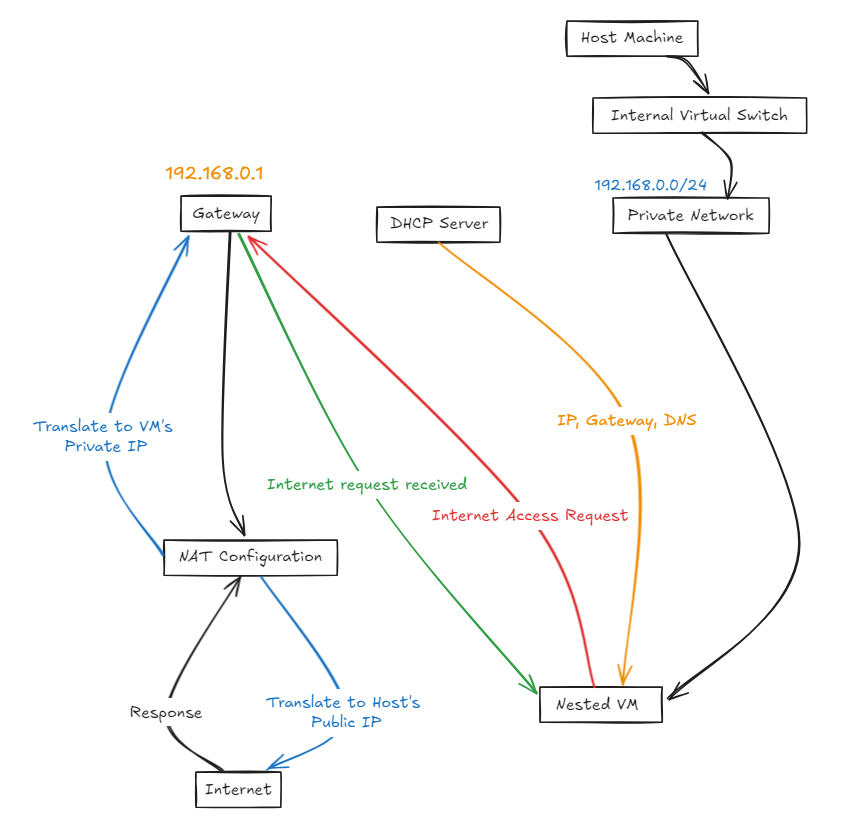
NAT (Network Address Translation) allows multiple devices on a private network to share a single public IP address for accessing external networks. Here’s how it works in this setup:
Internal Network:
- The internal virtual switch creates a private network (192.168.0.0/24) for the nested VMs.
NAT Configuration:
- The
New-NetNatcommand sets up NAT, mapping the private IP addresses of the nested VMs to the host’s public IP address.
- The
Gateway and IP Assignment:
The virtual switch is assigned an IP address (192.168.0.1), which acts as the gateway for the nested VMs.
The DHCP server assigns IP addresses to the nested VMs and provides them with the gateway and DNS server information.
Internet Access:
When a nested VM tries to access the internet, its private IP address is translated to the host’s public IP address by the NAT configuration.
Responses from the internet are translated back to the nested VM’s private IP address.

This setup ensures that the nested VMs can obtain IP addresses via DHCP and access the internet through the host’s network connection.
Subscribe to my newsletter
Read articles from Kaustubh Sharma directly inside your inbox. Subscribe to the newsletter, and don't miss out.
Written by
