Autoscaling in Kubernetes: A Beginner's Guide
 Usama Aijaz
Autoscaling is a key feature in Kubernetes that allows your applications to handle varying workloads by automatically adjusting resources. There are three main types of autoscaling in Kubernetes: Horizontal Pod Autoscaler (HPA), Vertical Pod Autoscaler (VPA), and Cluster Autoscaler (CA). Each of these serves a different purpose and is suited to different scenarios, especially when running Kubernetes on cloud providers.
Types of Autoscaling in Kubernetes
Horizontal Pod Autoscaler (HPA)
What it does: HPA scales the number of pods in a deployment, replica set, or stateful set based on observed CPU utilization (or other metrics like memory, custom metrics, etc.).
When to use it: HPA is ideal when your application experiences fluctuating demand, such as a web service that faces traffic spikes during certain times of the day. By scaling the number of pods up or down, HPA ensures that your application can handle the load without overprovisioning resources.
How it works: HPA monitors the resource usage of your pods and automatically adjusts the number of replicas to meet the specified target metrics. For example, if CPU usage exceeds the defined threshold, HPA will add more pods to distribute the load. Conversely, if the usage drops, HPA will reduce the number of pods to save resources.
Cloud Provider Consideration: HPA is fully supported on both cloud and on-premises Kubernetes clusters. However, it is particularly beneficial in cloud environments where you pay for the resources you use. By scaling pods based on demand, HPA helps optimize costs in cloud setups.
Vertical Pod Autoscaler (VPA)
What it does: VPA adjusts the CPU and memory requests and limits for the containers in your pods. Instead of adding or removing pods, VPA resizes the existing pods to better match the current resource needs.
When to use it: VPA is useful when your application has variable resource requirements over time. For example, some workloads may require more CPU or memory during certain phases, such as batch processing jobs, while using fewer resources at other times. VPA ensures that pods always have the right amount of resources without overprovisioning.
How it works: VPA monitors the historical and current resource usage of your containers and recommends or automatically adjusts the resource requests and limits. This adjustment helps ensure that your pods have enough resources to perform efficiently without wasting them.
Cloud Provider Consideration: VPA is particularly beneficial in cloud environments where resource usage translates directly into costs. By optimizing resource allocation, VPA helps to minimize expenses. Additionally, some cloud providers offer integrated VPA solutions, making it easier to implement and manage.
Cluster Autoscaler (CA)
What it does: CA adjusts the number of nodes in your Kubernetes cluster. It adds nodes when your cluster is running out of resources to schedule new pods and removes nodes when they are underutilized.
When to use it: CA is essential when running Kubernetes on a cloud provider, as it helps to dynamically manage the number of nodes based on your workload. For instance, if your applications suddenly require more resources than the current nodes can provide, CA will add more nodes to the cluster. Similarly, if certain nodes are idle, CA will remove them to save costs.
How it works: CA continuously monitors the cluster and checks for unschedulable pods due to resource constraints. If it finds that the current nodes cannot handle the workload, it provisions additional nodes. Conversely, if nodes are underutilized or not needed, CA can scale down the cluster by removing those nodes.
Cloud Provider Consideration: CA is primarily applicable in cloud environments because it relies on the ability to dynamically add or remove nodes. Most cloud providers like AWS, Google Cloud, and Azure offer native support for Cluster Autoscaler, making it easier to manage costs and resources. On-premises environments can also use CA, but the ability to scale is limited by the physical hardware available.
Example: Horizontal Pod Autoscaler (HPA) in Action
Let’s look at an example of how to set up and use the Horizontal Pod Autoscaler (HPA) in a Kubernetes cluster.
Step 1: Deploy the Metrics Server
The Metrics Server provides resource utilization data, which HPA uses to make scaling decisions. Apply the following YAML to deploy the Metrics Server:
apiVersion: v1
kind: ServiceAccount
metadata:
  labels:
    k8s-app: metrics-server
  name: metrics-server
  namespace: kube-system
---
apiVersion: rbac.authorization.k8s.io/v1
kind: ClusterRole
metadata:
  labels:
    k8s-app: metrics-server
    rbac.authorization.k8s.io/aggregate-to-admin: "true"
    rbac.authorization.k8s.io/aggregate-to-edit: "true"
    rbac.authorization.k8s.io/aggregate-to-view: "true"
  name: system:aggregated-metrics-reader
rules:
- apiGroups:
  - metrics.k8s.io
  resources:
  - pods
  - nodes
  verbs:
  - get
  - list
  - watch
---
apiVersion: rbac.authorization.k8s.io/v1
kind: ClusterRole
metadata:
  labels:
    k8s-app: metrics-server
  name: system:metrics-server
rules:
- apiGroups:
  - ""
  resources:
  - nodes/metrics
  verbs:
  - get
- apiGroups:
  - ""
  resources:
  - pods
  - nodes
  verbs:
  - get
  - list
  - watch
---
apiVersion: rbac.authorization.k8s.io/v1
kind: RoleBinding
metadata:
  labels:
    k8s-app: metrics-server
  name: metrics-server-auth-reader
  namespace: kube-system
roleRef:
  apiGroup: rbac.authorization.k8s.io
  kind: Role
  name: extension-apiserver-authentication-reader
subjects:
- kind: ServiceAccount
  name: metrics-server
  namespace: kube-system
---
apiVersion: rbac.authorization.k8s.io/v1
kind: ClusterRoleBinding
metadata:
  labels:
    k8s-app: metrics-server
  name: metrics-server:system:auth-delegator
roleRef:
  apiGroup: rbac.authorization.k8s.io
  kind: ClusterRole
  name: system:auth-delegator
subjects:
- kind: ServiceAccount
  name: metrics-server
  namespace: kube-system
---
apiVersion: rbac.authorization.k8s.io/v1
kind: ClusterRoleBinding
metadata:
  labels:
    k8s-app: metrics-server
  name: system:metrics-server
roleRef:
  apiGroup: rbac.authorization.k8s.io
  kind: ClusterRole
  name: system:metrics-server
subjects:
- kind: ServiceAccount
  name: metrics-server
  namespace: kube-system
---
apiVersion: v1
kind: Service
metadata:
  labels:
    k8s-app: metrics-server
  name: metrics-server
  namespace: kube-system
spec:
  ports:
  - name: https
    port: 443
    protocol: TCP
    targetPort: https
  selector:
    k8s-app: metrics-server
---
apiVersion: apps/v1
kind: Deployment
metadata:
  labels:
    k8s-app: metrics-server
  name: metrics-server
  namespace: kube-system
spec:
  selector:
    matchLabels:
      k8s-app: metrics-server
  strategy:
    rollingUpdate:
      maxUnavailable: 0
  template:
    metadata:
      labels:
        k8s-app: metrics-server
    spec:
      containers:
      - args:
        - --cert-dir=/tmp
        - --secure-port=10250
        - --kubelet-preferred-address-types=InternalIP,ExternalIP,Hostname
        - --kubelet-use-node-status-port
        - --kubelet-insecure-tls
        - --metric-resolution=15s
        image: registry.k8s.io/metrics-server/metrics-server:v0.7.1
        imagePullPolicy: IfNotPresent
        livenessProbe:
          failureThreshold: 3
          httpGet:
            path: /livez
            port: https
            scheme: HTTPS
          periodSeconds: 10
        name: metrics-server
        ports:
        - containerPort: 10250
          name: https
          protocol: TCP
        readinessProbe:
          failureThreshold: 3
          httpGet:
            path: /readyz
            port: https
            scheme: HTTPS
          initialDelaySeconds: 20
          periodSeconds: 10
        resources:
          requests:
            cpu: 100m
            memory: 200Mi
        securityContext:
          allowPrivilegeEscalation: false
          capabilities:
            drop:
            - ALL
          readOnlyRootFilesystem: true
          runAsNonRoot: true
          runAsUser: 1000
          seccompProfile:
            type: RuntimeDefault
        volumeMounts:
        - mountPath: /tmp
          name: tmp-dir
      nodeSelector:
        kubernetes.io/os: linux
      priorityClassName: system-cluster-critical
      serviceAccountName: metrics-server
      volumes:
      - emptyDir: {}
        name: tmp-dir
---
apiVersion: apiregistration.k8s.io/v1
kind: APIService
metadata:
  labels:
    k8s-app: metrics-server
  name: v1beta1.metrics.k8s.io
spec:
  group: metrics.k8s.io
  groupPriorityMinimum: 100
  insecureSkipTLSVerify: true
  service:
    name: metrics-server
    namespace: kube-system
  version: v1beta1
  versionPriority: 100
Apply Command:
kubectl apply -f metrics-server.yaml
Expected Output:

Additional Commands:
kubectl get deployment -n kube-system
kubectl get pods -n kube-system -l k8s-app=metrics-server
kubectl logs -n kube-system -l k8s-app=metrics-server
Expected Output:

Step 2: Deploy the PHP Application
Deploy a simple PHP application using the following YAML configuration:
apiVersion: apps/v1
kind: Deployment
metadata:
  name: php-apache
spec:
  selector:
    matchLabels:
      run: php-apache
  template:
    metadata:
      labels:
        run: php-apache
    spec:
      containers:
      - name: php-apache
        image: registry.k8s.io/hpa-example
        ports:
        - containerPort: 80
        resources:
          limits:
            cpu: 500m
          requests:
            cpu: 200m
---
apiVersion: v1
kind: Service
metadata:
  name: php-apache
  labels:
    run: php-apache
spec:
  ports:
  - port: 80
  selector:
    run: php-apache
Apply Command:
kubectl apply -f php-apache.yaml
Expected Output:

Additional Commands:
kubectl get deployments
kubectl get pods -l run=php-apache
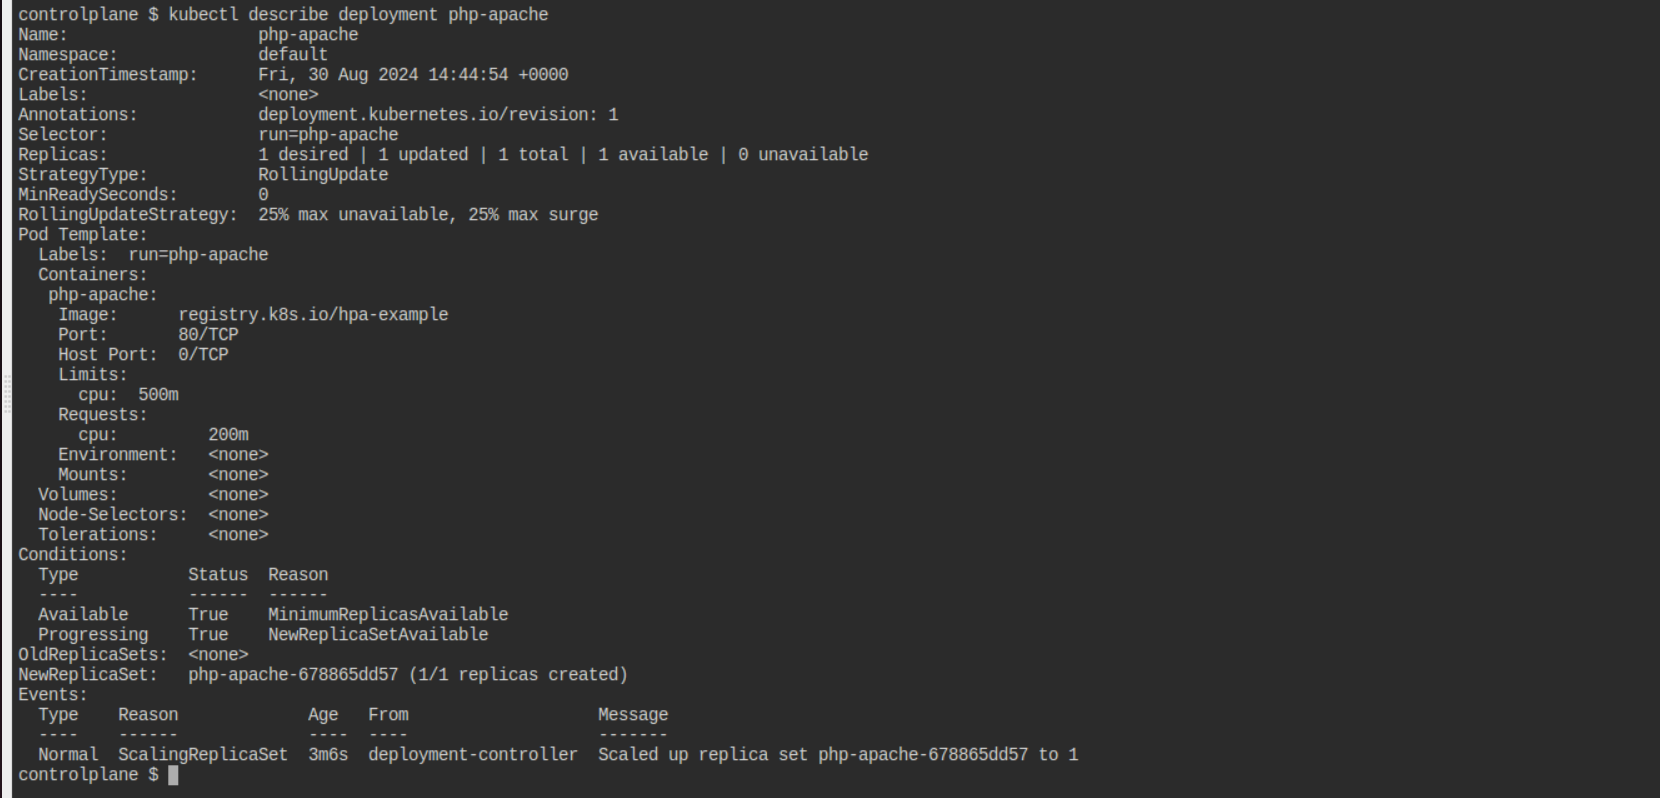
kubectl describe deployment php-apache
kubectl get svc php-apache
Expected Output:


Step 3: Configure Horizontal Pod Autoscaler (HPA)
Create an HPA for the PHP application. This will scale the number of pods between 1 and 10 based on CPU utilization, aiming to maintain an average CPU utilization of 50%.
Command:
kubectl autoscale deployment php-apache --cpu-percent=50 --min=1 --max=10
Expected Output:

Additional Commands:
kubectl get hpa
kubectl describe hpa php-apache
Expected Output:

Step 4: Simulate Load
Simulate a load on the PHP application using a busybox container to see the HPA in action:
Command:
kubectl run -i --tty load-generator --rm --image=busybox:1.28 --restart=Never -- /bin/sh -c "while sleep 0.01; do wget -q -O- http://php-apache; done"
Expected Output: This command will continuously send requests to the PHP application, causing an increase in CPU usage as below image.

Step 5: Monitor the HPA
Monitor the scaling activity of the HPA as it adjusts the number of pods:
Command:
kubectl get hpa php-apache --watch
Expected Output:

As the load increases, you will see the HPA scale up the number of pods. When the load decreases, it will scale them back down for this remove load generator pod or stop is by using Ctrl+C then after some time pods goes down.
Step 6: Stop Load Generator Pod
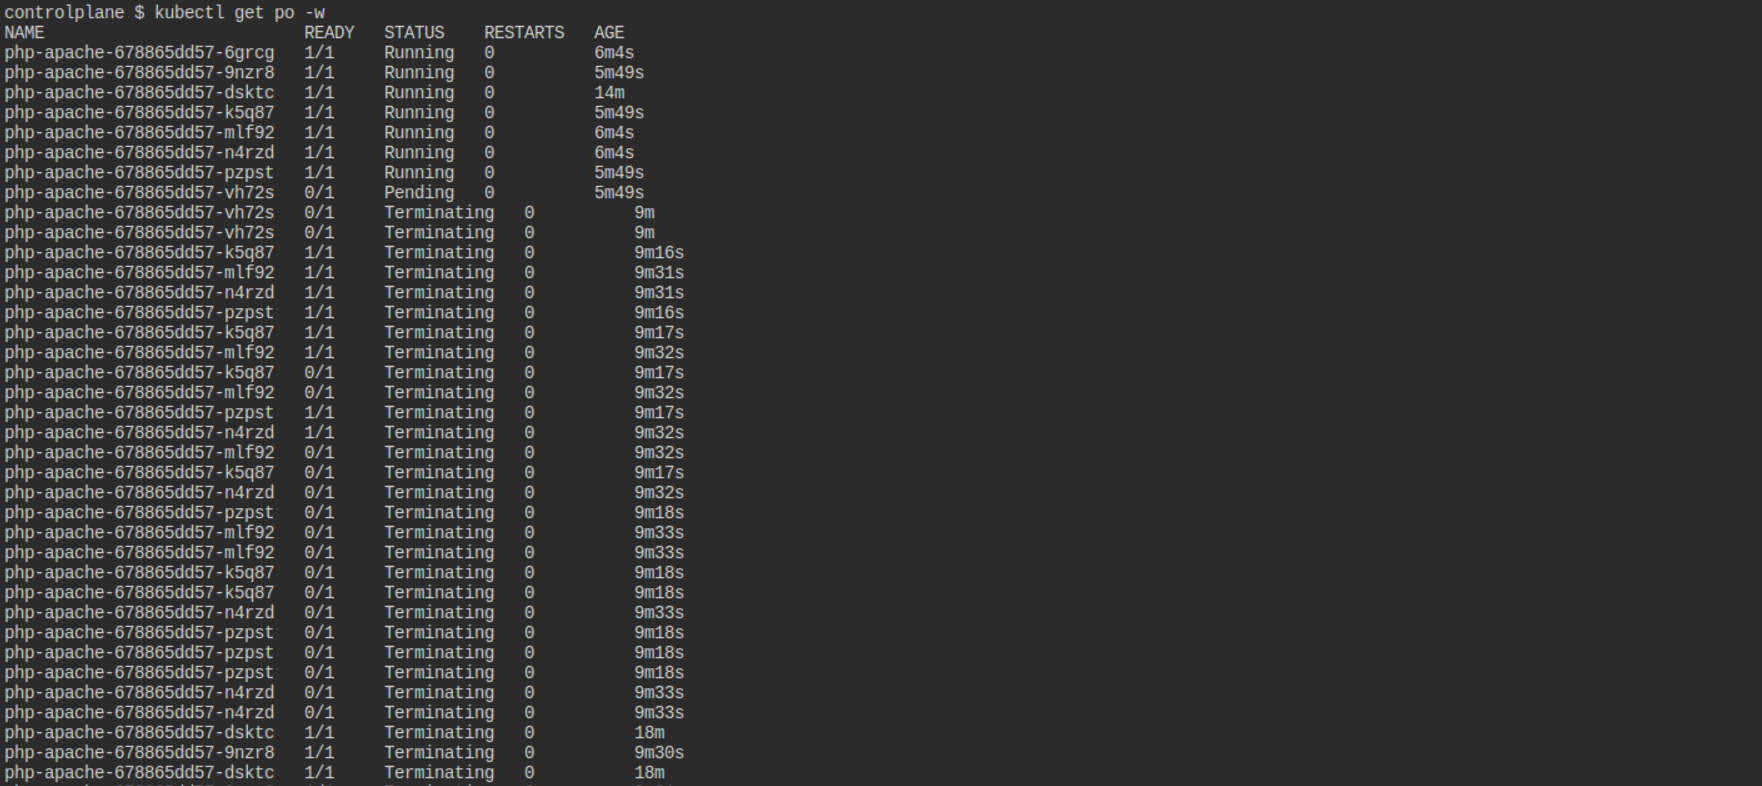
Then apply below commands again after stopping load generator pod by pressing Ctrl+C
kubectl get po -w
kubectl get hpa php-apache --watch
After some time replicas goes down as below output.


When to Use Each Autoscaler in Cloud Environments
- HPA: Use HPA in cloud environments where your application experiences varying traffic patterns. Since cloud resources are billed on a pay-as-you-go basis, HPA helps in optimizing costs by running only
Conclusion:
By strategically implementing these autoscaling mechanisms, you can ensure that your Kubernetes applications are both responsive to user demand and cost-effective, particularly when running on cloud providers. Whether you’re dealing with varying traffic, changing resource needs, or fluctuating infrastructure demands, Kubernetes autoscaling tools provide a comprehensive solution to maintain performance while controlling costs.
Subscribe to my newsletter
Read articles from Usama Aijaz directly inside your inbox. Subscribe to the newsletter, and don't miss out.
Written by
