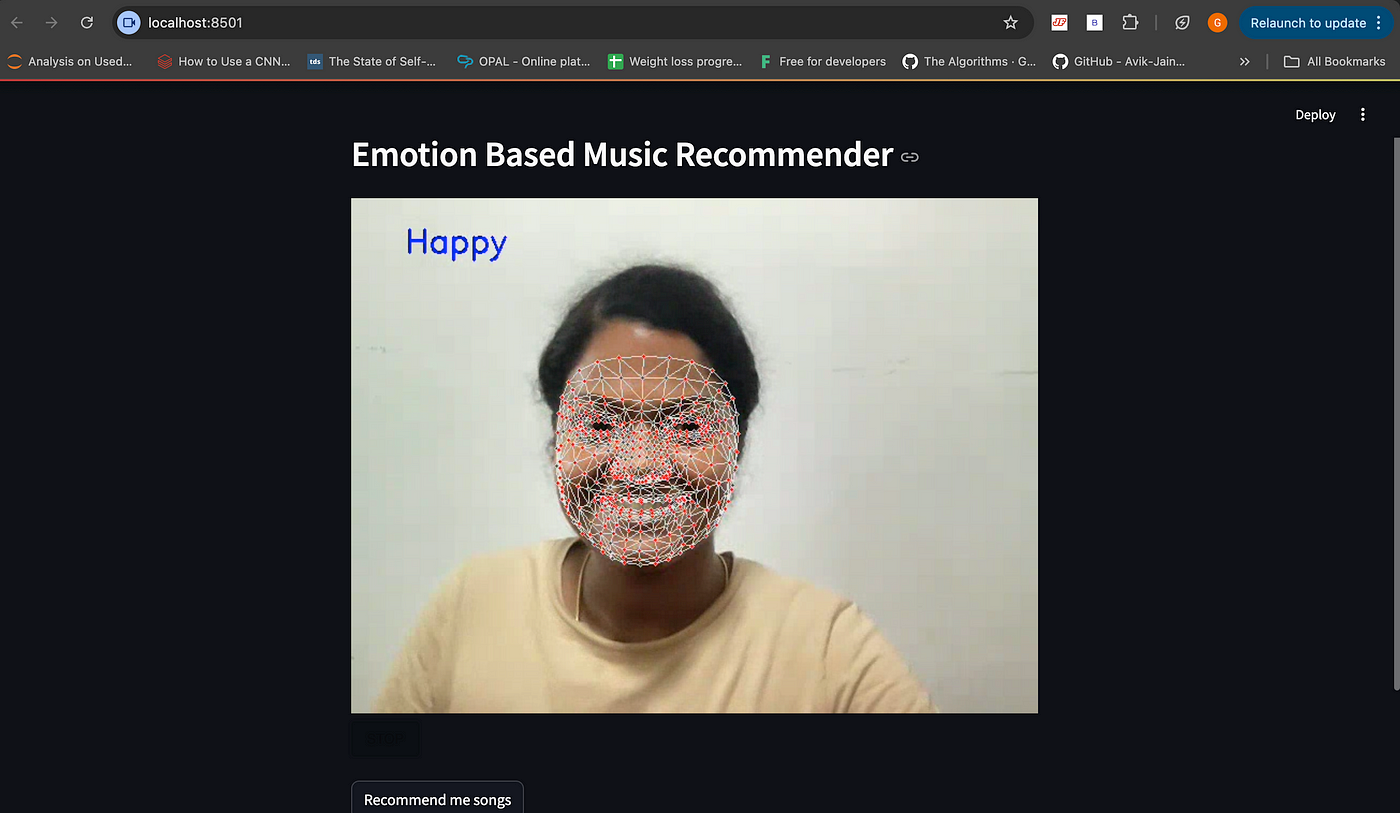
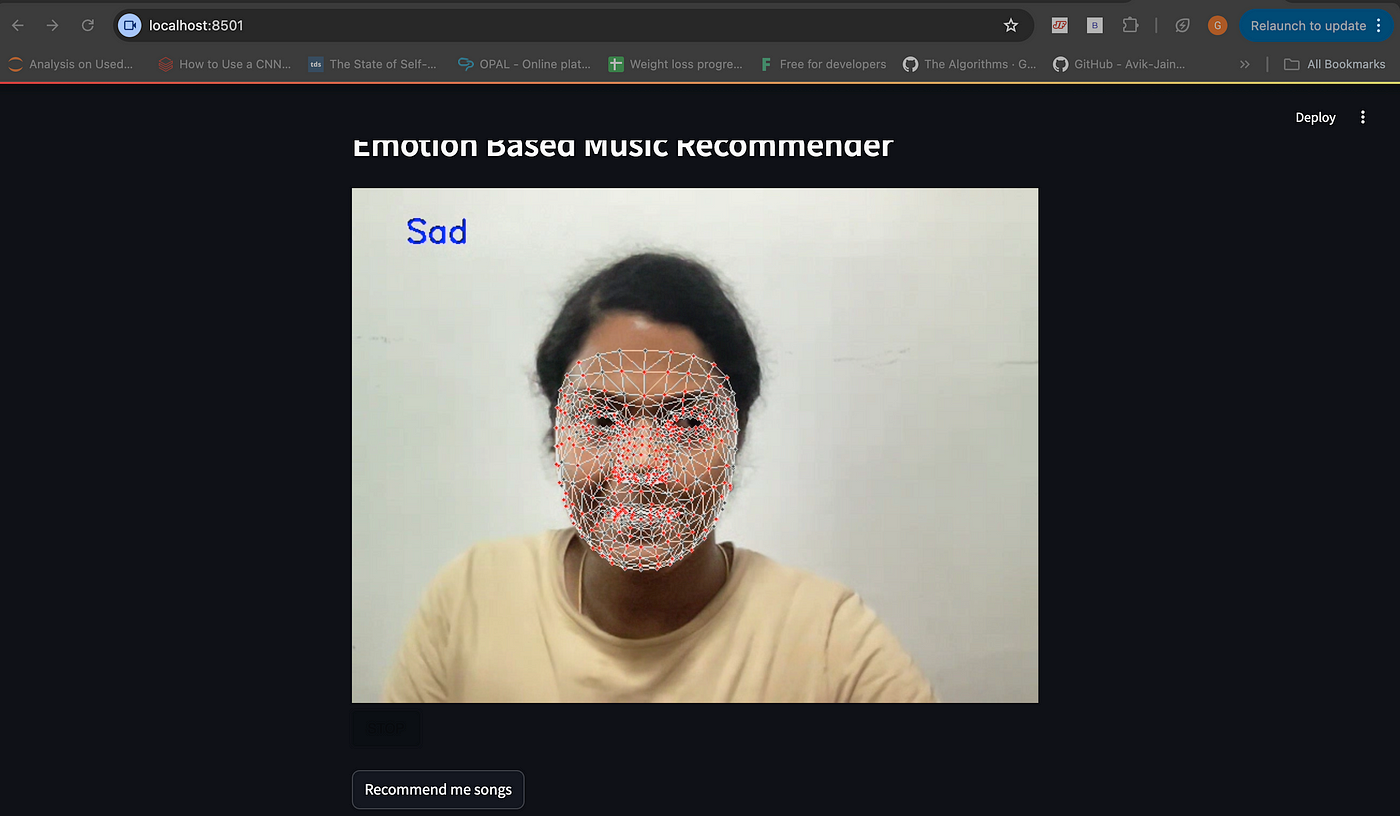
Building an Emotion-Based Music Recommender: A Step-by-Step Guide
 Gayathri Selvaganapathi
Table of Contents
Introduction
Project Overview
Tools and Libraries
Setting Up the Project
Cloning the Repository
Data Collection
Training the Model
Creating the Web App
5. Coding the Emotion Detection Logic
Emotion Processor Class
Loading the Model and Labels
Using Mediapipe for Landmark Detection
6. Integrating the Music Recommender
Creating the UI
Handling the YouTube Search Query
7. Handling Session State
8. Final Touches and Testing
9. Conclusion
10. References
1. Introduction
Welcome to this detailed walkthrough of building an Emotion-Based Music Recommender. This project leverages facial emotion recognition to recommend music that aligns with the user’s current mood. The application is built using a combination of computer vision, deep learning, and web technologies, creating an engaging and personalized user experience.
In this blog, we will guide you through every step of building this project, from setting up your environment to deploying the final web app.
2. Project Overview
In this project, the model captures the user’s facial expressions using their webcam, predicts their current emotion, and recommends music that matches this emotion by searching on YouTube.
Supported Emotions
Happy
Sad
Angry
Surprised
Neutral
Rock (a fun addition to the emotions)
3. Tools and Libraries
To build this project, we use several powerful tools and libraries:
Streamlit: A fast and simple way to create web applications for machine learning projects.
Streamlit WebRTC: Captures and processes video in real-time within a Streamlit app.
Mediapipe: Google’s open-source framework for building multimodal machine learning pipelines, used here for detecting facial and hand landmarks.
Keras: Used to load and run the pre-trained emotion detection model.
OpenCV: For image processing tasks.
Numpy: For handling arrays and numerical operations.
4. Setting Up the Project
Cloning the Repository
Start by cloning the repository that contains the base code for this project. If you haven’t already, you can get the code from the following link:
git clone https://github.com/Gayathri-Selvaganapathi/emotion_based_music_recommendation.git
cd emotion-based-music-recommendation
This repository contains all the scripts needed for data collection, model training, and the web app.
Data Collection
The first step is to collect data for training the emotion detection model. I have used this repo for the data collectiona nd training https://github.com/Pawandeep-prog/liveEmoji.
We achieve this by capturing images of different emotions such as happy, sad, angry, and so on.
Run the data_collection.py script to start collecting data:
python data_collection.py
The script will prompt you to enter the name of the emotion for which you want to collect data (e.g., “happy”). It then starts capturing images from your webcam.
Here’s a snippet of what the data collection code looks like:
import mediapipe as mp
import numpy as np
import cv2

cap = cv2.VideoCapture(0)

name = input("Enter the name of the data : ")

holistic = mp.solutions.holistic
hands = mp.solutions.hands
holis = holistic.Holistic()
drawing = mp.solutions.drawing_utils

X = []
data_size = 0

while True:
 lst = []

 _, frm = cap.read()

 frm = cv2.flip(frm, 1)

 res = holis.process(cv2.cvtColor(frm, cv2.COLOR_BGR2RGB))


 if res.face_landmarks:
  for i in res.face_landmarks.landmark:
   lst.append(i.x - res.face_landmarks.landmark[1].x)
   lst.append(i.y - res.face_landmarks.landmark[1].y)

  if res.left_hand_landmarks:
   for i in res.left_hand_landmarks.landmark:
    lst.append(i.x - res.left_hand_landmarks.landmark[8].x)
    lst.append(i.y - res.left_hand_landmarks.landmark[8].y)
  else:
   for i in range(42):
    lst.append(0.0)

  if res.right_hand_landmarks:
   for i in res.right_hand_landmarks.landmark:
    lst.append(i.x - res.right_hand_landmarks.landmark[8].x)
    lst.append(i.y - res.right_hand_landmarks.landmark[8].y)
  else:
   for i in range(42):
    lst.append(0.0)


  X.append(lst)
  data_size = data_size+1


 drawing.draw_landmarks(frm, res.face_landmarks, holistic.FACEMESH_CONTOURS)
 drawing.draw_landmarks(frm, res.left_hand_landmarks, hands.HAND_CONNECTIONS)
 drawing.draw_landmarks(frm, res.right_hand_landmarks, hands.HAND_CONNECTIONS)

 cv2.putText(frm, str(data_size), (50,50), cv2.FONT_HERSHEY_SIMPLEX, 1, (0,255,0),2)

 cv2.imshow("window", frm)

 if cv2.waitKey(1) == 27 or data_size>99:
  cv2.destroyAllWindows()
  cap.release()
  break


np.save(f"{name}.npy", np.array(X))
print(np.array(X).shape)
Training the Model
Once you have collected enough data for each emotion, the next step is to train the model. This can be done by running the training.py script:
python training.py
The script processes the images, trains a neural network on them, and saves the trained model as model.h5.
Here’s how the training script is be structured:
import os
import numpy as np
import cv2
from tensorflow.keras.utils import to_categorical

from keras.layers import Input, Dense
from keras.models import Model

is_init = False
size = -1

label = []
dictionary = {}
c = 0

for i in os.listdir():
 if i.split(".")[-1] == "npy" and not(i.split(".")[0] == "labels"):
  if not(is_init):
   is_init = True
   X = np.load(i)
   size = X.shape[0]
   y = np.array([i.split('.')[0]]*size).reshape(-1,1)
  else:
   X = np.concatenate((X, np.load(i)))
   y = np.concatenate((y, np.array([i.split('.')[0]]*size).reshape(-1,1)))

  label.append(i.split('.')[0])
  dictionary[i.split('.')[0]] = c
  c = c+1


for i in range(y.shape[0]):
 y[i, 0] = dictionary[y[i, 0]]
y = np.array(y, dtype="int32")

###  hello = 0 nope = 1 ---> [1,0] ... [0,1]

y = to_categorical(y)

X_new = X.copy()
y_new = y.copy()
counter = 0

cnt = np.arange(X.shape[0])
np.random.shuffle(cnt)

for i in cnt:
 X_new[counter] = X[i]
 y_new[counter] = y[i]
 counter = counter + 1


ip = Input(shape=(X.shape[1]))

m = Dense(512, activation="relu")(ip)
m = Dense(256, activation="relu")(m)

op = Dense(y.shape[1], activation="softmax")(m)

model = Model(inputs=ip, outputs=op)

model.compile(optimizer='rmsprop', loss="categorical_crossentropy", metrics=['acc'])

model.fit(X, y, epochs=50)


model.save("model.h5")
np.save("labels.npy", np.array(label))
Creating the Web App
With the model trained, it’s time to create the web app using Streamlit. This involves setting up the user interface (UI) and integrating the emotion detection model.
5. Coding the Emotion Detection Logic
Emotion Processor Class
The core functionality of this project lies in detecting emotions from the user’s face in real-time. This is achieved by creating an EmotionProcessor class that handles the video frames captured by the webcam.
Here’s the complete EmotionProcessor class:
class EmotionProcessor:
    def recv(self, frame):
        frm = frame.to_ndarray(format="bgr24")

        ##############################
        frm = cv2.flip(frm, 1)

        res = holis.process(cv2.cvtColor(frm, cv2.COLOR_BGR2RGB))

        lst = []

        if res.face_landmarks:
            for i in res.face_landmarks.landmark:
                lst.append(i.x - res.face_landmarks.landmark[1].x)
                lst.append(i.y - res.face_landmarks.landmark[1].y)

            if res.left_hand_landmarks:
                for i in res.left_hand_landmarks.landmark:
                    lst.append(i.x - res.left_hand_landmarks.landmark[8].x)
                    lst.append(i.y - res.left_hand_landmarks.landmark[8].y)
            else:
                for i in range(42):
                    lst.append(0.0)

            if res.right_hand_landmarks:
                for i in res.right_hand_landmarks.landmark:
                    lst.append(i.x - res.right_hand_landmarks.landmark[8].x)
                    lst.append(i.y - res.right_hand_landmarks.landmark[8].y)
            else:
                for i in range(42):
                    lst.append(0.0)

            lst = np.array(lst).reshape(1,-1)

            pred = label[np.argmax(model.predict(lst))]

            print(pred)
            cv2.putText(frm, pred, (50,50),cv2.FONT_ITALIC, 1, (255,0,0),2)

            np.save("emotion.npy", np.array([pred]))

        drawing.draw_landmarks(frm, res.face_landmarks, holistic.FACEMESH_TESSELATION,
                                landmark_drawing_spec=drawing.DrawingSpec(color=(0,0,255), thickness=-1, circle_radius=1),
                                connection_drawing_spec=drawing.DrawingSpec(thickness=1))
        drawing.draw_landmarks(frm, res.left_hand_landmarks, hands.HAND_CONNECTIONS)
        drawing.draw_landmarks(frm, res.right_hand_landmarks, hands.HAND_CONNECTIONS)

        ##############################

        return av.VideoFrame.from_ndarray(frm, format="bgr24")
Loading the Model and Labels
Before using the model in our EmotionProcessor class, we need to load the model and labels:
model = load_model("model.h5")
label = np.load("labels.npy")
These lines ensure that the model is ready to predict emotions and that we can map the predictions to human-readable labels.
Using Mediapipe for Landmark Detection
Mediapipe is an essential part of this project, providing the tools needed to detect facial and hand landmarks. Here’s how Mediapipe is integrated
holistic = mp.solutions.holistic
hands = mp.solutions.hands
holis = holistic.Holistic()
drawing = mp.solutions.drawing_utils
These lines initialize Mediapipe’s holistic and hand models, which are used to extract landmarks from the user’s face and hands.
6.Integrating the Music Recommender
Creating the UI
The UI for this project is built using Streamlit, which allows us to quickly create interactive web applications. Here’s how the UI is set up:
import streamlit as st
st.header("Emotion Based Music Recommender")
# Button to trigger the recommendation
btn = st.button("Recommend me songs")
Handling the YouTube Search Query
Once the emotion is detected, the app uses the emotion to create a YouTube search query. Here’s the code that handles this:
if btn:
    if not emotion:
        st.warning("Please let me capture your emotion first")
        st.session_state["run"] = "true"
    else:
        webbrowser.open(f"https://www.youtube.com/results?search_query={emotion}+song")
        np.save("emotion.npy", np.array([""]))
        st.session_state["run"] = "false"
This code ensures that the app only proceeds to recommend songs once an emotion has been detected. It then opens a new browser tab with a YouTube search query based on the detected emotion.
7.Handling Session State
Session state is crucial in this project, as it controls whether the webcam should continue capturing frames. Streamlit’s session state functionality allows us to manage this efficiently:
if "run" not in st.session_state:
    st.session_state["run"] = "true"
By setting st.session_state["run"] to false after a recommendation is made, we ensure that the webcam stops capturing frames, preventing unnecessary processing.
Here’s how we handle session state when the “Recommend me songs” button is pressed:
if btn:
    if not emotion:
        st.warning("Please let me capture your emotion first")
        st.session_state["run"] = "true"
    else:
        webbrowser.open(f"https://www.youtube.com/results?search_query={emotion}+song")
        np.save("emotion.npy", np.array([""]))
        st.session_state["run"] = "false"
8.Final Touches and Testing
With all the components integrated, it’s time to test the application. Run the app using the following command:
streamlit run app.py
Here’s what to do during testing:
Allow the webcam to capture your emotion: The app will detect your emotion in real-time.
Click the “Recommend me songs” button: The app will open a YouTube search query in a new tab based on your detected emotion.
Testing Scenarios
- Scenario 1: Test with a happy expression and see if the app recommends happy songs.

- Scenario 2: Test with a sad expression and ensure the app recommends sad songs.

- Scenario 3: Test with a rock hand gesture and ensure the app recommends rock songs.
9.Conclusion
In this blog, we’ve walked through the process of building an Emotion-Based Music Recommender using Streamlit, Mediapipe, Keras, and other powerful tools. This project showcases how AI can be used to create personalized user experiences by combining real-time emotion detection with music recommendations.
This project not only enhances your understanding of computer vision and deep learning but also demonstrates how these technologies can be integrated into interactive web applications.
Feel free to customize and expand this project. You might consider adding more emotions, integrating different music platforms, or even creating a mobile version of the app. The possibilities are endless!
10.References
Subscribe to my newsletter
Read articles from Gayathri Selvaganapathi directly inside your inbox. Subscribe to the newsletter, and don't miss out.
Written by

Gayathri Selvaganapathi
Gayathri Selvaganapathi
AI enthusiast ,working across the data spectrum. I blog about data science machine learning, and related topics. I'm passionate about building machine learning and computer vision technologies that have an impact on the "real world".