Design Patterns Handbook - Part III
 Tuan Tran Van
In Part I and Part II, we’ve covered creational and structural design patterns. Today, we'll dive into the final topic in our Design Patterns series: Behavioral Design Patterns.
Let’s begin!
Behavioral Design Patterns
Behavioral Design Patterns are design patterns that focus on how objects interact and communicate with each other to fulfill certain responsibilities. These patterns provide solutions to common problems arising in the interaction between objects and help achieve better communication, collaboration, and flexibility between objects.
There are several types of Behavioral Design Patterns, including:
Chain of Responsibility
Command
Iterator
Mediator
Memento
Observe
State
Strategy
Template Method
Visitor
The Chain of Responsibility Pattern

Chain of Responsibility is a behavioral design pattern that lets you pass requests along the chain of handlers. Upon receiving the request, each handler either decides to process the request or to pass it to the next handler in the chain.
https://refactoring.guru/design-patterns/chain-of-responsibility
Problem
Imagine you are working on an online ordering system. You want to restrict access to the system so only authenticated users can create orders. Also, users who have administrative permissions must have full access to all orders.
After a bit of planning, you realize that these checks must be performed sequentially. The application can attempt to authenticate users to the system whenever it receives a request that contains the user's credentials. However, if those credentials aren't correct and authentication fails, there is no reason to proceed with any other checks.
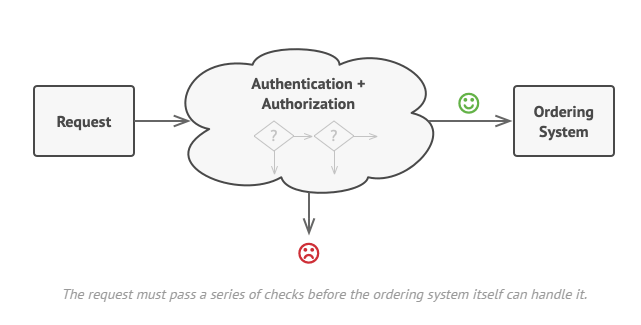
During the next few months, you implemented several of those sequential checks.
One of your colleagues suggests that is unsafe to pass raw data straight to the ordering system. So you added an extra validation step to sanitize the data in a request.
Later, somebody noticed that the system was vulnerable to brute-force password cracking. To negate this, you promptly added a check that filters repeated failed requests coming from the same IP address.
Someone else suggested that you could speed up the system by returning cached results on repeated requests containing the same data. Hence, you added another check that lets the request pass through to the system only if there is no suitable cached response.
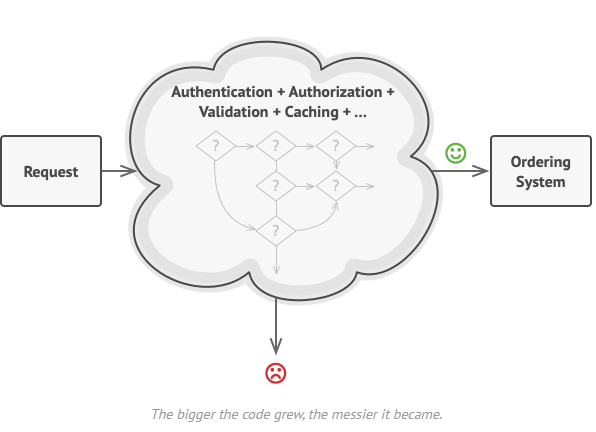
The code of the checks, which had already looked like a mess, became more and more bloated as you added each new feature. Changing one check sometimes affected the others. Worst of all, when you tried to reuse the checks to protect other components of the system, you had to duplicate some of the code since those components required some of the checks, but not all of them.
The system became very hard to comprehend and expensive to maintain. You struggled with the code for a while, until one day you decided to refactor the whole thing.
Solution
Like many other behavioral design patterns, the Chain of Responsibility relies on transforming particular behaviors into stand-alone objects called handlers. In our case, each check should be extracted to its own class with a single method that performs a check. The request, along with its data, is passed to this method as an argument.
The pattern suggests that you link the handler into a chain. Each linked handler has a field for storing a reference to the next handler in the chain. In addition to processing the request, handlers pass the request further along the chain. The request travels along the chain until all handlers have had a chance to process it.
Here is the best part: a handler can decide not to pass the request further down the chain and effectively stop any further processing.
In our example with ordering systems, a handler performs the processing and then decides whether to pass the request further down the train. Assuming the request contains the right data, all the handlers can execute their primary behaviors, whether it's authentication check or caching.
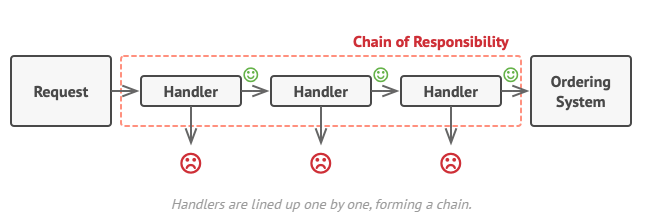
However, there is a slightly different approach (and it's a bit more canonical) in which, upon receiving the request, a handler decides whether it can process it. If it can, it doesn't pass the request any further. So it's either only one handler that processes the request or none at all. This approach is very common when dealing with events in stacks of elements within a graphical user interface.
For instance, when a user clicks on a button, the event propagates through the chain of GUI elements that starts with the button, goes along its containers (like forms and panels), and ends up with the main application window. The event is processed by the first element in the chain that's capable of handling it. This example is also noteworthy because it shows that a chain can always be extracted from an object tree.
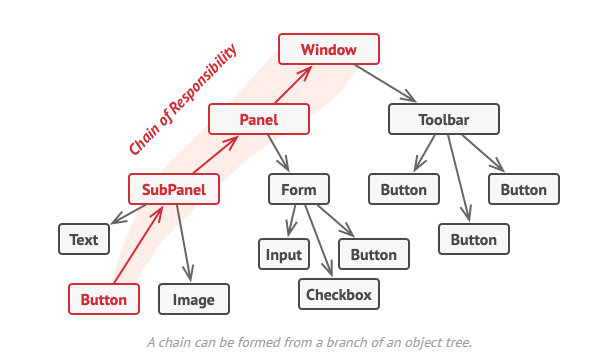
It's crucial that all handler classes implement the same interface. Each concrete handler should only care about the following one having the execute method. This way you can compose chains at runtime, using various handlers without coupling your code to their concrete classes.
Chain of Responsibility Pattern: Advantages and Disadvantages
The Chain of Responsibility pattern has a number of advantages, summarized in the following points:
The code is more maintainable because it is less coupled between the object and other the object handles a request. The object (sender) only needs to know that a request will be handled by the handlers. That is to say that both (the receiver and sender) have no explicit knowledge about each other. Besides, the object in the chain doesn't need to know about the chain's structure.
Clean code. The Open-Closed Principle (OCP) is guaranteed since the new handler can be introduced without breaking existing code in the chain.
Cleaner code. The Single Responsibility Principle (SRP) is respected since the responsibility of each handler is transferred into its into
handlemethod instead of having that business logic in the client code.
A well-known drawback of this pattern is that the receipt isn’t guaranteed. That’s due to the fact that the request has no explicit receiver. Therefore, the request can fall off the end of the chain without ever being handled.
Finally, the main drawback of the chain of responsibility pattern — like most design patterns — is that there’s an increase in code complexity and the number of classes required for the code. With that said, this disadvantage is well known when applying design patterns — it’s the price to pay for gaining abstraction in the code.
Example in Typescript
In this example, we are going to use the chain of responsibility pattern to simulate an authentication and authorization system using a set of middleware that applies checks on a request.
As we did in the previous example, let’s start by taking a look at the UML diagram that is going to help us identify each of the parts that this pattern is composed of.
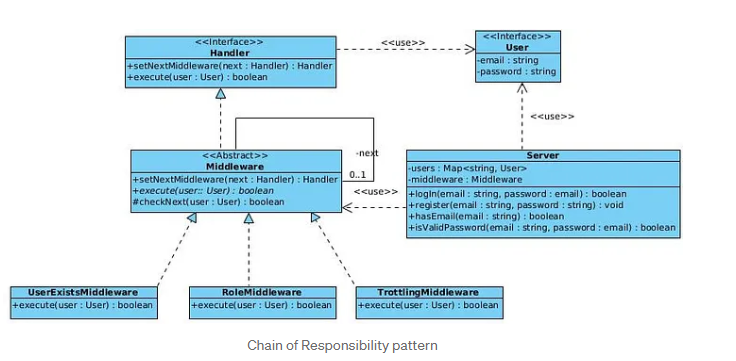
Notice that our class diagram incorporates some extra classes. These give context to our problem, but the chain of responsibility pattern can easily be identified among the set of classes.
Before we address the implementation of our problem, let’s define a set of constants that will give us semantic value to these values. These three constants are quite simple: Firstly, we have two false users (USERS), secondly, the number of maximum authentication requests per minute (REQUEST_PER_MINUTE), and finally, the waiting time in milliseconds when the number of requests per minute is exceeded (WAIT_TIME).
export const USERS = {
  ADMIN: {
    email: "admin@example.com",
    password: "admin",
  },
  USER: {
    email: "user@example.com",
    password: "user",
  },
};

export const REQUEST_PER_MINUTE = 2;
export const WAIT_TIME = 60_000;
We start to define the pattern again by defining the Handler interface with the same two methods as in the basic structure of the pattern. In other words, the Handler interface is made up of the setNextMiddleware and execute methods, the first being in charge of linking each of the middleware, and the second method is responsible for handling the request.
In our case, the request that we have to handle is the one composed by a User.
import { User } from "./user.interface";

export interface Handler {
  setNextMiddleware(handler: Handler): void;

  execute(user: User): boolean;
}
The objects that behave as users must satisfy the User interface, which is simply composed of an email and a password. The goal of this tutorial is to understand the chain of responsibility pattern, so this part will be simple — but complete enough to solve the authentication and authorization problem.
export interface User {
  email: string;
  password: string;
}
Continuing with the pattern, the next element is the development of the abstract class, Middleware, that implements the Handler interface. In this implementation, there is the setNextMiddleware method, which allows linking the following middleware, and the execute method, which is abstract and is implemented in each of the specific middleware. Finally, we have the checkNext method that checks if we have reached the end of the middleware chain, responding true when all the checks have been passed. If there is a next middleware then the next middleware check will be executed.
import { Handler, User } from "../interfaces";

export abstract class Middleware implements Handler {
  private next: Handler;

  public setNextMiddleware(next: Handler): Handler {
    this.next = next;
    return next;
  }
  public abstract execute(user: User): boolean;

  protected checkNext(user: User): boolean {
    if (!this.next) {
      return true;
    }
    return this.next.execute(user);
  }
}
The first middleware we need to build for the authentication and authorization system is verification that the user exists.
In our example, we have modeled a fake server where we have two registered users (the same ones that we previously defined in the constants). This server, which we will see later, provides us an API with the hasEmail and isValidPassword methods. The execute method will receive the request (a User) and we would make the checks to ensure the user exists on the server. First, it checks if the email exists on the server; if so, the username and password are checked. If the check is passed, the checkNext method is executed, which consists of making the request to the next middleware.
import { Middleware } from "./middleware";
import { Server } from "../server";
import { User } from "../interfaces";

export class UserExistsMiddleware extends Middleware {
  public constructor(private server: Server) {
    super();
  }

  public execute({ email, password }: User): boolean {
    if (!this.server.hasEmail(email)) {
      console.log("This email is not registered!");
      return false;
    }
    if (!this.server.isValidPassword(email, password)) {
      console.log("Wrong password!");
      return false;
    }
    return this.checkNext({ email, password });
  }
}
The following middleware would be the one that allows us to control the number of requests per minute.
This is where you can see the Open-Close Principle (OCP) — it is very easy to incorporate new middleware and checks without breaking the existing code. You can also see the Single Responsibility Principle(SRP) since each middleware has only one responsibility.
In this middleware, we receive the maximum number of requests per minute as a parameter. In addition, this middleware has some private attributes that allow you to control the time that has passed between requests, and the number of attempts that have been made in one minute.
If you look at the logic of the execute method, it’s quite simple — but you can check how a check exists again. This is what stops the chain of responsibility since it’s resolved by this handler.
In case the check is passed, this middleware, like the previous one, will proceed to pass the request to the next middleware.
import { Middleware } from "./middleware";
import { User } from "../interfaces";
import { WAIT_TIME } from "../app.constants";

export class ThrottlingMiddleware extends Middleware {
  private request: number = 0;
  private currentTime: number = new Date().getTime();
  private requestPerMinute: number;

  constructor(requestPerMinute: number) {
    super();
    this.requestPerMinute = requestPerMinute;
  }

  public execute(user: User): boolean {
    const now = new Date().getTime();
    const limitTime = this.currentTime + WAIT_TIME;

    if (now > limitTime) {
      this.request = 0;
      this.currentTime = now;
    }

    this.request++;

    if (this.request > this.requestPerMinute) {
      console.log("Request limit exceeded!");
      return false;
    }
    return this.checkNext(user);
  }
}
Finally, the following middleware is in charge of checking if the user is an administrator or not, obviously, this should have been done with a real check on a knowledge base. However, to illustrate that each middleware can have different parameters, a basic check has been performed.
In the case of being an admin, the chain of responsibility is finished. Otherwise, it continues. This is so that when a new middleware is developed, it can be managed in the chain. In our case, here we end the responsibility chain because we do not have any more middleware implemented.
export class RoleMiddleware extends Middleware {
  public execute({ email, password }: User): boolean {
    if (email === USERS.ADMIN.email) {
      console.log("Hello, admin!");
      return true;
    }
    console.log("Hello, user!");
    return this.checkNext({ email, password });
  }
}
For educational purposes, we have built a Server class that stores users on a Map<String, User> and has a Middleware that is the one that begins the chain of responsibility.
The register, hasEmail and isValidPassword methods are focused on performing these operations using the users who are registered on the server.
The logIn method receives the request from the user. The chain of responsibility begins on line 13 with the execution of the middleware sending the user as a request.
import { Middleware } from "./middlewares";
import { User } from "./interfaces";

export class Server {
  private users: Map<string, User> = new Map<string, User>();
  private middleware: Middleware;

  public setMiddleware(middleware: Middleware): void {
    this.middleware = middleware;
  }

  public logIn(email: string, password: string): boolean {
    if (this.middleware.execute({ email, password })) {
      console.log("Authorization have been successful!");

      return true;
    }
    return false;
  }

  public register(email: string, password: string): void {
    const user: User = {
      email,
      password,
    };
    this.users.set(email, user);
  }

  public hasEmail(email: string): boolean {
    return this.users.has(email);
  }

  public isValidPassword(email: string, password: string): boolean {
    const user = this.users.get(email);
    return user.password === password;
  }
}
Finally, the client that makes use of our middleware system is the one shown in the code. A server has been created and two user accounts registered (obviously this would be our real backend and should not have been done here).
Subsequently, the chain of responsibilities is indicated using the following middleware in the following order:
UserExists -> Trottling -> Role
Finally, we have created a loop in which email and password are requested.
import {
  Middleware,
  RoleMiddleware,
  ThrottlingMiddleware,
  UserExistsMiddleware,
} from "./middlewares";
import { REQUEST_PER_MINUTE, USERS } from "./app.constants";

import { Server } from "./server";

const readline = require("readline-sync");

const server = new Server();
server.register(USERS.ADMIN.email, USERS.ADMIN.password);
server.register(USERS.USER.email, USERS.USER.password);

const middleware: Middleware = new ThrottlingMiddleware(REQUEST_PER_MINUTE);
middleware
  .setNextMiddleware(new UserExistsMiddleware(server))
  .setNextMiddleware(new RoleMiddleware());

server.setMiddleware(middleware);

while (true) {
  let success = false;

  do {
    console.log("....Autentication Software....");
    const email = readline.question("Email: ");
    const password = readline.question("Password: ", { hideEchoBack: true });
    success = server.logIn(email, password);
  } while (!success);
}
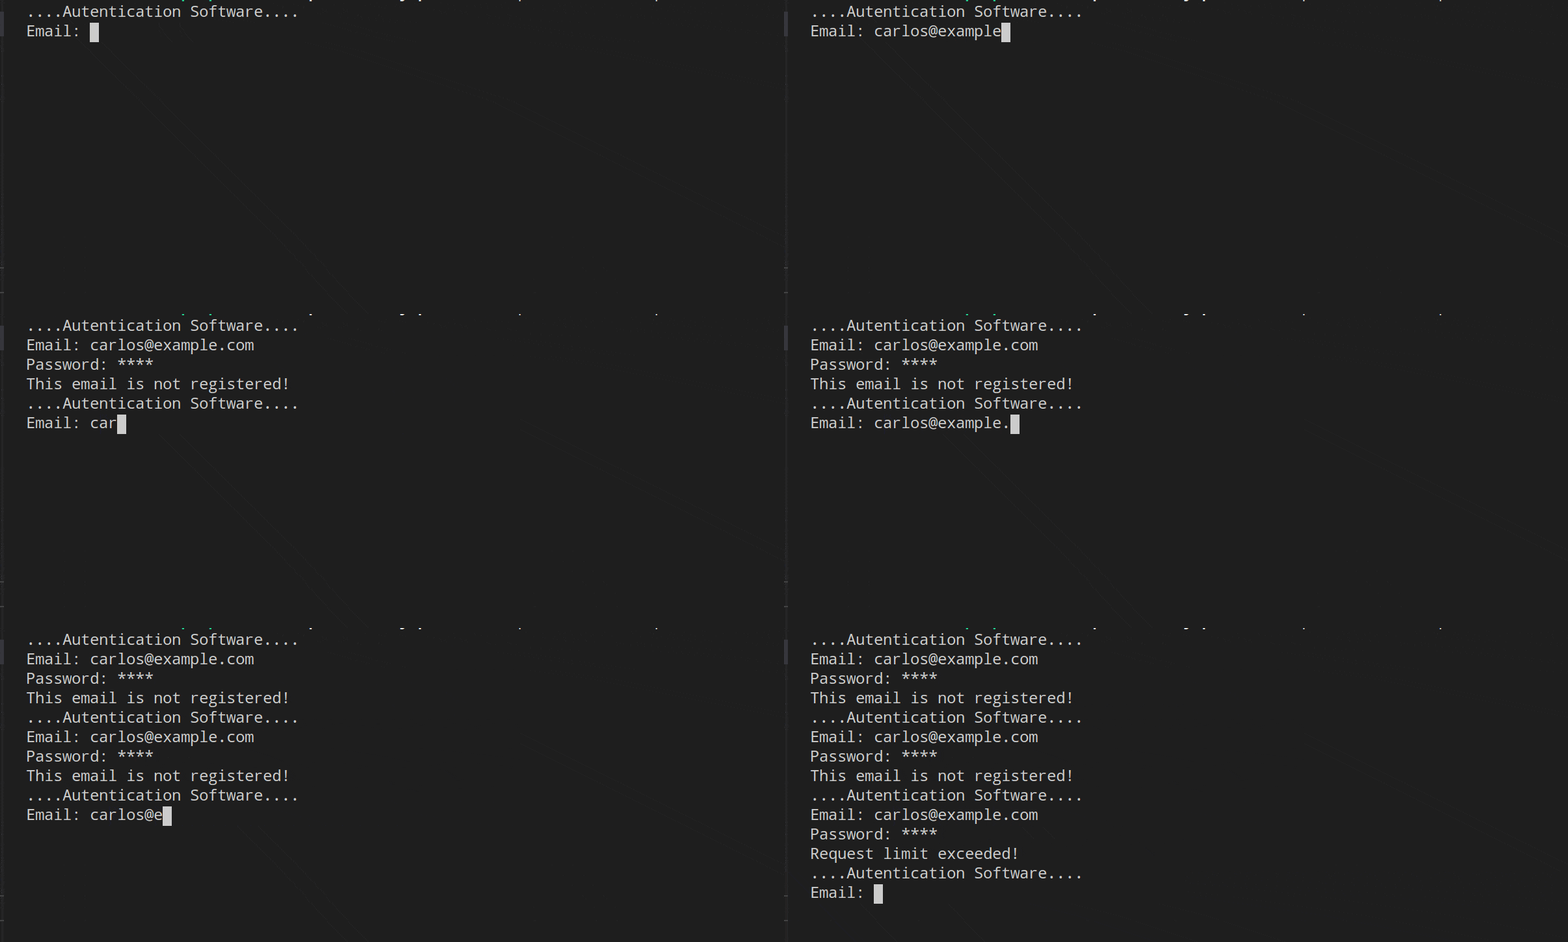
To end this article we are going to see the code working and for this I have recorded several GIFs.
In the first, we can see the UserExists and Throttling middleware in operation. I have entered the wrong email and password several times, the first middleware (Throttling) will leave the responsibility the first two times to the UserExists middleware, which rejects the validation of the user/password. From the third time the credentials are entered, the Throttling middleware will be in charge of managing the request.
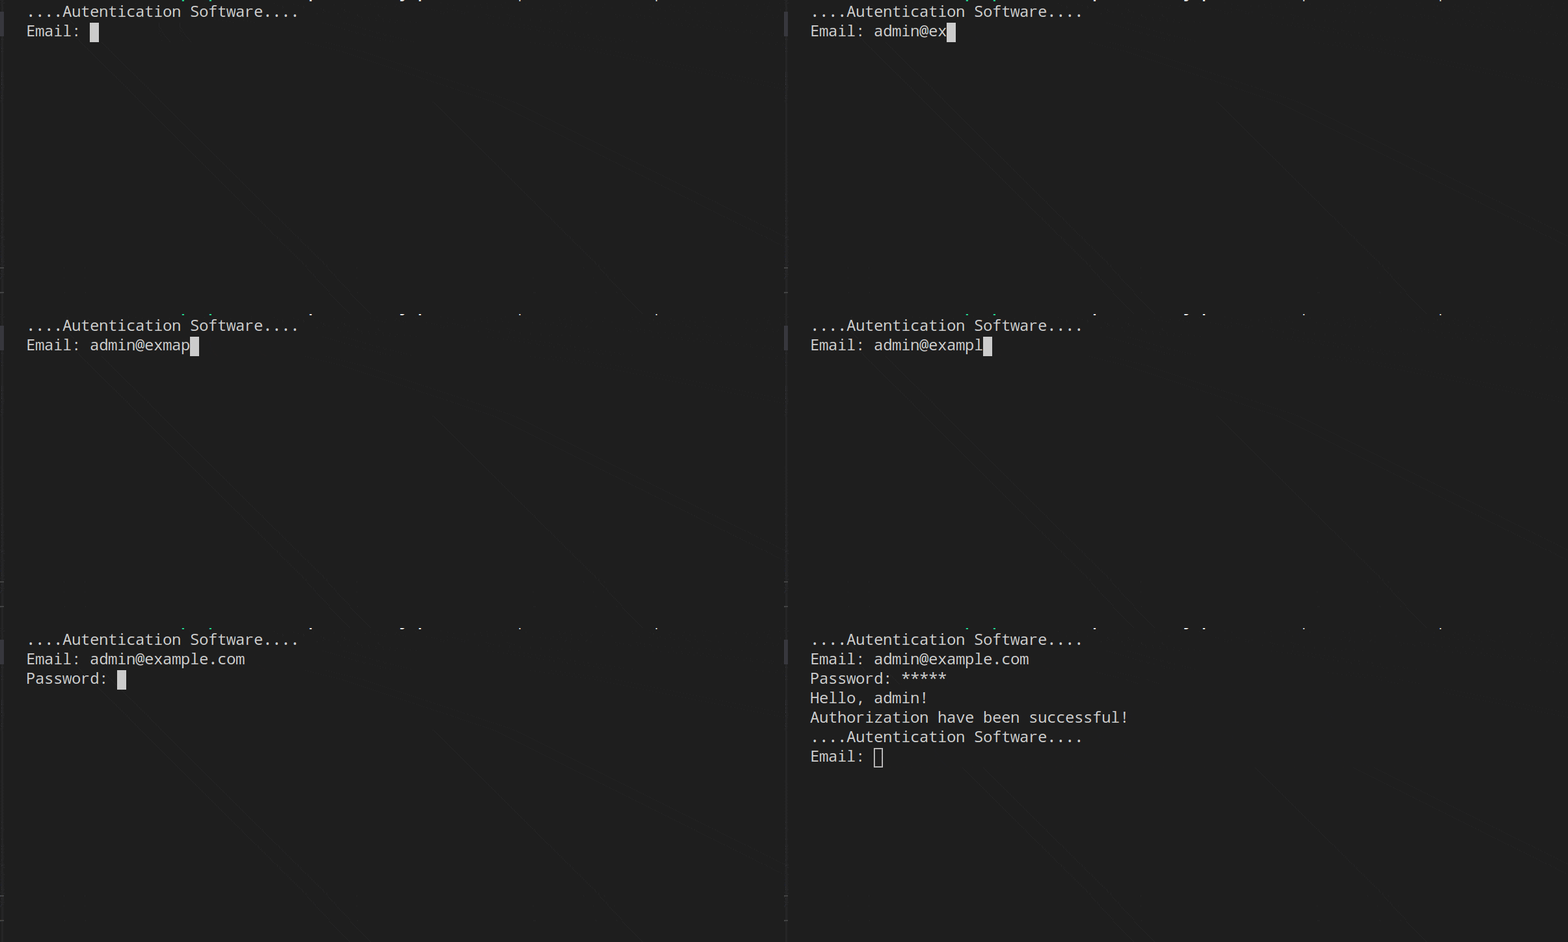
The role middleware is the one that manages the request when the credentials corresponding to the admin role are entered.
The most important thing about this pattern is not its concrete implementation but its ability to recognize the problem that this pattern can solve and when it can be applied. The specific implementation isn’t as important since that will vary depending on the programming language used.
The Command Pattern

Command is a behavioral design pattern that turns a request into a stand-alone object contains all information about the request. This transformation lets you pass requests as a method arguments, delay or queue a request's execution, and support undoable operations.
Problem
Imagine you are working on a new text editor app. Your current task is to create a toolbar with a bunch of buttons for the editor's various operations. You create a very neat Button class that can be used for buttons on the toolbar, as well as for generic buttons in various dialogs.
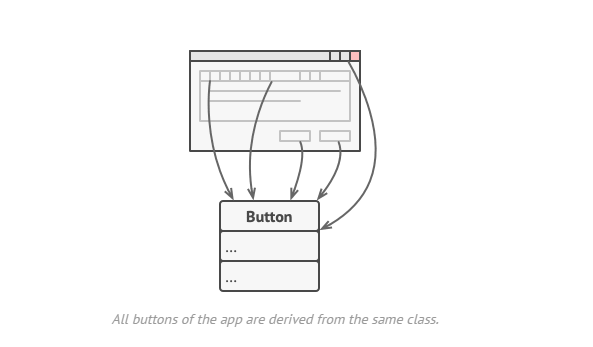
While all of these buttons look similar, they are all supposed to do different things. where would you put the code for the various click handlers of these buttons? The simplest solution is to create a ton of subclasses for each place where the button is used. These classes would contain the code that would have to be executed on a button click.
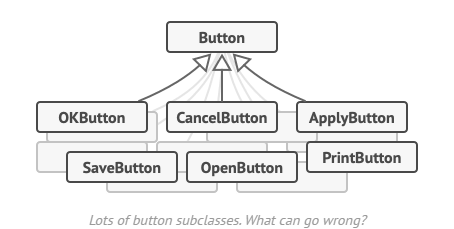
Before long, you realize that this approach is deeply flawed. First, you have an enormous number of subclasses, and that would be ok if you weren't risking breaking the code in these subclasses each time you modify the base Button class. Put simply, your GUI code has become awkwardly dependent on the volatile code of the business logic.

And here is the ugliest part. Some operations, such as copying/pasting text, would need to be invoked from multiple places. For example, a user could click a small "Copy" button on the toolbar, or copy something via the context menu, or just hit Ctrl + C on the keyboard.
Initially, when our app only had the toolbar, it was ok to play the implementation of various operations into the button subclasses. In other words, having the code for copying text inside the CopyButton subclass was fine. But then, when you implement context menus, shortcuts, and other stuff, you have to either duplicate the operation’s code in many classes or make menus dependent on buttons, which is an even worse option.
Solution
Good software design is often based on the principle of separation of concerns, which usually results in breaking an app into layers. The most common example: a layer for the graphical user interface and another layer for the business logic. The GUI layer is responsible for rendering a beautiful picture on the screen, capturing any inputs, and showing results of what the user and the app are doing, however, when it comes to doing something important, like calculating the trajectory of the moon or composing an annual report, the GUI layer delegates the work to the underlying layer of business logic.
In the code it might look like this: a GUI object calls a method of a business logic object, passing it some arguments. This process is usually described as one object sending another a request.
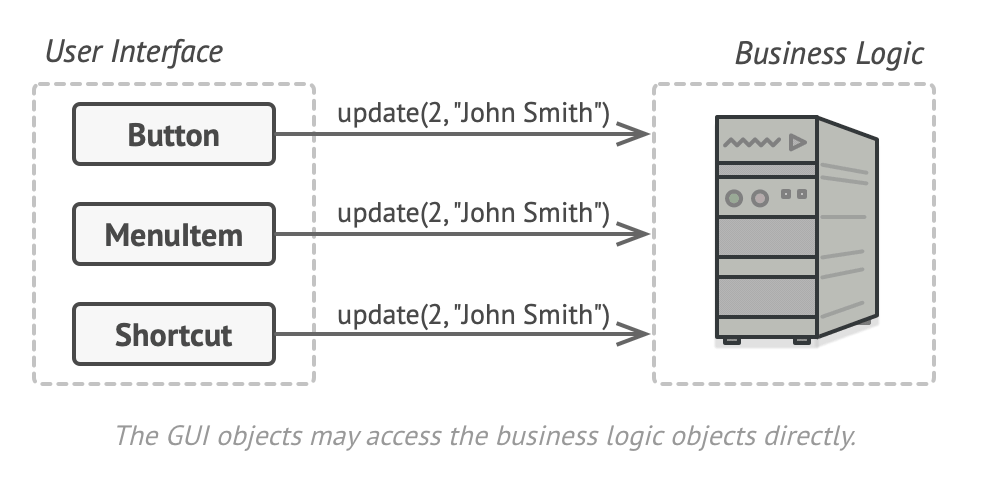
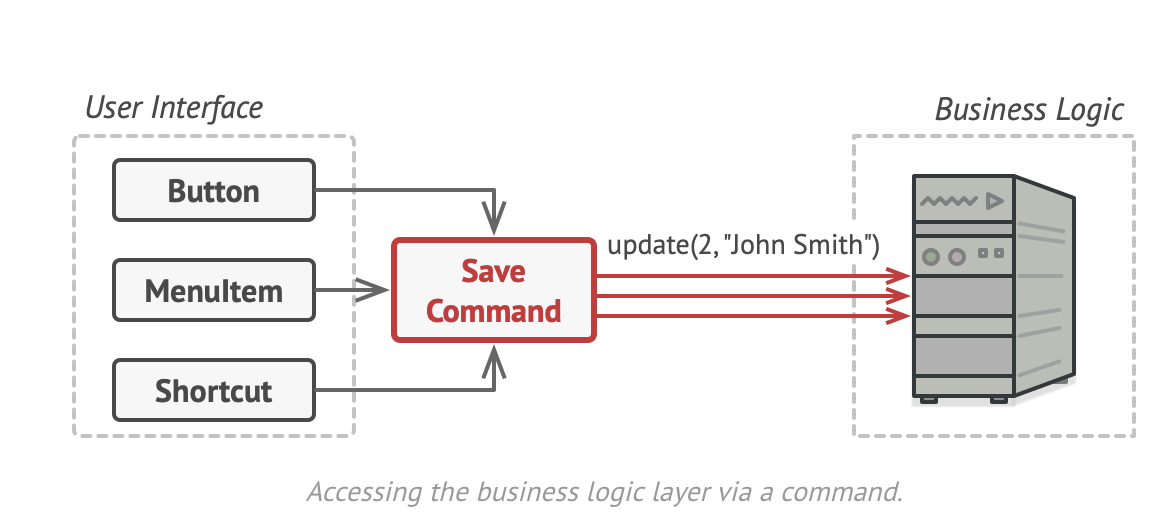
The Command pattern suggests that GUI objects shouldn't send these requests directly. Instead, you should extract all of the request details, such as the request being called, the name of the method, and the list of arguments into a separate command class with a single method that triggers this request.
Command objects serve as links between various GUI and business logic objects. From now on, the GUI object doesn't need to know what business object will receive the request and how it will be processed. The GUI object just triggers the command, which handles all the details.
The next step is to implement your commands using the same interface. Usually, it has just a single execution method that takes no parameters. This interface lets you use various commands with the same request sender, without coupling it to concrete classes of commands. As a bonus, now you can switch command objects linked to the sender, effectively changing the sender's behavior at runtime.
You might have noticed one missing piece of the puzzle, which is the request parameters. A GUI object might have supplied the business-layer object with some parameters. Since the command execution method doesn't have any parameters, how would we pass the request details to the receiver? It turns out the command should be either pre-configured with this data or capable of getting it on its own.
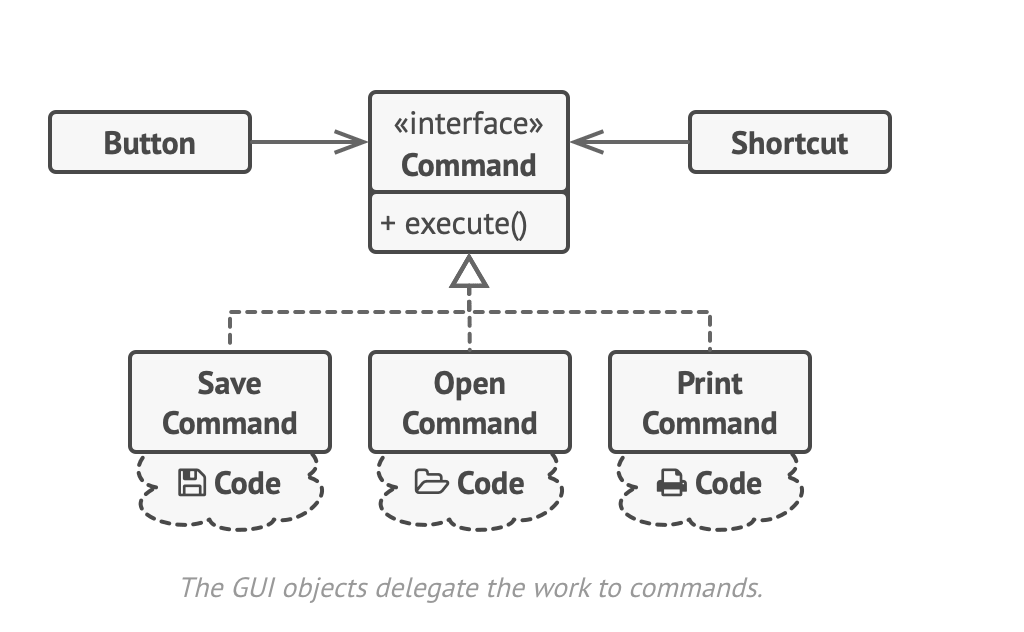
Let's get back to our text editor. After we apply the Command pattern, we no longer need all of those classes to implement various click behaviors. It's enough to put a single field into the base Button class that stores a reference to a command object and makes the button execute that command with a click.
You will implement a bunch of command classes for every possible operation and link them with particular buttons, depending on the button's intended behavior.
Other GUI elements, such as menus, shortcuts, or entire dialogs, can be implemented in the same way. They will be linked to a command that gets executed when a user interacts with the GUI elements. As you have probably guessed by now, the elements related to the same operations will be linked to the same commands, preventing any code duplication.
As a result, commands become a convenient middle layer that reduces the coupling between the GUI and business logic layers. And that is only a fraction of the benefits that the Command pattern can offer!
Real-World Analogy
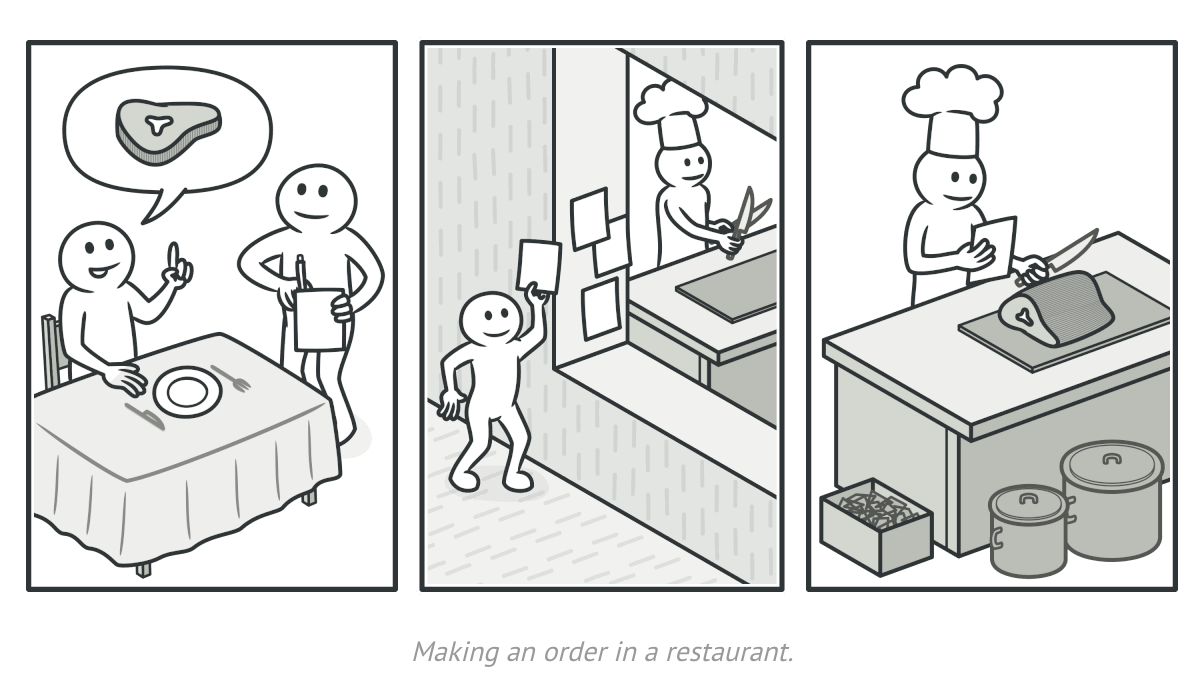
After a long walk through the city, you get to a nice restaurant and sit at the table by the window. A friendly waiter approaches you and quickly takes an order, writing it down on the piece of paper. The waiter goes to the kitchen and sticks the order on the wall. After a while, the order gets to the chef, who reads it and cooks the meal accordingly. The cook places the meal on the tray along with the order. The waiter discovers the tray, checks the order to make sure everything is as you want it, and brings everything to your table.
The order paper serves as a command. It remains in a queue until the chef is ready to serve it. The order contains all the relevant information required to cook the meal. It allows the chef to start cooking right away instead of running around clarifying the order details from you directly.
Example
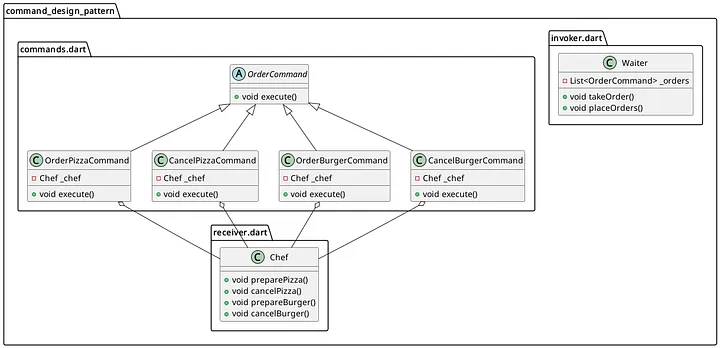
Implementation
Define the Command Interface: Create an interface or abstract class that defines a method for executing a command. In our example, this is the
OrderCommandinterface with theexecute()method.abstract class OrderCommand { void execute(); }Implement Concrete Commands: Create concrete classes that implement the command interface and perform specific actions. Examples include
OrderPizzaCommand,OrderBurgerCommand,CancelPizzaCommand, andCancelBurgerCommand, each implementing theexecute()method to perform the corresponding action on theChefobject.class OrderPizzaCommand implements OrderCommand { Chef _chef; OrderPizzaCommand(this._chef); @override void execute() { _chef.preparePizza(); } } class CancelPizzaCommand implements OrderCommand { Chef _chef; CancelPizzaCommand(this._chef); @override void execute() { _chef.cancelPizza(); } } class OrderBurgerCommand implements OrderCommand { Chef _chef; OrderBurgerCommand(this._chef); @override void execute() { _chef.prepareBurger(); } } class CancelBurgerCommand implements OrderCommand { Chef _chef; CancelBurgerCommand(this._chef); @override void execute() { _chef.cancelBurger(); } }Create the Receiver Class: Define a class that performs the actual work. The
Chefclass includes methods for making and canceling pizza and burger orders.class Chef { void preparePizza() { print("Chef is preparing a pizza..."); } void cancelPizza() { print("Chef is cancelling the pizza order."); } void prepareBurger() { print("Chef is preparing a burger..."); } void cancelBurger() { print("Chef is cancelling the burger order."); } }Create the Invoker Class: Implement a class that stores and executes commands. The
Waiterclass holds a list of commands and provides methods to take orders (takeOrder()) and place orders (placeOrders()).class Waiter { List<OrderCommand> _orders = []; void takeOrder(OrderCommand order) { _orders.add(order); } void placeOrders() { for (var order in _orders) { order.execute(); } _orders.clear(); } }
Usage
Create the Chef: Instantiate the
Chefclass, which will perform the actual work of making and canceling orders.Create the Commands: Instantiate the concrete command classes, passing the
Chefinstance to their constructors.OrderCommand orderPizza = OrderPizzaCommand(chef); OrderCommand orderBurger = OrderBurgerCommand(chef); OrderCommand cancelPizza = CancelPizzaCommand(chef); OrderCommand cancelBurger = CancelBurgerCommand(chef);Create the Waiter: Instantiate the
Waiterclass, which will act as the invoker of commands.Take and Place Orders: Use the
takeOrder()method of theWaiterto queue commands and theplaceOrders()method to execute them.
void main() {
  // Create a Chef
  Chef chef = Chef();

  // Create commands
  OrderCommand orderPizza = OrderPizzaCommand(chef);
  OrderCommand orderBurger = OrderBurgerCommand(chef);
  OrderCommand cancelPizza = CancelPizzaCommand(chef);
  OrderCommand cancelBurger = CancelBurgerCommand(chef);

  // Create a Waiter
  Waiter waiter = Waiter();

  // Take orders
  waiter.takeOrder(orderPizza);
  waiter.takeOrder(cancelBurger);
  waiter.takeOrder(orderBurger);
  waiter.takeOrder(cancelPizza);

  // Place orders
  waiter.placeOrders();
}
The Iterator Pattern

Iterator is a behavioral design pattern that lets you tranverse elements of a collection without exposing its underlying representation (list,stack,tree, etc.)
Problem
Collections are one of the most used data types in programming. Nonetheless, a collection is just a container for a group of objects.

Most collections store their elements in simple lists. However, some of them are based on stacks, trees, graphs, and other complex data structures.
No matter how a collection is structured, it must provide some ways of accessing its elements so that other code can use these elements. This should be a way to go through each element of the collection without accessing the same elements over and over.
This may sound like an easy job if you have a collection based on a list. You just loop over all of the elements. But how do you sequentially traverse elements of a complex data structure, such as a tree? For example, one day you might be just fine with the depth-first traversal of a tree. Yet the next day you might require breadth-first traversal. And the next week, you might need something else, like random access to the tree elements.
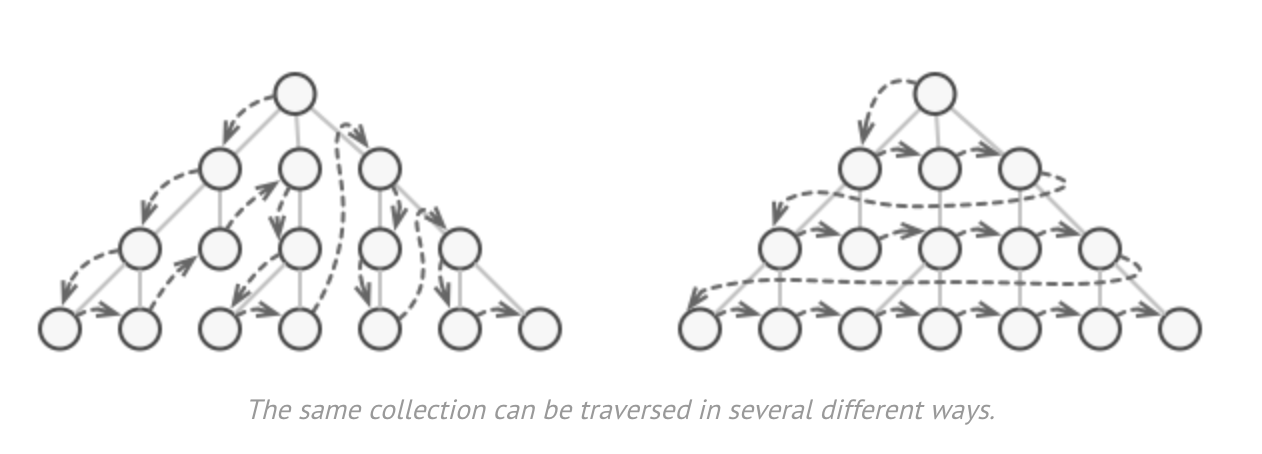
Adding more and more traversal algorithms to the collection gradually blurs its primary responsibility, which is efficient data storage. Additionally, some algorithms might be tailored for a specific application, so including them in a generic collection class would be weird.
On the other hand, the client code that's supposed to work with various collections may not even care how they store their elements. However, since collections all provide different ways of accessing their elements, you have no option other than to couple your code to the specific collection classes.
Solution
The Iterator pattern's main idea is to extract a collection's traversal behavior into a separate object called an iterator.
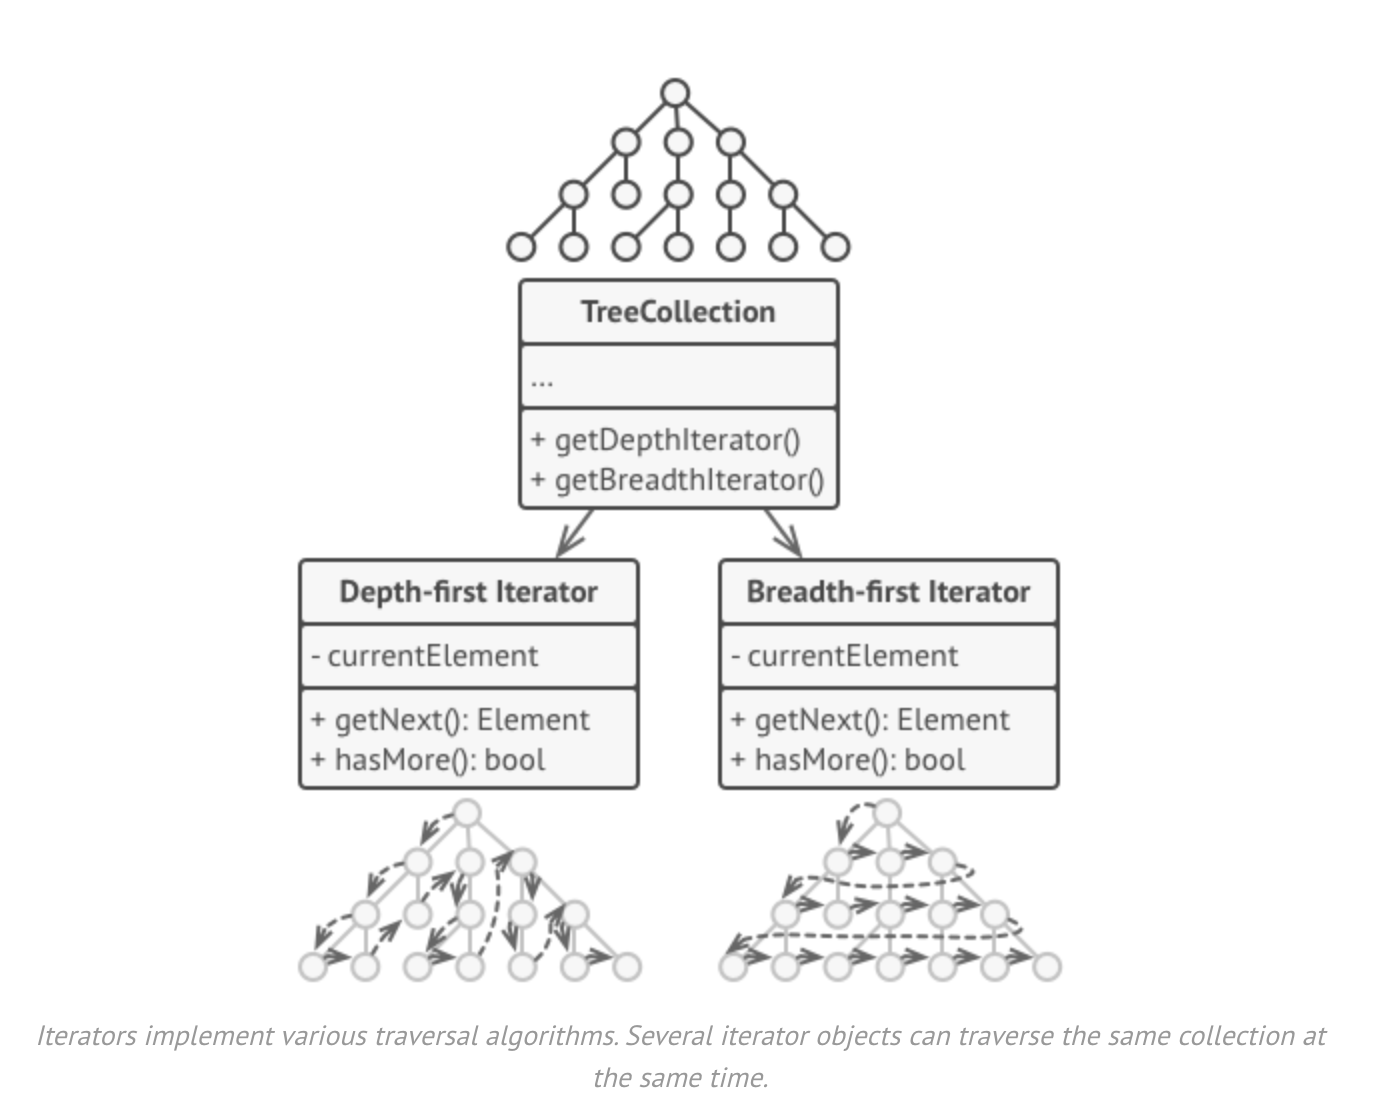
In addition to implementing the algorithm itself, an iterator object encapsulates all of the traversal details, such as the current position and how many elements are left till the end. Because of this, several iterators can go through the same collection at the same time, independently of each other.
Usually, iterators provide one primary method for fetching elements of the collection. The client can keep running this method until it doesn't return anything, which means that the iterator has traversed all of these elements.
All iterators must implement the same interface. This makes the client code compatible with any collection type or any traversal algorithm as long as there is a proper iterator. if you need a special way to traverse a collection, you just create a new iterator class, without having to change the collection or the client.
Real-World Analogy
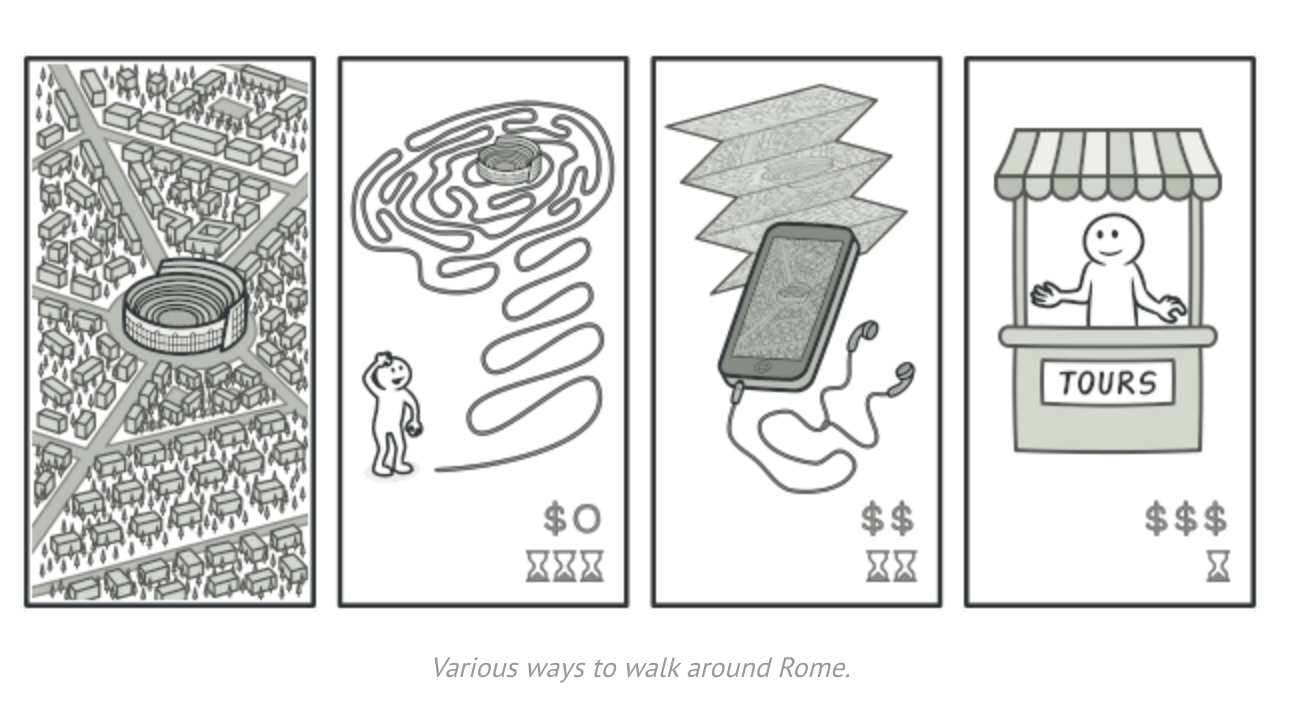
You plan to visit Rome for a few days and visit all of its main sights and attractions. But once there, you could waste a lot of time walking in circles, unable to find even the Colosseum.
On the other hand, we could buy a virtual guide app for your smartphone and use it for navigation. It's smart and inexpensive, and you could be staying at some interesting places for as long as you want.
A third alternative is that you could spend some of the trip's budget and hire a local guide who knows the city like the back of his hand. This guide would be able to tailor the tour to your liking, show you every attraction, and tell a lot of exciting stories. That will be even more fun, but, alas, more expensive, too.
All of these options - the random directions born in your head, the smartphone navigator, or the human guide - act as iterators over the vast collection of sights and attractions located in Rome.
The Mediator Pattern

Mediator is a behavioral design pattern that lets you reduce chaotic dependencies between objects. The pattern restricts direct communications between the objects and forces them to collaborate only via a mediator object.
Problem
Say you have a dialog for creating and editing customer profiles. It consists of various form controls such as text fields, checkboxes, buttons, etc.
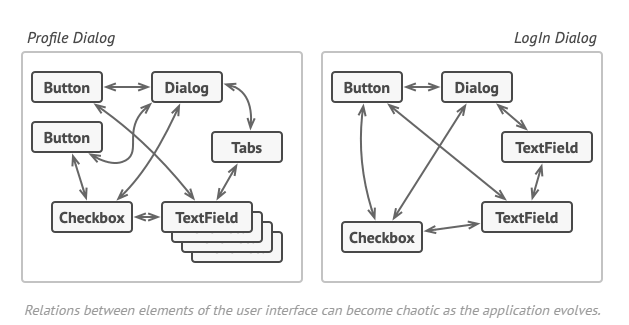
Some of the form elements may interact with others. For instance, selecting the "I have a dog" checkbox may reveal a hidden text field for entering the dog's name. Another example is the submit button which has to validate the values of all fields before saving the data.

By having this logic implemented directly inside the code of the form elements you make these element classes much harder to reuse in other forms of the app. For example, you won't be able to use that checkbox class inside another form, because it's coupled to the dog's text field. You can use either all the classes involved in rendering the profile form or none at all.
Solution
The Mediator pattern suggests that you should cease all direct communication between the components that you want to make independent of each other. Instead, these components must collaborate indirectly, by calling a special mediator object that redirect the calls to appropriate components. As a result, the components depend on only a single mediator class instead of being coupled to dozens of their colleagues.
In our example with the profile editing form, the dialog itself may act as the mediator. Most likely, the dialog class is already aware of its sub-elements, so you won't even need to introduce new dependencies into this class.
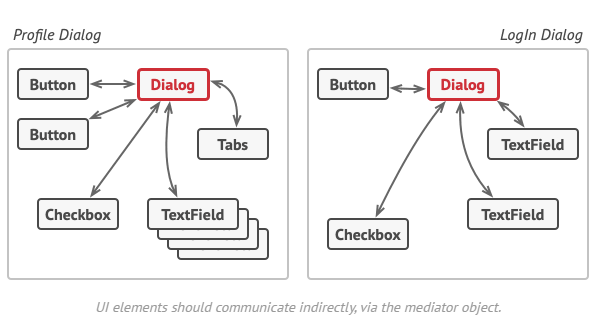
The most significant change happens to the actual form elements. Let's consider the submit button. Previously, each time a user clicked on the button, it had to validate the values of all individual form elements. Now its single job is to notify the dialog about the click. Upon receiving this notification, the dialog itself performs the validations or passes the task to the individual elements. Thus, instead of being tied to a dozen form elements, the button is only dependent on the dialog class.
You can go further and make the dependency even looser by extracting the common interface for all types of dialogs. The interface would declare the notification method that all form elements can use to notify the dialog about events happening to those elements. Thus, our submit button should now be able to work with any dialog that implements that interface.
This way, the Mediator pattern lets you encapsulate a complex web of relations between various objects inside a single mediator object. the fewer dependencies a class has, the easier it becomes to modify, extend, or reuse that class.
Real-World Analogy
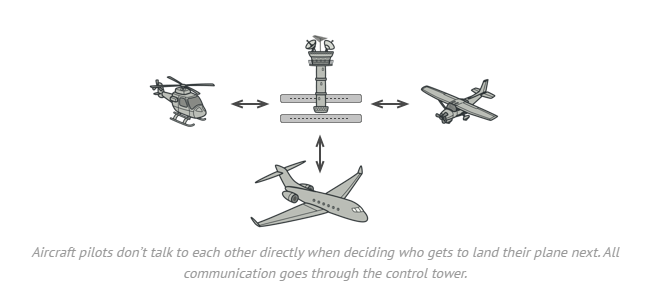
Pilots of aircraft that approach or depart the airport control area don't communicate directly with each other. Instead, they speak to an air traffic controller, who sits in a tall tower somewhere near the airstrips. Without the air traffic controller, pilots would need to be aware of every plan in the vicinity of the airport, discussing landing priorities with a committee of dozens of other pilots. That would probably skyrocket the airplane crash statistics.
The tower doesn't need to control the whole flight. It exists only to enforce constraints in the terminal area because the number of involved actors there might be overwhelming to a pilot.
When To Use It
The Mediator is a good solution when we find ourselves with a system in which a set of objects communicate in a complex and direct way with each other, resulting in high coupling between them. Here are some common situations where using the Mediator pattern can be beneficial:
Complex communication between multiple objects: As we have said when we have several objects that need to communicate with each other in a complex and direct way, it can be difficult to understand and maintain. The Mediator pattern centralizes this complex communication into a single object, thus simplifying the communication flow and reducing coupling between objects.
Reducing coupling: if you want to reduce coupling between the components of your system, the Mediator pattern can help. By centralizing communication between objects through a mediator, direct dependencies between objects are eliminated, making it easier to modify and maintain code.
Facilitating component reusability: The Mediator pattern promotes the reusability of individual components by decoupling them from their interactions with other components. This allows objects to be more independent and therefore easier to reuse in different contexts or systems.
In summary, the Mediator pattern is useful in situations where it is necessary to reduce coupling between objects, simplify communication between them, and facilitate the maintenance and evolution of code in complex systems.
Let's now move on to see the example of how to apply this system.
Example
Let's take a look at the UML class diagram for this pattern to understand each of its elements:
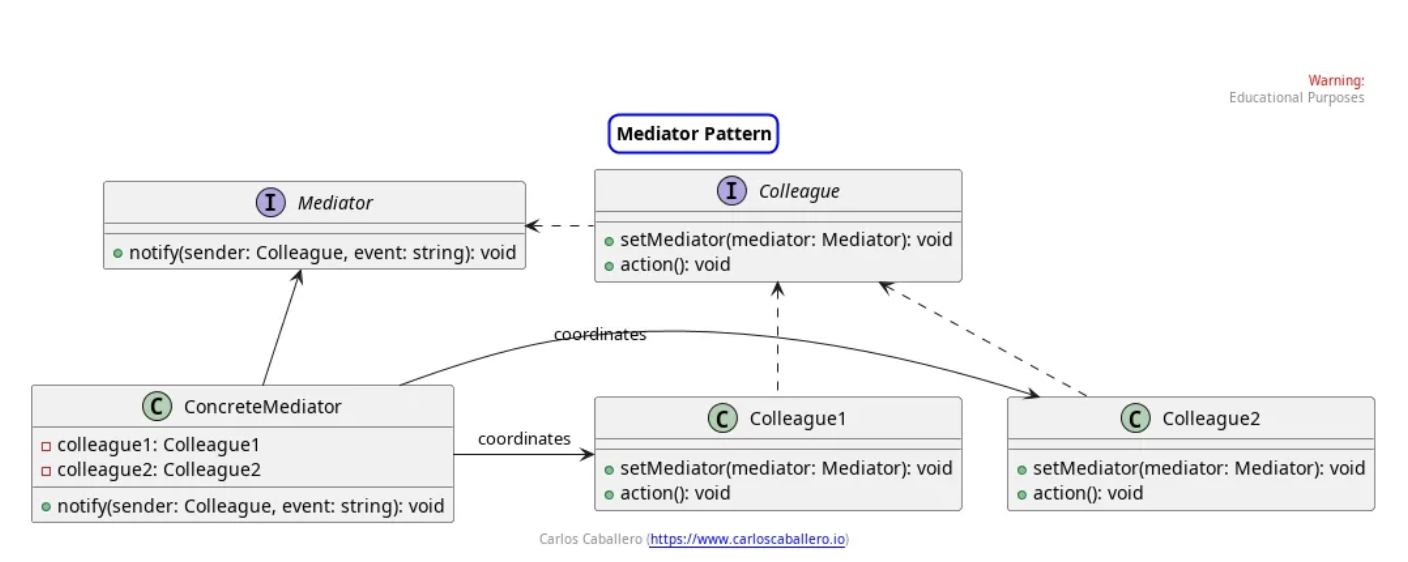
The Mediator pattern typically includes the following main elements:
Mediator: Defines the interface for communication with
Colleagueobjects.Concrete Mediator: Implements the
Mediatorinterface and coordinate communication betweenColleagueobjects.Colleague: Defines the interface for communication with other colleagues through the mediator.
Concrete Colleague: Implements the Colleague interface and communicates its needs to the mediator, reacting to messages from the mediator.
Let's start with the Mediator interface. This interface defines the contract that any mediator in the system must follow. In this case, it only has one method that we have called notify which receives the event sender (sender) and the event itself (event). This method is implemented by concrete mediators to handle communication between colleagues.
import { Colleague } from "./colleague";

export interface Mediator {
    notify(sender: Colleague, event: string): void;
}
The next class is the concrete mediator. This class implements the Mediator interface. It has references to the colleagues with which it will interact. In this notify method, the mediator receives an event from a colleague and decides how to handle it based on the sender. In our case, the solution has been modeled using a switch control structure in which, depending on the colleague, we invoke a request handler. In this example, we only display messages on the screen to know that the notification has arrived correctly.
import { Colleague } from "./colleague";
import { Colleague1 } from "./colleague1";
import { Colleague2 } from "./colleague2";
import { Mediator } from "./mediator";

export class ConcreteMediator implements Mediator {
    private colleague1: Colleague1;
    private colleague2: Colleague2;


    constructor(colleague1: Colleague1, colleague2: Colleague2) {
      this.colleague1 = colleague1;
      this.colleague2 = colleague2;
    }

    notify(sender: Colleague, event: string): void {
        switch(sender){
            case this.colleague1: this.handleColleague1(event); break;
            case this.colleague2: this.handleColleague2(event); break;
            default: console.log("Unknown sender");
        }

    }
    private handleColleague1(event){
        console.log("Event received by ConcreteMediator from Colleague1: ", event);
        console.log("implements colleague1 logic");
        console.log("-----------------");
    }

    private handleColleague2(event){
        console.log("Event received by ConcreteMediator from Colleague1: ", event);
        console.log("implements colleague1 logic");
        console.log("-----------------");
    }
}
The next thing would be to define the colleague interface, which is the contract that all colleagues in the system must follow. In this case, they have 2 methods: setMediator, to set the mediator they belong to, and action , to perform an action that can generate an event.
import { Mediator } from "./mediator";

export interface Colleague {
    setMediator(mediator: Mediator): void;
    action(): void;
}
What remains to be seen of the Mediator pattern would be the colleagues who implement this interface. In this case, they receive the mediator dependency through the constructor, and it is stored in a private attribute of the mediator type. This reference is very useful for communicating with the mediator when an event occurs, this is done in the action method, where we can see how it is being modified and that an action has been performed that we want to be managed by the mediator through the notify method. This method is sent as a parameter to the class itself that sends the request and the message or parameter that we want to be managed from the mediator.
import { Colleague } from "./colleague";
import { Mediator } from "./mediator";

export class Colleague1 implements Colleague {
    private mediator: Mediator;

    setMediator(mediator: Mediator): void {
      this.mediator = mediator;
    }

    action(): void {
      this.mediator.notify(this, "Event from Colleague1");
    }
}

export class Colleague2 implements Colleague {
    private mediator: Mediator;

    setMediator(mediator: Mediator): void {
      this.mediator = mediator;
    }

    action(): void {
      this.mediator.notify(this, "Event from Colleague2");
    }
}
At this point, we can think that the mediator could use another pattern to communicate with both colleagues and the mediator in a more reactive way, and this would be using the Observer pattern. We leave you with a task, once you have internalized the mediator pattern, how to apply the observer pattern together with it.
To conclude, we would have to see how this pattern is used in the client class.
import { Colleague1 } from "./colleague1";
import { Colleague2 } from "./colleague2";
import { ConcreteMediator } from "./concrete-mediator";

const colleague1 = new Colleague1();
const colleague2 = new Colleague2();

const mediator = new ConcreteMediator(colleague1, colleague2);

colleague1.setMediator(mediator);
colleague2.setMediator(mediator);

colleague1.action();
colleague2.action();
In this class, the colleagues that interact with each other are instantiated. we relate the colleagues through the mediator, which is the one that will perform the mediation tasks between them.
On the other hand, we pass the mediator as a parameter to each colleague so that communication between the colleagues and the mediator can be achieved, that is, that the colleagues notify or warn that an event has occurred to the mediator.
Finally, each colleague will independently execute its action, which will be notified to the mediator and it will perform the different mediation tasks.
In this way we have decoupled the different colleagues from knowing each other, allowing new colleagues to be created without the need to know each other.
The Memento Pattern

Memento is a behavioral design pattern that lets you save and restore the previous state of an object without revealing the details of its implementation.
Problem
Imagine you are creating a text editor app. In addition to simple text editing, your editor can format text, insert inline images, etc.
At some point, you decided to let users undo any operations carried out on the text. This feature has become so common over the years that nowadays people expect every app to have it. For the implementation, you chose to take a direct approach. Before performing any operation, the app records the state of all objects and saves them in some storage. Later, when a user decides to revert an action, the app fetches the latest snapshot from the history and uses it to restore the state of all objects.
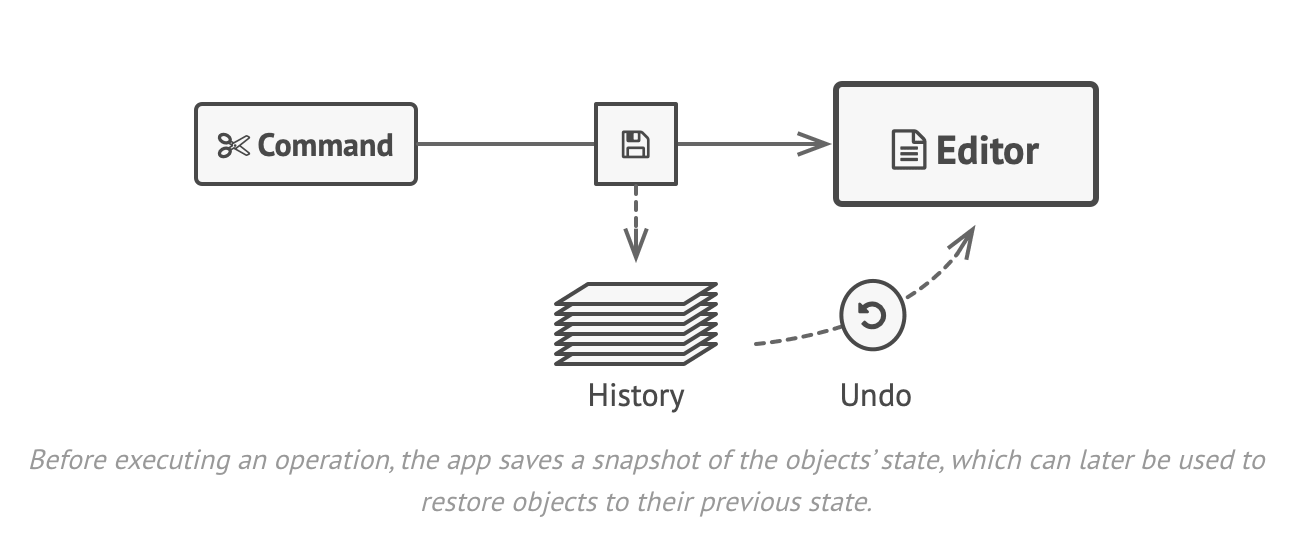
Let's think about those state snapshots. How exactly would you produce one? You would probably need to go over all of the fields in an object and copy their values into storage. However, this would only work if the object had quite relaxed access restrictions to its contents. Unfortunately, most real objects won't let others peek inside them that easily, hiding all significant data in private fields.
Ignore that problem for now and let's assume that our objects behave like hippies: preferring open relations and keeping their state public. While this approach would solve the immediate problem and let you produce snapshots of an object's states at will, it still has some serious issues. In the future, you might decide to refactor some of the editor classes or add or remove some of the fields. Sounds easy, but this would also require changing the classes responsible for copying the state of the affected objects.
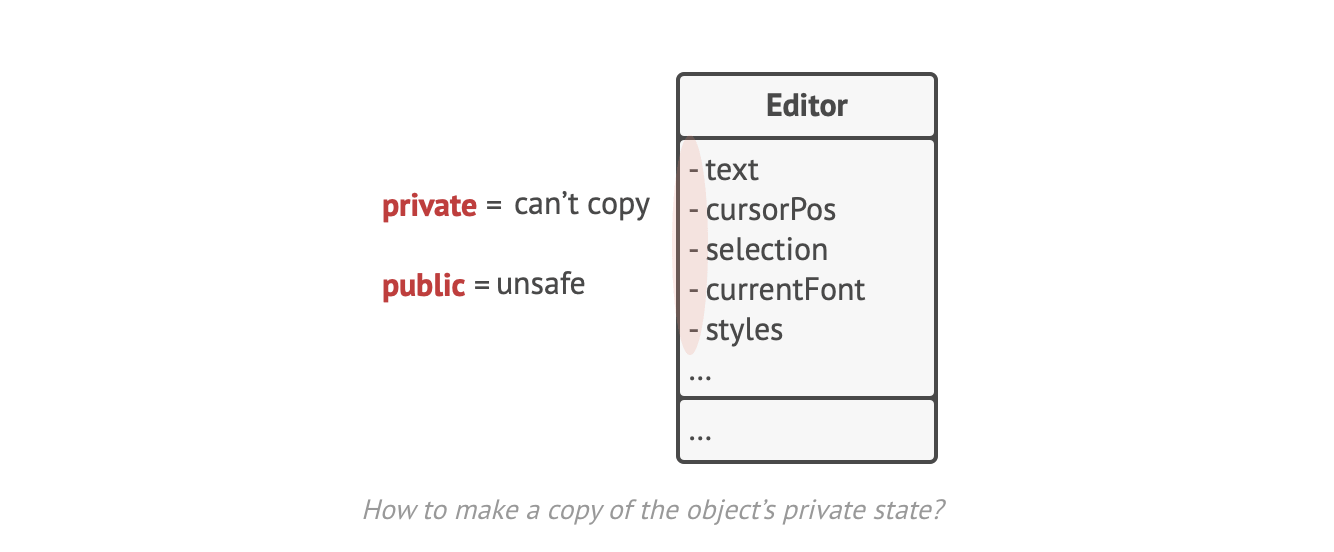
But there is more. Let's consider the actual "snapshots" of the editor's state. What data does it contain? At a bare minimum, it must contain the actual text, cursor coordinates, current scroll, etc. To make a snapshot, you would need to collect these values and put them into some kind of container.
Most likely, you are going to store lots of these container objects inside some list that would represent the history. Therefore the container would probably end up being objects of one class. The class would have almost no methods, but lots of fields that mirror the editor's state. To allow other objects to write and read data to and from a snapshot, you would probably make its fields public. That would expose all the editor's states, private or not. Other classes would become dependent on every little change to the snapshot class, which would otherwise happen within private fields and methods without affecting outer classes.
It looks like we have reached a dead end: you either expose all internal details of classes, making them too fragile, or restrict access to their state, making it impossible to produce snapshots. Is there any other way to implement the "undo"?
Solution
All problems that we have just experienced are caused by broken encapsulation. Some objects try to do more than they are supposed to. To collect the data required to perform some action, they invade the private space of other objects instead of letting these objects perform the actual action.
The Memento pattern delegates the creation of state snapshots to the actual owner of that state, the originator object. Hence, instead of other objects trying to copy the editor's state from the outside, the editor class itself can make the snapshot since it has full access to its own state.
The pattern suggests storing the copy of the object's state in a special object called a memento. The contents of the memento aren't accessible to any other objects except the one that produced it. Other objects must communicate with mementos using a limited interface which may allow fetching the snapshot's metadata (creation time, the name of the performed operation, etc.) but not the original objects contained in the snapshot.
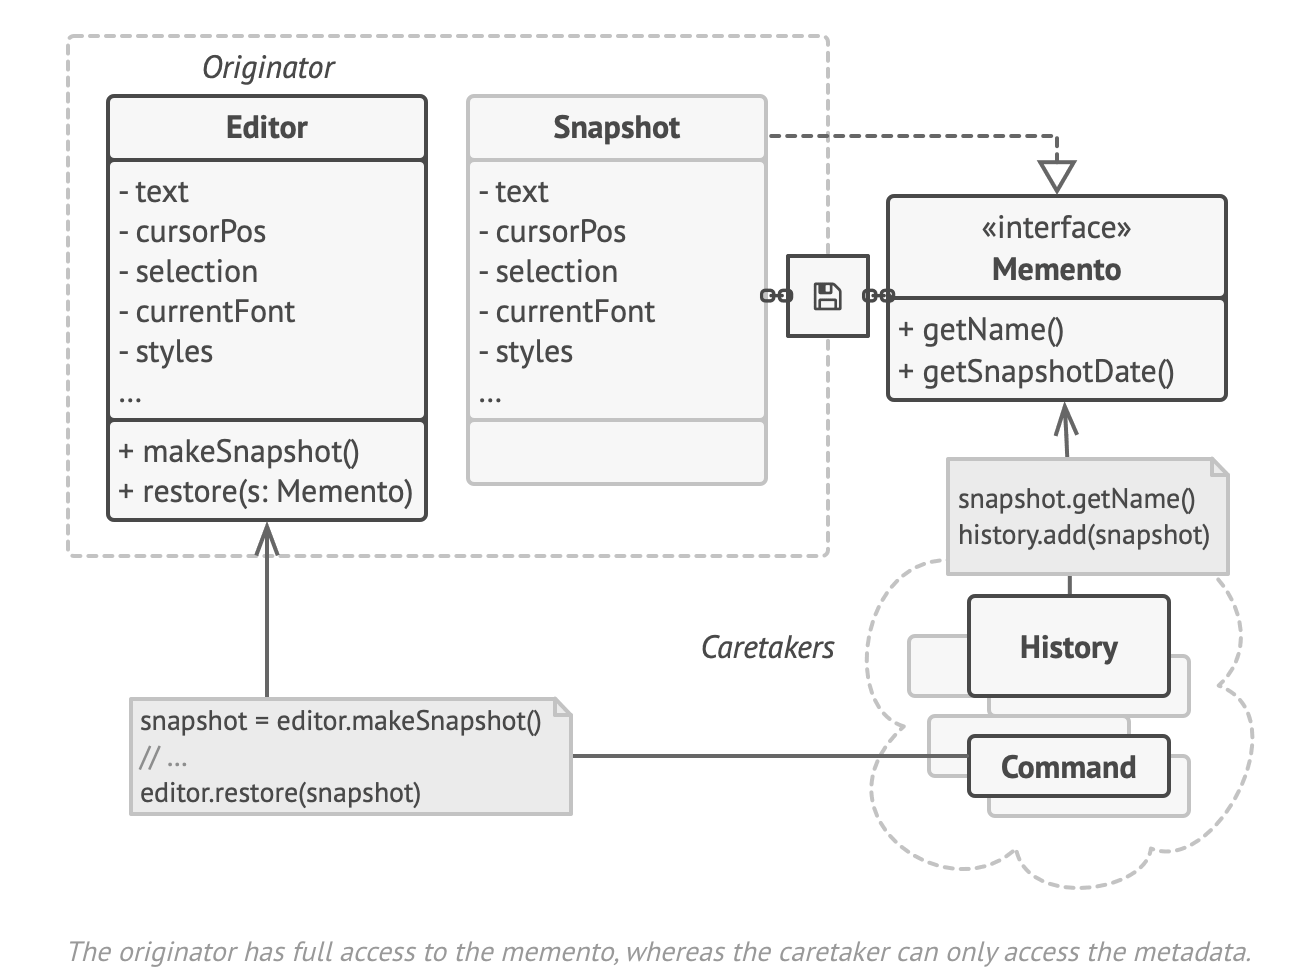
Such a restrictive policy lets you store mementos inside other objects, usually called caretakers. Since the caretakers work with the memento only via a limited interface, it's not able to tamper with the state stored inside the memento. At the same time, the originator has access to all fields inside the memento, allowing it to restore its previous at will.
In our text editor example, we can create a separate history class to act as the caretaker. A stack of mementos stored inside the caretaker will grow each time the editor is about to execute an operation. You could even render this stack within the app's UI, displaying the history of previously performed operations to a user.
When a user triggers the undo, the history grabs the most recent memento from the stack and passes it back to the editor, requesting a roll-back. Since the editor has full access to the memento, it changes its own state with the values taken from the memento.
Example
Check out this article to see how to implement the Memento pattern in Javascript.
\=>> There’s much to unpack here. See you in Part IV.
References
https://betterprogramming.pub/understanding-the-chain-of-responsibility-design-pattern-2f44cdff61e5
https://levelup.gitconnected.com/command-design-pattern-explained-63d6df1b6ccb
https://betterprogramming.pub/the-power-of-iterator-design-pattern-in-javascript-e8a9ec703fb5
https://levelup.gitconnected.com/understanding-the-mediator-design-pattern-9dbfe19d6d71
Subscribe to my newsletter
Read articles from Tuan Tran Van directly inside your inbox. Subscribe to the newsletter, and don't miss out.
Written by

Tuan Tran Van
Tuan Tran Van
I am a developer creating open-source projects and writing about web development, side projects, and productivity.