A Comprehensive Guide to Kubernetes Networking with Multiple Docker Containers
 Rudraksh Laddha
Kubernetes, often abbreviated as K8s, is a powerful container orchestration platform that automates the deployment, scaling, and management of containerized applications. One of the core features that make Kubernetes so effective is its robust networking model, which enables seamless communication between containers, Pods, and services across the cluster. Understanding Kubernetes networking is crucial when deploying multiple Docker containers in a Kubernetes environment.
This guide will explore the key concepts behind Kubernetes networking, demonstrate how to set up multiple Docker containers within a Kubernetes cluster, and explain how networking facilitates container communication.
Key Concepts in Kubernetes Networking
To effectively manage containerized applications in Kubernetes, it’s important to understand several foundational concepts:
Pods:
- A Pod is the smallest deployable unit in Kubernetes and represents a single instance of a running process in the cluster. A Pod can contain one or more tightly coupled containers, which share the same network namespace and storage volumes. Containers within a Pod can communicate with each other over
localhostbecause they share the same IP address. This design is ideal for applications with closely related components, such as a web server and a caching layer.
- A Pod is the smallest deployable unit in Kubernetes and represents a single instance of a running process in the cluster. A Pod can contain one or more tightly coupled containers, which share the same network namespace and storage volumes. Containers within a Pod can communicate with each other over
Services:
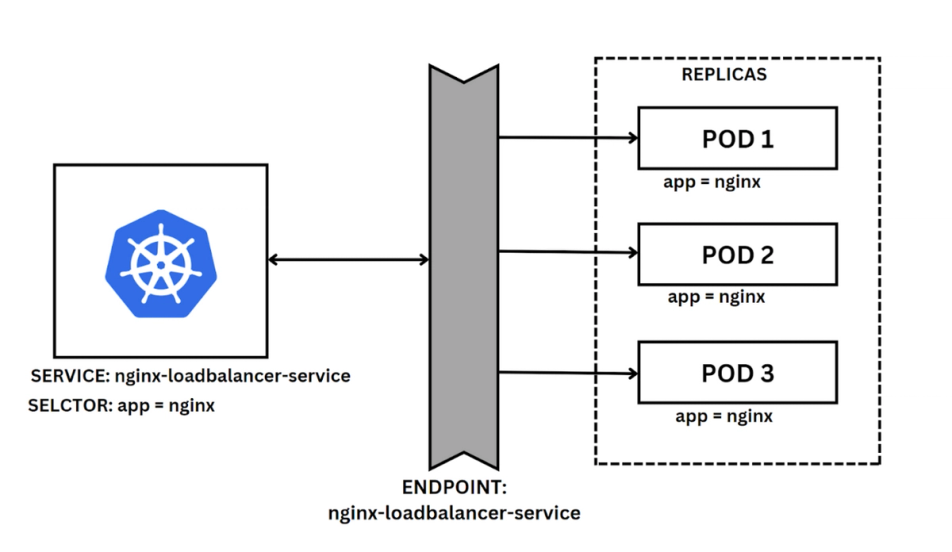
- A Service in Kubernetes is an abstraction that defines a logical set of Pods and a policy to access them. Services provide a stable IP address and DNS name, allowing other Pods or external clients to discover and communicate with the backend Pods, even if the set of Pods changes. Services in Kubernetes act as load balancers, distributing network traffic among the set of Pods.
Cluster Networking:
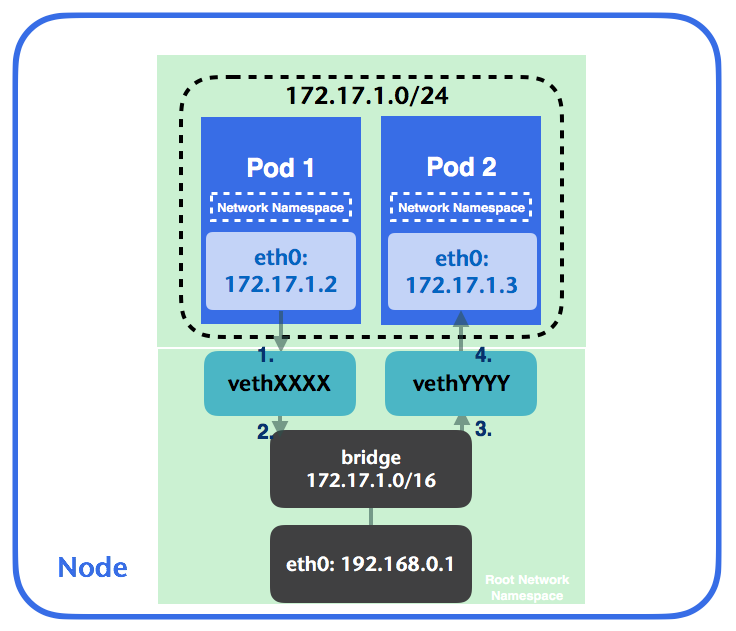
- In a Kubernetes cluster, every Pod is assigned a unique IP address, enabling direct communication between Pods without the need for NAT (Network Address Translation). This "flat" network model ensures that all Pods can communicate with each other directly, simplifying service discovery and inter-Pod communication.
Network Plugins:
- Kubernetes supports different network plugins (such as Calico, Flannel, Weave, and Cilium) that implement the Container Network Interface (CNI). These plugins are responsible for setting up the cluster network, assigning IP addresses to Pods, and enforcing network policies.
Networking Models in Kubernetes
Kubernetes supports several networking models to facilitate communication between Pods, services, and external clients. Let’s explore these models:
Container-to-Container Communication:
Containers within the same Pod share the same network namespace, meaning they can communicate with each other using
localhost. This model is useful for containers that need to work closely together, such as a web server and a logging agent.
Pod-to-Pod Communication:
Pods can communicate with each other using their IP addresses. Kubernetes ensures that each Pod gets a unique IP address, allowing any Pod to communicate with any other Pod in the cluster directly. The CNI plugins manage the routing of traffic between Pods, ensuring seamless communication.

Pod-to-Service Communication:
Services provide a consistent way to expose an application running on a set of Pods. Kubernetes manages a cluster-wide DNS service that assigns a DNS name to each Service, which other Pods or external clients use to access the Service. This model abstracts the backend Pods behind a stable endpoint, enabling easier service discovery and load balancing.

External-to-Service Communication:
Services of type
NodePortorLoadBalancerexpose applications to external clients outside the cluster.NodePortopens a specific port on all cluster nodes to forward traffic to the backend Pods, whileLoadBalancerintegrates with external cloud providers to provision a load balancer that forwards traffic to the Service.
Deploying Multiple Docker Containers in Kubernetes: A Step-by-Step Example
To illustrate how Kubernetes networking works with multiple Docker containers, we’ll walk through an example of deploying a web application with a Redis cache in a Kubernetes cluster. This example will involve creating Docker images, deploying them as a multi-container Pod, and exposing the application via a Kubernetes Service.
Step 1: Create Dockerfiles for Your Containers
To begin, we need Dockerfiles to define the environment and dependencies for each container.
Dockerfile for Web Application (
Dockerfile.web):# Use Node.js base image FROM node:14 # Set the working directory WORKDIR /app # Copy application code to the container COPY . . # Install dependencies RUN npm install # Expose port 3000 EXPOSE 3000 # Start the application CMD ["npm", "start"]Dockerfile for Redis (
Dockerfile.redis):# Use Redis base image FROM redis:6.0 # Expose Redis port EXPOSE 6379
These Dockerfiles specify the base images (node:14 and redis:6.0), set up the working environment, copy the necessary files, and define how to run the containers.
Step 2: Build and Push Docker Images
Build the Docker images using the Dockerfiles and push them to a container registry like Docker Hub.
# Build Docker images for the web application and Redis
docker build -t myrepo/web-app:latest -f Dockerfile.web .
docker build -t myrepo/redis:latest -f Dockerfile.redis .

# Push images to Docker Hub (or another container registry)
docker push myrepo/web-app:latest
docker push myrepo/redis:latest
Ensure you have access to a Docker registry where Kubernetes can pull these images.
Step 3: Define Kubernetes Manifests for Deployment
Next, we define a Kubernetes Pod manifest to deploy both the web application and Redis containers in a single Pod.
multi-container-pod.yaml:apiVersion: v1 kind: Pod metadata: name: multi-container-pod labels: app: multi-container-app spec: containers: - name: web-app image: myrepo/web-app:latest ports: - containerPort: 3000 env: - name: REDIS_HOST value: "localhost" - name: REDIS_PORT value: "6379" - name: redis image: myrepo/redis:latest ports: - containerPort: 6379
This manifest defines a Pod named multi-container-pod containing two containers: web-app and redis. Both containers share the same network namespace and can communicate over localhost.
Step 4: Deploy the Pod to Kubernetes
Apply the manifest to create the Pod in your Kubernetes cluster.
kubectl apply -f multi-container-pod.yaml
Kubernetes will schedule the Pod on a node and deploy both containers. Since the containers share the same network namespace, the web application can access Redis using localhost:6379.
Step 5: Expose the Application Using a Kubernetes Service
To make the web application accessible outside the cluster, we need to define a Kubernetes Service.
service.yaml:apiVersion: v1 kind: Service metadata: name: web-app-service spec: selector: app: multi-container-app ports: - protocol: TCP port: 80 targetPort: 3000 type: NodePort
This manifest defines a Service named web-app-service of type NodePort, exposing port 80 on each node’s IP address and forwarding traffic to port 3000 of the web application container.
Apply the Service manifest:
kubectl apply -f service.yaml
Step 6: Access the Application
To access the web application from outside the cluster, use the external IP address of any node in the cluster and the port number assigned to the Service:
curl http://<node-ip>:<node-port>
You can find the node IP and port by running:
kubectl get svc web-app-service
Conclusion
Kubernetes networking provides a flexible and powerful model for managing containerized applications, enabling seamless communication between containers within a Pod and across the entire cluster. By understanding the concepts of Pods, Services, and networking models, you can effectively deploy and manage multiple Docker containers in Kubernetes.
In this example, we demonstrated how to deploy a multi-container application in a single Pod and expose it using a Service, highlighting the simplicity and power of Kubernetes networking. With these skills, you are well-equipped to deploy complex, scalable applications in a Kubernetes environment and ensure reliable communication between all application components.
Thank you for reading!
#2Articles1Week #Kubernetes hashtag#Docker hashtag#DevOps hashtag#CloudComputing hashtag#ContainerOrchestration hashtag#Networking hashtag#Microservices hashtag#Tech hashtag#Learning hashtag#CloudNative
Subscribe to my newsletter
Read articles from Rudraksh Laddha directly inside your inbox. Subscribe to the newsletter, and don't miss out.
Written by

Rudraksh Laddha
Rudraksh Laddha
DevOps Engineer || Technical Writer || Content Creator || | Adventurer chasing dreams, capturing life's kaleidoscope. || 🎓UCET '24 || Dm for Collabs📥||