DevOps Week 4 : Configuration Management and Ansible
 Manjot Singh Bajwa
Table of contents

Configuration Management in DevOps
Configuration management is a cornerstone of DevOps practices, ensuring that software systems and infrastructure maintain consistency, reliability, and stability across environments. It plays a crucial role in automating deployment processes and ensuring that all environments (development, testing, production) share the same configurations. This practice mitigates the risk of configuration drift, where environments diverge over time, leading to deployment issues, debugging difficulties, and challenges in scaling.
Key Aspects of Configuration Management
Consistency: Ensures uniform configurations across all environments, reducing deployment failures.
Automation: Reduces manual intervention and human error by automating system setup and configuration management.
Version Control: Tracks changes in configuration files, making it easy to roll back to previous versions if needed.
Scalability: Enables seamless scaling by automatically applying correct configurations to new instances or nodes.
Compliance: Ensures systems adhere to security policies and organizational standards.
Tools for Configuration Management
Several tools facilitate configuration management in DevOps, automating the process of managing and configuring servers, making it easier to handle large-scale systems. Below are some of the most widely used tools:
1. Ansible
Overview: Ansible, an open-source tool by Red Hat, is known for its simplicity and ease of use. It employs YAML-based playbooks to define configurations and automation tasks.
Key Features: Agentless architecture, easy to learn, supports a wide range of platforms, and integrates well with other DevOps tools.
Use Cases: Ideal for application deployment, configuration management, and orchestration.
2. Puppet
Overview: Puppet is a popular configuration management tool that uses a declarative language to define the desired state of the system.
Key Features: Model-driven approach, agent-based architecture, powerful reporting capabilities, and a large ecosystem of modules.
Use Cases: Suitable for managing complex, large-scale infrastructure with multiple nodes.
3. Chef
Overview: Chef is a powerful automation platform that turns infrastructure into code, allowing you to manage servers by writing code.
Key Features: Uses Ruby-based DSL for configurations, flexible and extensible, strong community support, and integrates with cloud providers.
Use Cases: Used for managing cloud infrastructure, automating application deployments, and configuring servers.
4. SaltStack (Salt)
Overview: SaltStack is known for its speed and scalability, using a master-slave architecture. It’s particularly effective in environments with many nodes.
Key Features: Fast communication with agents, scalable to thousands of nodes, event-driven automation, and powerful orchestration capabilities.
Use Cases: Ideal for managing large infrastructures with real-time configuration and orchestration.
5. Terraform
Overview: Terraform, by HashiCorp, is primarily an infrastructure-as-code (IaC) tool but is widely used for configuration management as well.
Key Features: Declarative language for defining infrastructure, multi-cloud support, state management, and version control of infrastructure.
Use Cases: Creating, updating, and managing infrastructure in cloud environments like AWS, Azure, GCP.
In-Depth Comparison: Ansible vs. Puppet
Puppet and Ansible are both popular tools in the configuration management space, but they differ significantly in their architecture, language, ease of use, and operational models.
1. Architecture
Puppet:
Agent-Based: Uses an agent-based architecture where a Puppet master server communicates with agent nodes installed on each machine.
Master-Agent Model: The Puppet master controls the configuration and sends the desired state to the agents.
Ansible:
Agentless: Does not require software installation on the nodes it manages. It connects to nodes over SSH (for Linux) or WinRM (for Windows).
Push Model: Uses a push-based model where the control node (where Ansible is installed) pushes configurations directly to managed nodes.
2. Language and Syntax
Puppet:
Domain-Specific Language (DSL): Uses a Ruby-based declarative language to define the desired state.
Complexity: The DSL can be more complex to learn, especially for those unfamiliar with Ruby or declarative programming.
Ansible:
YAML: Uses YAML (Yet Another Markup Language) for playbooks, which are easy to read and write, even for beginners.
Simplicity: YAML's simplicity makes Ansible more accessible, particularly for new users.
3. Ease of Use
Puppet:
Steeper Learning Curve: Due to its DSL and more complex setup, Puppet can be harder to learn.
More Powerful for Complex Configurations: Puppet is powerful and flexible, suitable for large, complex environments.
Ansible:
Easier to Get Started: Ansible's simple YAML syntax and agentless architecture make it easier to start.
Quick Setup: The lack of agents means less setup and maintenance, simplifying its use in various environments.
4. Operational Model
Puppet:
Declarative: Follows a purely declarative model where the desired state is defined, and Puppet ensures the system remains in that state.
Idempotent: Applying the same configuration multiple times does not change the system beyond the initial application.
Ansible:
Declarative and Imperative: Ansible supports both models. You can declare the desired state in playbooks and write tasks that execute commands in a specific order.
Idempotent: While Ansible playbooks can be idempotent, tasks must be carefully written to ensure this.
5. Scalability
Puppet:
Highly Scalable: Designed for managing large infrastructures with many nodes, often used in enterprise environments.
Centralized Management: The master-agent architecture allows centralized control, useful for large-scale deployments.
Ansible:
Scalable but Depends on SSH: While scalable, Ansible's performance can be affected by SSH connection overhead, especially in large environments.
No Centralized Server: Ansible’s flexibility comes from not relying on a centralized server, but this may require additional effort to scale efficiently.
6. Community and Ecosystem
Puppet:
Mature Ecosystem: Has a large and mature ecosystem with various modules available from Puppet Forge.
Strong Enterprise Support: Widely used in enterprises, with strong support and commercial offerings.
Ansible:
Growing Ecosystem: Ansible's ecosystem is rapidly growing, with Ansible Galaxy serving as a repository for playbooks and roles.
Strong Community Support: Ansible has a large community and is popular in both small and large organizations, with strong Red Hat support.
More About Ansible
1. Ansible Ad-Hoc Commands
What it is: Ansible ad-hoc commands are single-line commands that allow you to perform quick tasks on multiple hosts without needing a full playbook.
Use Cases: They are ideal for tasks like rebooting servers, copying files, managing services, or checking uptime across your infrastructure.
Example Command:
ansible all -m pingThis command pings all hosts in the inventory to check their availability.
2. Ansible Playbooks
What it is: Ansible playbooks are YAML files that define a series of tasks to be executed on specified hosts. Unlike ad-hoc commands, playbooks are designed for more complex and repeatable automation.
Structure: A typical playbook includes definitions for hosts, tasks, roles, variables, and handlers.
Use Cases: Playbooks are used for automating tasks such as setting up environments, deploying applications, or configuring systems.
Example:
  - hosts: webservers
    tasks:
      - name: Install Apache
        yum:
          name: httpd
          state: present
This playbook installs the Apache web server on all hosts in the
webserversgroup.
3. Ansible Roles
What it is: Roles in Ansible allow you to organize playbooks into reusable components. A role typically includes tasks, templates, variables, files, and handlers that are related to a specific function.
Use Cases: Roles help in breaking down complex configurations into manageable, reusable parts, making your playbooks easier to maintain.
Structure: Roles are structured with directories like
tasks,handlers,templates,files,vars, anddefaults.Example:
  - hosts: webservers
    roles:
      - { role: apache, when: "ansible_os_family == 'RedHat'" }
This applies the
apacherole towebserversonly if the OS family is RedHat.
4. Ansible Galaxy
What it is: Ansible Galaxy is a community-driven platform for sharing Ansible roles. You can download roles from Galaxy to use in your playbooks or share your own roles with others.
Use Cases: Galaxy is particularly useful for quickly setting up roles for common tasks like configuring a LAMP stack, managing users, or deploying Docker.
Example Commands:
ansible-galaxy install geerlingguy.apacheThis command installs the
apacherole bygeerlingguyfrom Ansible Galaxy.
5. Ansible File Structure
What it is: Ansible's file structure refers to the organized layout of directories and files in an Ansible project.
Common Structure:
  ├── ansible.cfg       # Configuration file
  ├── inventory/        # Inventory files (hosts)
  │   ├── production
  │   └── staging
  ├── roles/            # Roles directory
  │   ├── common/
  │   └── webserver/
  ├── group_vars/       # Variables for groups of hosts
  ├── host_vars/        # Variables for specific hosts
  ├── playbooks/        # Playbooks directory
  │   ├── site.yml
  │   └── webserver.yml
  └── templates/        # Templates directory
Use Cases: Following this structure ensures that your Ansible project remains organized and scalable, facilitating easier management as it grows.
Setting Up and Executing Tasks on EC2 Instances Using Ansible
Prerequisites
EC2 Instances:
demo-server-1(Ansible server) anddemo-server-2(Target server).Operating System: Both instances are running Linux.

Step 1: Install Ansible on demo-server-1
Connect to your demo-server-1 instance and install Ansible:
# Update the package manager
sudo apt update -y

# Install Ansible
sudo apt install ansible -y
Step 2: Generate SSH Key Pair on demo-server-1
Generate an SSH key pair on demo-server-1 to establish a password-less SSH connection:
# Generate an SSH key pair
ssh-keygen -t rsa

# Copy the public key to `demo-server-2`
ssh-copy-id ubuntu@<demo-server-2-IP>
Note: If ssh-copy-id is not available, you can manually copy the public key:
# Display the public key
cat ~/.ssh/id_rsa.pub

# On demo-server-2, paste the public key into the ~/.ssh/authorized_keys file
On demo-server-1 (Ansible installed)

On demo-server-2 (Target)


Step 3: Test SSH Connection
Verify that the SSH connection from demo-server-1 to demo-server-2 works without requiring a password:
# Test the SSH connection
ssh <demo-server-2-IP>
Step 4: Create Two Files Using Ansible Ad-Hoc Command
Use Ansible ad-hoc commands to create two files on demo-server-2:
Note: You can add demo-server-2 IP inside a inventory file and use that inventory file in commands
# Create the first file
ansible -i inventory all -m "shell" -a "touch <file_name>"

On demo-server-1 (Ansible installed)
On demo-server-2 (Target)

Step 5: Write an Ansible Playbook to Install and Start Nginx
On demo-server-1, create a playbook file for installing and starting Nginx:
# Create a playbook file
vim install_nginx.yml
install_nginx.yml Content:
---
- name: Install and Start nginx
  hosts: all
  become: true

  tasks:
    - name: Install nginx
      apt:
        name: nginx
        state: present
    - name: Start nginx
      service:
        name: nginx
        state: started
Step 6: Execute the Ansible Playbook
Run the playbook to install and start Nginx on demo-server-2:
# Execute the playbook
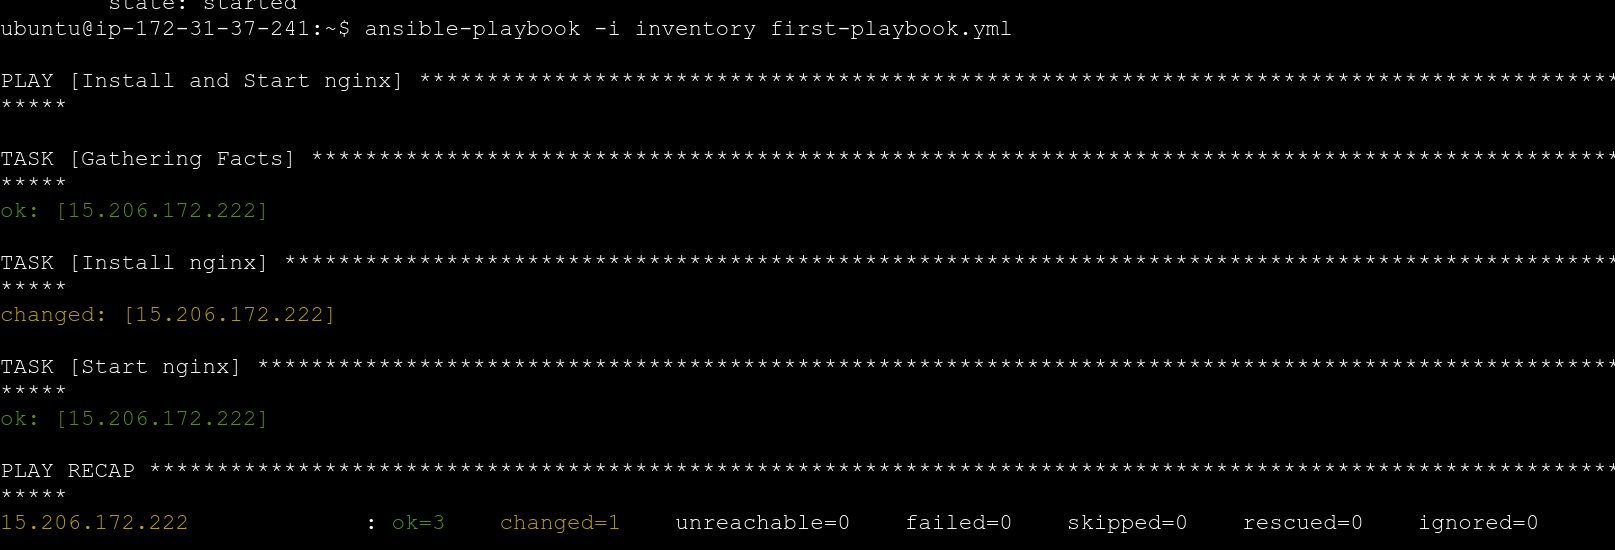
ansible-playbook -i inventory install_nginx.yml

Step 7: Verify Nginx Installation
Confirm that Nginx is installed and running on demo-server-2:
# Check the status of the Nginx service
sudo systemctl status nginx

Summary
Installed Ansible on
demo-server-1.Established password-less SSH access between
demo-server-1anddemo-server-2.Used Ansible ad-hoc commands to create two files on
demo-server-2.Deployed and started Nginx on
demo-server-2using an Ansible playbook.
Conclusion
Effective configuration management in DevOps is essential for maintaining consistency, reliability, and efficiency. Automating system setup and management reduces errors, ensures compliance, and supports scalability. Tools like Ansible, Puppet, Chef, SaltStack, and Terraform offer diverse features suited to different needs.
Ansible is favored for its simplicity and agentless architecture, Puppet for managing complex environments, Chef for flexibility with cloud infrastructure, SaltStack for scalability and speed, and Terraform for multi-cloud infrastructure-as-code. Choosing the right tool depends on your infrastructure needs and team expertise. This document also includes a guide on using Ansible for automation with EC2 instances.
Subscribe to my newsletter
Read articles from Manjot Singh Bajwa directly inside your inbox. Subscribe to the newsletter, and don't miss out.
Written by

Manjot Singh Bajwa
Manjot Singh Bajwa
I'm experienced in designing scalable software architecture on a higher level and lower level implementation. Ensures the smooth functioning of technical operations by monitoring and evaluating staff progress. Involved in the training and recruitment process, works for company goals, and ensures overall client satisfaction.