Creating safe and fast multiplayer in games on Unity and NodeJS with examples
 Elijah Brown
Introduction
Planning an approach to multiplayer game development - plays one of the most important roles in the further development of the whole project, because it includes a lot of criteria that we should take into account when creating a really high-quality product. In today's manifesto tutorial, we will look at an example of an approach that allows us to create really fast games, while respecting all security and anti-chit rules.

So, let's define the main criteria for us:
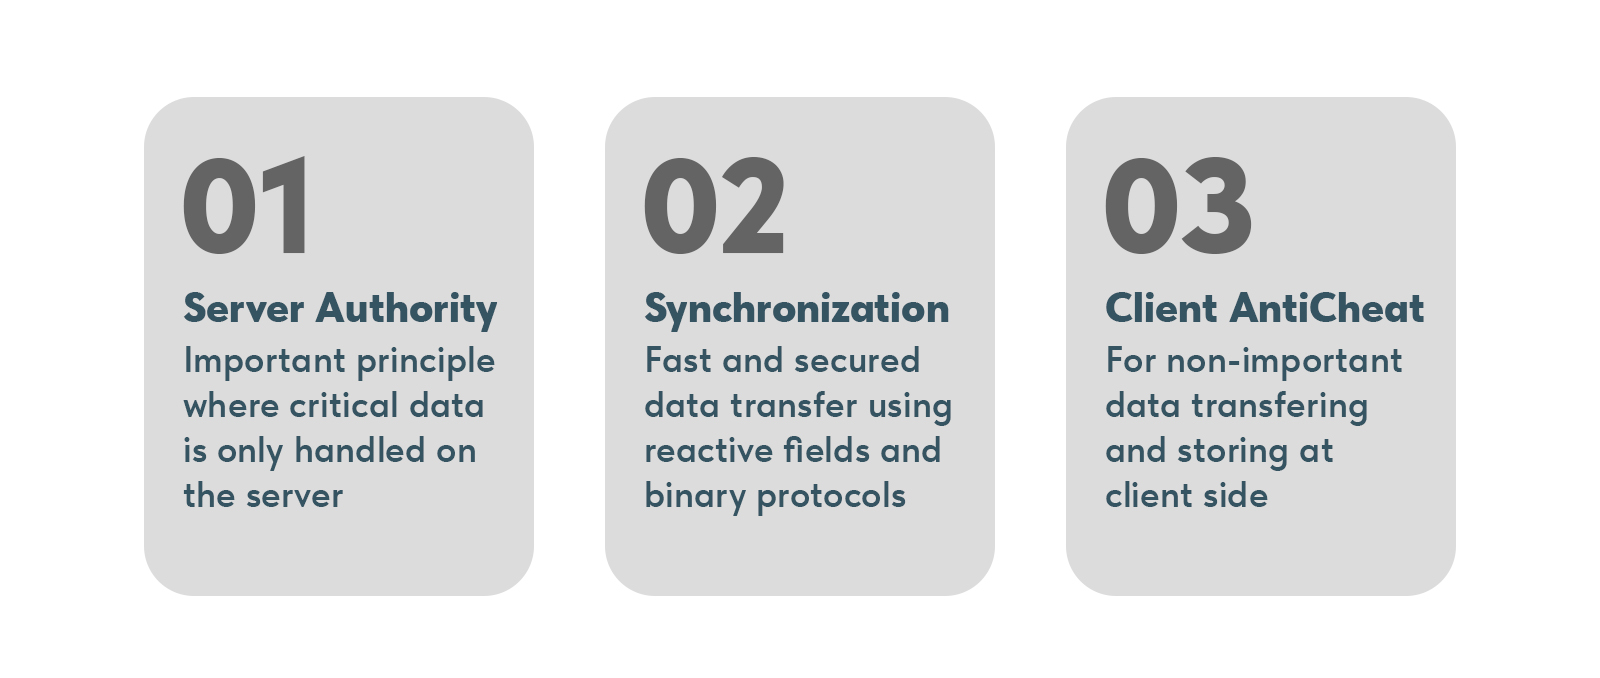
Multiplayer games require a special approach to managing network synchronization, especially when it comes to real time. A binary protocol is used to speed up data synchronization between clients, and reactive fields will help update player positions with minimal latency and memory savings.
Server authority is an important principle where critical data is only handled on the server, ensuring game integrity and protection against cheaters. However, in order for us to maximize performance - the server only does critical updates and we leave the rest to the client anti-cheat.
Implementation of client anti-chit in order to process less critical data without additional load on the server.

Main components of the architecture
Client side (Unity): The client side is responsible for displaying the game state, sending player actions to the server and receiving updates from the server. Reactive fields are also used here to dynamically update player positions.
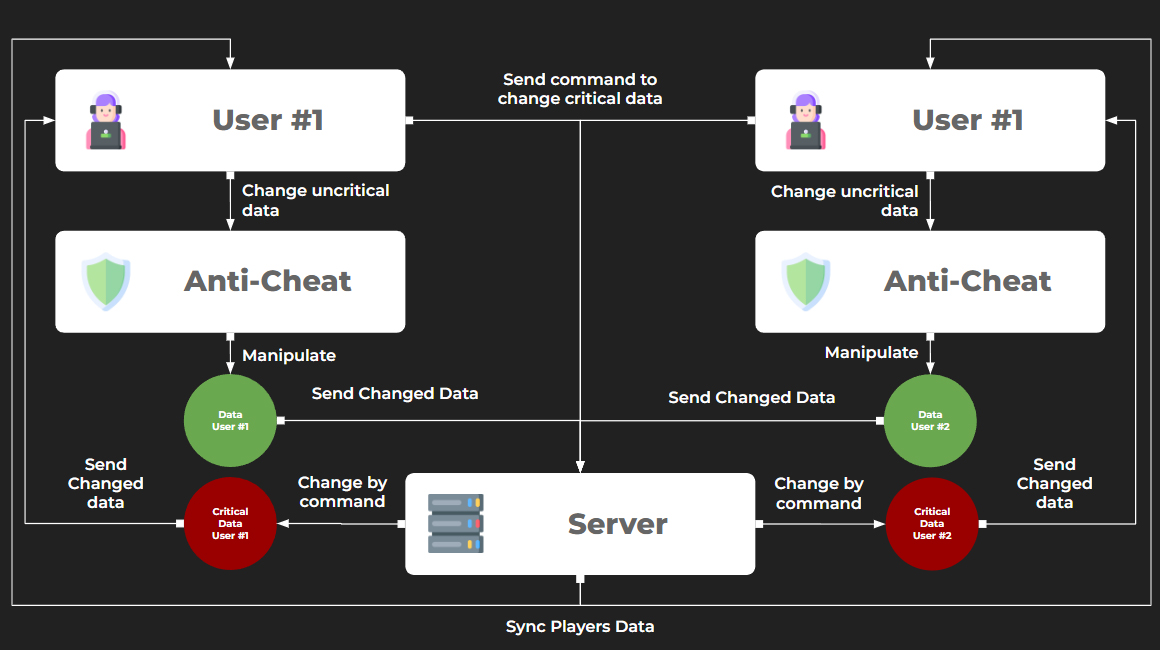
Server side (Node.js): The server handles critical data (e.g., moves, collisions, and player actions) and sends updates to all connected clients. Non-critical data can be processed on the client and forwarded using the server to other clients.
Binary Protocol: Binary data serialization is used to reduce the amount of data transferred and improve performance.
Synchronization: Fast synchronization of data between clients is provided to minimize latency and ensure smooth gameplay.
Client Anti-Cheat: It is used for the kinds of data that we can change on the client and send out to other clients.
Step 1: Implementing the server in Node.js
First, you need to set up a server on Node.js. The server will be responsible for all critical calculations and transferring updated data to the players.
Installing the environment
To create a server on Node.js, install the necessary dependencies:
mkdir multiplayer-game-server
cd multiplayer-game-server
npm init -y
npm install socket.io
Socket.io makes it easy to implement real-time two-way communication between clients and server using web sockets.
Basic server implementation
Let's create a simple server that will handle client connections, retrieve data, calculate critical states and synchronize them between all clients.
// Create a simple socket IO server
const io = require('socket.io')(3000, {
    cors: {
        origin: '*'
    }
});

// Simple example of game states
let gameState = {};
let playerSpeedConfig = {
    maxX: 1,
    maxY: 1,
    maxZ: 1
};

// Work with new connection
io.on('connection', (socket) => {
    console.log('Player connected:', socket.id);

    // Initialize player state for socket ID
    gameState[socket.id] = { x: 0, y: 0, z: 0 };

    // work with simple player command for movement
    socket.on('playerMove', (data) => {
        const { id, dx, dy, dz } = parsePlayerMove(data);

        // Check Maximal Values
        if(dx > playerSpeedConfig.maxX) dx = playerSpeedConfig.maxX;
        if(dy > playerSpeedConfig.maxY) dx = playerSpeedConfig.maxY;
        if(dz > playerSpeedConfig.maxZ) dx = playerSpeedConfig.maxZ;

        // update game state for current player
        gameState[id].x += dx;
        gameState[id].y += dy;
        gameState[id].z += dz;

        // Send new state for all clients
        const updatedData = serializeGameState(gameState);
        io.emit('gameStateUpdate', updatedData);
    });

    // Work with unsafe data
    socket.on('dataUpdate', (data) => {
        const { id, unsafe } = parsePlayerUnsafe(data);

        // update game state for current player
        gameState[id].unsafeValue += unsafe;

        // Send new state for all clients
        const updatedData = serializeGameState(gameState);
        io.emit('gameStateUpdate', updatedData);
    });

    // Work with player disconnection
    socket.on('disconnect', () => {
        console.log('Player disconnected:', socket.id);
        delete gameState[socket.id];
    });
});

// Simple Parse our binary data
function parsePlayerMove(buffer) {
    const id = buffer.toString('utf8', 0, 16); // Player ID (16 bit)
    const dx = buffer.readFloatLE(16);         // Delta X
    const dy = buffer.readFloatLE(20);         // Delta  Y
    const dz = buffer.readFloatLE(24);         // Delta  Z
    return { id, dx, dy, dz };
}

// Simple Parse of unsafe data
function parsePlayerUnsafe(buffer) {
    const id = buffer.toString('utf8', 0, 16); // Player ID (16 bit)
    const unsafe = buffer.readFloatLE(16);     // Unsafe float
    return { id, unsafe };
}

// Simple game state serialization for binary protocol
function serializeGameState(gameState) {
    const buffers = [];
    for (const [id, data] of Object.entries(gameState)) {
        // Player ID
        const idBuffer = Buffer.from(id, 'utf8');

        // Position (critical) Buffer
        const posBuffer = Buffer.alloc(12);
        posBuffer.writeFloatLE(data.x, 0);
        posBuffer.writeFloatLE(data.y, 4);
        posBuffer.writeFloatLE(data.z, 8);

        // Unsafe Data Buffer
        const unsafeBuffer = Buffer.alloc(4);
        unsafeBuffer.writeFloatLE(data.unsafeValue, 0);

        // Join all buffers
        buffers.push(Buffer.concat([idBuffer, posBuffer, unsafeBuffer]));
    }
    return Buffer.concat(buffers);
}
This server does the following:
Processes client connections.
Receives player movement data in binary format, validates it, updates the state on the server and sends it to all clients.
Synchronizes the game state with minimal latency, using binary format to reduce the amount of data.
Simply forwards unsafe data that came from the client.
Key points:
Server authority: All important data is processed and stored on the server. Clients only send action commands (e.g., position change deltas).
Binary data transfer: Using a binary protocol saves traffic and improves network performance, especially for frequent real-time data exchange.
Step 2: Implementing the client part on Unity
Now let's create a client part on Unity that will interact with the server.
Installing Socket.IO for Unity
To connect Unity to a server on Socket.IO, you need to connect a library that was designed for Unity. In this case we are not bound to any particular implementation (in fact they are all similar), but just use an abstract example.
Using reactive fields for synchronization
We will use reactive fields to update player positions. This will allow us to update states without having to check the data in each frame via the Update() method. Reactive fields automatically update the visual representation of objects in the game when the state of the data changes. To get a reactive properties functional you can use UniRx.
Client code on Unity
Let's create a script that will connect to the server, send data and receive updates via reactive fields.
using UnityEngine;
using SocketIOClient;
using UniRx;
using System;
using System.Text;

// Basic Game Client Implementation
public class GameClient : MonoBehaviour
{
    // SocketIO Based Client
    private SocketIO client;

    // Our Player Reactive Position
    public ReactiveProperty<Vector3> playerPosition = new ReactiveProperty<Vector3>(Vector3.zero);

    // Client Initialization
    private void Start()
    {
        // Connect to our server
        client = new SocketIO("http://localhost:3000");

        // Add Client Events
        client.OnConnected += OnConnected;    // On Connected
        client.On("gameStateUpdate", OnGameStateUpdate); // On Game State Changed

        // Connect to Socket Async
        client.ConnectAsync();

        // Subscribe to our player position changed
        playerPosition.Subscribe(newPosition => {
            // Here you can interpolate your position instead
            // to get smooth movement at large ping
            transform.position = newPosition;
        });

        // Add Movement Commands
        Observable.EveryUpdate().Where(_ => Input.GetKey(KeyCode.W)).Subscribe(_ => ProcessInput(true));
        Observable.EveryUpdate().Where(_ => Input.GetKey(KeyCode.S)).Subscribe(_ => ProcessInput(false));
    }

    // On Player Connected
    private async void OnConnected(object sender, EventArgs e)
    {
        Debug.Log("Connected to server!");
    }

    // On Game State Update
    private void OnGameStateUpdate(SocketIOResponse response)
    {
        // Get our binary data
        byte[] data = response.GetValue<byte[]>();

        // Work with binary data
        int offset = 0;
        while (offset < data.Length)
        {
            // Get Player ID
            string playerId = Encoding.UTF8.GetString(data, offset, 16);
            offset += 16;

            // Get Player Position
            float x = BitConverter.ToSingle(data, offset);
            float y = BitConverter.ToSingle(data, offset + 4);
            float z = BitConverter.ToSingle(data, offset + 8);
            offset += 12;

            // Get Player unsafe variable
            float unsafeVariable = BitConverter.ToSingle(data, offset);

            // Check if it's our player position
            if (playerId == client.Id)
                playerPosition.Value = new Vector3(x, y, z);
            else
                UpdateOtherPlayerPosition(playerId, new Vector3(x, y, z), unsafeVariable);
        }
    }

    // Process player input
    private void ProcessInput(bool isForward){
        if (isForward)
            SendMoveData(new Vector3(0, 0, 1)); // Move Forward
        else
            SendMoveData(new Vector3(0, 0, -1)); // Move Backward
    }

    // Send Movement Data
    private async void SendMoveData(Vector3 delta)
    {
        byte[] data = new byte[28];
        Encoding.UTF8.GetBytes(client.Id).CopyTo(data, 0);
        BitConverter.GetBytes(delta.x).CopyTo(data, 16);
        BitConverter.GetBytes(delta.y).CopyTo(data, 20);
        BitConverter.GetBytes(delta.z).CopyTo(data, 24);

        await client.EmitAsync("playerMove", data);
    }

    // Send any unsafe data
    private async void SendUnsafeData(float unsafeData){
        byte[] data = new byte[20];
        Encoding.UTF8.GetBytes(client.Id).CopyTo(data, 0);
        BitConverter.GetBytes(unsafeData).CopyTo(data, 16);
        await client.EmitAsync("dataUpdate", data);
    }

    // Update Other players position
    private void UpdateOtherPlayerPosition(string playerId, Vector3 newPosition, float unsafeVariable)
    {
        // Here we can update other player positions and variables
    }

    // On Client Object Destroyed
    private void OnDestroy()
    {
        client.DisconnectAsync();
    }
}
Step 3: Optimize synchronization and performance
To ensure smooth gameplay and minimize latency during synchronization, it is recommended:
Use interpolation: Clients can use interpolation to smooth out movements between updates from the server. This compensates for small network delays.
Batch data sending: Instead of sending data on a per-move basis, use batch sending. For example, send updates every few milliseconds, which will reduce network load.
Reduce the frequency of updates: Reduce the frequency of sending data to a reasonable minimum. For example, updating 20-30 times per second may be sufficient for most games.
How to simplify working with the binary protocol?
In order to simplify your work with a binary protocol - create a basic principle of data processing, as well as schemes of interaction with it.
For our example, we can take a basic protocol where:
The first 4 bits are the maxa of the request the user is making (e.g. 0 - move player, 1 - shoot, etc.);
The next 16 bits are the ID of our client.
Next we fill in the data that is passed through the loop (some Net Variables), where we store the ID of the variable, the size of the offset in bytes to the beginning of the next variable, the type of the variable and its value.
For the convenience of version and data control - we can create a client-server communication schema in a convenient format (JSON / XML) and download it once from the server to further parse our binary data according to this schema for the required version of our API.
Client Anti-Cheat
It doesn't make sense to process every data on the server, some of them are easier to modify on the client side and just send to other clients.
To make you a bit more secure in this scheme - you can use client-side anti-chit system to prevent memory hacks - for example, my GameShield - a free open source solution.
Conclusion
We took a simple example of developing a multiplayer game on Unity with a Node.js server, where all critical data is handled on the server to ensure the integrity of the game. Using a binary protocol to transfer data helps optimize traffic, and reactive programming in Unity makes it easy to synchronize client state without having to use the Update() method.
This approach not only improves game performance, but also increases protection against cheating by ensuring that all key calculations are performed on the server rather than the client.
And of course, as always thank you for reading the article. If you still have any questions or need help in organizing your architecture for multiplayer project - I invite you to my Discord.
You can also help me out a lot in my plight and support the release of new articles and free for everyone libraries and assets for developers:
My Discord | My Blog | My GitHub
BTC: bc1qef2d34r4xkrm48zknjdjt7c0ea92ay9m2a7q55
ETH: 0x1112a2Ef850711DF4dE9c432376F255f416ef5d0
USDT (TRC20): TRf7SLi6trtNAU6K3pvVY61bzQkhxDcRLC
Subscribe to my newsletter
Read articles from Elijah Brown directly inside your inbox. Subscribe to the newsletter, and don't miss out.
Written by

Elijah Brown
Elijah Brown
🤔 My name is Elijah, I've been working in the game development industry for more than 10 years and I love to solve various problems related to my field. 🔭 My main tool as a person working with both mobile and console games is of course Unity. ⚡I also worked with WebGL and used mostly C# or NodeJS as a server language. I would be glad to share my experience - you can always write to me in Discord (SodaBoom).