Kubernetes Networking: A Comprehensive Guide - TechCorp
 Hari Kiran B
Table of contents
- Introduction
- 1. Kubernetes Networking Fundamentals
- 2. Container Network Interface (CNI)
- 3. Pod-to-Pod Communication
- 4. Services and Service Discovery
- 5. Ingress and External Access
- 6. Network Policies
- 7. Service Mesh
- 8. Advanced Networking Concepts
- 9. Kubernetes Networking in Cloud Environments
- 10. Production Best Practices
- 11. Security Best Practices
- 12. Monitoring and Observability
- 13. Troubleshooting Kubernetes Networking
- Step-by-Step Troubleshooting Process
- Common Issues and Solutions
- 14. Real-world Challenges and Solutions
- Conclusion
- Additional Resources
Introduction
Welcome to TechCorp! You've just joined as a new DevOps engineer, and your first major project is to optimize the company's growing e-commerce platform using Kubernetes. As you settle into your new role, you quickly realize that mastering Kubernetes networking is crucial for the success of this project. But don't worry – this guide will take you on a journey from the basics to advanced concepts, all while working on a real-world scenario.
Note: This guide is based on Kubernetes versions 1.29 and 1.30. While the core concepts remain consistent, always refer to the official Kubernetes documentation for the most up-to-date information specific to your cluster version.
Why Kubernetes Networking Matters
Imagine Kubernetes networking as the circulatory system of your application. Just as blood flow is vital for a healthy body, efficient networking is crucial for a robust, scalable, and secure Kubernetes environment. Here's why it's so important:
Communication: Enables seamless interaction between different parts of your application.
Scalability: Allows your system to grow from handling hundreds to millions of requests.
Security: Provides mechanisms to control and secure data flow.
Performance: Directly impacts the speed and efficiency of your applications.
The TechCorp E-commerce Challenge
As you dive into the TechCorp e-commerce platform, you're faced with several challenges:
The platform needs to handle a growing number of users and transactions.
Different microservices need to communicate efficiently and securely.
The system must be able to scale dynamically during peak shopping seasons.
Security is paramount, especially for handling sensitive customer data.
Are you ready to tackle these challenges? Let's begin our journey through the intricacies of Kubernetes networking!
1. Kubernetes Networking Fundamentals
The Kubernetes Networking Model
As you start exploring the TechCorp e-commerce platform, you realize that understanding the basic Kubernetes networking model is crucial. This model is built on four key principles:
Every Pod gets its own IP address
In Kubernetes, each Pod is assigned a unique IP address. This allows Pods to be addressed directly. This design simplifies networking because each Pod can communicate with other Pods and services without needing additional configurations like port forwarding or NAT (Network Address Translation).
Pods on a node can communicate with all pods on all nodes without NAT
Kubernetes uses a flat networking model, meaning that every Pod can reach every other Pod in the cluster, regardless of which node they are on. This communication happens directly without needing NAT. The cluster networking solution, like Calico, Flannel, or others, ensures that Pod IPs are routable across the entire cluster
Agents on a node can communicate with all pods on that node.
Agents (like kubelet or other monitoring tools) running on a node can communicate directly with Pods running on the same node using the Pod's IP address. This is because the networking model ensures that local communication on a node is direct and not routed through external mechanisms.
Pods in the host network of a node can communicate with all pods on all nodes without NAT.
When a Pod is configured to use the host network (
hostNetwork: true), it shares the network namespace of the node. This means it uses the node’s IP address and networking stack. These Pods can communicate with other Pods across the cluster without NAT, just like Pods with their own IPs, because they are part of the same network namespace as the node.
These principles might seem simple, but they provide a powerful foundation for building complex networking scenarios.
Key Components
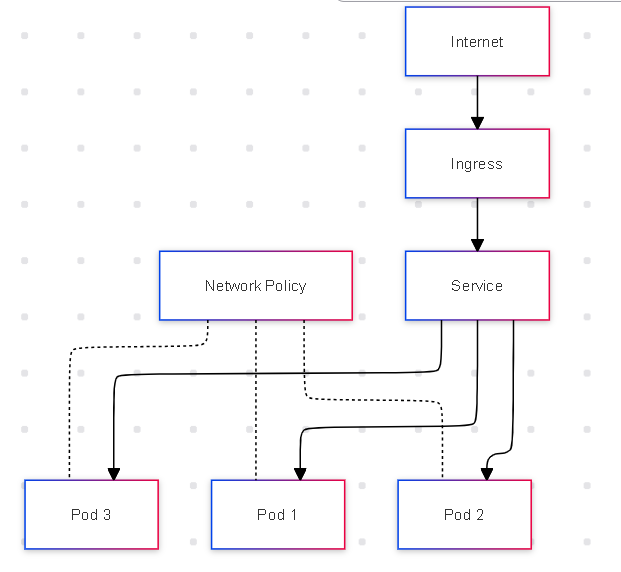
To get a grasp on the TechCorp e-commerce platform's architecture, you need to understand these key Kubernetes networking components:
Pods: The smallest deployable units in Kubernetes, usually containing one or more containers.
Services: An abstraction that defines a logical set of Pods and a policy by which to access them.
Ingress: An API object that manages external access to services in a cluster, typically HTTP.
NetworkPolicies: Specifications of how groups of Pods are allowed to communicate with each other and other network endpoints.
Let's visualize these components:
Hands-on Exercise: Setting Up Your First Pod Network
Let's get our hands dirty! Your first task at TechCorp is to set up a basic network for two Pods in the e-commerce platform. Here's how you can do it:
Create a namespace for our e-commerce platform:
kubectl create namespace techcorp-ecommerceCreate two Pods in this namespace:
 apiVersion: v1
 kind: Pod
 metadata:
   name: frontend
   namespace: techcorp-ecommerce
   labels:
     app: frontend
 spec:
   containers:
   - name: frontend
     image: nginx
 ---
 apiVersion: v1
 kind: Pod
 metadata:
   name: backend
   namespace: techcorp-ecommerce
   labels:
     app: backend
 spec:
   containers:
   - name: backend
     image: nginx
Create a Service to expose the backend Pod:
 apiVersion: v1
 kind: Service
 metadata:
   name: backend-service
   namespace: techcorp-ecommerce
 spec:
   selector:
     app: backend
   ports:
     - protocol: TCP
       port: 80
       targetPort: 80
Test the connection:
kubectl exec -it frontend -n techcorp-ecommerce -- curl backend-service
If you see the Nginx welcome page, congratulations! You've successfully set up your first Pod network in the TechCorp e-commerce platform.
Key Points Summary
Kubernetes networking model is based on four key principles
Essential components: Pods, Services, Ingress, and network policies
Understanding these fundamentals is crucial for building complex networking scenarios
2. Container Network Interface (CNI)
As you delve deeper into the TechCorp e-commerce platform, you realize that the Container Network Interface (CNI) plays a crucial role in how Pods communicate. CNI is like the universal adapter for Kubernetes networking – it allows different networking solutions to be plugged in seamlessly.
What is CNI?
CNI is a specification and set of libraries for configuring network interfaces in Linux containers. In Kubernetes, it's responsible for setting up the network for each Pod.
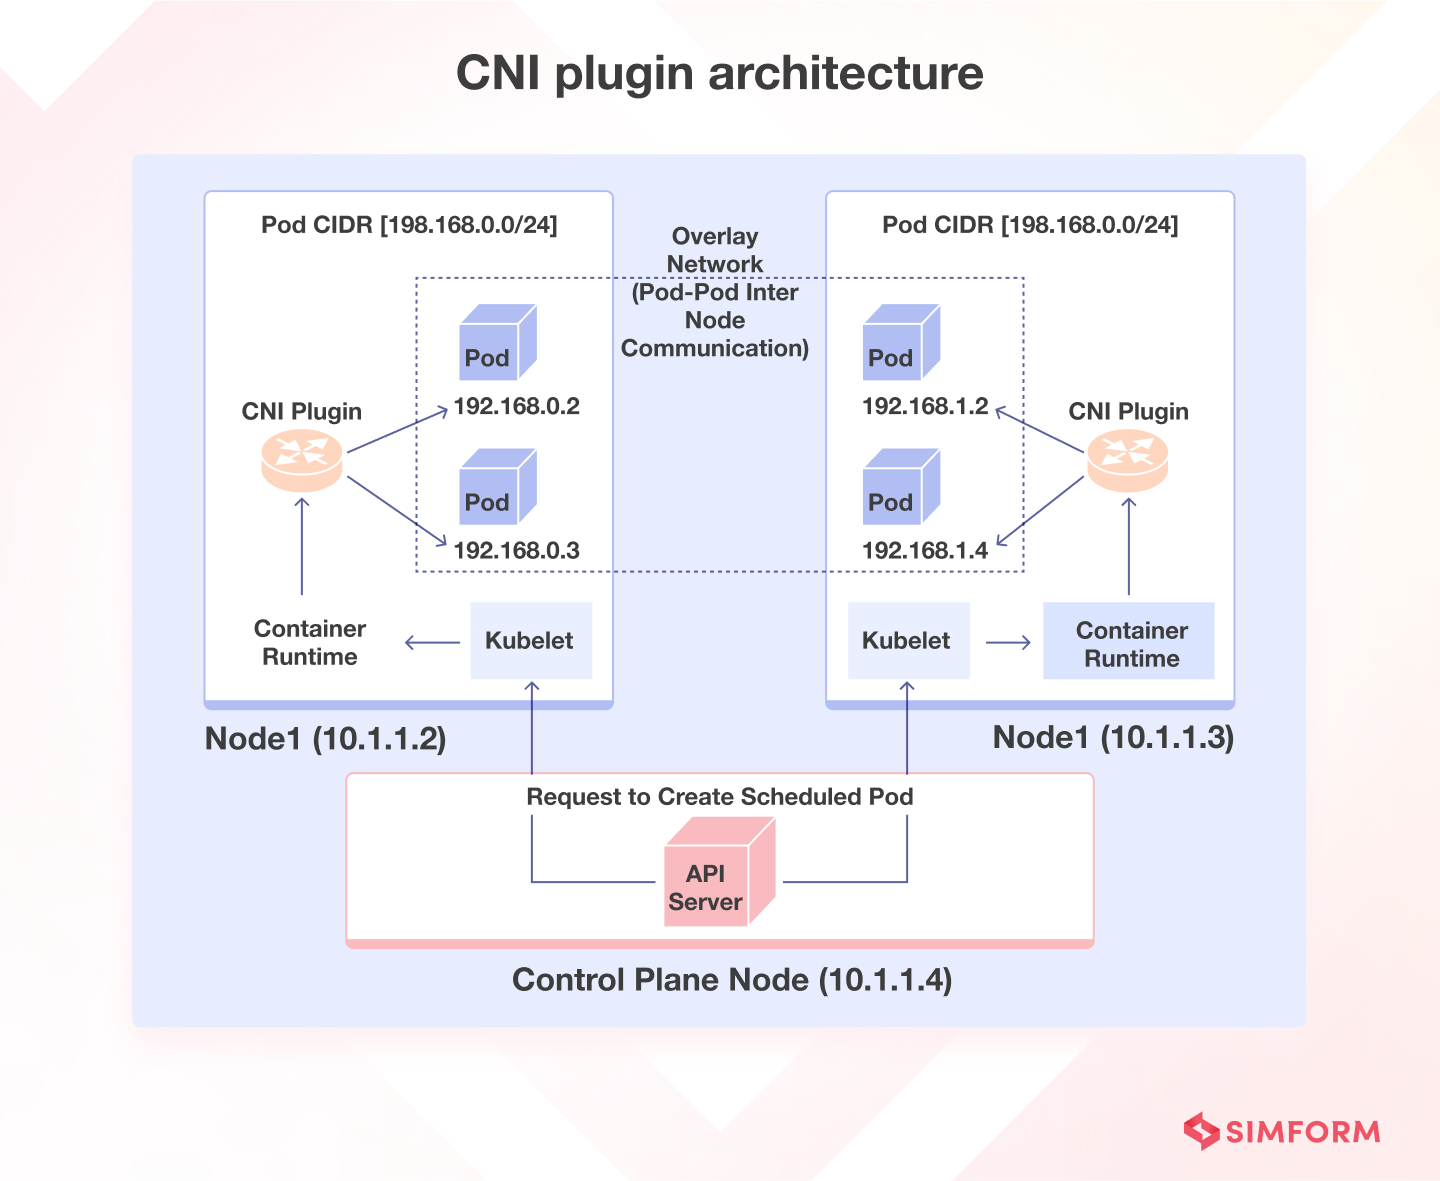
Picture from SIMFORM website - checkout their k8s blogs too
Popular CNI Plugins
As you research options for TechCorp's e-commerce platform, you come across several popular CNI plugins. Here's a comparison:
| Plugin | Key Features | Best For |
| Calico | BGP routing, Advanced network policies, Good performance | Large clusters with complex networking requirements |
| Flannel | Simple overlay network, Easy to set up | Small to medium clusters with basic networking needs |
| Weave | Encrypted networking, Multicast support | Clusters requiring strong security or multicast support |
| Cilium | eBPF-based networking, Advanced security features | High-performance environments with strict security requirements |
Hands-on Exercise: Implementing Cilium for TechCorp
Given the security requirements and expected growth of TechCorp's e-commerce platform, you decided to implement Cilium. Here's how you can do it:
Install Cilium using Helm:
 helm repo add cilium https://helm.cilium.io/
 helm install cilium cilium/cilium --namespace kube-system
Verify the installation:
kubectl get pods -n kube-system -l k8s-app=ciliumTest network connectivity:
cilium connectivity test
If all tests pass, you've successfully implemented Cilium in the TechCorp e-commerce platform!
Expanded CNI Plugin Comparison
Let's dive deeper into the comparison of popular CNI plugins:
| Plugin | Performance | Features | Complexity | Best Use Case |
| Calico | High | Advanced network policies, BGP routing | Medium | Large clusters with complex networking requirements |
| Flannel | Medium | Simple overlay network | Low | Small to medium clusters with basic networking needs |
| Weave | Medium | Encrypted networking, multicast support | Medium | Clusters requiring strong security or multicast support |
| Cilium | Very High | eBPF-based networking, advanced security | High | High-performance environments with strict security requirements |
Performance Benchmarks
A recent study comparing CNI plugins showed the following results for pod-to-pod communication latency (lower is better):
Cilium: 0.15ms
Calico: 0.18ms
Flannel: 0.21ms
Weave: 0.23ms
Note: These benchmarks are for illustrative purposes and may vary based on specific cluster configurations.
Key Points Summary
CNI is crucial for Pod networking in Kubernetes
Various CNI plugins offer different features and performance characteristics
Choosing the right CNI plugin depends on your specific requirements and use case
3. Pod-to-Pod Communication
Now that you have a CNI plugin set up, it's time to understand how Pods communicate with each other in the TechCorp e-commerce platform. This is crucial for ensuring smooth interactions between different microservices.
Understanding Pod Networking
In Kubernetes, each Pod gets its own IP address. This "IP-per-pod" model is fundamental to how Pod-to-Pod communication works.
Here's a simplified diagram of how Pods are networked within a node:
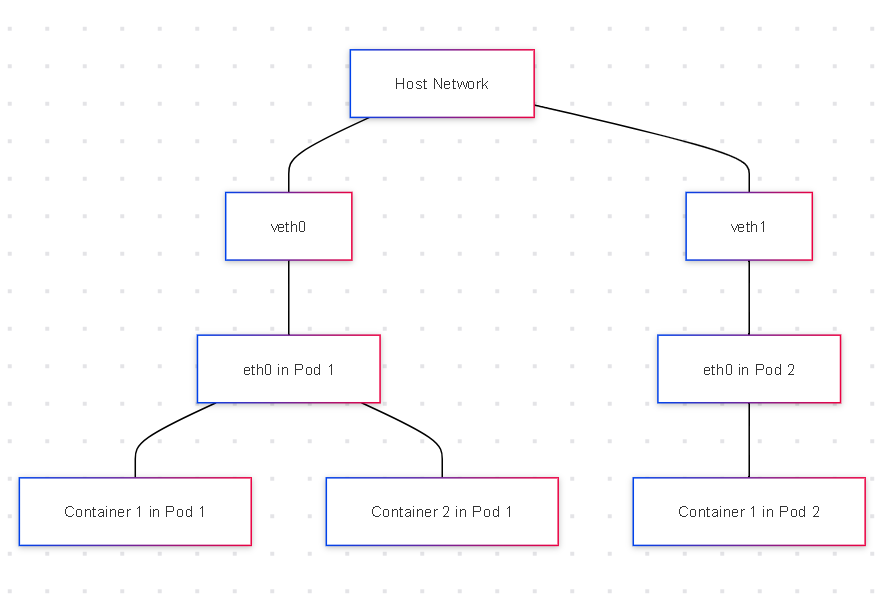
This diagram illustrates the networking setup within a Kubernetes node, specifically focusing on how Pods and their containers are connected to the host network.
Explanation:
Host Network:
- The topmost box labeled "Host Network" represents the node's network interface, which connects to the broader network (e.g., the internet or a private cluster network).
veth0 and veth1 (Virtual Ethernet Pairs):
These are virtual Ethernet devices that act as a bridge between the host network and the Pods. Each veth pair connects a Pod to the host network.
veth0connects Pod 1, andveth1connects Pod 2 to the host network.eth0 in Pods:
Inside each Pod, there's a virtual network interface (
eth0), which connects to thevethon the host network side.
eth0 in Pod 1is connected toveth0, andeth0 in Pod 2is connected toveth1. These interfaces allow the Pods to communicate with other network resources.Containers in Pods:
Each Pod can contain one or more containers. In this diagram:
Pod 1 has two containers: "Container 1 in Pod 1" and "Container 2 in Pod 1".
Pod 2 has one container: "Container 1 in Pod 2".
All containers within the same Pod share the same network namespace, meaning they share the same IP address and network interfaces (like
eth0).
Hands-on Exercise: Testing Pod-to-Pod Communication
Let's test Pod-to-Pod communication in the TechCorp e-commerce platform:
Create two Pods:
 apiVersion: v1
 kind: Pod
 metadata:
   name: pod1
   namespace: techcorp-ecommerce
 spec:
   containers:
   - name: main
     image: nginx
 ---
 apiVersion: v1
 kind: Pod
 metadata:
   name: pod2
   namespace: techcorp-ecommerce
 spec:
   containers:
   - name: main
     image: busybox
     command: ["/bin/sh", "-c", "while true; do echo hello; sleep 10;done"]
Get the IP of pod1:
kubectl get pod pod1 -n techcorp-ecommerce -o wideFrom pod2, try to reach pod1:
kubectl exec -it pod2 -n techcorp-ecommerce -- wget -O- <pod1-ip>
If you see the Nginx welcome page, congratulations! You've successfully demonstrated Pod-to-Pod communication in the TechCorp e-commerce platform.
Advanced Note: eBPF and Pod-to-Pod Communication
For advanced users, it's worth exploring how eBPF (extended Berkeley Packet Filter) is revolutionizing Pod-to-Pod communication. CNI plugins like Cilium leverage eBPF to bypass iptables, resulting in significant performance improvements and more fine-grained network control.
Key Points Summary
Each Pod gets its own IP address
Pods can communicate across nodes without NAT
Understanding the underlying networking model is crucial for troubleshooting and optimization
4. Services and Service Discovery
As the TechCorp e-commerce platform grows, you realize that directly communicating with Pods using their IP addresses isn't scalable. This is where Kubernetes Services comes into play.
Introduction to Kubernetes Services
A Service in Kubernetes is an abstraction that defines a logical set of Pods and a policy by which to access them. It's like a stable front door for a set of Pods that might be constantly changing.
Types of Services
As you plan the networking architecture for TechCorp's e-commerce platform, you consider the different types of Services:
ClusterIP: Exposes the Service on an internal IP within the cluster.
NodePort: Exposes the Service on the same port of each selected Node in the cluster using NAT.
LoadBalancer: Exposes the Service externally using a cloud provider's load balancer.
ExternalName: Maps the Service to the contents of the
externalNamefield (e.g.,foo.bar.example.com), by returning a CNAME record.
Hands-on Exercise: Setting Up Services for TechCorp's E-commerce Platform
Let's set up Services for the main components of the e-commerce platform:
Frontend Service (LoadBalancer):
 apiVersion: v1
 kind: Service
 metadata:
   name: frontend-service
   namespace: techcorp-ecommerce
 spec:
   type: LoadBalancer
   selector:
     app: frontend
   ports:
     - port: 80
       targetPort: 3000
Product Catalog Service (ClusterIP):
 apiVersion: v1
 kind: Service
 metadata:
   name: product-catalog-service
   namespace: techcorp-ecommerce
 spec:
   type: ClusterIP
   selector:
     app: product-catalog
   ports:
     - port: 8080
       targetPort: 8080
Apply these Services:
kubectl apply -f services.yamlTest the frontend service:
kubectl get svc frontend-service -n techcorp-ecommerceUse the EXTERNAL-IP to access the frontend in a web browser.
Congratulations! You've set up the core Services for TechCorp's e-commerce platform.
Key Points Summary
Services provide a stable endpoint for a set of Pods
Different types of Services (ClusterIP, NodePort, LoadBalancer, ExternalName) serve different purposes
Service discovery is handled automatically by Kubernetes DNS
For example, if you have a Service named
my-service, other Pods can connect to it usinghttp://my-servicewithout knowing which exact Pod or IP address is serving the requests. Kubernetes handles this routing behind the scenes.
5. Ingress and External Access
As TechCorp's e-commerce platform gains popularity, you need to manage external access more efficiently. This is where Ingress comes into play.
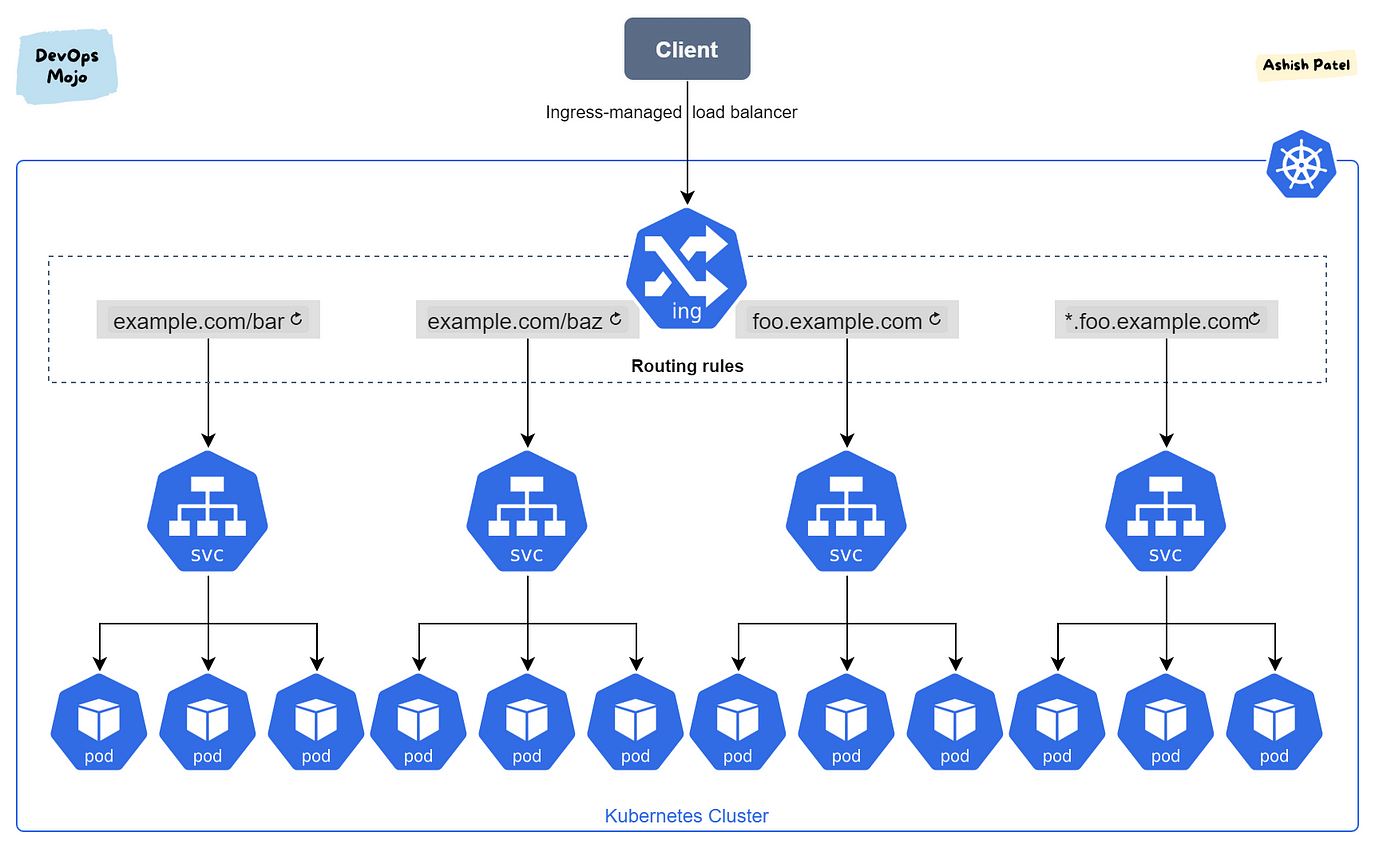
Picture from Medium - Ashish patel blog
Introduction to Ingress
Ingress is an API object that manages external access to services in a cluster, typically HTTP. It provides load balancing, SSL termination, and name-based virtual hosting.
Hands-on Exercise: Implementing Ingress for TechCorp
Let's set up an Ingress for the e-commerce platform:
First, install an Ingress controller (we'll use Nginx):
kubectl apply -f https://raw.githubusercontent.com/kubernetes/ingress-nginx/controller-v1.0.0/deploy/static/provider/cloud/deploy.yamlCreate an Ingress resource:
 apiVersion: networking.k8s.io/v1
 kind: Ingress
 metadata:
   name: techcorp-ingress
   namespace: techcorp-ecommerce
   annotations:
     kubernetes.io/ingress.class: nginx
 spec:
   rules:
   - host: shop.techcorp.com
     http:
       paths:
       - path: /
         pathType: Prefix
         backend:
           service:
             name: frontend-service
             port:
               number: 80
       - path: /api/products
         pathType: Prefix
         backend:
           service:
             name: product-catalog-service
             port:
               number: 8080
Apply the Ingress:
kubectl apply -f ingress.yamlTest the Ingress:
curl -H "Host: shop.techcorp.com" http://<ingress-controller-ip>/
You've successfully set up Ingress for TechCorp's e-commerce platform, allowing efficient management of external access!
Advanced Note: Ingress Controllers Comparison
While we've used the Nginx Ingress Controller in our example, it's worth comparing different Ingress controllers:
| Ingress Controller | Key Features | Best For |
| Nginx Ingress | Widely used, feature-rich | General-purpose use |
| Traefik | Auto service discovery, Let's Encrypt integration | Microservices architectures |
| HAProxy Ingress | High performance, extensive customization | High-traffic applications |
| Istio Ingress Gateway | Part of Istio service mesh, advanced traffic management | Applications using Istio |
Key Points Summary
Ingress manages external access to services in a cluster
Ingress controllers implement the Ingress resource
Choose an Ingress controller based on your specific requirements
6. Network Policies
As TechCorp's e-commerce platform handles more sensitive customer data, implementing strong network security becomes crucial. This is where Network Policies come in.
Implementing Network Segmentation
Network Policies allow you to control the flow of network traffic between pods, namespaces, and external networks.
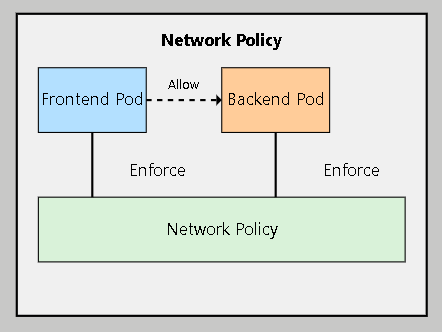
Hands-on Exercise: Creating Network Policies for TechCorp
Let's implement some basic Network Policies for the e-commerce platform:
Create a default deny policy:
 apiVersion: networking.k8s.io/v1
 kind: NetworkPolicy
 metadata:
   name: default-deny
   namespace: techcorp-ecommerce
 spec:
   podSelector: {}
   policyTypes:
   - Ingress
   - Egress
Allow ingress to the frontend:
 apiVersion: networking.k8s.io/v1
 kind: NetworkPolicy
 metadata:
   name: allow-frontend-ingress
   namespace: techcorp-ecommerce
 spec:
   podSelector:
     matchLabels:
       app: frontend
   policyTypes:
   - Ingress
   ingress:
   - from:
     - ipBlock:
         cidr: 0.0.0.0/0
     ports:
     - protocol: TCP
       port: 80
Apply these policies:
kubectl apply -f network-policies.yaml
You've now implemented basic network segmentation for TechCorp's e-commerce platform, enhancing its security!
Key Points Summary
Network Policies provide fine-grained control over Pod-to-Pod communication
They are essential for implementing the principle of least privilege
Always start with a default deny policy and explicitly allow necessary traffic
7. Service Mesh
As TechCorp's e-commerce platform grows more complex, you realize you need more advanced features for service-to-service communication. This is where a service mesh comes in handy.
Introduction to Service Mesh Concepts
A service mesh is a dedicated infrastructure layer for facilitating service-to-service communications between microservices, using a proxy.
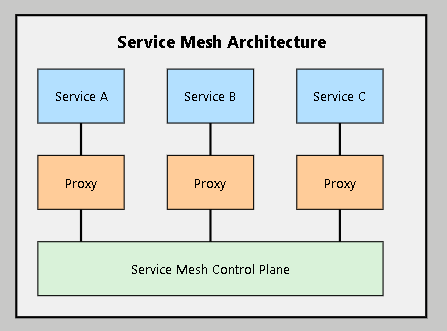
Hands-on Exercise: Implementing Istio for TechCorp
Let's implement Istio, a popular service mesh, for the e-commerce platform:
Install Istio:
istioctl install --set profile=demo -yEnable Istio injection for the tech corp-e-commerce namespace:
kubectl label namespace techcorp-ecommerce istio-injection=enabledDeploy a sample application:
kubectl apply -f samples/bookinfo/platform/kube/bookinfo.yamlCreate an Istio Gateway:
 apiVersion: networking.istio.io/v1alpha3
 kind: Gateway
 metadata:
   name: bookinfo-gateway
 spec:
   selector:
     istio: ingressgateway
   servers:
   - port:
       number: 80
       name: http
       protocol: HTTP
     hosts:
     - "*"
Apply the Gateway:
kubectl apply -f gateway.yaml
Congratulations! You've successfully implemented Istio for TechCorp's e-commerce platform, providing advanced traffic management, security, and observability features.
Service Mesh Comparison
Let's compare some popular service mesh options:
| Service Mesh | Key Features | Complexity | Best For |
| Istio | Comprehensive features, strong community | High | Large, complex microservices architectures |
| Linkerd | Lightweight, easy to use, focus on simplicity | Low | Small to medium-sized microservices deployments |
| Consul Connect | Integrates with HashiCorp stack, service discovery | Medium | Organizations already using HashiCorp products |
Advanced Istio Features for TechCorp
As TechCorp's e-commerce platform grows, you might want to leverage some advanced Istio features:
- Canary Deployments: Gradually roll out new versions of services.
apiVersion: networking.istio.io/v1alpha3
kind: VirtualService
metadata:
  name: reviews
spec:
  hosts:
    - reviews
  http:
  - route:
    - destination:
        host: reviews
        subset: v1
      weight: 90
    - destination:
        host: reviews
        subset: v2
      weight: 10
- Circuit Breaking: Prevent cascading failures in your microservices.
apiVersion: networking.istio.io/v1alpha3
kind: DestinationRule
metadata:
  name: reviews
spec:
  host: reviews
  trafficPolicy:
    outlierDetection:
      consecutiveErrors: 3
      interval: 30s
      baseEjectionTime: 30s
Key Points Summary
Service meshes provide advanced features for service-to-service communication
They offer benefits like traffic management, security, and observability
Choose a service mesh based on your requirements and existing infrastructure
8. Advanced Networking Concepts
As TechCorp's e-commerce platform continues to grow and expand globally, you'll need to consider more advanced networking concepts.
Multicluster Networking
To ensure high availability and global presence, TechCorp decides to deploy its e-commerce platform across multiple Kubernetes clusters in different regions. Here's how you might approach this:
Cluster Federation: Use tools like KubeFed to manage multiple clusters as a single entity.
Service Mesh Federation: Extend your service mesh across clusters. For example, with Istio:
apiVersion: networking.istio.io/v1alpha3
kind: ServiceEntry
metadata:
  name: external-svc-wikipedia
spec:
  hosts:
  - en.wikipedia.org
  location: MESH_EXTERNAL
  ports:
  - number: 443
    name: https
    protocol: HTTPS
  resolution: DNS
IPv6 in Kubernetes
As TechCorp prepares for future growth, implementing IPv6 becomes a priority. Here's how to enable IPv6 in your Kubernetes cluster:
- Enable IPv6 in the Kubernetes API server:
--feature-gates="IPv6DualStack=true"
--service-cluster-ip-range=fd00::/108
- Configure your CNI plugin to support IPv6. For example, with Calico:
apiVersion: operator.tigera.io/v1
kind: Installation
metadata:
  name: default
spec:
  calicoNetwork:
    ipPools:
    - cidr: fd00::/108
      encapsulation: None
      natOutgoing: Enabled
      nodeSelector: all()
Network Function Virtualization (NFV) in Kubernetes
For advanced network management, TechCorp explores NFV in Kubernetes:
- Multus CNI: Attach multiple network interfaces to pods.
apiVersion: "k8s.cni.cncf.io/v1"
kind: NetworkAttachmentDefinition
metadata:
  name: macvlan-conf
spec:
  config: '{
      "cniVersion": "0.3.0",
      "type": "macvlan",
      "master": "eth0",
      "mode": "bridge",
      "ipam": {
        "type": "host-local",
        "subnet": "192.168.1.0/24",
        "rangeStart": "192.168.1.200",
        "rangeEnd": "192.168.1.216",
        "routes": [
          { "dst": "0.0.0.0/0" }
        ],
        "gateway": "192.168.1.1"
      }
    }'
Key Points Summary
Multicluster networking enables global deployment and high availability
IPv6 support in Kubernetes is crucial for future-proofing your infrastructure
NFV in Kubernetes allows for advanced network management and customization
9. Kubernetes Networking in Cloud Environments
As TechCorp considers cloud deployment options, understanding cloud-specific networking becomes crucial.
AWS VPC CNI
For AWS deployments, the AWS VPC CNI plugin integrates Kubernetes networking directly with the AWS VPC:
- Install the AWS VPC CNI:
kubectl apply -f https://raw.githubusercontent.com/aws/amazon-vpc-cni-k8s/release-1.7/config/v1.7/aws-k8s-cni.yaml
- Configure secondary IP addresses:
apiVersion: vpcres.k8s.aws/v1beta1
kind: ENIConfig
metadata:
  name: us-west-2a
spec:
  subnet: subnet-0bb1c79de3EXAMPLE
Azure CNI
For Azure deployments, Azure CNI provides integrated virtual network management:
- Create an AKS cluster with Azure CNI:
az aks create \
    --resource-group myResourceGroup \
    --name myAKSCluster \
    --network-plugin azure
- Configure network policies:
az aks create \
    --resource-group myResourceGroup \
    --name myAKSCluster \
    --network-plugin azure \
    --network-policy calico
Google Cloud VPC-native
For Google Cloud, VPC-native clusters provide better performance and security:
- Create a VPC-native GKE cluster:
gcloud container clusters create my-cluster \
    --network my-vpc \
    --subnetwork my-subnet \
    --enable-ip-alias
- Configure VPC-native ingress:
apiVersion: networking.k8s.io/v1
kind: Ingress
metadata:
  name: my-ingress
  annotations:
    kubernetes.io/ingress.class: "gce"
spec:
  rules:
  - http:
      paths:
      - path: /*
        pathType: Prefix
        backend:
          service:
            name: my-service
            port:
              number: 80
Key Points Summary
Cloud-specific CNI plugins offer better integration with cloud networking features
Understanding cloud-specific networking is crucial for optimal performance and security
Each cloud provider offers unique features for Kubernetes networking
10. Production Best Practices
As TechCorp's e-commerce platform prepares for high-traffic events like Black Friday sales, implementing production best practices becomes crucial:
Network Design
Use Private Networks: Keep Kubernetes nodes on private networks, using bastion hosts or VPNs for access.
Implement Network Segmentation: Use network policies to isolate different environments:
apiVersion: networking.k8s.io/v1
kind: NetworkPolicy
metadata:
  name: allow-intra-namespace
spec:
  podSelector: {}
  ingress:
  - from:
    - podSelector: {}
- Plan IP Address Management: Carefully allocate IP ranges to avoid conflicts and allow for future growth.
Performance Optimization
- Optimize MTU: Adjust the Maximum Transmission Unit for better performance:
apiVersion: operator.tigera.io/v1
kind: Installation
metadata:
  name: default
spec:
  calicoNetwork:
    mtu: 9000
- Use IPVS Mode: Configure kube-proxy to use IPVS for better performance at scale:
apiVersion: kubeproxy.config.k8s.io/v1alpha1
kind: KubeProxyConfiguration
mode: ipvs
- Implement Horizontal Pod Autoscaling: Use HPA to automatically scale based on network metrics:
apiVersion: autoscaling/v2beta1
kind: HorizontalPodAutoscaler
metadata:
  name: frontend-hpa
spec:
  scaleTargetRef:
    apiVersion: apps/v1
    kind: Deployment
    name: frontend
  metrics:
  - type: Pods
    pods:
      metricName: network_in_bytes
      targetAverageValue: 1000000
Disaster Recovery
- Regular Backups: Ensure you're taking regular backups of your etcd data and any stateful applications.
ETCDCTL_API=3 etcdctl --endpoints=https://127.0.0.1:2379 \
  --cacert=/etc/kubernetes/pki/etcd/ca.crt \
  --cert=/etc/kubernetes/pki/etcd/server.crt \
  --key=/etc/kubernetes/pki/etcd/server.key \
  snapshot save /backup/etcd-snapshot-$(date +%Y-%m-%d-%H:%M:%S).db
Multi-region Deployments: Consider deploying your application across multiple regions for high availability.
Practice Failover: Regularly practice failover scenarios to ensure your team is prepared for potential outages.
Hands-on Exercise: Implementing Production Best Practices
Let's implement some of these best practices for TechCorp's e-commerce platform:
Enable IPVS mode for kube-proxy:
kubectl edit configmap -n kube-system kube-proxyAdd the following under
data.config.conf:mode: "ipvs"Set up a horizontal pod autoscaler for the frontend:
kubectl autoscale deployment frontend -n techcorp-ecommerce --cpu-percent=50 --min=2 --max=10Create a backup script for etcd:
 #!/bin/bash
 ETCDCTL_API=3 etcdctl --endpoints=https://127.0.0.1:2379 \
   --cacert=/etc/kubernetes/pki/etcd/ca.crt \
   --cert=/etc/kubernetes/pki/etcd/server.crt \
   --key=/etc/kubernetes/pki/etcd/server.key \
   snapshot save /backup/etcd-snapshot-$(date +%Y-%m-%d-%H:%M:%S).db
Key Points Summary
Use private networks and implement network segmentation for security
Optimize network performance through MTU adjustments and IPVS mode
Implement autoscaling based on network metrics for handling traffic spikes
Implement disaster recovery strategies including regular backups and failover practices
11. Security Best Practices
With TechCorp handling sensitive customer data, implementing robust security measures is paramount:
Network Policies
- Default Deny: Start with a default deny policy and then explicitly allow necessary traffic:
apiVersion: networking.k8s.io/v1
kind: NetworkPolicy
metadata:
  name: default-deny
spec:
  podSelector: {}
  policyTypes:
  - Ingress
  - Egress
- Least Privilege: Only allow necessary traffic:
apiVersion: networking.k8s.io/v1
kind: NetworkPolicy
metadata:
  name: allow-frontend-to-backend
spec:
  podSelector:
    matchLabels:
      app: backend
  ingress:
  - from:
    - podSelector:
        matchLabels:
          app: frontend
    ports:
    - protocol: TCP
      port: 8080
- Egress Control: Don't forget to control outbound traffic as well as inbound.
Encryption
- Enable Encryption in Transit: Use TLS for all service communication:
apiVersion: networking.istio.io/v1alpha3
kind: DestinationRule
metadata:
  name: tls-routing
spec:
  host: myservice.default.svc.cluster.local
  trafficPolicy:
    tls:
      mode: ISTIO_MUTUAL
- Encrypt Secrets: Use tools like Sealed Secrets for Kubernetes secrets:
apiVersion: bitnami.com/v1alpha1
kind: SealedSecret
metadata:
  name: mysecret
spec:
  encryptedData:
    SECRET_KEY: AgBy3i4OJSWK+PiTySYZZA==
Authentication and Authorization
- Use RBAC: Implement Role-Based Access Control for fine-grained access management:
apiVersion: rbac.authorization.k8s.io/v1
kind: Role
metadata:
  namespace: techcorp-ecommerce
  name: pod-reader
rules:
- apiGroups: [""]
  resources: ["pods"]
  verbs: ["get", "watch", "list"]
- Enable Pod Security Policies: Use PSPs to control security-sensitive aspects of pod specifications:
apiVersion: policy/v1beta1
kind: PodSecurityPolicy
metadata:
  name: restricted
spec:
  privileged: false
  seLinux:
    rule: RunAsAny
  supplementalGroups:
    rule: RunAsAny
  runAsUser:
    rule: MustRunAsNonRoot
  fsGroup:
    rule: RunAsAny
Container Security
Use Distroless or Minimal Base Images: Reduce the attack surface by using minimal container images.
Implement Runtime Security: Use tools like Falco for runtime security monitoring:
apiVersion: apps/v1
kind: DaemonSet
metadata:
  name: falco
  namespace: falco
spec:
  selector:
    matchLabels:
      app: falco
  template:
    metadata:
      labels:
        app: falco
    spec:
      containers:
      - name: falco
        image: falcosecurity/falco:latest
        securityContext:
          privileged: true
Hands-on Exercise: Implementing Security Best Practices
Let's implement some of these security best practices for TechCorp's e-commerce platform:
Create a default deny network policy:
kubectl apply -f default-deny-policy.yamlEnable Pod Security Policies:
kubectl apply -f https://raw.githubusercontent.com/kubernetes/website/master/content/en/examples/policy/privileged-psp.yamlInstall Falco for runtime security:
 helm repo add falcosecurity https://falcosecurity.github.io/charts
 helm install falco falcosecurity/falco --namespace falco --create-name
Key Points Summary
Implement "default deny" network policies and follow the principle of least privilege
Use encryption for both data in transit and at rest
Regularly audit and update security configurations
Implement RBAC and Pod Security Policies for fine-grained access control
Use minimal base images and runtime security tools to enhance container security
12. Monitoring and Observability
To ensure TechCorp's e-commerce platform runs smoothly, implementing comprehensive monitoring is essential:
Prometheus and Grafana Setup
- Install Prometheus and Grafana:
helm repo add prometheus-community https://prometheus-community.github.io/helm-charts
helm install prometheus prometheus-community/kube-prometheus-stack
- Create a ServiceMonitor for your application:
apiVersion: monitoring.coreos.com/v1
kind: ServiceMonitor
metadata:
  name: frontend-monitor
  labels:
    release: prometheus
spec:
  selector:
    matchLabels:
      app: frontend
  endpoints:
  - port: web
Network Flow Logs
Enable network flow logs in your CNI. For example, with Calico:
apiVersion: projectcalico.org/v3
kind: FelixConfiguration
metadata:
  name: default
spec:
  flowLogsFileEnabled: true
Distributed Tracing
Implement distributed tracing with Jaeger:
- Install Jaeger:
kubectl create namespace observability
kubectl create -f https://github.com/jaegertracing/jaeger-operator/releases/download/v1.28.0/jaeger-operator.yaml -n observability
- Create a Jaeger instance:
apiVersion: jaegertracing.io/v1
kind: Jaeger
metadata:
  name: simple-prod
spec:
  strategy: production
  storage:
    type: elasticsearch
    options:
      es:
        server-urls: http://elasticsearch:9200
Key Points Summary
Use Prometheus and Grafana for metrics collection and visualization
Enable network flow logs for detailed traffic analysis
Implement distributed tracing for end-to-end request visibility
13. Troubleshooting Kubernetes Networking
When issues arise in TechCorp's e-commerce platform, having a systematic approach to troubleshooting is crucial. Here's a comprehensive guide to troubleshooting Kubernetes networking issues, including a step-by-step process and solutions to common problems:
Step-by-Step Troubleshooting Process
Identify the Problem
Determine if it's a pod-to-pod, service, or external connectivity issue
Gather relevant information (pod names, service names, error messages)
Check Basic Connectivity
Use
kubectl get pods -o wideto verify pod IPs and nodesTry pinging between pods using a debugging container:
kubectl run netshoot --rm -i --tty --image nicolaka/netshoot -- /bin/bash
Verify DNS Resolution
Check if DNS is resolving correctly:
kubectl run dnsutils --rm -i --tty --image=gcr.io/kubernetes-e2e-test-images/dnsutils:1.3 -- nslookup kubernetes.default
Examine Network Policies
List all network policies:
kubectl get networkpolicies --all-namespacesCheck if any policies are blocking traffic
Inspect Services and Endpoints
Verify service configuration:
kubectl describe service <service-name>Check if endpoints are correctly populated:
kubectl get endpoints <service-name>
Analyze Logs
Check relevant pod logs:
kubectl logs <pod-name>Examine kube-proxy logs on nodes:
journalctl -u kubelet
Use Network Debugging Tools
Deploy a network debugging pod:
kubectl run netshoot --rm -i --tty --image nicolaka/netshoot -- /bin/bashUse tools like
tcpdump,netstat, andiptablesfor deeper analysis
Common Issues and Solutions
1. Pod-to-Pod Communication Failure
Symptoms: Pods unable to communicate with each other
Possible Causes and Solutions:
Network policies blocking traffic
- Review and adjust network policies
CNI plugin misconfiguration
- Check CNI plugin logs and configuration
kube-proxy issues
- Restart kube-proxy pods:
kubectl rollout restart daemonset kube-proxy -n kube-system
- Restart kube-proxy pods:
2. Service Discovery Problems
Symptoms: Unable to resolve service names or connect to services
Possible Causes and Solutions:
CoreDNS issues
Check CoreDNS pods:
kubectl get pods -n kube-system -l k8s-app=kube-dnsReview CoreDNS configuration:
kubectl get configmap coredns -n kube-system -o yaml
Incorrect service configuration
Verify service and pod labels match
Check if service ports are correctly defined
3. Ingress Controller Not Routing Traffic
Symptoms: External traffic not reaching services
Possible Causes and Solutions:
Ingress resource misconfiguration
- Review Ingress resource:
kubectl get ingress <ingress-name> -o yaml
- Review Ingress resource:
Ingress controller pod issues
- Check Ingress controller pods:
kubectl get pods -n ingress-nginx
- Check Ingress controller pods:
SSL/TLS certificate problems
- Verify SSL certificate configuration in Ingress resource
4. Network Performance Issues
Symptoms: Slow network performance or high latency
Possible Causes and Solutions:
CNI plugin performance
- Consider switching to a more performant CNI plugin (e.g., Calico, Cilium)
Node networking issues
- Check node network interface configuration and performance
Cluster overload
- Monitor cluster resources and consider scaling out
Remember, troubleshooting Kubernetes networking issues often requires a systematic approach and deep understanding of both Kubernetes and networking concepts. Always start with the simplest possible cause and work your way up to more complex issues.
Hands-on Exercise: Troubleshooting a Networking Issue
Let's simulate and troubleshoot a networking issue in TechCorp's e-commerce platform:
- Create a pod that can't communicate with others:
apiVersion: v1
kind: Pod
metadata:
  name: isolated-pod
  namespace: techcorp-ecommerce
spec:
  containers:
  - name: nginx
    image: nginx
- Try to access it from another pod:
kubectl run test-pod --rm -it --image=busybox -- wget -O- http://isolated-pod
- When it fails, check the network policies:
kubectl get networkpolicies -n techcorp-ecommerce
- Create a network policy to allow the communication:
apiVersion: networking.k8s.io/v1
kind: NetworkPolicy
metadata:
  name: allow-test-pod
  namespace: techcorp-ecommerce
spec:
  podSelector:
    matchLabels:
      run: isolated-pod
  ingress:
  - from:
    - podSelector: {}
- Apply the policy and test again:
kubectl apply -f allow-test-pod-policy.yaml
kubectl run test-pod --rm -it --image=busybox -- wget -O- http://isolated-pod
Troubleshooting Tools
kubectl: The primary CLI for interacting with Kubernetes.
kubectl get pods kubectl describe pod <pod-name> kubectl logs <pod-name>tcpdump: Capture and analyze network traffic.
kubectl debug node/<node-name> -it --image=ubuntu apt-get update && apt-get install -y tcpdump tcpdump -i anynetshoot: A network troubleshooting container with various networking tools.
kubectl run tmp-shell --rm -i --tty --image nicolaka/netshoot -- /bin/bash
Key Points Summary:
Systematic troubleshooting involves a step-by-step process from identifying the problem to using advanced debugging tools.
Common Kubernetes networking issues include pod-to-pod communication failures, service discovery problems, ingress controller issues, and network performance problems.
Hands-on experience with troubleshooting scenarios helps build familiarity with common issues and their solutions.
Always start with the simplest possible cause and work your way up to more complex issues when troubleshooting.
14. Real-world Challenges and Solutions
As TechCorp's e-commerce platform scales, you encounter several real-world networking challenges. Let's explore some common issues and their solutions:
DNS Resolution Issues
Challenge: Intermittent DNS resolution failures causing service disruptions.
Solution:
- Increase the DNS cache size in CoreDNS:
apiVersion: v1
kind: ConfigMap
metadata:
  name: coredns
  namespace: kube-system
data:
  Corefile: |
    .:53 {
        errors
        health
        kubernetes cluster.local in-addr.arpa ip6.arpa {
           pods insecure
           fallthrough in-addr.arpa ip6.arpa
        }
        prometheus :9153
        forward . /etc/resolv.conf
        cache 30 {
            success 10000
            denial 5000
        }
        loop
        reload
        loadbalance
    }
- Implement DNS autoscaling:
apiVersion: apps/v1
kind: Deployment
metadata:
  name: dns-autoscaler
  namespace: kube-system
  labels:
    k8s-app: dns-autoscaler
spec:
  selector:
    matchLabels:
      k8s-app: dns-autoscaler
  template:
    metadata:
      labels:
        k8s-app: dns-autoscaler
    spec:
      containers:
      - name: autoscaler
        image: k8s.gcr.io/cluster-proportional-autoscaler-amd64:1.8.3
        resources:
          requests:
            cpu: 20m
            memory: 10Mi
        command:
        - /cluster-proportional-autoscaler
        - --namespace=kube-system
        - --configmap=dns-autoscaler
        - --target=Deployment/coredns
        - --default-params={"linear":{"coresPerReplica":256,"nodesPerReplica":16,"min":2}}
        - --logtostderr=true
        - --v=2
Handling Network Partition Scenarios
Challenge: Network partitions causing split-brain scenarios in the cluster.
Solution: Implement a proper quorum-based system and use Kubernetes features like Pod Disruption Budgets:
apiVersion: policy/v1beta1
kind: PodDisruptionBudget
metadata:
  name: zk-pdb
spec:
  minAvailable: 2
  selector:
    matchLabels:
      app: zookeeper
Dealing with IP Address Exhaustion
Challenge: Running out of available IP addresses in the cluster.
Solution:
Use a CNI plugin that supports IP address management (IPAM) efficiently.
Consider implementing IPv6 (as discussed in the Advanced Networking Concepts section).
Optimize your node-to-pod ratio.
Managing Large-scale Ingress in Production
Challenge: High volume of ingress traffic causing performance issues.
Solution:
- Implement a scalable ingress solution like NGINX Ingress Controller with HPA:
apiVersion: autoscaling/v2beta1
kind: HorizontalPodAutoscaler
metadata:
  name: nginx-ingress
  namespace: ingress-nginx
spec:
  scaleTargetRef:
    apiVersion: apps/v1
    kind: Deployment
    name: nginx-ingress-controller
  minReplicas: 3
  maxReplicas: 10
  metrics:
  - type: Resource
    resource:
      name: cpu
      targetAverageUtilization: 50
- Use a service mesh like Istio for advanced traffic management.
Key Points Summary
Real-world Kubernetes networking challenges often revolve around DNS, network partitions, IP exhaustion, and ingress management
Solutions typically involve a combination of configuration optimizations, autoscaling, and leveraging advanced Kubernetes features
Regular monitoring and proactive management are crucial for maintaining a healthy Kubernetes network
Conclusion
Congratulations! You've now mastered the intricacies of Kubernetes networking, from basic concepts to advanced topics like service meshes and production best practices. You've successfully navigated the challenges of TechCorp's e-commerce platform, implementing robust, scalable, and secure networking solutions.
Remember, Kubernetes networking is a vast and evolving field. Stay curious, keep learning, and don't hesitate to experiment with new tools and techniques as they emerge. Your journey with Kubernetes networking is just beginning, and the skills you've gained will be invaluable as you continue to build and optimize cloud-native applications.
Good luck with your future projects at TechCorp and beyond!
Additional Resources
To further enhance your Kubernetes networking knowledge, here are some valuable resources:
These resources cover advanced topics, provide hands-on tutorials, and offer insights from industry experts. They will help you stay updated with the latest developments in Kubernetes networking.
Acknowledgments: I’d like to extend my gratitude to ClaudeAI for providing valuable insights and detailed explanations that enriched this article. The assistance was instrumental in crafting a comprehensive overview of Kubernetes processes.
Subscribe to my newsletter
Read articles from Hari Kiran B directly inside your inbox. Subscribe to the newsletter, and don't miss out.
Written by
