Quickstart Guide to Developing on ZKSync: Crafting a Maps-Based NFT Monster Hunting Game with Gasless Transactions, Inspired by Pokemon Go (Chapter 6)
 Ridho Izzulhaq
In the previous chapter, Quickstart Guide to Developing on ZKSync: Develop a Gasless Transaction DApp, we explored the basics of gasless transactions by building a DApp that allows for NFT minting with gas fees covered by a paymaster. In this next chapter, Quickstart Guide to Developing on ZKSync: Crafting a Maps-Based NFT Monster Hunting Game with Gasless Transactions, Inspired by Pokemon Go, we'll delve deeper into the practical uses of gasless transactions on zkSync.
Why is Gasless Important in a Game?

Gasless transactions are a game-changer in blockchain-based games because they make the entire experience smoother and more accessible. Without the hassle of paying gas fees for every action, new players can jump in without worrying about cryptocurrency or hidden costs. This opens up the game to a broader audience and keeps things simple for everyone. Plus, with gasless transactions, the gameplay feels more seamless—players can trade items, mint NFTs, and interact with the game world without any extra steps or fees slowing them down. This not only makes the game more enjoyable but also helps keep players coming back, which is crucial for a game's success.
If you're interested in building gasless game, ZKSync is an ideal platform for developers, thanks to its native support for account abstraction and Paymasters—features that are often difficult to find on other blockchains. On platforms like Ethereum, implementing gasless transactions typically involves complex setups or third-party relayers, which can be cumbersome and costly. However, zkSync simplifies this process by allowing Paymasters to automatically cover gas fees or let users pay with ERC20 tokens. This level of flexibility and ease is hard to achieve on other blockchains. Moreover, zkSync leverages zk-rollups to further reduce transaction costs, making it more affordable to offer a truly gasless experience.
So, what are we going to build?

So, what we’re going to build is an app that allows users to mint location-based NFTs without having to pay gas fees for every action they take. This app will leverage the gasless transaction features available on ZKSync. Our adventure will begin with creating an NFT Minting smart contract, setup our paymaster for gasless transaction, building a page using Open Map for monster-hunting-style NFT minting, and using Alchemy API to display the NFTs that users have hunted. As a note, what we're creating isn't focused on the gaming experience but rather on developing an application capable of minting NFTs in a gasless manner.
Smart Contract for NFT Minting
// SPDX-License-Identifier: MIT
pragma solidity ^0.8.0;

import "@openzeppelin/contracts/token/ERC1155/ERC1155.sol";
import "@openzeppelin/contracts/access/Ownable.sol";

contract MonsterHunting is ERC1155, Ownable {
    uint256 private currentMonsterId = 0;

    struct Monster {
        uint256 id;
        string monsterUri;
    }

    mapping(uint256 => Monster) public monsters;

    event MonsterCreated(uint256 indexed monsterId, string monsterUri);
    event MonsterMinted(address indexed owner, uint256 indexed monsterId, uint256 amount);

    constructor() ERC1155("") Ownable(msg.sender) {}

    function createMonster(uint256 monsterId, string memory monsterUri) public onlyOwner {
        require(monsters[monsterId].id == 0, "Monster with this ID already exists");

        monsters[monsterId] = Monster(monsterId, monsterUri);

        emit MonsterCreated(monsterId, monsterUri);
    }

   function mintMonster(uint256 monsterId) public {
    require(monsters[monsterId].id != 0, "Monster does not exist");
    require(balanceOf(msg.sender, monsterId) == 0, "You have already minted this monster");

    _mint(msg.sender, monsterId, 1, "");

    emit MonsterMinted(msg.sender, monsterId, 1);
}

    function uri(uint256 monsterId) public view override returns (string memory) {
        return monsters[monsterId].monsterUri;
    }
}
This smart contract, MonsterHunting, is built using Solidity and leverages the ERC1155 standard for creating and managing Non-Fungible Tokens (NFTs). The contract allows users to create and mint NFTs that represent "monsters." Below is a detailed explanation of each part of the contract:
Contract Definition and State Variables :
contract MonsterHunting is ERC1155, Ownable {
    uint256 private currentMonsterId = 0;

    struct Monster {
        uint256 id;
        string monsterUri;
    }

    mapping(uint256 => Monster) public monsters;
MonsterHunting: The main contract inherits from both
ERC1155andOwnable.currentMonsterId: A private counter that can be used to track or increment the IDs of the monsters created. Although it's initialized, it's not incremented in this version of the contract.
Monster struct: This structure holds the data for each monster, including its ID and URI.
monsters mapping: A mapping that associates a monster's ID with its corresponding
Monsterstruct.
Events :
     event MonsterCreated(uint256 indexed monsterId, string monsterUri);
    event MonsterMinted(address indexed owner, uint256 indexed monsterId, uint256 amount);
These events log when a monster is created (MonsterCreated) and when a monster is minted (MonsterMinted), making it easier to track these actions on the blockchain.
Constructor :
constructor() ERC1155("") Ownable(msg.sender) {}
The constructor initializes the contract by calling the constructors of ERC1155 and Ownable:
ERC1155(""): Sets the base URI for the tokens to an empty string, meaning the URI will be set individually for each token.
Ownable(msg.sender): Assigns ownership of the contract to the account that deployed the contract.
createMonster Function :
function createMonster(uint256 monsterId, string memory monsterUri) public onlyOwner {
        require(monsters[monsterId].id == 0, "Monster with this ID already exists");

        monsters[monsterId] = Monster(monsterId, monsterUri);

        emit MonsterCreated(monsterId, monsterUri);
    }
createMonster: This function allows the contract owner to create a new monster.
monsterId: The unique ID for the monster.
monsterUri: The URI pointing to the monster's metadata (e.g., image, description).
require: Ensures that the monster ID is unique, i.e., no monster with the same ID exists.
monsters mapping: The newly created monster is stored in the
monstersmapping.emit MonsterCreated: Logs the creation of the monster.
mintMonster Function :
function mintMonster(uint256 monsterId) public {
        require(monsters[monsterId].id != 0, "Monster does not exist");
        require(balanceOf(msg.sender, monsterId) == 0, "You have already minted this monster");

        _mint(msg.sender, monsterId, 1, "");

        emit MonsterMinted(msg.sender, monsterId, 1);
    }
mintMonster: This function allows users to mint a monster NFT.
monsterId: The ID of the monster to mint.
require: Ensures the monster exists and that the user has not already minted this monster.
_mint: Mints one unit of the specified monster and assigns it to the caller.
emit MonsterMinted: Logs the minting action.
uri Function :
function uri(uint256 monsterId) public view override returns (string memory) {
        return monsters[monsterId].monsterUri;
    }
uri: Overrides the
urifunction from theERC1155standard to return the URI for a given monster based on its ID.monsterUri: The URI associated with the monster, which points to its metadata (e.g., stored on IPFS).
Running createMonster Function
 function createMonster(uint256 monsterId, string memory monsterUri) public onlyOwner {
        require(monsters[monsterId].id == 0, "Monster with this ID already exists");

        monsters[monsterId] = Monster(monsterId, monsterUri);

        emit MonsterCreated(monsterId, monsterUri);
    }
Please deploy using the Nethermind ZKSync Remix IDE plugin (refer to Chapter 1 for getting started). Run the createMonster function by entering the monster ID and URI, ensuring you've created the metadata for the NFT monster. For IPFS, you can use services like Pinata, Alchemy, or Infura. An example format is:
{"name":"dragon",
"description":"dragon-hunt",
"image":"https://lavender-adorable-hummingbird-774.mypinata.cloud/ipfs/QmepuRaLSgTGPxC8d9xnr47evPGQdwkXrsiH6EntaUWHKU"}
Setup Paymaster for Gasless Transaction
Note : In this section, it will be similar to the previous chapter about 'Let's Code Our First Gasless Program!
At this initial part, we will build our Paymaster program and send data from one account to another through the Paymaster. Please use the repository from Alchemy (Thanks to Alchemy for the open repo👏)
Let's break down the Paymaster code by opening the Paymaster contract (contracts/Paymaster.sol). For deployment, ensure that IPaymaster.sol and Transaction.sol are in the same folder. Use the Nethermind plugin in Remix IDE, as explored in the first chapter for the deployment process.
// SPDX-License-Identifier: MIT
pragma solidity 0.8.25;

import "./IPaymaster.sol";

address constant BOOTLOADER = address(0x8001);

contract Paymaster is IPaymaster {
    function validateAndPayForPaymasterTransaction(
        bytes32,
        bytes32,
        Transaction calldata _transaction
    ) external payable returns (bytes4 magic, bytes memory context) {
      require(BOOTLOADER == msg.sender);

      context = "";
      magic = PAYMASTER_VALIDATION_SUCCESS_MAGIC;

      uint requiredEth = _transaction.gasLimit * _transaction.maxFeePerGas;

      (bool success, ) = BOOTLOADER.call{ value: requiredEth }("");
      require(success);
    }

    receive() external payable {}
}
The validateAndPayForPaymasterTransaction function validates the transaction and covers its fees. It checks if the transaction meets the required criteria, such as ensuring that the ERC20 token allowance is sufficient. If the transaction uses an ERC20 token, it first confirms the user's allowance and then transfers the tokens to the Paymaster. Next, it sends the equivalent ETH to the bootloader to cover the transaction fee, allowing the user to avoid direct gas payments.
So, what is bootloader?
In zkSync, the bootloader is a specialized smart contract responsible for managing and validating transactions. It ensures transactions are processed correctly and handles the transfer of ETH to cover gas fees, enabling seamless gasless transactions. More on : https://docs.zksync.io/build/start-coding/quick-start/paymasters-introduction

Fill the Paymaster with funds

The deployed Paymaster address (Paymaster.sol) will be used to cover users transaction gas fees. Please send funds to the Paymaster address to cover these gas fees.
Build The Monster Hunting Page
In this step, we'll walk through the creation of a location-based NFT minting page using React, ZKSync's Paymaster feature, and Leaflet for map interactions. The DApp will allow users to mint a monster NFT if they are within a specific location radius.
Setting Up the Project
Initialize the React Project: Begin by creating a new React application using create-react-app.
npx create-react-app monster-hunt-dapp
cd monster-hunt-dapp
Install Required Dependencies: Install the required packages for interacting with zkSync, Leaflet, and Bootstrap.
npm install ethers zksync-ethers leaflet react-leaflet bootstrap
Set Up Basic Structure:
Create a PaymasterTransaction.js file within the src directory. This file will contain the main logic for interacting with the zkSync Paymaster and displaying the map.
Implementing the DApp
Import Required Modules: In
PaymasterTransaction.js, start by importing the necessary modules.import React, { useState, useEffect } from 'react'; import { ethers } from 'ethers'; import { Provider, Wallet, types } from 'zksync-ethers'; import { getPaymasterParams } from 'zksync-ethers/build/paymaster-utils'; import { MapContainer, TileLayer, Marker, Circle, useMapEvents } from 'react-leaflet'; import L from 'leaflet'; import 'leaflet/dist/leaflet.css'; import 'bootstrap/dist/css/bootstrap.min.css';Define Custom Icons and Monster Locations: Create a custom icon and define the locations where monsters can be minted.
 const locationIcon = new L.Icon({
   iconUrl: 'https://www.svgrepo.com/show/309790/my-location.svg',
   iconSize: [38, 38],
   iconAnchor: [19, 38],
 });

 const monsterLocations = {
   1: { lat: -6.8782658, lng: 107.5918008 }, // Example location for monster ID 1
   // Add more monster locations if needed
 };
Please note this is example for target location, please change with your location
1: { lat: -6.8782658, lng: 107.5918008 }Initialize zkSync Wallet and Provider: Use
useEffectto initialize the zkSync provider and wallet when the component mounts.const [provider, setProvider] = useState(null); const [wallet, setWallet] = useState(null); const PRIVATE_KEY = 'your-private-key'; // Replace with your private key useEffect(() => { const initializeProviderAndWallet = () => { const newProvider = Provider.getDefaultProvider(types.Network.Sepolia); const newWallet = new Wallet(PRIVATE_KEY, newProvider); setProvider(newProvider); setWallet(newWallet); }; initializeProviderAndWallet(); }, []);Handle Location and Minting Eligibility: Use
useMapEventsto track the user's location and determine if they are within the eligible radius to mint a monster.const [position, setPosition] = useState(null); const [canMint, setCanMint] = useState(false); const [monsterId, setMonsterId] = useState(1); useEffect(() => { if (position && monsterId) { setCanMint(isInAllowedArea(position.lat, position.lng, monsterId)); } }, [position, monsterId]); const isInAllowedArea = (lat, lng, monsterId) => { if (!monsterLocations[monsterId]) return false; const { lat: mLat, lng: mLng } = monsterLocations[monsterId]; const distance = Math.sqrt(Math.pow(lat - mLat, 2) + Math.pow(lng - mLng, 2)); return distance <= 50; // 50 meters radius for minting }; function LocationMarker() { const map = useMapEvents({ locationfound(e) { setPosition(e.latlng); map.flyTo(e.latlng, map.getZoom()); }, }); useEffect(() => { map.locate(); }, [map]); return position === null ? null : ( <> <Marker position={position} icon={locationIcon}></Marker> <Circle center={position} radius={50} // 50 meters radius for eligibility color={canMint ? 'green' : 'red'} /> </> ); }Integrate zkSync Paymaster and Minting Functionality: Create the minting function that interacts with the zkSync Paymaster to cover gas fees for the minting transaction.
 const PAYMASTER = 'your-paymaster-address'; // Replace with your paymaster address
 const monsterHuntContractAddress = 'your-contract-address'; // Replace with your contract address
 const MONSTER_HUNT_ABI = [/* ABI content here */]; // Replace with your contract's ABI

 const [transactionHash, setTransactionHash] = useState('');
 const [blockNumber, setBlockNumber] = useState('');

 const mintMonster = async () => {
   if (!wallet) {
     alert('Wallet is not initialized');
     return;
   }

   if (canMint) {
     try {
       const monsterHuntContract = new ethers.Contract(
         monsterHuntContractAddress,
         MONSTER_HUNT_ABI,
         wallet
       );

       const tx = await monsterHuntContract.mintMonster({
         customData: {
           paymasterParams: getPaymasterParams(PAYMASTER, {
             type: 'General',
             innerInput: new Uint8Array(),
           }),
         },
       });

       setTransactionHash(tx.hash);

       const receipt = await tx.wait();
       setBlockNumber(receipt.blockNumber);

       console.log('Monster minted successfully!');
     } catch (error) {
       console.error('Error minting monster:', error.message);
     }
   } else {
     alert('You are not within the allowed location to mint this monster.');
   }
 };
Note :
const PAYMASTER = 'your-paymaster-address'; (Replace with your paymaster address)const monsterHuntContractAddress = 'your-contract-address';(Replace with your contract address)
const MONSTER_HUNT_ABI = [/* ABI content here */];(Replace with your contract's ABI)Render the DApp: Finally, render the map and display minting eligibility and transaction status.
return ( <div> <MapContainer center={[-6.8782658, 107.5918008]} zoom={17} style={{ height: '400px', width: '100%' }}> <TileLayer url="https://{s}.tile.openstreetmap.org/{z}/{x}/{y}.png" attribution='© <a href="http://osm.org/copyright">OpenStreetMap</a> contributors' /> <LocationMarker /> </MapContainer> {canMint && ( <div className="alert alert-info position-absolute top-50 start-50 translate-middle" style={{ width: '300px', zIndex: 1000 }}> <h5 className="alert-heading">Eligibility for NFT Claim</h5> <p>You are within the target radius.</p> <button className="btn btn-primary w-100" onClick={mintMonster}>Claim Your Monster</button> </div> )} {transactionHash && ( <div className="alert alert-success mt-3 text-center"> <p>Transaction Hash: {transactionHash}</p> <p>Confirmed in Block: {blockNumber}</p> </div> )} </div> ); export default PaymasterTransaction; //end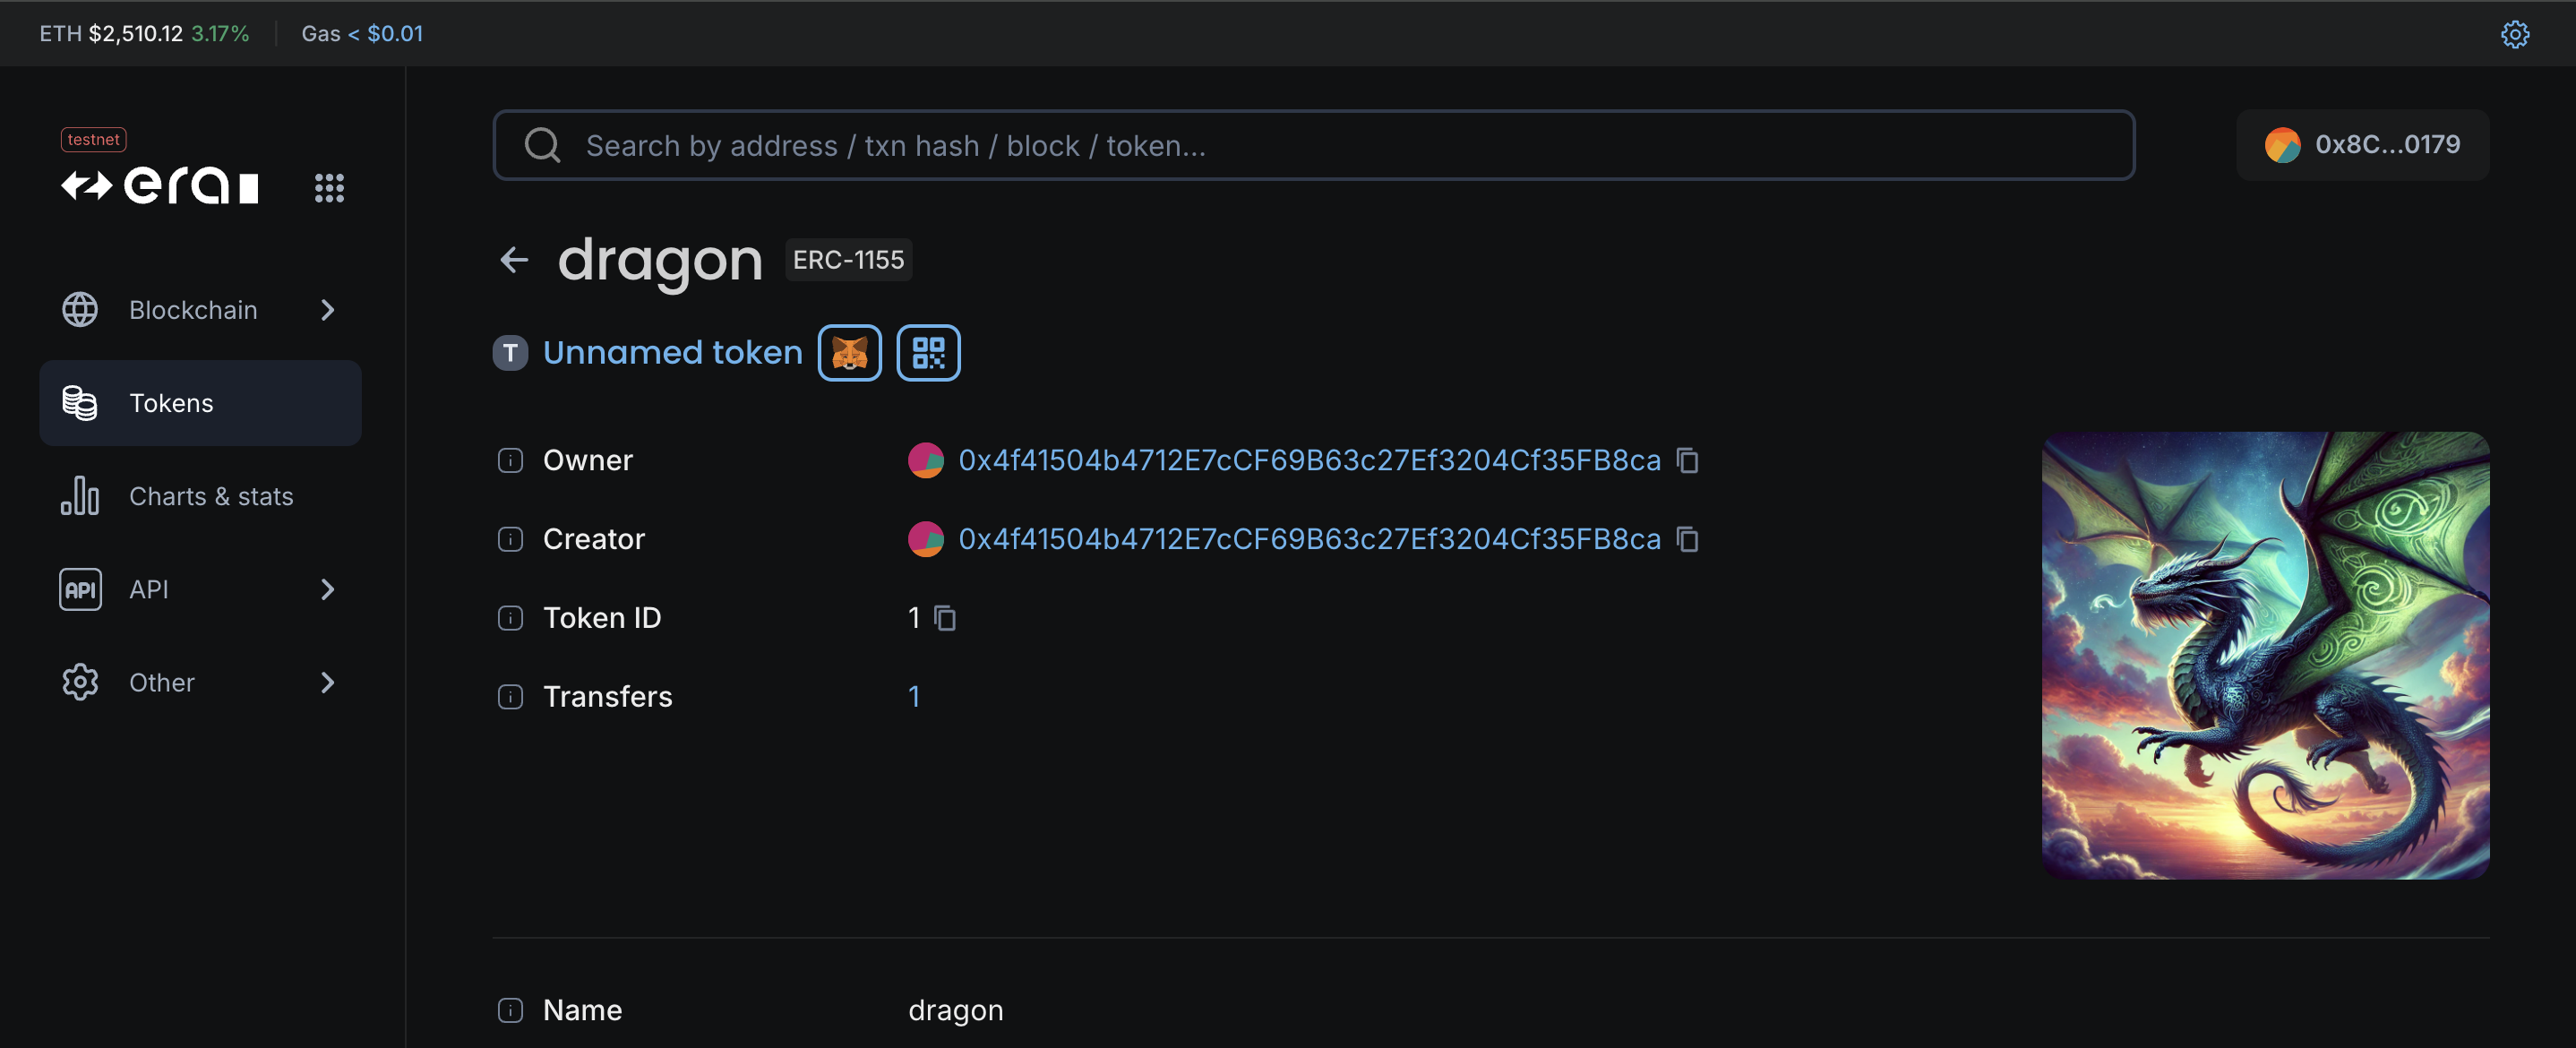
Check your Hunted Monster via Alchemy NFT API
Alchemy is one of many NFT API provider that allows developers to easily fetch and interact with users' NFTs across multiple blockchain networks. With Alchemy's NFT API, you can retrieve detailed metadata, ownership information, and historical data for any NFT owned by a specific address. This makes it simple to integrate NFT functionalities into your applications, enabling seamless access to users' digital assets and enhancing the overall user experience in your blockchain projects.
just check this API Endpoint : https://docs.alchemy.com/reference/getnftsforowner-v3 please input contract address with your deployed contract address.
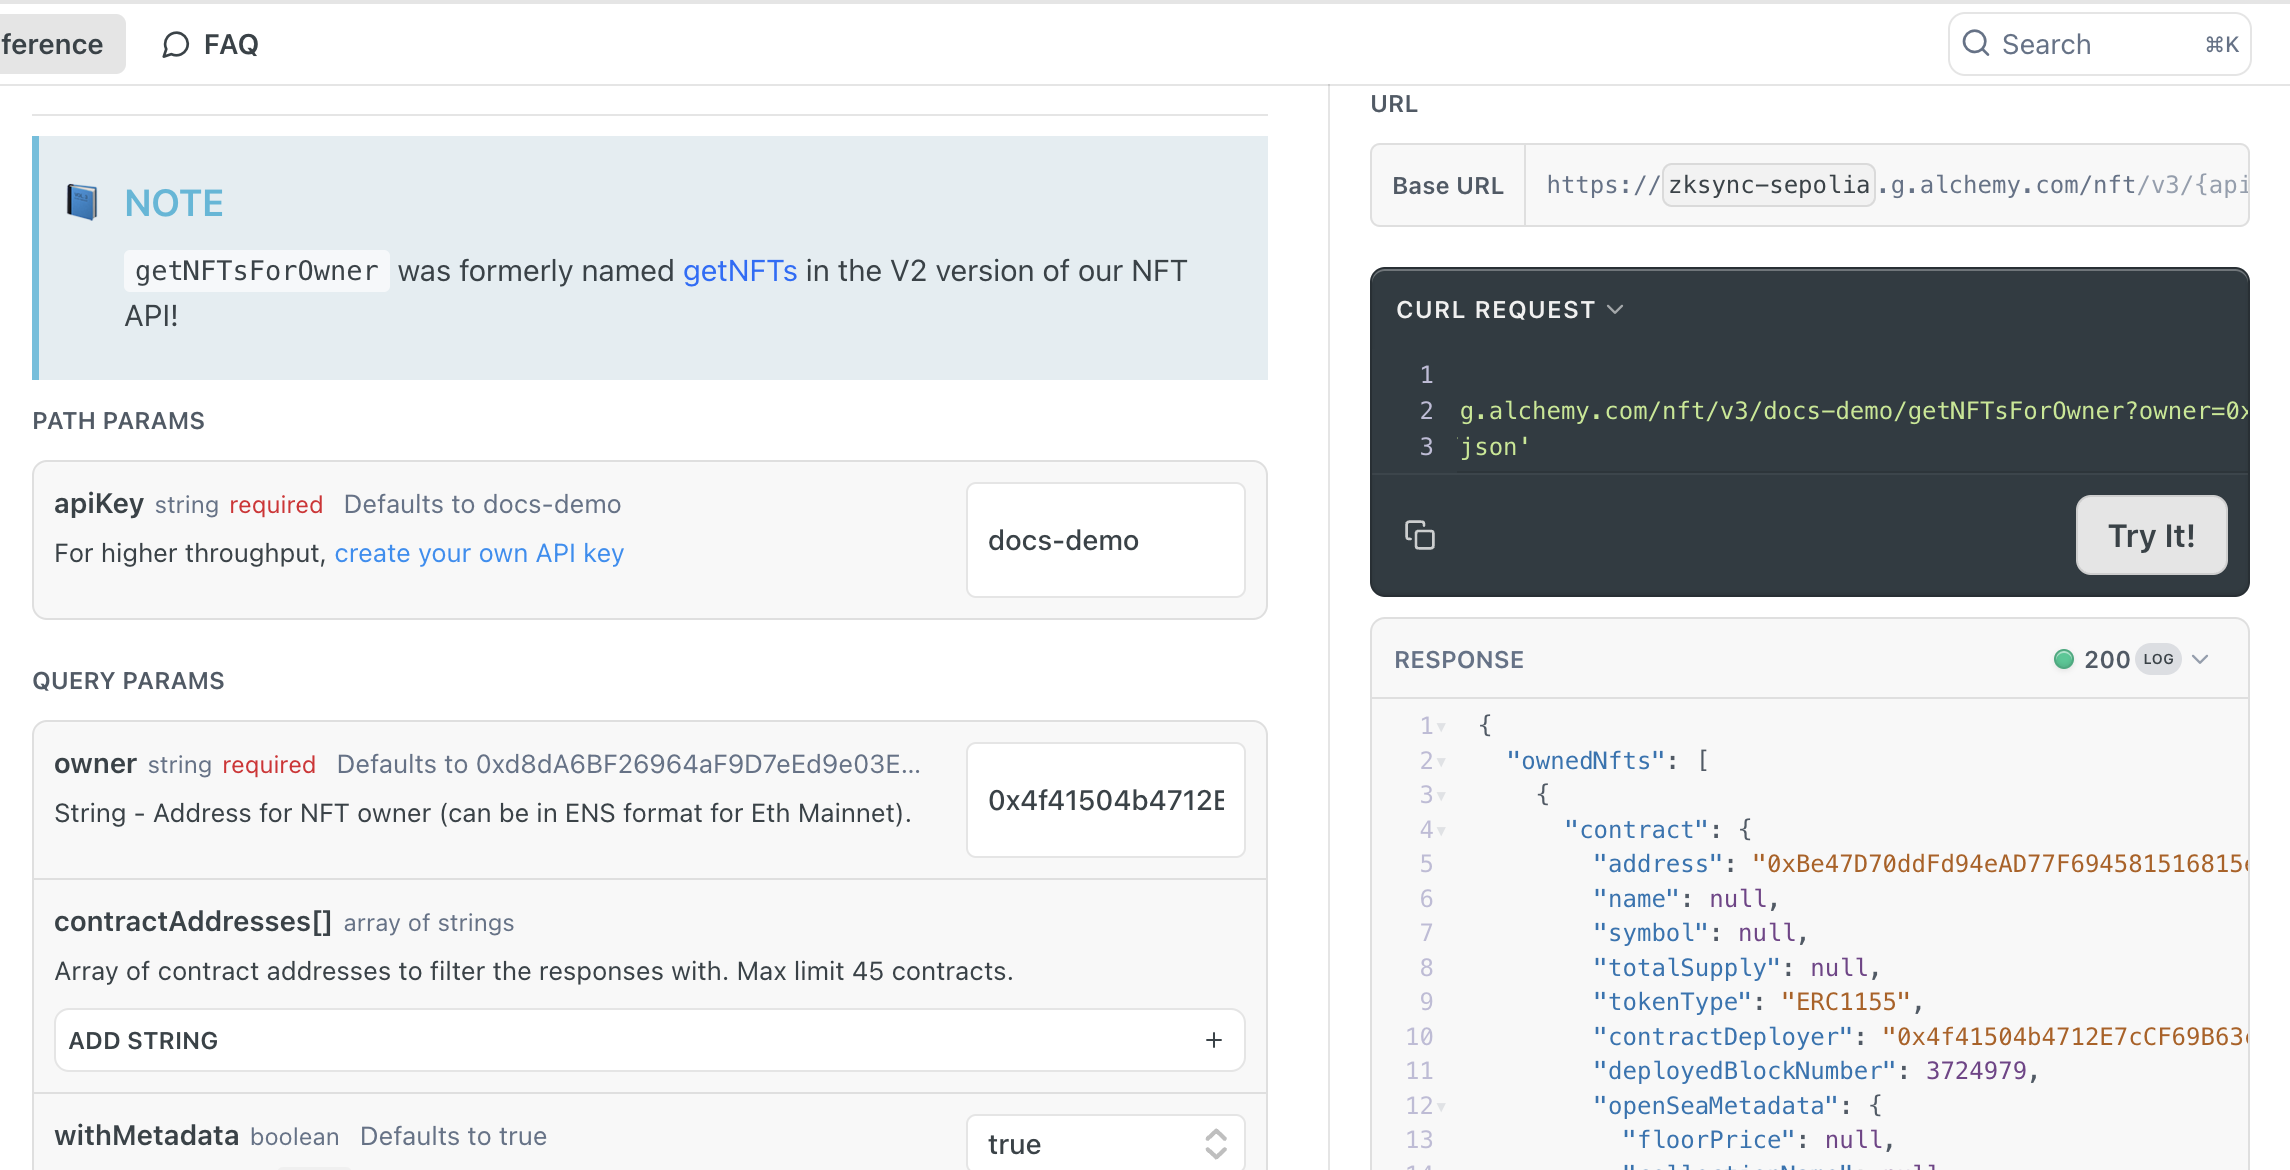
After entering the API key, owner, and contract address of the NFT, and choose javascript language copy the third line from the code output as shown in the image :
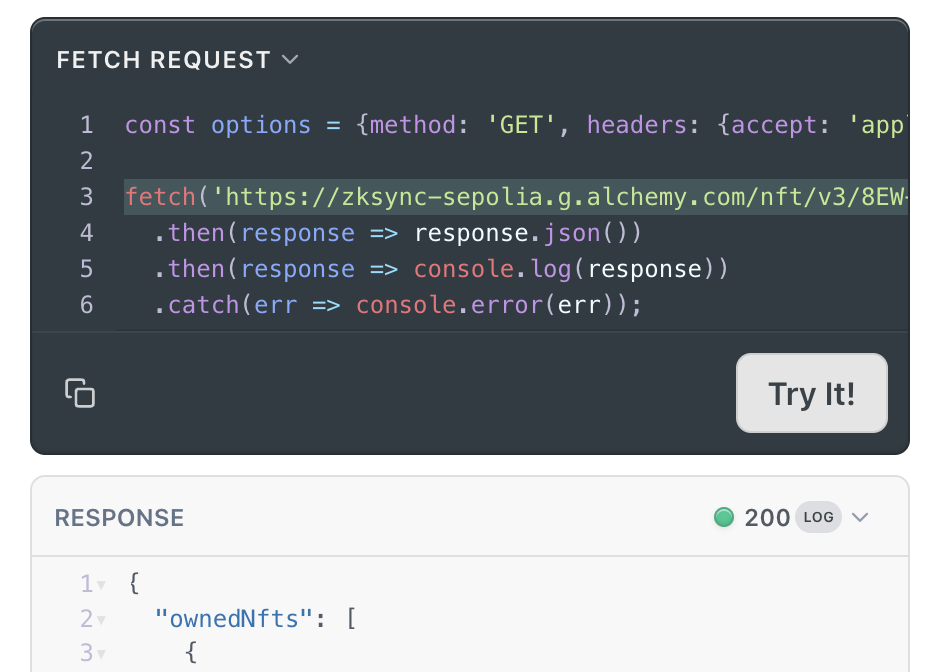
Put the line to :
     fetch('field here', options)
       .then(response => response.json())
       .then(data => {
         setNfts(data.ownedNfts || []); // Set to an empty array if `ownedNfts` is undefined
         setLoading(false);
       })
Full Code :
 import React, { useState, useEffect } from 'react';
 import 'bootstrap/dist/css/bootstrap.min.css';

 const NFTGallery = () => {
   const [nfts, setNfts] = useState([]);
   const [loading, setLoading] = useState(true);

   useEffect(() => {
     const options = {
       method: 'GET',
       headers: {
         accept: 'application/json',
       },
     };

     fetch('https://zksync-sepolia.g.alchemy.com/nft/v3/8EW-gK86JmOMANEHIixyZ1NBhMqdAI4A/getNFTsForOwner?owner=0x4f41504b4712E7cCF69B63c27Ef3204Cf35FB8ca&contractAddresses[]=0xBe47D70ddFd94eAD77F694581516815eFDe62d6f&withMetadata=true&pageSize=100', options)
       .then(response => response.json())
       .then(data => {
         setNfts(data.ownedNfts || []); // Set to an empty array if `ownedNfts` is undefined
         setLoading(false);
       })
       .catch(err => {
         console.error(err);
         setLoading(false);
       });
   }, []);

   if (loading) {
     return <div>Loading NFTs...</div>;
   }

   return (
     <div className="container mt-4">
       <div className="row">
         {nfts.map((nft, index) => {
           const { tokenId, name, description, image, raw } = nft;

           // Fallback to raw metadata if needed
           const nftName = name || raw?.metadata?.name || `Token ID: ${tokenId}`;
           const nftDescription = description || raw?.metadata?.description || 'No Description Available';
           const nftImage = image?.cachedUrl || raw?.metadata?.image || 'placeholder.jpg';

           return (
             <div className="col-md-4" key={index}>
               <div className="card mb-4">
                 <img
                   src={nftImage}
                   className="card-img-top"
                   alt={nftName}
                 />
                 <div className="card-body">
                   <h5 className="card-title">{nftName}</h5>
                   <p className="card-text">{nftDescription}</p>
                 </div>
               </div>
             </div>
           );
         })}
       </div>
     </div>
   );
 };

 export default NFTGallery;
Explanation of the Code :
Component Definition and State Management :
const NFTGallery = () => { const [nfts, setNfts] = useState([]); const [loading, setLoading] = useState(true);nfts: Holds the array of NFTs fetched from the API.loading: A boolean that tracks whether the NFTs are still being loaded.Fetch NFT :
useEffect(() => { const options = { method: 'GET', headers: { accept: 'application/json', }, }; fetch('field your api configuration', options) .then(response => response.json()) .then(data => { setNfts(data.ownedNfts || []); // Set to an empty array if `ownedNfts` is undefined setLoading(false); }) .catch(err => { console.error(err); setLoading(false); }); }, []);useEffect: This hook is used to perform the side effect of fetching NFT data from the Alchemy API when the component first mounts.fetchAPI Call: Sends a GET request to the Alchemy API to retrieve the NFTs owned by a specific address. The response is then converted to JSON.State Updates:
If the data is successfully fetched,
nftsis set to the list of owned NFTs, andloadingis set tofalse.If there's an error, it is logged to the console, and
loadingis also set tofalse.
Rendering NFT :
return (
  <div className="container mt-4">
    <div className="row">
      {nfts.map((nft, index) => {
        const { tokenId, name, description, image, raw } = nft;

        // Fallback to raw metadata if needed
        const nftName = name || raw?.metadata?.name || `Token ID: ${tokenId}`;
        const nftDescription = description || raw?.metadata?.description || 'No Description Available';
        const nftImage = image?.cachedUrl || raw?.metadata?.image || 'placeholder.jpg';

        return (
          <div className="col-md-4" key={index}>
            <div className="card mb-4">
              <img
                src={nftImage}
                className="card-img-top"
                alt={nftName}
              />
              <div className="card-body">
                <h5 className="card-title">{nftName}</h5>
                <p className="card-text">{nftDescription}</p>
              </div>
            </div>
          </div>
        );
      })}
    </div>
  </div>
);
export default NFTGallery;
nfts.map: Iterates over the array of NFTs and generates a Bootstrap card for each NFT.Destructuring: The relevant properties (
tokenId,name,description,image,raw) are destructured from thenftobject.Fallback Logic:
nftName: Usesnamefrom the NFT metadata, but falls back toraw.metadata.nameorToken ID: ${tokenId}ifnameis not available.nftDescription: Usesdescriptionfrom the NFT metadata, but falls back toraw.metadata.descriptionor a default message if not available.nftImage: Usesimage.cachedUrlif available, otherwise falls back toraw.metadata.imageor a placeholder image.
Card Layout:
- Each NFT is displayed inside a Bootstrap card, with the image, title, and description rendered in their respective sections.
Update your App.js for routing and Page Header
import React from 'react';
import { BrowserRouter as Router, Route, Routes, Link } from 'react-router-dom';
import PaymasterTransaction from './PaymasterTransaction';
import NFTGallery from './NFTGallery';

function App() {
  return (
    <Router>
      <div>
        <h1>Monster Hunting NFT Game</h1>
        <nav>
          <Link to="/">Home</Link> | <Link to="/nft-gallery">NFT Gallery</Link>
        </nav>
        <Routes>
          <Route path="/" element={<PaymasterTransaction />} />
          <Route path="/nft-gallery" element={<NFTGallery />} />
        </Routes>
      </div>
    </Router>
  );
}

export default App;
Ouput :
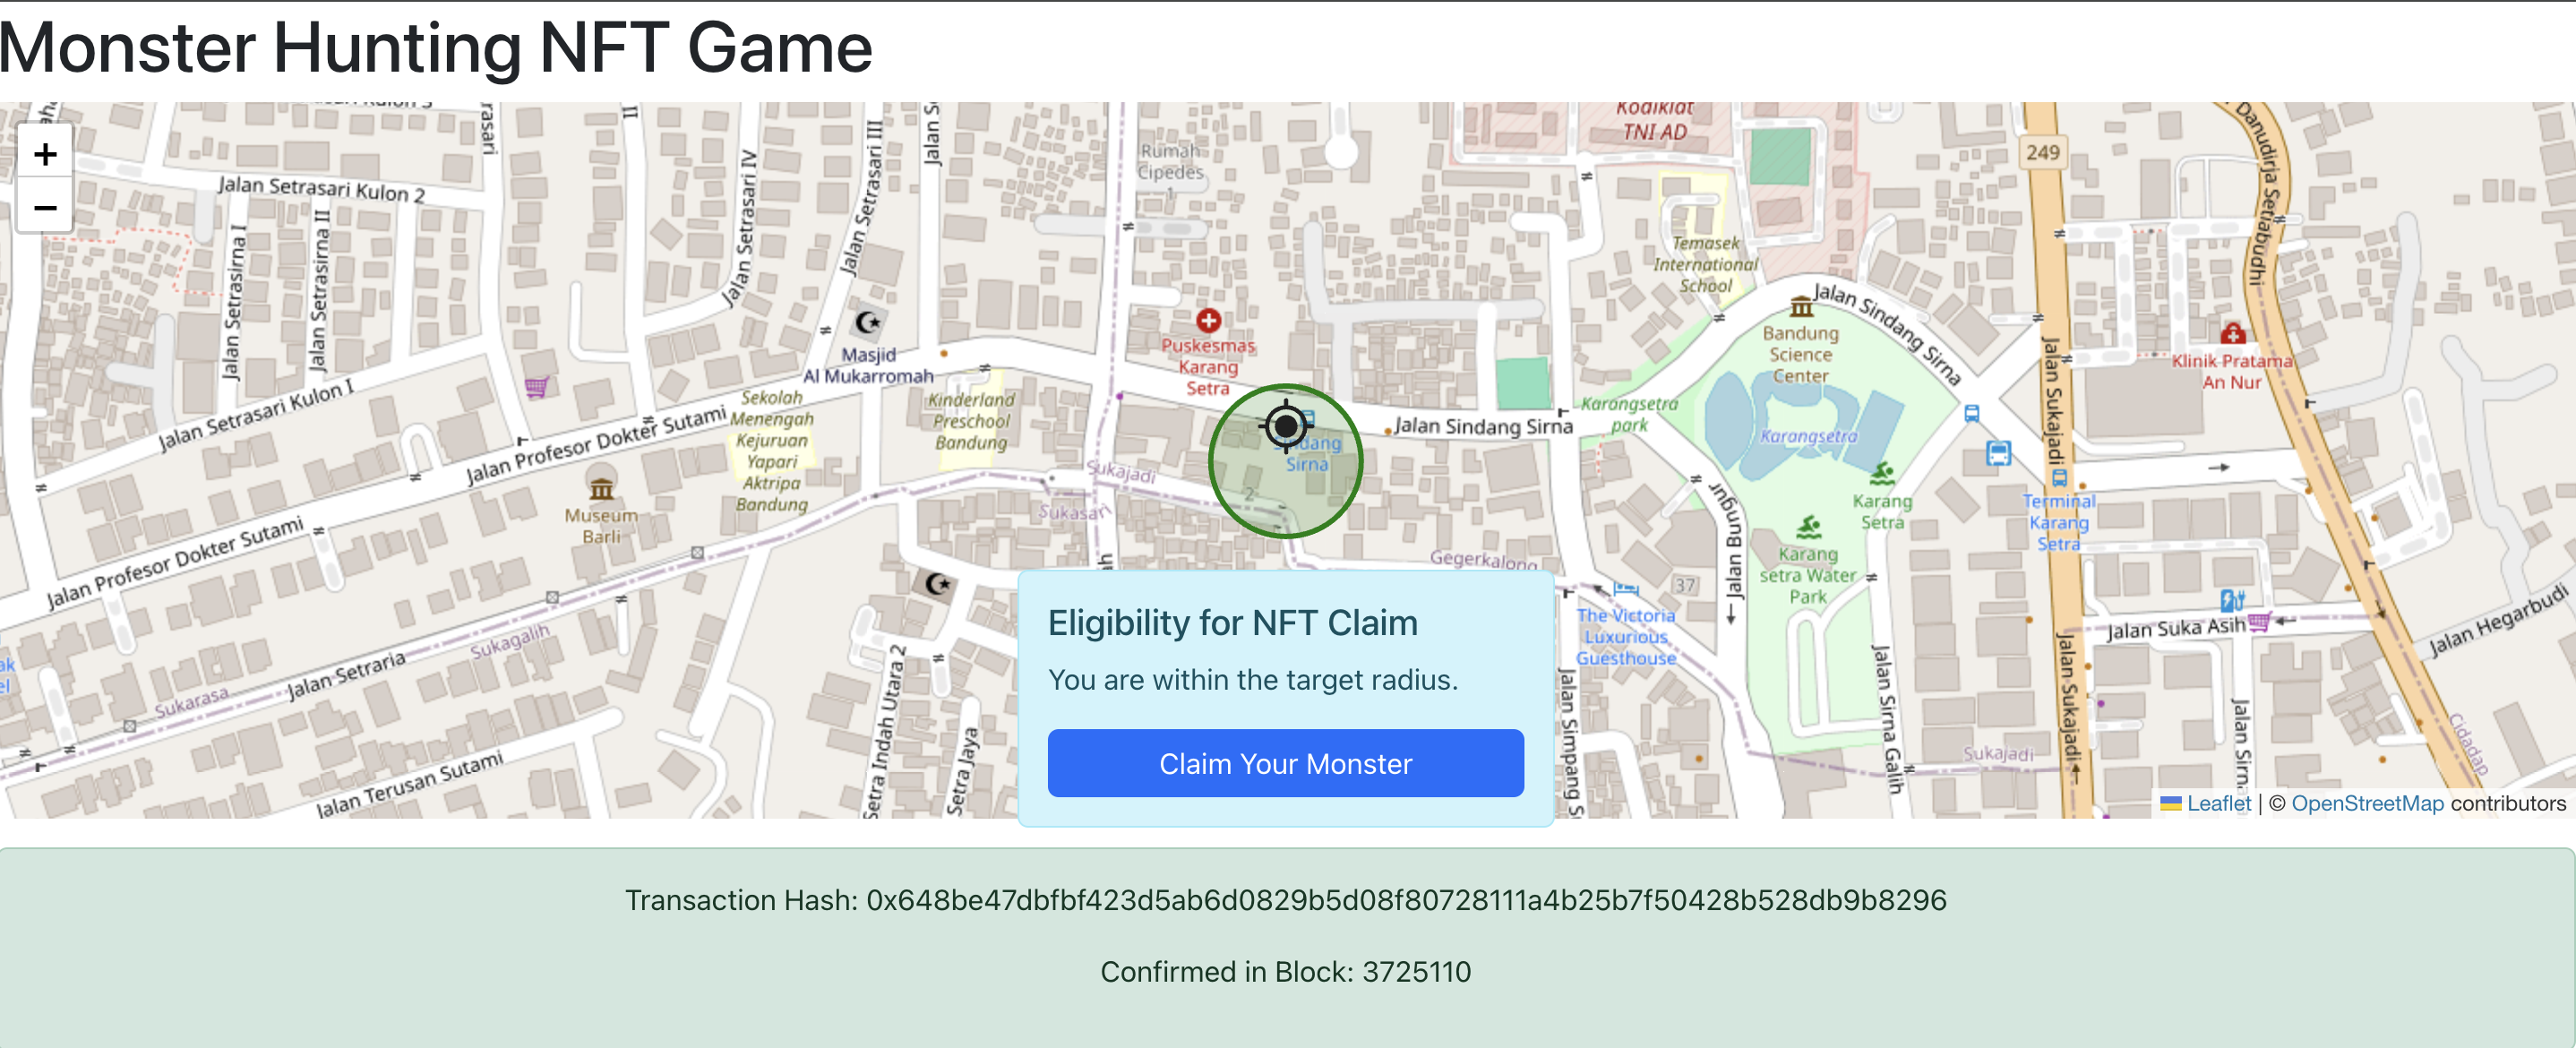
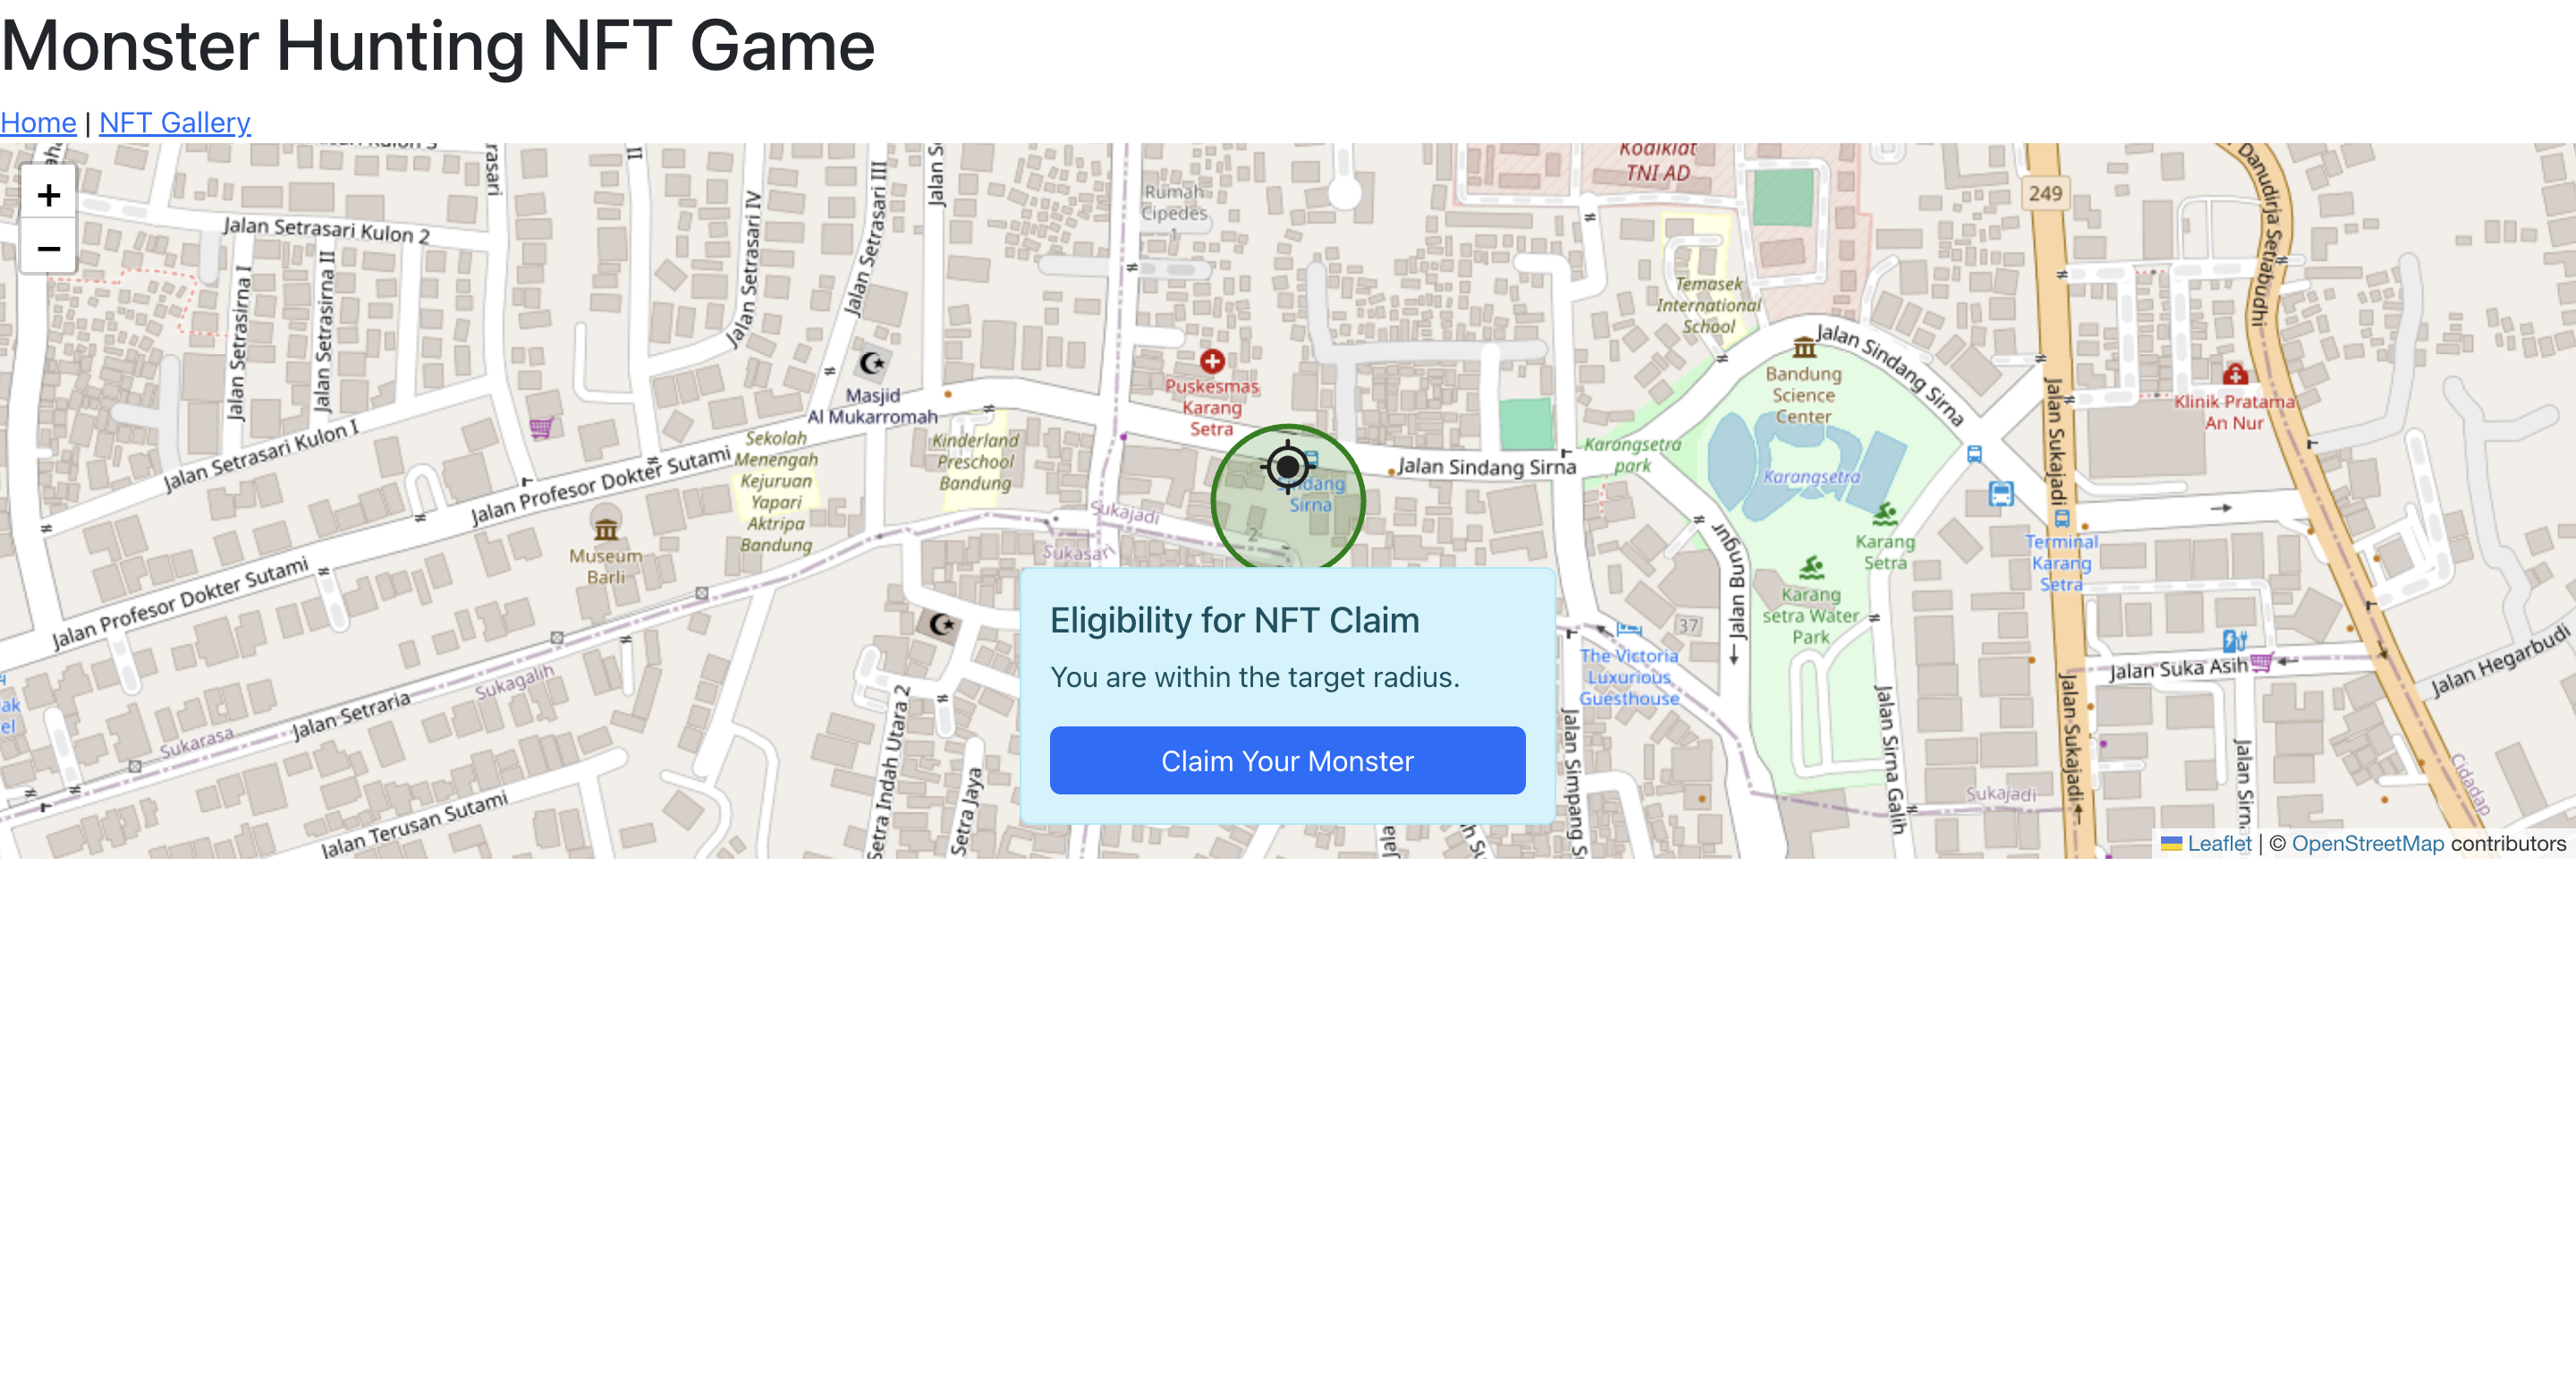
Results if NFT Monster is available within 50 meters
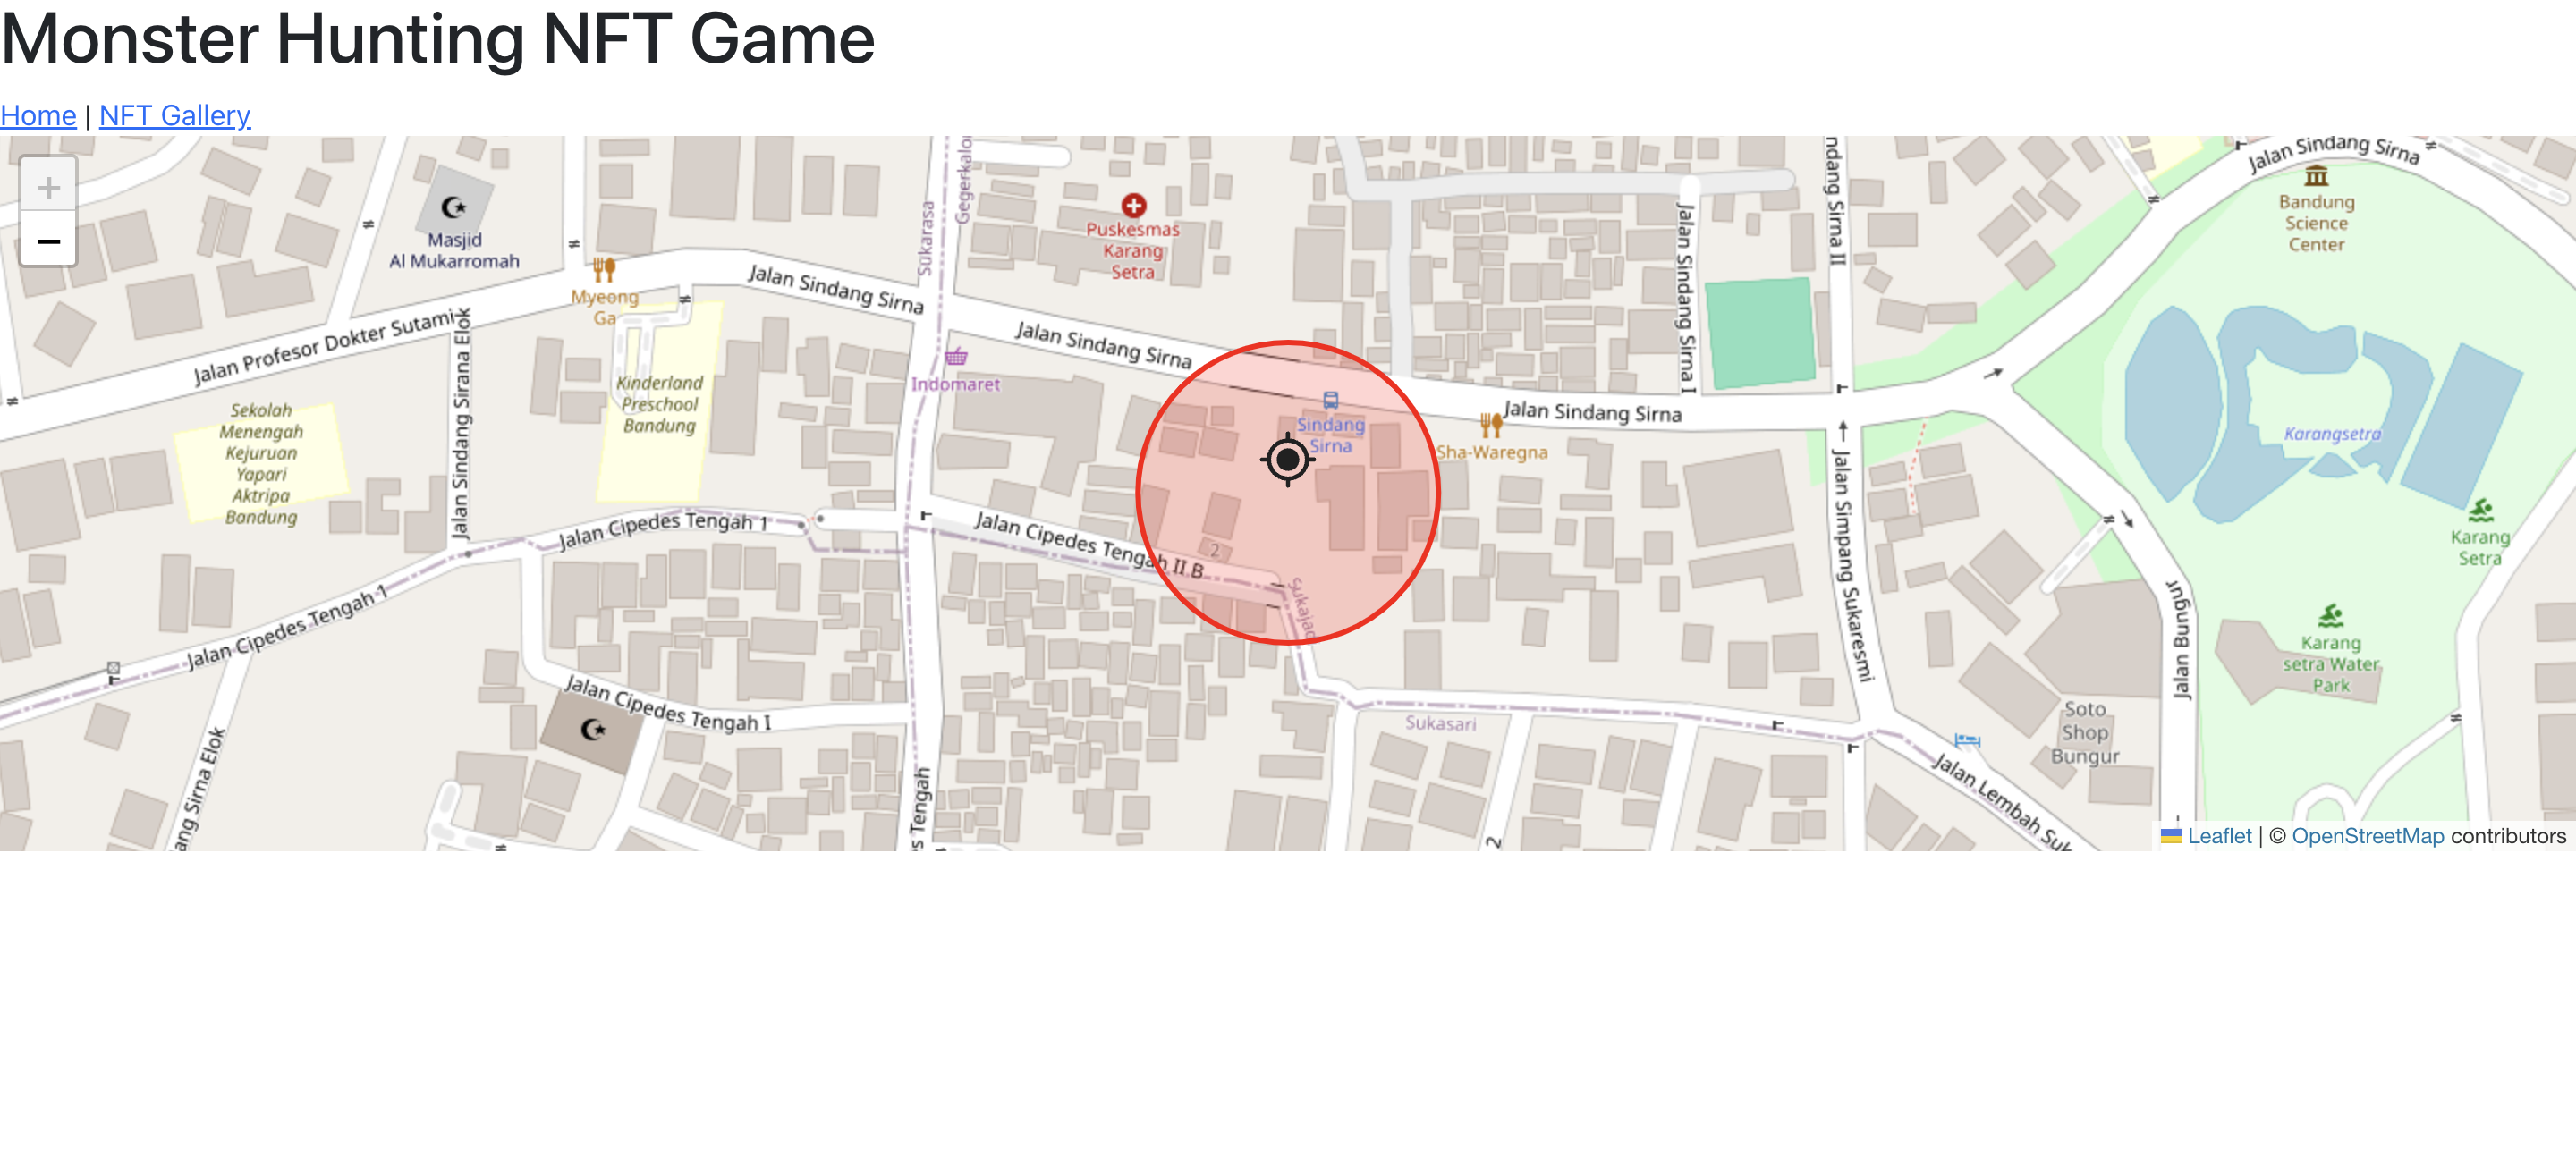
Results if NFT Monster is not available within 50 meters
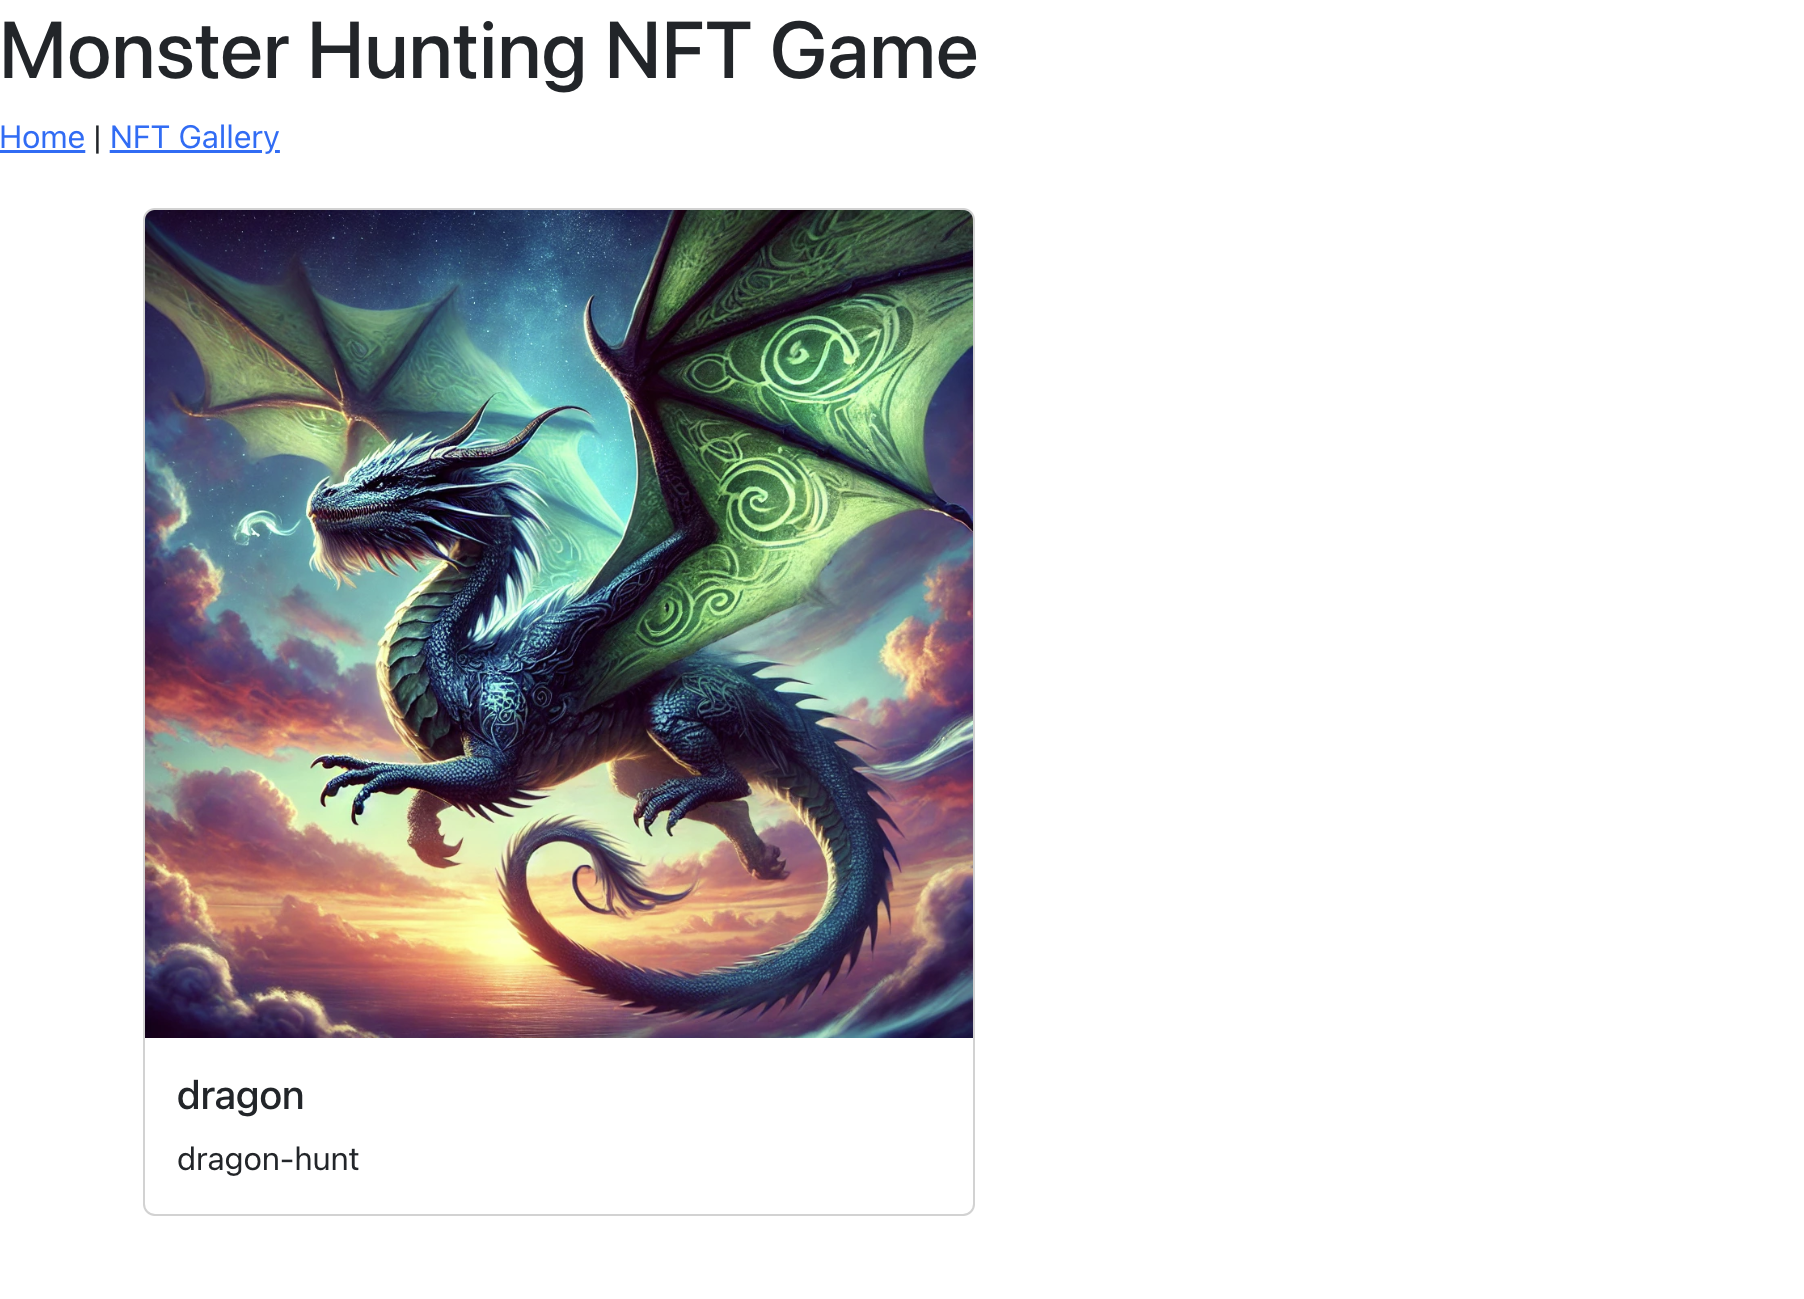
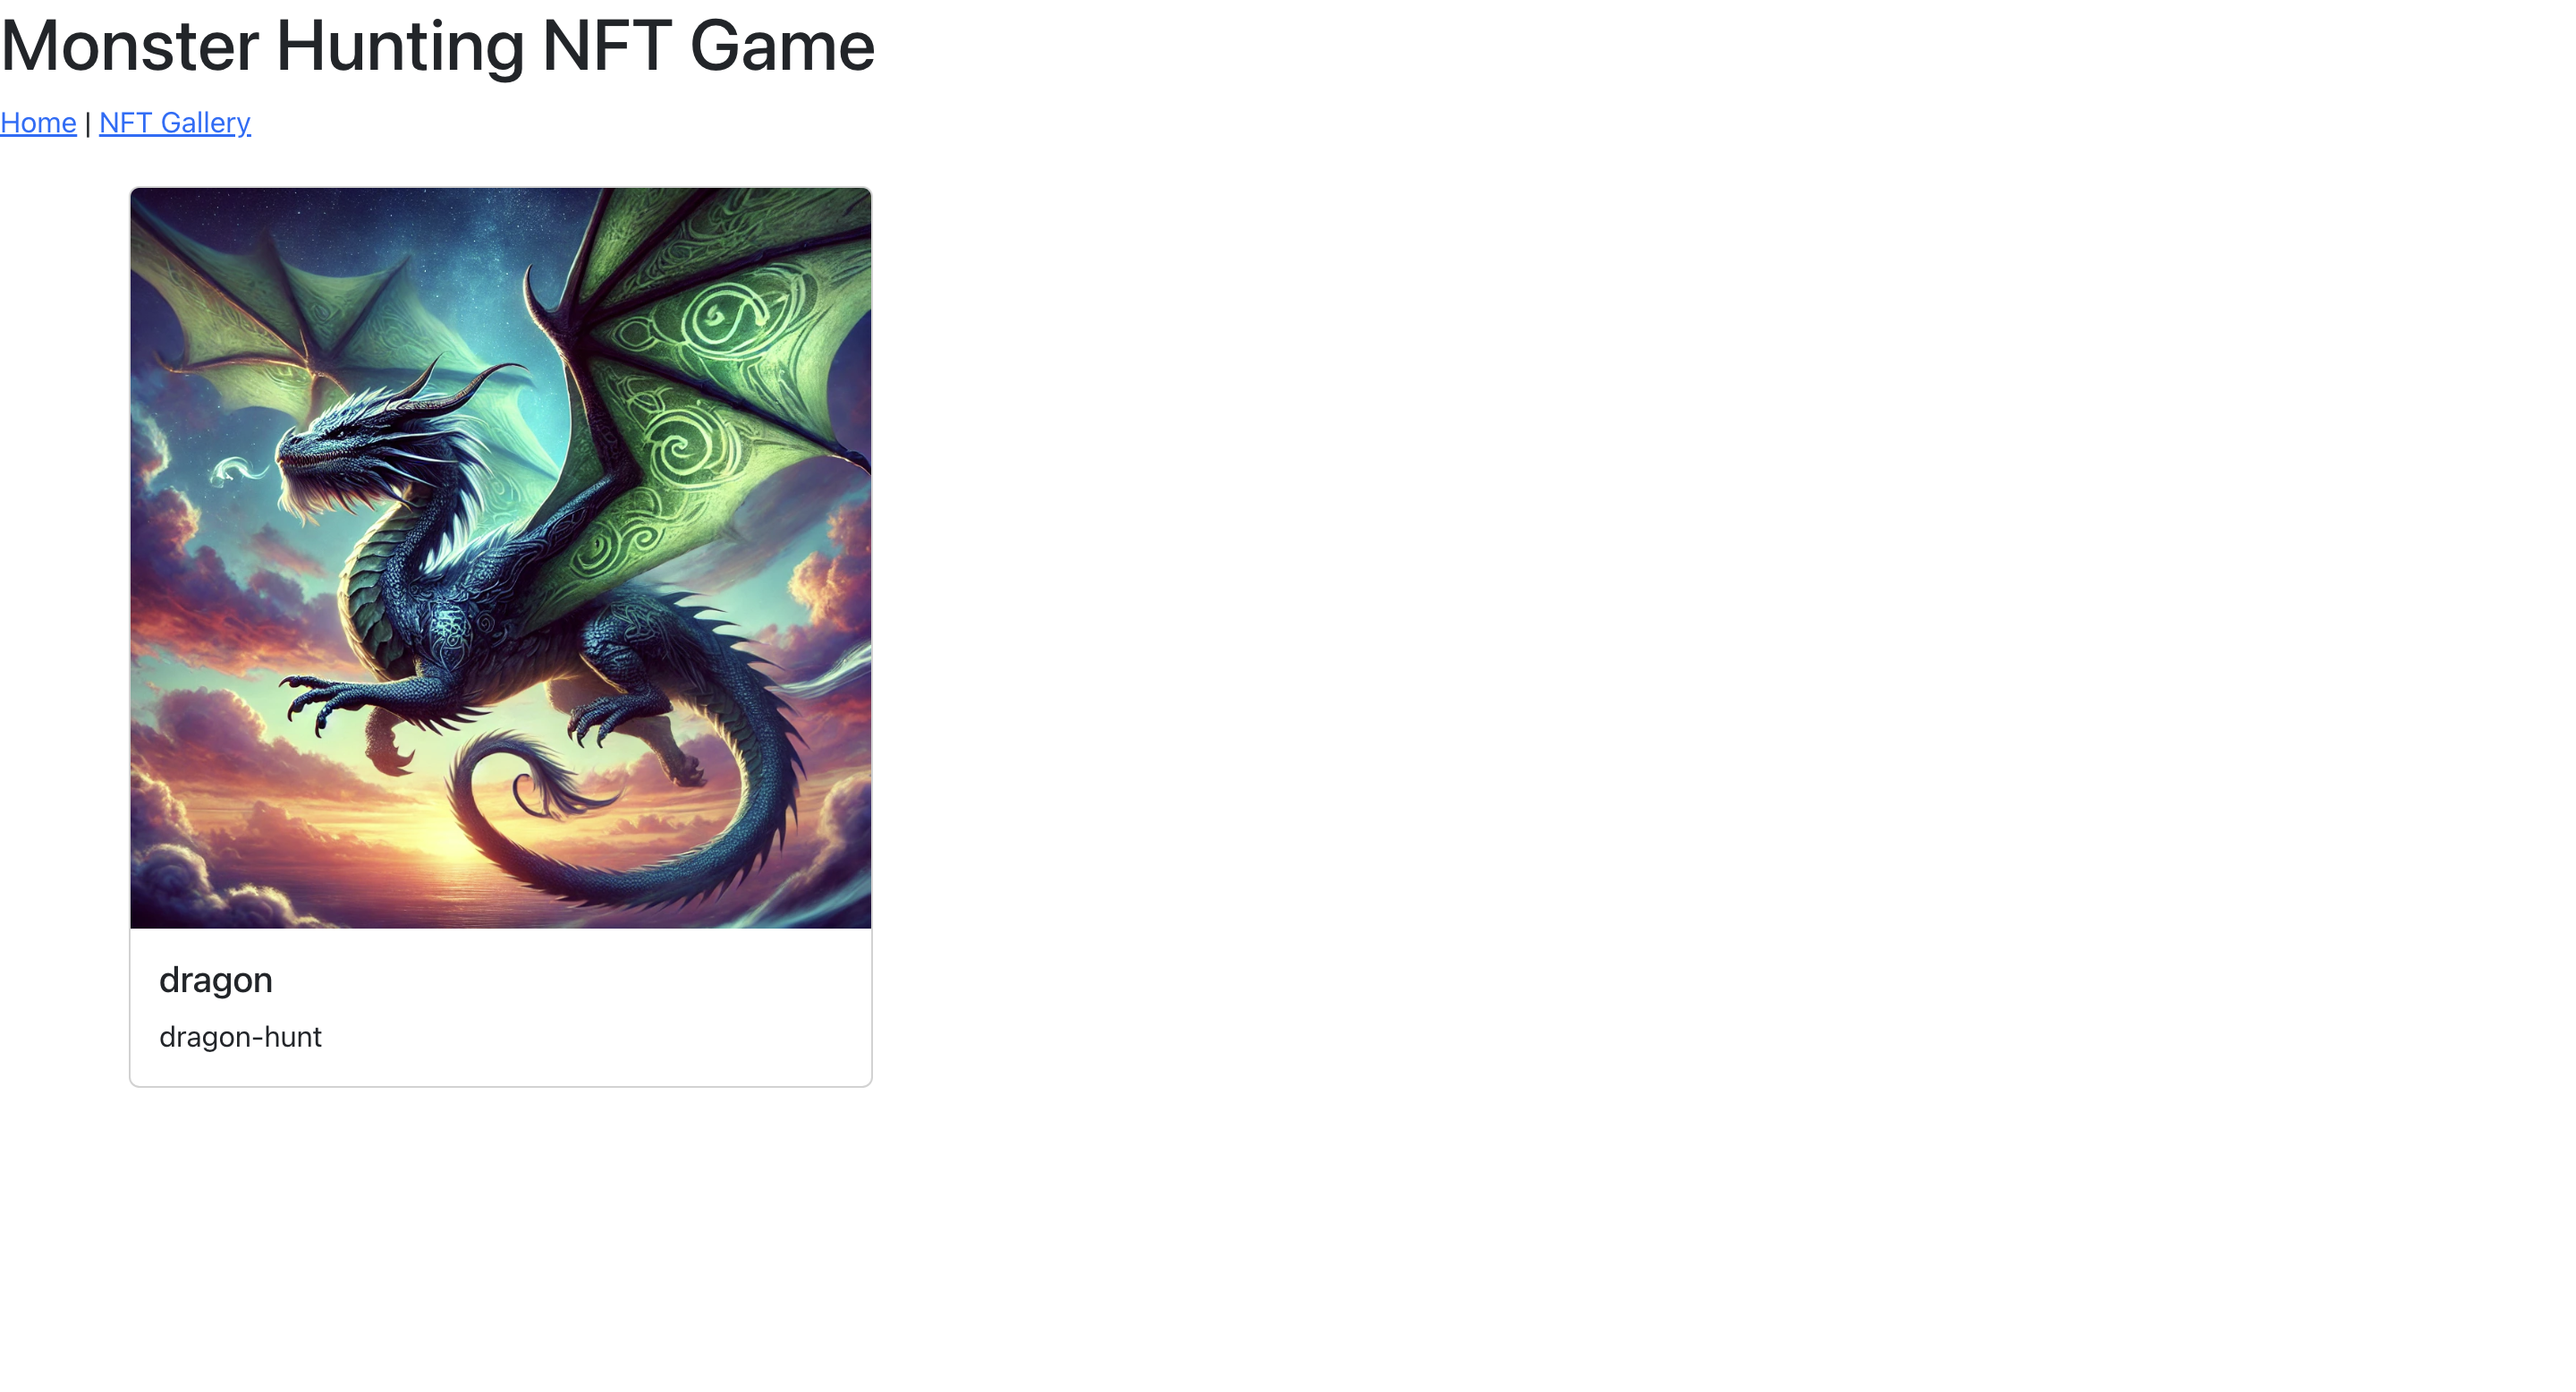
Your hunted monster page :
Closing
Thank you for your support and interest in this series of articles, which is part of a grant program available at Wave Hacks on Akindo.
Structure :
| WAVE | TITLE | LINK |
| 1st | Quickstart Guide to Develop on zkSync : Fundamental Concept and Development with ZKSync Remix IDE 'Instant Way' (Chapter 1) | ridhoizzulhaq.hashnode.dev/quickstart-guide.. |
| 3rd | Quickstart Guide to Develop on zkSync : Build a Complete Voting DApp on the ZKSync (Chapter 2) | ridhoizzulhaq.hashnode.dev/quickstart-guide.. |
| 4th | Quickstart Guide to Develop on ZKSync : Explore Basic Paymaster (Chapter 3) | ridhoizzulhaq.hashnode.dev/quickstart-guide.. |
| 5th | Quickstart Guide to Develop on ZKSync : Build NFT ERC-1155 Ticket Minter with Paymaster feature and DApp for Ticket Checker (Chapter 4) | ridhoizzulhaq.hashnode.dev/quickstart-guide.. |
| 6th | Quickstart Guide to Develop on ZKSync : Develop a Gasless Transaction DApp (Chapter 5) | https://ridhoizzulhaq.hashnode.dev/quickstart-guide-to-develop-on-zksync-develop-a-gasless-transaction-dapp-chapter-5 |
Subscribe to my newsletter
Read articles from Ridho Izzulhaq directly inside your inbox. Subscribe to the newsletter, and don't miss out.
Written by
