Advanced Terraform Project 1: VPC, EC2, and ALB Setup with Dynamic Target Group Allocation
 Shraddha Suryawanshi
Introduction
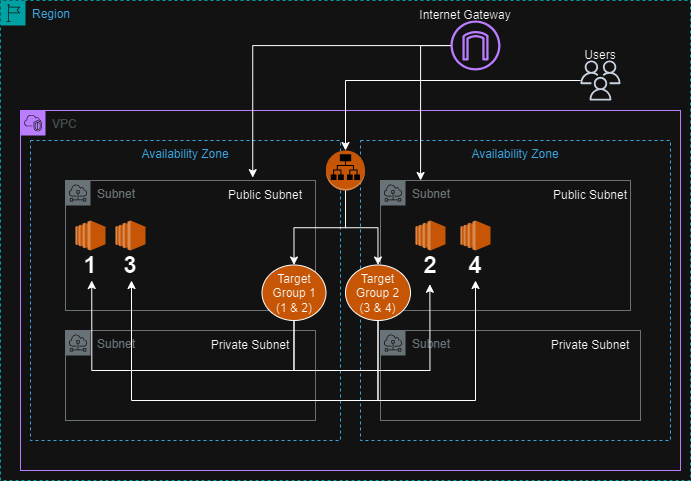
In this project, we'll automate the deployment of a highly available web application infrastructure on AWS using Terraform. The infrastructure includes a Virtual Private Cloud (VPC) with public and private subnets, EC2 instances deployed in different Availability Zones (AZs), and an Application Load Balancer (ALB) with dynamic target group (TG) allocation. The ALB will distribute traffic to the EC2 instances based on priority rules.
Resources Used
Terraform: Infrastructure as Code (IaC) tool used to provision and manage AWS resources.
AWS: Cloud provider for hosting the infrastructure.
VPC: Provides isolated networking.
EC2 Instances: Virtual machines to host the web application.
ALB (Application Load Balancer): Distributes incoming traffic across EC2 instances.
Target Groups: Logical grouping of EC2 instances for load balancing.
Use Case
This project is designed to demonstrate the automation of a web application infrastructure with the following requirements:
High Availability: Deploy EC2 instances across multiple AZs.
Load Balancing: Distribute traffic to instances using an ALB.
Dynamic Instance Allocation: Automatically allocate EC2 instances to different target groups based on the number of instances.
Automated Setup: Use Terraform to automate the entire setup.
Advantages
Scalability: The infrastructure is designed to scale easily by adding or removing instances.
Resilience: By spreading resources across multiple AZs, the architecture is resilient to failures.
Automation: Terraform automates the provisioning, reducing manual errors and speeding up the deployment process.
Project Structure
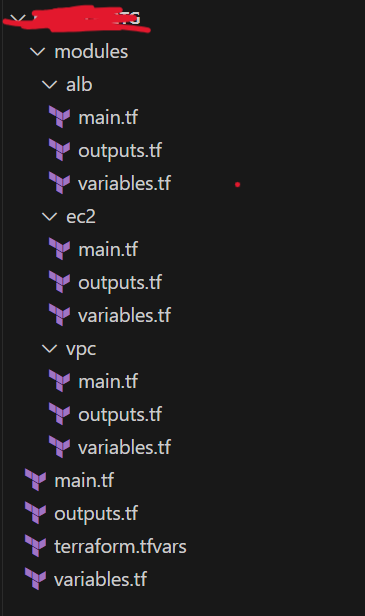
The project is structured into the following modules:
Main.tf
The main.tf file is the central configuration file in a Terraform project, which typically includes the definition of the provider, the instantiation of modules, and the configuration of resources.
Variables.tf
The main.tf file references variables defined in a separate variables.tf file. These variables allow for flexible configuration, enabling you to easily change aspects like the number of instances, CIDR blocks, or availability zones without modifying the main code.
Outputs.tf
Definition: Outputs export values from your Terraform configuration. These can be used for referencing in other configurations or for display purposes.
Modules
Definition: Modules encapsulate multiple resources into reusable and manageable pieces. They allow you to create complex configurations by combining smaller components.
VPC Module: Configures the VPC, subnets, route tables, and internet gateway.
EC2 Module: Launches EC2 instances in public subnets with Apache installed and a customized index.html.
ALB Module: Configures the Application Load Balancer, target groups, and dynamically attaches instances to target groups.
Terraform.tfvars
File Configurations:
Root main.tf
The root main.tf file serves as the entry point for your Terraform project. It orchestrates the creation of the entire infrastructure by calling different modules and defining outputs. Let’s break down the key components:
Provider Configuration
Module Declarations
 provider "aws" {
   region = var.region # "us-east-1"
 }

 # VPC Module
 module "vpc" {
   source             = "./modules/vpc"
   vpc_cidr           = "10.0.0.0/16"
   public_subnet_cidrs = ["10.0.1.0/24", "10.0.2.0/24"]
   private_subnet_cidrs = ["10.0.3.0/24", "10.0.4.0/24"]
 }

 # EC2 Module
 module "ec2" {
   source              = "./modules/ec2"
   vpc_id              = module.vpc.vpc_id
   public_subnet_ids   = module.vpc.public_subnet_ids
   private_subnet_ids  = module.vpc.private_subnet_ids
   instance_count      = 2
 }

 # ALB Module
 module "alb" {
   source              = "./modules/alb"
   vpc_id              = module.vpc.vpc_id
   public_subnet_ids   = module.vpc.public_subnet_ids
   private_subnet_ids  = module.vpc.private_subnet_ids
   instance_ids        = module.ec2.instance_ids
 }
Variable.tf
 variable "region" {
   default =  "ap-south-1" # "us-east-1"
 }
Output.tf
 output "vpc_id" {
   value = module.vpc.vpc_id
 }

 output "public_subnet_ids" {
   value = module.vpc.public_subnet_ids
 }

 output "private_subnet_ids" {
   value = module.vpc.private_subnet_ids
 }

 # Output the DNS name of the ALB
 output "alb_dns_name" {
   value = module.alb.alb_dns_name
 }
Variables.tfvar
# region = "us-east-1"Modules
VPC Module
Purpose: The VPC (Virtual Private Cloud) module is responsible for setting up the networking layer of your AWS infrastructure. This is the foundational component upon which the rest of the infrastructure is built.
Configuration:
VPC CIDR Block: The module defines a CIDR block for the VPC, specifying the IP address range for the entire network.
Public and Private Subnets: Within the VPC, the module creates multiple subnets, splitting them into public and private subnets. Public subnets are designed to be accessible from the internet, while private subnets are isolated and used for internal resources like databases.
Availability Zones: The subnets are distributed across different availability zones (AZs) to ensure high availability. This means that even if one AZ fails, the resources in the other AZ can continue operating.
Route Tables: The module also sets up route tables for the subnets. Public subnets are associated with route tables that route traffic through an Internet Gateway (IGW), making them accessible from the internet. Private subnets have route tables that only allow internal traffic.
Internet Gateway: An Internet Gateway is attached to the VPC, allowing instances in the public subnets to connect to the internet.
Contribution to the Infrastructure: The VPC module establishes a secure and scalable network environment where your EC2 instances and other AWS resources can be deployed. By separating public and private subnets, it ensures that only the necessary resources are exposed to the internet, enhancing security.
main.tf
 resource "aws_vpc" "main" {
   cidr_block = var.vpc_cidr
   enable_dns_support = true
   enable_dns_hostnames = true
   tags = {
     Name = "tf-main-vpc"
   }
 }

 resource "aws_subnet" "public" {
   count = length(var.public_subnet_cidrs)

   vpc_id     = aws_vpc.main.id
   cidr_block  = element(var.public_subnet_cidrs, count.index)
   availability_zone = element(data.aws_availability_zones.available.names, count.index)
   map_public_ip_on_launch = true
   tags = {
     Name = "tf-public-subnet-${count.index + 1}"
   }
 }

 resource "aws_subnet" "private" {
   count = length(var.private_subnet_cidrs)

   vpc_id     = aws_vpc.main.id
   cidr_block  = element(var.private_subnet_cidrs, count.index)
   availability_zone = element(data.aws_availability_zones.available.names, count.index)
   tags = {
     Name = "tf-private-subnet-${count.index + 1}"
   }
 }

 resource "aws_internet_gateway" "main" {
   vpc_id = aws_vpc.main.id
   tags = {
     Name = "tf-main-igw"
   }
 }

 resource "aws_route_table" "public" {
   vpc_id = aws_vpc.main.id

   route {
     cidr_block = "0.0.0.0/0"
     gateway_id = aws_internet_gateway.main.id
   }

   tags = {
     Name = "tf-public-route-table"
   }
 }

 resource "aws_route_table" "private" {
   vpc_id = aws_vpc.main.id
   tags = {
     Name = "tf-private-route-table"
   }
 }

 resource "aws_route_table_association" "public" {
   count = length(aws_subnet.public)

   subnet_id      = element(aws_subnet.public[*].id, count.index)
   route_table_id = aws_route_table.public.id
 }

 resource "aws_route_table_association" "private" {
   count = length(aws_subnet.private)

   subnet_id      = element(aws_subnet.private[*].id, count.index)
   route_table_id = aws_route_table.private.id
 }

 data "aws_availability_zones" "available" {}
variables.tf
 variable "vpc_cidr" {
   description = "The CIDR block for the VPC"
   type        = string
 }

 variable "public_subnet_cidrs" {
   description = "The CIDR blocks for the public subnets"
   type        = list(string)
 }

 variable "private_subnet_cidrs" {
   description = "The CIDR blocks for the private subnets"
   type        = list(string)
 }
outputs.tf
 output "vpc_id" {
   value = aws_vpc.main.id
 }

 output "public_subnet_ids" {
   value = aws_subnet.public[*].id
 }

 output "private_subnet_ids" {
   value = aws_subnet.private[*].id
 }
EC2 Module
Purpose: The EC2 (Elastic Compute Cloud) module is responsible for launching the virtual machines (instances) that will run your applications. In this project, it focuses on deploying web servers in the public subnets.
Configuration:
Instance Count: The module allows you to specify the number of EC2 instances to launch. These instances are distributed across the public subnets to ensure they are deployed in different availability zones.
Subnet Assignment: Each instance is placed in one of the public subnets created by the VPC module. By alternating the subnets, the instances are automatically distributed across the availability zones, which enhances fault tolerance.
User Data Script:
A user data script is provided to configure the instances upon launch. In this project, the script installs Apache (a web server) and customizes the index.html file. The customization includes dynamically adding the availability zone information to the web page, which helps in identifying which instance is serving the traffic.
Security Group:
The module also associates a security group with the instances, defining which ports are open for incoming traffic. Typically, only port 80 (HTTP) is open for public web servers, ensuring that only necessary traffic is allowed.
Contribution to the Infrastructure: The EC2 module deploys and configures the servers that will handle incoming web traffic. By distributing these instances across different AZs and customizing their setup, it ensures that the application is resilient and provides useful information for testing and troubleshooting.
main.tf
 # Security Group for Public EC2 Instances
 resource "aws_security_group" "ec2_sg" {
   vpc_id = var.vpc_id

   egress {
     from_port   = 0
     to_port     = 0
     protocol    = "-1"
     cidr_blocks = ["0.0.0.0/0"]
   }

   ingress {
     from_port   = 22
     to_port     = 22
     protocol    = "tcp"
     cidr_blocks = ["0.0.0.0/0"]
   }

   ingress {
     from_port   = 80
     to_port     = 80
     protocol    = "tcp"
     cidr_blocks = ["0.0.0.0/0"]
   }
   tags = {
     Name = "tf-public-ec2-sg"
   }
 }

 # Security Group for Private EC2 Instances
 resource "aws_security_group" "ec2_sg_private" {
   vpc_id = var.vpc_id

   egress {
     from_port   = 0
     to_port     = 0
     protocol    = "-1"
     cidr_blocks = ["0.0.0.0/0"]
   }

   ingress {
     from_port   = 22
     to_port     = 22
     protocol    = "tcp"
     cidr_blocks = ["10.0.0.0/16"]  # Adjust this as needed for internal access only
   }

   ingress {
     from_port   = 80
     to_port     = 80
     protocol    = "tcp"
     cidr_blocks = ["0.0.0.0/0"]
   }

   tags = {
     Name = "tf-private-ec2-sg"
   }
 }

 # Example of defining the instances within the same module
 resource "aws_instance" "web" {
   count                  = 4
   ami                    = "ami-0522ab6e1ddcc7055" # us-east-1 ---> "ami-0a0e5d9c7acc336f1"  # Update to your desired AMI
   instance_type          = "t2.micro"
   subnet_id              = element(var.public_subnet_ids, count.index)
   vpc_security_group_ids = [aws_security_group.ec2_sg.id]

   tags = {
     Name = "tf-web-instance-${count.index + 1}"
   }

   user_data = <<-EOF
               #!/bin/bash
               apt-get update
               apt-get install -y apache2
               systemctl restart apache2
               echo '<!DOCTYPE html>
               <html lang="en">
               <head>
                   <meta charset="UTF-8">
                   <meta name="viewport" content="width=device-width, initial-scale=1.0">
                   <title>Instance Status</title>
                   <style>
                       body {
                           font-family: Arial, sans-serif;
                           color: #ffffff;
                           background-color: #af4cab;
                           text-align: center;
                           padding: 50px;
                       }
                       .container {
                           background-color: #333333;
                           border-radius: 10px;
                           padding: 20px;
                           display: inline-block;
                       }
                       h1 {
                           color: #ffffff;
                       }
                   </style>
               </head>
               <body>
                   <div class="container">
                       <h1>Instance ${count.index + 1} is running in the Public subnet</h1>
                   </div>
               </body>
               </html>' > /var/www/html/index.html
               EOF
 }
variables.tf
 variable "vpc_id" {
   description = "The VPC ID"
   type        = string
 }

 variable "public_subnet_ids" {
   description = "List of public subnet IDs"
   type        = list(string)
 }

 variable "instance_count" {
   description = "Number of EC2 instances to create"
   type        = number
 }
 variable "private_subnet_ids" {
   description = "List of private subnet IDs"
   type        = list(string)
 }
outputs.tf
 output "instance_ids" {
   description = "The IDs of the EC2 instances"
   value       = aws_instance.web[*].id
 }

 output "public_ips" {
   description = "The public IP addresses of the EC2 instances"
   value       = aws_instance.web[*].public_ip
 }

 output "private_ips" {
   description = "The private IP addresses of the EC2 instances"
   value       = aws_instance.web[*].private_ip
 }
 output "instance_azs" {
   value = aws_instance.web.*.availability_zone
 }
ALB Module
Purpose: The ALB (Application Load Balancer) module manages traffic distribution across the EC2 instances. It ensures that incoming requests are evenly distributed, providing both high availability and scalability.
Configuration:
Load Balancer Setup: The module creates an Application Load Balancer that sits in front of the EC2 instances. The ALB is deployed in the public subnets, making it accessible from the internet. It handles all incoming traffic and directs it to the appropriate instances based on the rules defined.
Target Groups: Two target groups are created within this module. Each target group contains a subset of the EC2 instances. The instances are dynamically assigned to these target groups based on their distribution across availability zones.
Listener Rules: Listener rules are configured to determine how traffic is routed to the target groups. For example, traffic might first be routed to instances in target group 1, and then to target group 2 if the priority rules change.
Health Checks: The ALB regularly checks the health of the instances in each target group. If an instance is found to be unhealthy, the ALB stops sending traffic to it, ensuring that users only interact with healthy instances.
Security Group: The load balancer is associated with a security group that allows incoming HTTP traffic on port 80. This security group is separate from the one used by the EC2 instances, providing an additional layer of security.
Contribution to the Infrastructure: The ALB module is crucial for ensuring that your web application can handle varying levels of traffic while remaining highly available. By distributing requests across multiple instances and using health checks, the ALB ensures that the application remains responsive even if some instances fail.
main.tf
 resource "aws_security_group" "alb_sg" {
   vpc_id = var.vpc_id

   egress {
     from_port   = 0
     to_port     = 0
     protocol    = "-1"
     cidr_blocks = ["0.0.0.0/0"]
   }

   ingress {
     from_port   = 80
     to_port     = 80
     protocol    = "tcp"
     cidr_blocks = ["0.0.0.0/0"]
   }

   tags = {
     Name = "tf-alb-sg"
   }
 }

 resource "aws_lb" "main" {
   name               = "tf-main-alb"
   internal           = false
   load_balancer_type = "application"
   security_groups    = [aws_security_group.alb_sg.id]
   subnets            = var.public_subnet_ids

   enable_deletion_protection = false
   enable_http2               = true
   enable_cross_zone_load_balancing = true

   tags = {
     Name = "tf-main-alb"
   }
 }

 resource "aws_lb_target_group" "tg1" {
   name     = "tg1"
   port     = 80
   protocol = "HTTP"
   vpc_id   = var.vpc_id

   health_check {
     path                = "/"
     interval            = 10
     timeout             = 5
     healthy_threshold   = 2
     unhealthy_threshold = 2
   }

   tags = {
     Name = "tg1"
   }
 }

 resource "aws_lb_target_group" "tg2" {
   name     = "tg2"
   port     = 80
   protocol = "HTTP"
   vpc_id   = var.vpc_id

   health_check {
     path                = "/"
     interval            = 10
     timeout             = 5
     healthy_threshold   = 2
     unhealthy_threshold = 2
   }

   tags = {
     Name = "tg2"
   }
 }

 resource "aws_lb_listener" "http" {
   load_balancer_arn = aws_lb.main.arn
   port              = 80
   protocol          = "HTTP"

   default_action {
     type = "fixed-response"
     fixed_response {
       content_type = "text/plain"
       message_body = "This is a default response"
       status_code  = "200"
     }
   }
 }

 resource "aws_lb_listener_rule" "tg1_rule" {
   listener_arn = aws_lb_listener.http.arn
   priority     = 400

   action {
     type             = "forward"
     target_group_arn = aws_lb_target_group.tg1.arn
   }

   condition {
     path_pattern {
       values = ["/*"]
     }
   }
 }

 resource "aws_lb_listener_rule" "tg2_rule" {
   listener_arn = aws_lb_listener.http.arn
   priority     = 200

   action {
     type             = "forward"
     target_group_arn = aws_lb_target_group.tg2.arn
   }

   condition {
     path_pattern {
       values = ["/*"]
     }
   }
 }

 # First, attach half (or roughly half) of the instances to the first target group
 resource "aws_lb_target_group_attachment" "tg1_attachment" {
   count               = ceil(length(var.instance_ids) / 2)
   target_group_arn    = aws_lb_target_group.tg1.arn
   target_id           = element(var.instance_ids, count.index)
   port                = 80
 }

 # Attach the remaining instances to the second target group
 resource "aws_lb_target_group_attachment" "tg2_attachment" {
   count               = length(var.instance_ids) - ceil(length(var.instance_ids) / 2)
   target_group_arn    = aws_lb_target_group.tg2.arn
   target_id           = element(var.instance_ids, count.index + ceil(length(var.instance_ids) / 2))
   port                = 80
 }
variables.tf
 variable "vpc_id" {
   description = "The VPC ID"
   type        = string
 }

 variable "public_subnet_ids" {
   description = "List of public subnet IDs"
   type        = list(string)
 }

 variable "private_subnet_ids" {
   description = "List of private subnet IDs"
   type        = list(string)
 }

 variable "instance_ids" {
   description = "List of EC2 instance IDs"
   type        = list(string)
 }
outputs.tf
 output "alb_arn" {
   value = aws_lb.main.arn
 }

 output "tg1_arn" {
   value = aws_lb_target_group.tg1.arn
 }

 output "tg2_arn" {
   value = aws_lb_target_group.tg2.arn
 }

 output "alb_dns_name" {
   value       = aws_lb.main.dns_name
   description = "The DNS name of the Application Load Balancer"
 }
Once you have written the code, you can perform terraform commands from code space or Visual Studio Code or Server.
Terraform Execution
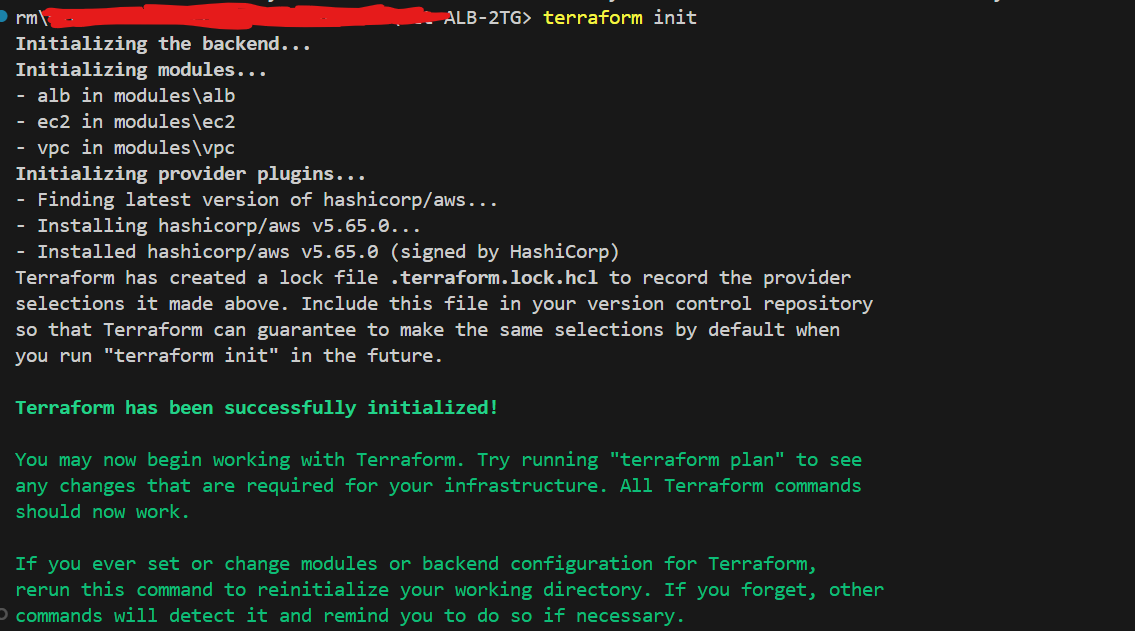
terraform init:
When you run terraform init, Terraform initializes the project by preparing the working directory. This command sets up the necessary files and downloads the required plugins and modules. Here’s a brief breakdown:
Plugin Installation: Terraform downloads the provider plugins (like AWS) specified in your configuration files. These plugins allow Terraform to interact with the respective cloud providers. The plugins are stored in a hidden directory called .terraform, which is created in your working directory.
Module Retrieval: If you are using any remote modules (though in this case, you’re using local modules), Terraform fetches and installs them. It ensures that the module versions are consistent with the ones specified in your code.
Backend Initialization: If you’re using a remote backend to store your state files (like S3), Terraform will initialize the backend and prepare it to store the state.
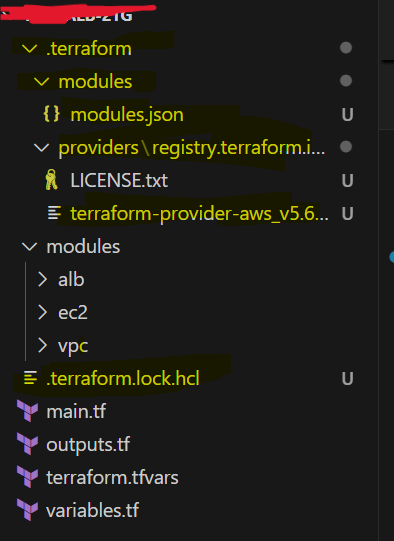
Creation of Lock File: Terraform creates or updates the .terraform.lock.hcl file, which ensures that future Terraform runs use the same versions of the providers to maintain consistency.
Files Added/Modified: .terraform/ directory: Contains the downloaded provider plugins and other necessary files. .terraform.lock.hcl: A lock file that records the exact provider versions used.
Newly added files
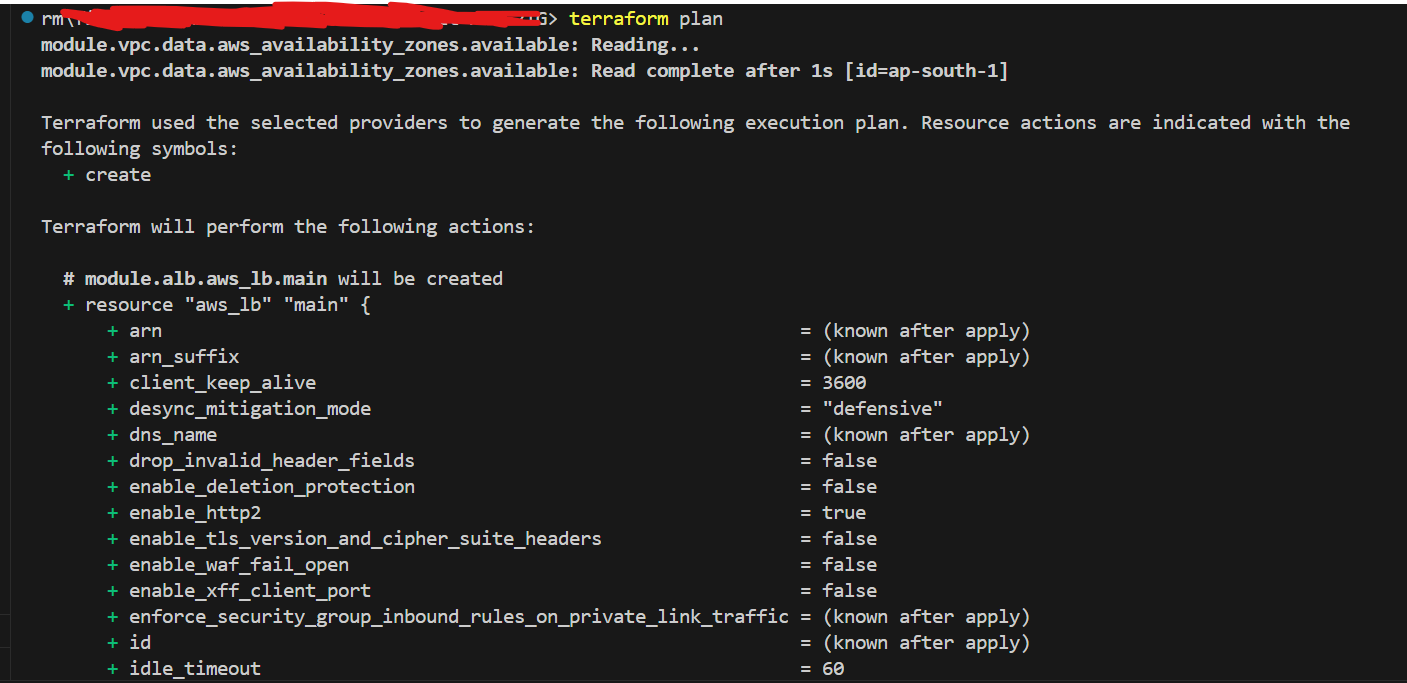
terraform plan:
When you run terraform plan, Terraform generates an execution plan, showing you what actions it will take to achieve the desired state described in your configuration files.
Refresh State: Terraform refreshes the current state by querying the infrastructure provider (e.g., AWS) to ensure it has the latest information.
Dependency Graph: Terraform builds a graph of all resources, understanding dependencies to determine the order of operations.
Execution Plan: Terraform compares the current state of your infrastructure with the desired state defined in your configuration. It then outputs a detailed list of actions it will take, categorized as create, update, or destroy.
This plan allows you to review changes before applying them.
No Changes Detected: If the infrastructure is already in the desired state, Terraform will output that no changes are necessary.
No Files Added/Modified: The plan itself doesn’t create or modify files, but it gives you a preview of what will happen during apply.
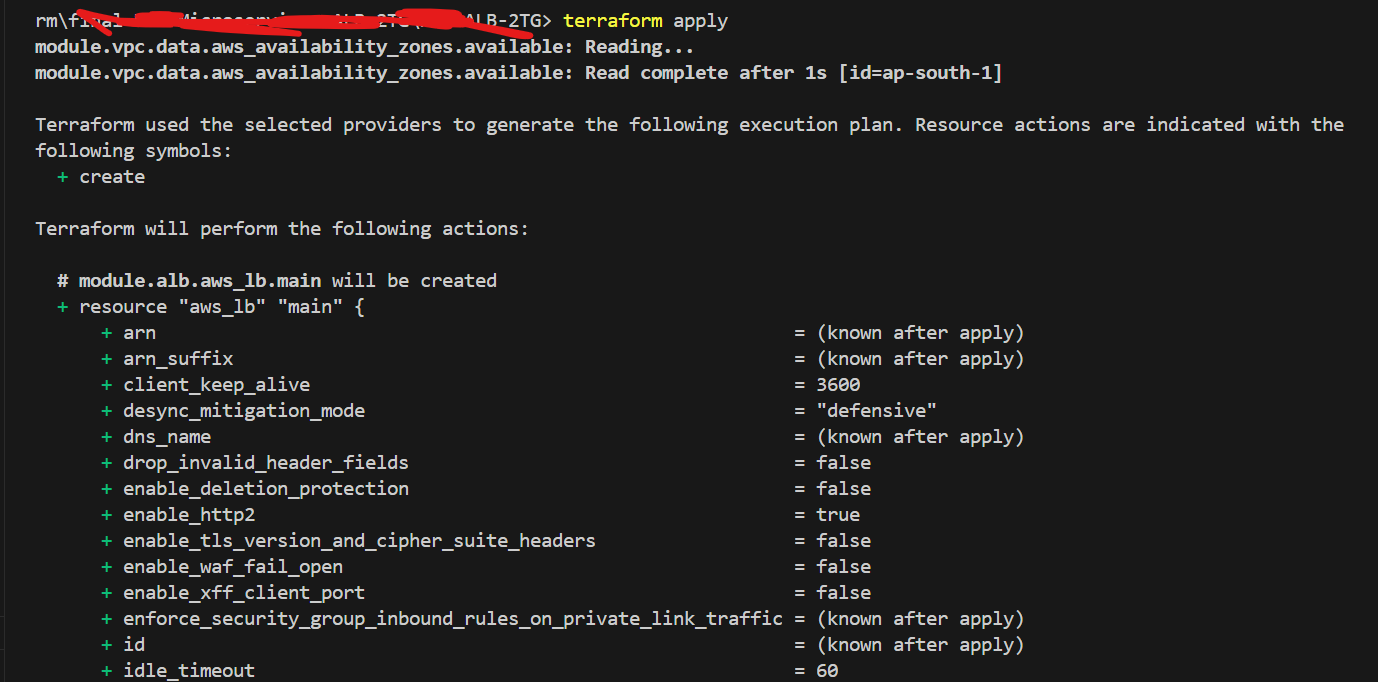
terraform apply:
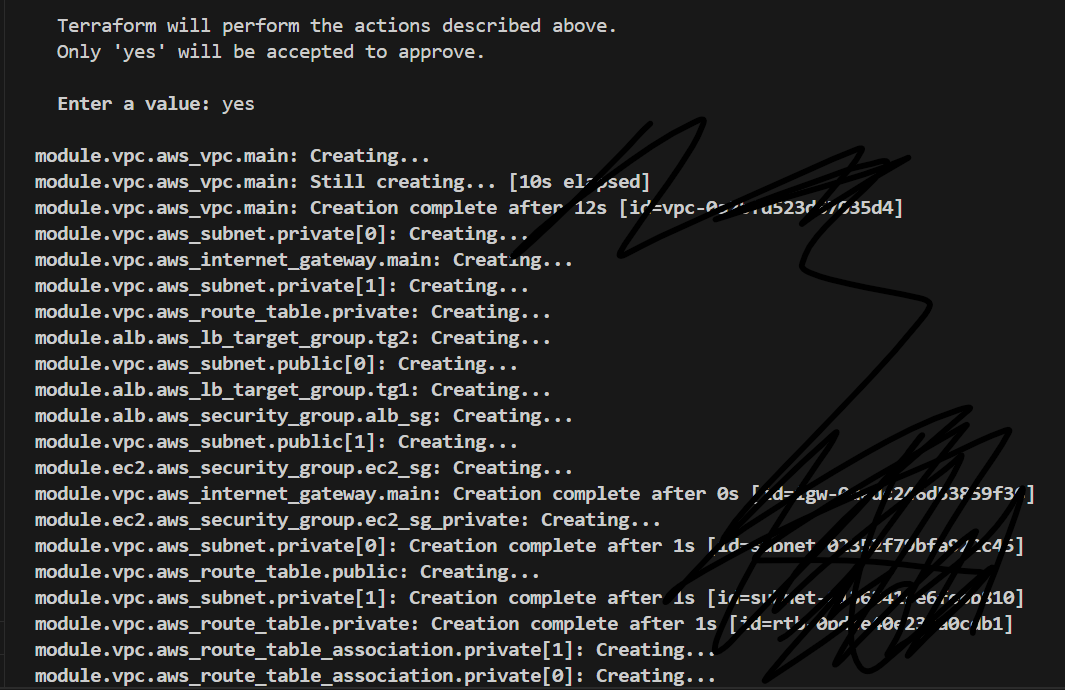
Applies the changes and deploys the infrastructure. When you run terraform apply, Terraform executes the actions planned during the terraform plan phase and makes the necessary changes to your infrastructure.
Confirmation: Terraform shows you the plan again and asks for confirmation before proceeding.
Resource Creation/Modification/Deletion: Terraform executes the changes in the correct order based on the dependency graph. It will create new resources, modify existing ones, or destroy resources that are no longer needed.
State File Update: After the changes are applied, Terraform updates the state file (terraform.tfstate) to reflect the current state of the infrastructure. The state file is crucial as it keeps track of all the resources managed by Terraform.
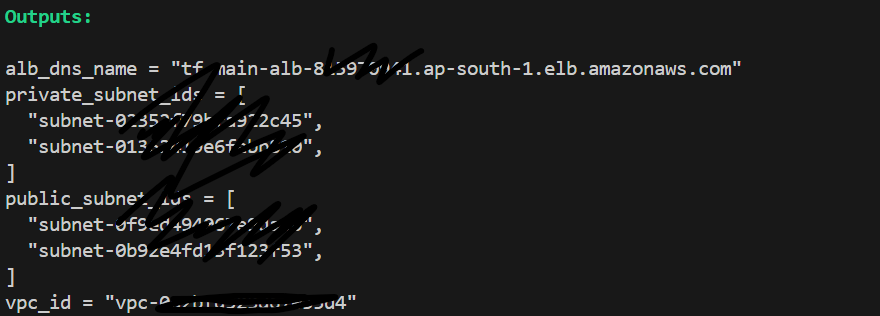
Outputs: If you have defined output variables, Terraform will display their values after the apply completes. For example, the DNS name of the ALB.
Files Added/Modified: terraform.tfstate: Updated to reflect the current state of your infrastructure after applying the changes.
terraform.tfstate.backup: A backup of the previous state file, saved before the changes are applied. This process ensures that your infrastructure is managed in a controlled and predictable way, with full visibility into what changes are being made and why.
Demonstrating the Project with AWS Console: Step-by-Step Explanation with Screenshots
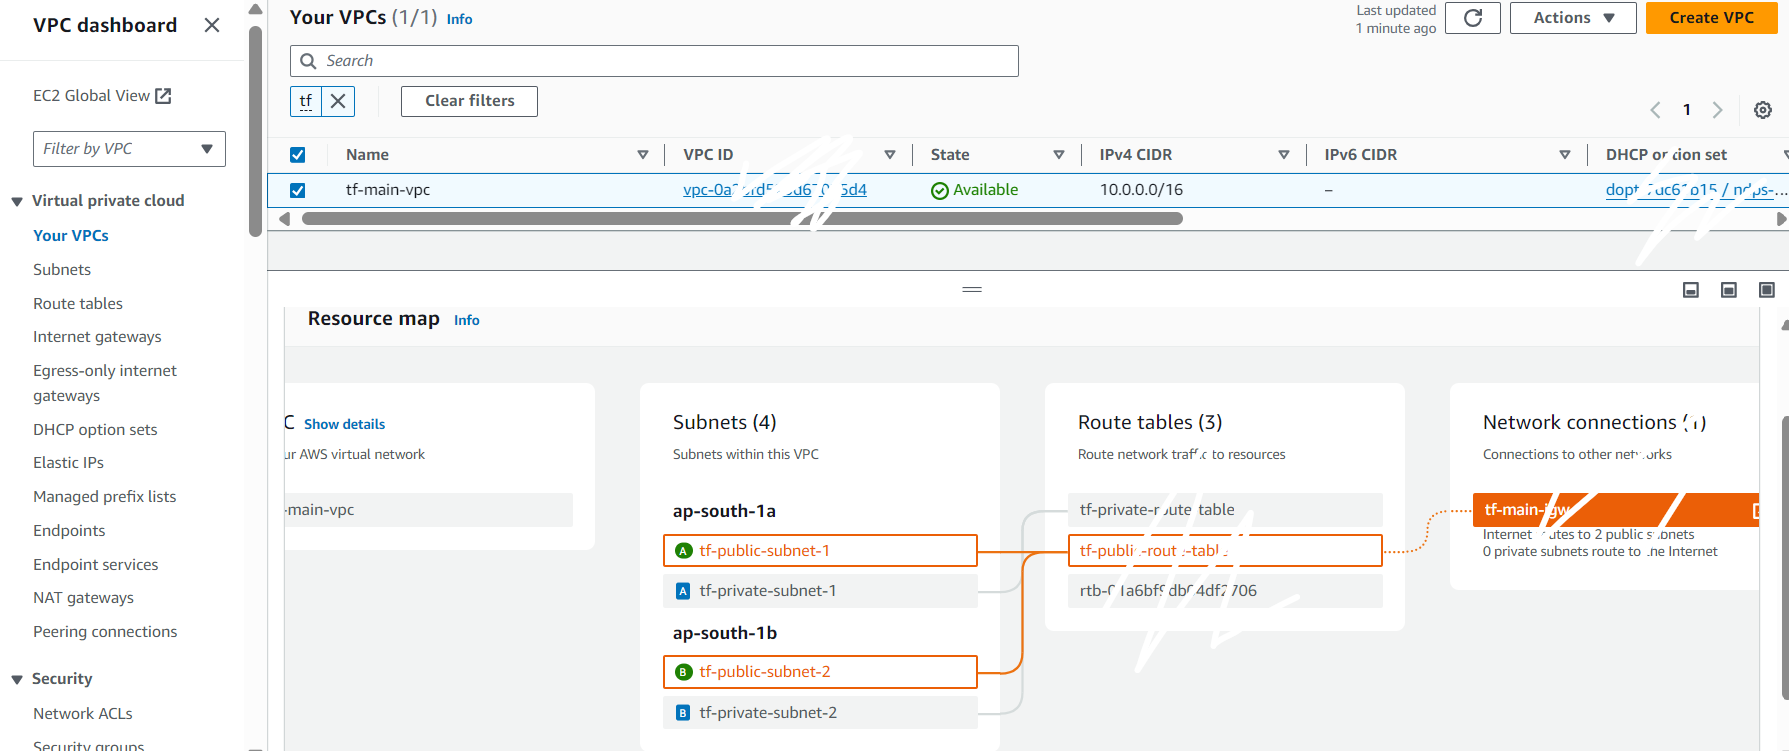
VPC Overview :
Explanation: The VPC was created with a 10.0.0.0/16 CIDR block, providing ample IP addresses for subnets. The VPC spans two availability zones, ensuring high availability and redundancy.
Subnets Overview
Explanation: Two public subnets and two private subnets were created, each in different availability zones. This ensures that the resources are distributed across multiple AZs for better fault tolerance.

Route Tables and Internet Gateway
Explanation: Public subnets are associated with a route table that routes internet traffic through the Internet Gateway, enabling instances in public subnets to communicate with the internet. The private subnets are associated with a route table that doesn’t allow direct internet access, keeping these instances isolated.


Security Groups

EC2 Instances:
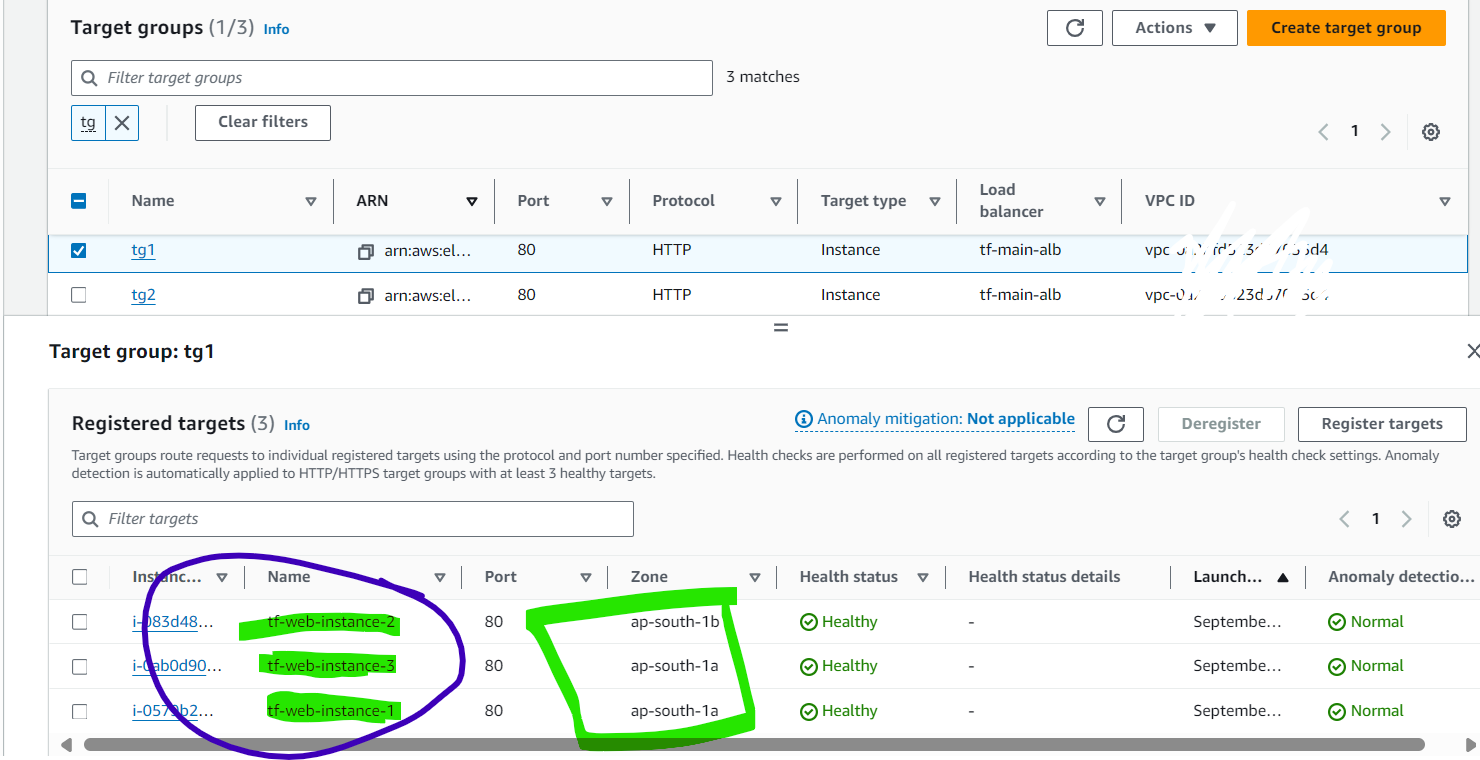
Explanation: Instances are launched alternately in the two availability zones. For example, if you have four instances, Instance 1 and Instance 3 are in AZ1, and Instance 2 and Instance 4 are in AZ2. This ensures that your application remains available even if one AZ experiences an issue.

EC2 User Data Configuration:
Explanation: The user data script installs Apache and customizes the index.html file with details such as the instance number and availability zone. This information is displayed when accessing the instance via the browser.
Load Balancer (ALB) Configuration
Explanation: The ALB is configured to distribute traffic across multiple instances. The ALB’s DNS name is what you use to access your application. Initially, the ALB will direct traffic based on the target group priorities.
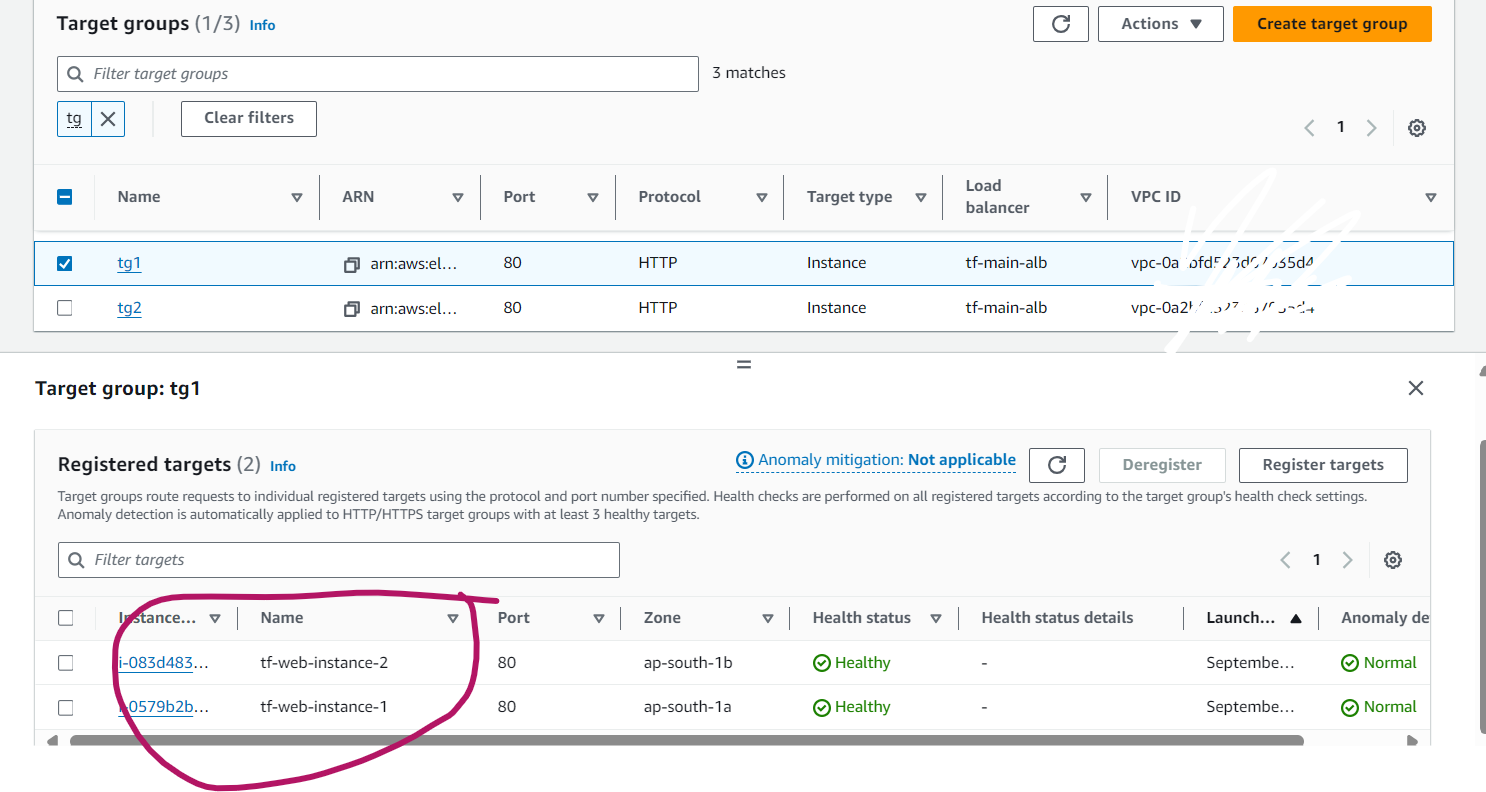
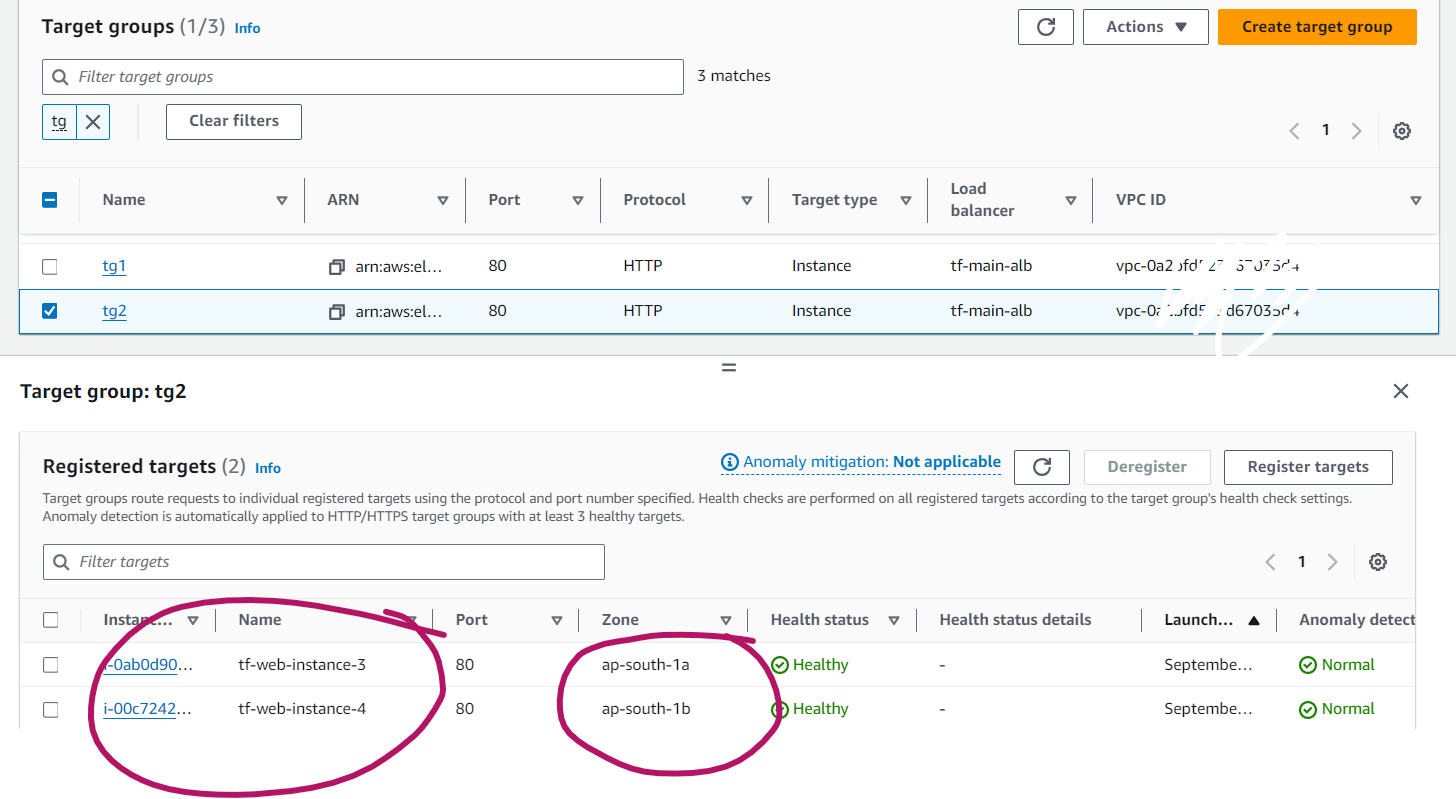
Target Groups (TG) Configuration:
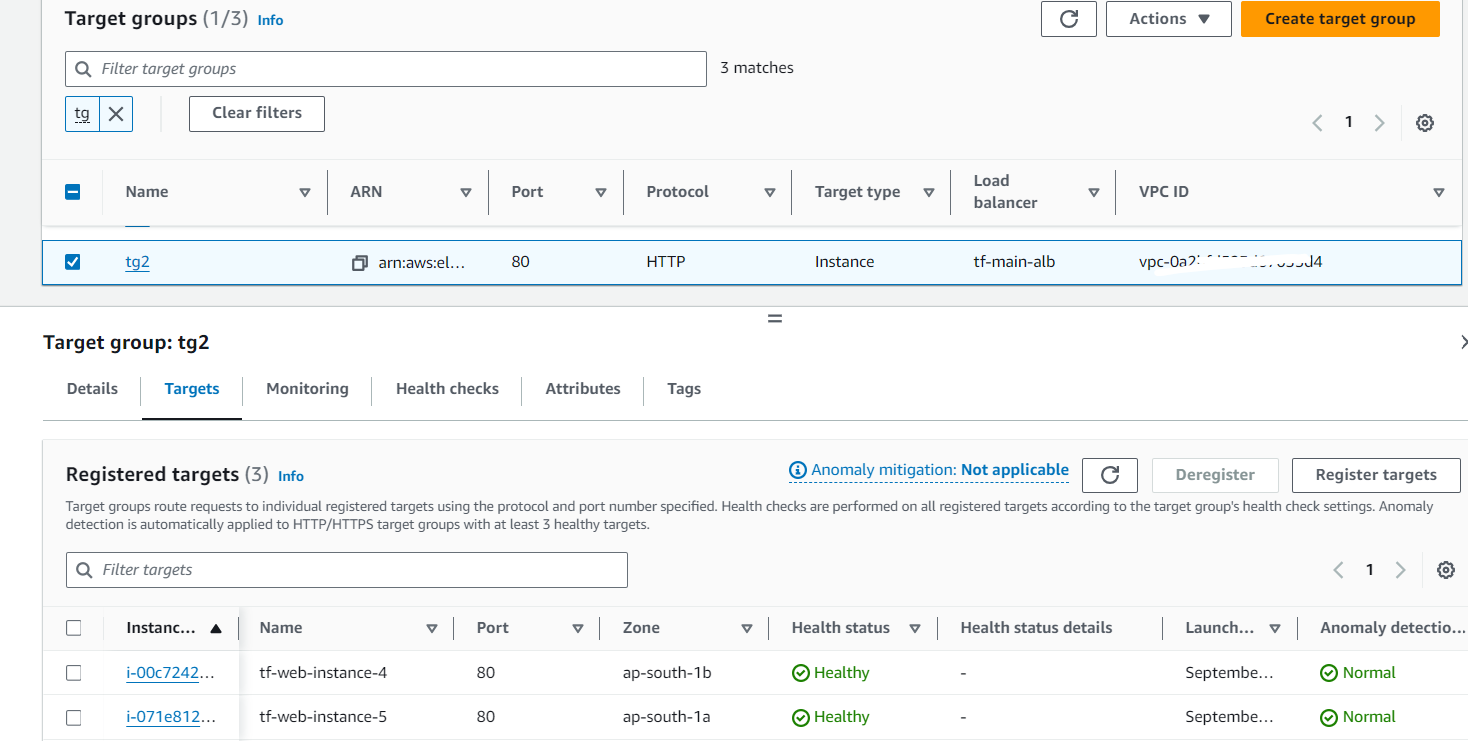
Explanation: The target groups are configured to distribute traffic across instances in both availability zones. TG1 might initially have instances 1 and 2, while TG2 might have instances 3 and 4.
Demonstrating ALB DNS Access:
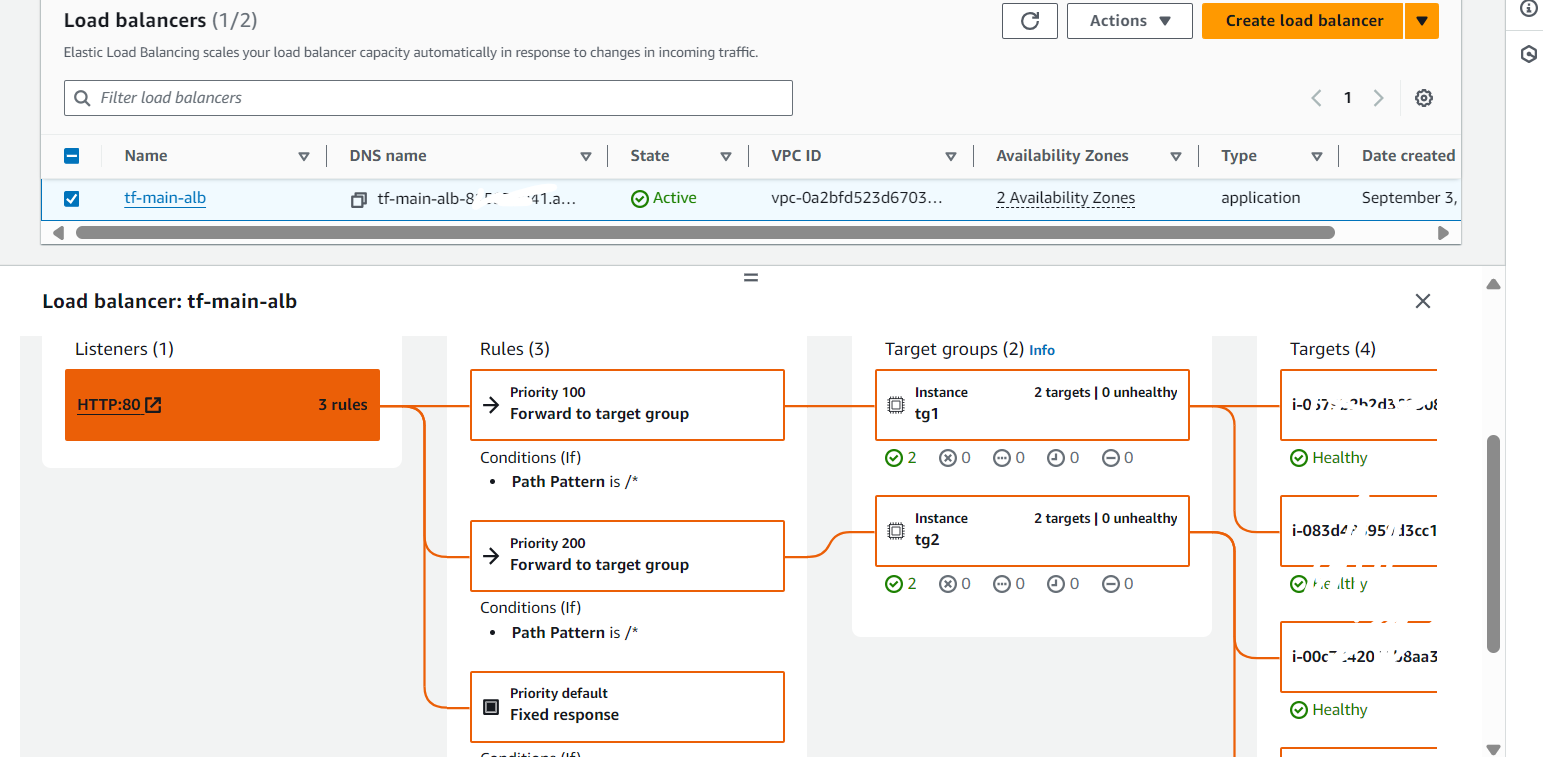
Explanation: When you first access the ALB DNS, traffic is routed to TG1 (because of its higher priority), and you’ll see the output from instances 1 and 2.


Changing Target Group Priority
Explanation: Change TG1’s priority from 100 to 400. After this change, the ALB will direct traffic to TG2 instead, so when you refresh the ALB DNS in your browser, you should see the output from instances 3 and 4.
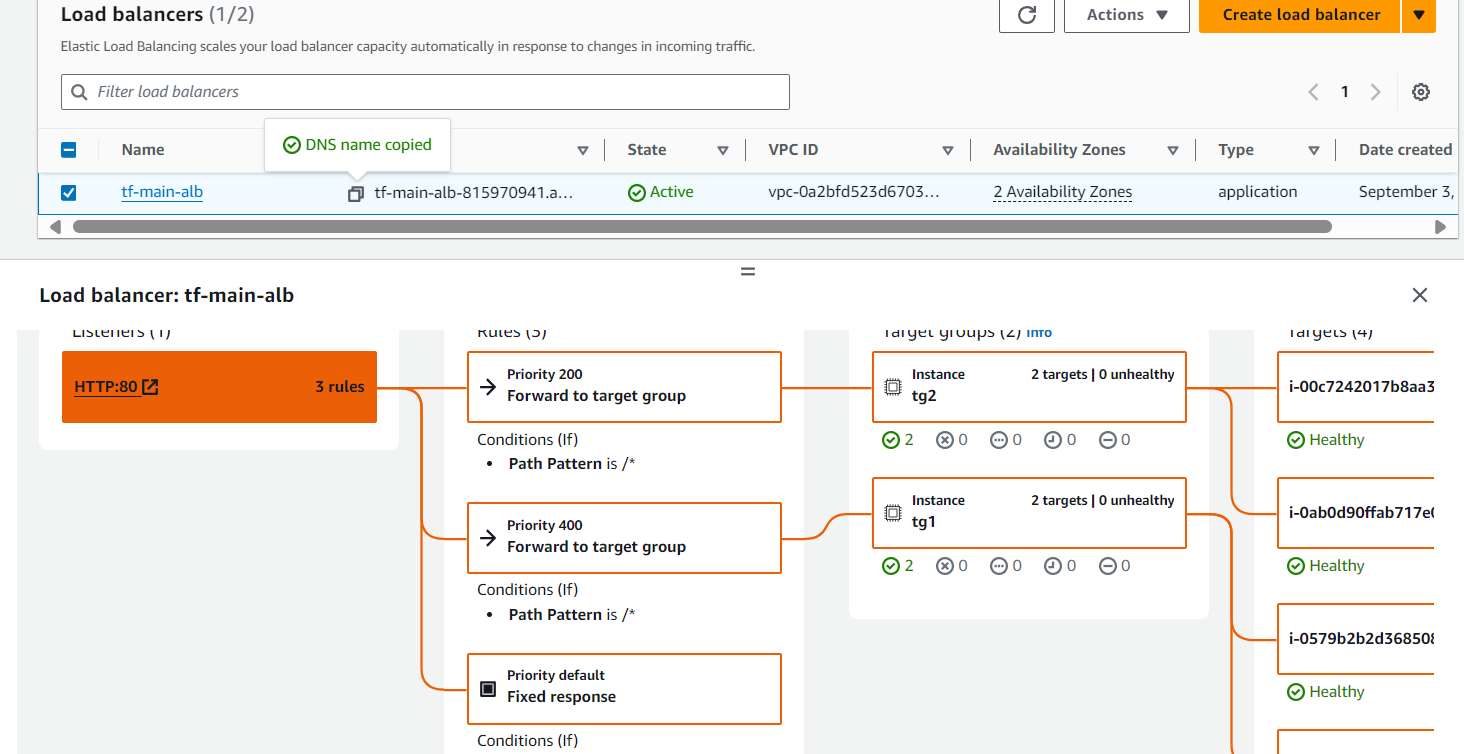


Scaling the Number of Instances: Demonstrate the process of updating the instance count in the Terraform configuration and applying the changes.
Explanation: Increasing the instance count to 5 or 7 involves updating the Terraform configuration and running terraform apply. Instances will continue to be distributed across the availability zones, ensuring a balanced load. As the number of instances increases, they will be automatically attached to the appropriate target groups based on the logic defined in your Terraform code.
Example: If you scale to 5 instances, the first 3 might go to TG1 (if it has a higher priority), and the remaining 2 will go to TG2. If you later change the priority, the traffic will shift to the target group with the new priority. 11. Conclusion Screenshot Description: Capture the final state of your infrastructure, showing all resources deployed and their statuses. Explanation: The project demonstrates the dynamic scaling and high availability of your application infrastructure using Terraform and AWS. You can see how Terraform's automation capabilities allow for easy scaling and management of resources across multiple availability zones, ensuring both resilience and efficiency. Testing the Application in a Browser After making any changes, access the ALB DNS in your browser. Refresh the page after changing target group priorities to observe how traffic is routed to different instances based on the target group configuration. AWS Console Notes When taking screenshots, ensure to focus on the relevant sections of the AWS Console that reflect the configurations mentioned. For instance, the VPC overview should clearly show the CIDR block and subnets, while the EC2 instance details should highlight the availability zone and instance ID. Conclusion The Terraform project successfully demonstrates the creation and management of a VPC, EC2 instances, and an ALB with target groups. The dynamic routing based on target group priorities showcases how traffic management can be automated and adjusted on the fly to respond to changing conditions or needs. This detailed documentation with AWS Console screenshots provides a clear and thorough explanation of each step, helping you or others understand the project’s setup, configuration, and testing process.

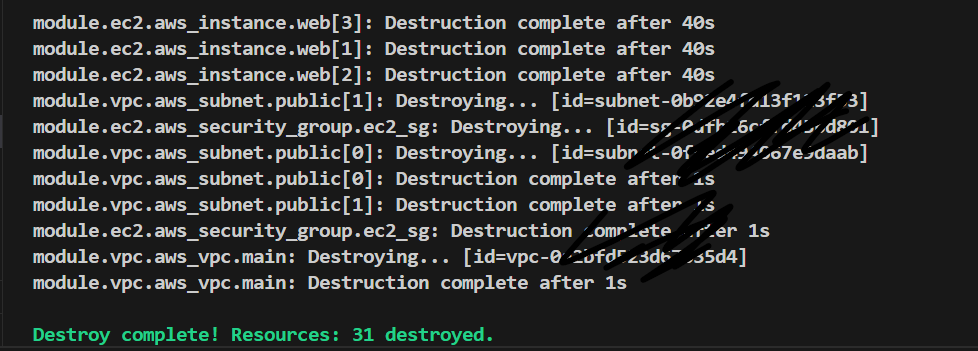
terraform destroy:
Destroys the deployed infrastructure one resource at a time.
This project, through its modular design, demonstrates how to build a robust, scalable, and secure web application infrastructure on AWS using Terraform. Each module is responsible for a specific aspect of the infrastructure, from networking and compute resources to load balancing and traffic management. The use of Terraform modules allows for easy replication, scaling, and modification of the infrastructure as needed.
Conclusion
This Terraform project demonstrates the power of Infrastructure as Code (IaC) for automating complex AWS deployments. By structuring the project into modular components, it becomes easier to manage, scale, and maintain the infrastructure. The dynamic allocation of instances to target groups ensures an even distribution of traffic, enhancing the performance and reliability of the application.
Subscribe to my newsletter
Read articles from Shraddha Suryawanshi directly inside your inbox. Subscribe to the newsletter, and don't miss out.
Written by
