"Mastering CSS: A Comprehensive Guide to Selectors, Pseudo-Elements, and Best Practices"
 Rohit Gawande
Introduction to CSS
CSS, or Cascading Style Sheets, is a cornerstone technology used to define the presentation of web pages. It enables you to control the layout, colors, fonts, and overall aesthetic of a website. When we first start learning CSS, a common practice is to directly style HTML elements within the same file. For instance, we might use a simple rule like:
p {
    color: red;
}
While this approach is functional, it's not the most efficient or scalable method, especially as your project grows. A better practice is to use external CSS files, linked to your HTML document using the <link> tag. This allows you to separate your content (HTML) from your presentation (CSS), making your code cleaner and more manageable. But before diving into external CSS, it's crucial to understand selectors, which are fundamental in applying styles to specific elements on your webpage.
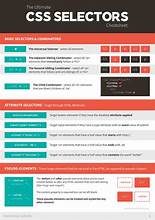
Understanding Selectors
Selectors are the foundation of CSS. They allow you to target HTML elements and apply styles to them. Let's explore the various types of selectors and how they work:
Universal Selector
The universal selector is represented by an asterisk (
*). It selects all elements on a page and applies the specified styles to them. For example:* { padding: 0; background-color: #4d4d4d; color: #ffffff; }
This rule resets the padding of all elements and sets a uniform background and text color across the entire page. It's useful for applying global styles but should be used sparingly, as it can override more specific rules.
2. Individual Selector
The individual selector targets specific HTML elements by their tag name. For example:
p {
       background-color: #d1ea76;
}
This rule targets all <p> (paragraph) elements and applies a light green background color. Individual selectors are straightforward but can become cumbersome if you need to apply the same style to multiple elements.
Class and ID Selectors
Class and ID selectors are more specific than individual selectors. A class selector is prefixed with a dot (
.) and can be applied to multiple elements:.warning { background-color: #ef9323; color: #ffffff; }This
.warningclass applies an orange background and white text to any element that has theclass="warning"attribute.An ID selector is prefixed with a hash (`#`) and is unique to a single element:
#danger {
       background-color: #066344;
       color: #ffffff;
}
The #danger ID selector targets only one specific element, which should be unique on the page.
Chained (And) Selector
Chained selectors allow you to apply styles to elements that match multiple criteria. For example:
 li.bg-black {
 background-color: #dccdcd;
 }
This rule targets <li> elements that also have the bg-black class. Chained selectors are powerful for creating specific and targeted styles.
5. Combined Selector
Combined selectors allow you to group multiple selectors together, applying the same styles to each. For example:
span, li {
       background-color: #5709b6;
}
This rule applies the same background color to both <span> and <li> elements. Combined selectors help reduce code duplication and improve readability.
Nested (Descendant) Selector
Descendant selectors target elements nested within other elements. For example:
 div ul li {
 background-color: #0d8def;
 }
This rule targets <li> elements that are inside an <ul>, which is itself inside a <div>. Descendant selectors allow you to apply styles based on the structure of your HTML.
7. Direct Child Selector
The direct child selector (`>`) targets only the immediate children of a specific element. For example:
div > li {
       background-color: #9df213;
}
This rule applies to <li> elements that are direct children of a <div>. It won't apply to <li> elements nested deeper within other elements. Direct child selectors are useful when you want to limit the scope of your styles.
Sibling Selector
Sibling selectors target elements that share the same parent and are adjacent to each other. The general sibling selector (
~) and the adjacent sibling selector (+) are used for this purpose:.sibling + p { background-color: #400505; }
Difference Between Class and ID
In CSS, classes and IDs serve different purposes. A class can be applied to multiple elements, making it ideal for styling recurring elements on your webpage. For example, you might use a class to style all buttons or sections that share the same design
.button {
    background-color: #28a745;
    color: white;
    padding: 10px;
}
An ID, on the other hand, is unique and should only be applied to one element on the page. It's typically used for elements that require unique styling or need to be targeted specifically, such as a navigation menu or a footer.
#header {
    background-color: #333;
    color: white;
    padding: 20px;
}
IDs are also often used in JavaScript for selecting and manipulating specific elements. While classes provide flexibility, IDs offer precision, and it's crucial to use them appropriately to maintain clean and maintainable code.
Understanding Direct Child vs. Descendant Selectors
Direct child and descendant selectors are crucial for understanding the hierarchical structure of your HTML. In the example:
<div>
    <li>awesome</li>
    <ul>
        <li>Highlight me</li>
        <li>Highlight me</li>
    </ul>
</div>
The <li> and <ul> elements are direct children of the <div>. However, the <li> elements inside the <ul> are not direct children of the <div> but are descendants. This distinction is important when applying styles, as it allows you to target elements with precision. Direct child selectors (>) are useful when you want to apply styles to elements directly under a parent, without affecting nested elements. Descendant selectors, on the other hand, apply styles to all nested elements within a parent, regardless of their depth in the hierarchy.
Block vs. Inline Elements
HTML elements are classified as either block-level or inline elements. Block-level elements, like <h1>, <div>, and <p>, take up the entire width of their container and start on a new line. They are used for structuring the layout of a webpage. For example:
<h1>This is a block-level element</h1>
<p>This paragraph is also a block-level element.</p>
Inline elements, like <span>, <a>, and <strong>, only take up as much space as their content requires and do not start on a new line. They are used for styling specific parts of text within block-level elements without disrupting the flow of the document. For example:
<p>This is a <span>highlighted</span> word in a paragraph.</p>
Understanding the difference between block-level and inline elements is crucial for effective web design. Block-level elements are best for creating structure and layout, while inline elements are perfect for applying specific styles within a block of text.
Pseudo-Selectors: Before and After
Pseudo-selectors in CSS allow you to apply styles to elements based on their state or position in the document. Two of the most powerful pseudo-selectors are :before and :after, which insert content before or after an element's content, respectively. These pseudo-elements are commonly used for adding decorative content or icons without modifying the HTML.
For example, let's consider a hover effect using :before:
.imp-label:hover:before {
    content: ' ';
    display: block;
    width: 20px;
    height: 20px;
    background-color: orange;
    border-radius: 10px;
}
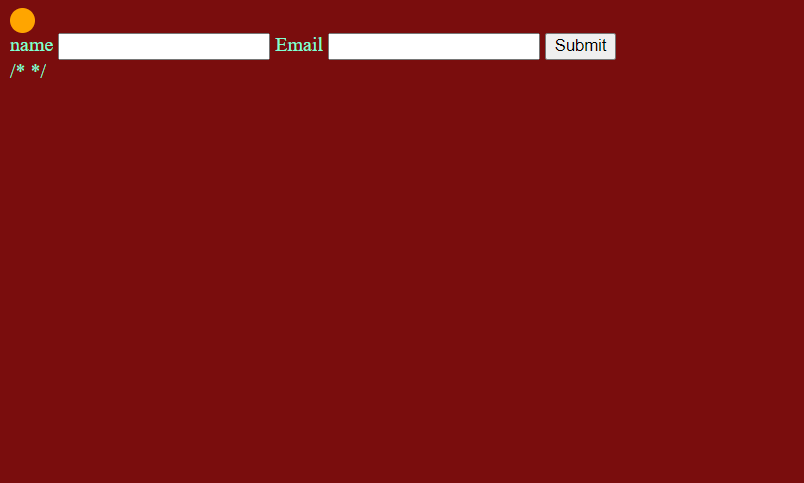
In this example, when a user hovers over an element with the class imp-label, a small orange circle appears before the label. This is a simple yet effective way to enhance user interaction and visual appeal.
Similarly, the :after pseudo-element can be used to add content after an element. For example:
.imp-label:hover:after {
    content: ' ✓';
    color: green;
}
This rule adds a green checkmark after the label when it is hovered over, providing immediate visual feedback to the user.
Results and Examples
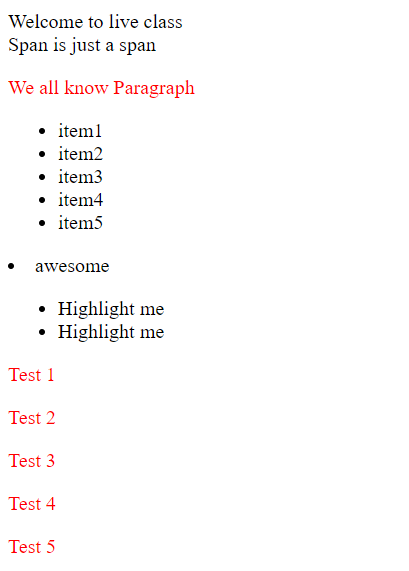
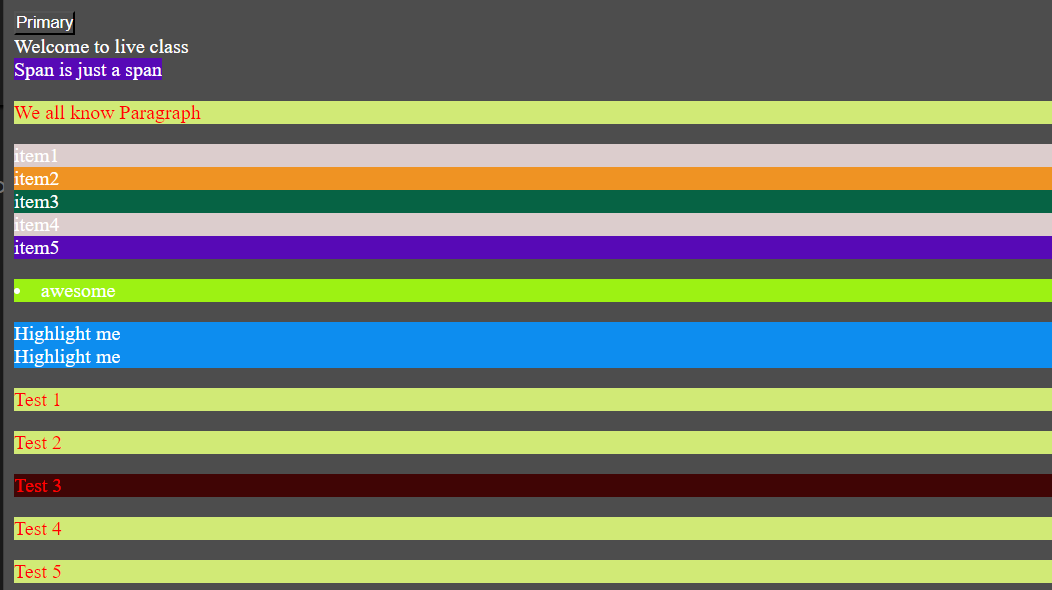
Below, I am sharing the results of all the code snippets and examples I have written. These examples illustrate various CSS concepts, including selectors, pseudo-elements, and best practices. Each snippet demonstrates different aspects of CSS and how they can be applied to style web pages effectively.
Feel free to explore the code and see how the styles are applied in practice!
<!DOCTYPE html>
<html lang="en">
<head>
    <meta charset="UTF-8">
    <meta name="viewport" content="width=device-width, initial-scale=1.0">
    <title>Basic</title>
    <style >
        p{
            color: red;
        }
    </style>
</head>
<body>
    <div>Welcome to live class</div>
    <span>Span is just a span</span>
    <p>We all know Paragraph</p>
    <ul>
        <li class="bg-black text-white">item1</li>
        <li>item2</li>
        <li>item3</li>
        <li>item4</li>
        <li>item5</li>
    </ul>
    <div>
        <li>awesome</li>
        <ul>
            <li>Highlight me</li>
            <li>Highlight me</li>
        </ul>
    </div>
    <section>
        <p>Test 1</p>
        <p class="sibling">Test 2</p>
        <p>Test 3</p>
        <p>Test 4</p>
        <p>Test 5</p>
    </section>
</body>
</html>

<!DOCTYPE html>
<html lang="en">
<head>
    <meta charset="UTF-8">
    <meta name="viewport" content="width=device-width, initial-scale=1.0">
    <title>External</title>
    <link rel="stylesheet" href="style.css">
    <style>
        /* 1.Univarsal Selector */
        *{
            padding: 0;
            background-color: #4d4d4d;
            /* ui color picker */
            color: #ffffff;
        }

    /* 2.Individual Selector */
    p{
        background-color: #d1ea76;
    }
    /* 3.class and id Selector */
    .warning {
        background-color: #ef9323;
        color: #ffffff ;
    }
    #danger{
        background-color: #066344;
        color: #ffffff ;
    }
    /* 4.and selector(Chained) */
    li.bg-black{
        background-color: #dccdcd;
    }
    /* 5.combined Selector */
    span,li{
        background-color: #5709b6;
    }
    /* 6.inside an element */
    div ul li{
        background-color: #0d8def;
    }
    /* 7.direct child */
    div>li{
        background-color: #9df213;
    }
    /* 8. sibling ~ or + --> */
    .sibling + p{
        background-color: #400505;
    }
    </style>
</head>
<body>

    <button type="button" class="btn btn-primary">Primary</button>
    <div>Welcome to live class</div>
    <span>Span is just a span</span>
    <p>We all know Paragraph</p>
    <ul>
        <li class="bg-black text-white">item1</li>
        <li class="warning">item2</li>
        <li id="danger">item3</li>
        <li class="bg-black">item4</li>
        <li>item5</li>
    </ul>
    <div>
        <li>awesome</li>
        <ul>
            <li>Highlight me</li>
            <li>Highlight me</li>
        </ul>
    </div>
    <section>
        <p>Test 1</p>
        <p class="sibling">Test 2</p>
        <p >Test 3</p>
        <p>Test 4</p>
        <p>Test 5</p>
    </section>
</body>
</html>

<!DOCTYPE html>
<html lang="en">
<head>
    <meta charset="UTF-8">
    <meta name="viewport" content="width=device-width, initial-scale=1.0">
    <title>Document</title>
    <style>
        body{
            background-color: #7a0d0d;
            color: aquamarine;
        }
        /* before*/
        .imp-label:hover:before{
            content: ' ';
            display: block;
            width: 20px;
            height: 20px;
            background-color: orange;
            border-radius: 10px;
        }

        /*after : : part of label*/
    </style>
</head>
<body>
    <div>
        <form action="">
            <label class="imp-label" for="name">name</label>
            <input type="text" name="name"/>

            <label for="email">Email</label>
            <input type="text" name="email" />

            <button data-tooltip="Tooltip" type="submit">Submit</button>

        </form>
    </div>
    /*
    */
</body>
</html>

Conclusion
CSS is a powerful tool for styling web pages, and mastering its basics—such as selectors, class vs. ID usage, child vs. descendant relationships, block vs. inline elements, and pseudo-selectors—will significantly improve your web development skills. By applying best practices, such as separating CSS from HTML, using specific selectors, and understanding how different properties interact, you can create more maintainable, efficient, and visually appealing websites. As you continue to refine your skills, you'll find that CSS provides the flexibility and power needed to bring your web design visions to life.
Feel free to share this post and leave your feedback!
Related Content:
Connect:
Let’s discuss more about Java and coding! Feel free to leave a comment below or connect with me on LinkedIn.
Thank you for taking the time to read this post! Your interest and feedback help improve the content and make learning more engaging for everyone.
Subscribe to my newsletter
Read articles from Rohit Gawande directly inside your inbox. Subscribe to the newsletter, and don't miss out.
Written by
Rohit Gawande
Rohit Gawande
🚀 Tech Enthusiast | Full Stack Developer | System Design Explorer 💻 Passionate About Building Scalable Solutions and Sharing Knowledge Hi, I’m Rohit Gawande! 👋I am a Full Stack Java Developer with a deep interest in System Design, Data Structures & Algorithms, and building modern web applications. My goal is to empower developers with practical knowledge, best practices, and insights from real-world experiences. What I’m Currently Doing 🔹 Writing an in-depth System Design Series to help developers master complex design concepts.🔹 Sharing insights and projects from my journey in Full Stack Java Development, DSA in Java (Alpha Plus Course), and Full Stack Web Development.🔹 Exploring advanced Java concepts and modern web technologies. What You Can Expect Here ✨ Detailed technical blogs with examples, diagrams, and real-world use cases.✨ Practical guides on Java, System Design, and Full Stack Development.✨ Community-driven discussions to learn and grow together. Let’s Connect! 🌐 GitHub – Explore my projects and contributions.💼 LinkedIn – Connect for opportunities and collaborations.🏆 LeetCode – Check out my problem-solving journey. 💡 "Learning is a journey, not a destination. Let’s grow together!" Feel free to customize or add more based on your preferences! 😊