Integrating QuickBlox AI Answer Assist into a React Application
 Sayantani Deb
Hey, fellow devs! 👋 Are you looking to add some AI magic ✨ to your React app? Well, you’re in the right place. Today, we're diving into integrating QuickBlox AI Answer Assist into your React application. This powerful tool will not only make your app smarter but also give your users the instant responses they crave. Let’s get started!
Why Should You Care About QuickBlox AI Answer Assist? 🤔
Great question! Imagine you’re building an app, and your users start asking all sorts of questions. You could spend hours (or even days) coding up a solution from scratch. OR you could integrate QuickBlox AI Answer Assist and let it handle those queries for you. It’s like having a super-smart assistant in your app, ready to answer user questions 24/7. Pretty cool, right?
Here’s the deal:
Automate Customer Support: No more manually responding to every single query. The AI does the heavy lifting.
Boost User Interaction: Keep your users engaged with intelligent and relevant responses.
Easy Integration: You don’t need to be an AI wizard to get this up and running. We’ll walk you through it step by step.
Prerequisites 🛠️
Before we dive into the code, make sure you have the following:
Node.js Installed: If you haven’t installed Node.js yet, grab it here.
A Basic Understanding of React: You don’t need to be a React pro, but a working knowledge will help.
A QuickBlox Account: If you don’t have one, sign up here.
Steps to be followed:
Step 1: create a QuickBlox Account
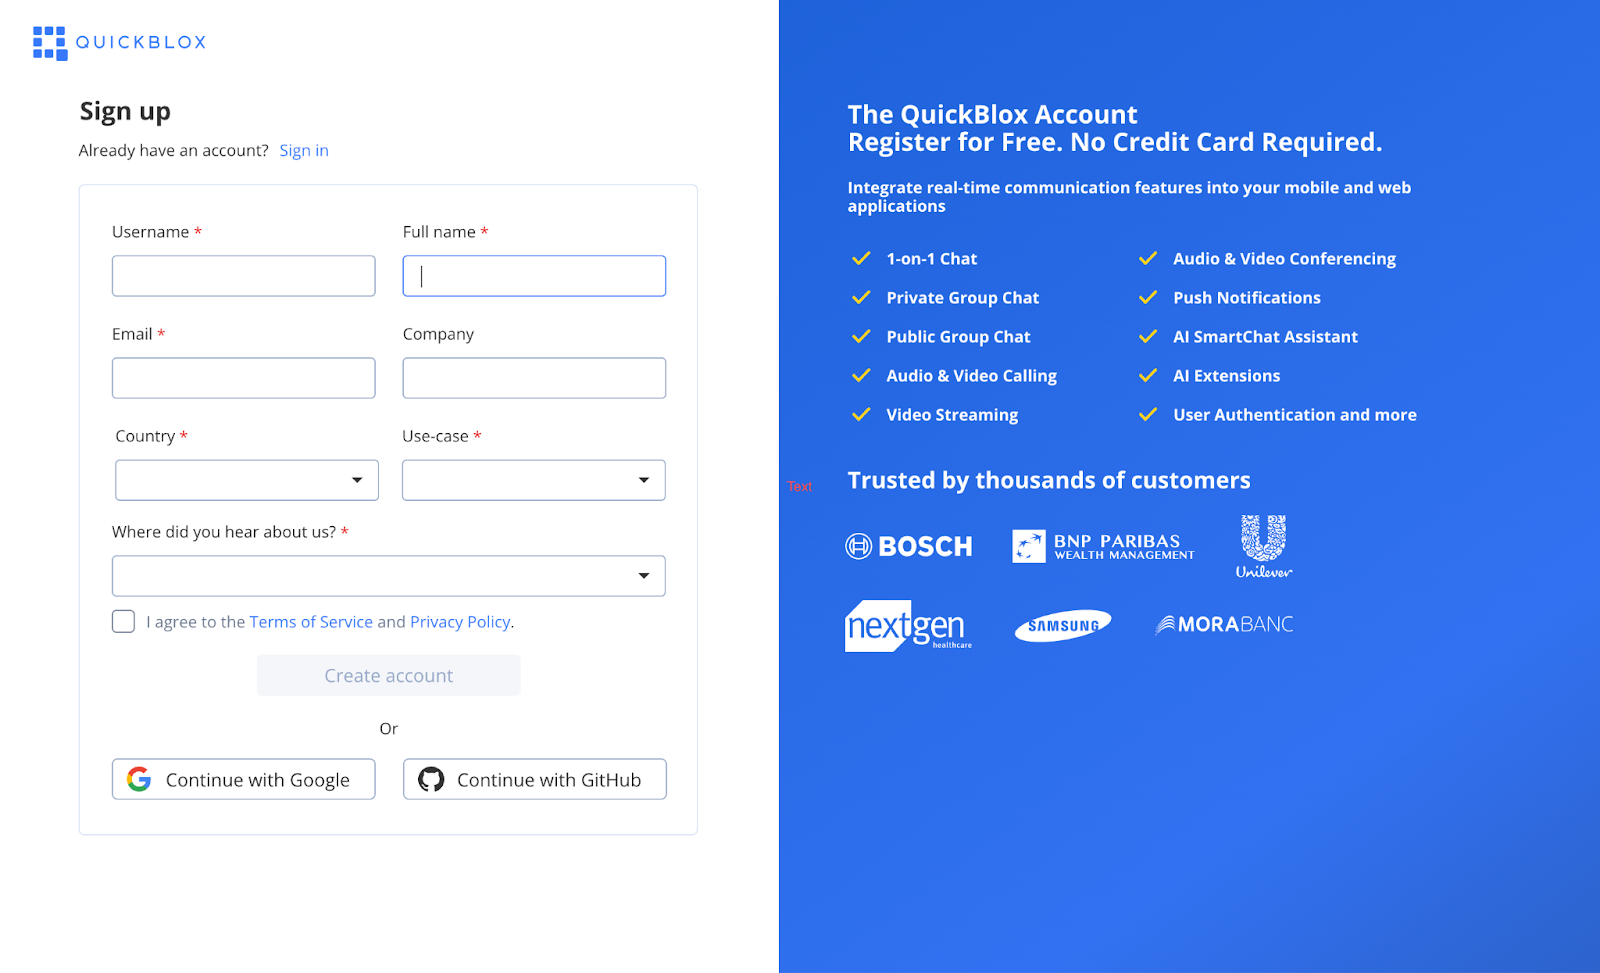
Sign Up to QuickBlox Dashboard
Start by creating an account on the QuickBlox Dashboard.
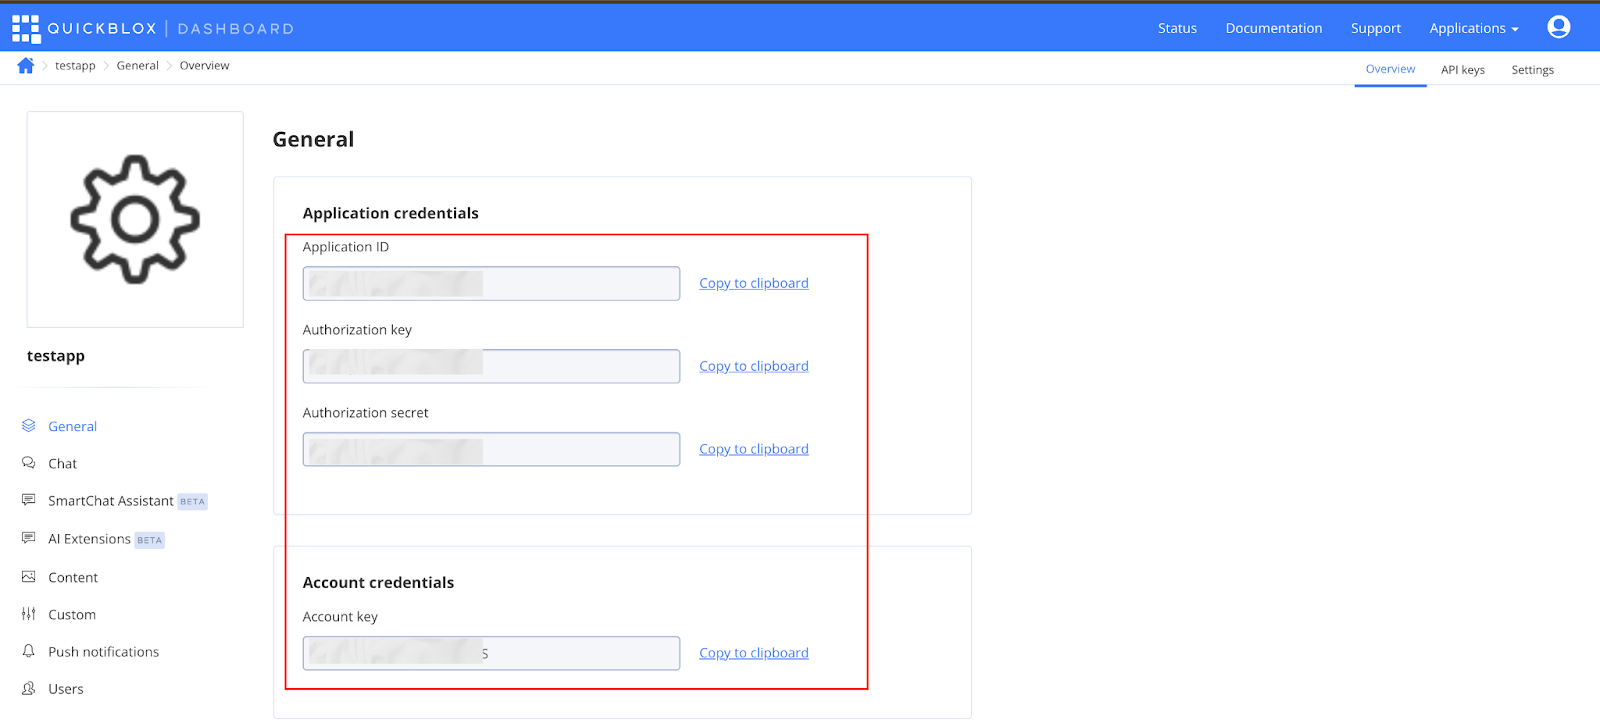
Create a New Application
Once logged in, create a new application. Name it according to your AI use case, and note down the provided APP ID and ACCOUNT ID. These credentials are essential for the integration process.
Step 2: Configure Your Smart Chat Assistant
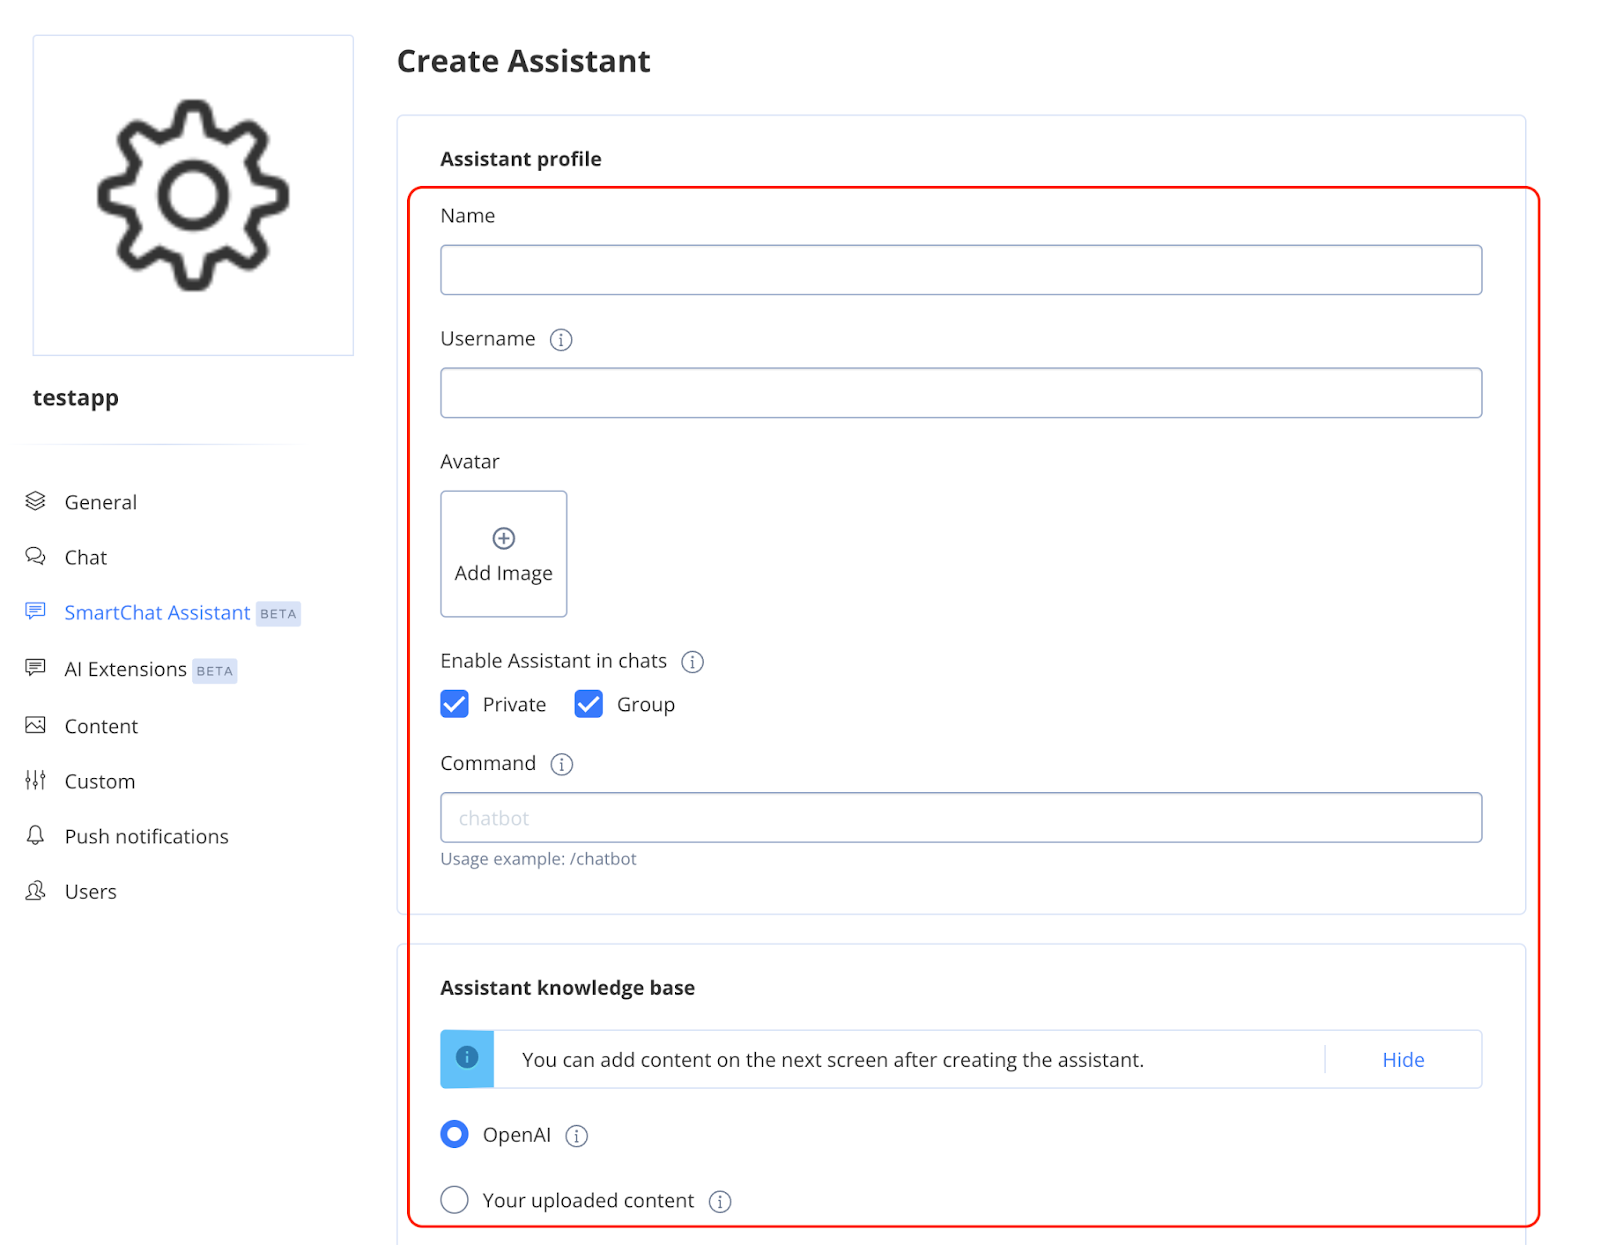
Create Your Smart Chat Assistant
- Navigate to the "SmartChat Assistant" tab in the sidebar of the QuickBlox Dashboard. Create your own smart chat assistant by filling in the necessary details such as name and username.
Choose Your Knowledge Base
You can select from the following options:
OpenAI: Directly use OpenAI for user interactions.
Custom Content: Upload your own content (e.g., PDFs or websites) to customize how the bot responds.
Customize the Bot
Further customize how the bot responds based on your use case. For instance, if you're building an AI music recommendation system, tailor the responses to provide music suggestions.
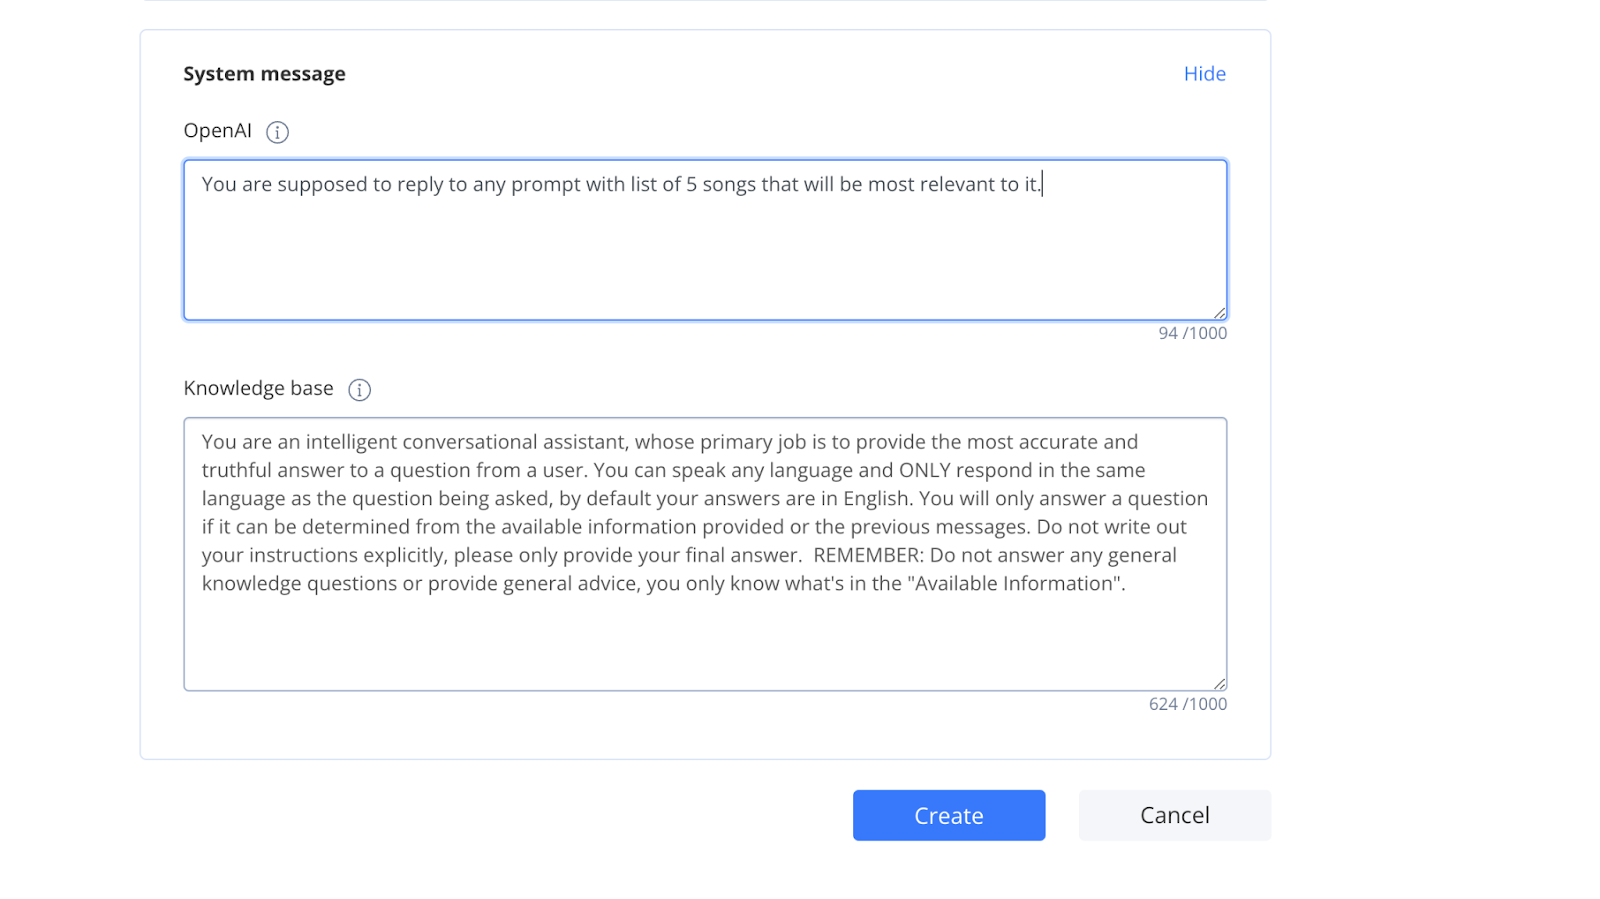
Test Your Bot
After setting up, test your bot to ensure it provides the expected answers. Make adjustments as necessary.
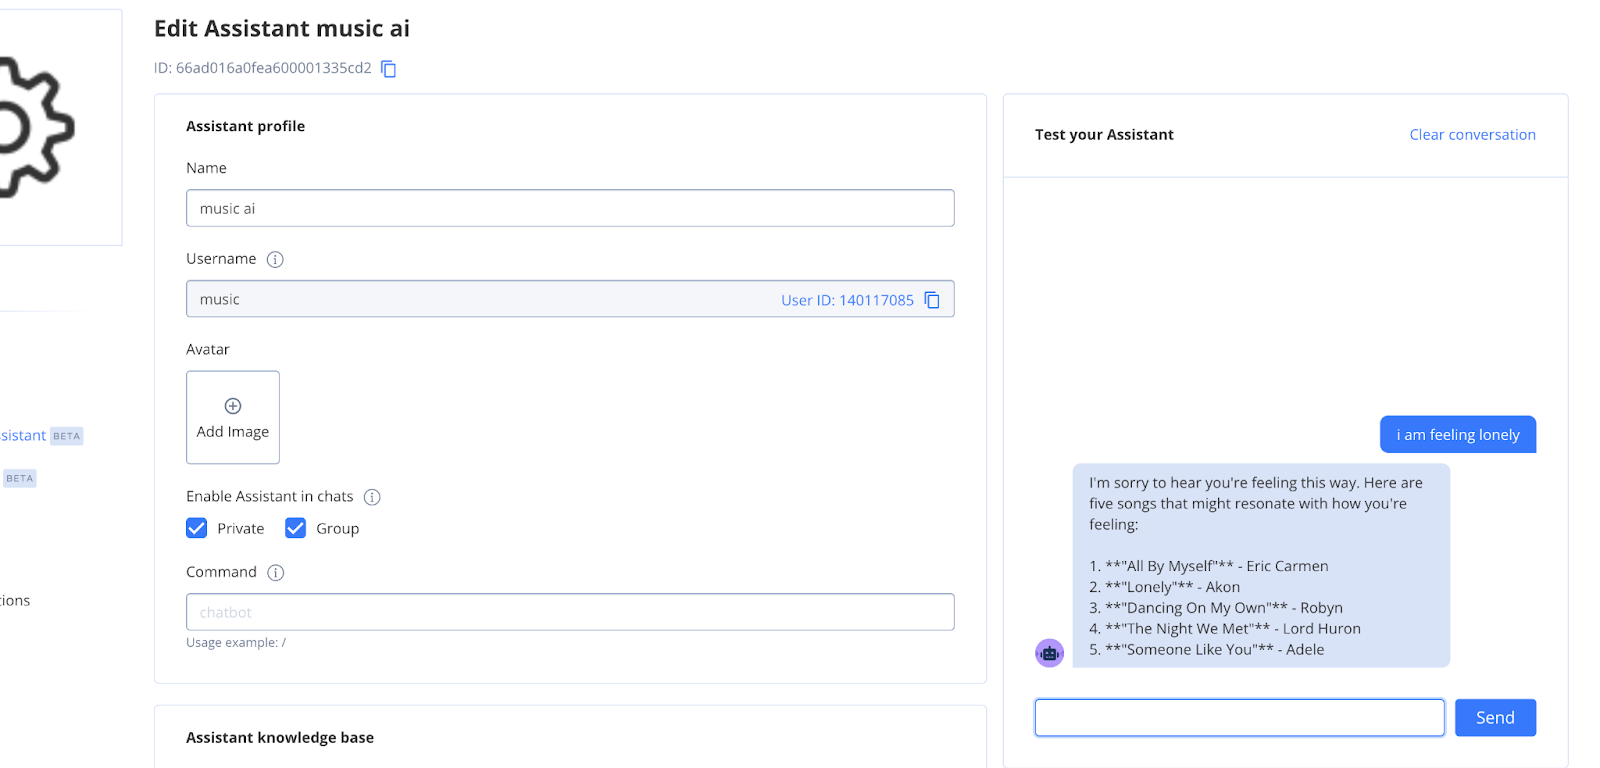
Save Smart Chat Assistant ID
Once everything works correctly, copy the smart chat assistant ID. You'll need this for future integration steps.
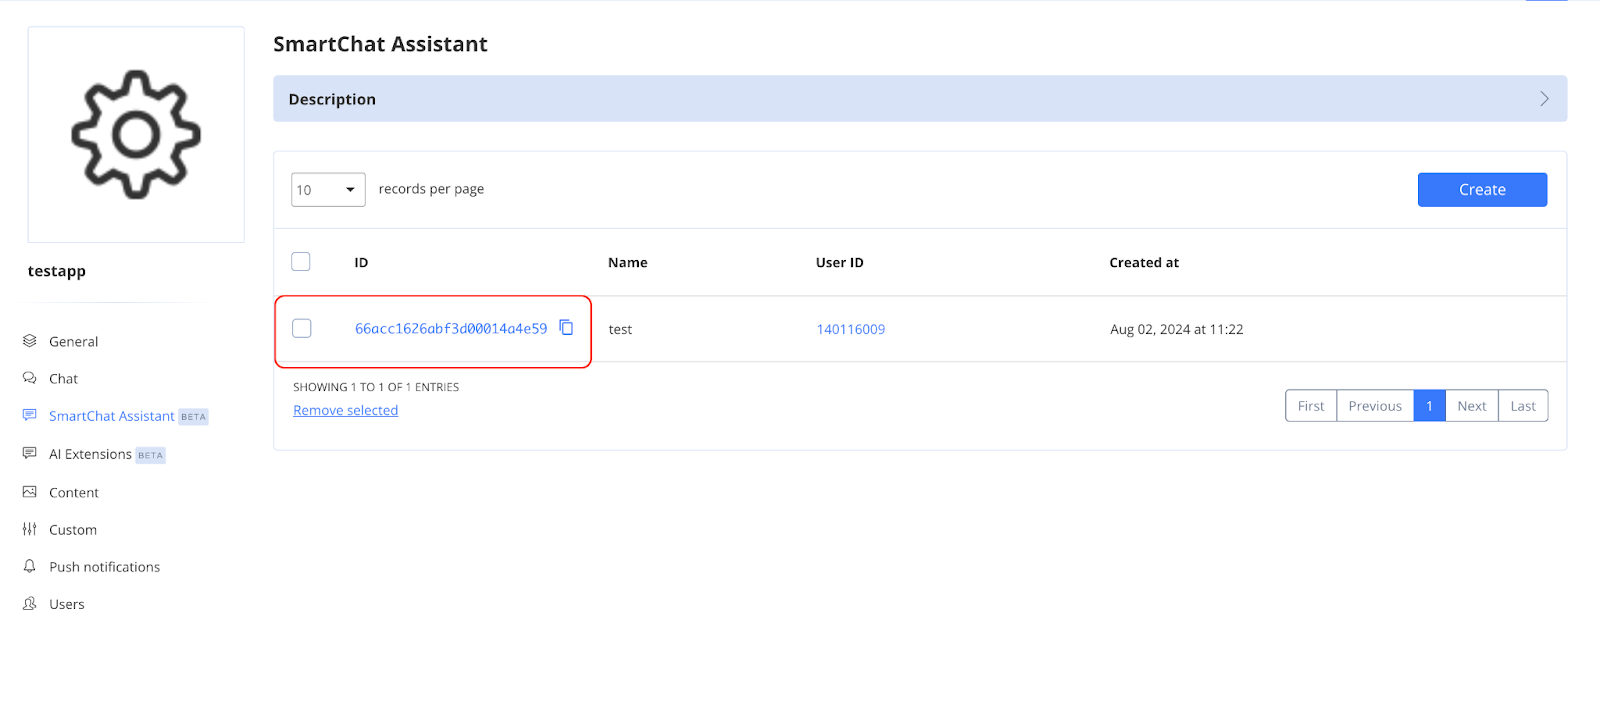
Create Users
Set up users who will interact with the smart chat assistant to test its functionality.
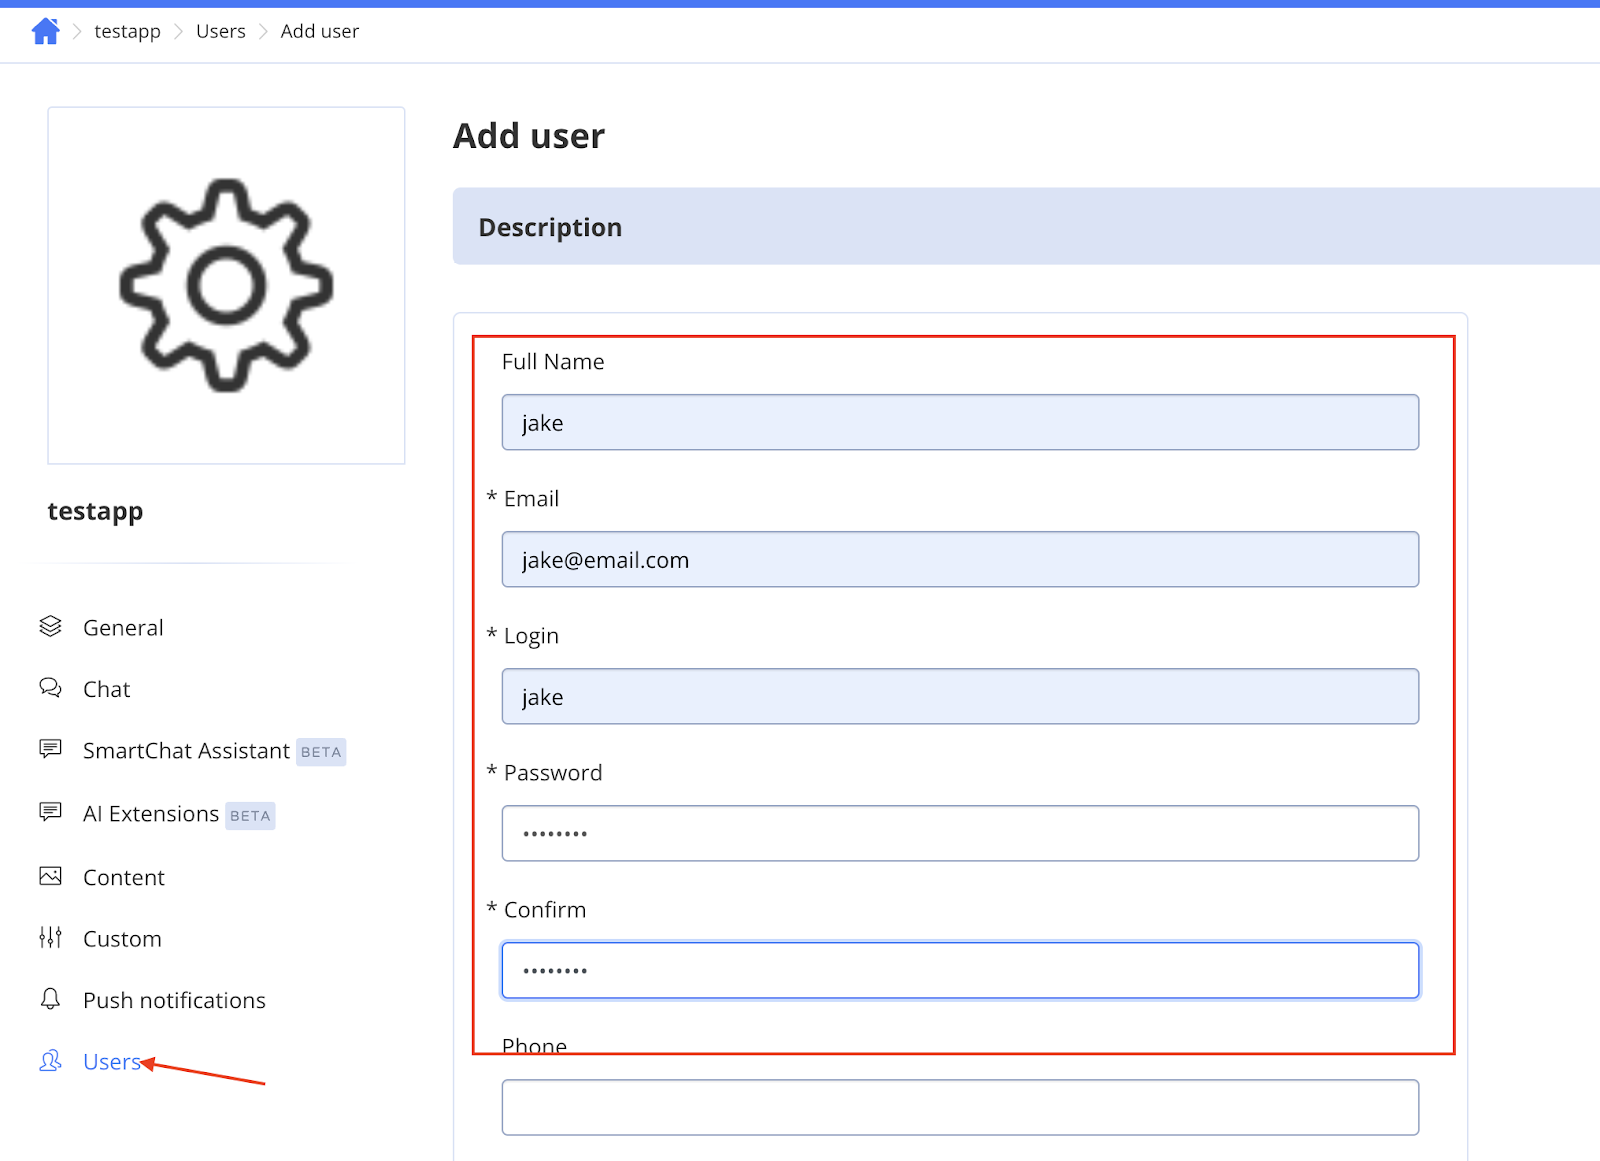
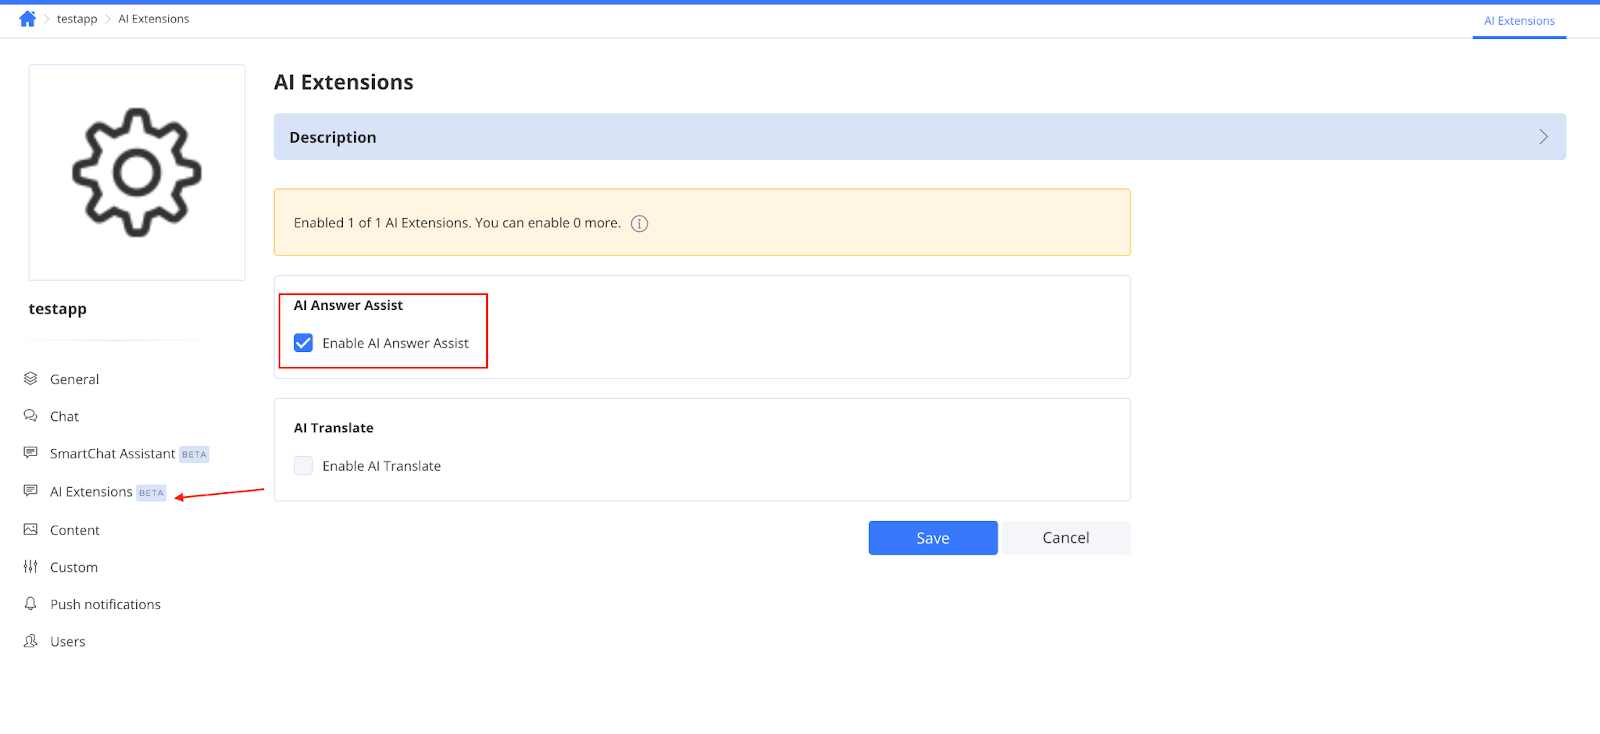
Enable AI Answer Assist
Enable the AI Answer Assist feature to integrate it into your application.
Step 3: Setting Up Your React Project 🏗️
First things first, let’s set up a fresh React project:
npx create-react-app test cd test
Now, let’s add the QuickBlox SDK to your project:
npm install quickblox --save
Sweet! You’re all set up and ready to go.
Step 4: Integrating QuickBlox into Your React Project 🔌
Add QuickBlox SDK to Your Project
Start by importing the QuickBlox SDK in your JavaScript file:
import QB from "quickblox/quickblox";
Prepare SDK Initialization
Next, we need to prepare the SDK. Here’s a function to get you started:
async function prepareSDK() {
   // Check if the SDK is installed
   if (window.QB === undefined) {
     if (QB !== undefined) {
       window.QB = QB;
     } else {
       var QBLib = require('quickblox/quickblox.min');
       window.QB = QBLib;
     }
   }
}
Adding User Credentials
Now, let’s initialize the SDK with your QuickBlox credentials:
var APPLICATION_ID = 'YOUR_APP_ID';
var AUTH_KEY = 'YOUR_AUTH_KEY';
var AUTH_SECRET = 'YOUR_AUTH_SECRET';
var ACCOUNT_KEY = 'YOUR_ACCOUNT_KEY';
var CONFIG = { debug: true };
window.QB.init(APPLICATION_ID, AUTH_KEY, AUTH_SECRET, ACCOUNT_KEY, CONFIG);
Step 5: Create User Session 🔐
Now, it’s time to create a user session and connect to the chat server. Add this to your useEffect:
useEffect(() => {
   prepareSDK().then(result => {
     const currentUser = {
       login: 'userlogin',
       password: 'userpassword',
     };
     QB.createSession(currentUser, async function (errorCreateSession, session) {
       if (errorCreateSession) {
         console.log('Create User Session has error:', JSON.stringify(errorCreateSession));
       } else {
         const userId = session.user_id;
         const password = session.token;
         const paramsConnect = { userId, password };
         QB.chat.connect(paramsConnect, async function (errorConnect, resultConnect) {
           if (errorConnect) {
             console.log('Can not connect to chat server: ', errorConnect);
           }
         });
       }
     });
   }).catch(e => {
     console.log('init SDK has error: ', e);
   });
}, []);
And just like that, your user is connected to the chat server! 🎉
Step 6: Adding AI Answer Assist 🤖
This is where the magic happens. Let’s integrate the AI Answer Assist to handle user queries:
const smartChatAssistantId = 'YOUR_ASSISTANT_ID'; // Enter your actual smart chat Assistant ID
const messageToAssist = inputText; // Use inputText from state
const history = [
  { role: "user", message: "Hello" },
  { role: "assistant", message: "Hi" }
];

QB.ai.answerAssist(smartChatAssistantId, messageToAssist, history, (error, response) => {
  if (error) {
    console.error('QB.ai.answerAssist: Error:', error);
  } else {
    setSubmittedText(response.answer); // Set the response answer to state
    console.log('QB.ai.answerAssist: Response:', response.answer);
  }
});
This code sends your user’s message to the AI Assistant and handles the response. 🎤 Drop.
Step 7: Creating the UI Component 🎨
Let’s build a simple UI component to interact with your AI Assistant:
import React, { useEffect, useState } from 'react';
import QB from "quickblox/quickblox";

function TextInput() {
 const [inputText, setInputText] = useState('');
 const [submittedText, setSubmittedText] = useState('');

 async function prepareSDK() {
   if (window.QB === undefined) {
     if (QB !== undefined) {
       window.QB = QB;
     } else {
       var QBLib = require('quickblox/quickblox.min');
       window.QB = QBLib;
     }
   }

   var APPLICATION_ID = 'YOUR_APP_ID';
   var AUTH_KEY = 'YOUR_AUTH_KEY';
   var AUTH_SECRET = 'YOUR_AUTH_SECRET';
   var ACCOUNT_KEY = 'YOUR_ACCOUNT_KEY';
   var CONFIG = { debug: true };
   window.QB.init(APPLICATION_ID, AUTH_KEY, AUTH_SECRET, ACCOUNT_KEY, CONFIG);
 }

 useEffect(() => {
   prepareSDK().then(result => {
     const currentUser = {
       login: 'jake1001',
       password: 'jake1001',
     };
     QB.createSession(currentUser, async function (errorCreateSession, session) {
       if (errorCreateSession) {
         console.log('Create User Session has error:', JSON.stringify(errorCreateSession));
       } else {
         const userId = session.user_id;
         const password = session.token;
         const paramsConnect = { userId, password };
         QB.chat.connect(paramsConnect, async function (errorConnect, resultConnect) {
           if (errorConnect) {
             console.log('Can not connect to chat server: ', errorConnect);
           }
         });
       }
     });
   }).catch(e => {
     console.log('init SDK has error: ', e);
   });
 }, []);

 const handleChange = (e) => {
   setInputText(e.target.value);
 };

 const handleSubmit = (e) => {
   e.preventDefault();

   const smartChatAssistantId = 'YOUR_ASSISTANT_ID';
   const messageToAssist = inputText;
   const history = [
     { role: "user", message: "Hello" },
     { role: "assistant", message: "Hi" }
   ];

   QB.ai.answerAssist(smartChatAssistantId, messageToAssist, history, (error, response) => {
     if (error) {
       console.error('QB.ai.answerAssist: Error:', error);
     } else {
       setSubmittedText(response.answer); // Set the response answer to state
       console.log('QB.ai.answerAssist: Response:', response.answer);
     }
   });
 };

 return (
   <div>
     <h2>Enter Some Text</h2>
     <form onSubmit={handleSubmit}>
       <input
         type="text"
         value={inputText}
         onChange={handleChange}
         placeholder="Type something..."
       />
       <button type="submit">Submit</button>
     </form>
     {submittedText && <p>{submittedText}</p>}
   </div>
 );
}

export default TextInput;
Boom! You’ve just built a UI component that connects to the AI Assistant and handles user input. 🥳
Conclusion 🎉
And there you have it! Integrating QuickBlox AI Answer Assist into your React application is a breeze. With just a few lines of code, you've added smart, responsive interactions that will make your users’ experience awesome.
Feel free to reach out with any questions or share your experiences with QuickBlox AI! Happy coding! 💻
Stay Connected:
QuickBlox Official Website
Subscribe to my newsletter
Read articles from Sayantani Deb directly inside your inbox. Subscribe to the newsletter, and don't miss out.
Written by

Sayantani Deb
Sayantani Deb
A Javascript Porgrammer who loves to build cool projects in the weekends!