Easy Steps to Insert "0" in Excel Cells
 Jogleen Calipon
Have you ever wondered why adding zero in Excel doesn't work? Sometimes you need to perform some rituals for zero to appear in your cell (pun intended!).
We will cover some of the easiest ways to do that in this article!
To guide you, here's our step-by-step procedure to give you an overview:
Preparing data: If you want to follow along, I have uploaded the dataset to Kaggle. You can download it and follow along with me throughout this article.
Using the Text Format: We will learn how to use the "Text format," especially in this scenario.
Using a single quote ('): We will explore how to use a single quote effectively.
Taking advantage of Custom Format: We will explore how to use this format and its application.
Prepare the data
You can download the dataset from Kaggle.
(If you don't have a Kaggle account, you can create one using your Google account.)
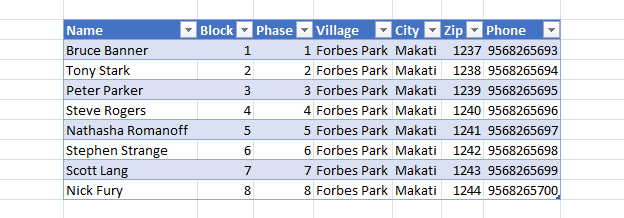
Your dataset should look like this:
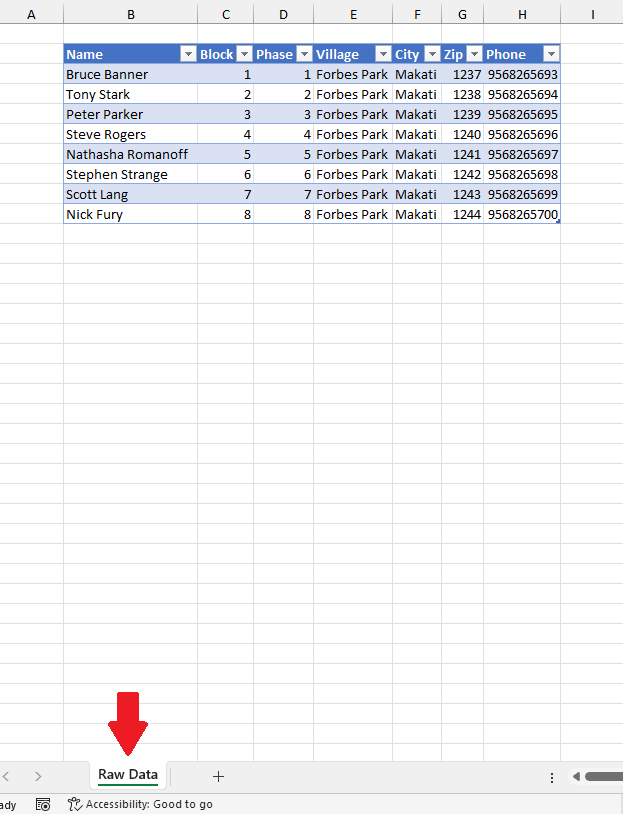
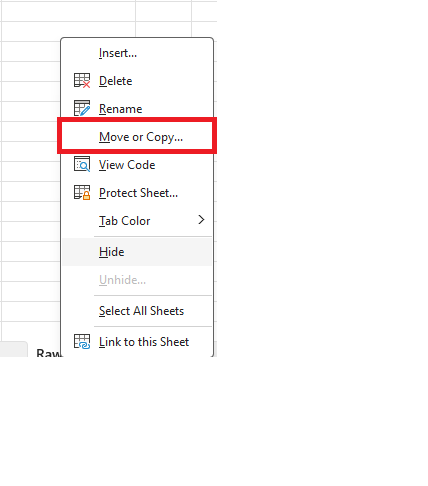
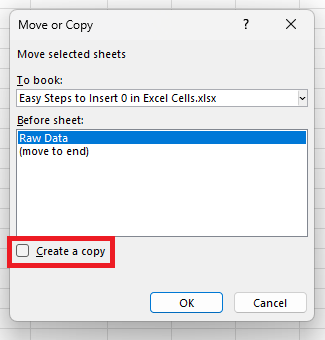
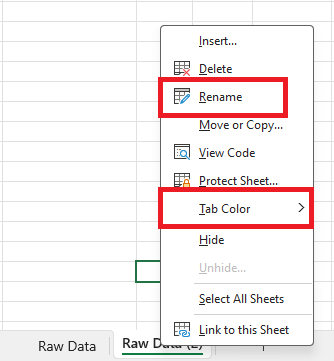
Let's create backup data, which will also serve as our reference. Right-click on your worksheet (Raw Data) and look for Move or Copy. Click it and check the Create a copy checkbox.
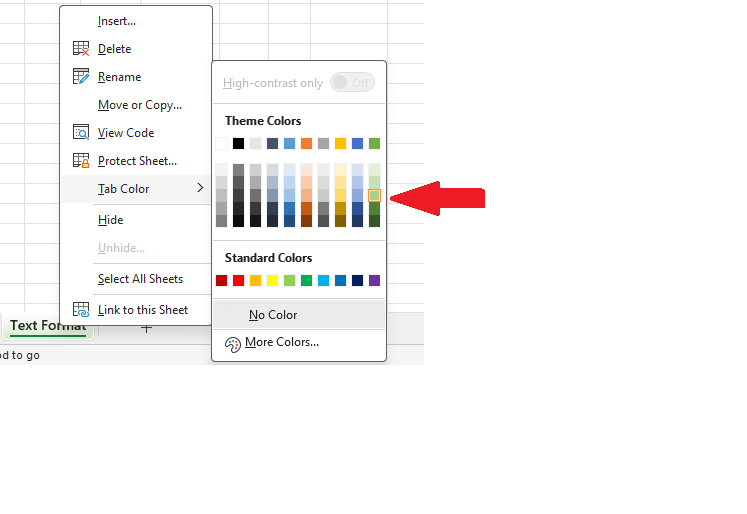
Let's rename the data from Raw Data (2) to Text Format and let's add a tab color. You can either double-click the worksheet or right-click it to see the Rename option.
Using the Text Format
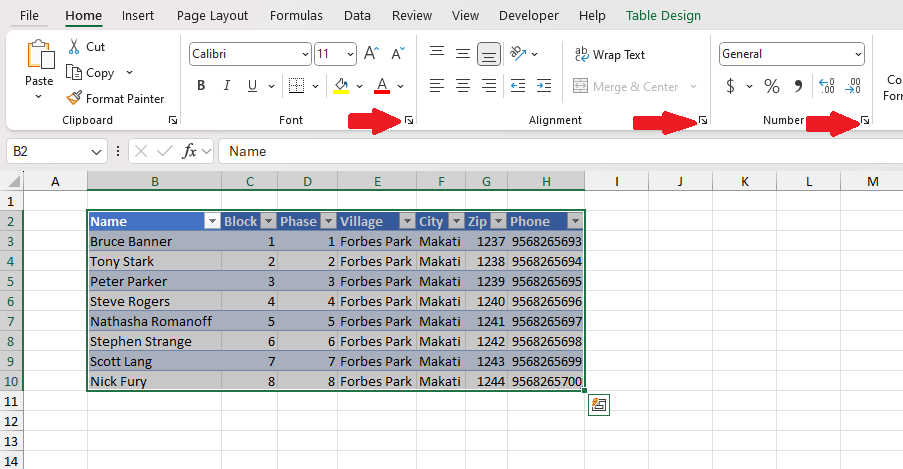
Assuming that the correct format for the Block and Phase columns is 01 and 001, respectively. However, what we have on our dataset is just Block 1 and Phase 1. To rectify this, we will use the Text format. There's a shortcut to the Text format if you're unfamiliar with it. You can either click anywhere on the Home ribbon shortcut or use the Ctrl + 1 keyboard shortcut. Either or will save you time!
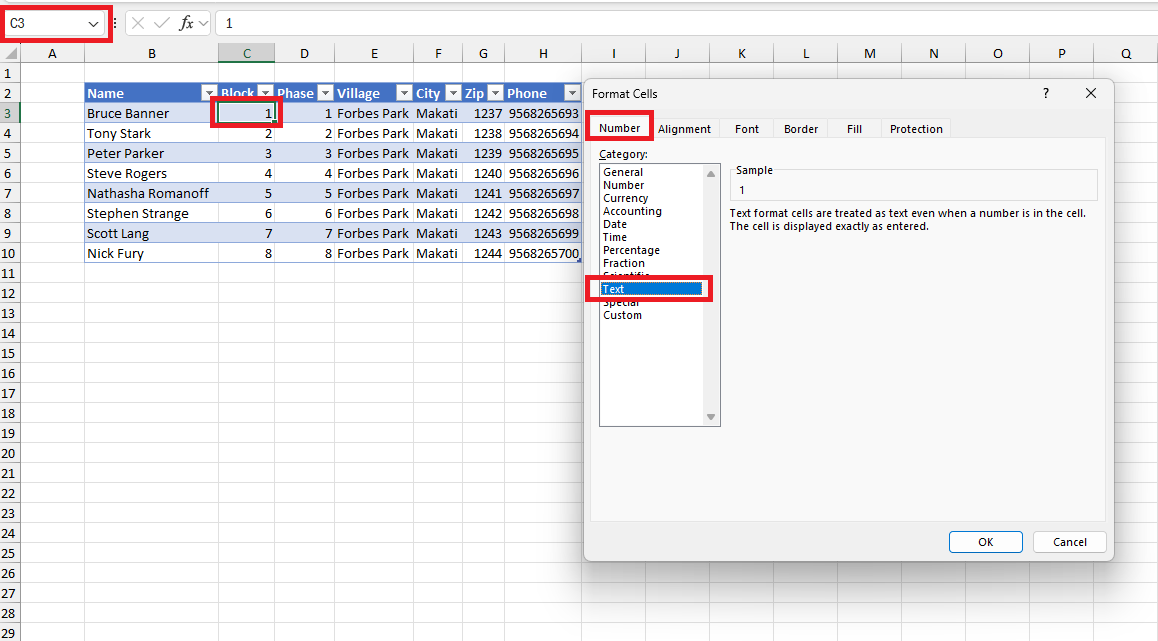
First, highlight C3 go to Format Cells, and choose the Text format. Once the format has been changed go to the formula bar to add the 0 before the 1. Hold and drag the fill handle to fill the entire column.
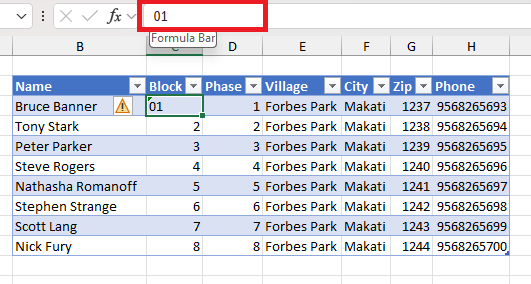
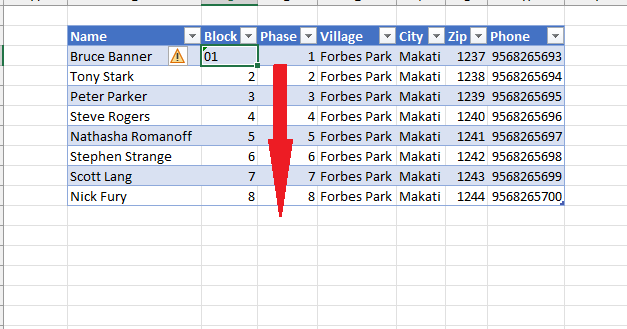
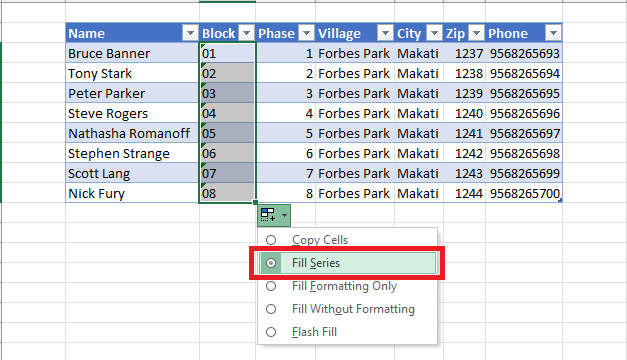
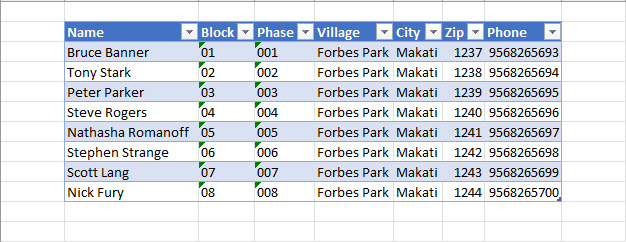
You will notice that there are some warning signs on your cell. Do not be alarmed; Excel is only telling us that the number has been converted to text and is not applicable for formulas.
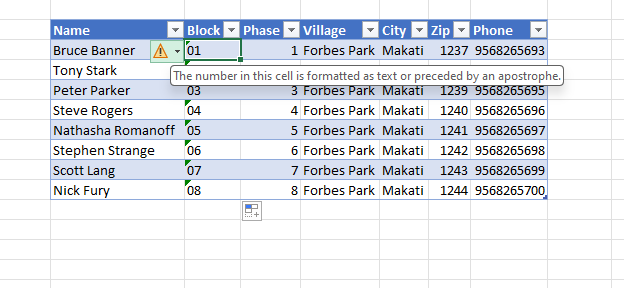
Now let's do the same procedure to the Phase column; however, this time we will be adding two zeros instead of one. Your output should look like this below
Using a single quote (')
Now let's move forward to our Zip column. Our Zip column has only a 4-digit number. Assuming that we need to have a 5-digit number, adding a zero before the number would correct the format to 01237.
Now, before we make any changes, let's add another worksheet dedicated to this section. We can follow the same procedure as above. Let's make a copy of the Text Format worksheet and rename it as Single Quote. It would look like this as your output.
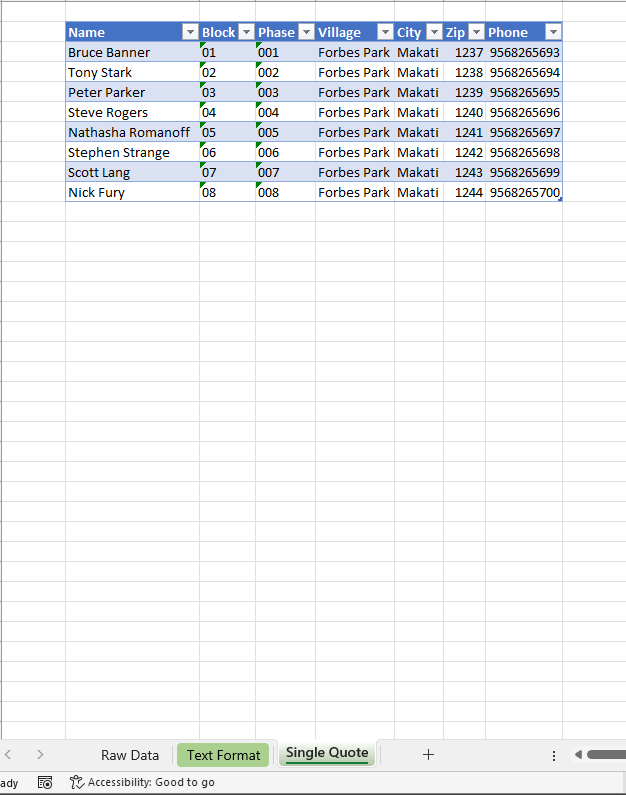
Let's head to cell G3 to add a zero before the number. We can follow the above procedure, or we can do it the easy way! In your formula bar, add a single quote before the number followed by zero. ='01237 then drag the fill handle below to fill the entire column of the new format.
Noticed something?
Yeah, I know. It is exactly the same thing as above, but without going to the Format Cells option!
Which one do you prefer? You can effectively use this if you want something versatile since the format hasn't been changed, unlike the above process, where we change the format of the number.
Taking advantage of Custom Format
Now for the last part of this guide, we will move forward on the Phone column. Let's create a dedicated worksheet for this procedure. We can copy the Single Quote worksheet and rename it as Custom Format. Your output should look like this:
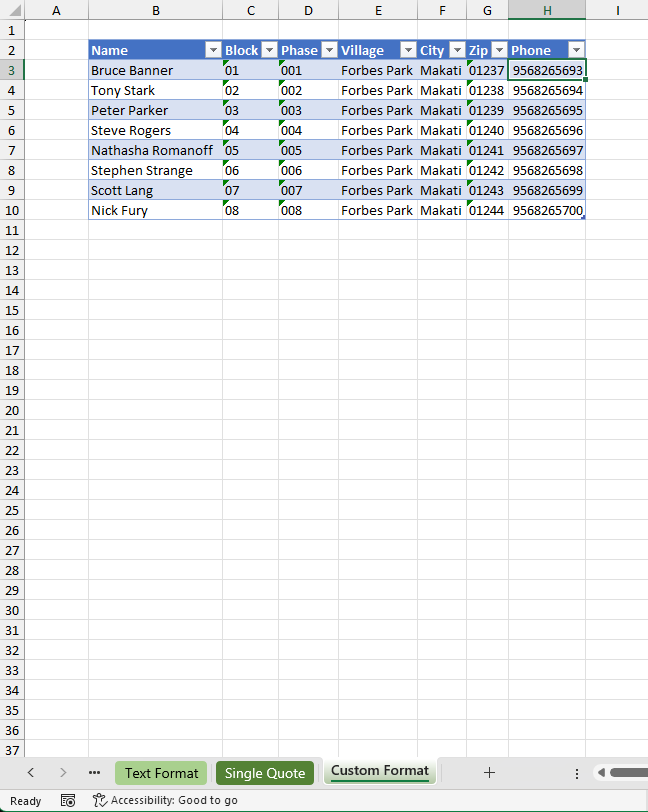
Let's head to cell H3 and go to the Format Cell option. Look for Custom and type in your desired format. We can either use just the plain format, which adds a zero before the number, or we can follow the standard phone format here in the Philippines (consult your stakeholder on which format to follow appropriately).
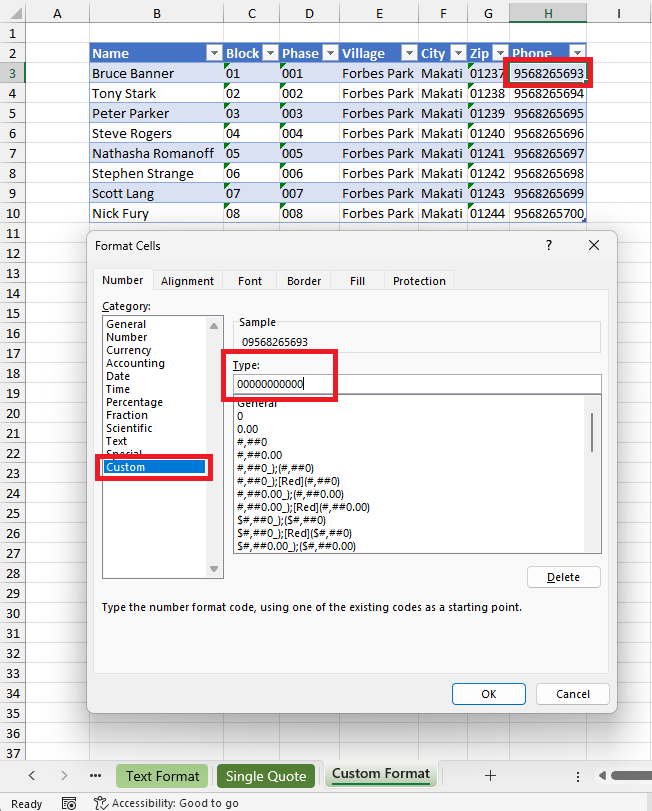
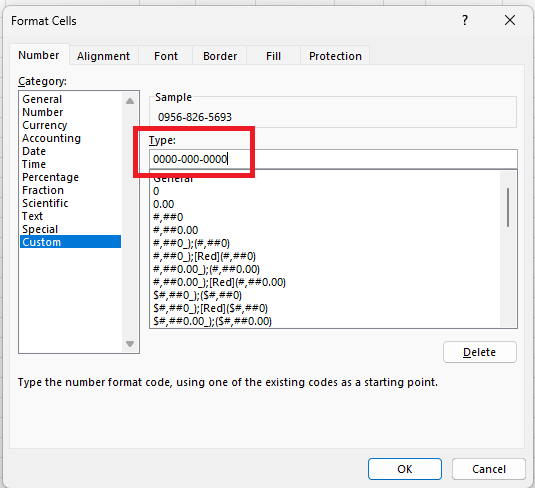
Once you have your desired format, hold and drag the fill handle to update the entire column with the new format. Your output should look like this.
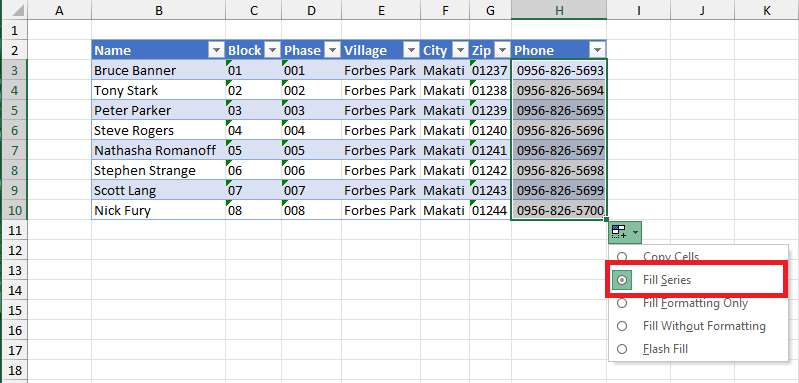
There are still many ways to do this, but so far, this has been the easiest way I've found to handle this scenario. I hope I was able to provide you with some useful insights. If you have questions, feel free to leave a comment, and I will gladly answer them!
References:
Subscribe to my newsletter
Read articles from Jogleen Calipon directly inside your inbox. Subscribe to the newsletter, and don't miss out.
Written by

Jogleen Calipon
Jogleen Calipon
👋 Welcome to My Profile! I'm a Data Analyst with over four years of experience turning data into meaningful insights that drive smart business decisions. Whether it's building automated reports, uncovering operational inefficiencies, or creating interactive dashboards that tell a clear story—I'm passionate about using data to solve real-world problems. 💡 What I Do Best Data Preparation: Cleaning, shaping, and enriching messy datasets Data Analysis: Extracting insights to inform decisions Automation: Streamlining recurring reports and building data entry forms Business Reporting: Creating reports tailored to decision-makers Visualization: Designing dashboards that make data easy to understand Collaboration: Translating technical findings for non-technical audiences 🛠️ Tools & Technologies Spreadsheets & Data Processing Microsoft Excel: Power Query, Power Pivot, DAX, advanced lookup functions, custom automation workflows Business Intelligence Power BI: Interactive dashboards and visual storytelling Databases & SQL Foundational knowledge of MS SQL Server, MySQL, BigQuery, and MS Access Experience writing basic to intermediate SQL queries Programming Python: Foundational experience with Pandas, NumPy, SciPy, Seaborn, and Matplotlib for data analysis and visualization R: Working knowledge of data wrangling, ggplot2, and statistical modeling 🚀 Let's Connect I'm currently open to short-term projects and part-time roles where I can contribute to: Optimizing processes Unlocking insights hidden in data Building scalable, automated solutions Thanks for visiting my profile! Feel free to explore my projects and reach out for collaboration or just to connect. 😊