How to Deploy Redhat OpenShift Container Platform on Google Cloud Platform (GCP)
 LakshmanaRao

Red Hat OpenShift is an enterprise-grade Kubernetes platform that provides a seamless application development and deployment experience across both on-premises and cloud environments. This guide walks you through deploying OpenShift Container Platform (OCP) on Google Cloud Platform (GCP) using the Installer-Provisioned Infrastructure (IPI) method.
Prerequisites
Before beginning, ensure you have:
An active GCP project with billing enabled
A Red Hat account (create one at https://www.redhat.com)
Basic familiarity with Kubernetes concepts and GCP services
1. Setting Up the GCP Environment
💡 Tip: You can run all commands directly from the GCP Cloud Shell. Look for the Cloud Shell icon in the top-right corner of the Google Cloud Console.
Start by creating a new GCP project using cloud shell.
gcloud projects create ocp-v4-16 --name openshift-gcp
🔑 Authorize: When prompted for authorization, click Authorize.
Set your active project
gcloud config set project ocp-v4-16
Billing Setup
To link the newly created project to a billing account, go to the Billing Accounts section in the GCP Console, and add your project.

2. Enable Required API Services
| API service | Console service name |
| Compute Engine API | compute.googleapis.com |
| Cloud Resource Manager API | cloudresourcemanager.googleapis.com |
| Google DNS API | dns.googleapis.com |
| IAM Service Account Credentials API | iamcredentials.googleapis.com |
| Identity and Access Management (IAM) API | iam.googleapis.com |
| Service Usage API | serviceusage.googleapis.com |
| Google Cloud APIs | cloudapis.googleapis.com |
| Service Management API | servicemanagement.googleapis.com |
| Google Cloud Storage JSON API | storage-api.googleapis.com |
| Cloud Storage | storage-component.googleapis.com |
Enable the required APIs for deploying OpenShift by running the following command in Cloud Shell:
gcloud services enable compute.googleapis.com cloudresourcemanager.googleapis.com dns.googleapis.com iamcredentials.googleapis.com iam.googleapis.com serviceusage.googleapis.com cloudapis.googleapis.com storage-api.googleapis.com servicem
anagement.googleapis.com storage-component.googleapis.com
check if the APIs are enabled
gcloud services list
3. Configuring DNS for the Domain
If you don't own a domain, you can purchase one from Google Domains, GoDaddy, or other registrars.
If you followed the link above you can skip the below steps
Create a managed public zone in GCP to handle your domain DNS records:
gcloud dns managed-zones create CLOUD_DNS_ZONE_NAME \
    --description="DESCRIPTION" \
    --dns-name=DOMAIN_NAME
Example
gcloud dns managed-zones create lakshman --description "dns for openshift" --dns-name lakshmanarao.net
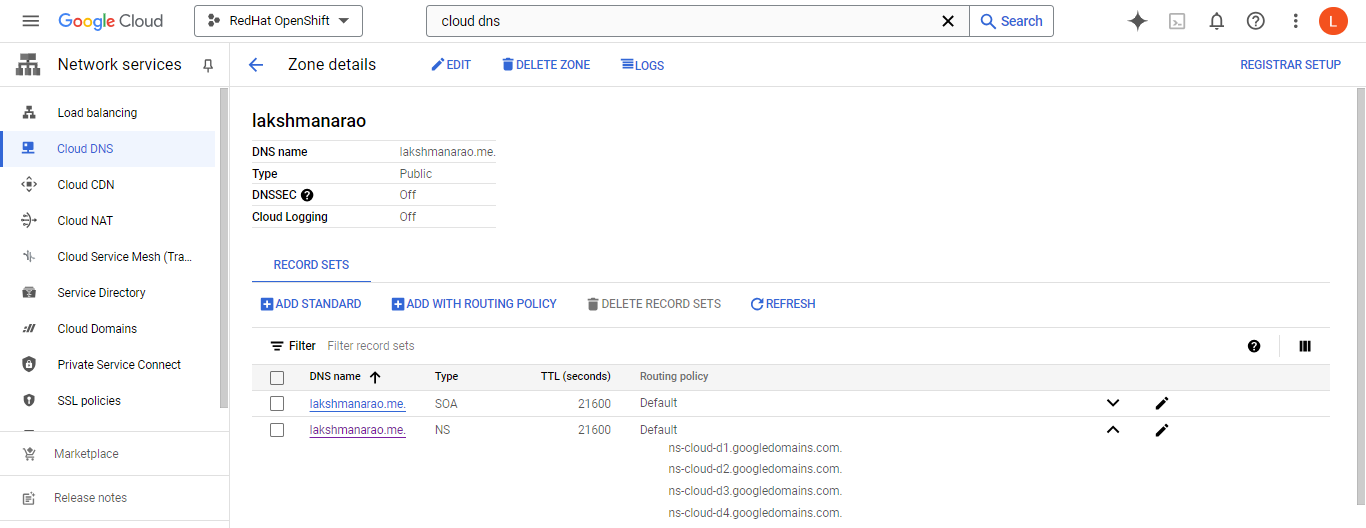
note the NS records for your new zone and update your domain's nameservers with your registrar to point to the GCP nameservers.
gcloud dns managed-zones describe <zone-name>
you can also see those details under Cloud DNS resource
4. Check GCP Resource Quotas and Limits
Before deployment, check your resource quotas in the selected GCP region (for example, us-central1). Quota requirements can vary, but here’s an overview:
here is the list of resource quota that are needed for creating openshift cluster
| Service | Component | Location | Total resources required | Resources removed after bootstrap |
| Service account | IAM | Global | 6 | 1 |
| Firewall rules | Compute | Global | 11 | 1 |
| Forwarding rules | Compute | Global | 2 | 0 |
| In-use global IP addresses | Compute | Global | 4 | 1 |
| Health checks | Compute | Global | 3 | 0 |
| Images | Compute | Global | 1 | 0 |
| Networks | Compute | Global | 2 | 0 |
| Static IP addresses | Compute | Region | 4 | 1 |
| Routers | Compute | Global | 1 | 0 |
| Routes | Compute | Global | 2 | 0 |
| Subnetworks | Compute | Global | 2 | 0 |
| Target pools | Compute | Global | 3 | 0 |
| CPUs | Compute | Region | 28 | 4 |
| Persistent disk SSD (GB) | Compute | Region | 896 | 128 |
you can check the resource quotas in Quotas and system limits under IAM and Admin
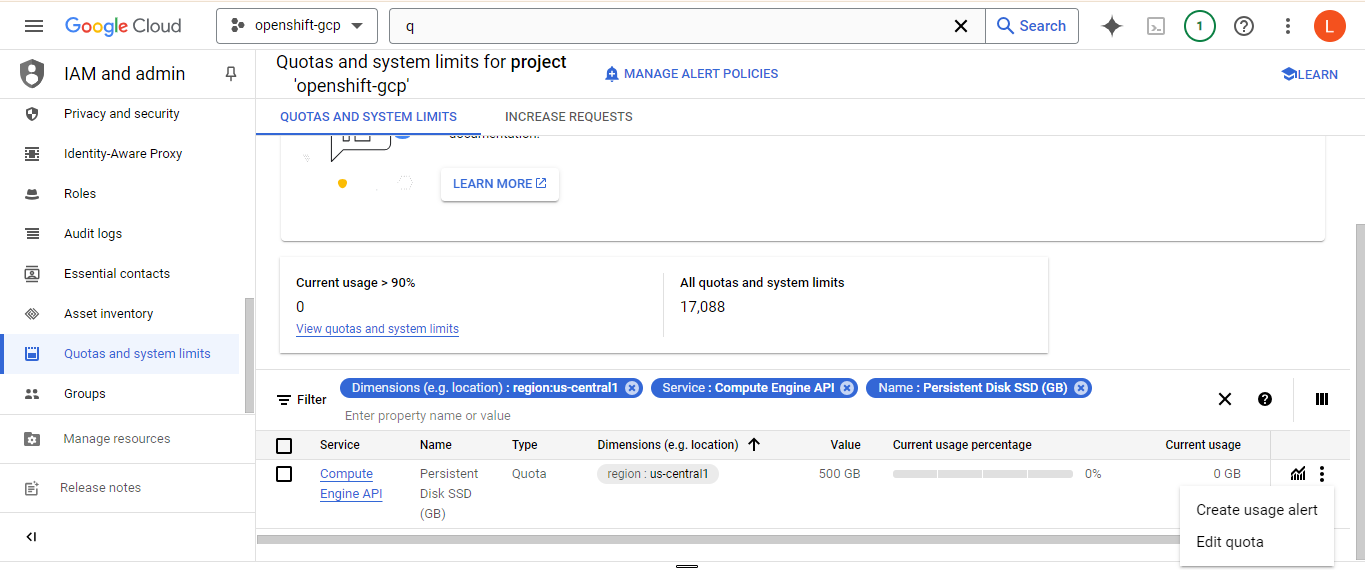
As you can see in above image i have only 500 GB of persistent storage in us-central1 region where i am deploying cluster, but we need a 896GB so we have to increase the quota you can find the option by clicking that 3 dots.
once you request the quota wait until you receive an email with confirmation of quota accepting. you can check for all service quota in the same way as said above. Or you can check for CPUs and SSD for time being and the rest of them it will show during installation if don't have enough quota at that time you can request.
5. Create Service Account with Required IAM Roles
To authorize the installation program to interact with GCP, create a service account and assign the necessary IAM roles:
Role Administrator
Security Admin
Service Account Admin
Service Account Key Admin
Service Account User
Service Usage Consumer
Storage Admin
Compute Admin
DNS Administrator
Compute Load Balancer Admin
Create the service account in the IAM section of GCP and add the required roles. Generate a JSON key for the service account and upload it to Cloud Shell.
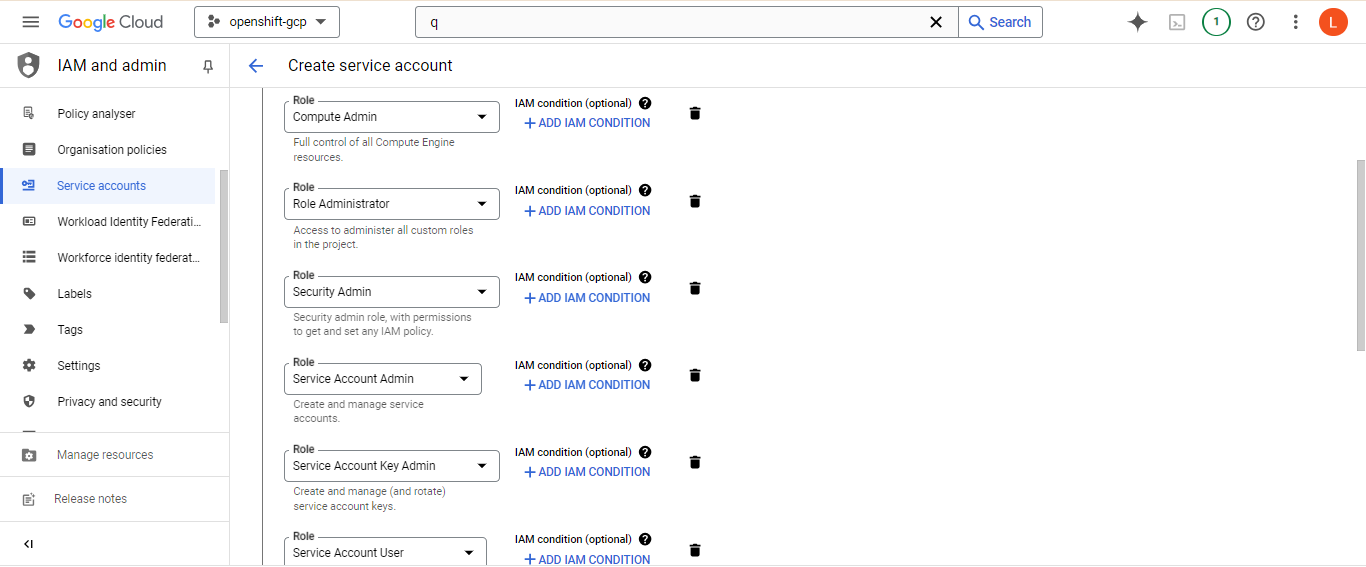
After adding, press done and then a service account will be created. Now we need to create the keys for SA to make use of service account. This can be done by selecting the service account and press Add key under keys section then press add new key and select JSON key type, that will download the key to your local machine. now upload the key to google cloud shell, click the "More" menu (three vertical dots) in Cloud Shell.
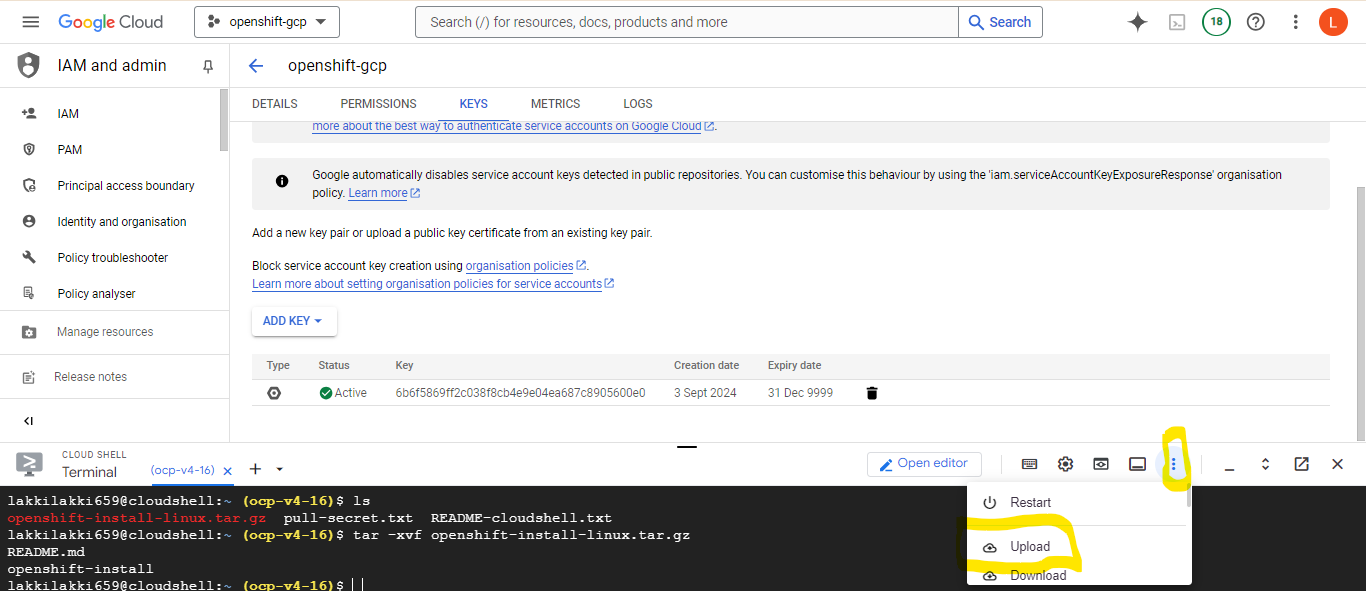
Click on the upload option as shown above and then select the key file that you want to upload.
6. SSH Key Generation
Create an SSH key pair for accessing cluster nodes:
ssh-keygen -t ed25519 -N '' -f ~/.ssh/ocp -C "lakshmanarao"
Add the private key to the ssh agent:
eval "$(ssh-agent -s)" # #check if the ssh agent is running
ssh-add ~/.ssh/ocp
7. Download OpenShift Installer and Pull Secret
Log in to https://console.redhat.com/openshift, subscribe to 60 days trial period.
Navigate to Clusters -> Create Cluster -> Run it yourself -> Google Cloud -> Automated
Download the OpenShift installer for Linux and your pull secret.
Upload both files to Cloud Shell using the same method as the service account key
Extract the installer:
# extract the uploaded installation zip file
tar -xvf openshift-install-linux.tar.gz
# removing the zip file
rm openshift-install-linux.tar.gz
Organize files:
# list the files in current working directory
ls
# create a new dir
mkdir -p redhat-openshift
#move installer program, pull secret and service account key file to new dir
mv openshift-install redhat-openshift/
mv pull-secret.txt redhat-openshift/
mv redhat-openshift-659-00b2b502299f.json redhat-openshift/
# change to new directory
cd redhat-openshift
8. Openshift Installation
now that we have everything we need the last thing is to configuraing our GCP environment inside cloud shell. By default openshift-install program looks for these "GOOGLE_CREDENTIALS, GOOGLE_CLOUD_KEYFILE_JSON, or GCLOUD_KEYFILE_JSON environment variables" to look for service account key that we created and uploaded to cloud shell.
So, lets create a environment variable and pass the key file and also we have to do some configuration to gcloud
#create the env variable
export GOOGLE_CREDENTIALS=redhat-openshift-659-00b2b502299f.json
# configure gcloud
gcloud config set project PROJECT-ID
gcloud config set compute/region REGION-NAME
#check the gcloud configuration details
gcloud config list
make sure to check the gcloud config details like project, region.
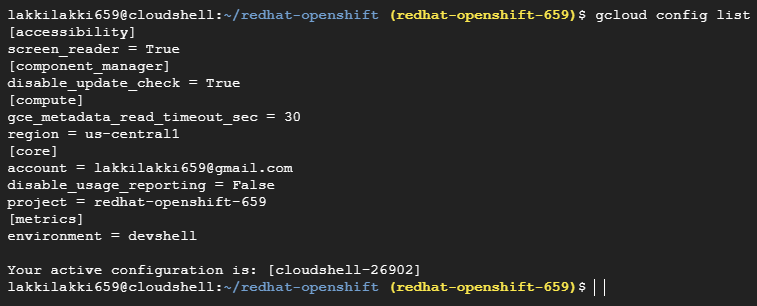
Now we are all set, moving forward have to run the commands using openshift-install command.
first step we need to create directory in the directory where you have installation program, pull secret and other details for our cluster installation.
# create directory
mkdir -p cluster
# create install config file inside the directory cluster
./openshift-install create install-config --dir cluster
When prompted, select GCP as the platform, and provide the pull secret. If you encounter any errors, such as missing roles, go back to IAM and assign the required roles to the service account.
We got an error:(Related to an service account role that is not granted which is required for the installation program)
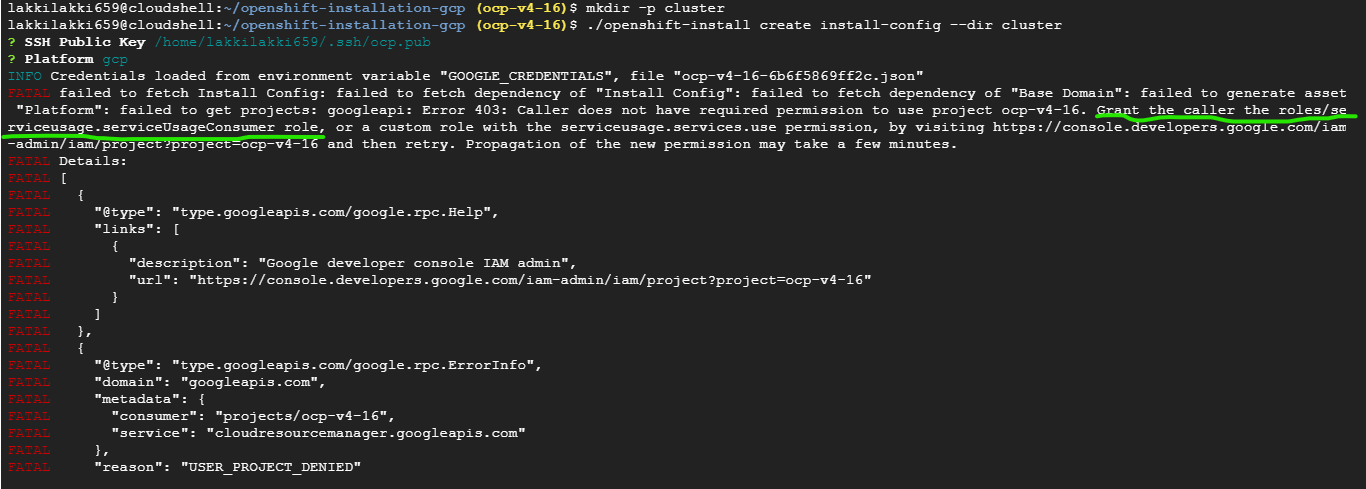
Now all we got to do is go to service accounts in IAM and add the role which is in the error above to our service account.
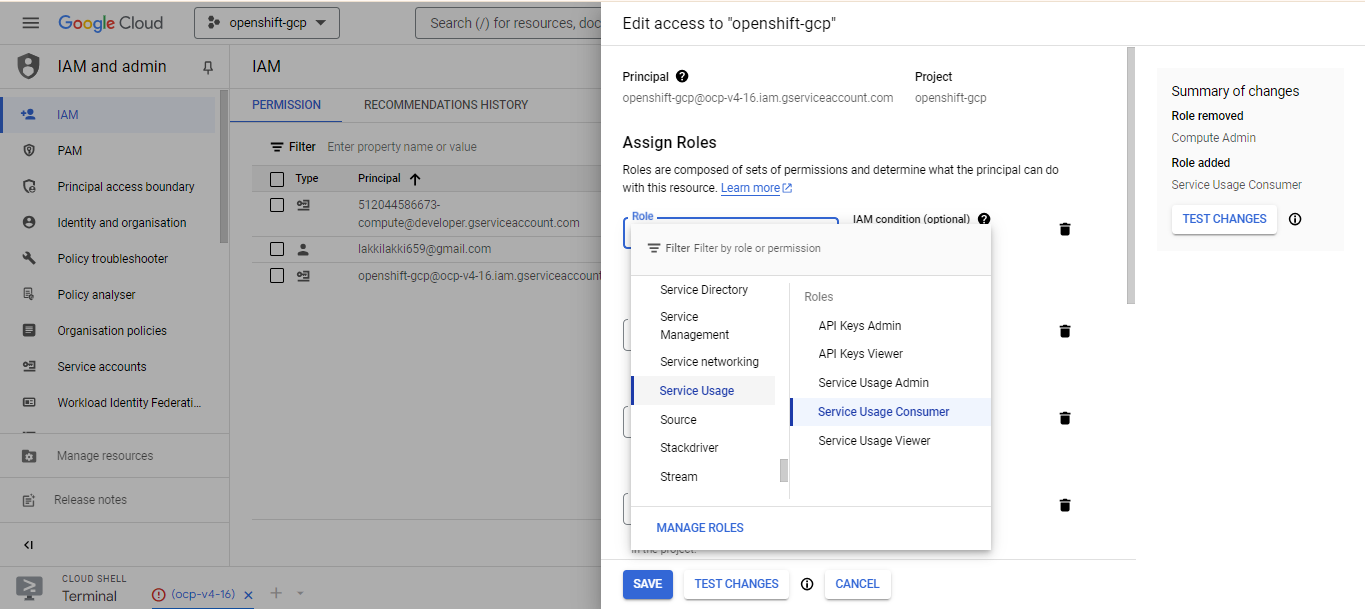
after adding the role save it and run the openshift-install program again.

The configuration is ready. it has details like how many worker and master nodes, pull secret and ssh public key to login into the nodes. I will edit file because i only want two master nodes (it's upto you, just play around it).
create the cluster:
./openshift-install create cluster --dir cluster --log-level=debug
⏳ Note: This step may take 40–45 minutes to complete.

9. Access OpenShift Console
After the installation, you will receive the OpenShift Console URL and login credentials.
Now we have to install Openshift CLI to work with cluster through command line
you can find the download details here.
# unpack the zip file
tar -xvf openshift-client-linux-amd64-rhel9-4.16.9.tar.gz
# remove the zip file
rm openshift-client-linux-amd64-rhel9-4.16.9.tar.gz
Now that we have oc tool, we can login into the cluster Use the following command to log in via the CLI:
export KUBECONFIG=/home/lakkilakki659/redhat-openshift/cluster/auth/kubeconfig
./oc login -u kubeadmin -p <password> https://api.<cluster-url>:6443/
the password for kubeadmin is located at : cluster-dir/auth/kubeadmin-password and url is given right after the cluster was installed.

You can login to UI also using the url provided by installer program.
you can get the url using the following command
./oc whoami --show-console # it only works after you have logged in through cli
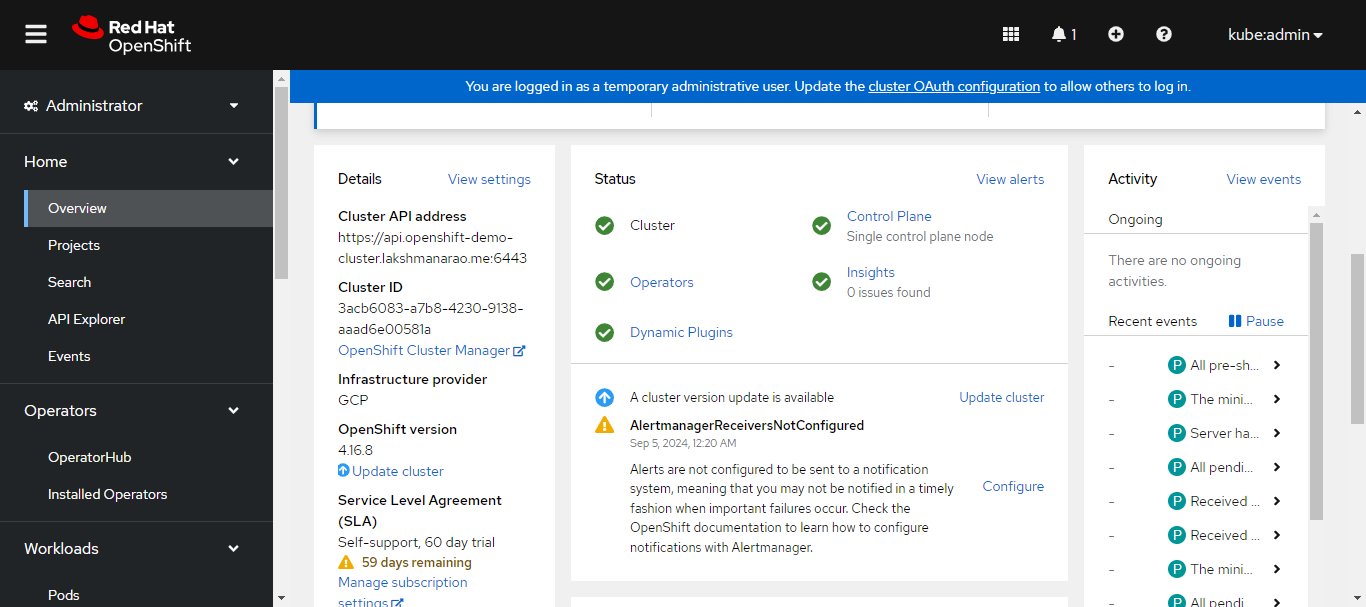
you can also check that the cluster we created in gcp is added to our redhat openshift console.
Summary
This guide has walked you through deploying Red Hat OpenShift on GCP, covering everything from GCP setup to cluster creation and access. Enjoy exploring your newly deployed OpenShift cluster. Remember to destroy your cluster when you're done to avoid unnecessary charges:
./openshift-install destroy cluster --dir=cluster
Subscribe to my newsletter
Read articles from LakshmanaRao directly inside your inbox. Subscribe to the newsletter, and don't miss out.
Written by
LakshmanaRao
LakshmanaRao
DevOps Engineer with specializing in designing, implementing, and maintaining cloud infrastructures on Azure and AWS. Proficient in Kubernetes (EKS, GKE, OpenShift v4), CI/CD pipelines, and infrastructure automation using Terraform and Ansible.