How to Build a Python Bot for Automated Customer Service Using NLP
 ByteScrum Technologies
Table of contents
- Step 1: Setting Up the Environment
- Step 2: Load and Preprocess External Data
- Step 3: Train-Test Split
- Step 4: Text Vectorization Using TF-IDF
- Step 5: Train a Simple Naive Bayes Classifier
- Step 6: Advanced NLP with BERT
- Step 7: Deploy the Bot as a Flask API
- Step 8: Real-Time Integration
- Step 9: Further Enhancements
- Example Dataset
- Steps to Train the Model and Generate a Reply:
- Example Code Implementation
- Output:
- How It Works:

Automating customer service is a key trend, and building a Python bot to handle customer queries using Natural Language Processing (NLP) can save time and resources. In this guide, we'll walk through the steps to develop a Python bot that can process customer queries, classify them, and provide automated responses. We'll leverage both basic and advanced machine learning models for customer query understanding, focusing on ease of deployment and integration.
We'll use several tools:
NLTK and spaCy for text preprocessing.
scikit-learn for training a simple classifier.
Hugging Face's Transformers for more advanced natural language understanding using models like BERT.
Additionally, we'll train the bot using a dataset of real customer service interactions, such as the Customer Support on Twitter Dataset available on Kaggle.
Step 1: Setting Up the Environment
To get started, install the required libraries:
pip install nltk spacy scikit-learn transformers pandas flask
These libraries will help with preprocessing, model training, and deployment.
Step 2: Load and Preprocess External Data
We'll be using the Customer Support on Twitter Dataset, which contains thousands of real customer queries and their corresponding labels. You can download the dataset from Kaggle here.
Once downloaded, load and inspect the dataset:
import pandas as pd
import spacy

# Load the CSV
data = pd.read_csv('customer-support-data.csv')

# Inspect the data
print(data.head())

# Select relevant columns
data = data[['text', 'label']]

# Load SpaCy model for text preprocessing
nlp = spacy.load('en_core_web_sm')

# Process the text (tokenize, remove stopwords, etc.)
data['processed_text'] = data['text'].apply(lambda x: " ".join([token.text.lower() for token in nlp(x) if not token.is_stop]))

print(data.head())
This script tokenizes the text, removes stopwords, and prepares the data for further processing.
Step 3: Train-Test Split
We'll split the dataset into training and testing sets for model evaluation:
from sklearn.model_selection import train_test_split

# Split the dataset into training and testing sets
X_train, X_test, y_train, y_test = train_test_split(data['processed_text'], data['label'], test_size=0.2, random_state=42)
Step 4: Text Vectorization Using TF-IDF
Before feeding the data into our machine learning model, we'll need to convert the text into numerical format using TF-IDF Vectorization:
from sklearn.feature_extraction.text import TfidfVectorizer

# Convert text to vectors using TF-IDF
vectorizer = TfidfVectorizer()
X_train_vec = vectorizer.fit_transform(X_train)
X_test_vec = vectorizer.transform(X_test)
Step 5: Train a Simple Naive Bayes Classifier
We'll start with a basic Naive Bayes classifier for text classification:
from sklearn.naive_bayes import MultinomialNB
from sklearn.metrics import accuracy_score

# Train the Naive Bayes classifier
clf = MultinomialNB()
clf.fit(X_train_vec, y_train)

# Make predictions and evaluate the model
y_pred = clf.predict(X_test_vec)
print(f"Accuracy: {accuracy_score(y_test, y_pred)}")
This provides a simple classification model that can predict responses to customer queries.
Step 6: Advanced NLP with BERT
To enhance the bot's understanding of complex queries, we can use BERT (Bidirectional Encoder Representations from Transformers) for more accurate language modeling. Using Hugging Face’s Transformers library, you can easily implement BERT.
from transformers import pipeline

# Load pre-trained BERT model for text classification
classifier = pipeline('sentiment-analysis')

# Test on a sample query
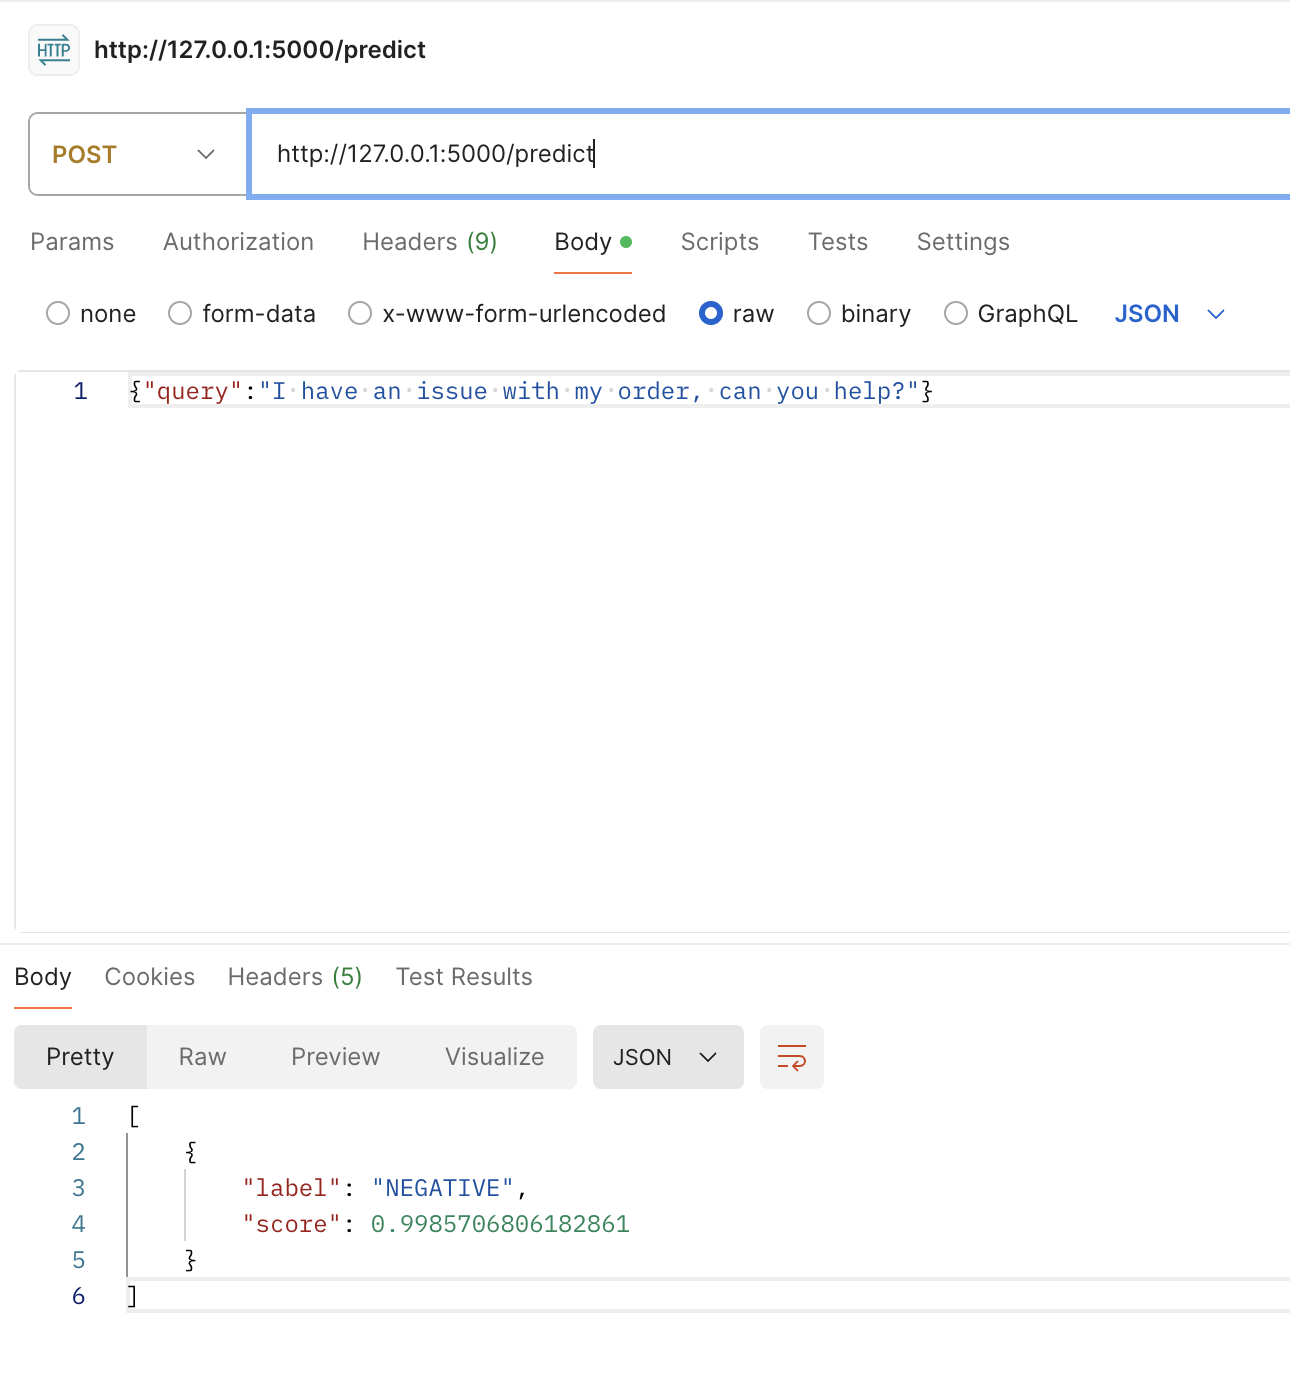
query = "I have an issue with my order, can you help?"
result = classifier(query)
print(result)
BERT can provide much more nuanced responses compared to traditional classifiers, making it ideal for customer service bots that handle complex interactions.
Step 7: Deploy the Bot as a Flask API
Once the model is trained and ready, you can deploy it using Flask for easy integration with web platforms or messaging services.
from flask import Flask, request, jsonify

app = Flask(__name__)

@app.route('/predict', methods=['POST'])
def predict():
    query = request.json['query']
    result = classifier(query)
    return jsonify(result)

if __name__ == '__main__':
    app.run(debug=True)
You can test this Flask API by sending customer queries through HTTP POST requests. The bot will process the query and return a predicted response.
Complete Code:
from flask import Flask, request, jsonify
from transformers import pipeline
from sklearn.metrics import accuracy_score
from sklearn.naive_bayes import MultinomialNB
from sklearn.feature_extraction.text import TfidfVectorizer
from sklearn.model_selection import train_test_split
import pandas as pd
import spacy

# Load the CSV
data = pd.read_csv('chatbot/sample.csv')

# Inspect the data
print(data.head())
data['label'] = data['inbound'].apply(lambda x: 1 if x else 0)

# Select relevant columns
data = data[['text', 'label']]

# Load SpaCy model for text preprocessing
nlp = spacy.load('en_core_web_sm')

# Process the text (tokenize, remove stopwords, etc.)
data['processed_text'] = data['text'].apply(lambda x: " ".join(
    [token.text.lower() for token in nlp(x) if not token.is_stop]))

print(data.head())


# Split the dataset into training and testing sets
X_train, X_test, y_train, y_test = train_test_split(
    data['processed_text'], data['label'], test_size=0.2, random_state=42)


# Convert text to vectors using TF-IDF
vectorizer = TfidfVectorizer()
X_train_vec = vectorizer.fit_transform(X_train)
X_test_vec = vectorizer.transform(X_test)


# Train the Naive Bayes classifier
clf = MultinomialNB()
clf.fit(X_train_vec, y_train)

# Make predictions and evaluate the model
y_pred = clf.predict(X_test_vec)
print(f"Accuracy: {accuracy_score(y_test, y_pred)}")

# Load pre-trained BERT model for text classification
classifier = pipeline('sentiment-analysis')

# Test on a sample query
query = "I have an issue with my order, can you help?"
result = classifier(query)
print(result)

app = Flask(__name__)

@app.route('/predict', methods=['POST'])
def predict():
    query = request.json['query']
    result = classifier(query)
    return jsonify(result)


if __name__ == '__main__':
    app.run(debug=True)


Step 8: Real-Time Integration
You can integrate the bot with platforms like Slack, Telegram, or your website’s chat system by connecting the Flask API to these services via their respective APIs.
Step 9: Further Enhancements
You can improve the bot by:
Training it on custom datasets with domain-specific queries.
Using other NLP models like GPT for dialogue generation.
Adding more layers to the preprocessing, such as stemming, lemmatization, or using more advanced techniques for entity extraction.
Example Dataset
You can use a dataset like this for training:
| user_id | text | label |
| 1 | "I need help with my account." | Account Help |
| 2 | "How do I reset my password?" | Password Help |
| 3 | "I want to cancel my subscription." | Cancellation |
| 4 | "What are your operating hours?" | Information |
| 5 | "I have a billing issue with my order." | Billing |
Use the CSV format to store your customer queries, preprocess them, and then train your bot on these real-world examples.
Steps to Train the Model and Generate a Reply:
Preprocess the Data: Extract the
textandlabelcolumns from the CSV dataset.Train a Classifier: Use a classifier like Naive Bayes or Logistic Regression to train the model on the
textandlabeldata.Predict the Label: Once the user submits a query, the model will predict the label.
Reply According to the Label: Based on the predicted label, return a corresponding reply.
Example Code Implementation
First, make sure you have the dataset in CSV format. Here’s a Python implementation:
import pandas as pd
from sklearn.feature_extraction.text import TfidfVectorizer
from sklearn.model_selection import train_test_split
from sklearn.naive_bayes import MultinomialNB
from sklearn.pipeline import make_pipeline
from sklearn.metrics import classification_report

# Load dataset
data = pd.DataFrame({
    'user_id': [1, 2, 3, 4, 5],
    'text': ["I need help with my account.",
             "How do I reset my password?",
             "I want to cancel my subscription.",
             "What are your operating hours?",
             "I have a billing issue with my order."],
    'label': ["Account Help", "Password Help", "Cancellation", "Information", "Billing"]
})

# Train-test split
X = data['text']
y = data['label']

X_train, X_test, y_train, y_test = train_test_split(X, y, test_size=0.2, random_state=42)

# Use a TF-IDF vectorizer and Naive Bayes classifier pipeline
model = make_pipeline(TfidfVectorizer(), MultinomialNB())

# Train the model
model.fit(X_train, y_train)

# Evaluate the model
y_pred = model.predict(X_test)
print(classification_report(y_test, y_pred))

# Define replies based on labels
replies = {
    "Account Help": "We can help you with your account. Please provide more details.",
    "Password Help": "Here’s how you can reset your password.",
    "Cancellation": "We’re sorry to see you go! To cancel your subscription, follow this link.",
    "Information": "Our operating hours are from 9 AM to 5 PM, Monday to Friday.",
    "Billing": "Please provide more details about your billing issue, and we will assist you."
}

# Function to predict label and provide reply
def get_auto_reply(query):
    predicted_label = model.predict([query])[0]
    return replies[predicted_label]

# Test the function with a user query
user_query = "How do I reset my password?"
reply = get_auto_reply(user_query)
print(f"User Query: {user_query}")
print(f"Auto Reply: {reply}")
Output:
When the user asks, "How do I reset my password?", the output will be:
User Query: How do I reset my password?
Auto Reply: Here’s how you can reset your password.
How It Works:
Data Preparation: The dataset has two columns:
text(the query) andlabel(the intent).Model Training: We use a TF-IDF vectorizer and a Naive Bayes classifier to train the model.
Prediction and Reply: Based on the predicted label, a corresponding reply is generated.
Conclusion
This bot can be further enhanced with custom datasets, more advanced models, and integration into messaging platforms to automate customer support effectively!
Subscribe to my newsletter
Read articles from ByteScrum Technologies directly inside your inbox. Subscribe to the newsletter, and don't miss out.
Written by

ByteScrum Technologies
ByteScrum Technologies
Our company comprises seasoned professionals, each an expert in their field. Customer satisfaction is our top priority, exceeding clients' needs. We ensure competitive pricing and quality in web and mobile development without compromise.