Setting Up Multi-VMs in Vagrant
 Aryan Gupta
Content
Introduction
Multi-VM setup in Vagrant
Sample Use Case for Multi-VM Setup
Setting Up Your Multi-VM Environment
Networking in Multi-VM Setup
Provisioning VMs
Syncing Folders Between Host and VMs
Conclusion
Introduction
In modern DevOps environments, managing multiple virtual machines (VMs) efficiently is crucial for handling complex infrastructures. Vagrant offers a powerful solution by enabling easy provisioning, configuration, and management of multi-VM environments. In this blog, we’ll explore how to set up and manage multiple VMs using Vagrant, focusing on practical examples.
Multi-VM Setup in Vagrant
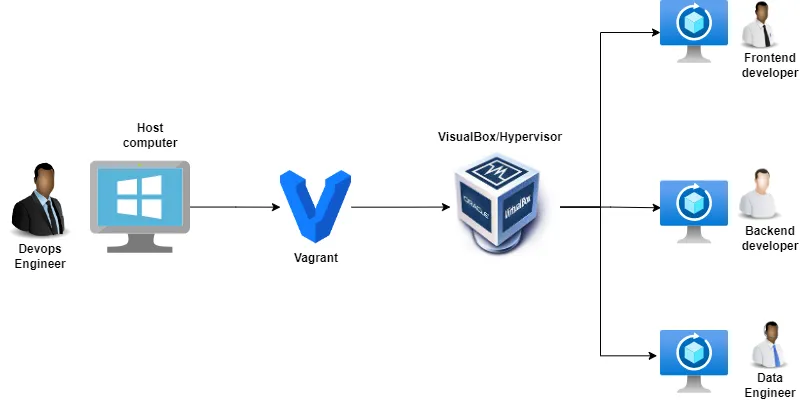
In a multi-VM setup, you can define multiple virtual machines within a single Vagrantfile. This is useful when you need separate VMs for various parts of your application, such as web servers, database servers, and more. Vagrant handles all the configuration, provisioning, and networking of these VMs, making it easier to replicate complex infrastructures.
Sample Use Case for Multi-VM Setup
Let's consider a scenario where we need:
Two Ubuntu web servers (
web01andweb02).One CentOS database server (
db01).
Each server has a private IP address, hostname configuration, and specific provisioning.
Setting Up Your Multi-VM Environment
Step 1: Install Vagrant Make sure you have Vagrant installed on your machine. You can install it by downloading it from Vagrant's official website.
Step 2: Create a Vagrantfile You can initiate a Vagrantfile by running:
vagrant init
This will generate a basic Vagrantfile, which you can modify for your multi-VM setup.
Step 3: Define the Multi-VM Configuration
Here’s a basic example of how you can define multiple VMs in a Vagrantfile:
Vagrant.configure("2") do |config|
  # Define web01 VM
  config.vm.define "web01" do |web|
    web.vm.box = "ubuntu/focal64"
    web.vm.hostname = "web01"
    web.vm.network "private_network", ip: "192.168.56.10"
    web.vm.provision "shell", inline: <<-SHELL
      sudo apt-get update
      sudo apt-get install -y apache2
    SHELL
  end

  # Define web02 VM
  config.vm.define "web02" do |web|
    web.vm.box = "ubuntu/focal64"
    web.vm.hostname = "web02"
    web.vm.network "private_network", ip: "192.168.56.11"
    web.vm.provision "shell", inline: <<-SHELL
      sudo apt-get update
      sudo apt-get install -y apache2
    SHELL
  end

  # Define db01 VM
  config.vm.define "db01" do |db|
    db.vm.box = "centos/7"
    db.vm.hostname = "db01"
    db.vm.network "private_network", ip: "192.168.56.12"
    db.vm.provision "shell", inline: <<-SHELL
      sudo yum update -y
      sudo yum install -y mariadb-server
      sudo systemctl start mariadb
    SHELL
  end
end
In this setup:
We define three VMs:
web01,web02, anddb01.Each VM has a unique private IP address and hostname.
Provisioning scripts are used to install necessary packages like Apache on the web servers and MariaDB on the database server.
Step 4: Bring Up the VMs To start the VMs, run:
vagrant up
Vagrant will start each VM, apply the necessary configurations, and run the provisioning scripts.
Step 5: Verify the Setup You can SSH into any of the VMs using:
vagrant ssh web01
Replace web01 with any VM name to log in to that specific machine.
Networking in Multi-VM Setup
One of the key advantages of Vagrant is its networking capabilities. In a multi-VM environment, you can set up:
Private networks: Used for communication between VMs.
Public networks: Allow external access to VMs.
Port forwarding: Forward traffic from the host machine to specific ports on VMs.
In our example, the VMs are configured on a private network, allowing them to communicate with each other.
Provisioning VMs
Vagrant allows multiple methods of provisioning, including:
Shell scripts (as seen in the example).
Puppet, Chef, or Ansible for more complex setups. Provisioning ensures that your VMs are configured automatically every time they are brought up.
Syncing Folders Between Host and VMs
By default, Vagrant syncs a folder between your host machine and the guest VMs. This is useful for sharing application code across VMs. You can configure custom folder syncing in your Vagrantfile:
config.vm.synced_folder "./app", "/var/www/html"
Conclusion
Setting up multiple VMs using Vagrant provides an efficient and streamlined way to manage complex environments. Whether you're a developer or a DevOps engineer, the flexibility and ease of use offered by Vagrant's multi-VM setup can significantly improve your workflow.
Subscribe to my newsletter
Read articles from Aryan Gupta directly inside your inbox. Subscribe to the newsletter, and don't miss out.
Written by
