How to Integrate Quilljs WYSIWYG Editor in Your Phoenix Project
 Auwal MS
In this article, we will outline steps for adding Quilljs, a free, open-source What-You-See-Is-What-You-Get (WYSIWYG) editor, to a Phoenix project to enhance users' experience when creating content that requires formatting. Let's get started.
I assume you already have an elixir project you want to implement this on, but for the sake of this guide, let's bootstrap one for this from our terminal/CLI.
mix phx.new quill_to_phoenix_demo
# Hit Enter when prompted to "Fetch and install dependencies? [Yn]"
I will set up the database using this command mix ecto.setup and run the initial migration. Next, let us use the Mix generator to create the HTML boilerplate of our project using mix phx.gen.html Blog Post posts title:string body:string. Once we add our resource path resources "/posts", PostController to the router file lib/quill_to_phoenix_demo_web/router.ex and run our migration (mix ecto.migrate) so that the post table will be created in our database. We should be up and ready.
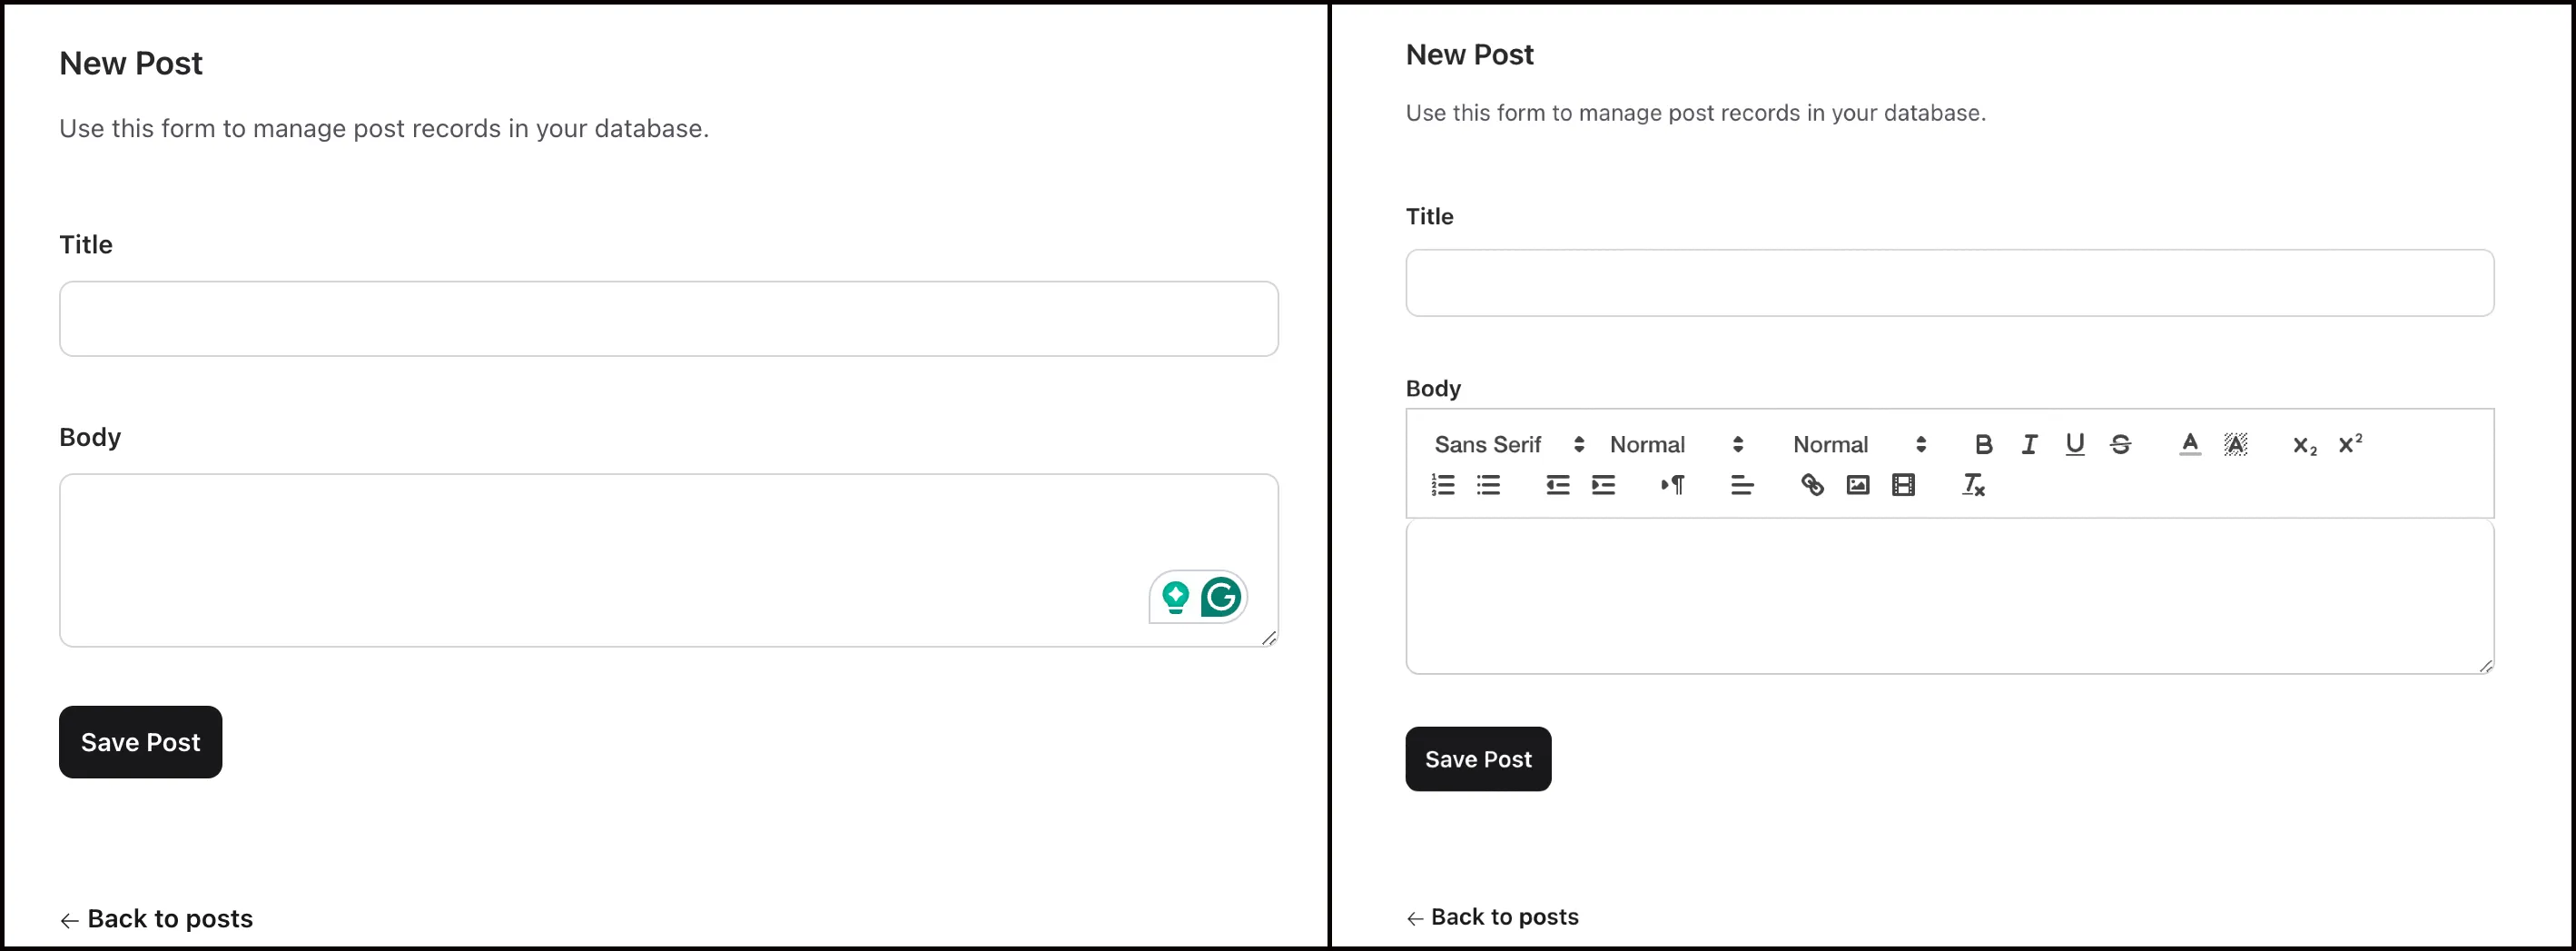
Running our server using iex -S mix phx.server and navigating to http://localhost:4000/posts/ and then clicking New Post will show us a basic form like what we have below:

On the left is what we currently have, and on the right is our destination
Step 1: Add Quill to the project
We have two options:
Install it as an NPM package by running
npm install quillin your assets directoryUse CDN to add it globally to your project by adding t.
In this guide, we will be using the second option by adding the below code to root.html.heex.
<script src="https://cdn.jsdelivr.net/npm/quill@2.0.2/dist/quill.js">
    </script>
Step 2: Add Quill CSS to your Project
To ensure your WYSIWYG editor looks like what we want, you need to add the quill's CSS CDN to our root.html.heex.
<link href="https://cdn.jsdelivr.net/npm/quill@latest/dist/quill.snow.css" rel="stylesheet" />
If you used option 2 in the first step, ensure this CSS link comes before your JS.
Step 3: Initialize Quill in your project
Now that we've added both the JS and CSS to our project, it is time to initialize the quill package in our project, and we will do that by adding the following code to our hook.js file, which can be found in /assets/js/ folder (If it doesn't exist, create one).
//import Quill from 'quill';
//uncomment the above line if you added quill to the project using npm

let Hooks = {};

Hooks.QuillEditor = {
    mounted() {
        this.initializeQuill();
    },
    updated() {
        this.initializeQuill();
    },
    initializeQuill() {


        this.quill = new Quill('#editor-container', {
            theme: 'snow',
            placeholder: 'Type your content here...',
            modules: {
                //customization happens here
            }
        });

        const hiddenInput = document.getElementById('hidden-content');

        this.quill.root.innerHTML = hiddenInput.value;
        this.quill.on('text-change', () => {
            hiddenInput.value = this.quill.root.innerHTML;
        });
    }
};

export default Hooks;
You also need to import hooks.js into the app.js file and add it to the liveSocket's third parameter object as such
...
import topbar from "../vendor/topbar"
import Hooks from "./hooks" //add this

let csrfToken = document.querySelector("meta[name='csrf-token']").getAttribute("content")
let liveSocket = new LiveSocket("/live", Socket, {
  longPollFallbackMs: 2500,
  hooks: Hooks, //add this as well
  params: {_csrf_token: csrfToken}
})
...
Step 4: Connect HTML/Heex form to connect to hook
Here, we will be adding an empty <div id="editor-container" phx-hook="QuillEditor"></div> that serves as the container of our editor and is connected to the hook we created in Step 3. The existing input for the body must be changed to a hidden input field to keep all entries in the editor box and transmit the input when submitting the form. Our input field and div will look like the below code in the form.
<.simple_form :let={f} for={@changeset} action={@action}>
...
  <.input field={f[:body]} type="hidden" label="Body" id="hidden-content"/>
  <div id="editor-container" phx-hook="QuillEditor"></div>
...
</.simple_form>
Congratulations. Your project should have the editor up and running, but let's customize it more. Everything after this is optional.
Step 5: Increase the Toolbar Option of your Editor
Quills API allows us to customize our editor as much as we want. To achieve the formatting option we've seen at the beginning of this guide, we need to add the following codes to the initializeQuill() node of our hooks.js file
const toolbarOptions = [
            [ { 'size': [] }],
            [{ 'header': [1, 2, 3, 4, 5, 6, false] }],
            ['bold', 'italic', 'underline', 'strike'],
            [{ 'color': [] }, { 'background': [] }],
            [{ 'script': 'sub' }, { 'script': 'super' }],
            [{ 'list': 'ordered' }, { 'list': 'bullet' }],
            [{ 'indent': '-1' }, { 'indent': '+1' }],
            [{ 'direction': 'rtl' }],
            [{ 'align': [] }],
            ['link', 'image', 'video'],
            ['clean']
        ];
Then, let us change our initialization of the quill editor to have toolbar as a child of the empty module object as seen below.
this.quill = new Quill('#editor-container', {
            theme: 'snow',
            placeholder: 'Type your content here...',
            modules: {
                toolbar: toolbarOptions //this was added
            }
        });
You can see other customization options on the Quill documentation page.
Finally, remember to change your view to display the raw HTML created using the editor to avoid having HTML tags flying around.

Subscribe to my newsletter
Read articles from Auwal MS directly inside your inbox. Subscribe to the newsletter, and don't miss out.
Written by
