Simplifying IAM (Identity Access Management) #Day_13
 Vaishnavi Modakwar
Introduction to IAM 🔐
IAM (Identity and Access Management) is like the security system 🛡️ for your AWS (Amazon Web Services) environment. It helps you control who has access to different parts of your cloud infrastructure, just like a manager controlling access to different areas of a company.
Imagine you run a large office building 🏢. You wouldn't want just anyone to walk into any room and take whatever they like, right? You’d have locks and keycards 🔑 to control access. Similarly, IAM is like a digital security guard 🚓 that helps make sure only authorized people can access sensitive areas in your AWS cloud.
Why IAM is so important:
Protects Your Data: Just like you wouldn't give access to sensitive financial documents 🗃️ to all your employees, IAM lets you protect sensitive data from unauthorized access.
Customized Access: You can decide who can do what. For example, developers can have access to code 🖥️, but not to financial data 📊.
Centralized Control: You get to manage all the permissions and who can access what from a single dashboard, which makes it easy to monitor and control access.
Key Components of IAM 🔑
1. IAM Users 👤
In AWS, IAM Users are individual accounts created for people or services that need access to AWS resources. Each user gets their own unique credentials (username and password, or access keys) to access AWS. These accounts help you manage who has access to your AWS environment and what actions they can perform.
How to Create IAM Users:
Creating IAM users in AWS is straightforward. Here’s how you can do it step by step:
Log in to AWS: First, log in to your AWS Management Console.
Go to the IAM Dashboard: In the AWS Console, type "IAM" in the search bar and click on IAM. This will take you to the IAM dashboard.
Click on ‘Users’: On the left-hand menu, click on Users. This is where you manage your individual accounts.
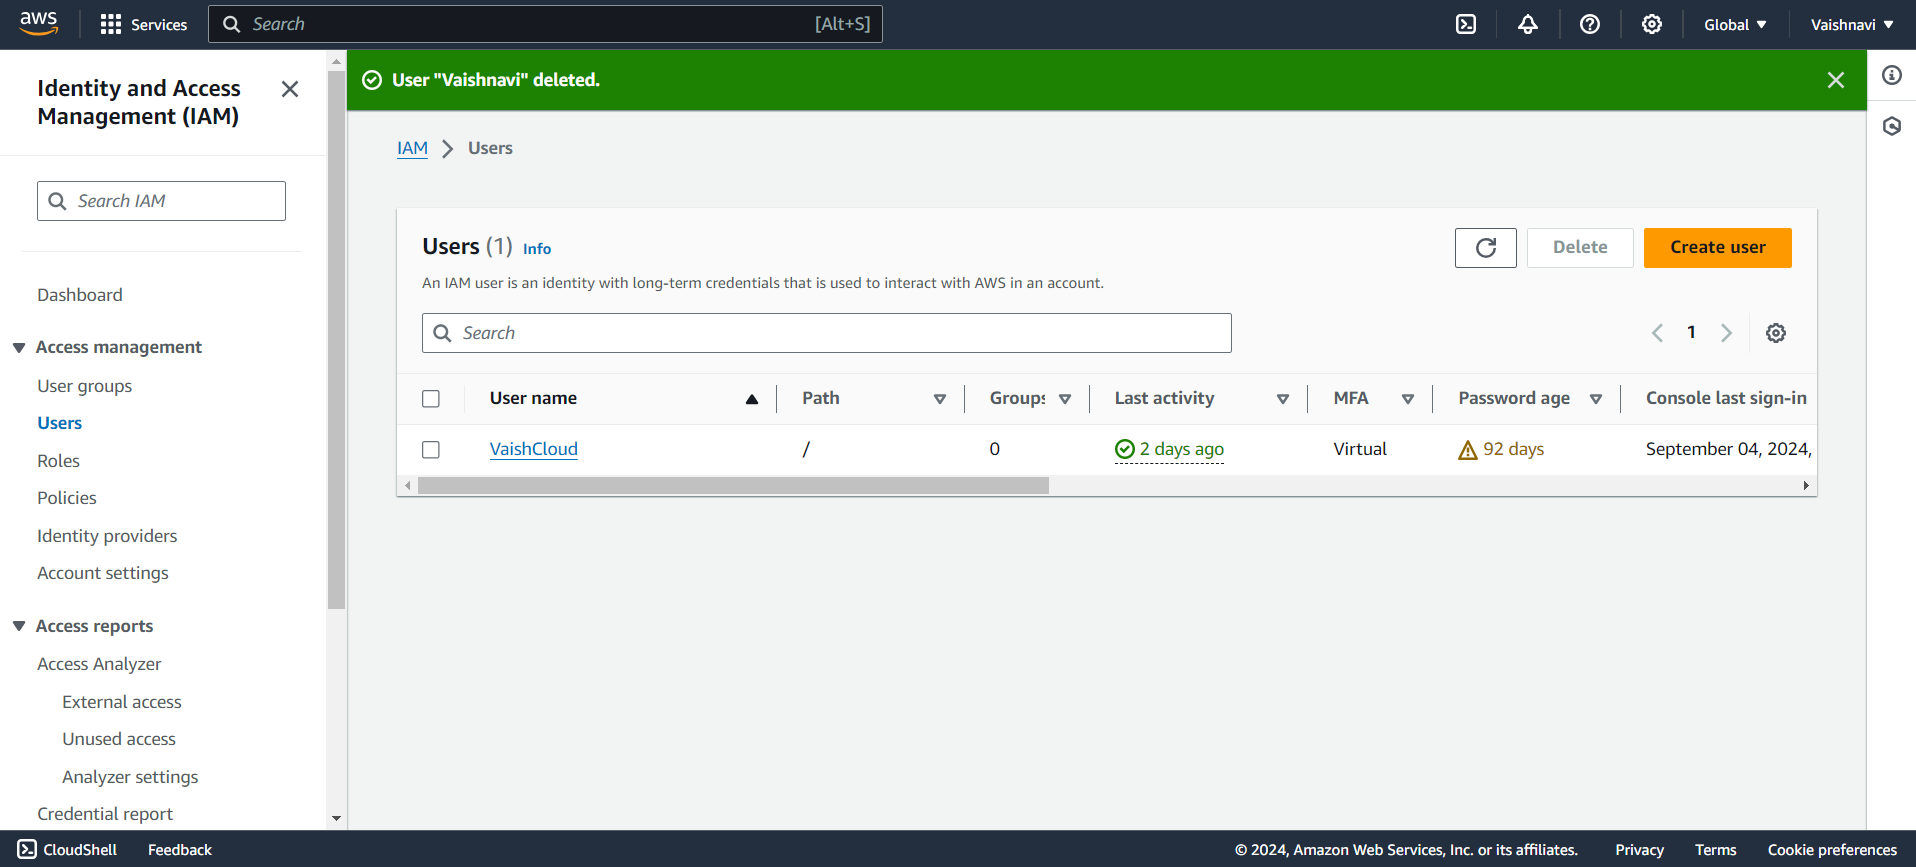
Create User: Click on ‘Create user’ to create a new IAM user.
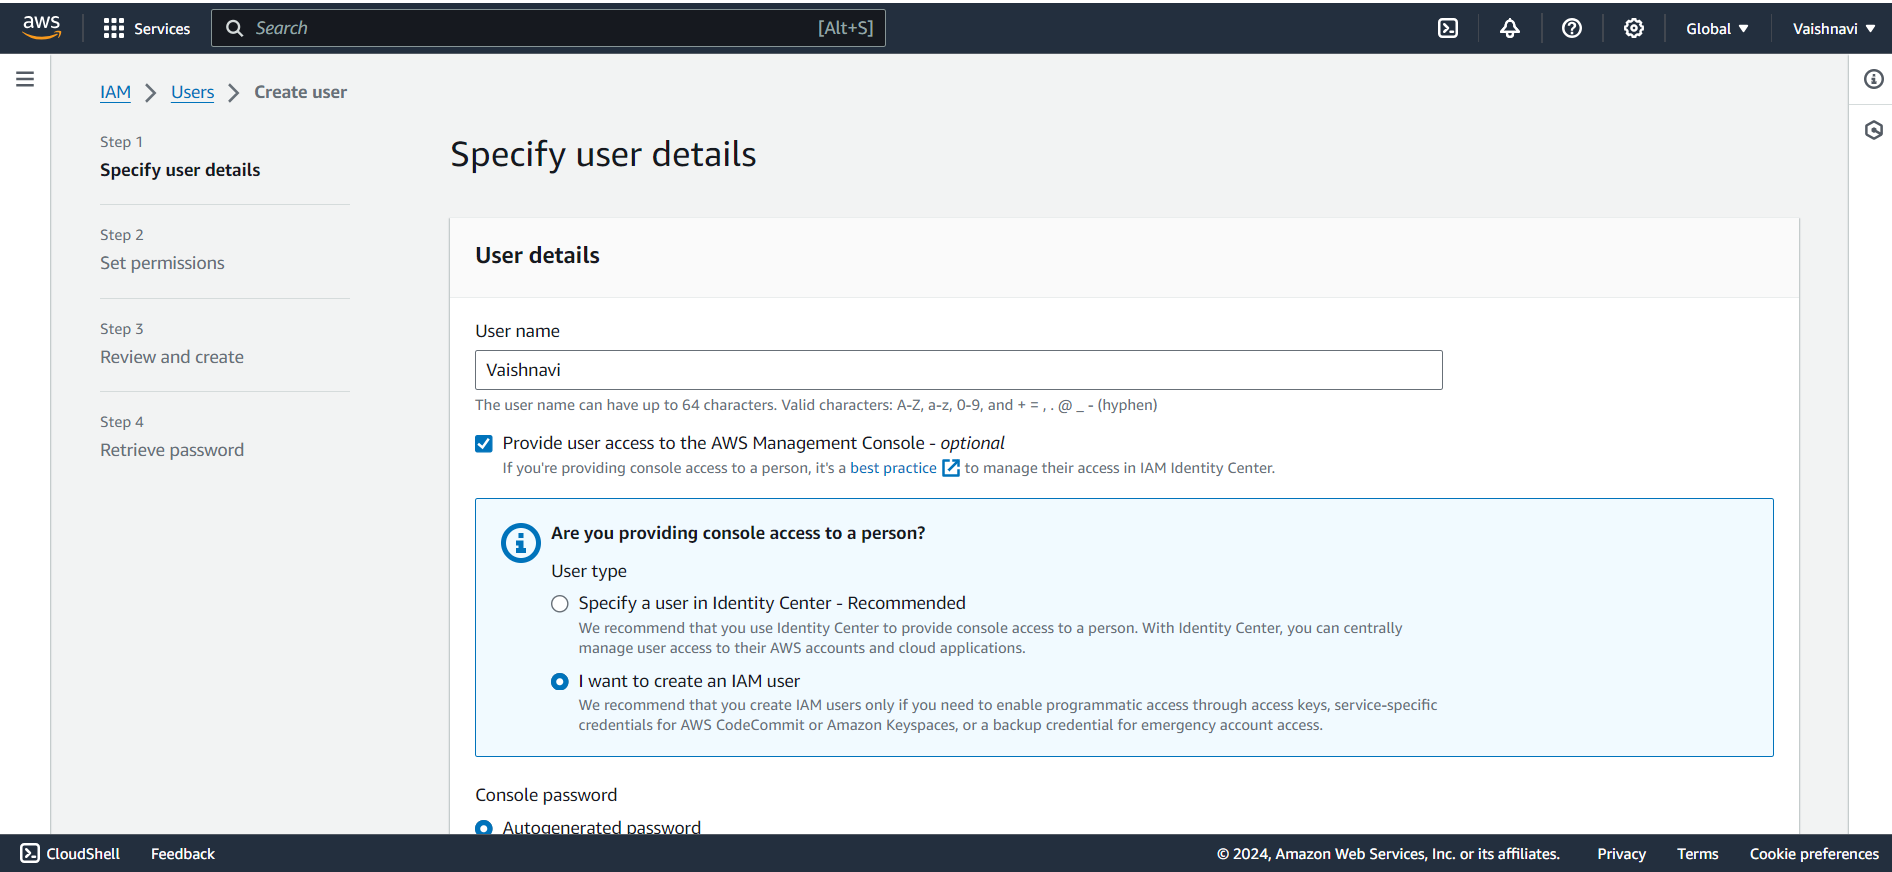
Set User Details: Enter a username. You can create multiple users at once if needed.
Choose Access Type: You can choose the type of access:
Programmatic access (for using AWS via API, CLI, SDK)
AWS Management Console access (for logging in to the web console)
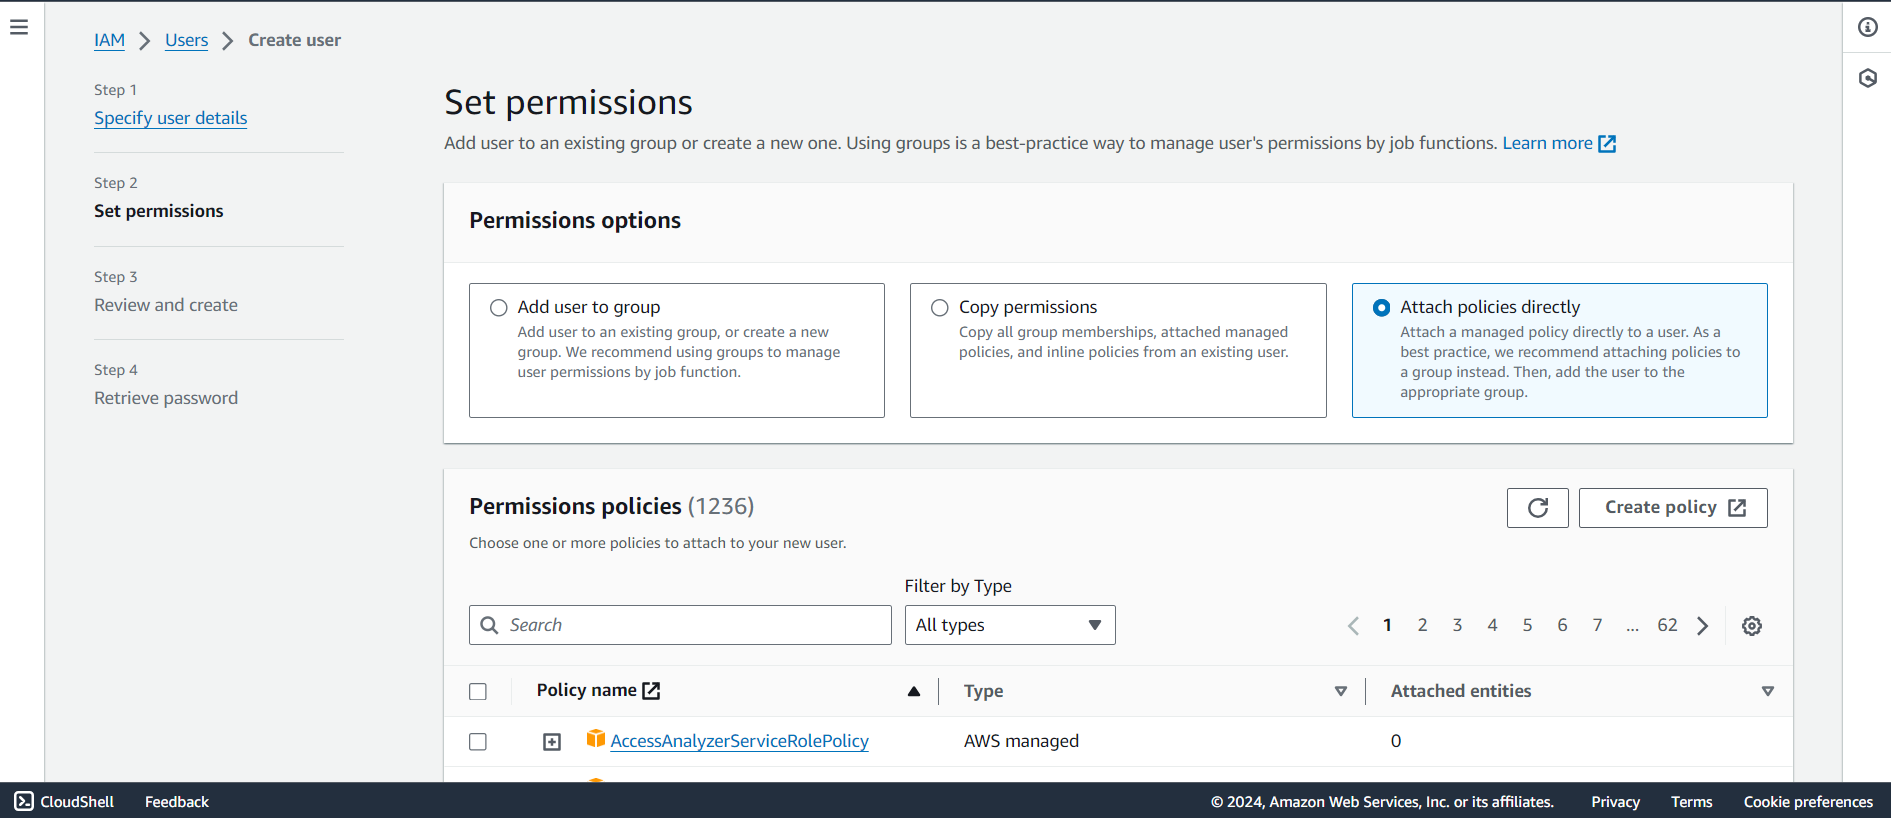
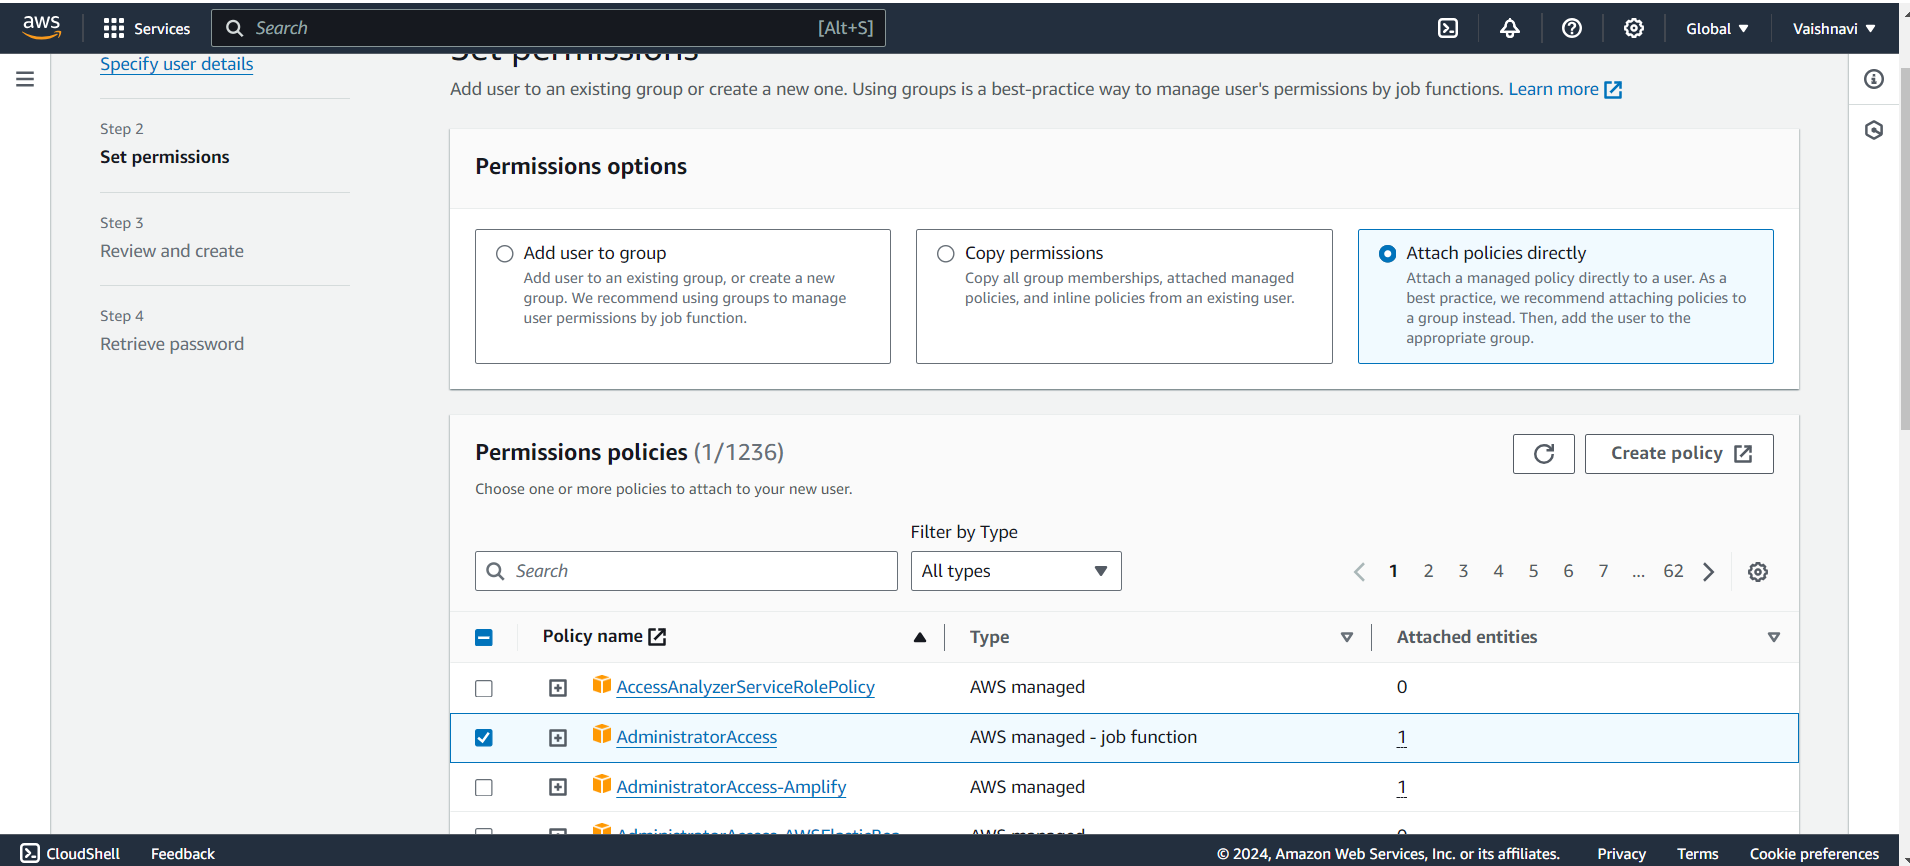
Attach Permissions: Now, choose what permissions this user should have. You can either:
Attach an existing policy (pre-made permissions templates), or
Create a custom policy to control what the user can do.
I have given existing Administrator Access means that your IAM user will have the access to all the services like a Root user
Note: IAM user don't have access to Billing and Cost Management by default only root user will have the access to it. If you want to give you have to enable it for particular IAM user.
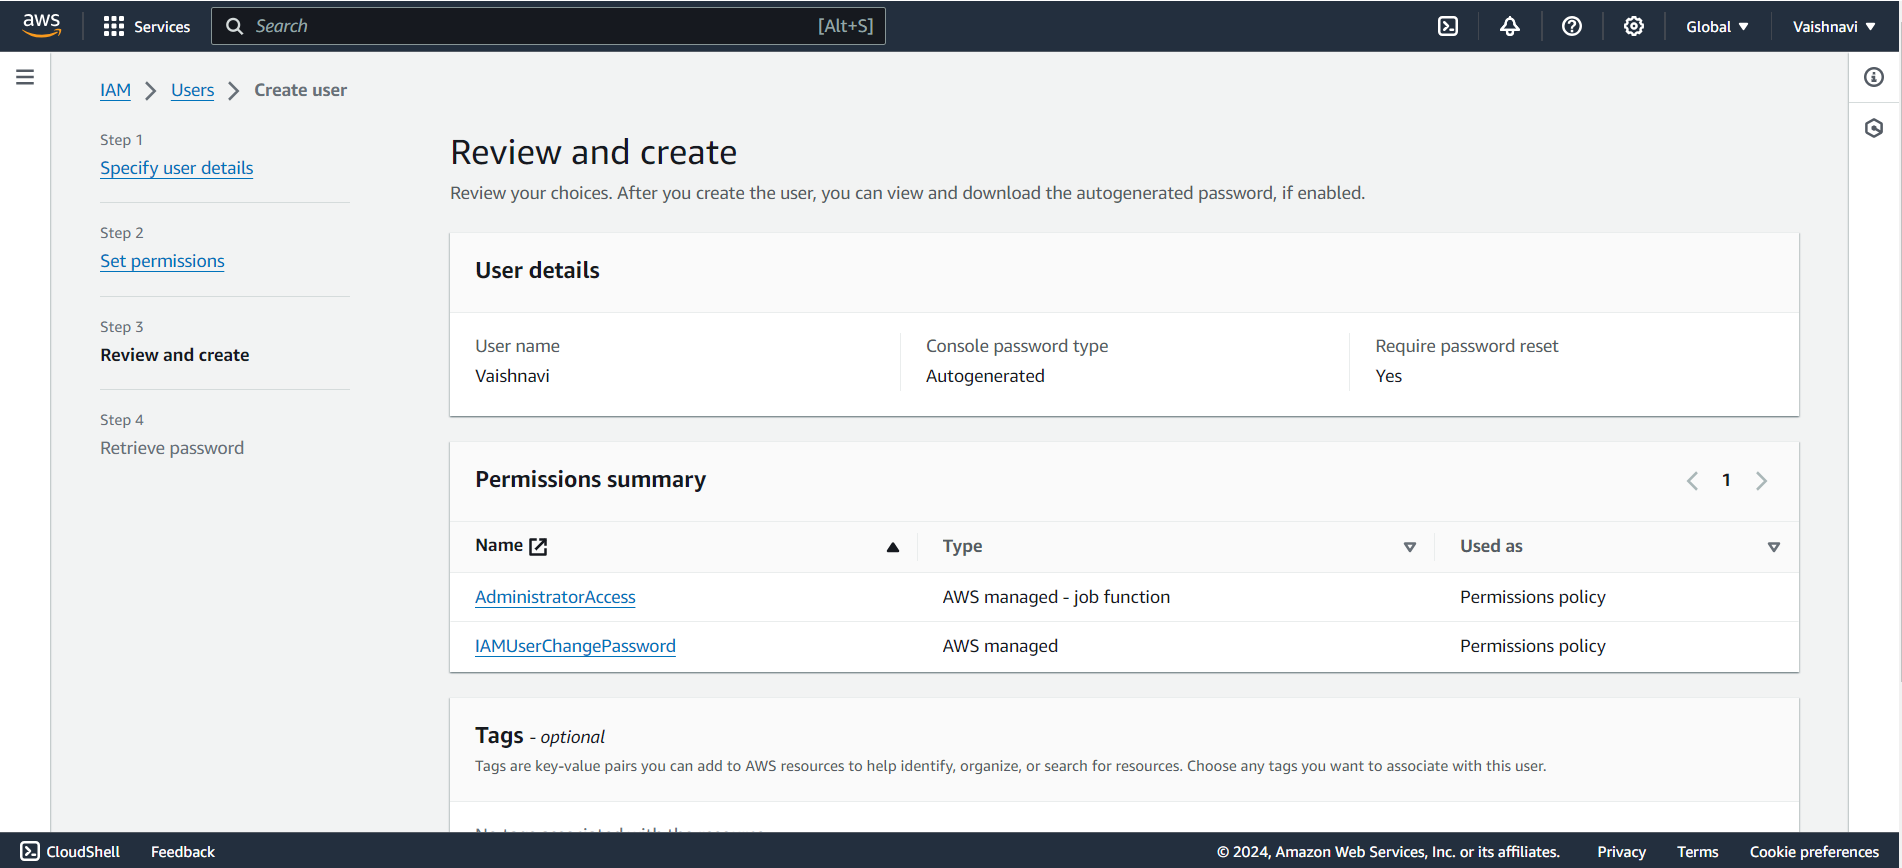
Review and Create: After reviewing the details, click on Create user. AWS will generate the login details (username and password, or access keys) for the user.
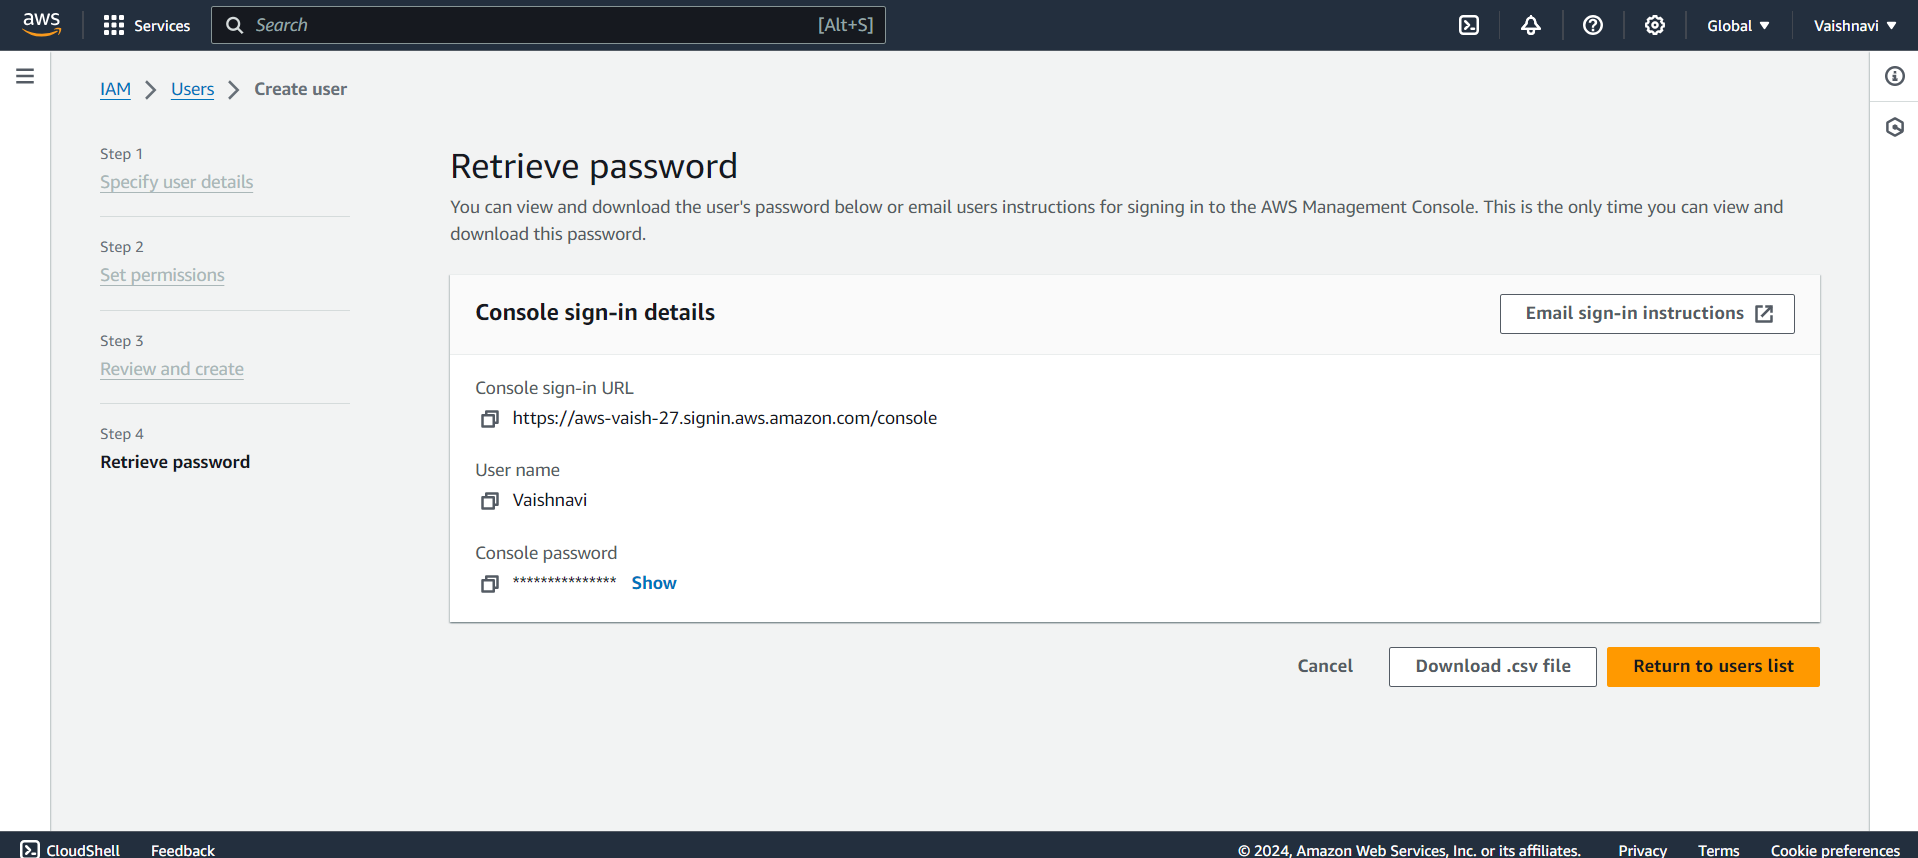
Retrieve Password: Make sure you retrieve the password before returning to users list and download .csv file, because password is available to retrieve only once.
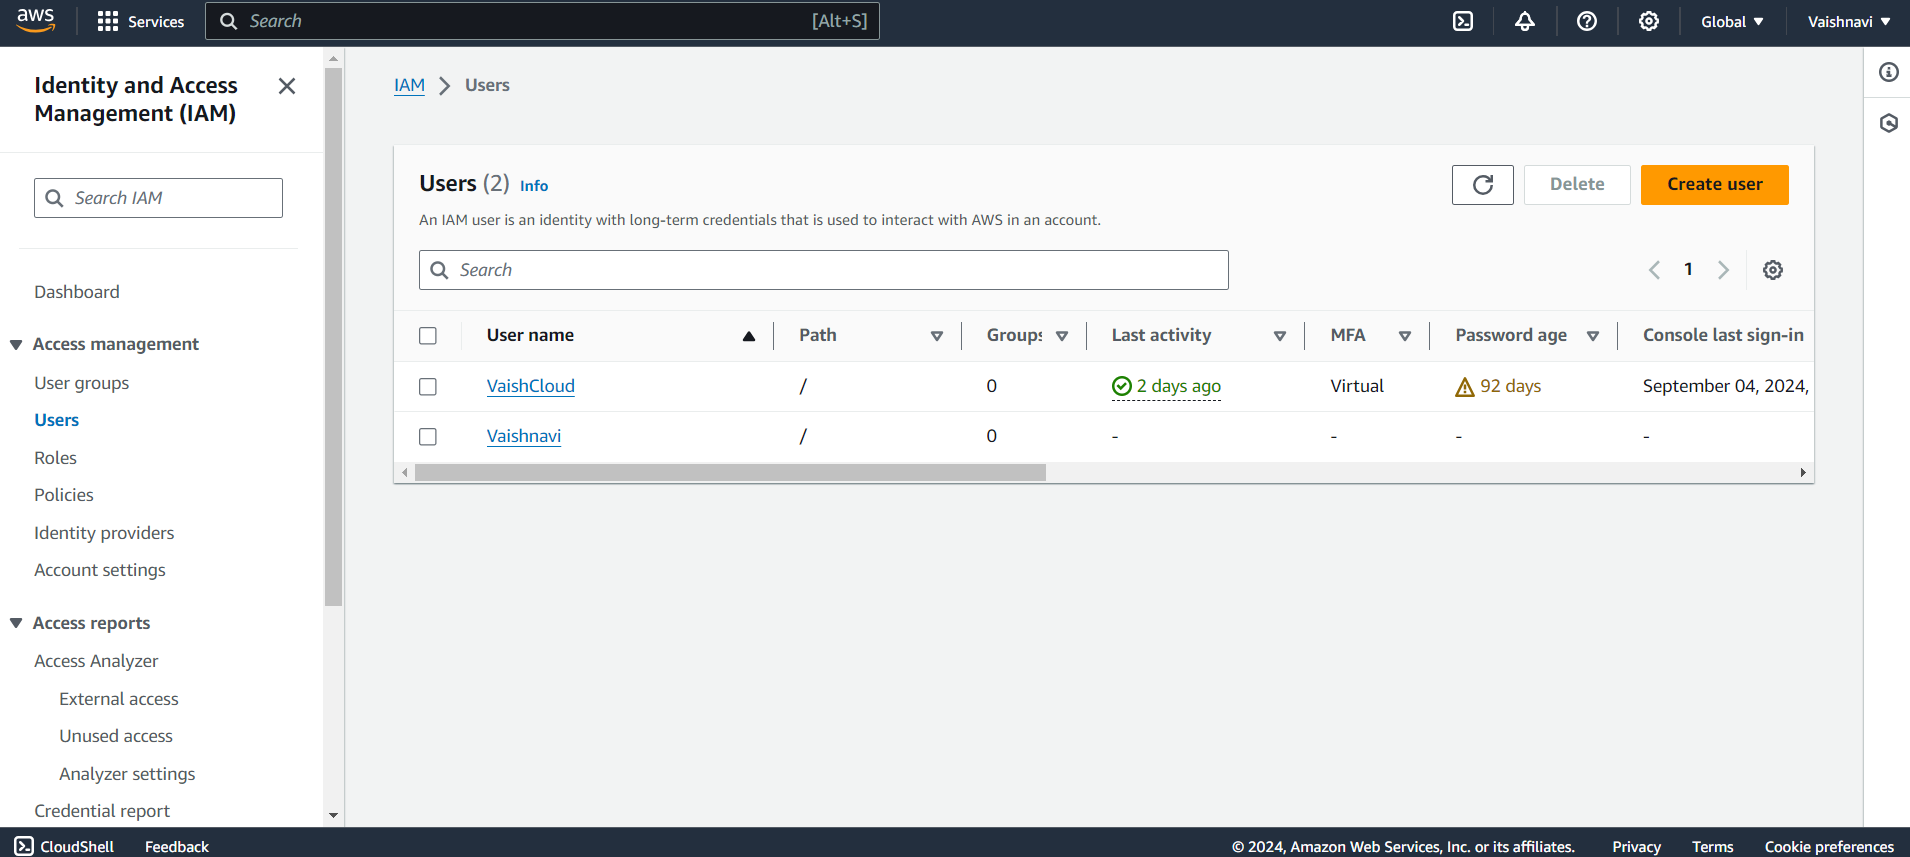
Returns to users list: Now you can see yours IAM user is being created.
Summary:
Creating IAM users allows you to set up individual accounts for each person or team in your organization. This way, you ensure they only have access to the parts of AWS they need, keeping your cloud environment secure and organized! 👥💼
2. IAM Groups 👥
IAM Groups in AWS are collections of IAM Users that share the same permissions. Instead of assigning permissions to each user individually, you can create a group and assign the same permissions to all users in that group. This makes managing multiple users much simpler and more efficient.
Example
Imagine you have a team of developers 👨💻👩💻. Each developer needs the same access to AWS resources like EC2, S3, and Lambda for coding and deploying applications. Instead of assigning permissions one by one to every developer, you create a “Developer Group”. Now, you just need to assign the required permissions to this group, and every user in the group automatically gets the same access.
If a new developer joins the team, you simply add them to the Developer Group, and they instantly get the necessary permissions to start working. This approach saves time and keeps your permissions organized.
How to Create IAM Groups:
Creating an IAM group is quick and easy. Here’s how to do it:
Log in to AWS: First, log in to your AWS Management Console.
Go to the IAM Dashboard: In the AWS Console, search for IAM and click on it to open the IAM dashboard.
Click on ‘Groups’: In the left-hand menu, click on Groups. This is where you manage your groups of users.
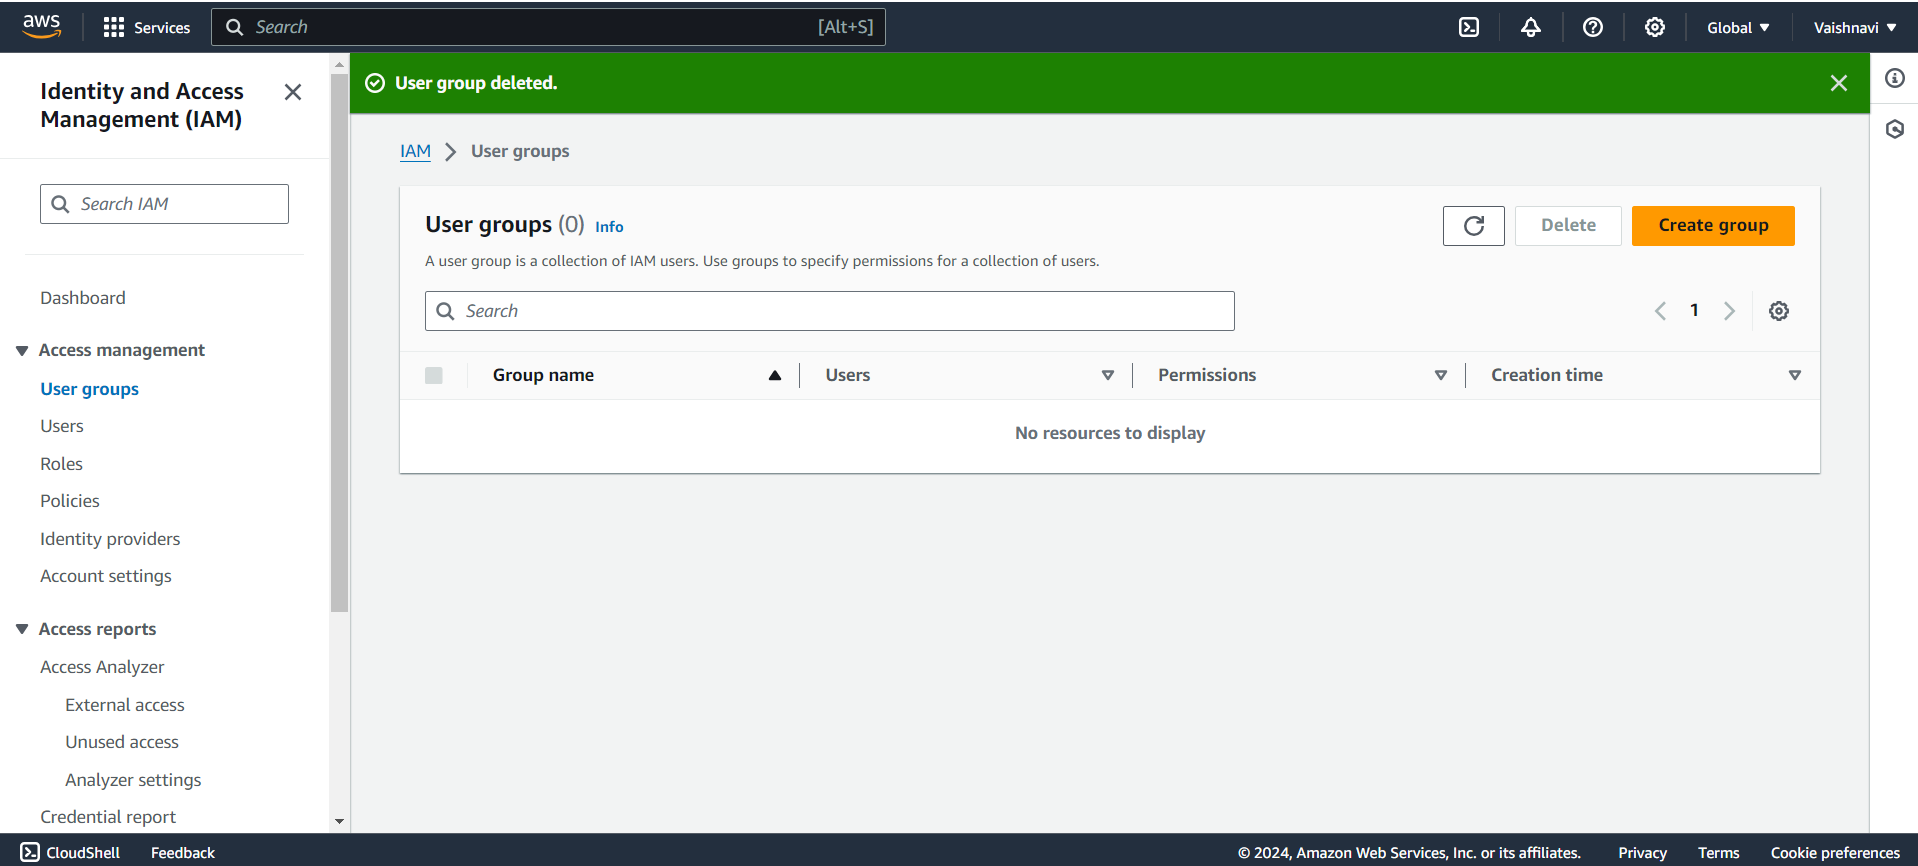
Create a New Group: Click on ‘Create New Group’ to start the process.
Name the Group: Give your group a name that describes its purpose, like “Developers” or “DevOps”. This helps you easily identify the group later.
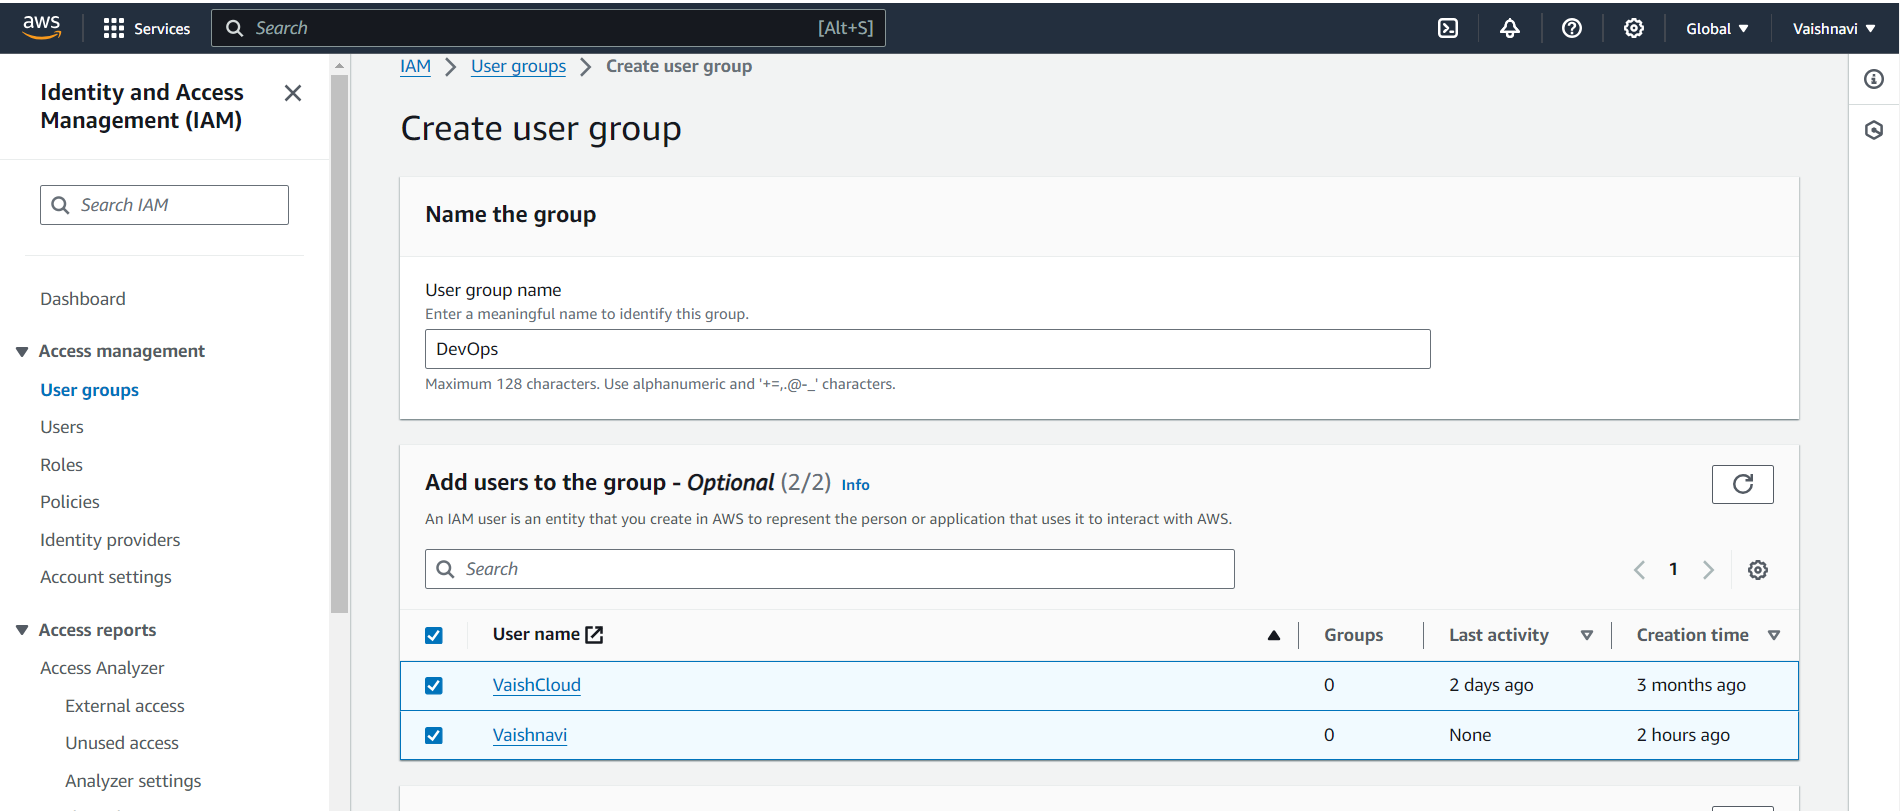
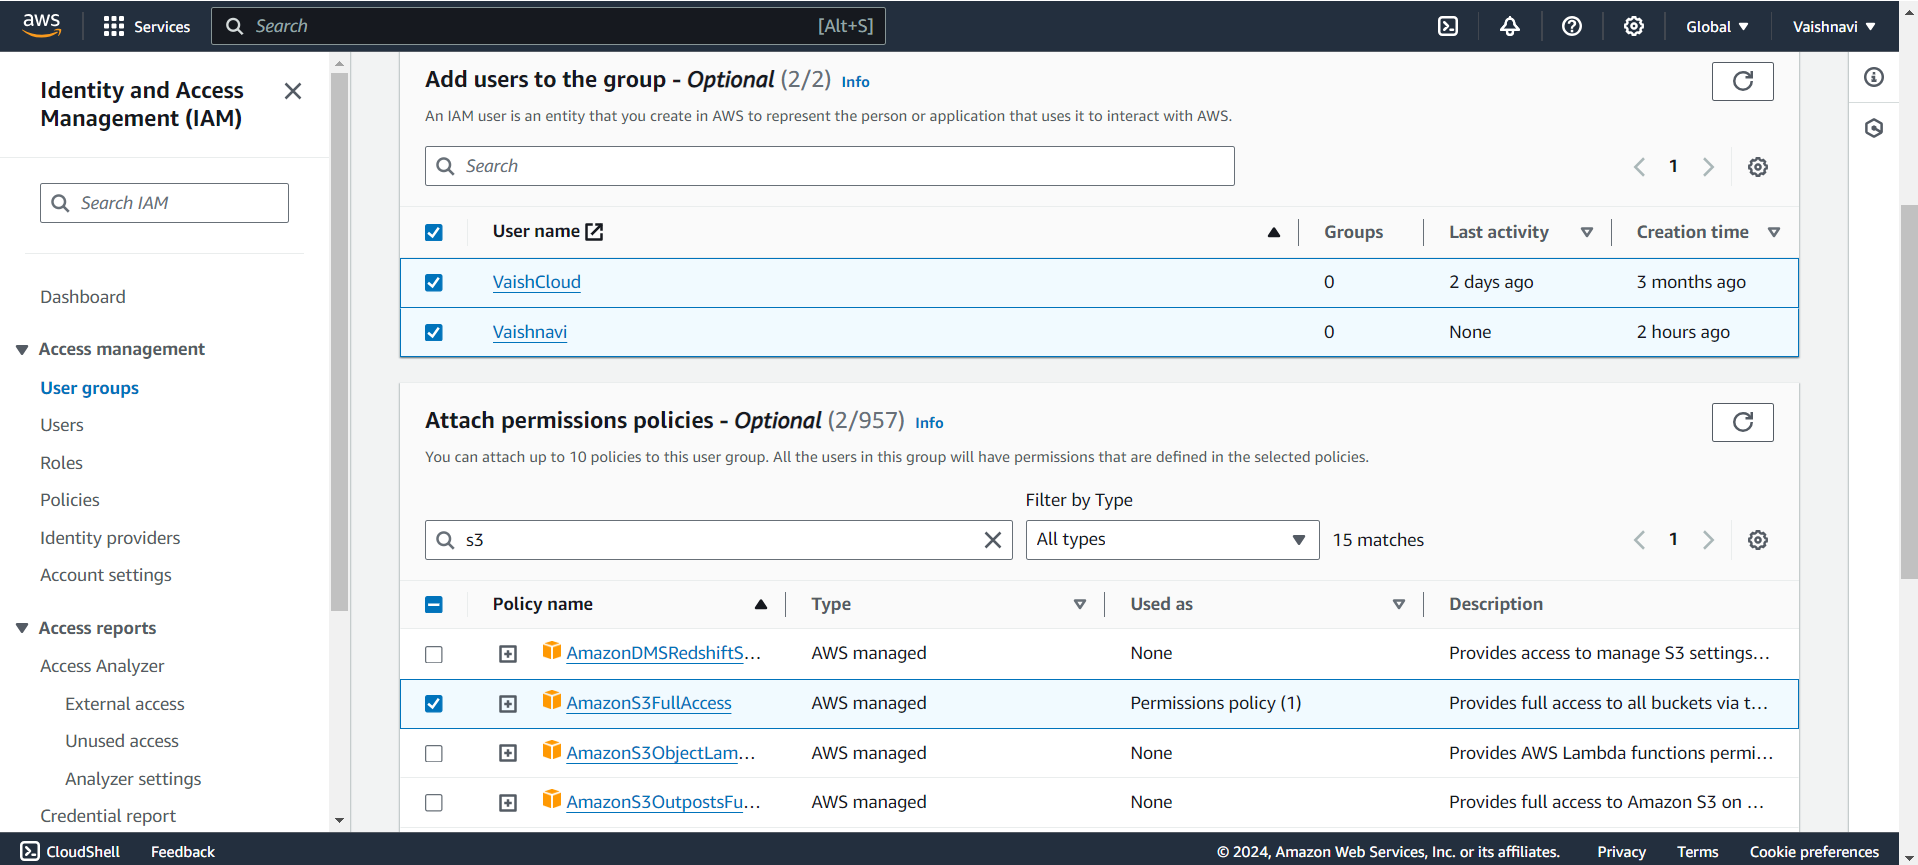
Assign Permissions to the Group:
You can either attach an existing policy (pre-defined permissions) like “AmazonEC2FullAccess” or “AmazonS3ReadOnlyAccess”, or
Create a custom policy that suits your group’s specific needs.
Add Users to the Group: After setting up the permissions, you can immediately add users to the group. Any user added to this group will automatically inherit the group’s permissions.
Review and Create: Once you’ve reviewed everything, click Create Group. Your new group is ready!
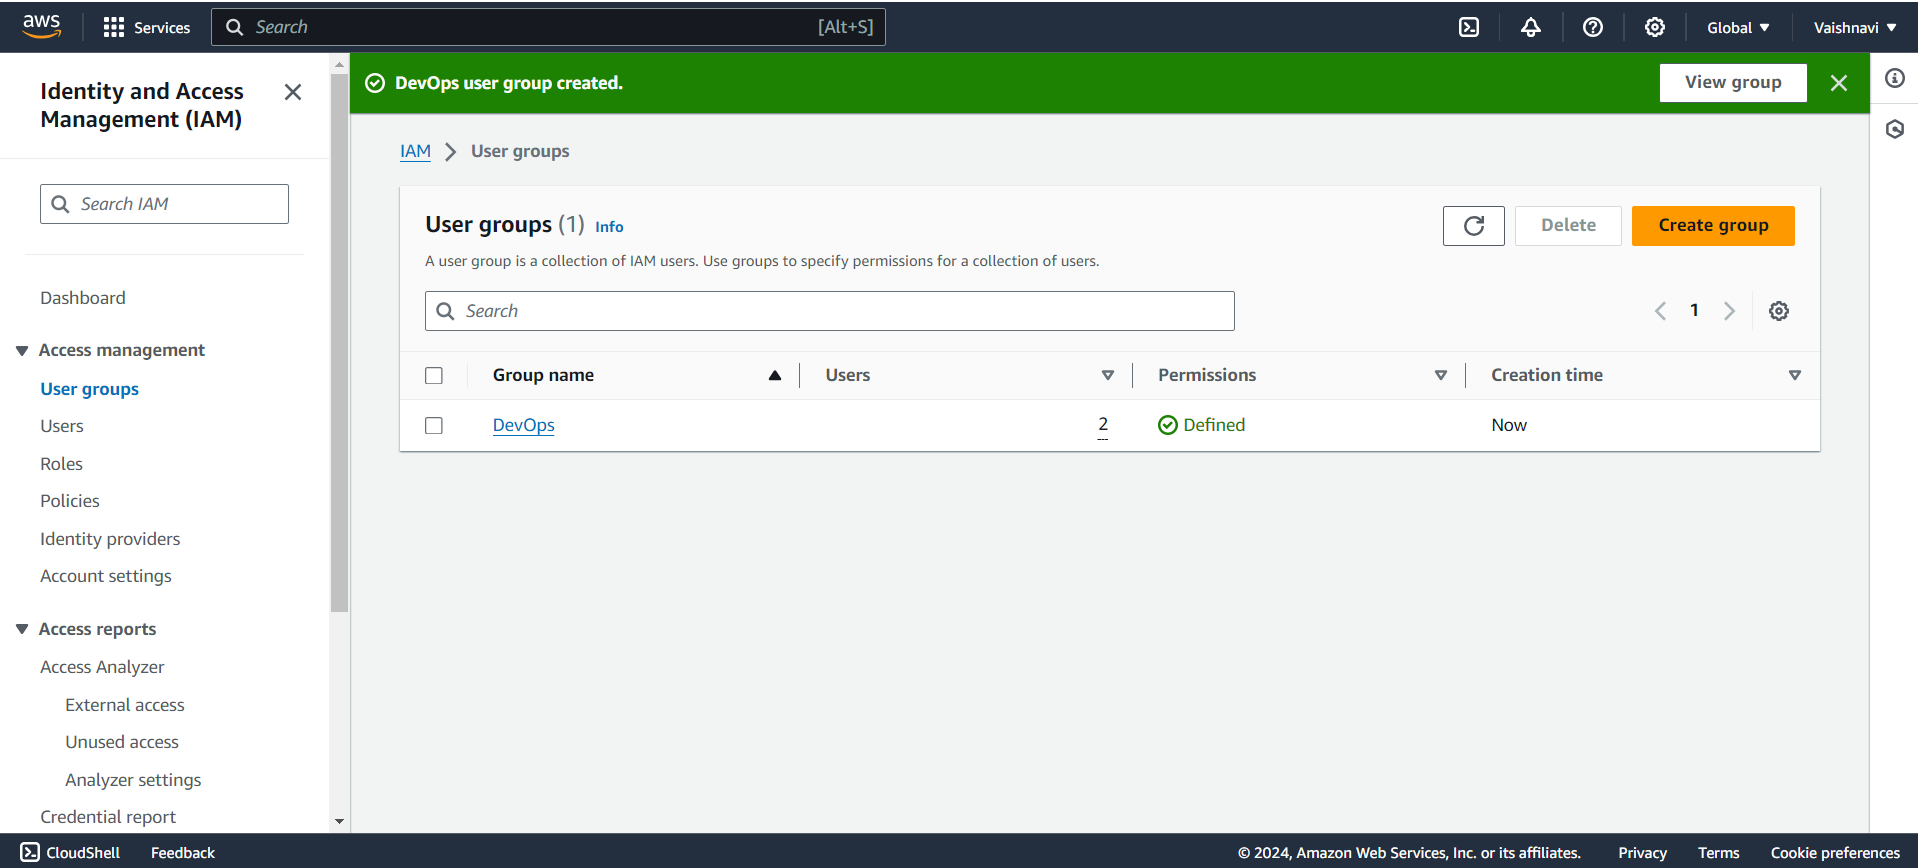
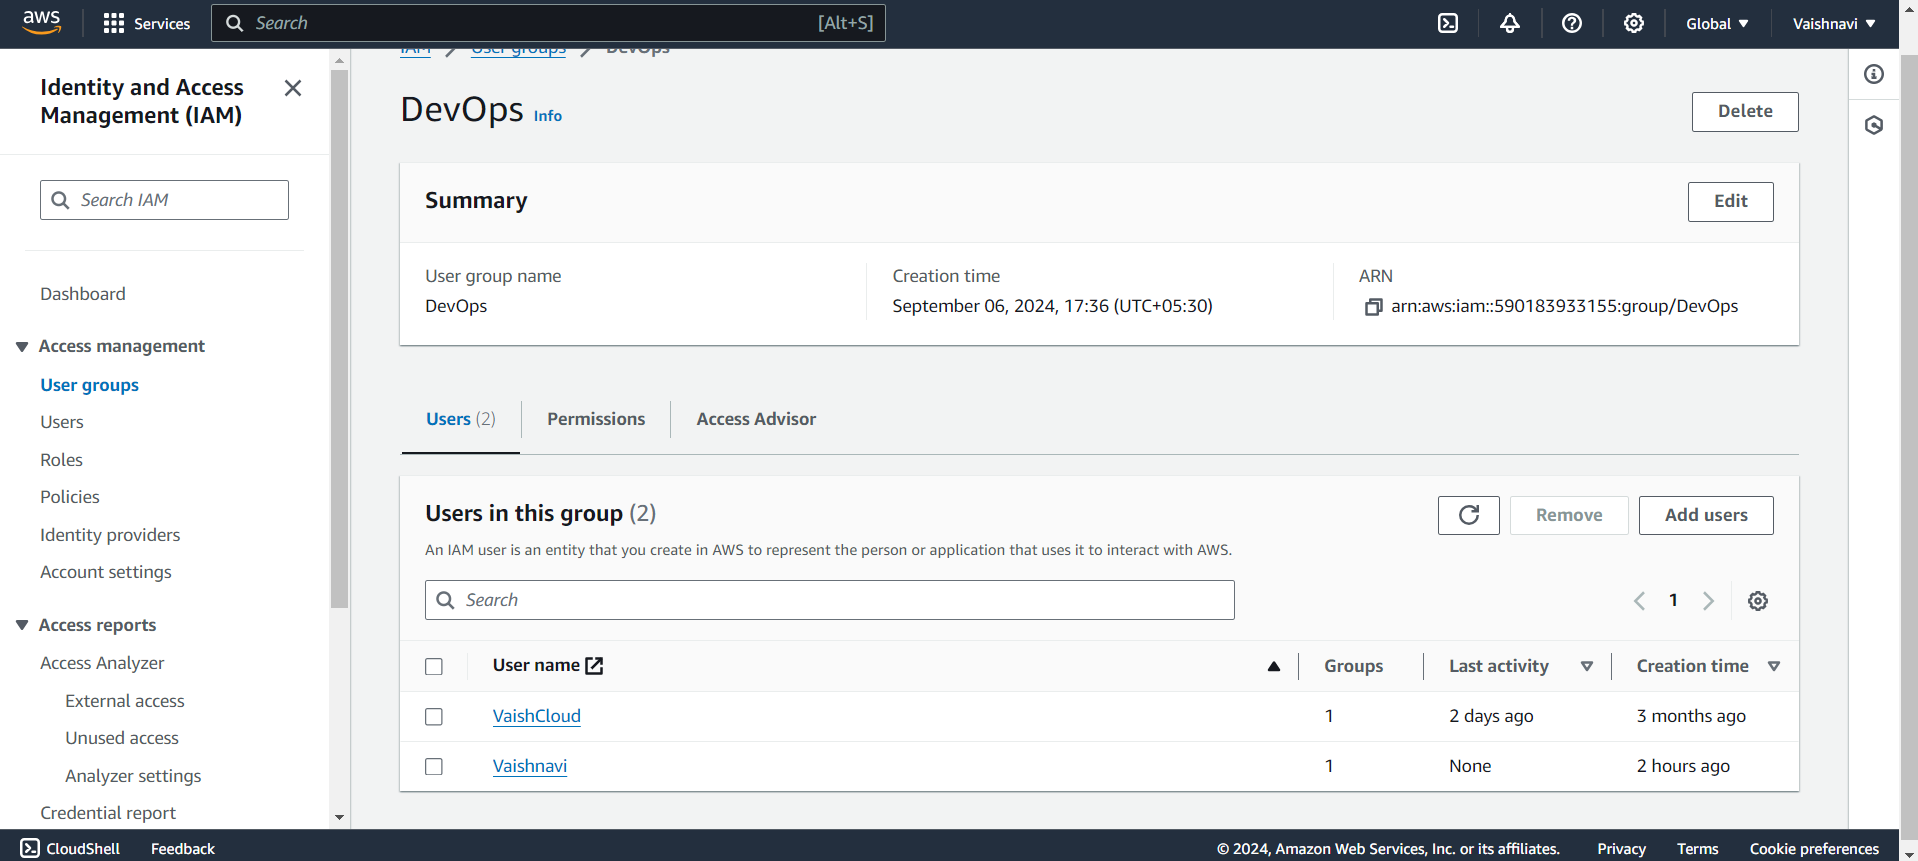
Now click on the DevOps group and you see the users that we have selected while creating the group.
3. IAM Roles 🎭
IAM Roles in AWS are like temporary permission slips that allow users or services to perform certain actions without needing permanent credentials. Instead of assigning long-term permissions to a user or service, you can use a role to grant temporary access to AWS resources.
Unlike IAM Users, who have long-term credentials, IAM Roles are meant for temporary use. Roles are commonly used by AWS services (like EC2 or Lambda) that need access to other AWS services, or by users needing temporary elevated access.
Example:
Imagine you have an EC2 instance (a virtual server in AWS) that needs to read files from an S3 bucket. Instead of hardcoding access keys into the EC2 instance (which is risky and not secure), you can create an IAM Role and assign it to the EC2 instance. This role gives the EC2 instance the temporary permissions it needs to access the S3 bucket 🎟️.
This approach is much more secure and manageable. If the role’s permissions need to change, you just update the role, and the EC2 instance automatically follows those new rules without needing manual updates to credentials.
How to Create IAM Roles:
Creating an IAM Role is a simple process. Here’s how you do it:
Log in to AWS: First, log in to your AWS Management Console.
Go to the IAM Dashboard: In the AWS Console, search for IAM and click on it to access the IAM dashboard.
Click on ‘Roles’: In the left-hand menu, click on Roles. This is where you manage all the roles for your AWS environment.
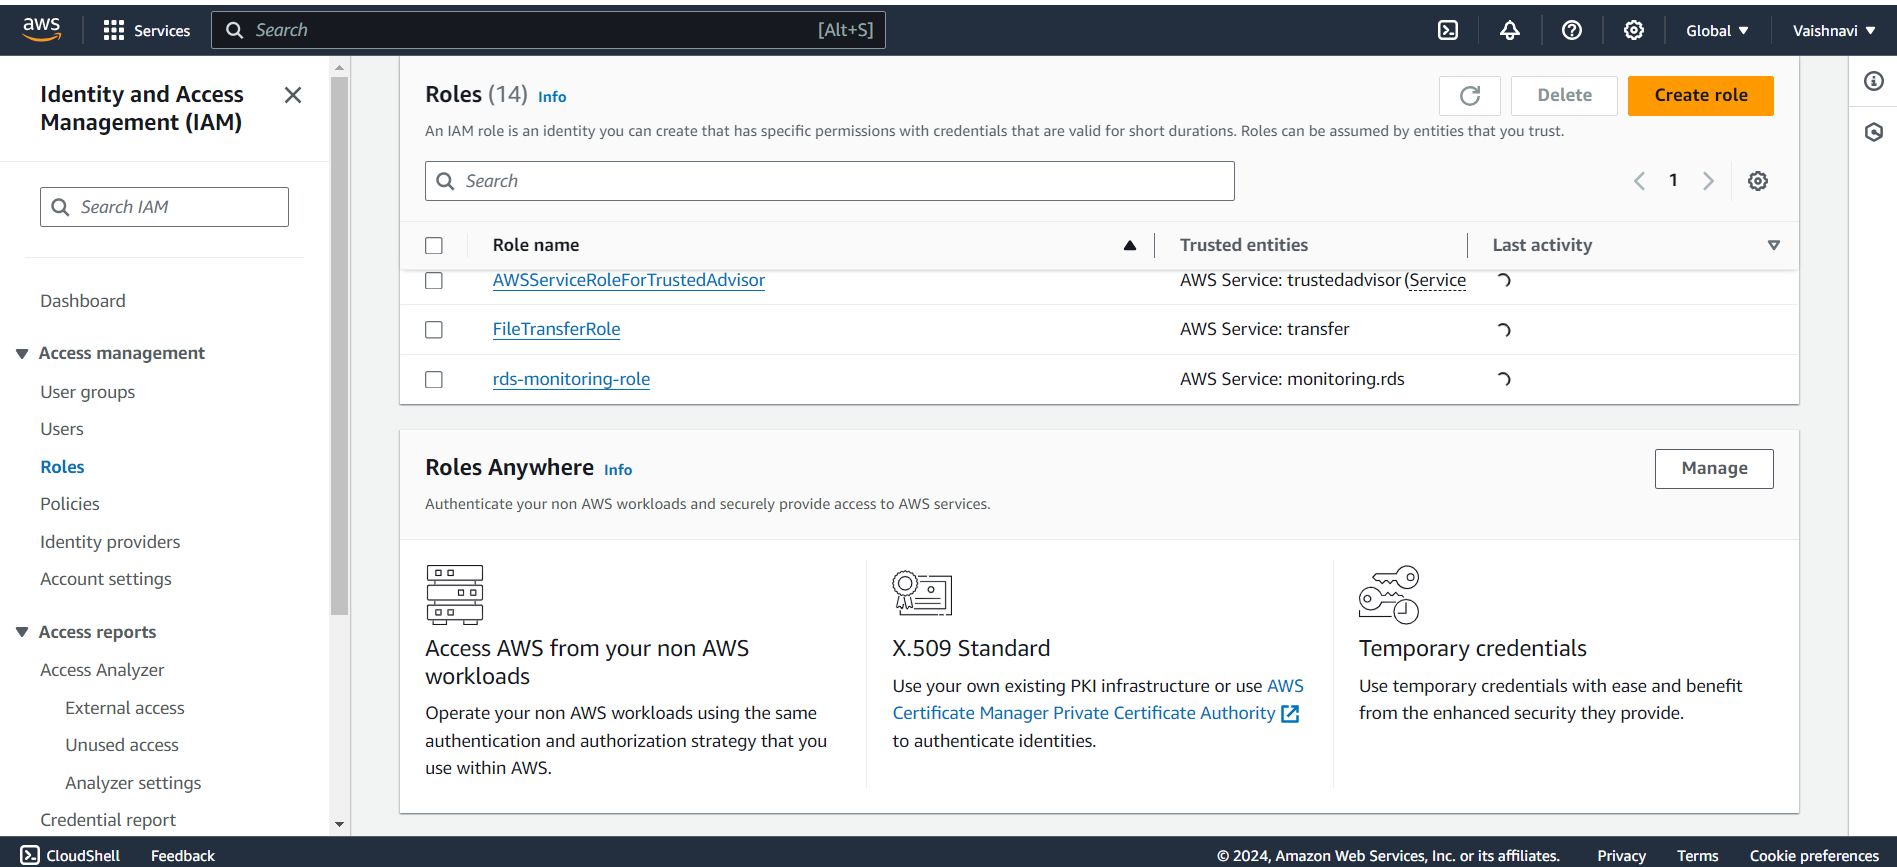
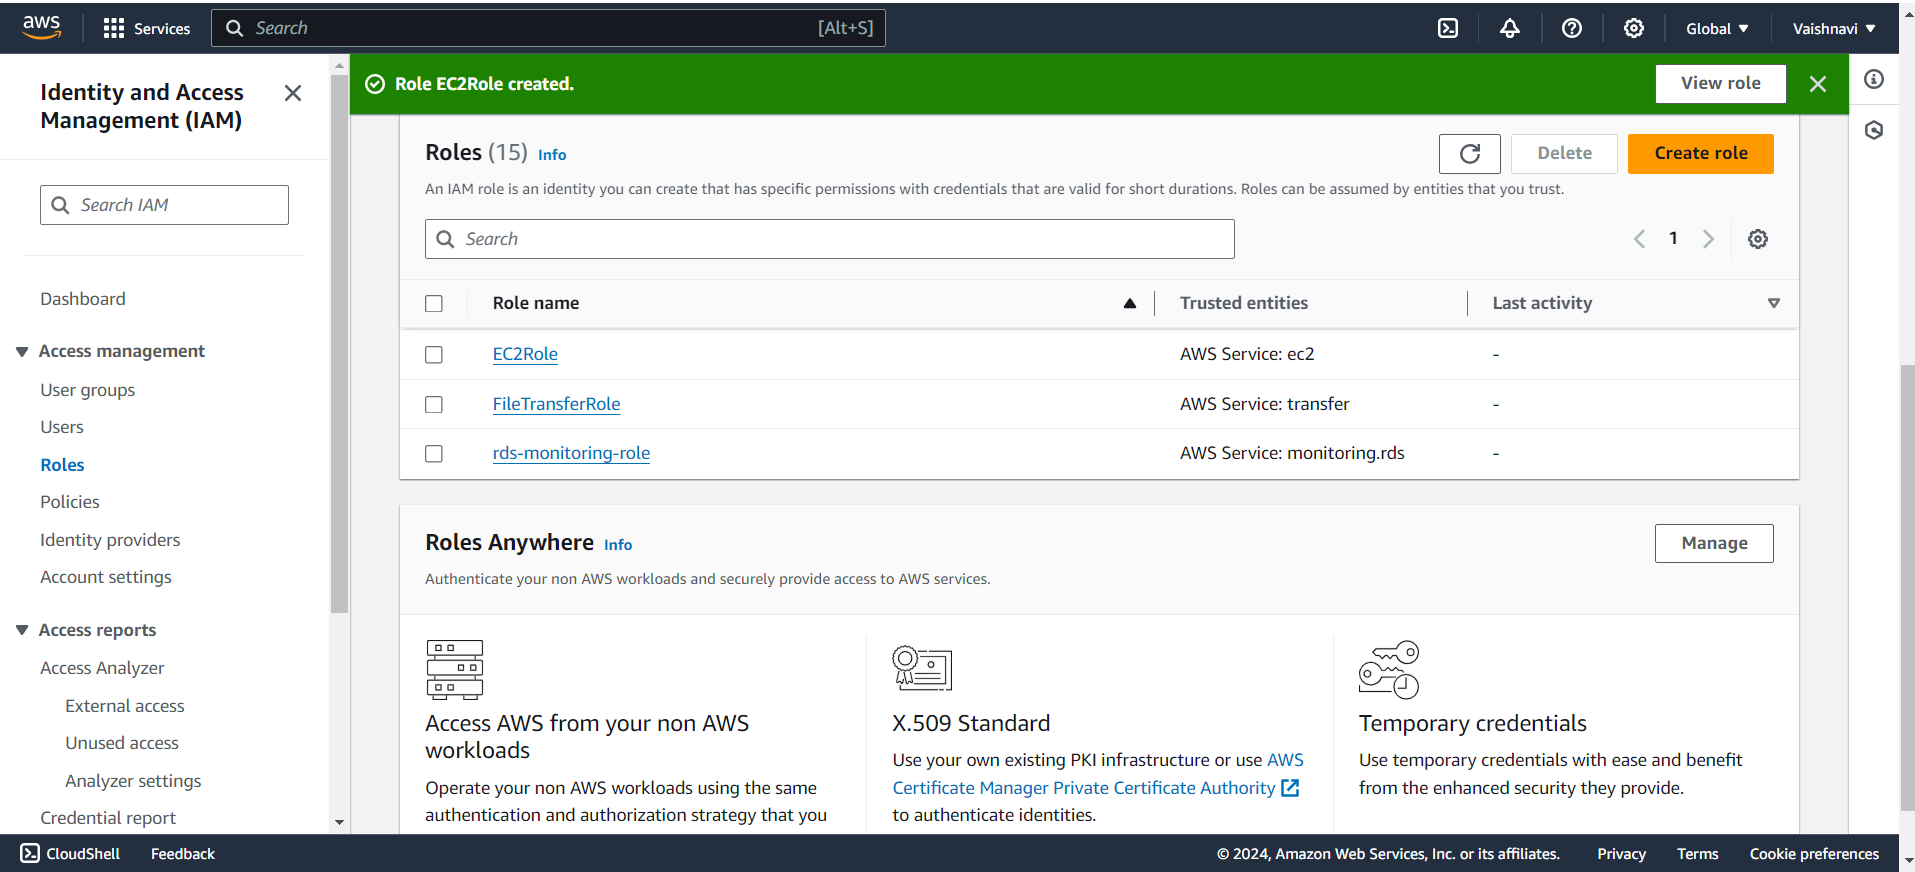
Create a New Role: Click on ‘Create role’ to start creating a new IAM Role.
Select the Trusted Entity: Choose who or what will assume the role. You have a few options:
AWS Services (like EC2 or Lambda)
Another AWS Account (if you want to grant access to resources across accounts)
Web Identity or SAML (for federated users)
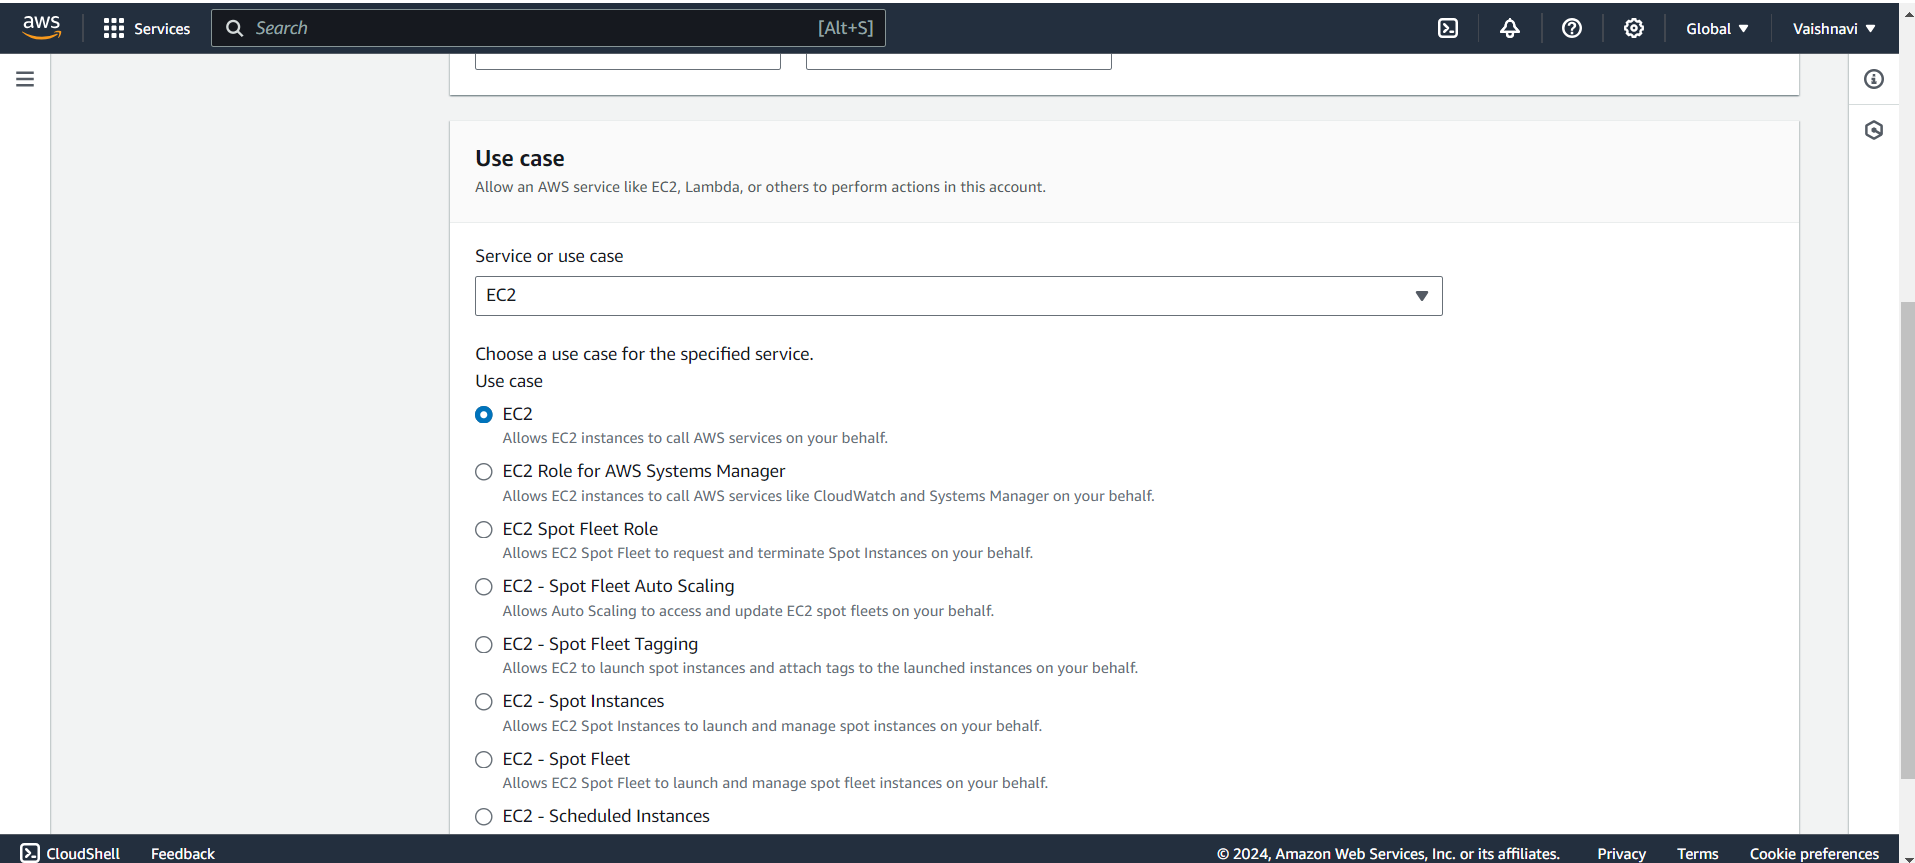
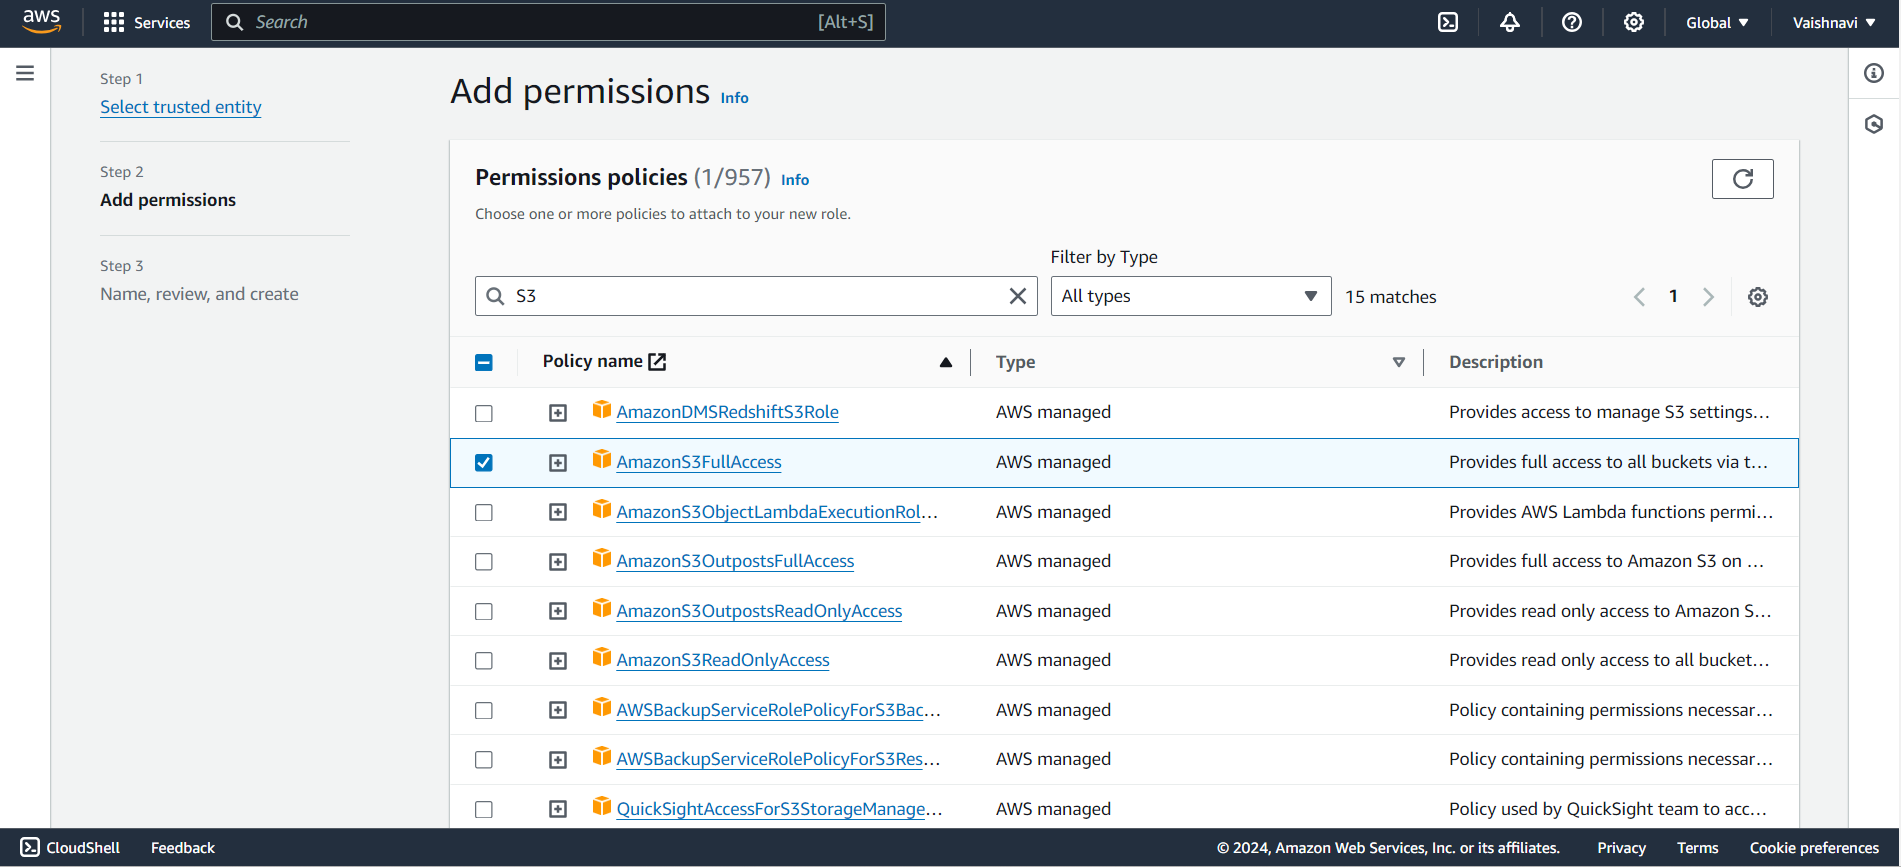
Attach Permissions: Once you’ve selected the trusted entity, you attach the permissions that this role will have. You can either:
Attach existing policies (like “AmazonS3FullAccess” or “AmazonEC2ReadOnlyAccess”), or
Create a custom policy for more specific permissions.
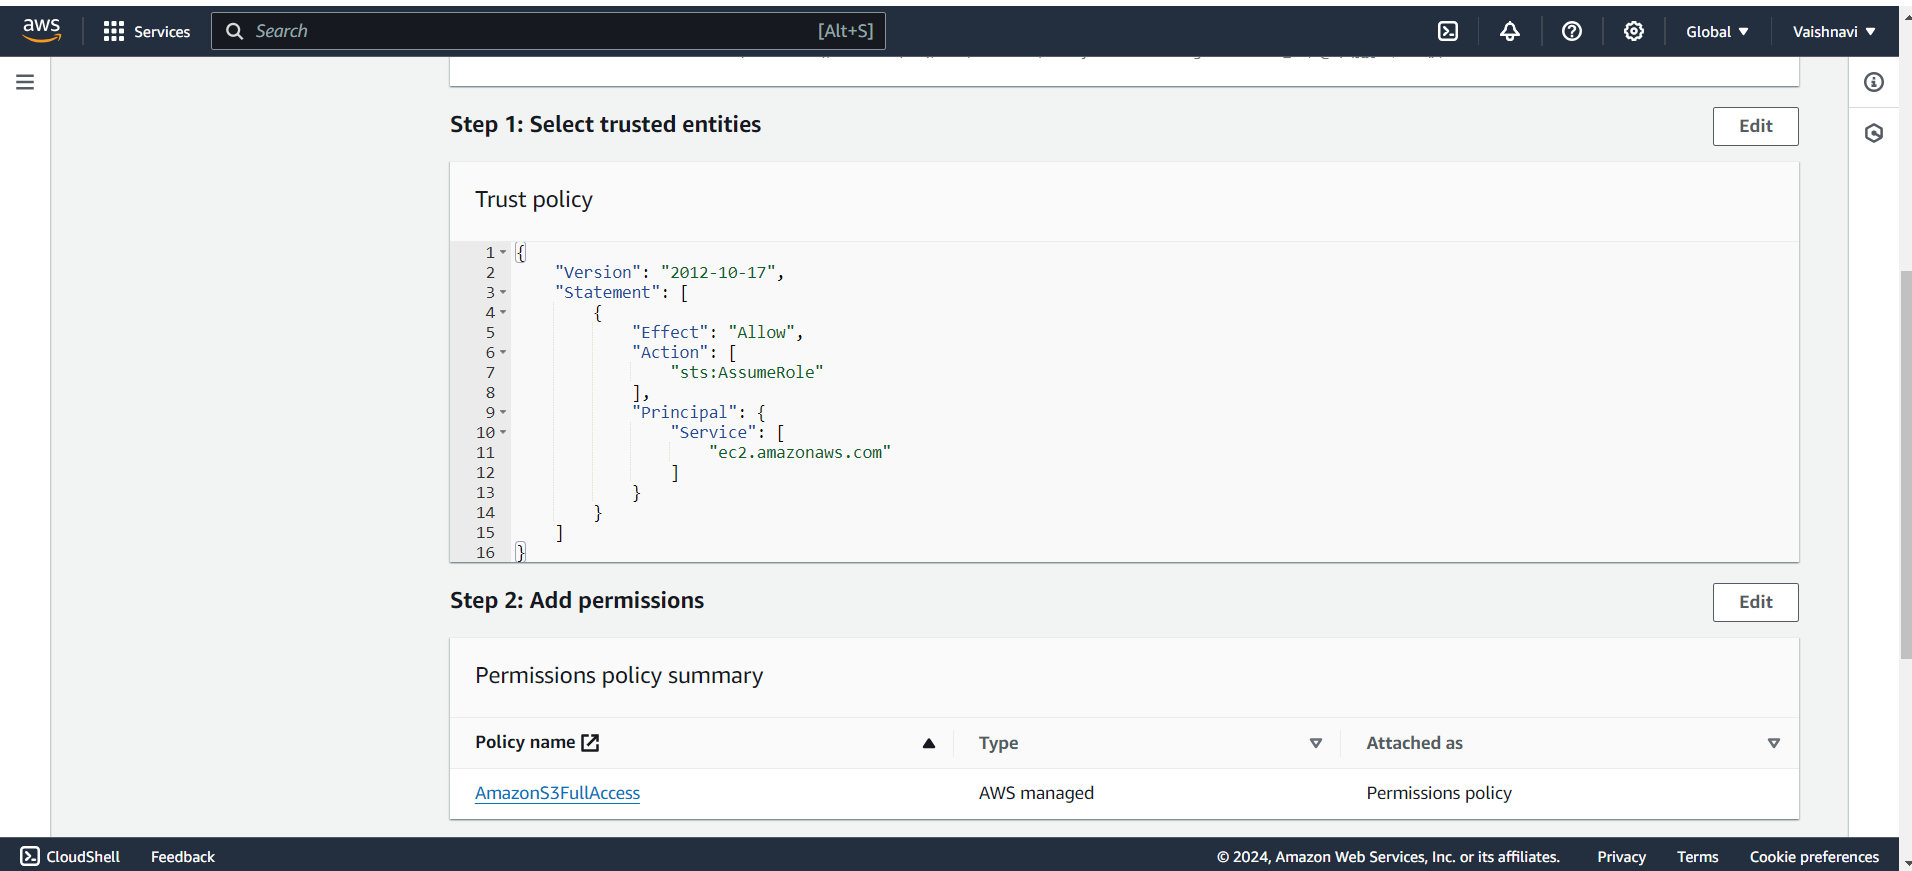
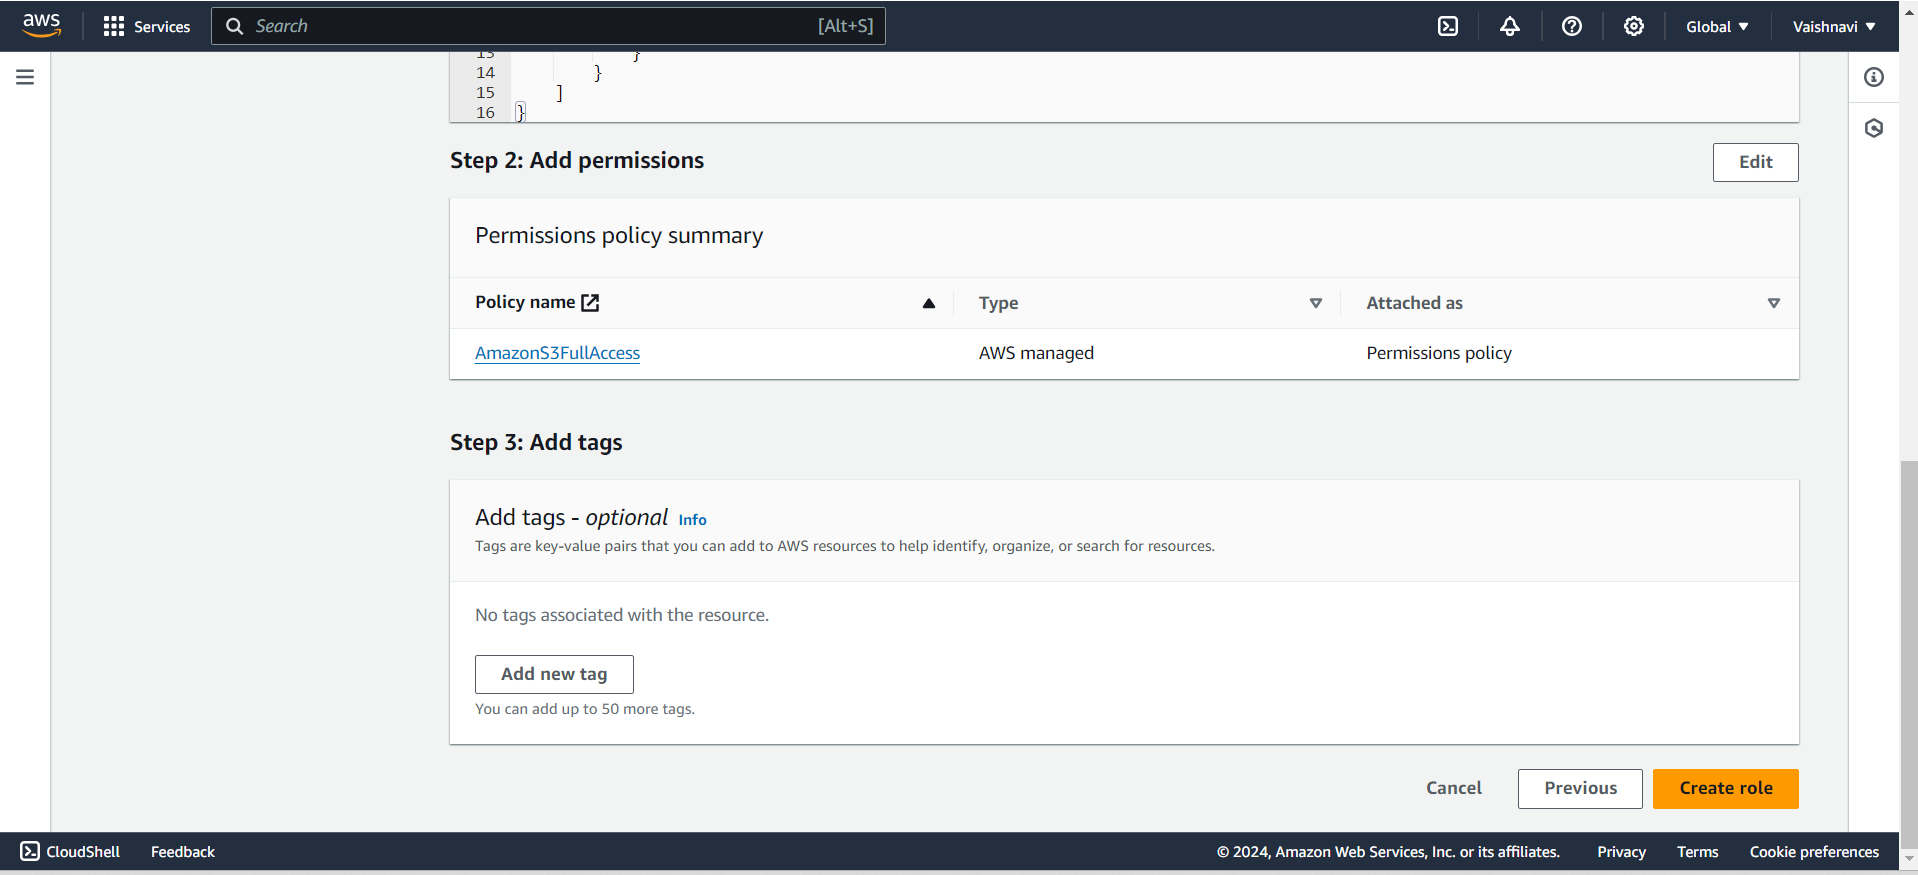
Add Tags (Optional): You can add tags (key-value pairs) to identify and manage the role.
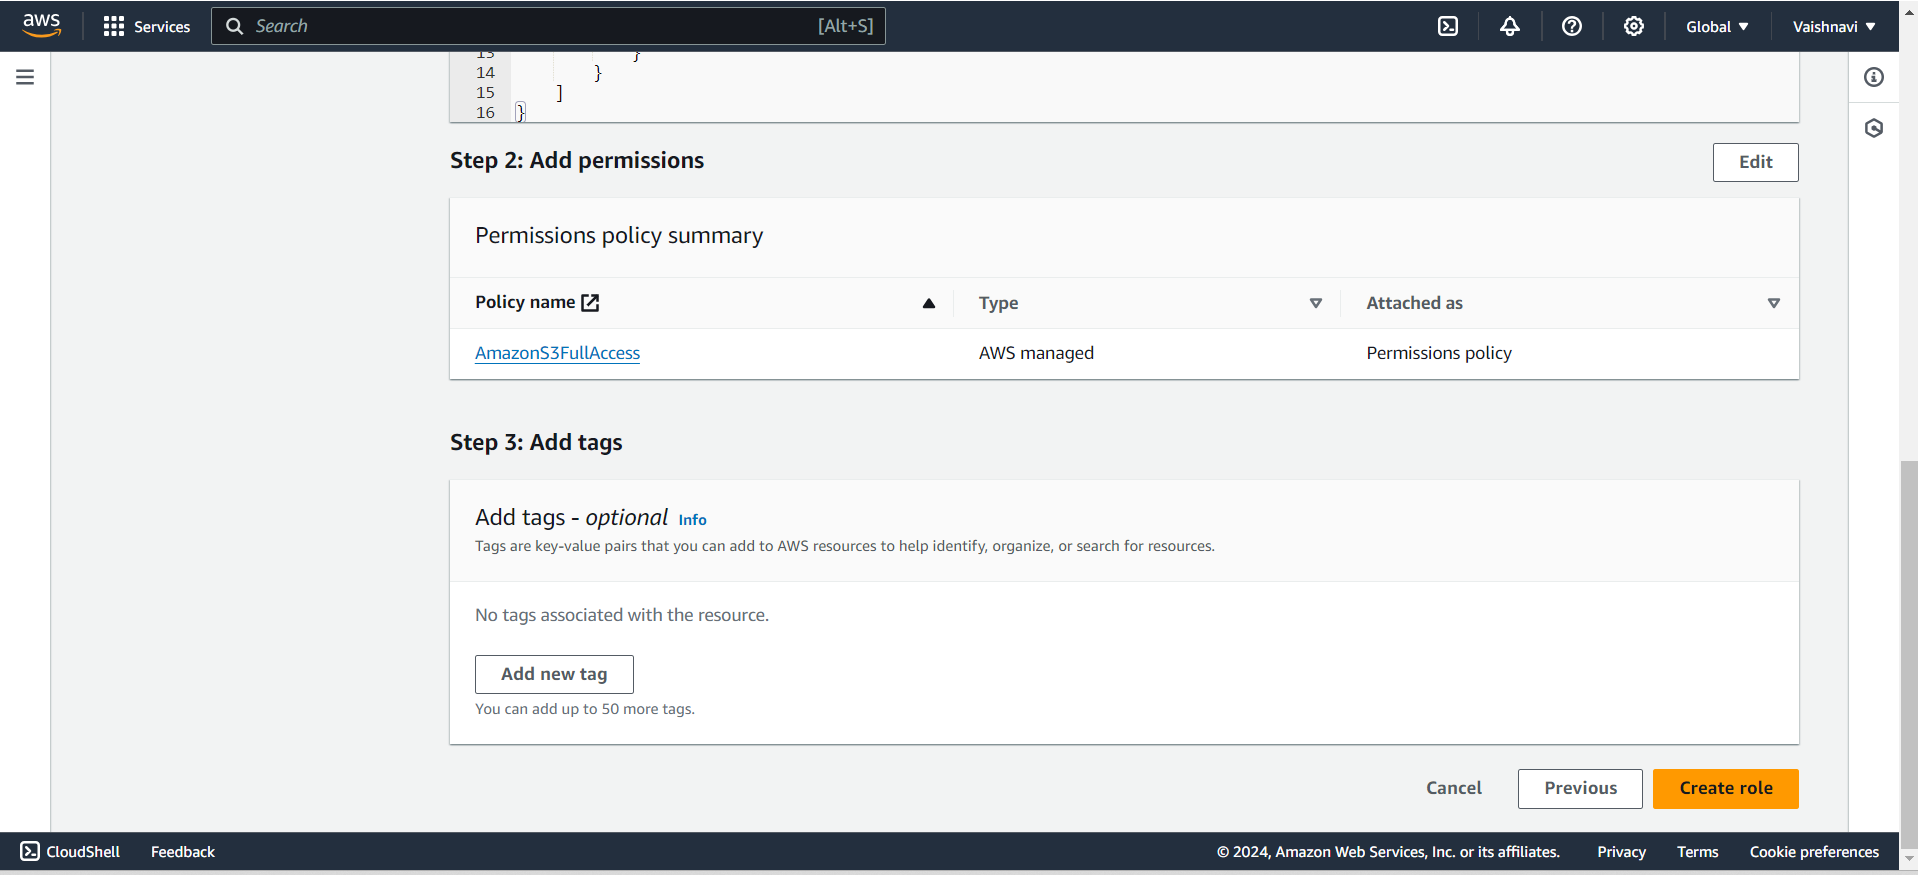
Review and Create: After reviewing the role’s configuration, click Create role. The new IAM Role is now ready to be assigned to a service or user.
Summary:
IAM Roles let you grant temporary permissions to AWS services or users without needing long-term credentials. This is perfect for scenarios where one service, like EC2, needs access to another service, like S3. By using roles, you enhance security while maintaining flexibility in your AWS environment 🎭🔐.
4. IAM Policy Structure 📜
An IAM Policy is a JSON document that defines permissions for users, groups, and roles within AWS. It determines what actions are allowed or denied on specific AWS resources. A policy typically includes elements like SID, Effect, Action, Resource, and optionally, Condition.
Key Elements of an IAM Policy:
SID (Statement ID):
The SID is an identifier for the policy statement, allowing you to distinguish between different rules within the same policy. It’s optional but useful when managing complex policies.Effect:
Defines whether the action is allowed or denied. It can only be set to"Allow"or"Deny".Action:
Specifies the AWS operations that are either allowed or denied (e.g.,s3:PutObjectorec2:StartInstances). You can specify multiple actions in a single policy.Resource:
Identifies the AWS resources (such as an S3 bucket, EC2 instance, or RDS database) the policy applies to. It can be a specific resource or multiple resources using wildcards.Condition:
Adds additional logic by allowing the policy to be applied based on specific conditions. You can specify when a policy is allowed or denied based on factors like IP address, time, or tags. This makes the policy more granular.
Example IAM Policy:
      "Version": "2012-10-17",
      "Statement": [
        {
          "Sid": "Stmt1",
          "Effect": "Allow",
          "Action": "s3:GetObject",
          "Resource": "arn:aws:s3:::my-bucket/*",
          "Condition": {
            "IpAddress": {
              "aws:SourceIp": "192.168.0.1/24"
            }
          }
        },
        {
          "Sid": "Stmt2",
          "Effect": "Deny",
          "Action": "s3:PutObject",
          "Resource": "arn:aws:s3:::my-bucket/*"
        }
      ]
    }
Breakdown:
SID:
"Stmt1"and"Stmt2"are statement IDs for identification purposes.Effect: The first statement allows access (
"Allow") and the second denies ("Deny").Action: The
"s3:GetObject"action allows reading from the S3 bucket, while"s3:PutObject"is denied.Resource: The policy applies to a specific S3 bucket identified by its Amazon Resource Name (ARN)
"arn:aws:s3:::my-bucket/*".Condition: Access is allowed only if the request comes from an IP address range
"192.168.0.1/24".
Summary:
IAM Policies consist of multiple elements like SID, Effect, Action, Resource, and Condition. Each part plays a critical role in defining access control, from what resources are accessible to under what conditions. This structure provides flexibility and precision in managing permissions for AWS resources.
5. IAM Tags 🏷️
IAM Tags are labels that you can attach to users, groups, roles, and other AWS resources. Tags help you organize, track, and manage your resources more efficiently by assigning key-value pairs that describe the resource.
How Tags Work:
Key: A tag’s identifier (like “Department” or “Project”).
Value: The specific value for that tag (like “Finance” or “DevOps”).
By using tags, you can easily filter and track IAM entities in large AWS environments. For example, you could add a tag for "Team" to indicate whether a user belongs to the development or finance team.
6. Security Tools and Best Practices 🔐
IAM Access Advisor 🧭
- Helps you monitor what resources users are accessing and what they aren’t. It’s like a security audit that shows which permissions are being used.
IAM Access Analyzer 🛠️
- Analyzes your access policies to check if they allow access to resources from outside your AWS account. It helps you ensure your data isn’t accidentally exposed to outsiders.
IAM Credentials Report 📑
- This is a report that lists all users and the status of their security credentials (passwords, access keys). It’s useful for checking the security health of your IAM users.
Conclusion 🏁
AWS IAM is a vital part of managing access in your AWS environment. By carefully assigning users, roles, and policies, you can ensure the security of your resources and make sure that the right people have the right access 🚀. Always review your IAM policies regularly to keep your environment safe from unauthorized access 🔐.
Like 👍| Comment 🗨️| Share 🔃
Subscribe to my newsletter
Read articles from Vaishnavi Modakwar directly inside your inbox. Subscribe to the newsletter, and don't miss out.
Written by

Vaishnavi Modakwar
Vaishnavi Modakwar
👋 Hi there! I'm Vaishnavi Modakwar, a dedicated DevOps and Cloud Engineer with 2 years of hands-on experience in the tech industry. My journey in DevOps has been fueled by a passion for optimizing and automating processes to deliver high-quality software efficiently. Skills: Cloud Technologies: AWS, Azure. Languages: Python, YAML, Bash Scripting. Containerization: Docker, ECS, Kubernetes. IAC: Terraform, Cloud Formation. Operating System: Linux and MS Windows. Tools: Jenkins, Selenium, Git, GitHub, Maven, Ansible. Monitoring: Prometheus, Grafana. I am passionate about demystifying complex DevOps concepts and providing practical tips on automation and infrastructure management. I believe in continuous learning and enjoy keeping up with the latest trends and technologies in the DevOps space. 📝 On my blog, you'll find tutorials, insights, and stories from my tech adventures. Whether you're looking to learn about CI/CD pipelines, cloud infrastructure, or containerization, my goal is to share knowledge and inspire others in the DevOps community. Let's Connect: I'm always eager to connect with like-minded professionals and enthusiasts. Feel free to reach out for discussions, collaborations, or feedback. Wave me at vaishnavimodakwar@gmail.com