HTB Noxious Walkthrough: LLMNR Poisoning & Network Forensics
 TATHAGATA ROY
Table of contents
- Introduction to HTB Noxious
- Scenario Overview
- Task 1: Identifying the Malicious IP Address
- Task 2: Finding the Hostname of the Rogue Machine
- Task 3: Verifying if the Attacker Captured the User's Hash
- Task 4: Determining the First Time the Hashes Were Captured
- Task 5: Discovering the Victim's Typo that Leaked Credentials
- Task 6: Finding the NTLM Server Challenge
- Task 7: Extracting the NTProofStr Value
- Task 8: Testing Password Complexity
- Task 9: Finding the Actual File Share
- Conclusion
- FAQs

Introduction to HTB Noxious
In this HTB lab, I dive into a real-world network forensics scenario involving an Active Directory network. The setup focuses on identifying and mitigating an LLMNR (Link-Local Multicast Name Resolution) poisoning attack, a common technique used by attackers to capture NTLM hashes.
My mission is to analyze a packet capture (PCAP) file, detect malicious activity, and trace the attacker's steps. I'll identify the rogue device, capture the victim's hash, and explore the complexity of the attack.
Let’s walk through the investigation step by step.
Scenario Overview
In this lab, the Intrusion Detection System (IDS) has detected suspicious activity on Forela's internal Active Directory network, with an alert suggesting a rogue device conducting an LLMNR poisoning attack. The attack appears to be directed at Forela-WKstn002 with the IP address 172.17.79.136. Our task as the network forensics expert is to analyze the provided packet capture and uncover details about the attacker, the victim's compromised credentials, and any potential mishaps during the attack.
Task 1: Identifying the Malicious IP Address
The first task involves determining the IP address of the rogue machine that is suspected of running the Responder tool to perform an LLMNR poisoning attack. By analyzing the packet capture using Wireshark, I can try to filter for LLMNR traffic and identify the malicious IP.
Solution:
Downloaded and unzipped the provided
noxious.zipfile.Opened the packet capture file in Wireshark.
Filtered for UDP port 5355 using the filter:
udp.port == 5355This will display all LLMNR traffic.
For identifying LLMNR responses from IPs other than the legitimate domain controller, a rogue device will likely respond to LLMNR requests pretending to be a domain controller.
The malicious IP address responding to the victim’s queries is 172.17.79.135.
Answer: 172.17.79.135
Task 2: Finding the Hostname of the Rogue Machine
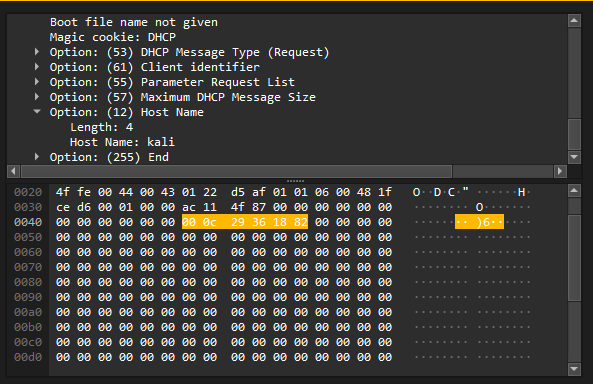
After identifying the rogue IP address, I now need to determine the hostname of the attacker’s device. Since the attacker’s machine used DHCP to assign itself an IP address, I can filter for DHCP traffic in Wireshark to uncover the hostname.
Solution:
In Wireshark, I applied the following filter:
ip.addr == 172.17.79.135 && dhcpExamined the DHCP packets, particularly the hostname field, to reveal the attacker’s hostname.

Answer: kali
Task 3: Verifying if the Attacker Captured the User's Hash
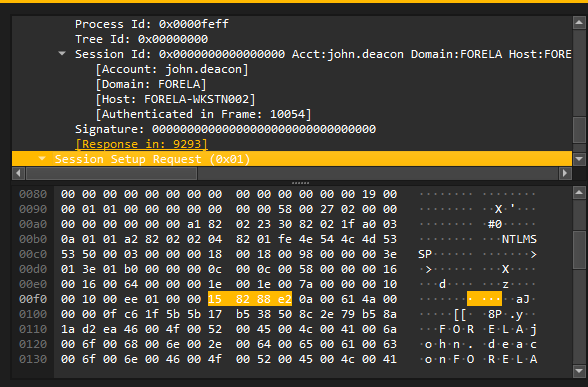
Next, I need to determine whether the attacker's machine was successful in capturing the victim’s NTLM hash. This can be done by analyzing SMB traffic for signs of NTLMSSP (NT LAN Manager Security Support Provider) negotiation and authentication packets.
Solution:
Filter for SMB traffic using:
smb2Narrowed it further to NTLMSSP-related traffic by applying the filter:
smb2 && ntlmsspLooking for NTLMSSP negotiate and auth packets, which indicate that the attack captured the victim’s hash.
The captured user's username is john.deacon.

Answer: john.deacon
Task 4: Determining the First Time the Hashes Were Captured
Once I've confirmed that the victim's hash was captured, I need to determine the exact time when this occurred. By analyzing the NTLMSSP packets in the SMB traffic, I can pinpoint the time of the first hash capture.
Solution:
Modifying the time display format in Wireshark:
- Go to View > Time Display Format > UTC Date.
Applying the filter:
ntlmsspIdentifying the first three packets, starting from NTLMSSP_NEGOTIATE and ending with NTLMSSP_AUTH, and noted the time.

Answer: 2024-06-24 11:18:30
Task 5: Discovering the Victim's Typo that Leaked Credentials
One of the key moments in the attack occurred when the victim made a typo while navigating to a file share, causing LLMNR to resolve the wrong hostname. The attacker exploited this by pretending to be the legitimate domain controller.
Solution:
Reviewed the LLMNR traffic and observed the query where the victim's machine requested DC01.
The attacker’s machine responded to a query for DCC01, indicating that the victim mistakenly typed "DCC01" instead of "DC01".
Answer: DCC01
Task 6: Finding the NTLM Server Challenge
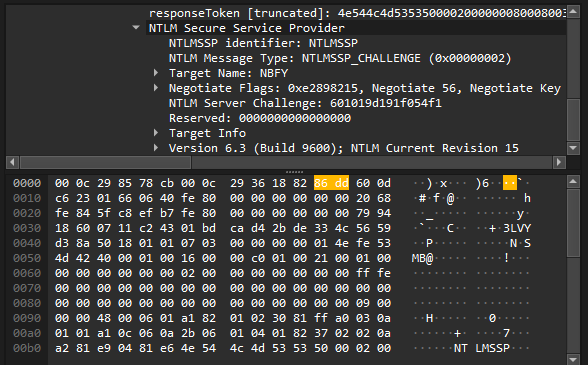
In this task, I am asked to extract the NTLM server challenge value from the NTLM negotiation packets, which is crucial for understanding the authentication exchange.
Solution:
Added a filter for NTLMSSP:
ntlmsspLocate the NTLMSSP_CHALLENGE packet (e.g., Packet #9291).
Expand the following details in Wireshark:
SMB2 (Server Message Block Protocol Version 2) -> Session Setup Response -> Security Blob -> GSS-API Generic -> SimpleProtected Negotiation -> negTokenTarg -> NTLM Server Challenge.
Answer: 601019d191f054f1
Task 7: Extracting the NTProofStr Value
To further understand the NTLM authentication, I needed to extract the NTProofStr value from the NTLMSSP_AUTH Packet.
Solution:
Located the NTLMSSP_AUTH Packet (e.g., Packet #9292).
Expand:
SMB2 -> Session Setup Response -> Security Blob -> GSS-API Generic -> SimpleProtected Negotiation -> NTLM Response -> NTLMv2 Response -> NTProofStr.
Answer: c0cc803a6d9fb5a9082253a04dbd4cd4
Task 8: Testing Password Complexity
In this step, I will test the complexity of the captured credentials by using the NTLM server challenge, NTProofStr, and other values to attempt password recovery with hashcat.
Solution:
Created a hashfile with the following format:
john.deacon::FORELA:601019d191f054f1:c0cc803a6d9fb5a9082253a04dbd4cd4:010100000000000080e4d59406c6da01cc3dcfc0de9b5f2600000000020008004e0042004600590001001e00570049004e002d00360036004100530035004c003100470052005700540004003400570049004e002d00360036004100530035004c00310047005200570054002e004e004200460059002e004c004f00430041004c00030014004e004200460059002e004c004f00430041004c00050014004e004200460059002e004c004f00430041004c000700080080e4d59406c6da0106000400020000000800300030000000000000000000000000200000eb2ecbc5200a40b89ad5831abf821f4f20a2c7f352283a35600377e1f294f1c90a001000000000000000000000000000000000000900140063006900660073002f00440043004300300031000000000000000000Ran hashcat with the following command:
hashcat -a0 -m5600 hashfile.txt rockyouwordlist.txt
Answer: NotMyPassword0K?
Task 9: Finding the Actual File Share
Lastly, I need to find the specific file share that the victim was trying to access when they made the typo. By analyzing the SMB traffic, I can uncover the file share in question.
Solution:
Filtered for SMB traffic:
smb2Scrolled through the packets and looked for a Tree Connect/Disconnect event related to a non-default file share name.

Answer: \\DC01\DC-Confidential
Conclusion
The Noxious HTB lab provided an excellent opportunity to understand the impact of LLMNR poisoning attacks and explore network forensics in a practical setting. By analyzing the provided packet capture, I identified a rogue machine, captured compromised credentials, and explored password cracking techniques.
FAQs
What is LLMNR poisoning?
LLMNR poisoning is a network attack where an attacker responds to LLMNR requests on a local network, pretending to be a legitimate resource and capturing sensitive data like NTLM hashes.
How can LLMNR attacks be mitigated?
Disabling LLMNR and NetBIOS on internal networks, using SMB signing, and enforcing strong password policies are common ways to mitigate LLMNR attacks.What tools are used in LLMNR poisoning attacks?
Tools like Responder and MITM6 are commonly used to perform LLMNR and NetBIOS poisoning attacks.What is the role of Wireshark in network forensics?
Wireshark is a packet analysis tool used to capture and inspect network traffic, crucial for identifying malicious activity in network forensics.Why is NTLM vulnerable to LLMNR attacks?
NTLM relies on name resolution protocols like LLMNR and can expose credentials if these protocols are manipulated by attackers.
Subscribe to my newsletter
Read articles from TATHAGATA ROY directly inside your inbox. Subscribe to the newsletter, and don't miss out.
Written by

TATHAGATA ROY
TATHAGATA ROY
Hello! I'm a passionate and dedicated cybersecurity enthusiast with a love for learning and sharing insights, my blog dives deep into cybersecurity threats, technical analysis, and best practices to safeguard digital assets.