Getting Started with Azure SQL Database: Your Guide to Building and Managing Cloud Databases
 Rabiatu Mohammed
Table of contents
- Introduction
- What is an Azure SQL Database Server?
- Creating Your Azure SQL Database Server
- Setting Authentication for Your SQL Server
- Finalizing the Admin Settings
- Configuring Networking for Your SQL Database Server
- Securing Your SQL Database Server
- Enhancing Security with Microsoft Defender for SQL
- Creating Your First SQL Database
- Using SQL Elastic Pool
- Configuring Compute and Service Tiers
- Configuring vCores and Storage Size
- Configuring Backup Storage Redundancy
- Configuring Networking and Firewall Rules
- Configuring Additional Settings for Your SQL Database
- Accessing Your Database Using SQL Query Editor
- Configuring Firewall Rules for Access
- Running Queries in SQL Query Editor

Introduction
Imagine you're tasked with building or managing a database that needs to grow effortlessly as your business scales, all while keeping your data safe and accessible from anywhere. That’s where Azure SQL Database comes in a powerful platform designed to make complex database management simple. Whether you’re a seasoned developer building the next big thing in the cloud, or a business owner taking the first steps in digital transformation, this guide will walk you through setting up and managing your first Azure SQL Database Server. Let's dive into the world of cloud databases and discover how Azure can transform your data management journey!
What is an Azure SQL Database Server?
Think of an Azure SQL Database Server as the control tower of your cloud databases. It’s not a physical machine sitting in a data center; instead, it’s a virtual manager overseeing everything from database access and performance to security and scaling. Just like an air traffic controller makes sure planes take off and land safely, your Azure SQL Database Server keeps your databases running smoothly, no matter how complex or large they grow. The best part is that Microsoft handles all the heavy lifting behind the scenes, managing infrastructure, ensuring high availability, and scaling resources as needed, so you can focus on building your applications without worrying about hardware.
Creating Your Azure SQL Database Server
Alright, now that we’ve covered the basics, it’s time to dive in and get your very own Azure SQL Database Server up and running. This is where the fun begins! Don’t worry, I’ll walk you through it step by step, and before you know it, you’ll have your server ready to roll.
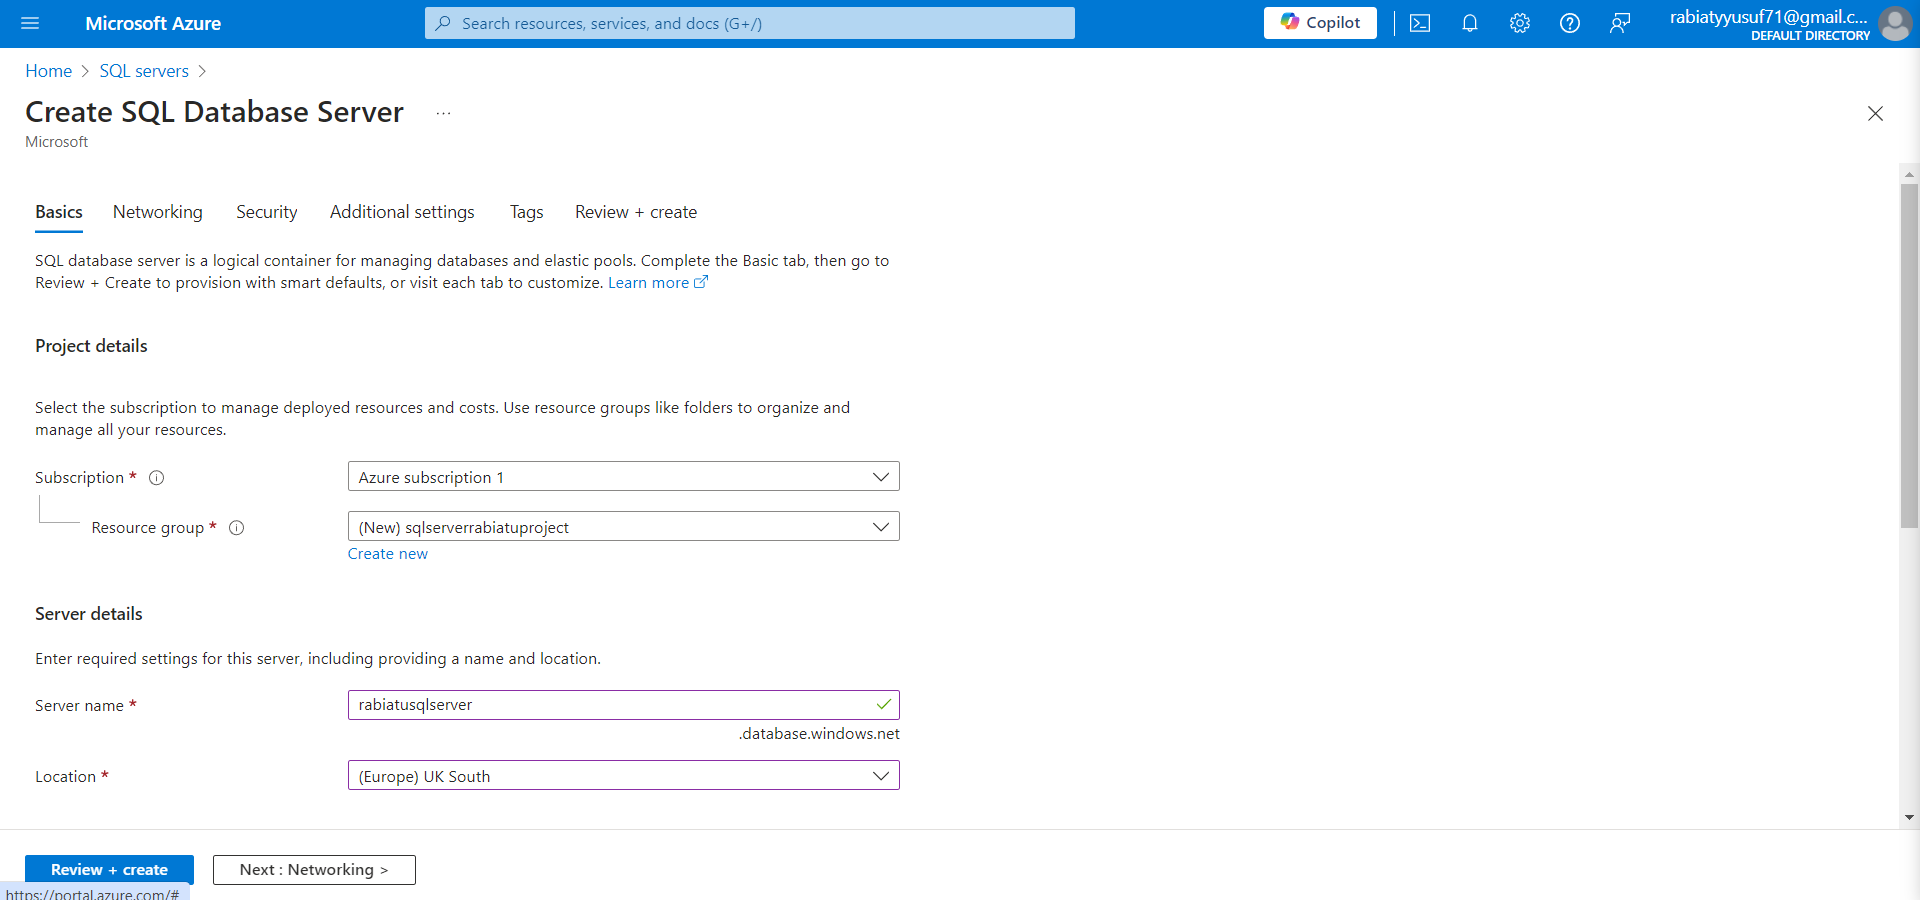
Open the Azure Portal: First things first, head over to the Azure Portal. Once you’re in, type SQL servers into the search bar at the top, because that’s where we’re headed. You’ll see an option pop up, click Create to get started.
Fill Out the Basics: Now we’re at the Basics tab, where we’ll set the foundation for your server. Here’s what you need to do:
Subscription: Pick the subscription you want to use (if you’ve got more than one, just select the right one).
Resource Group: You can either create a new resource group or use an existing one. Think of this as a folder to keep your server and related resources organized.
Server Name: Give your server a name, something unique like
rabiatusqlserver. This is how you’ll identify it in Azure.Location: Choose a data center closest to you or your users. I went with UK South for mine.
Setting Authentication for Your SQL Server
Once your server is created, it's time to set up the right authentication method. Azure SQL Database allows you to authenticate users via Microsoft Entra ID (formerly Azure Active Directory) or traditional SQL Authentication. I recommend using both, which gives you flexibility for different types of users.
Choose an Authentication Method: On the authentication screen, you can choose from:
Microsoft Entra Authentication: Use your organization's Entra (Azure AD) users and groups.
SQL Authentication: Traditional login and password.
Both: This is the option I’m going with for maximum flexibility.
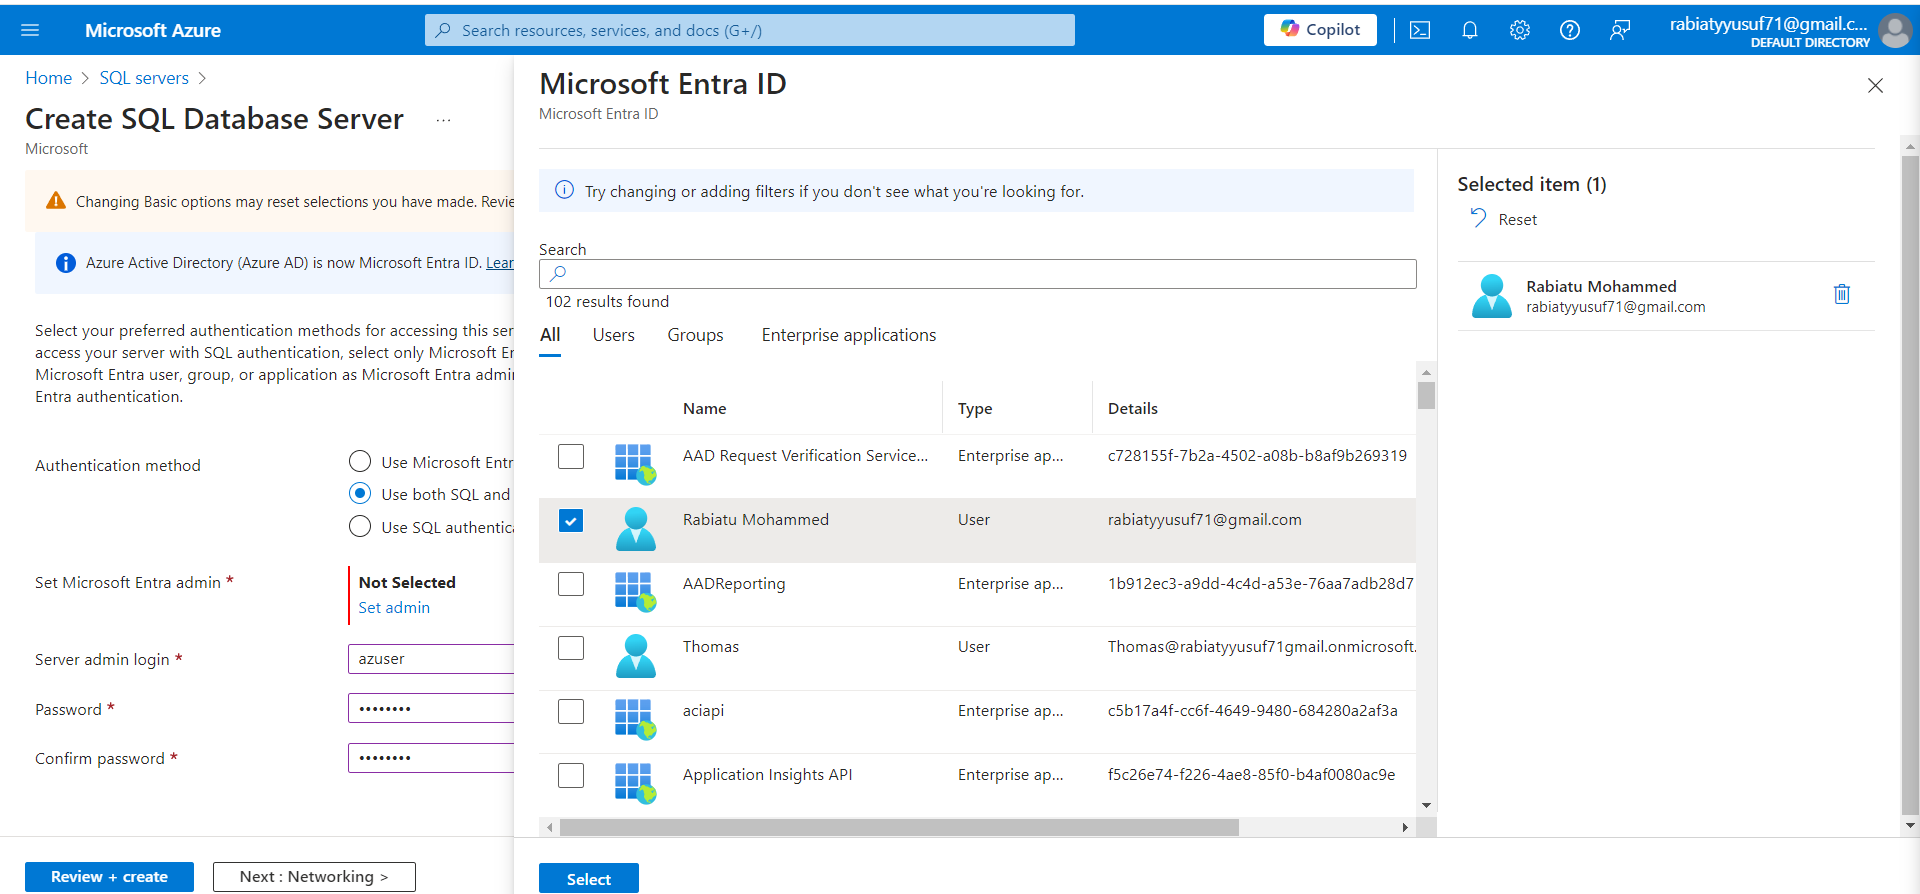
Set Microsoft Entra Admin: In this step, you'll need to assign a Microsoft Entra (formerly Azure AD) admin to manage the server. As shown below, I selected my own account as the admin:
Finalizing the Admin Settings
After selecting your Microsoft Entra ID and authentication method, the next step is to set the server admin login and password. This ensures that your server is secure and that only authorized users have access.
Set the Microsoft Entra Admin: At this stage, you’ll see the Entra admin you’ve chosen, in this case, my account
rabiatyusuf71@gmail.com. You can adjust it by clicking Set admin if needed.Create the Server Admin Login: You’ll also need to set a Server admin login and a secure password. Here, I’ve gone with
azuserfor the login and created a strong password to ensure my server is safe.

Configuring Networking for Your SQL Database Server
Now that the basics are set, let’s move on to configuring the networking settings for your Azure SQL Database Server. This step is critical because it defines how your server will be accessed and which Azure services can communicate with it.
- Allow Azure Services: In this section, you need to decide whether you want to allow Azure services and resources to access your SQL server. This is especially useful when using services like the Azure Query Editor or connecting your Azure Virtual Machine to your database. For maximum convenience, I chose Yes to allow access, but remember to control access securely.

Securing Your SQL Database Server
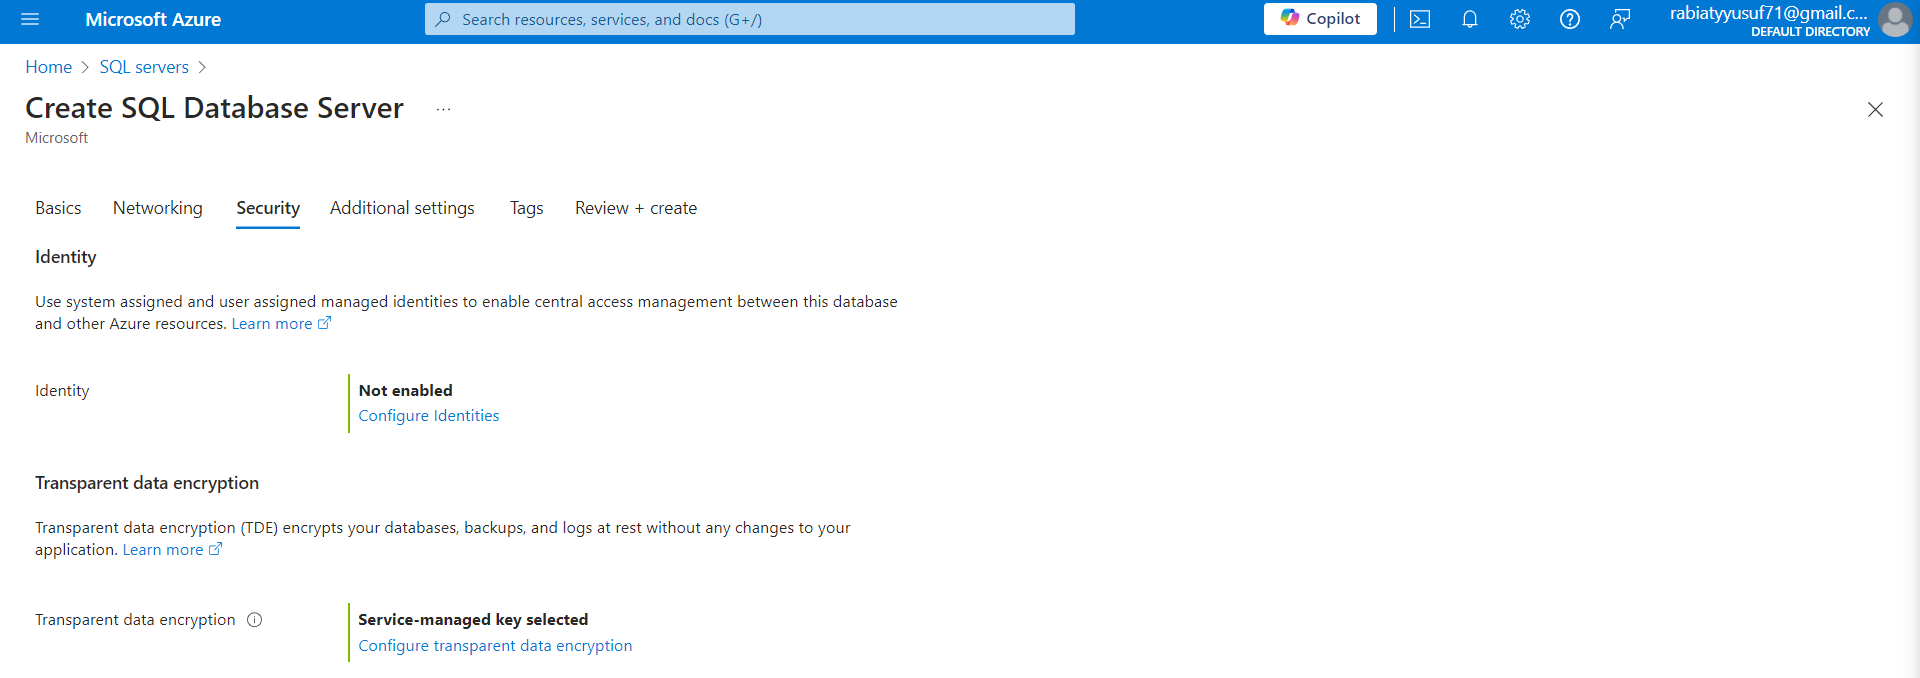
Now that we’ve tackled the networking settings, it’s time to configure security. Azure SQL Database provides essential features to protect your data, including encryption and managed identities.
Identity Management: Managed identities allow Azure resources like databases to authenticate without storing credentials. In this step, you can configure system-assigned or user-assigned managed identities. I’ve left this setting disabled for now, but it’s a great option for enhanced security.
Transparent Data Encryption (TDE): TDE encrypts your database, backups, and logs at rest. Azure automatically enables TDE using a service-managed key, providing out-of-the-box security without any extra steps. You can also configure a customer-managed key for more control if needed.
Enhancing Security with Microsoft Defender for SQL
Before we wrap up, Azure gives you the option to further enhance your database security with Microsoft Defender for SQL. This is a unified security package that helps to detect and mitigate potential database vulnerabilities while also keeping an eye on anomalous activities that could signal a threat.
- Microsoft Defender for SQL: In this step, you have the option to enable Microsoft Defender by starting a free trial or choosing Not now if you want to enable it later. Microsoft Defender for SQL helps with vulnerability assessments and database threat detection, making it a valuable addition if you’re looking for proactive security measures.

Creating Your First SQL Database
Now that you’ve set up your Azure SQL Database Server, let’s create a database on it. Follow these steps to get your first database up and running:
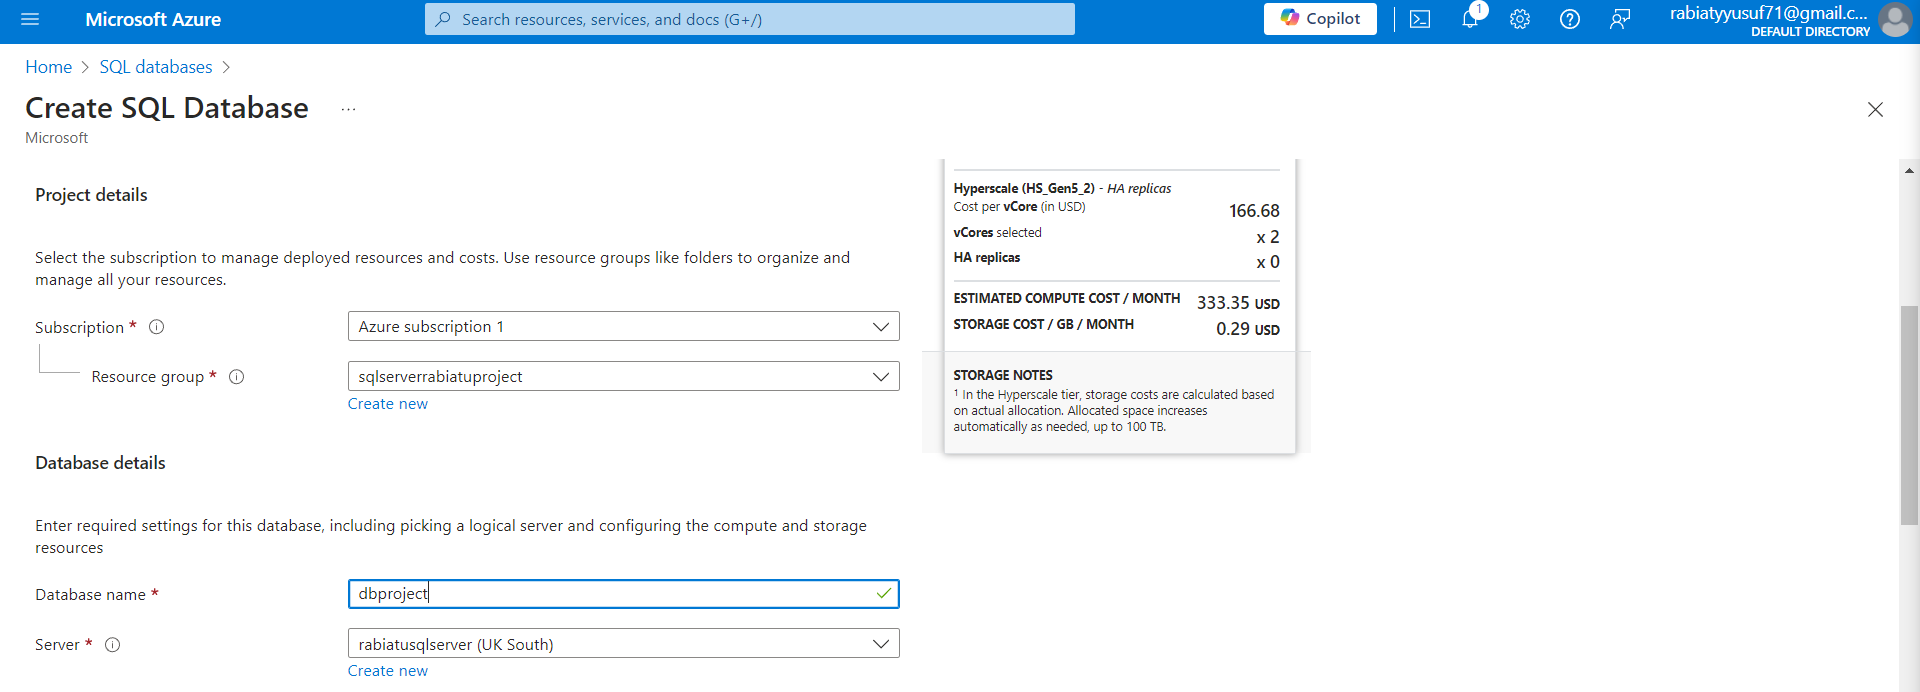
Project Details: In the Create SQL Database page, you’ll start by selecting the project details:
Subscription: Make sure the correct subscription is selected.
Resource Group: Choose the resource group where your SQL server resides, in this case,
sqlserverrabiatuproject.
Database Details:
Database Name: Enter the name of your database. I’ve named mine
dbproject.Server: Choose the SQL server you’ve already created. In this example, it’s
rabiatusqlserver (UK South).
Using SQL Elastic Pool
Azure SQL Elastic Pools provide a cost-effective way to manage the performance of multiple databases. Instead of allocating resources to each database individually, Elastic Pools allow you to share resources like compute and storage across several databases, optimizing both performance and cost.
What is an Elastic Pool? An Elastic Pool provides shared compute (measured in eDTUs) and storage resources that can be used by all the databases in the pool. This means your databases only use the resources they need, when they need them, which keeps costs predictable and manageable.
Deciding on Elastic Pools: If you have multiple databases that experience varying loads, enabling Elastic Pools can help you save money. However, if you're working with just one database or have predictable performance needs, this may not be necessary.

Configuring Compute and Service Tiers
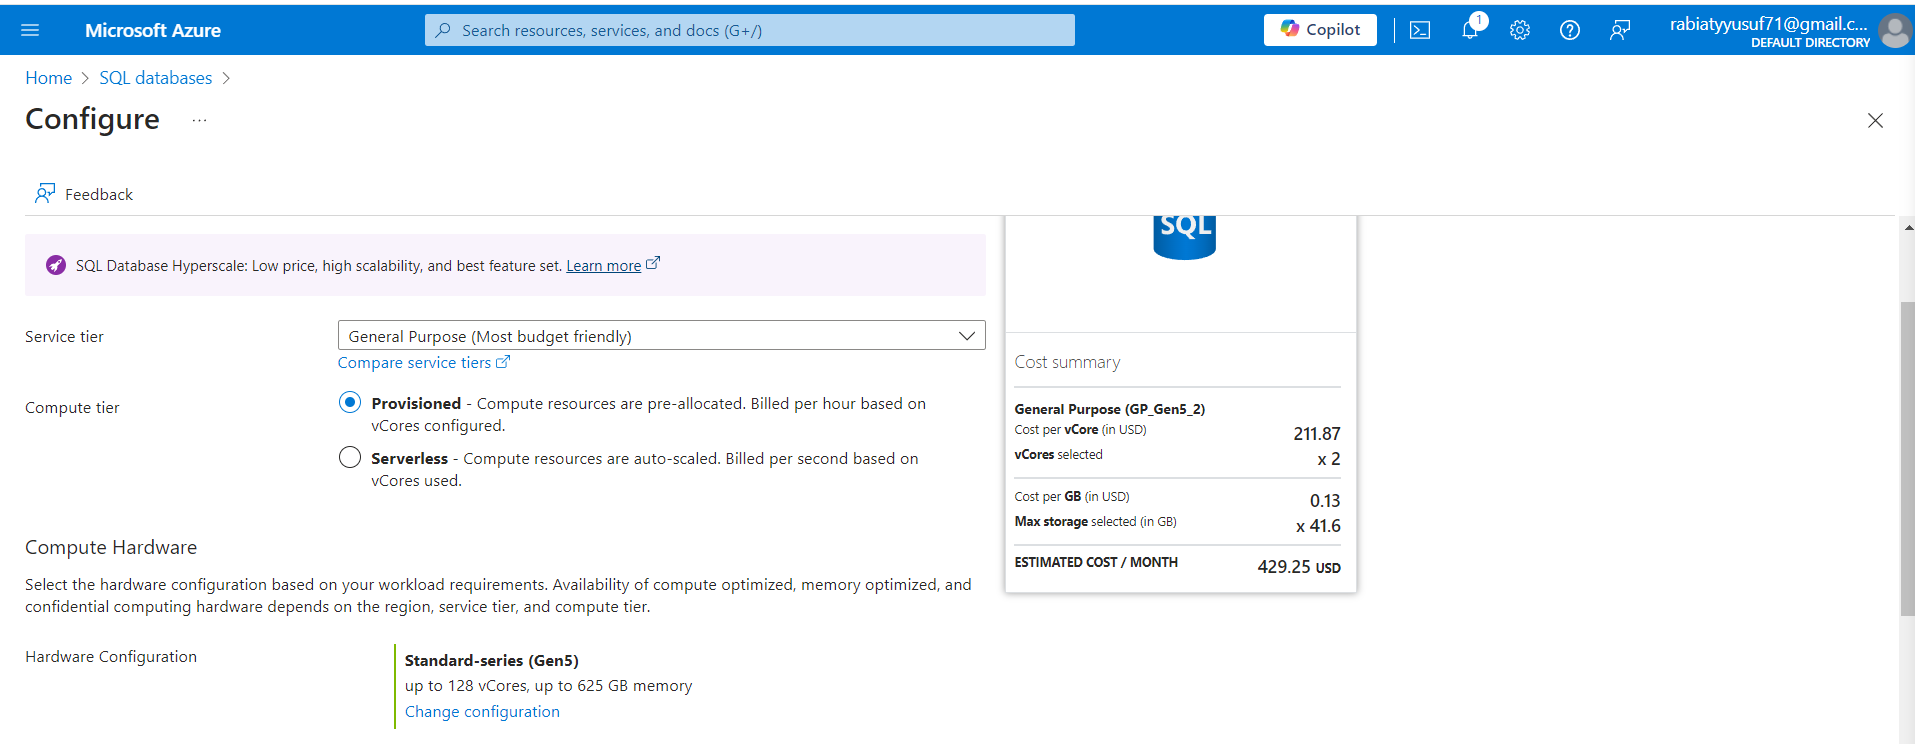
The next step in setting up your SQL database is choosing the right Service Tier and Compute Tier. These settings determine the performance, scalability, and cost of your database. Azure provides flexible options to cater to different workloads and budget requirements.
Choosing the Service Tier:
Azure offers different service tiers like General Purpose, Business Critical, and Hyperscale. For this example, I’ve chosen General Purpose, which is a great budget-friendly option for most applications.
If your workload demands high scalability and rapid growth, you might consider Hyperscale, which supports very large databases.
Configuring Compute Tier:
Provisioned: In this option, you pre-allocate compute resources, meaning you're billed hourly for the vCores you select, regardless of actual usage.
Serverless: This option automatically scales based on demand, and you're billed per second for the resources your database consumes.
Configuring vCores and Storage Size
Azure SQL Database allows you to configure the number of vCores and the maximum storage size according to your workload requirements. Let’s take a look at how to set this up.
Save Money: If you already have an SQL Server License, you can save money by using the Azure Hybrid Benefit. In this case, I haven’t enabled this option, but it's a great way to reduce costs if you qualify.
Configure vCores and Storage:
vCores: This slider lets you select the number of virtual cores based on your database’s performance needs. Here, I’ve set it to 14 vCores.
Data Max Size (GB): This slider allows you to allocate storage space. In this setup, I’ve chosen a maximum size of 1511 GB, with 453.3 GB of log space allocated.

Configuring Backup Storage Redundancy
Azure SQL Database allows you to choose how your backups are stored. This is important for ensuring that you can recover your data in case of an outage or disaster.
Backup Storage Redundancy Options:
Locally-redundant backup storage: Stores your backups within a single data center. This is the most cost-effective option but doesn’t protect against data center failures.
Zone-redundant backup storage: Stores your backups across multiple availability zones, providing more resilience against regional outages.
Geo-redundant backup storage: This is the most resilient option, replicating your backups across different regions. It allows you to recover data even in the case of a regional failure.

Configuring Networking and Firewall Rules
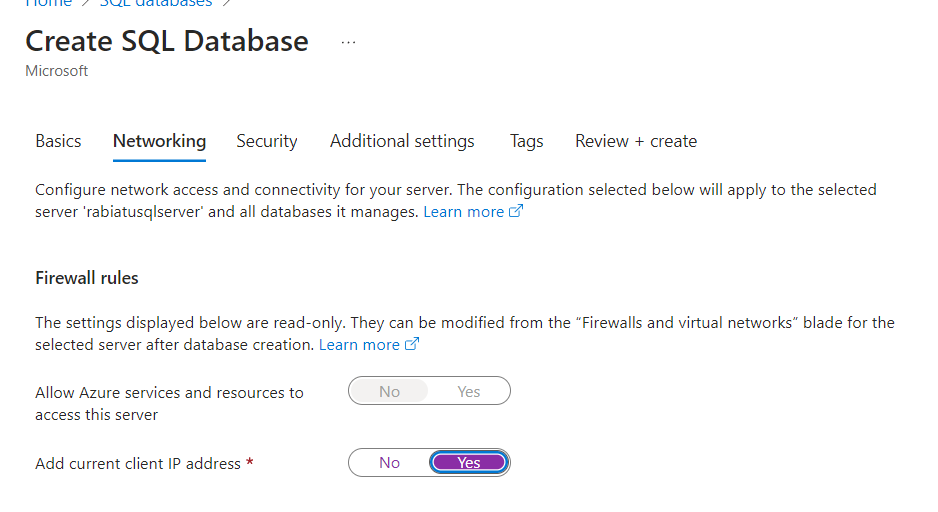
The networking configuration allows you to control how Azure services and external clients can connect to your SQL database. Let’s go over the basic networking settings you need to configure.
Allow Azure Services:
- You can choose to allow other Azure services to access your SQL server. This is useful when you're using services like Azure App Service or Azure Logic Apps that need to communicate with your database.
Add Current Client IP:
- For security purposes, it’s important to define which IP addresses can access your database. The easiest way to grant yourself access is by adding your current client IP. This allows you to manage and query your SQL database from your current location.
Configuring Additional Settings for Your SQL Database
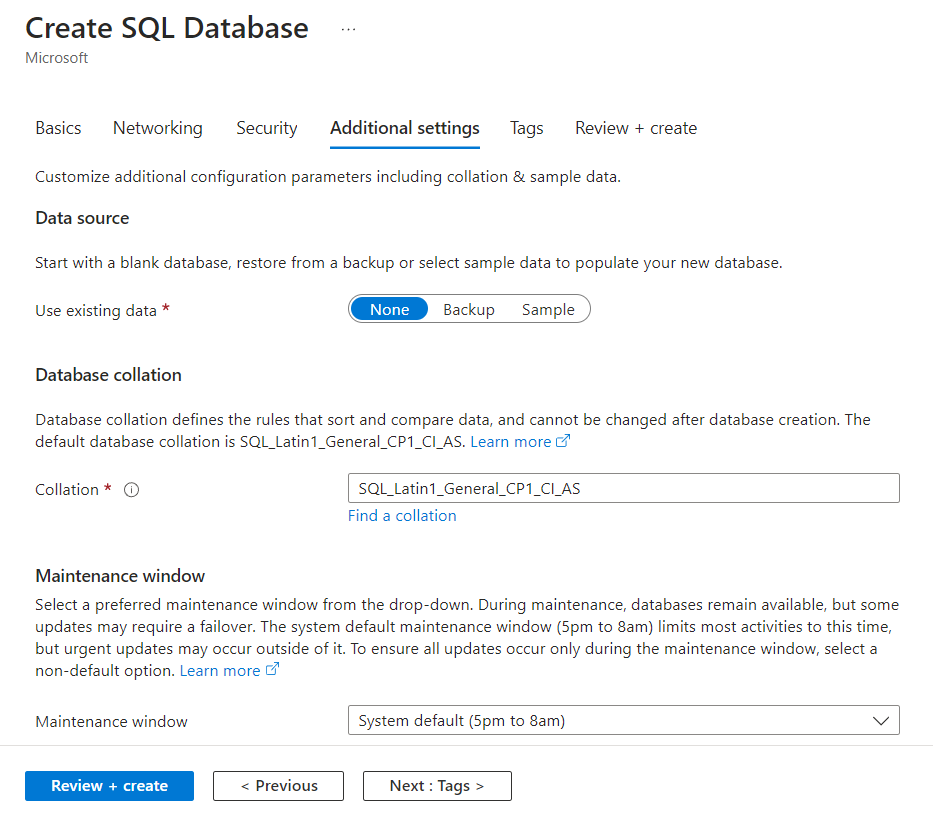
In the Additional Settings section, you have the option to customize various configuration parameters, including data source, database collation, and maintenance windows. Let’s walk through each of these options.
Data Source:
- You can choose to start with a blank database, restore data from a backup, or use sample data to populate your new database. In this case, I’ve selected None, meaning I’ll be starting with an empty database.
Database Collation:
- Collation defines how your database will sort and compare data. It cannot be changed after the database is created. The default collation is SQL_Latin1_General_CP1_CI_AS, which is typically fine for most applications, but you can choose a different collation based on your data requirements.
Maintenance Window:
- You can set a preferred maintenance window for your database. By default, Azure selects the window from 5 PM to 8 AM, but you can customize this based on your operational needs. During maintenance, most updates happen during the selected window, ensuring minimal disruptions.
Accessing Your Database Using SQL Query Editor
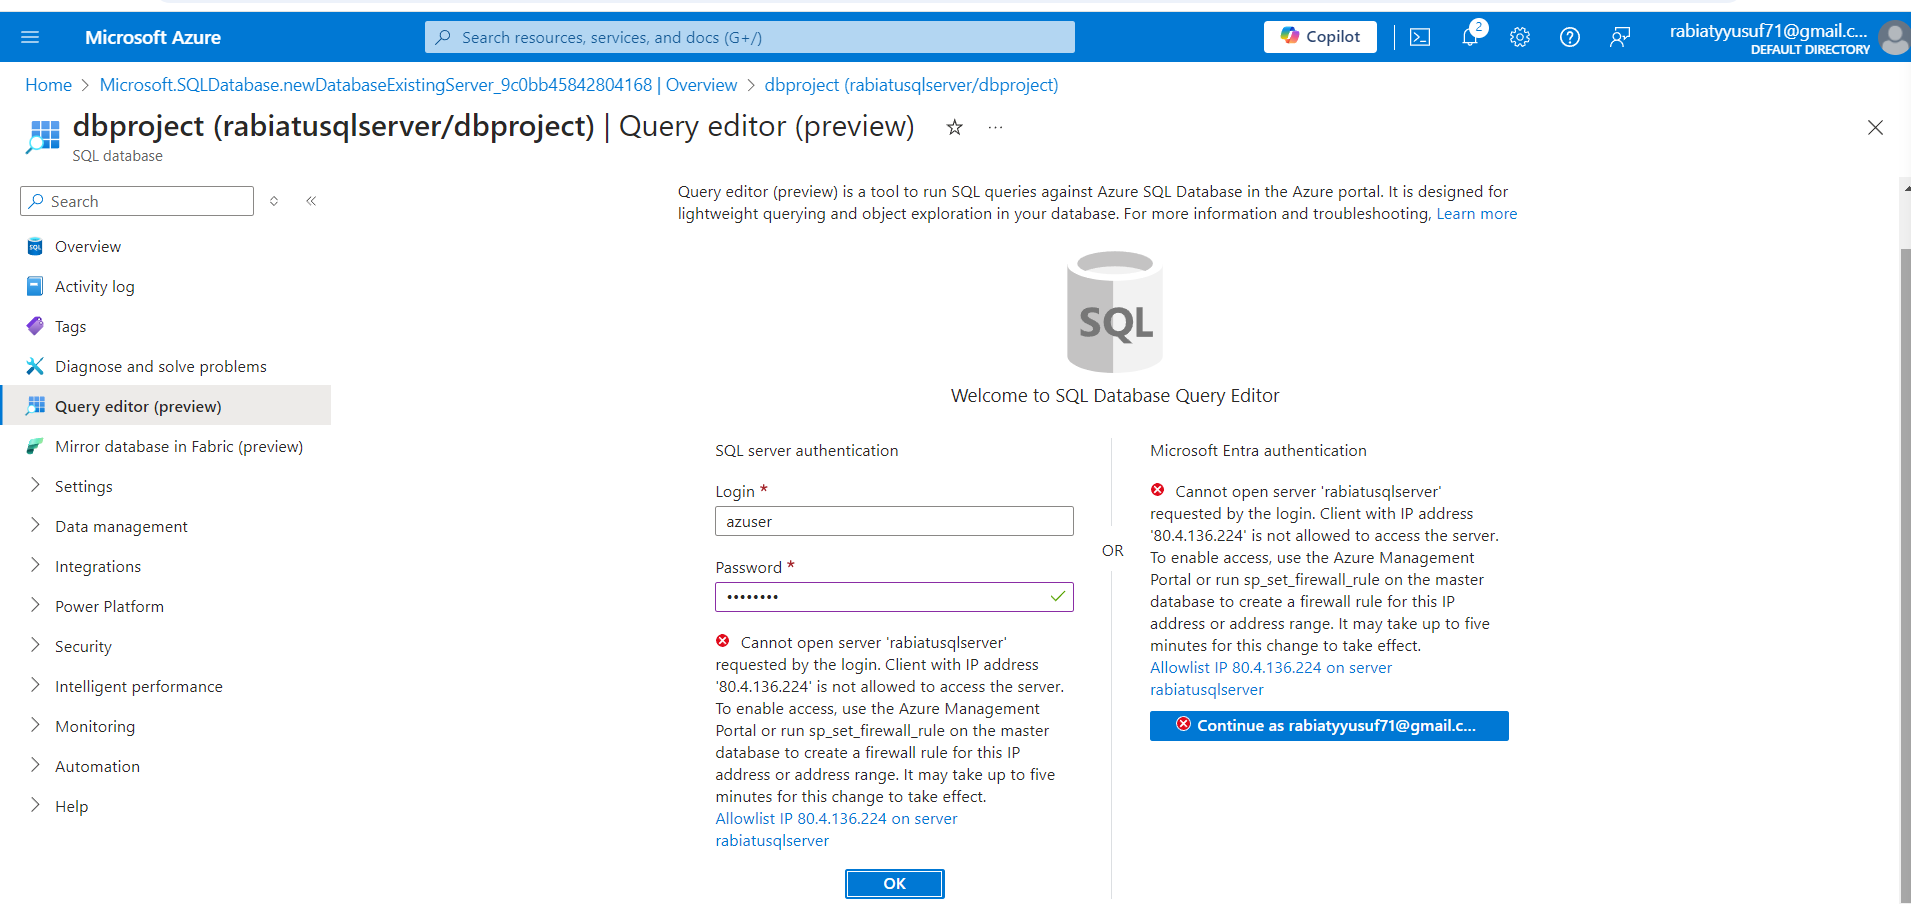
Once your database is up and running, you can start managing and querying it using the SQL Query Editor in the Azure portal. This tool allows you to run SQL queries directly against your Azure SQL Database without the need for external tools. Let’s take a look at the process of logging in.
SQL Server Authentication:
To access your database through the Query Editor, you need to log in using the SQL Server Authentication credentials you set up during the database creation process.
In this example, I’ve used the azuser login. Once the credentials are entered, click OK to connect.
Firewall Issues:
If you encounter a firewall error (like I did here), it means the IP address you're using isn't allowed to access the server. You’ll need to add the IP to the server’s firewall settings.
You can either use the Azure Management Portal to add the IP address or run the appropriate SQL query to allow access. It may take a few minutes for the change to take effect.
Configuring Firewall Rules for Access
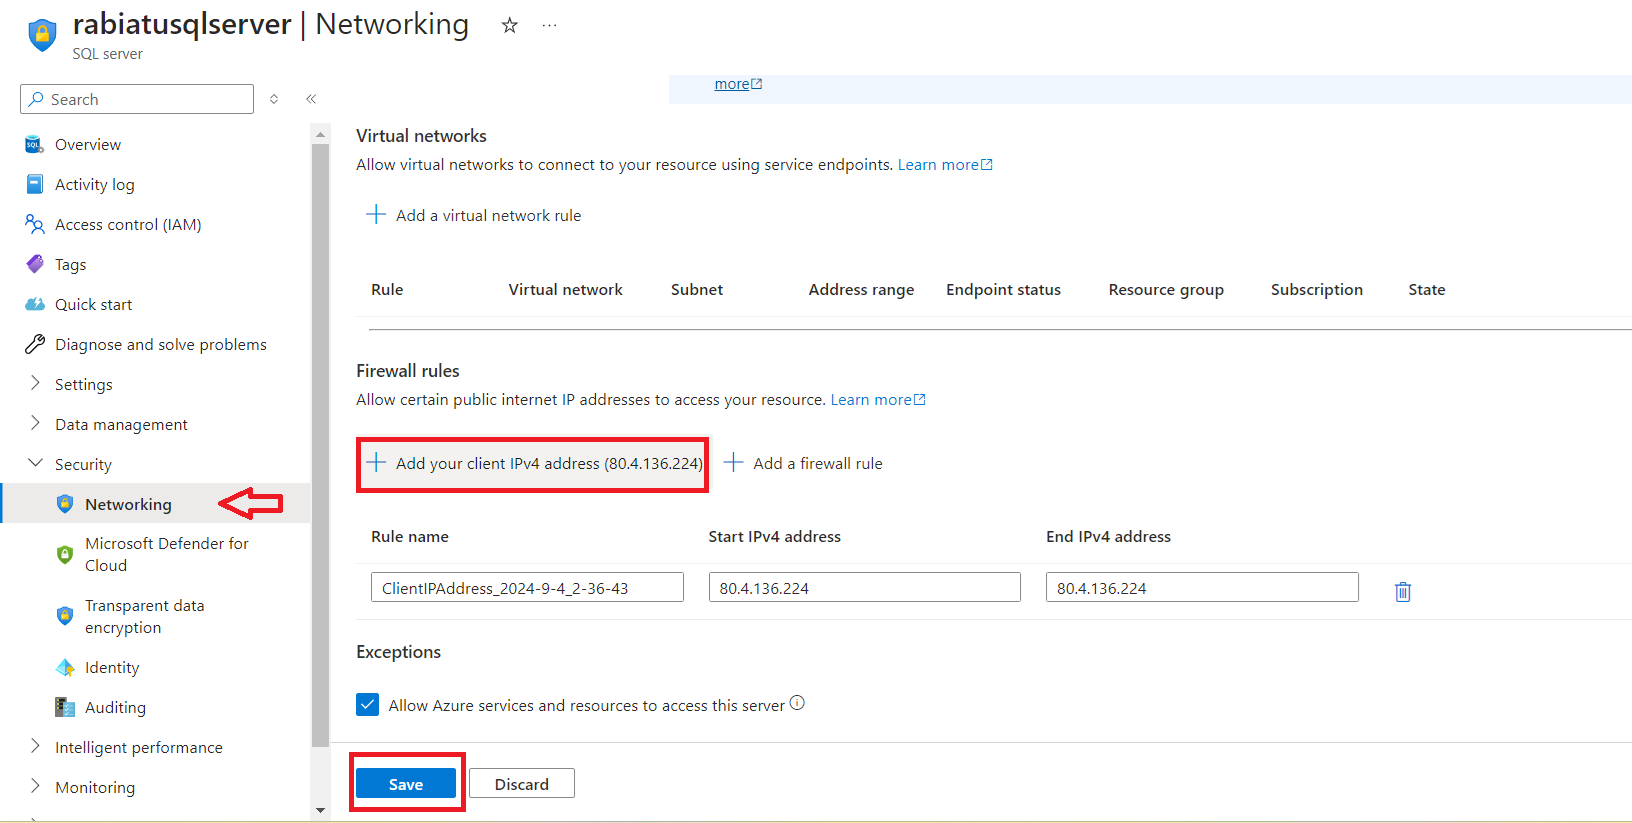
To resolve the firewall access issue in SQL Query Editor, you’ll need to add your client IP address to the firewall rules. This will allow your current IP to connect to the SQL Server securely.
Navigate to Networking:
- From your SQL Server page, navigate to Networking in the left-hand menu.
Add Your Client IP Address:
- Under Firewall rules, click Add your client IPv4 address. This will automatically populate your current IP address into the firewall rule.
Save the Firewall Rule:
- After adding the IP address, click Save to apply the rule.
Running Queries in SQL Query Editor
After configuring the firewall rules and gaining access to your database, you can start running SQL queries using the Query Editor in the Azure portal. This built-in editor allows you to write and execute SQL queries directly in the browser without needing additional tools.
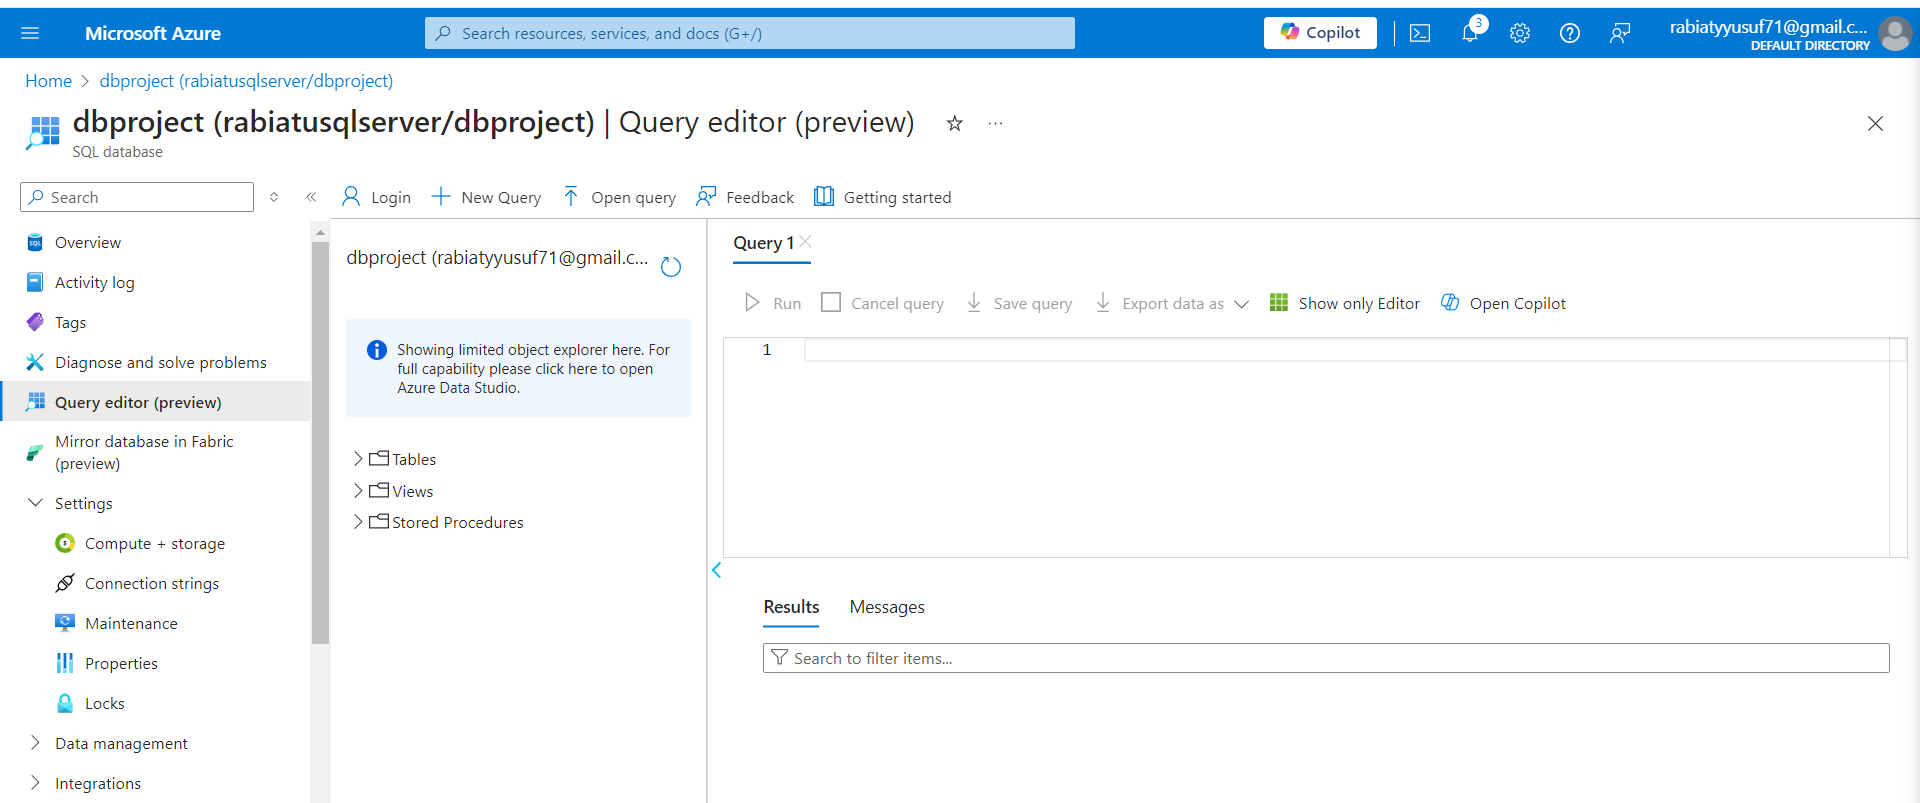
Opening the Query Editor:
From your database's overview page, navigate to Query editor (preview) on the left-hand menu.
Once inside, you can write SQL queries, explore tables, views, and stored procedures.
Writing and Executing Queries:
In the Query 1 window, you can begin writing your SQL statements. After writing your query, click Run to execute it.
Results will appear in the Results pane at the bottom of the editor.
Well done! You’ve just laid the foundation for your Azure SQL Database adventure. From spinning up your first SQL Server, securing access, to running your first query, you’ve stepped into the world of cloud-based data management.
Subscribe to my newsletter
Read articles from Rabiatu Mohammed directly inside your inbox. Subscribe to the newsletter, and don't miss out.
Written by

Rabiatu Mohammed
Rabiatu Mohammed
I work on securing, automating, and improving cloud environments. Always exploring better ways to build reliable, secure infrastructure.