Step-by-Step Webpack Integration in ReactJS
 Vikas Mishra
Welcome to our multi-part guide on building and optimizing React applications using Webpack and Babel.
In this series, we will walk you through the process of setting up a React application from scratch, bundling your JavaScript files with Webpack, and transforming modern JavaScript syntax into browser-compatible code using Babel. Whether you're new to these tools or looking to refine your workflow, this guide will offer step-by-step instructions, troubleshooting tips, and best practices for building a robust development environment. We will also cover common errors you might encounter and how to optimize your project for production, ensuring faster load times and a better user experience.
Create a React App
First, set up your React app using npx create-react-app learning-webpack or manually by creating a project directory and initializing it with npm init.
Install webpack libraries
To bundle your JavaScript files, install the necessary Webpack libraries:
npm i -D webpack webpack-dev-server webpack-cli
webpack: Core library for bundling JavaScript modules.
webpack-cli: Provides commands for setting up and managing Webpack projects.
webpack-dev-server: This will provide a live reloading feature so we don’t have to refresh the web page each time we make a change to the codebase, and it should be used in development only.
Loader in Webpack?
Loaders are transformations that are applied to the source code of a module. They allow you to pre-process files as you import or “load” them. Thus, loaders are kind of like “tasks” in other build tools and provide a powerful way to handle front-end build steps. Loaders can transform files from a different language (like TypeScript) to JavaScript or load inline images as data URLs. Loaders even allow you to do things like import CSS files directly from your JavaScript modules! -- webpack.js.org
Ex: Babel Loader
Babel is a toolchain that is mainly used to convert ECMAScript 2015+ code into a backwards compatible version of JavaScript in current and older browsers or environments --babeljs.io
Install Babel and Related Packages
npm install -D @babel/core @babel/preset-env @babel/preset-react babel-loader
@babel/core: The core functionality of Babel resides at the @babel/core module.
@babel/preset-env: this preset will include all plugins to support modern JavaScript (ES2015, ES2016, etc.)
@babel/preset-react: Babel preset for all React plugins
babel-loader: Within your webpack configuration object, you'll need to add the babel-loader to the list of modules to allow transpiling JavaScript
What are plugins in the preset?
Transformations come in the form of
plugins, which are small JavaScript programs that instruct Babel on how to carry out transformations to the code. To transform ES2015+ syntax into ES5 we can rely on officialpluginslike@babel/plugin-transform-arrow-functions--babeljs.ioBut we also have other ES2015+ features in our code that we want transformed. Instead of adding all the plugins we want one by one, we can use a "
preset" which is just a pre-determined set of plugins --babeljs.io
Configure Webpack
Create a webpack.config.js file to define how Webpack should process your files:
const path = require("path");

module.exports = {
  entry: "./src/index.js",
  output: { path: path.resolve(__dirname, "dist") },
  module: {
    rules: [
      {
        test: /.(js|jsx)$/,
        exclude: /node_modules/,
        use: {
          loader: "babel-loader",
          options: {
            presets: ["@babel/preset-env", "@babel/preset-react"],
          },
        },
      },
    ],
  },
};
Update package.json
Add a build script to your package.json:
"scripts": {
    "build": "webpack"
 }
Build the Project
Run the build command:
npm run build
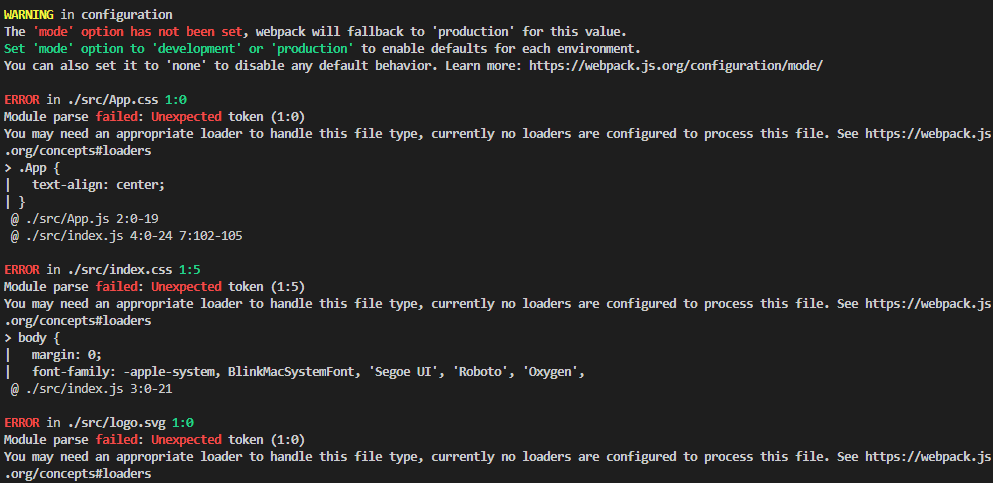
Fixing Errors and Warnings

Add Webpack Mode
There are mainly two ways to tell webpack what's the mode of your development. There are mainly three options available development , production, and none. Webpack applies different optimization techniques based on the mode of the development. To resolve warnings, specify the mode in webpack.config.js:
mode: "development"; // or "production"
or specify the mode in package.json
"build:development": "webpack --mode=development"
"build:production": "webpack --mode=production"
Handle CSS Files
We configured babel-loader to transpile our js and jsx code but we have not added any loader for the css files. Let do that in webpack.config.js. Install CSS loaders:
npm i --D css-loader style-loader postcss-loader
style-loader: Inject CSS into the DOM
css-loader: Interprets @import and url() like import/require() and will resolve them
Update webpack.config.js:
{
    test: /\.(sa|sc|c)ss$/i,
    use: ["style-loader", "css-loader", "postcss-loader"],
}
Handle SVG Files
We have not added any loader for the SVG files. Let do that in webpack.config.js. Install SVG loaders:
npm i -D svg-inline-loader
Update webpack.config.js:
{
    test: /\.svg$/,
    loader: "svg-inline-loader",
}
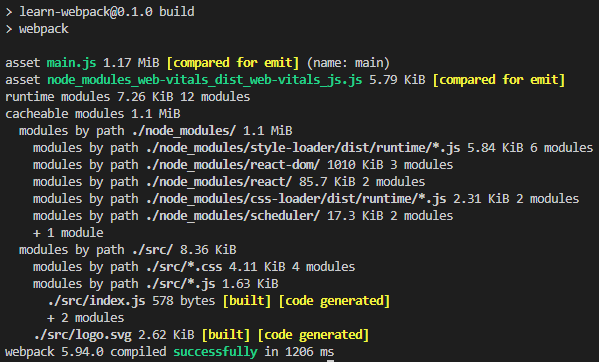
We fixed the warning and all the errors. Let build it again
npm run build:development
you will see something like this

Building for Different Environments
What's the difference in when you build:development or build:production using webpack?
development: Provides useful module and chunk names for easier debugging.

production: Optimizes the build with minification and other performance enhancements.

Difference in plugin and loader?
Loaders:
Best for file transformation tasks (e.g., transpiling, bundling stylesheets, handling images).
Examples: babel-loader (transpile ES6 to ES5), css-loader (process CSS files).
Plugins:
Best for tasks that affect the entire build process or need to interact with multiple parts of the compilation (e.g., minification, code splitting, environment variables).
Examples: HtmlWebpackPlugin (generate HTML files), MiniCssExtractPlugin (extract CSS into separate files), CleanWebpackPlugin (clean output directory before each build).
Using Plugins
For production builds it's recommended to extract the CSS from your bundle being able to use parallel loading of CSS/JS resources later on. This can be achieved by using the mini-css-extract-plugin, because it creates separate css files. For development mode (including webpack-dev-server) you can use style-loader, because it injects CSS into the DOM using multiple <style></style> and works faster.
npm i -D mini-css-extract-plugin
NOTE
Do not use
style-loaderandmini-css-extract-plugintogether.
Update webpack.config.js:
const path = require("path");
const MiniCssExtractPlugin = require("mini-css-extract-plugin");
const devMode = process.env.NODE_ENV !== "production";

module.exports = {
  entry: "./src/index.js",
  output: { path: path.resolve(__dirname, "dist") },
  module: {
    rules: [
      {
        test: /.(js|jsx)$/,
        exclude: /node_modules/,
        use: {
          loader: "babel-loader",
          options: {
            presets: ["@babel/preset-env", "@babel/preset-react"],
          },
        },
      },
      {
        test: /\.(sa|sc|c)ss$/i,
        use: [
          devMode ? "style-loader" : MiniCssExtractPlugin.loader,
          "css-loader",
          "postcss-loader",
        ],
      },
      {
        test: /\.svg$/,
        loader: "svg-inline-loader",
      },
    ],
  },
  plugins: [].concat(devMode ? [] : [new MiniCssExtractPlugin()]),
};
Install cross-env to manage environment variables across platforms:
npm i -D cross-env
Update package.json
"build:development": "cross-env NODE_ENV=development webpack --mode=development"

"build:production": "cross-env NODE_ENV=production webpack --mode=production"
Run the production build:
npm run build:production
You will something similar to below output

Conclusion
Congratulations on completing our guide!
You now have a solid understanding of how to create a React application, bundle it with Webpack, and transpile modern JavaScript with Babel. Along the way, we explored important concepts like loaders, plugins, and environment variables that help streamline the development and production processes.
By breaking down this guide, we hope it made each concept easier to grasp and apply to your projects. As you continue to build more complex applications, these tools will play a critical role in optimizing your workflow and improving performance.
If you're interested in deepening your knowledge, feel free to explore additional resources on Webpack and Babel, and don’t hesitate to revisit any part of this guide as you encounter new challenges in your development journey. Happy coding!
If you have any questions, need clarification on any of the concepts discussed, or just want to connect over frontend technologies, feel free to reach out to me! I'm always happy to collaborate, learn, and discuss new ideas.
You can get in touch with me via:
Email: vikas.mishra0796@gmail.com
LinkedIn: linkedin.com/in/vikas-mshra
Portfolio: vikas-mishra-portfolio.netlify.app
I’m currently looking for full-time opportunities in software development, particularly in frontend or backend development. Let’s connect if you’re hiring or know someone who is!
Subscribe to my newsletter
Read articles from Vikas Mishra directly inside your inbox. Subscribe to the newsletter, and don't miss out.
Written by

Vikas Mishra
Vikas Mishra
I’m Vikas Mishra, a software developer with 3+ years of experience in full-stack development, specializing in ReactJS, Spring Boot, and microservices. I’m pursuing my Master’s in Computer Science at California State University, Sacramento, with a 3.85 GPA, graduating in December 2024. I’ve led the development of a Storm Water Analytics platform and worked at Tata Consultancy Services, enhancing microservice performance and API optimization